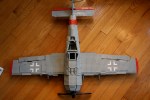
Focke-Wulf FW-190 a5
June 23, 2012 3 Comments
I start most of my projects because I see something brilliant by another builder, and then I decided to develop this idea, or give the idea little more substance. After discovering a great two row radial, I wanted to give the engine a body. It had also been a long time since I had done a large project.

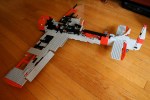
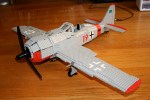
I chose to make the FW-190 for a couple of reasons. First, it had a radial. OK, 14 cylinders in the plane, and mine would only have 12, but it was close enough. Second, it was one of my favorire plane of WWII. Third, the body work would not present too many challenges. I set to work. I had to get the scale right, and start placing some of the plane’s extremities, so I would have a good idea where to place all the parts that I would build.
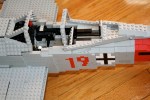
Once everything was placed, I had to figure out how I was going to do all the control surfaces. This started with figuring out the joystick, and the rudders. The joystick was a simple design driving side to side movements out the front by an axle to gears for the ailerons. When the joystick was moved front to back, a link all the way to the rear elevator was activated. I mounted the foot pedals on a simple pivot connected by gears to the rear rudder. Flaps, with a simple activating lever, were also installed. The cockpit was pretty full.
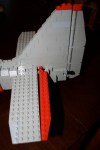
With a project this size, it took a great deal of work to get the shaping of the plane to work right. I used half stud offsets to get the fuselage correct, and spent a lot of time on the wings. Because the cockpit had a lot of activating levers, a lot of work went into the area around here. Adding the opening canopy did not help things. I added brick built markings, worked on the coloring, and spent some time adding guns and other details. The model was done.
Brickshelf.com gallery is here.
It’s been three years since I have built this plane, but I needed a little motivation to help me with another similar project. It was good for me to remember how much I enjoyed this project, even though it took a lot of time and energy. Stay tuned for the next big plane.