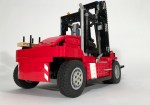
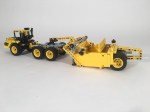
Kalmar DCG180-9


After doing a lot of non powered builds, it was time for me to do something motorized. I very much enjoyed doing a forklift a couple of years ago, so it was time for another one.

See the full gallery on Flickr and Brickshelf.

Kalmar 180

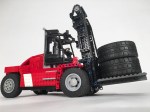
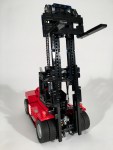
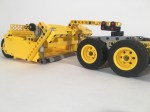
The JCB930 that I did a couple of years ago was non-motorized and had some great features. I wanted to build something with all the same features, and since I would need more room for all the electronics, I decided early to model the forklift after the Kalmar mid-sized 180 model. The model would have drive, steering, a two stage lift, and fork tilt. I did not realize how hard this would be. I wanted to keep the  boom clear for visibility, and the forks not more than two studs in front of the wheels to keep integrity of scale.

Kalmar 180 Front

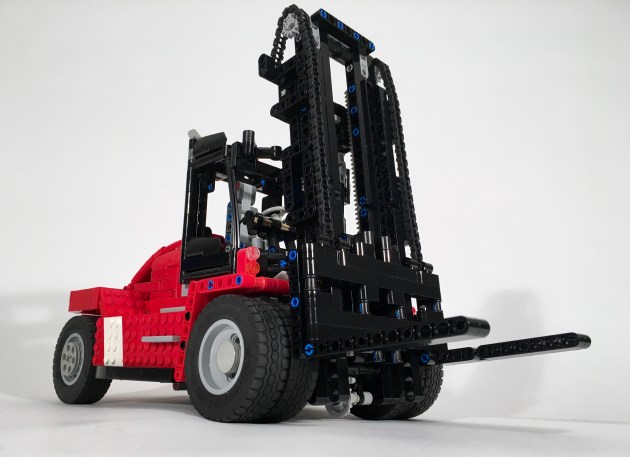
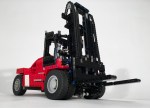
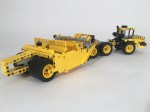
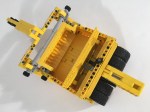
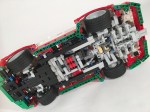
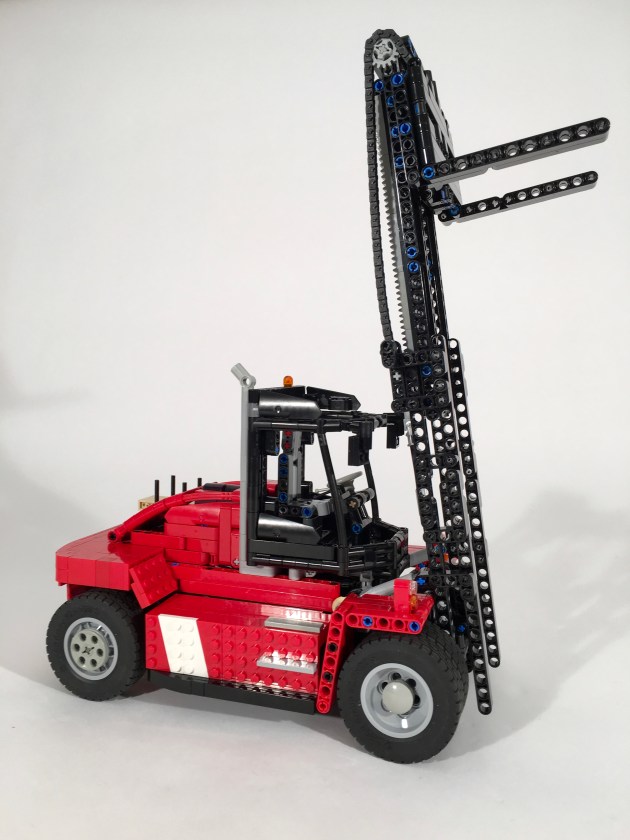
I set the scale and I went to work. After setting the chassis measurements, I went to work on the fork and boom. I knew I wanted to have a two stage boom, and I wanted to keep as much of the boom open as I could. The forks connect through the middle of both the first and second stage booms, and pinch both together. The middle boom is has a gear rack on both sides to lift the forks. This boom has two gears at the top, to route the chain over the top to move the forks. The outer boom is connected to the chassis at the bottom, and two mLA connect to it operate the tilt. After some working, I was able to get the boom to be thin, and just how I wanted.

Kalmar 180 Up

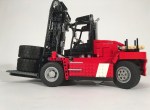
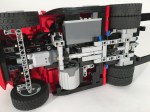
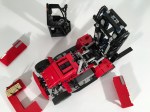
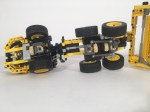
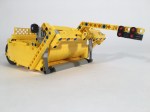
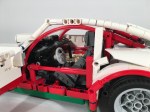
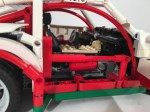
I decided early that I want to keep the motors out of the boom. So I had to route the lifting function out to the forklift body through the bottom pivot. This required routing the lifting axle under the drive differential. The lifting axle then move rearward, and connected up to a PF L motor. On top of the lifting axle was the drive axle. The PF XL motors was mounted transversally on the right side, and drove and axle forward to connect directly to the differential. To give me some additional space at the front, a portal axle was mounted on its side to move the differential rearward. A PF Servo was mounted in the rear, over the steering axle, and drove the steering function. The steering uses some 2×4 liftarms mounted at an angle to allow for a better steering angle. Finally, a PF M was mounted in front of the Servo, under the cabin to drive the tilt function. None of the mechanics were difficult, but the packaging required a number of drafts.

Kalmar 180 Open

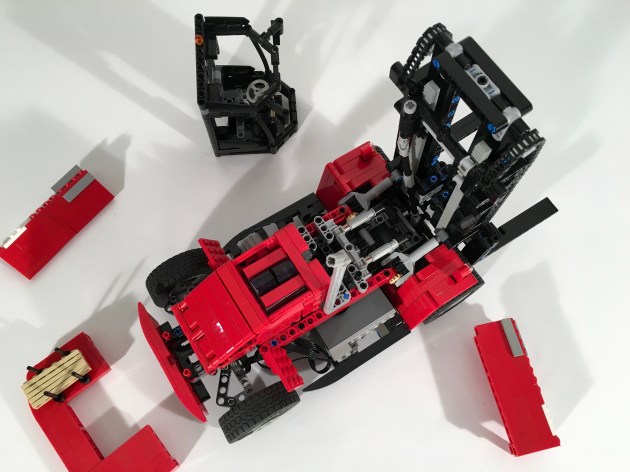
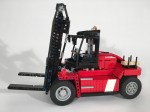
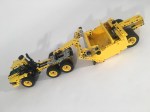
The final hurdle was the body work. I spend a lot of time early in my MOCs working on packaging placement, so I do not have many body work problems later in the build. Still, some simple SNOT work was needed on the side sills to fit about the battery box, and the XL motor. Oh, and the wires. The cab was pretty straightforward, but still took a little bit of time. Finally, I had some trouble with the rear engine cover and counterweight. In the end it was a simple design that I settled on, but I tried many designs. Again, this took a lot of time.

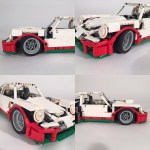
It took a long time, but I am pleased with the final product. The functions worked smoothly and consistently. The control that was afforded by the fork functions was great. It could lift three AA battery boxes at a time. The steering was quick, and had a great lock which gave great maneuverability. The XL motor provided adequate power, and moved the forklift well. Finally, the bodywork represented the original Kalmar well. I hope you enjoyed as well.

Until next time, Happy Building.

Advertisement

K-Tec 1233 Scraper


I find myself on diecastmodels.co frequently as it inspires many of my future builds. Most of the time the site gives me reference pictures, and sometimes it shows me something I have never seen before. This is the result of one of those late night browsing sessions.

See the full gallery at Brickshelf and on Flickr. Instructions may be found here.

K-TEC 1233

I wanted to make a scraper, and once I was browsing this site, I came across the K-Tec. It was a different set-up that I thought looked fun. I was hooked. Early I decided the MOC would be perfect for the newer 49.5×20 tire, so the tire set my scale.

I started with the suspension for the tractor first. I did not have too much room to work with on the rear, so I set two differentials together, and connected them via two 20T gears. The rear one connects above to a 12T gear, which transmits rotation to the fake motor in the front. The two axle assembly pivots at this gear connection and connects to the rear wheels, so no u-joint is needed. The middle axle connects to the rear assembly through the differential connecting axle. This simple set-up allows for all four wheels to move freely, and independently.

K-TEC 1233 ADT Suspension

I then added the front cab. It is not too complex with a differential fixed for the front axle, and a two-cylinder fake motor above it. A HOG gear is above the cabin which pulls a liftarm for the steering. A turntable is used to provide articulation between the cab and the rear chassis. Then a simple body was made, and off to the scraper.

K-TEC 1233 Tractor

I then worked on the scraper part; kind-of. I knew when I started this project I would need a bunch of 1×6 arch bricks in yellow for the front gate. There are not many of them, so I started ordering them over the course of three months. As each would  arrive, I worked on the scraper. I first set the dimensions and worked on the lifting mechanism. It was a little tricky to find the correct geometry while not taking too much room, and keeping the upper pivot point small while using to mLAs for the movement. I found a good solution, but a little more stiffness in the assembly would have been great. I added an extraction plate at the rear driven with a worm gear assembly resting between the rear wheels. Another stud of travel would be great, but it was not worth adding another four stud gear rack to make that happen. Finally, all the parts arrived for the front gate, so I installed it. Because the walls of the scraper are only one stud thin, I did not want to mess with the thickness of the sides to much by adding a mechanism for the gate movement. Each assembly I tried with a mLA or a worm gear set-up looked clunky or bulky. I ended up with a friction pin with a gear to move it. It is not very fancy, but it works well. At this scale, it is all that needed.

K-TEC 1233 Gate

All in all, the MOC turned out OK. It would have been better to have a stiffer hitch arm, and I would have liked a different solution for the entry gate. I was pleased with the size, and I enjoyed packing a number of features into the small (but long) MOC. Finally, for some reason the MOC does not please my eyes as much as those first pictures I saw on diecastmodels.co. Maybe it just needs to be a little bigger.

Until the next one, Happy Building.

Porsche 911 Cup Car


In a moment of online immaturity, I requested a topic for the 100th LUGNuts Challenge. I was tasked to build “any year Porsche 911, or a 2015 Jaguar F-Type.” It was to be completed during February 2016. I, of course, mistook the challenge as a requirement, and worked frantically to complete the MOC in 13 days.

The full gallery may be found on Flickr or Brickshelf.

Porsche 911 (964)

Being the year of the Technic Porsche, I figured it was a good idea to try my hand at the 911. The 911 is an iconic car and it’s shaping is instantly identifiable. It seemed like a bad idea to try and recreate it. I spent the first week of the month planning the style, scale, and the features. I decided to model 935, 964, or 991 GT3. Each were rear wheel drive, and had a wide rear track with prominent rear fenders. I decided on a four speed transmission, steering, and full suspension all around. Throughout the build, I settled on a cup racing version of Model 964, in OCTAN colors of course.

911 WIP 2

I started building on Feb. 10th, and completed the placement of all the major components. By Feb. 15 I had a final chassis. I used a “dynalive” suspension on the rear connecting to a short/long arm suspension design. The differential is not fixed to the chassis, but move in a dynamic way between each side of the suspension. I have used this set up before, and it works well. Immedialty in front of the suspension is the transmission. Rather than having the common four speed tranmissions found in 8880 and many other MOC, this transmission has all the gears in a single plane. This add a couple of gears, but it allows for a lower car, which works great at this scale. The output shaft exits the transmission on the non-driver side, and goes up and over the rear suspension where it connects to the boxer 6 at the rear of the car. Finally, I added a simple double A-arm suspension on the front.

911 WIP 2

By the 16, I had an introduction to the body work, and the steering had been finalized. I added a drivers seat and worked on the roof , and a draft of the front hood was done on the 17th. On the 18th, I submitted for feedback to the internet a couple of designs for the front hood. I finalized the hood and the rear quarterpanels on the 19th. By the 20th the exterior details were done, and I stopped posting work in progress pictures. After a week of solid building, I took a couple days off and made a 12 part Bricklink order to cover the few white parts that were needed.

WIP 6

I then spent the next couple of days finalizing the interior details, including the dashboard, a full roll cage, and the engine details. The MOC was done by the 25th, which means I completed it in 15 days, faster than anything I have ever built.

911 Side

The MOC worked well. The suspension was taught, and functioned well. The steering lock was a little limited, but it worked smoothly. The transmission was a little gummy in gear one, but two through four worked great. But did it look like a Porsche? Yes, but some parts bothered my eyes a little, such as the spoiler, fenders, and hood. Basically the shape is there; you can tell what car it is, but from some angles, you cannot tell it has flared fenders. The hood does not look as curvaceous as it should, and the spoiler looks like an add on. The colors looks good, but a little more great would be great. Overall, I was pleased with what I did in 15 days, but next time I will be a little more particular.

Until next time, happy building.