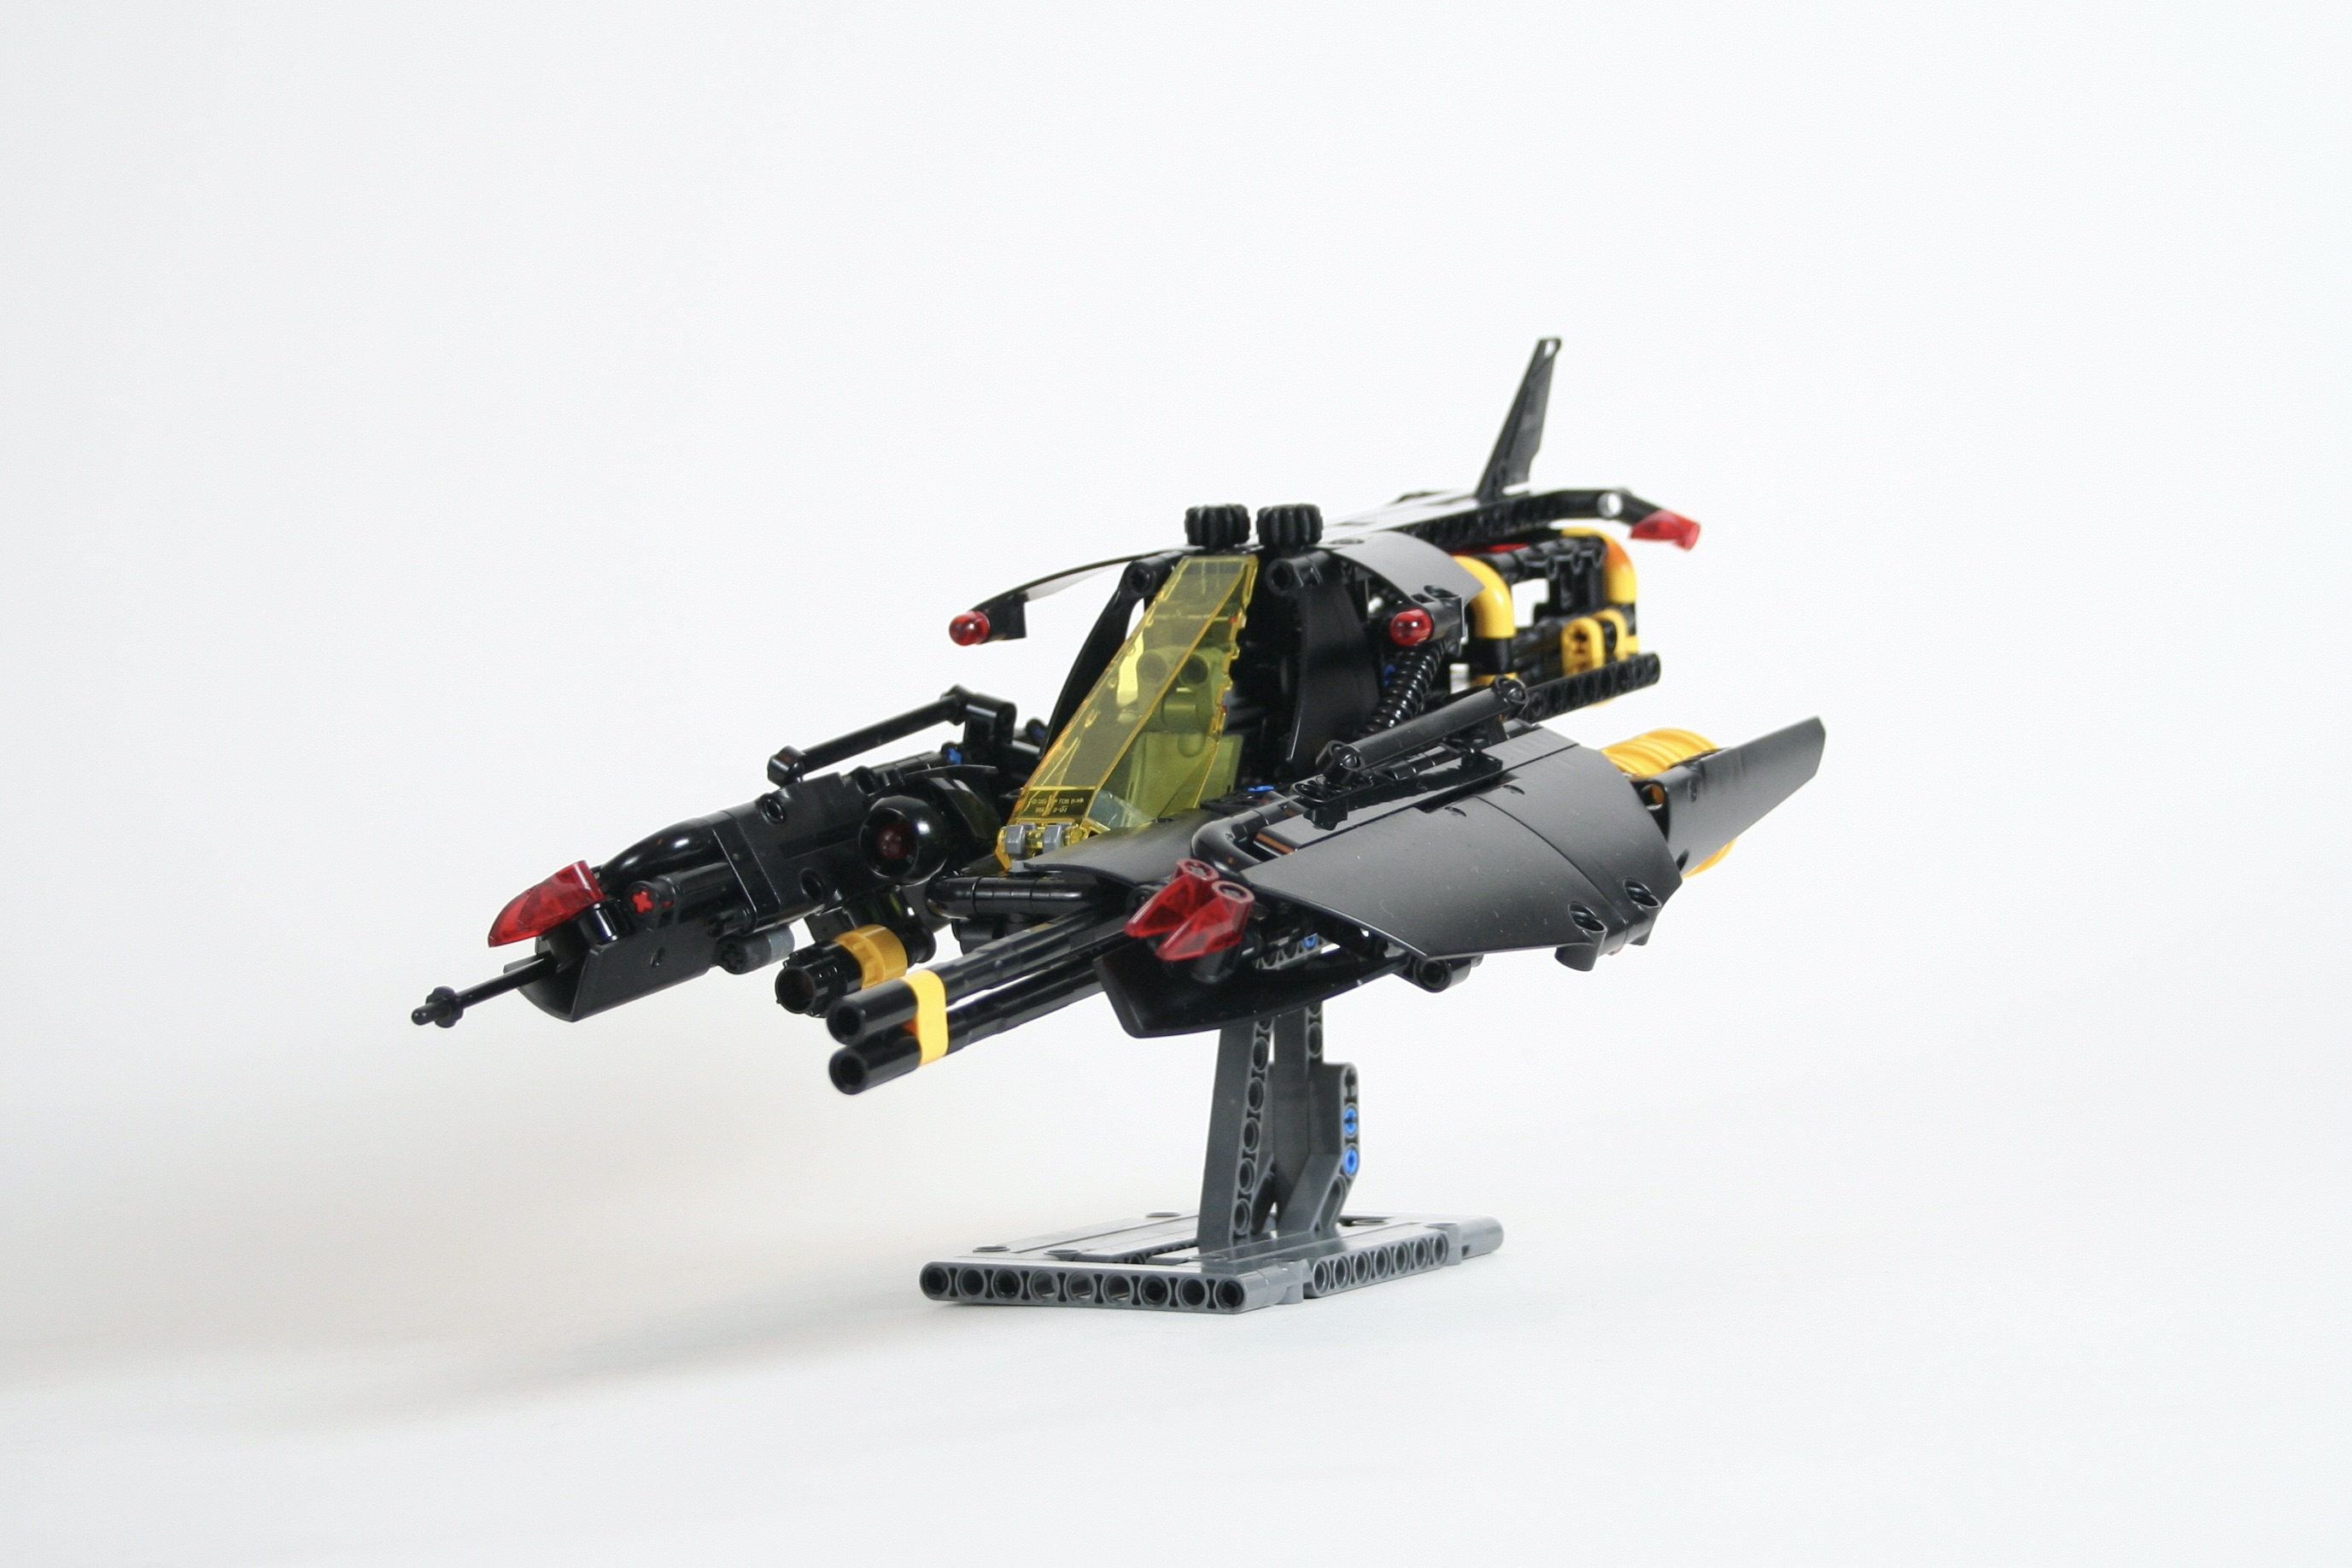
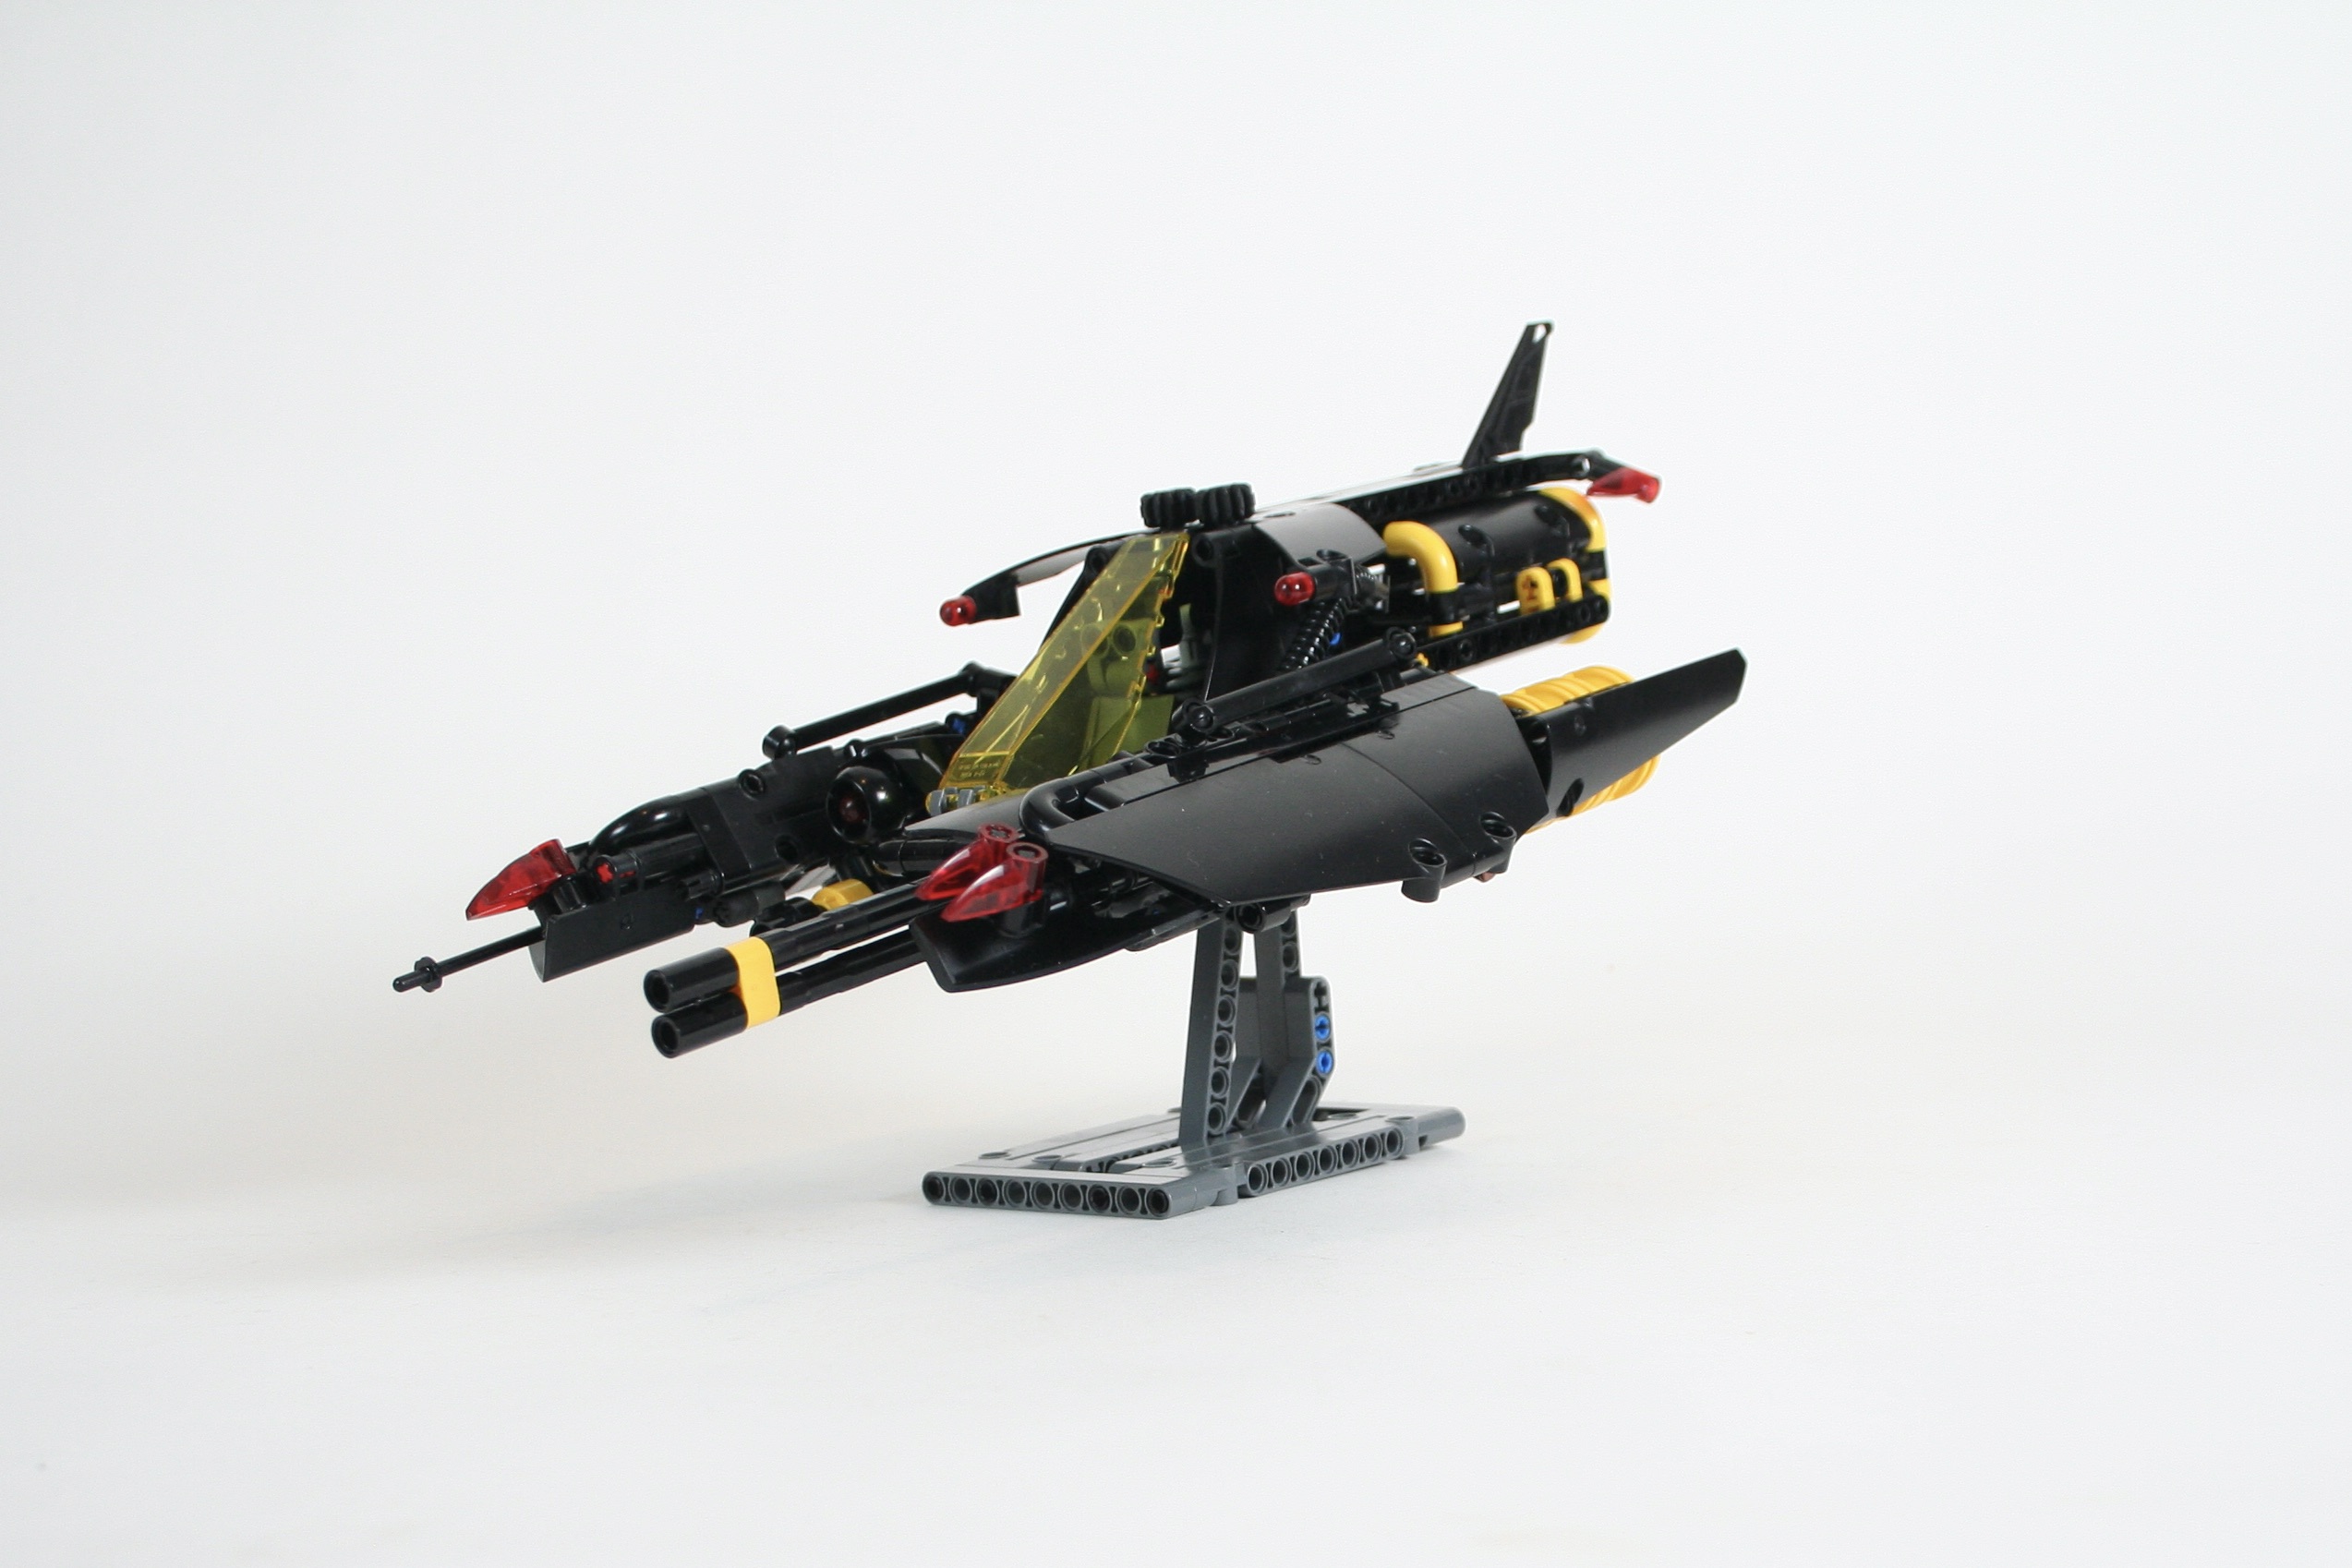
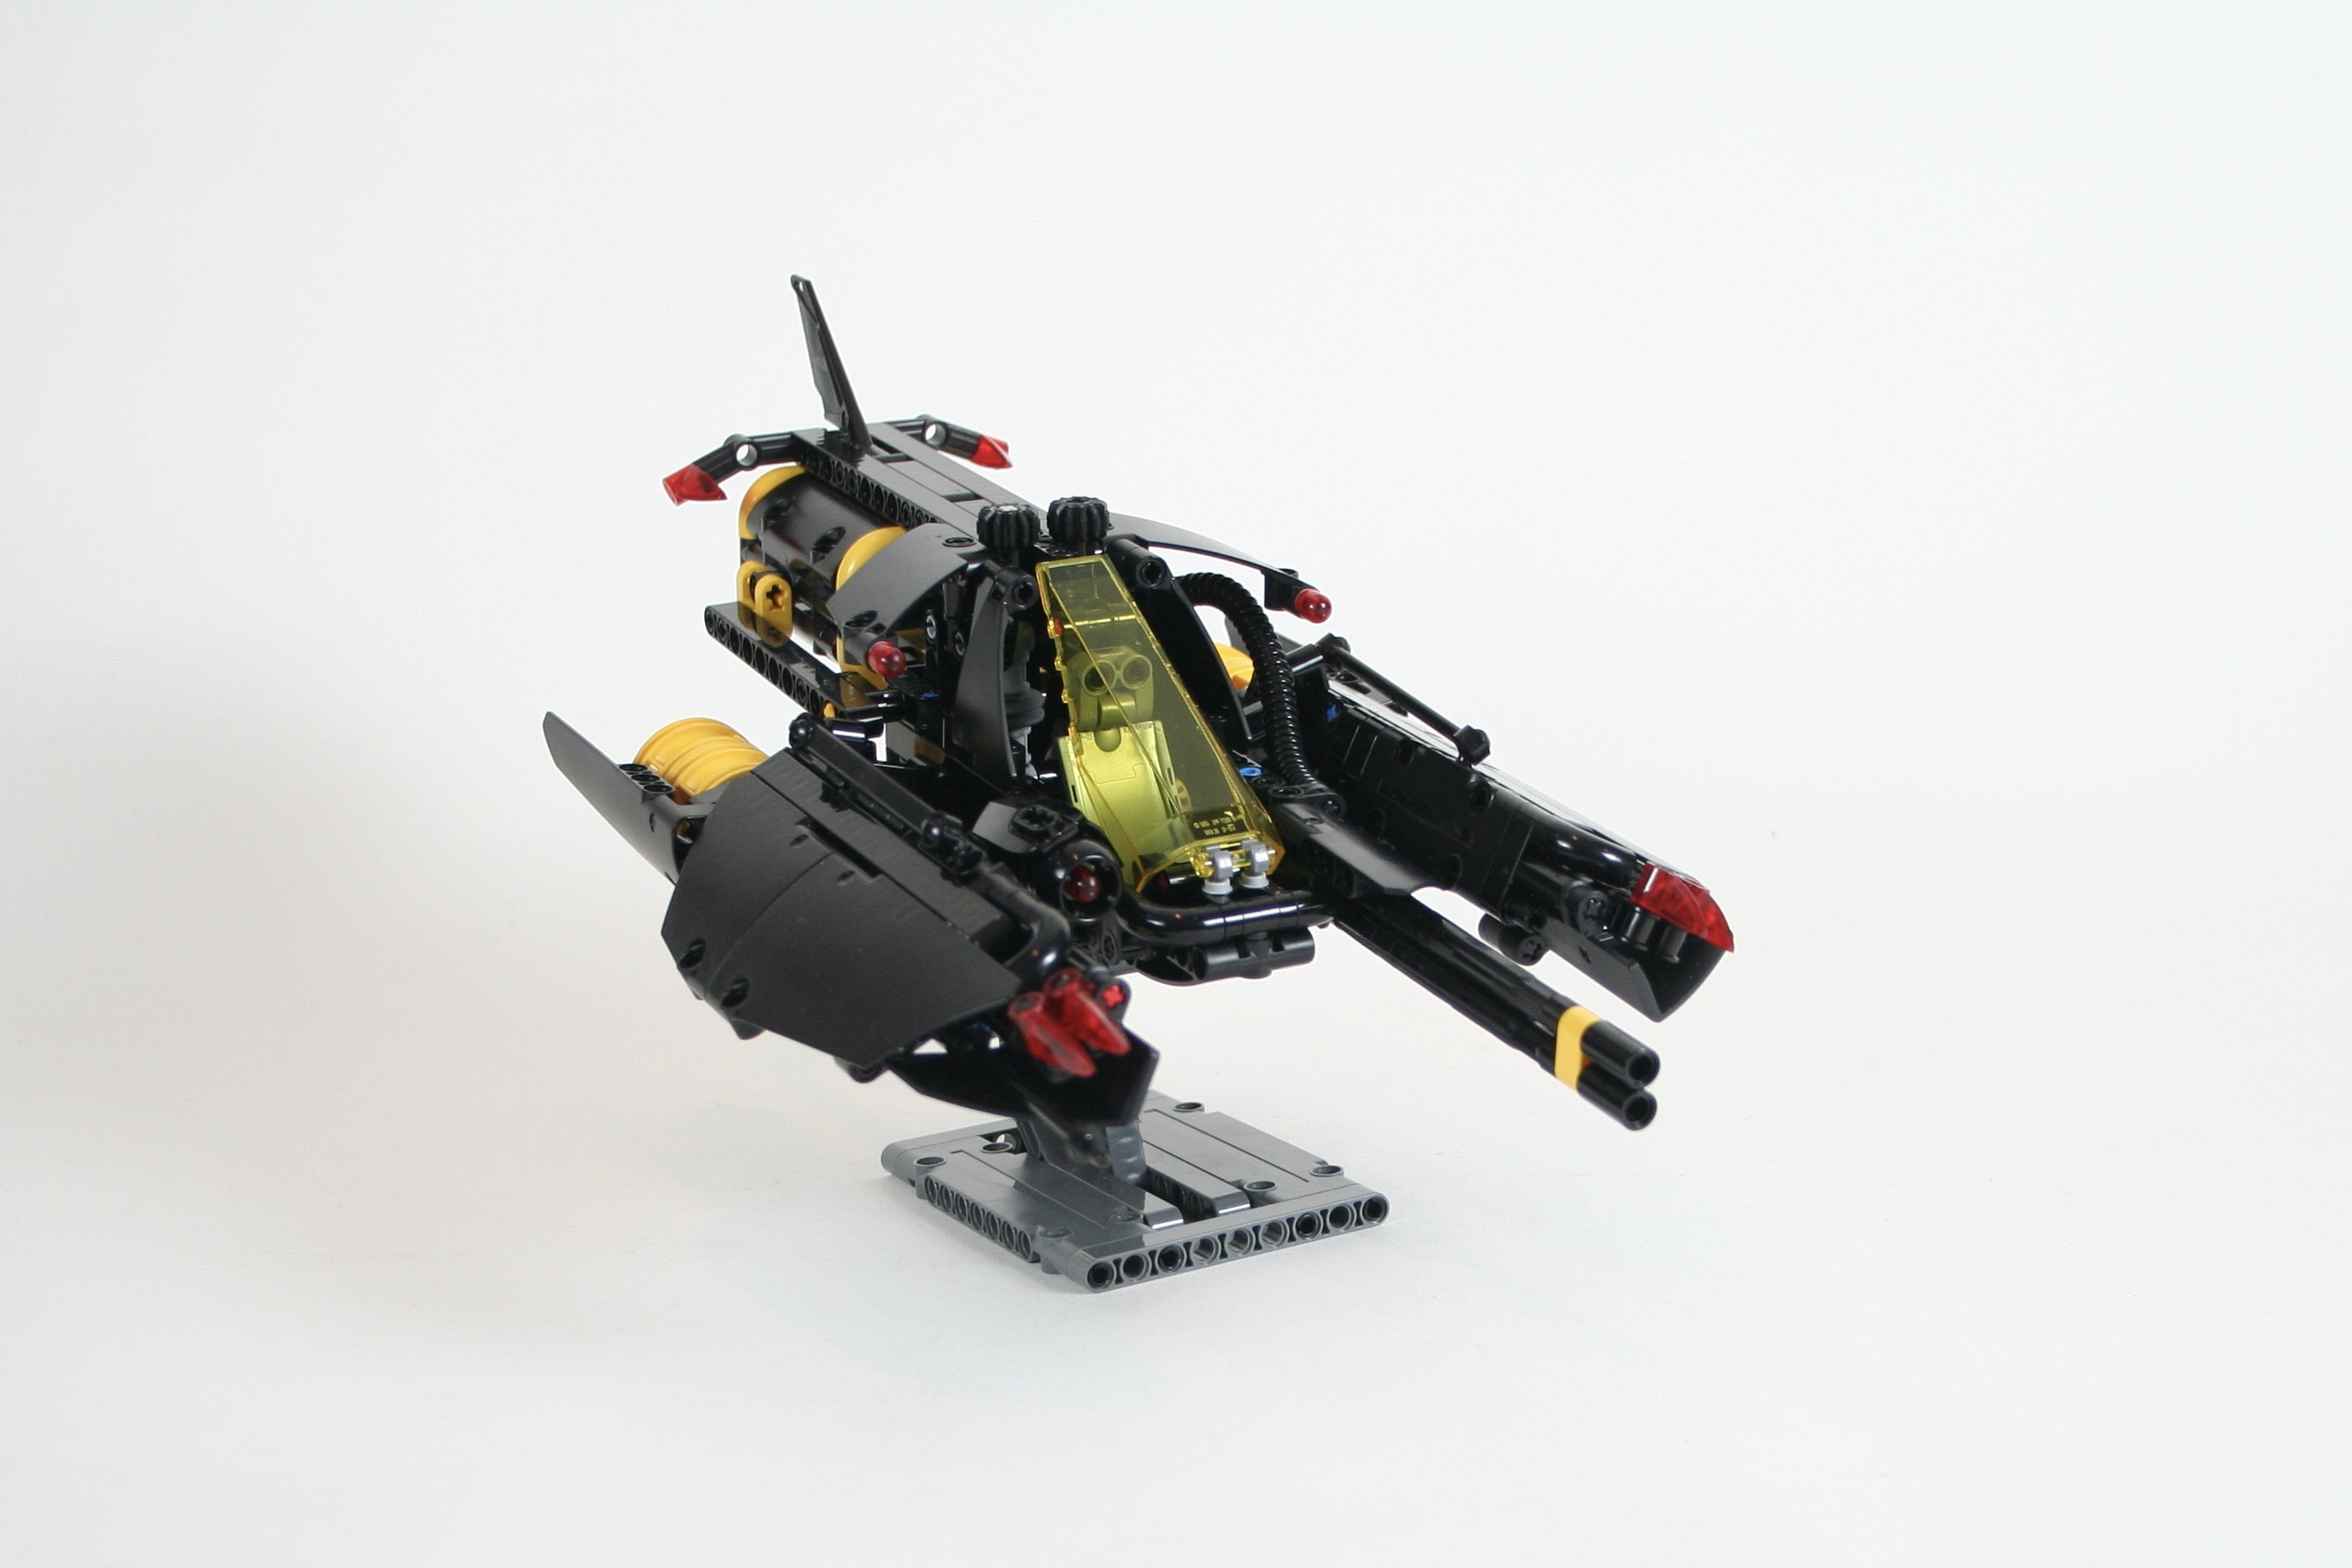
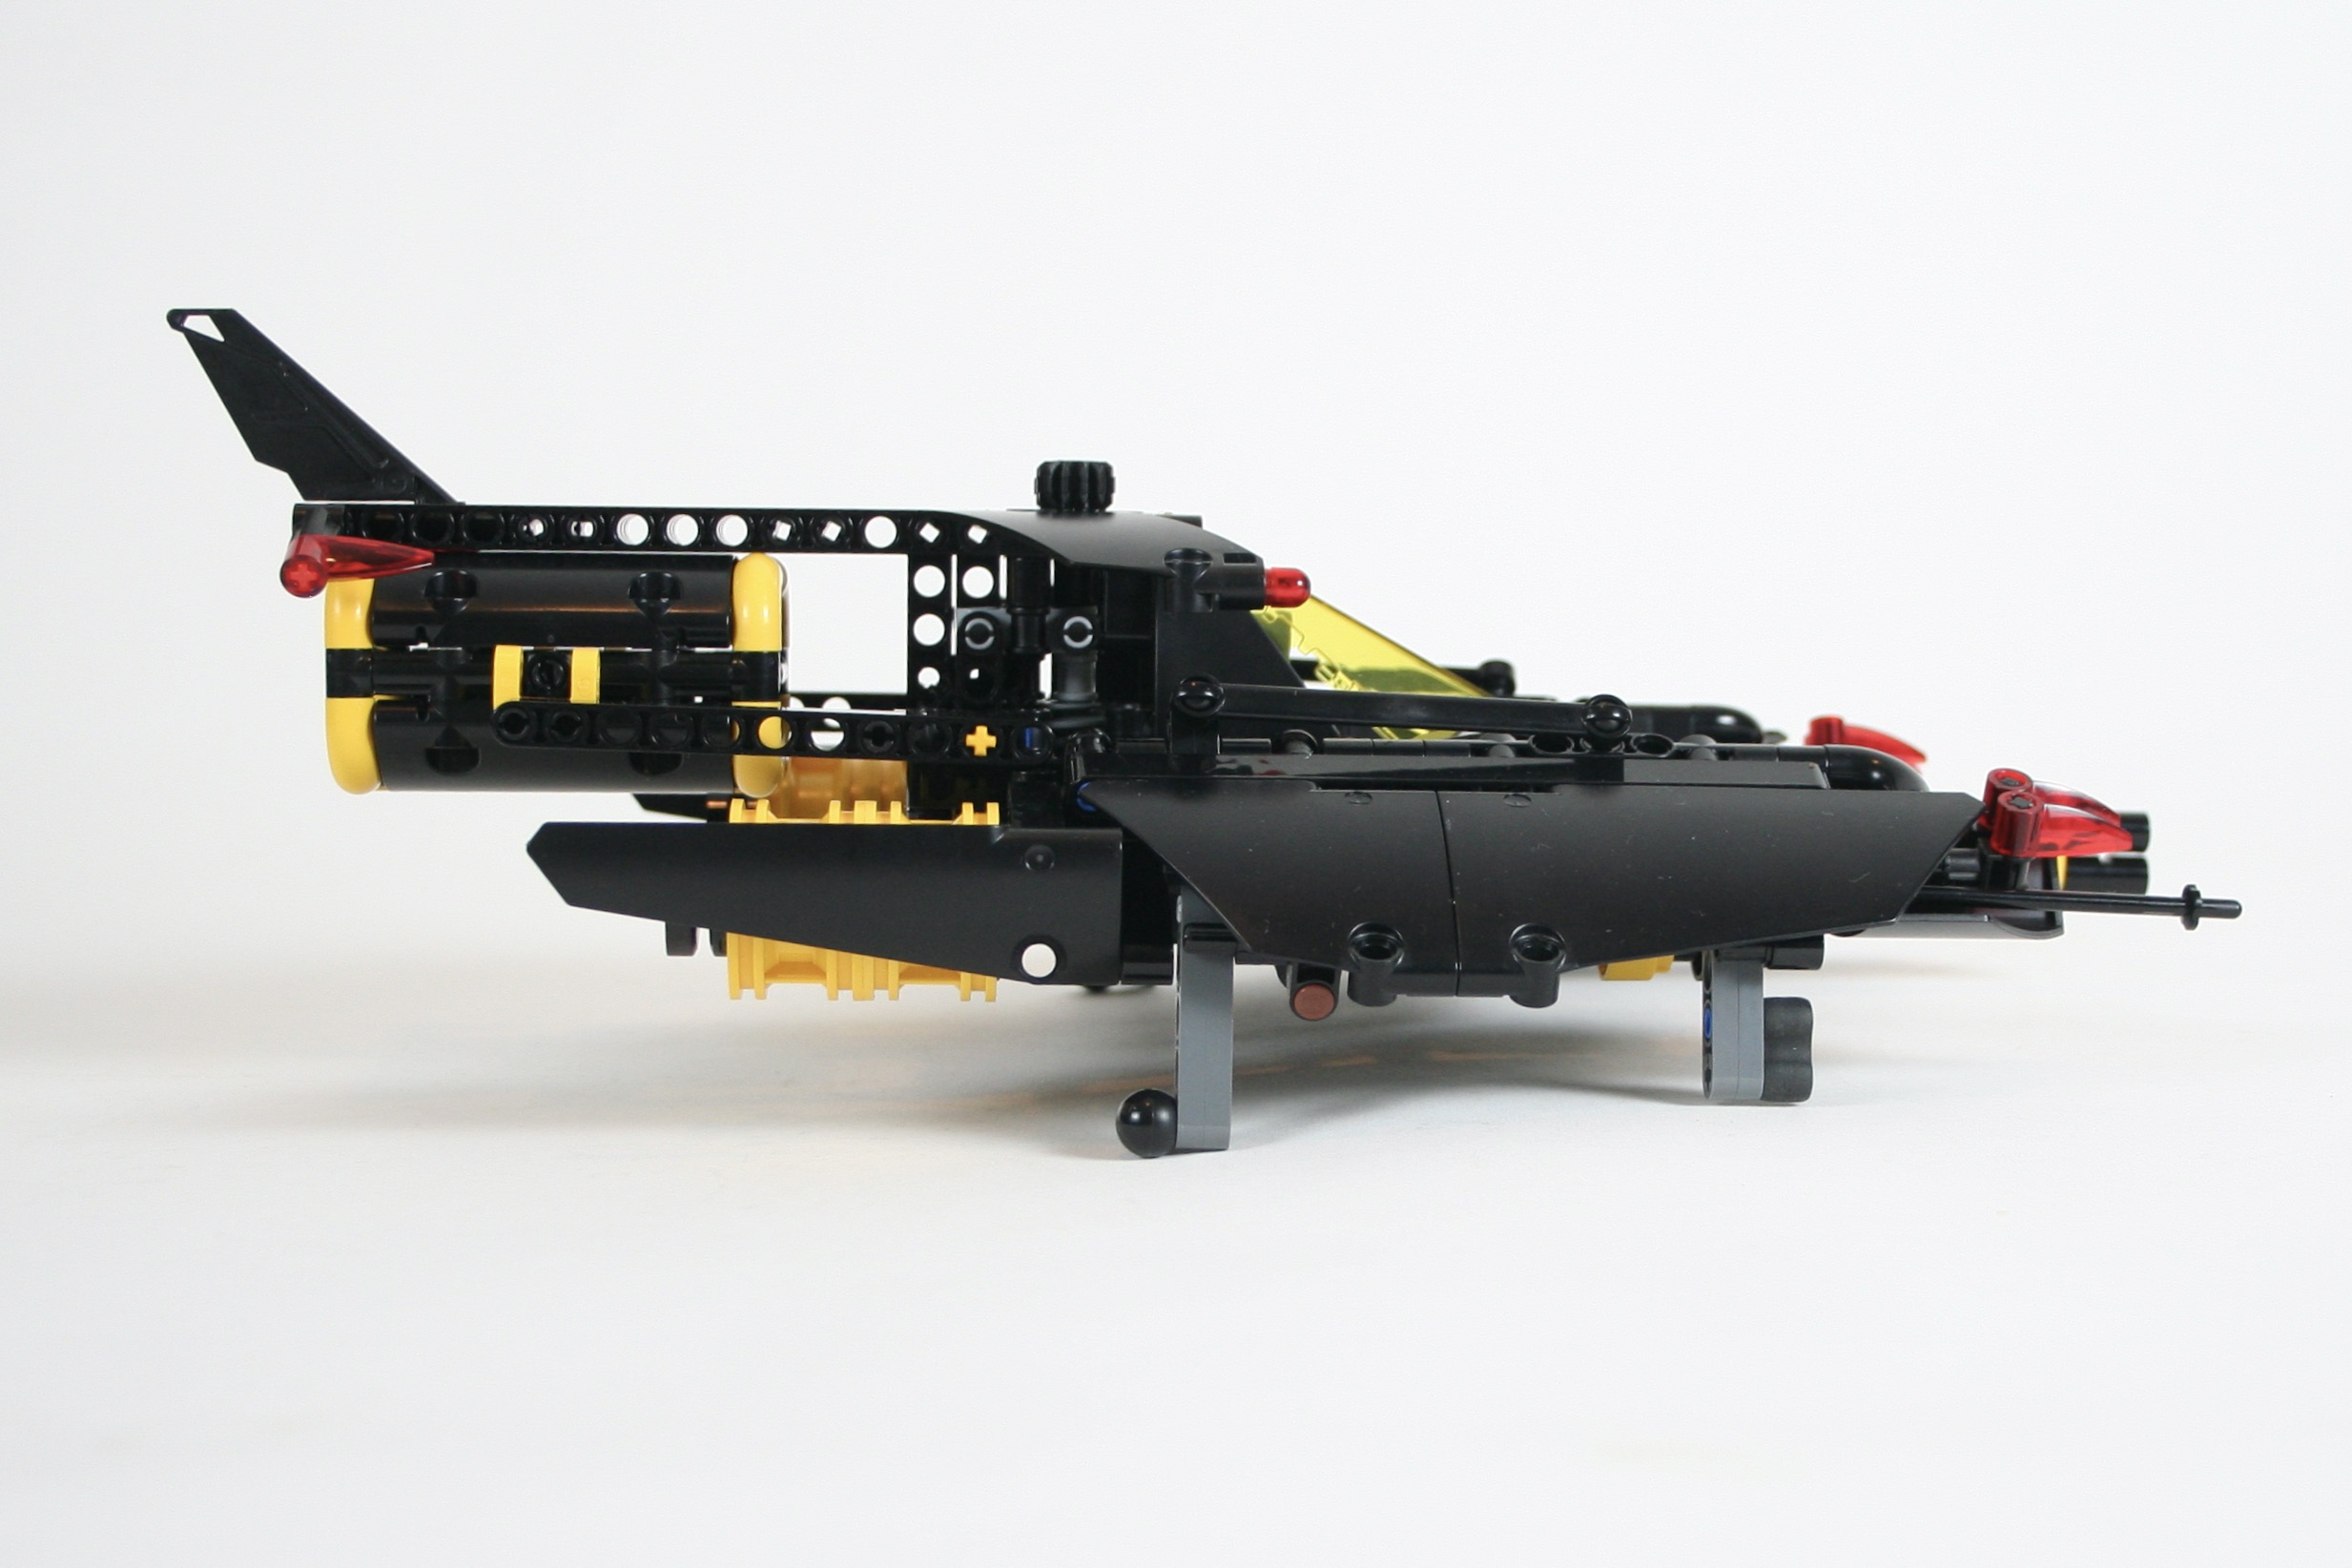
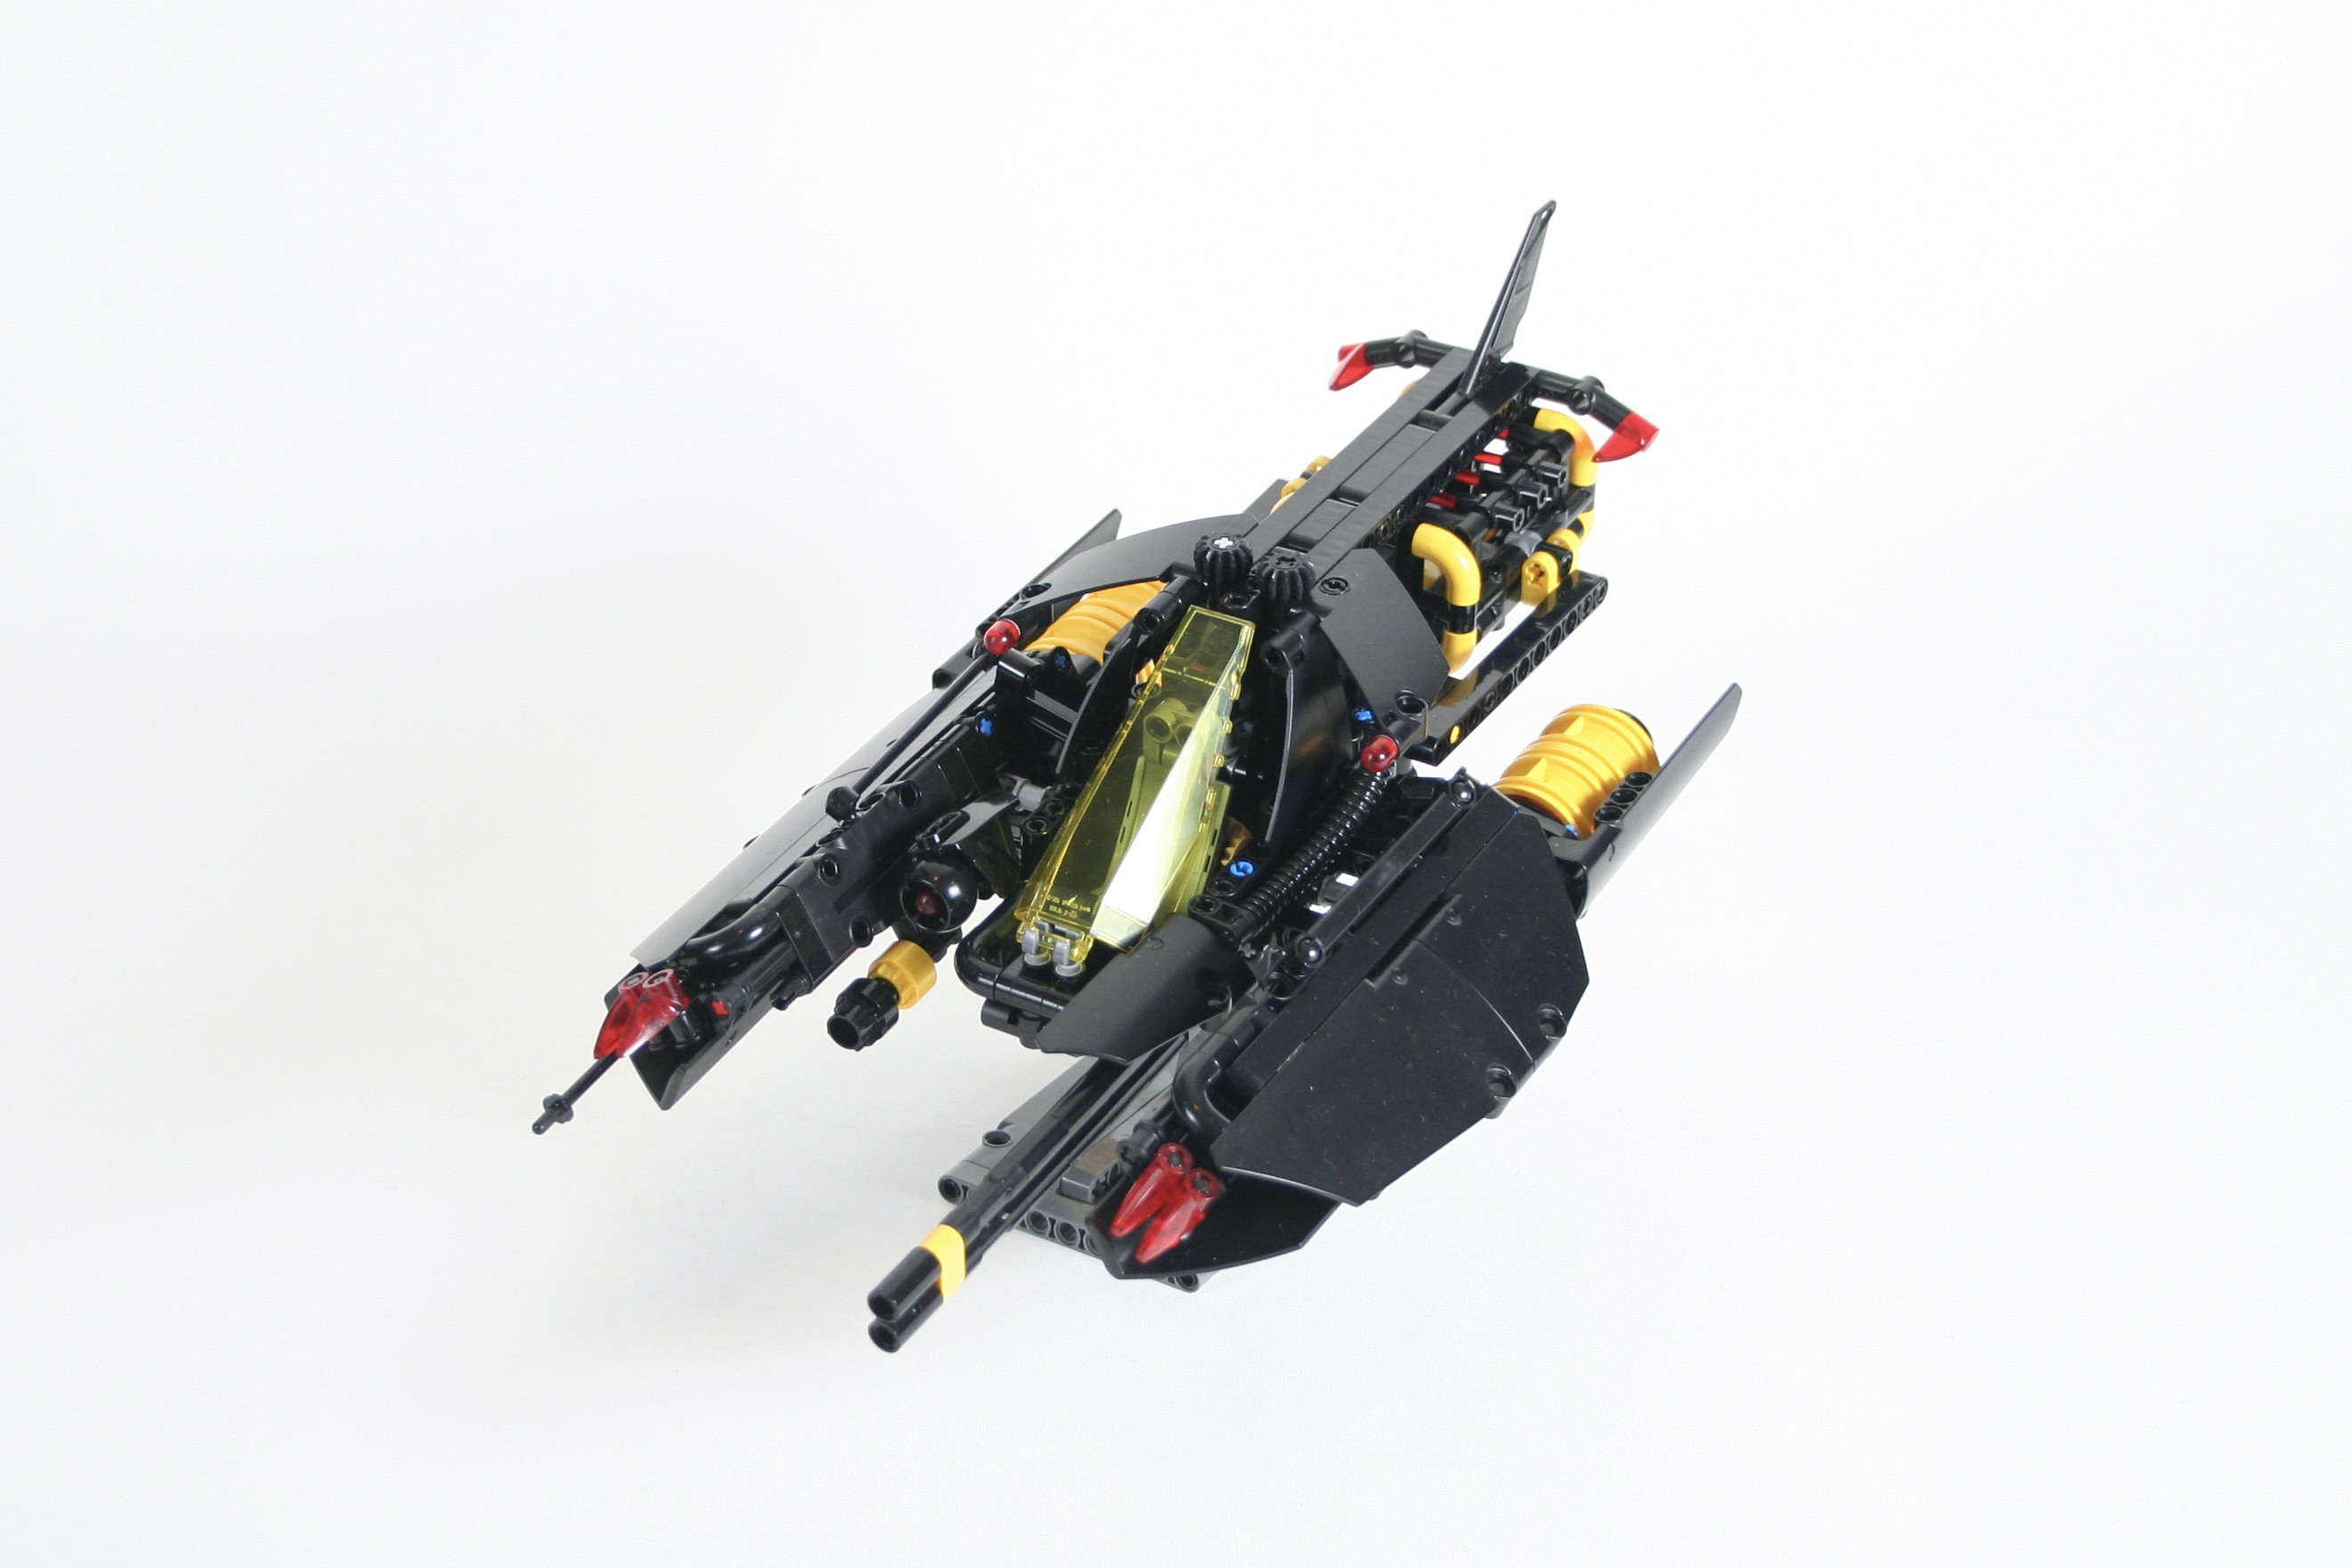
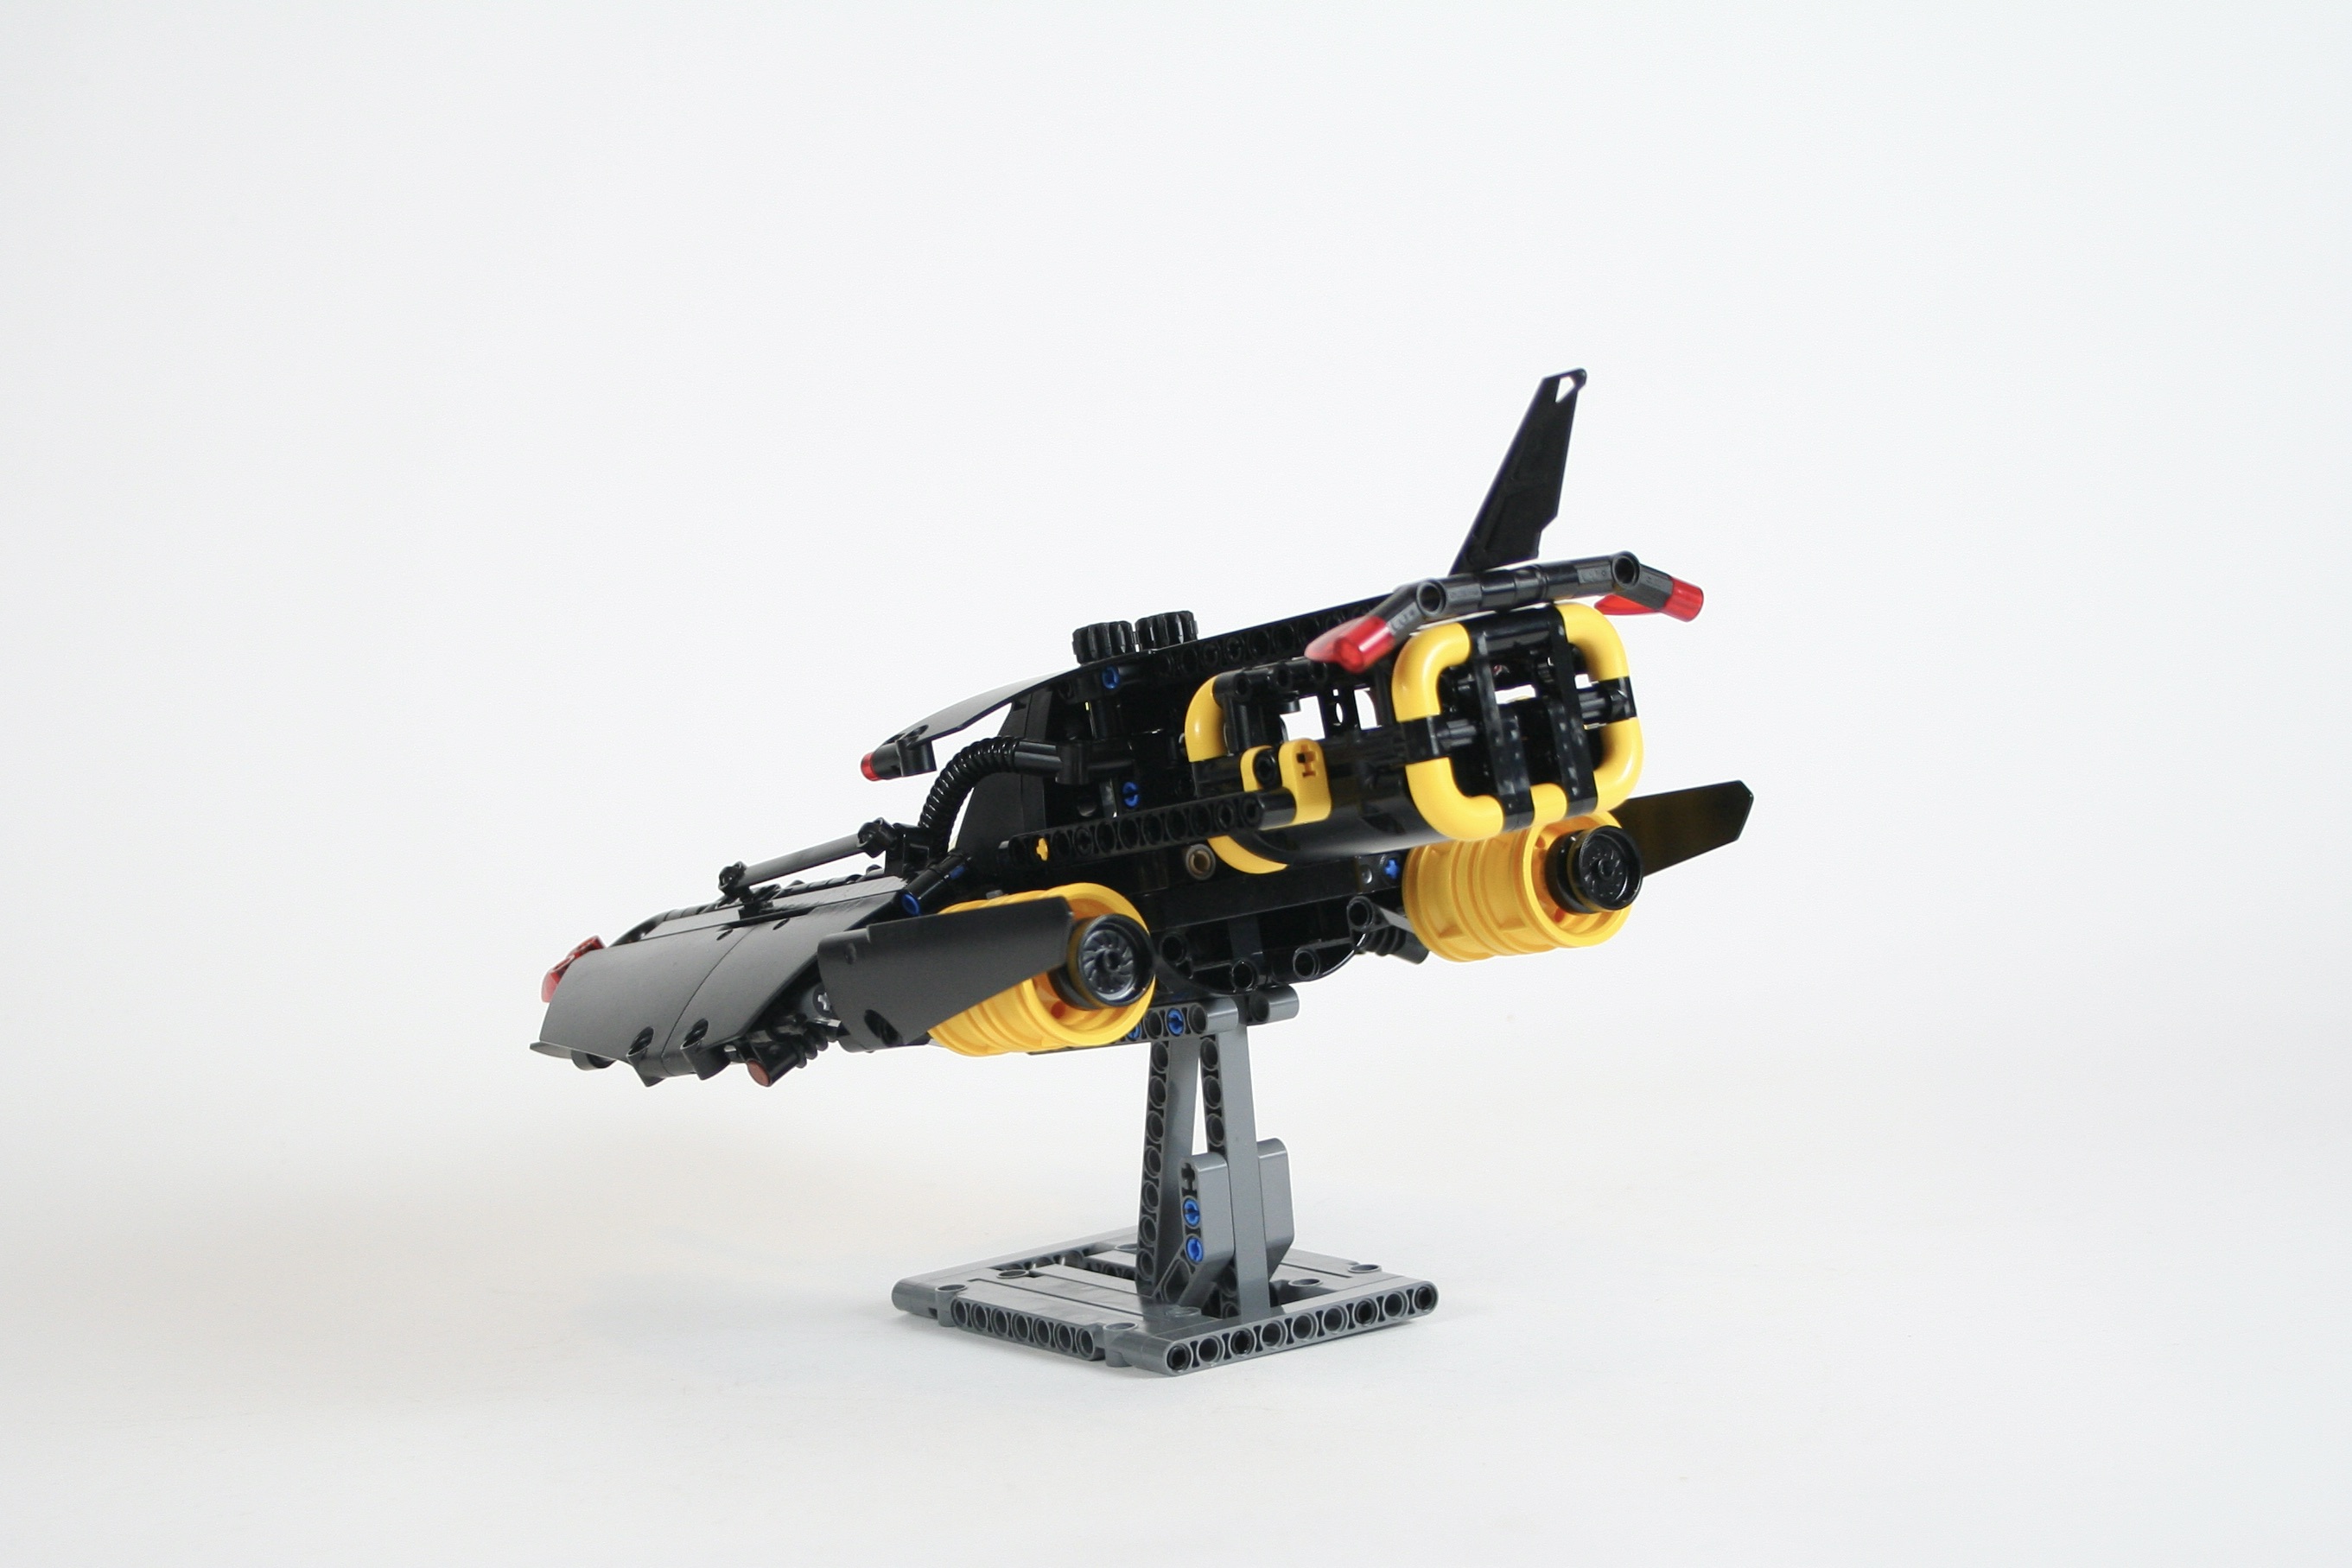
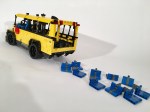
About once or twice a year, Eurobricks offers a Technic contest for builders all around the world to participate in a build challenge. This time, the theme was to build a space vehicle. Naturally I participated, because, 1) space is amazing, and 2) it gave me a chance to finally build something Blacktron. Like any builder who grew up in the 90s, classic LEGO space has a special place in my history, and for me specifically, Blacktron even more so.
I decided to make a little spaceship with a few features, and a fast look. Blacktron colors call for black, a little yellow, a trans-yellow canopy, and trans-red details. After the general shape was developed I placed a simple landing gear with two legs under each wing. This is controlled by a HOG above and behind the cabin. Second, I added a little pod that would be carried behind the cockpit, and could be lowered by another HOG behind the cabin. One pod is a cargo container, and the other is a little jail container.
The MOC looked perfect to my eyes with a fast look and just the right amount of greebling. The simple functions were enough for the size, and give it a nice bit of playability while maintaining appropriate swooshability. It turns out others agreed, as it won first place for the contest!
I often participate in online LEGO contests, and most of them are on Eurobricks.com. In the summer of 2021, Eurobricks announced TC20, Technic Studless Recreation. I participate in many, but not all, of the contests that Eurobricks offers. The requirement was to pick an old studded set, and recreated it in studless Technic. I couldn’t sit this contest out, as it checked all the right boxes for me. Entries would be smaller to stay in scale, the builds would be feature packed, and it they would have a deep nostalgic connection. I was in.
Choosing a set to recreate took some time. I started with a list of 32 sets, and started to whittle it down from there. Quickly I removed some of the sets for various reasons: interest, size, not right now, too sacred (8880). I ended with a top three of 6357, 8855, and 8854. 6357 would be interesting to me, but after doing 8640 a couple months back it could wait. 8855 had some opportunity. It is a classic set, and instantly identifiable. I built a little mock-up, and let it sit for a couple of days. I didn’t come back to it.
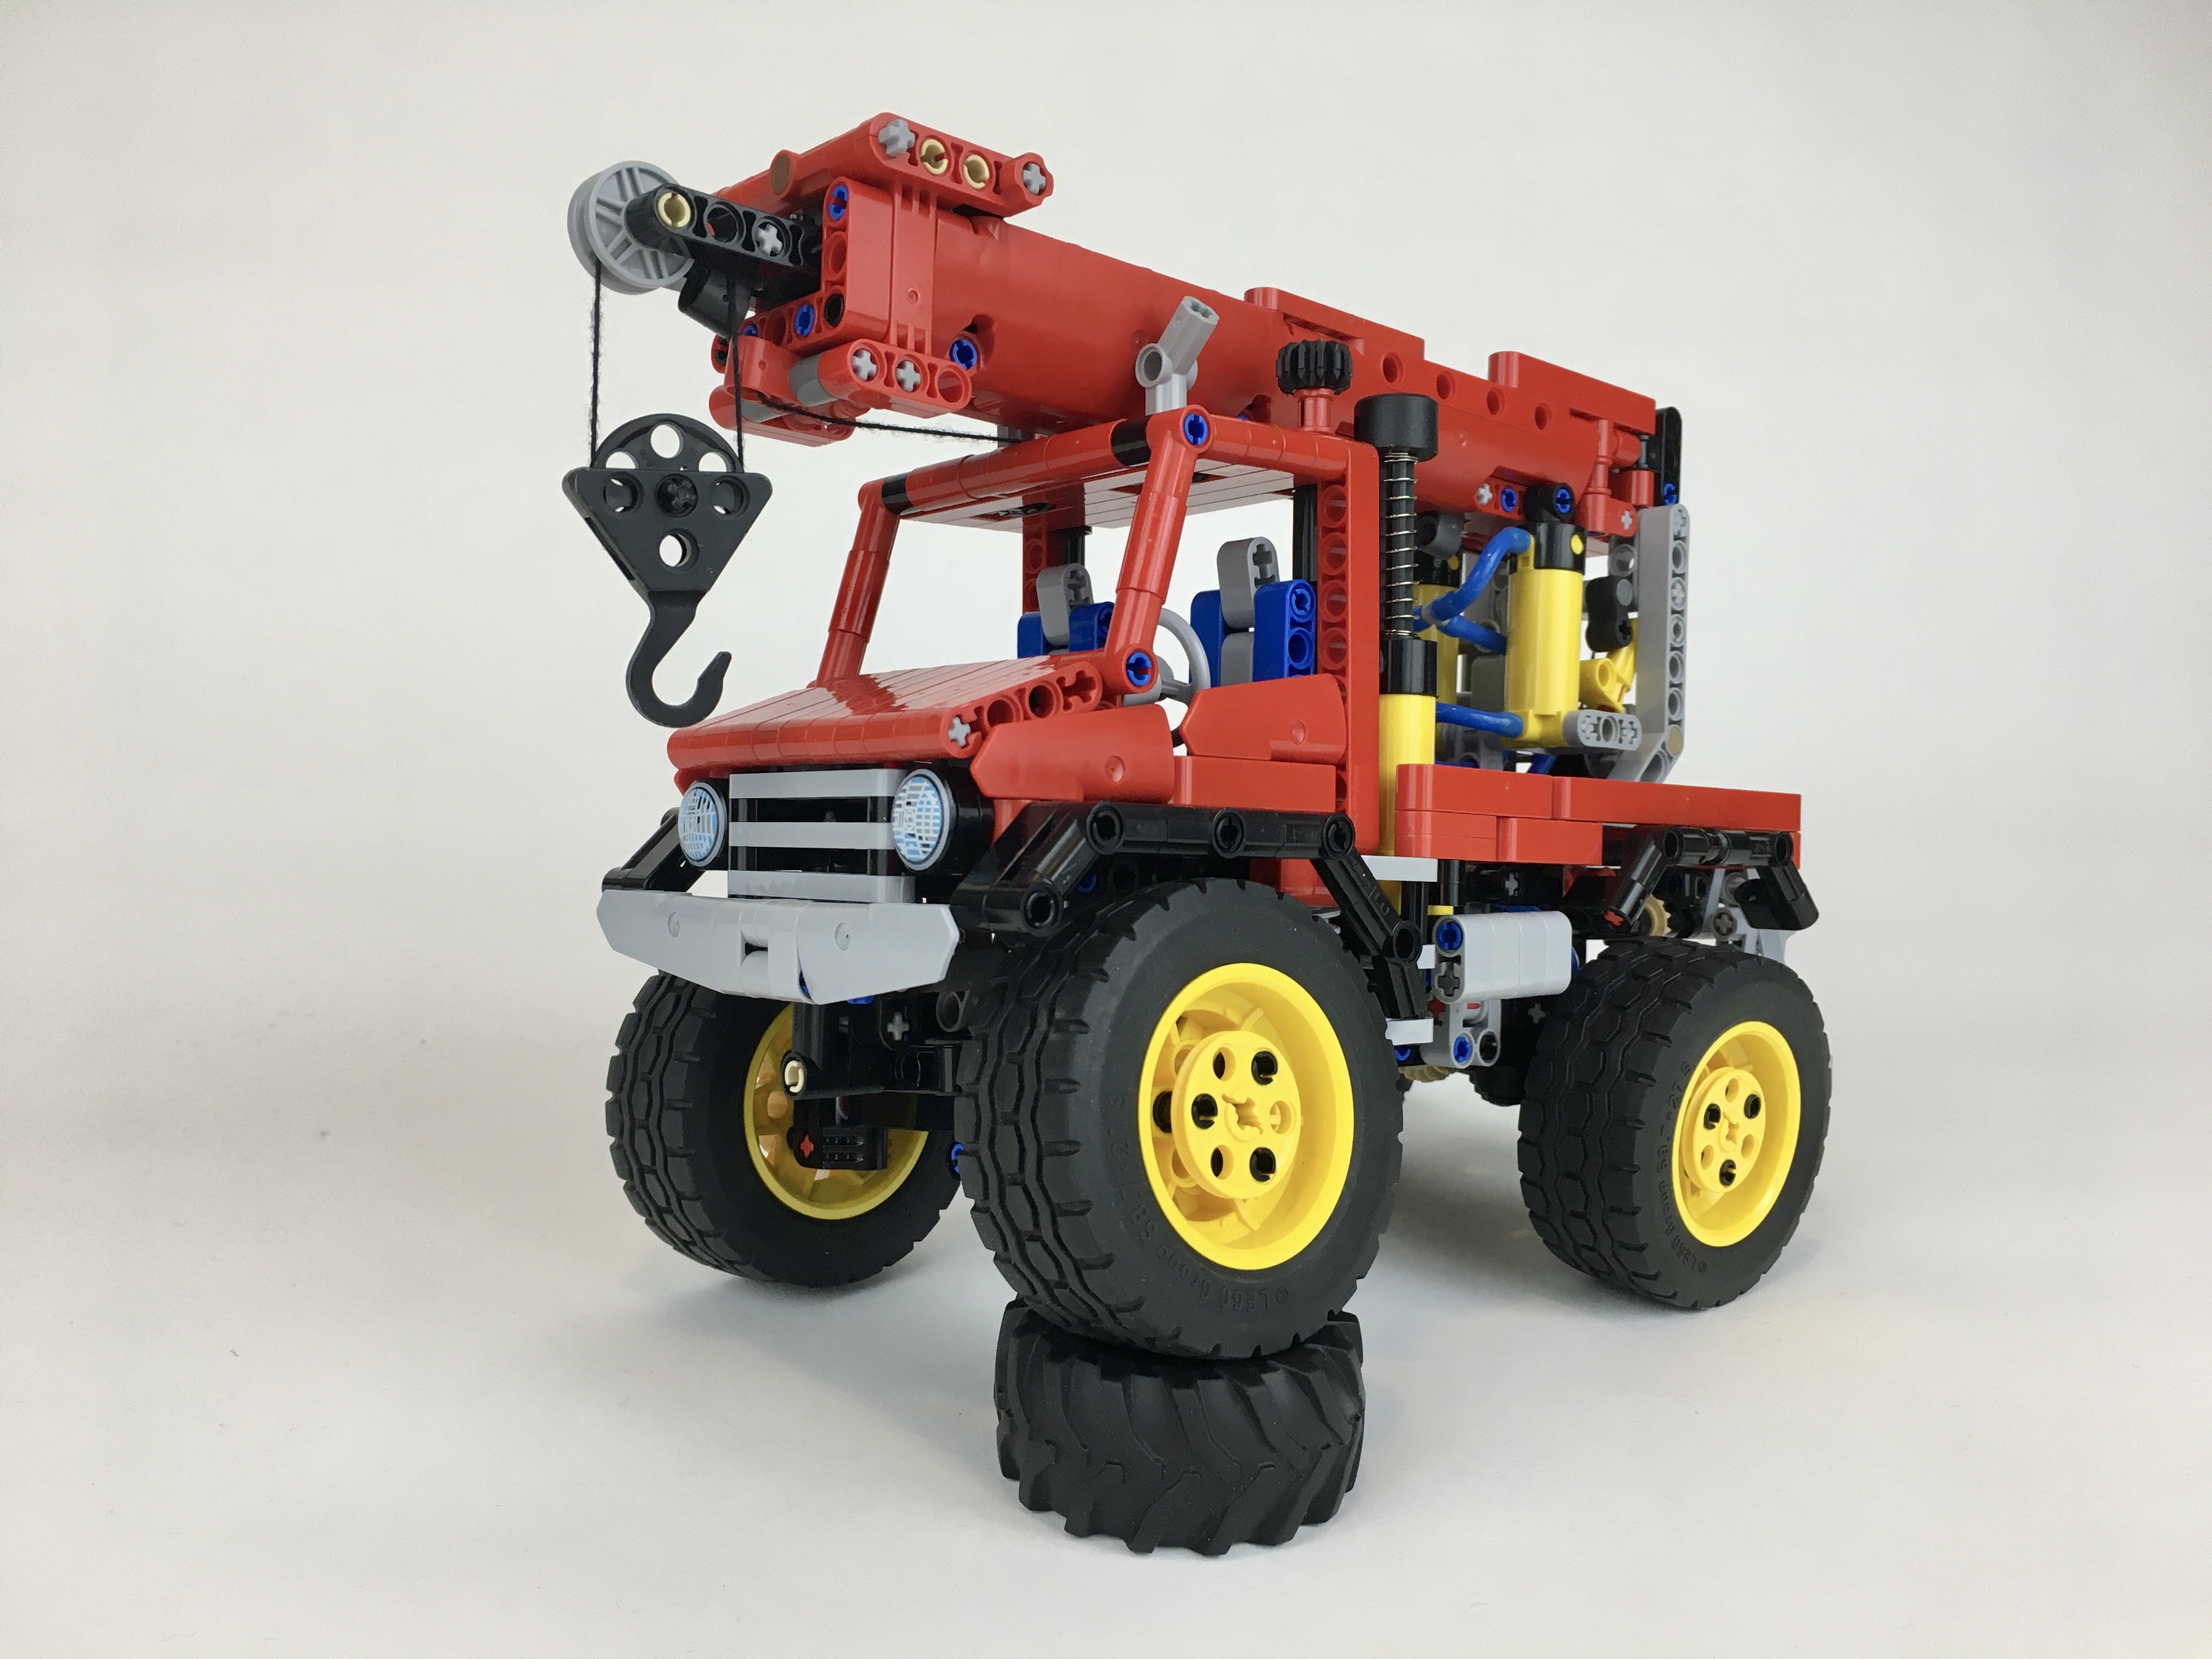
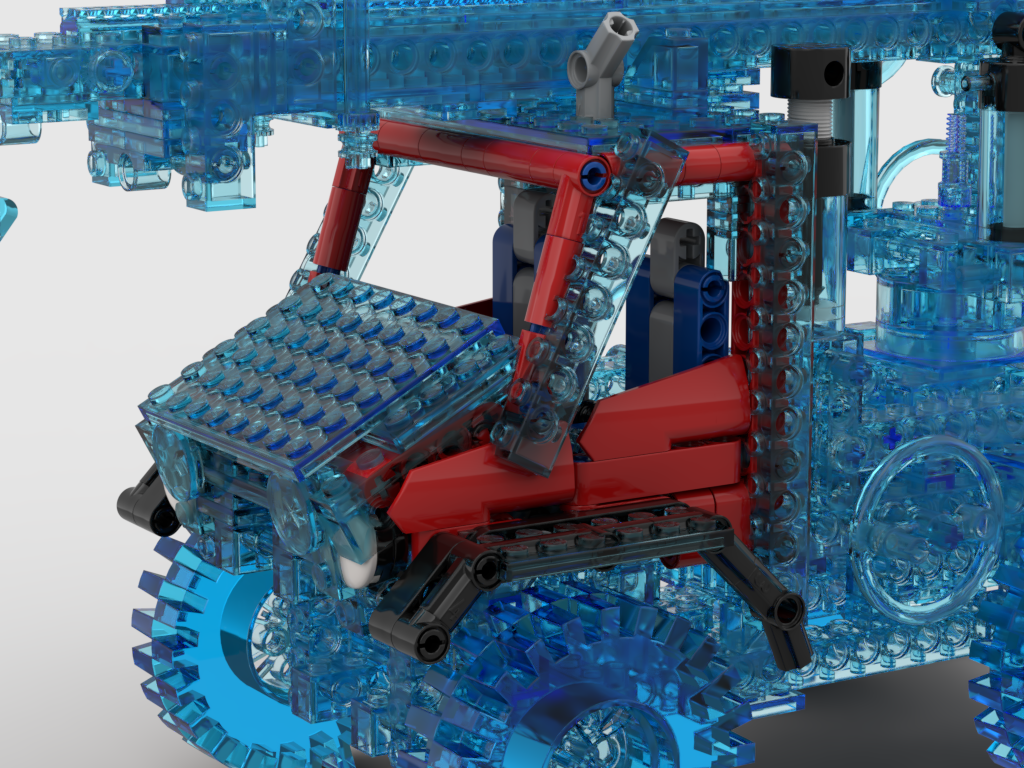
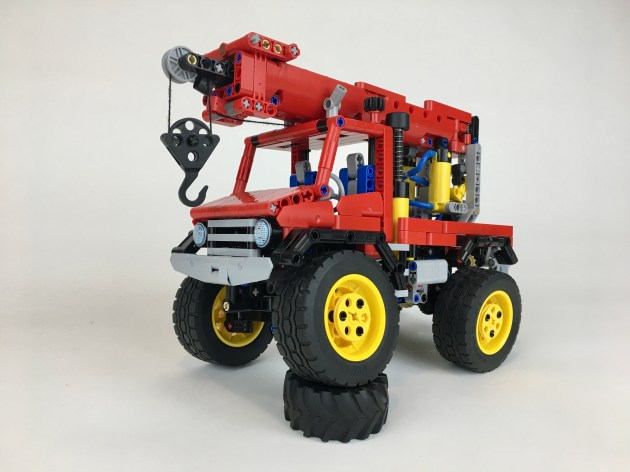
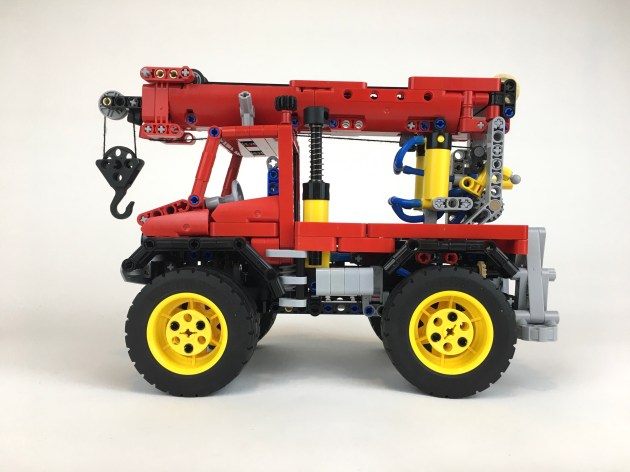
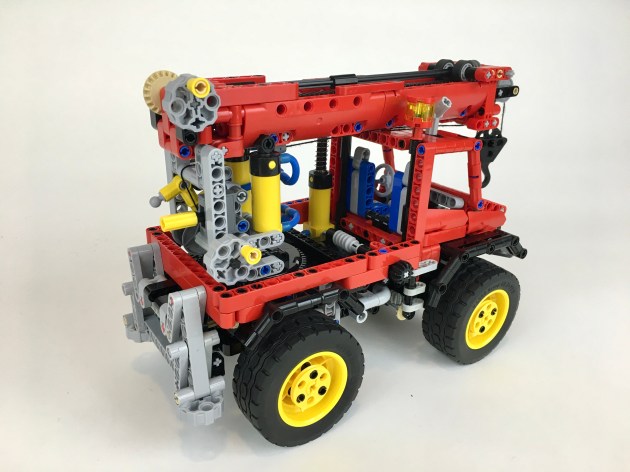
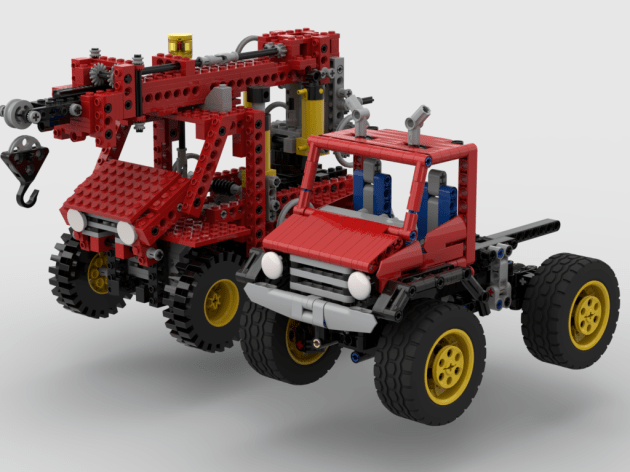
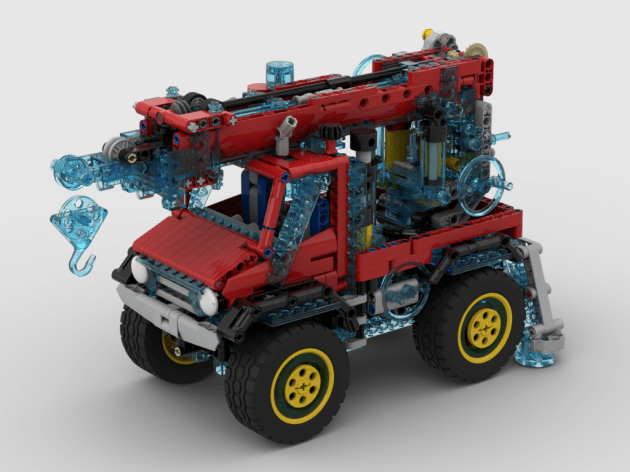
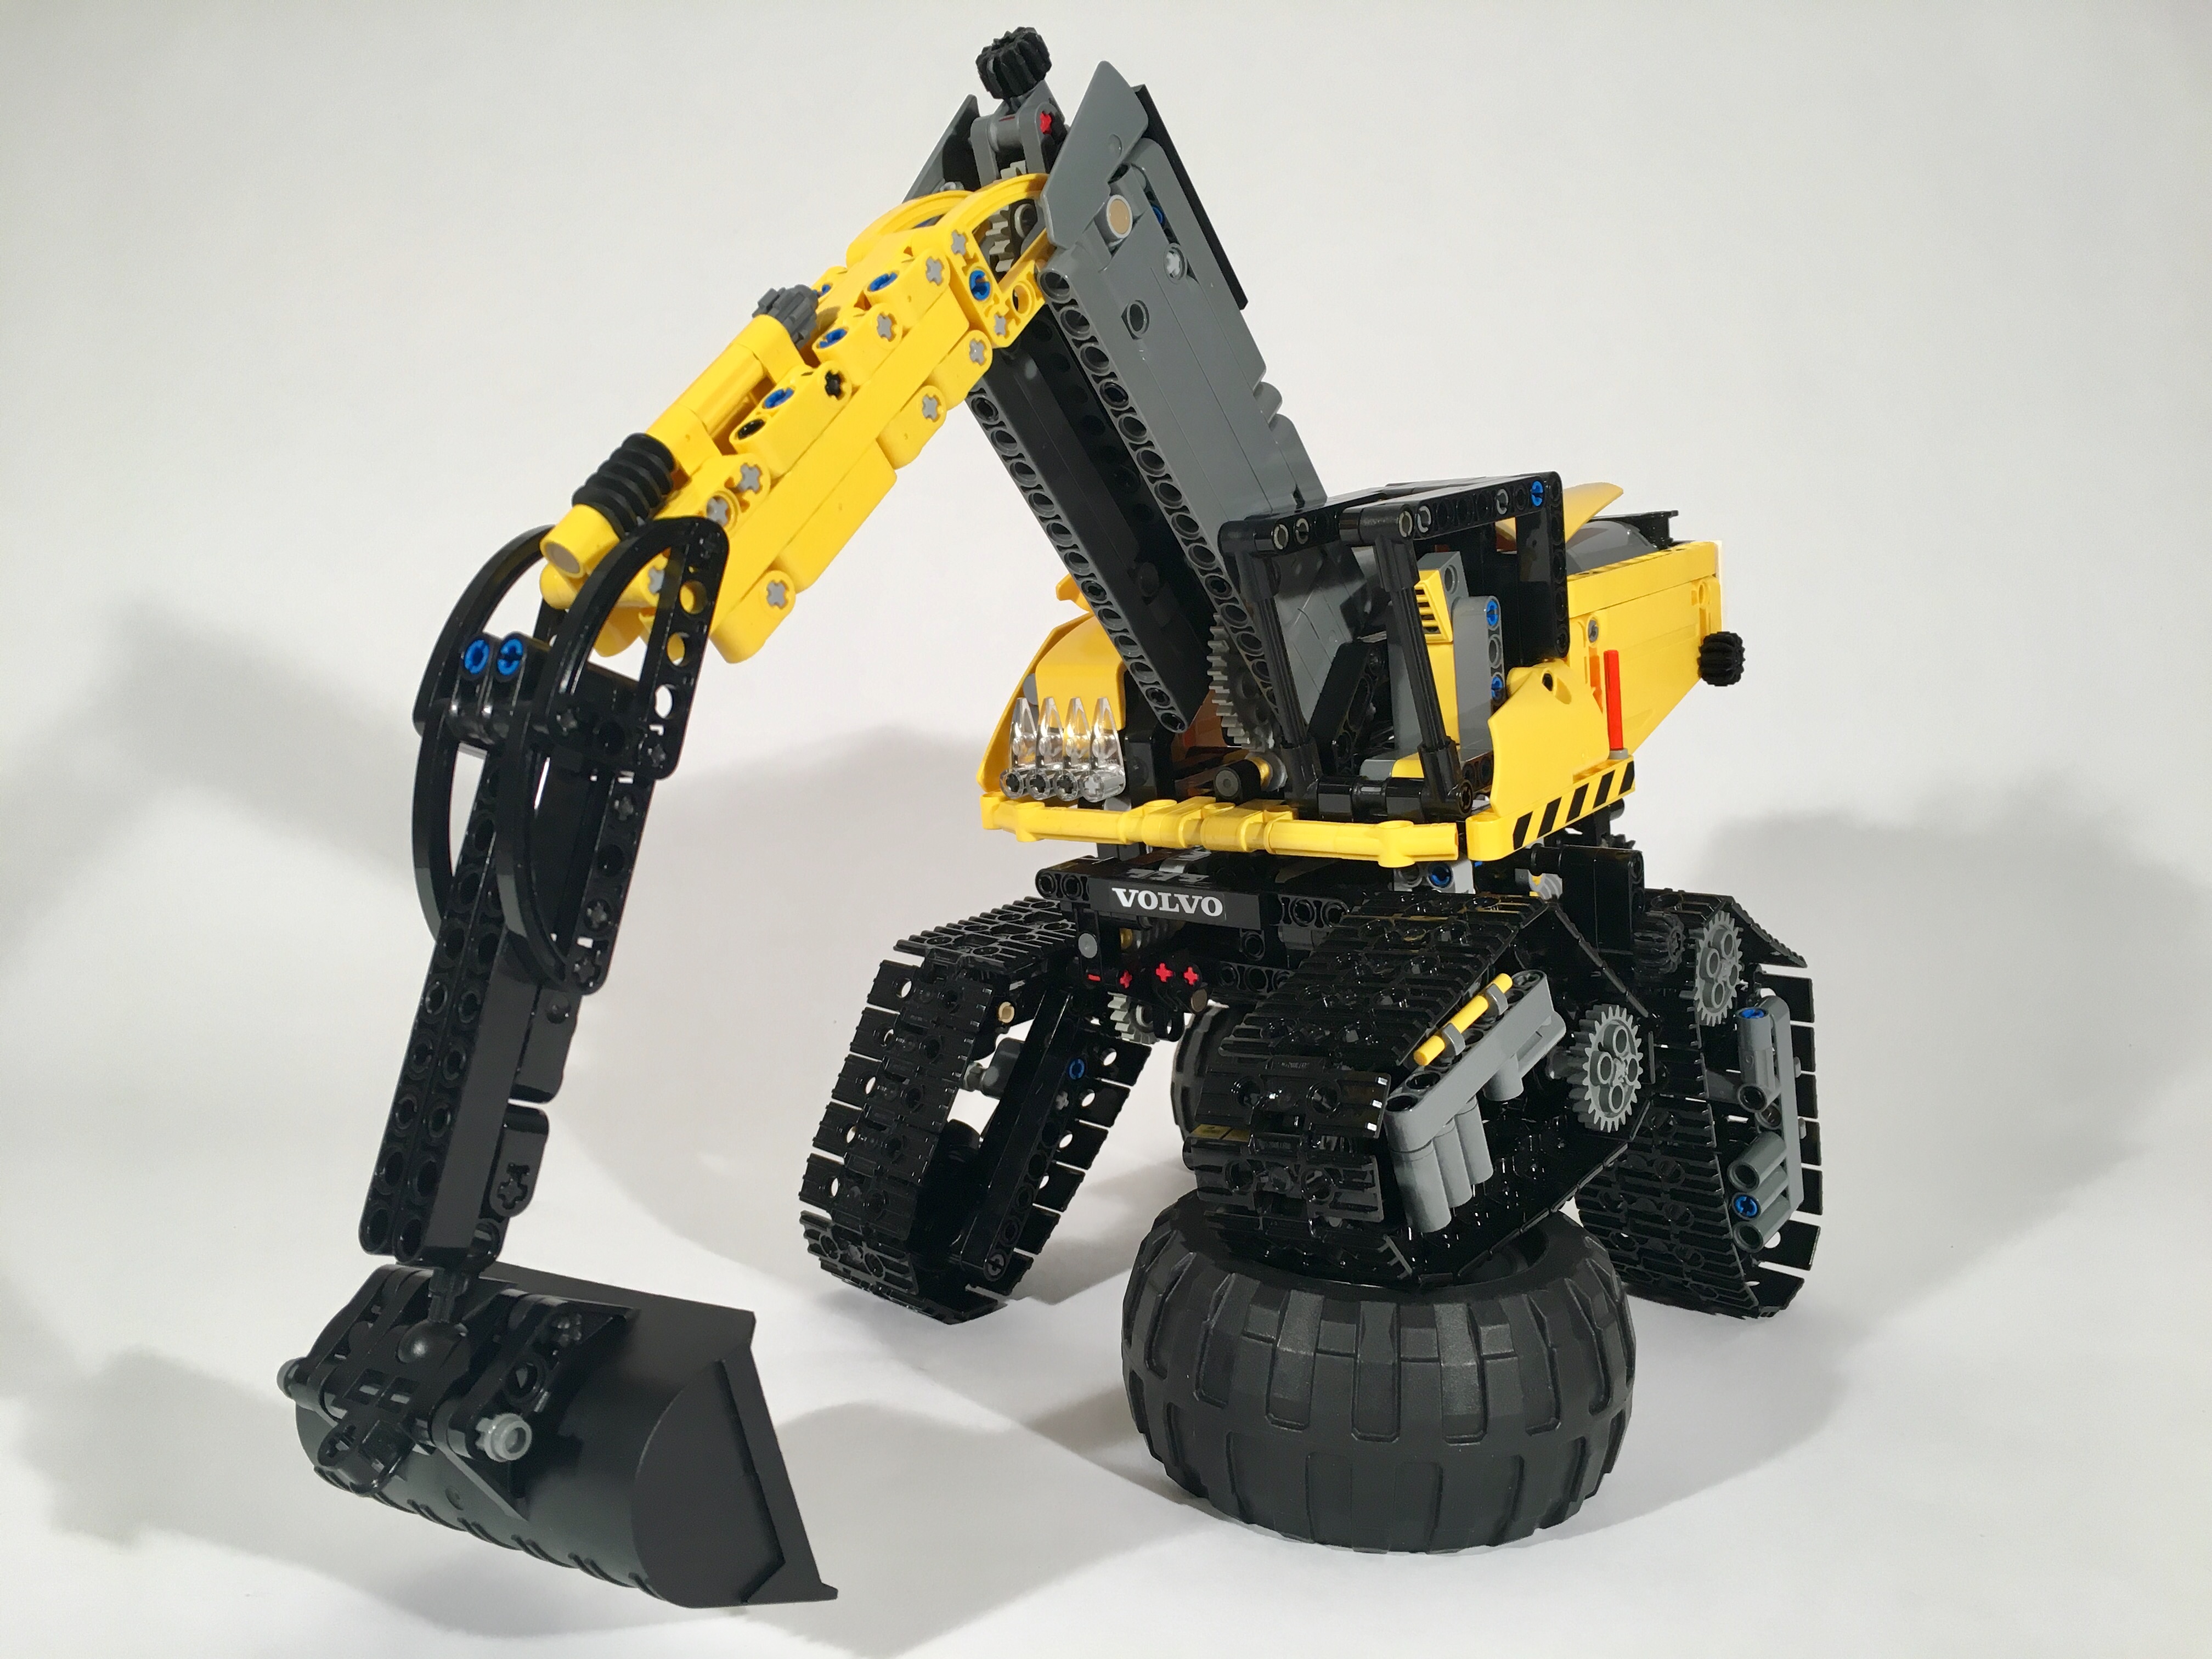
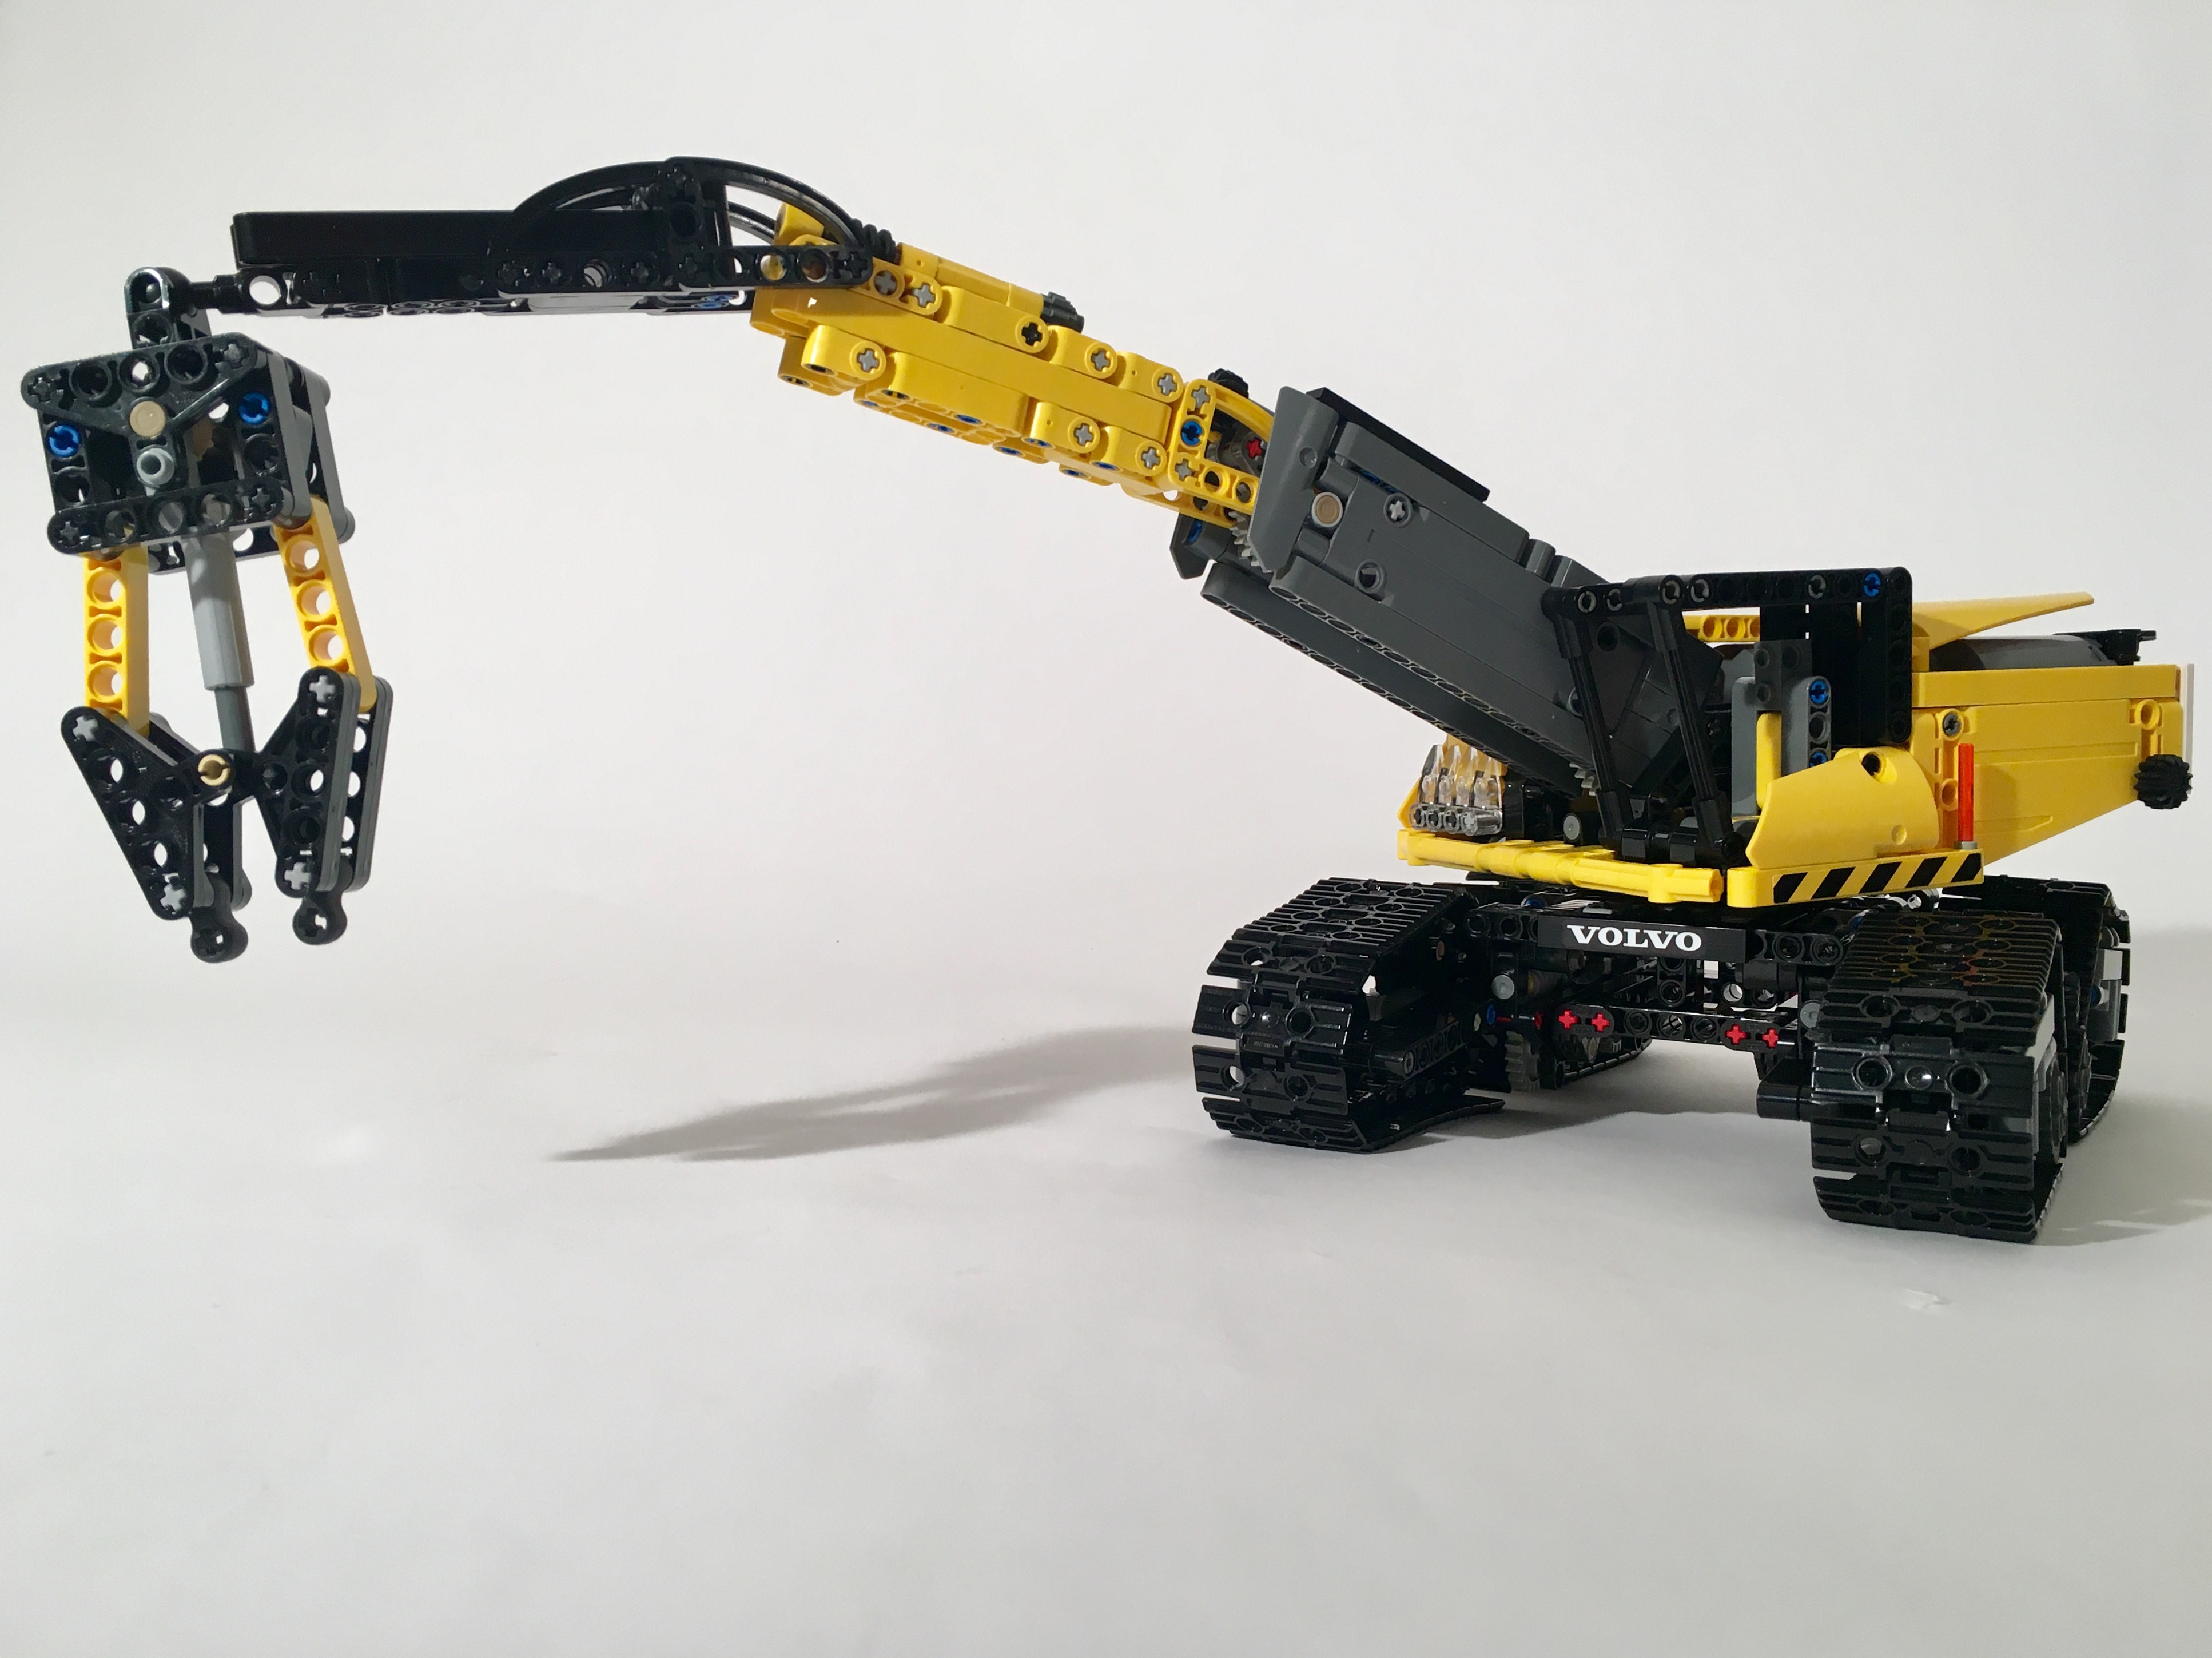
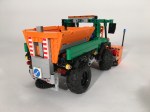
I am not sure why I did not settle on 8854 right away. I love building Unimogs, and when I do updates I like to add some features. 8854 was missing suspension and an engine, so everything was right for me to recreate this iconic set. I had made my decision and I started posting my progress. First, I had to decide the scale. I made the decision to use the newish Batmobile tires in the build, which make the tires a little larger than the original 8854. I added a stud to the wheelbase to compensate, but otherwise the scale would remain the same.
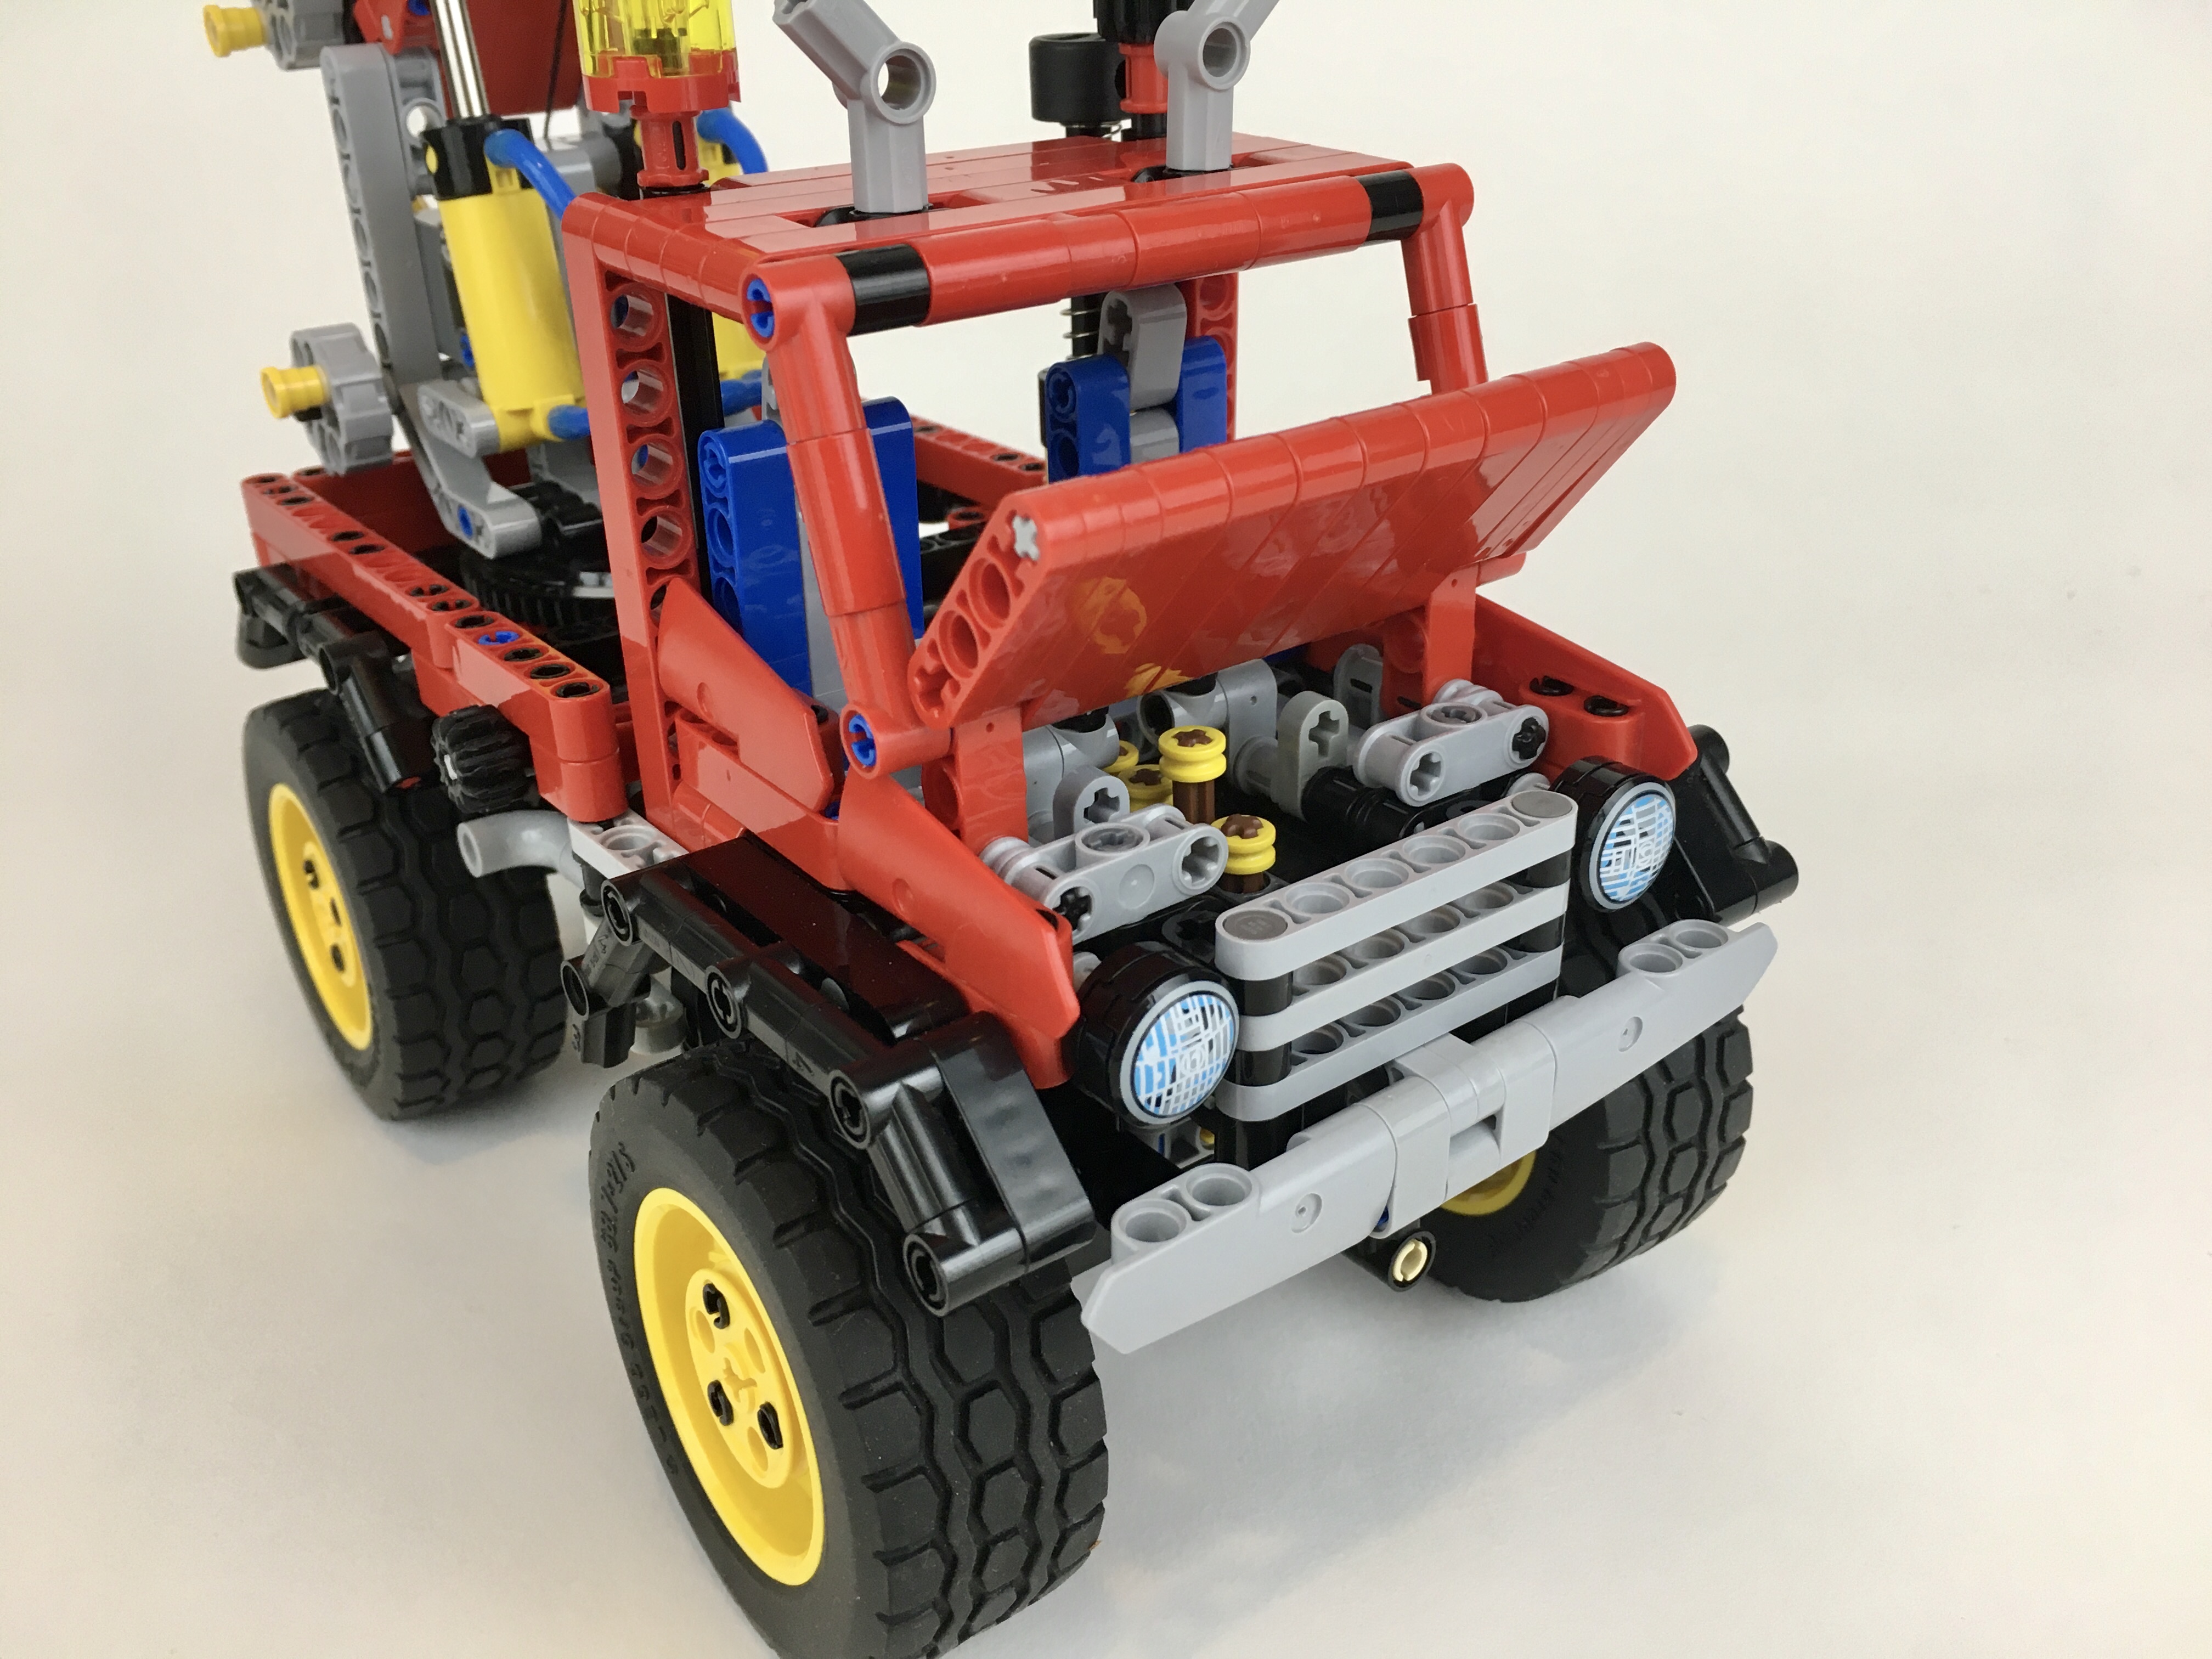
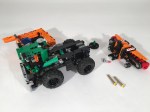
Next, I had to figure out how to add all the features I would want, while keeping all the original features. HOG for the steering would remain on the top right side of the cab, naturally as a beacon. I then added a control gear for the outriggers on the top left side of the cab. The rotation of the crane would be on the right of the truck driven by a worm gear, and all other crane controls would be on the crane itself.
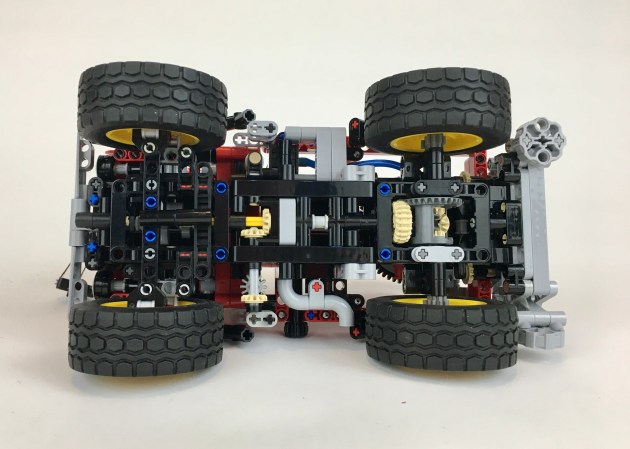
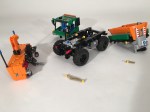
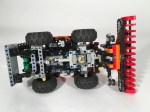
Fitting in the suspension and engine was a little tricky. Adding the engine was simple enough. There is a differential on the rear axle with portal axle. The driveshaft goes forward to drive a I4 mini engine. Suspension is a dual pendular axle setup: both axles pivot side to side. The front and rear axles are linked together so that when one axle pivots right, the other axle pivots left. It is a simple design that functions well.
LEGO 8854 Engine
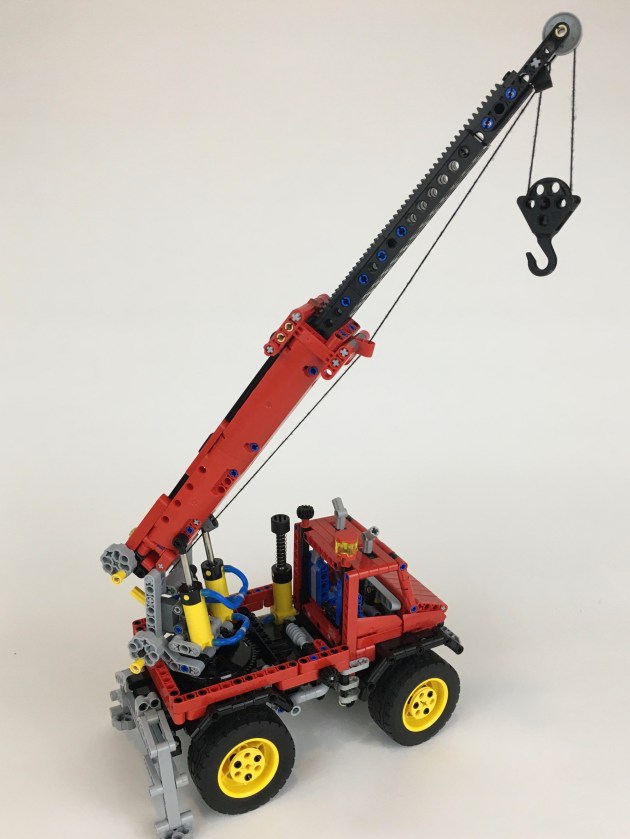
Designing the crane was the easiest part. Panels form the base of the arm, and a simple extending boom as created using studded technic beams and some rack gears. A worm gear extends the boom.
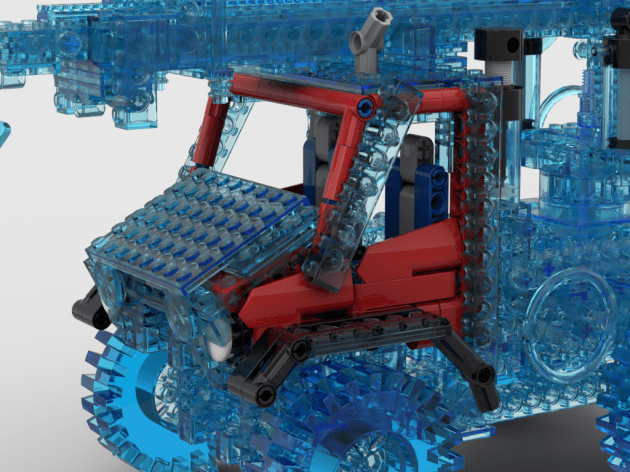
The cab is where I had some trouble. 8854 has a funny shaped cab to my eyes. First, it is very narrow. Second, the hood slopes very steeply. Third, the windshield is not very steep, more car shaped than truck shaped. I rebuilt 8854 in Bricklink Studio to help me compare the two designs over each other. I found this to be a helpful step, and allowed for some good feedback from other Eurobrick members. I ended up making the hood a little more flat and slightly shorter. The roof was made a little longer, which made the windshield a little more steep. Then added the fenders that wrap around the wheels a little better, and headlights and a grill that referenced the original grill. I was pleased with the final design. Oh, and I added seats, opening doors, and a dashboard.
Being able to compare the two versions side by side helped me feel comfortable with how the build was going. Most of the time I use Studio when the build is complete, as do not like to tinker in Studio. However, being able to see changes in real time, was immensely helpful. I could ask was the new version staying true to the original? If not, what was the specific part that was making it feel/look off? Being able to overlay both versions on top of each other was helpful, and a step I will do again in the future.
Cab Comparison Overlay
It turns out the design was good enough for a first place! I was thrilled that through both a voting and jury stage, this update was picked over 46 other designs. In addition to that affirmation, I was pleased with how the MOC turned out as well. The functions all worked well, and the control of each was simple and effective. I only wish the suspension was little more stable, but this was only noticeable when the crane was fully extended. I’ll use the suspension again in other MOC soon. If you love 8854 as much as I do, I hope you will give this update a build as well.
Another contest, another build. LEGO Ideas posted a contest to build your idea of the Volvo construction vehicle of the future using LEGO Technic bricks. This was my entry for the contest, which did not win, but was a design I was happy to complete.
The design was inspired by the Volvo Sfinx and the Hyundai HFex Concept as I was interested in trying the various tracks, and a foldable boom. I started with the track sections, with four idetntical modules. Each are connected to the center turntable with a worm gear assembly for individual track movement. The system is enough to hold the full MOC, but not overly strong.
Next came the superstructure. I created a conventional cab on the left, and added some fuel cells on the back. These cells can slide out the back of the superstructure to be easily replaced. Next came the boom. I wanted a three section boom that would fold, and extend in a variety of directions. Each of the three pivots is operated by a worm gear mechanism. The best manage the length of the boom, the main boom used a worm and 48z gear, the second used a worm and 24z gear, and the final boom used a worm and 8z gear. I added a ball join at the end of the boom to allow for multiple attachments.
The entry did not win the contest, but I was happy with the result. It was creative, and functioned well. I like the way it looked, and was happy with the track setup.
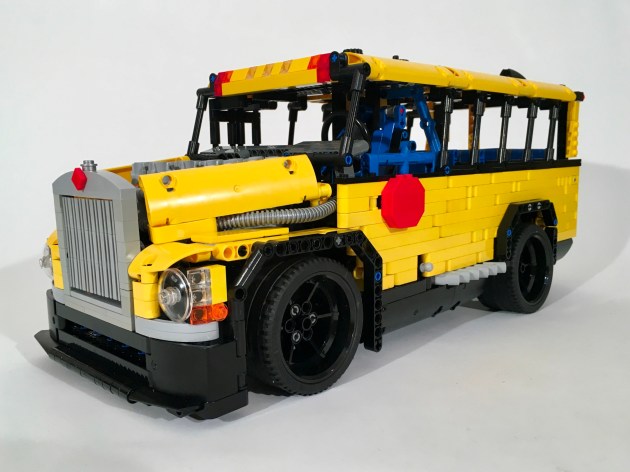
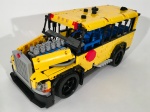
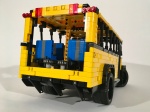
When I was in high school, we had a little bus; we called it “The Toaster.” We had big buses for the large football team and various student “schlepping,” but the Toaster was the perfect size for a cross country or soccer team. But, boy was it hot; the short wheelbase and many windows fused shut allowed for virtually no air movement in travel, and it would spend all day baking in the hot Arizona desert. Hence the name.
When when the Eurobricks Technic Challenge 12-Wacky Racers was announced, I figured this subject would be a good basis for an entry. Maybe I could visualize my fantasies of the ultimate racing bus. What would it be like to give the bus a stupid big engine, and some sport tires, and make it visually hot?
The contest required wheels or tracks and, steering. No problem. It also required a wacky feature to gain an advantage in a race. I’m not very violent, so I immediately thought of a bus that would toss out its seats to make it harder to follow in race. I built a chassis, added a V12 and I was off.
Very early, I had the idea of an attacking sill as well. I gave the bus a lowered look, and this gave a lot of internal space under the drivetrain. I created a side panel that would spring out to attach a racer to the left of the bus. You can see it work here. It was a fun addition to my plans. Then I started working on the seat toss feature. Five seats would be mounted on a 32l axle on both sides of the bus. The seats would slide out the back, driven by two chains with controls on the roof.
I added some visual excitement such as the exhaust pipes, the engine intakes, a stop sign (I know, I know, I need a sticker), and and internal roll cage. I built a simple working bus door, and closed up the body work. Visually, it could have used a little more excitement, but I liked how it turned out.
All the functions of the bus worked mostly well. Sometimes, some of the seats would get stuck as they were being thrown out the back. The attacking sill worked flawlessly each and everytime. It was a fun feature. I wish the bus has a little more creative styling. Next time.
As a LEGO Technic builder, form generally follows function. Sure, I make most of my MOCs aesthetically pleasing, but the joy and the priority of my builds, is what they can do. But every once and while, I flip this. I set out to make a motorcycle that looked a certain way, and adding in as many features as I could.
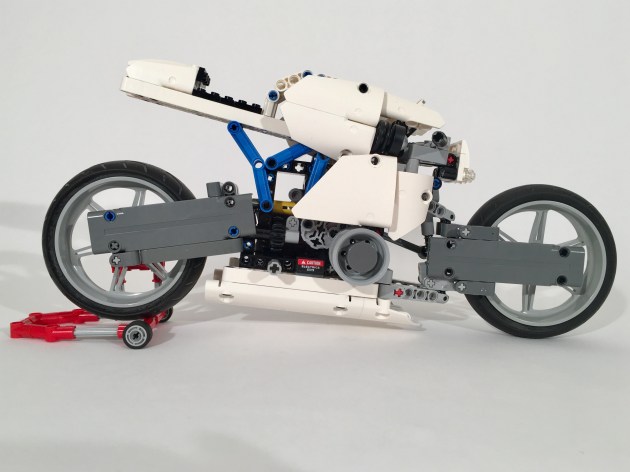
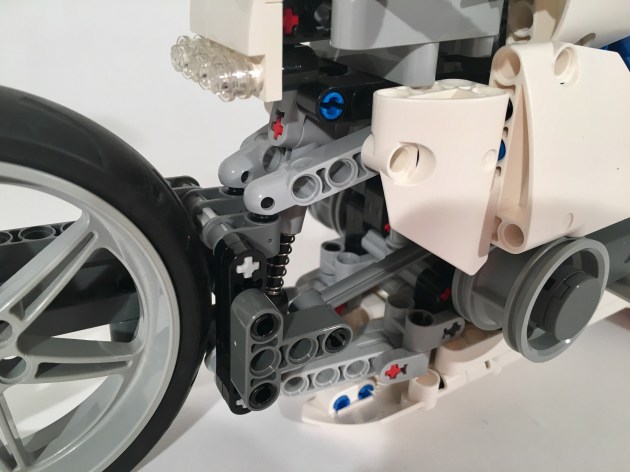
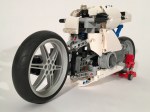
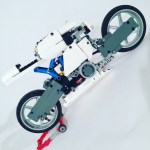
I have been planning to build a motorcycle for some time, and the 2017 Rebrick contest was a good impetus to finally make good on that claim. The contest theme was to build a BMW motorcycle for the future. So while keeping a couple design themes in mind, I could let my imagination go wild. I used Ian McElroy’s excellent Kickboxer concept as a basis. My bike would be dual single sided swingarms, a boxer electric motor, steering, and front and rear suspension, with drive front and rear. Oh, and I had to use the sweet 8420 wheels.
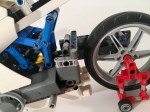
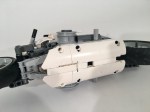
I started with swing arms. The front would be tough as steering with the swing arm would be tricky. I settled on a design with four steering links mounted in a square. This would allow for suspension movement, and the parallelogram linkage would allow for a virtual pivot close to the wheel centerline. I quickly learned adding a drive axle was not worth my time. The liftarm was connected to the handle bars with a series of links and liftarms. Technically, it worked, but it was a little sloppy. The rear swing arm was more simple. After toying with a rear driveline idea, I found it to be clunky looking, so I reverted to a design that mirrored the front. So now both drivelines had been given up.
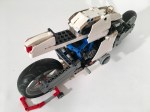
The body was little more straightforward. Keeping with many BMW motorcycles, I wanted to keep the two cylinder Boxer motor. Since my bike would be electric, one motor would drive the front, and one would drive the rear. The battery was mounted low, and under motors and covered by the panels. I added a seat with seat back pod, and a tank. The tank was for small luggage, since the fuel tank was no longer needed due to the battery. I wanted to keep the sides free so you could see the frame, but it looked like it was missing something. I added two panels, which to my eyes seems about right. The small blue subframe under the seat gave a little additional color.
The bike looked good to my eyes, but the functions were lacking or did not function well. The suspension was gummy, and steering was sloppy. The bike lacked a drivetrain, which is the whole reason I build in Technic. It was fun to build a Motorcycle though, so I’ll make another one soon, but I think this time, I’ll use some more common design themes and building techniques.
In what is becoming a little bit of a theme, I submitted another design for a Lego contest. In the long line of Eurobricks.com contests, the Technic Challenge 10 called for a pneumatic build. Challenge accepted!
The contest had very few constraints other than the build had to use Pneumatics. As I have mentioned before, working with pneumatics is not my preference. I don’t like them, so it was good for me to step out of my comfort zone.
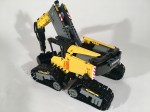
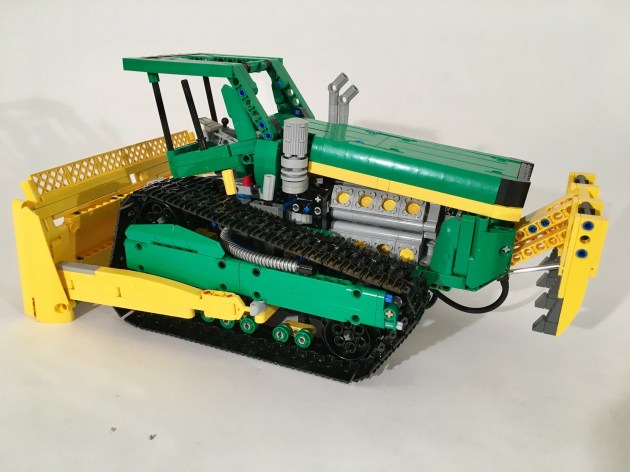
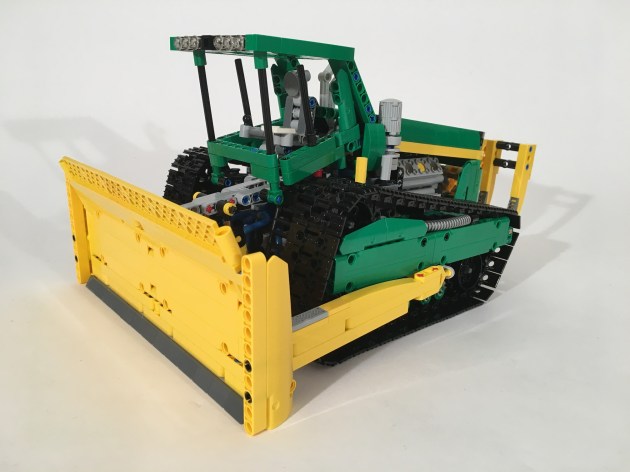
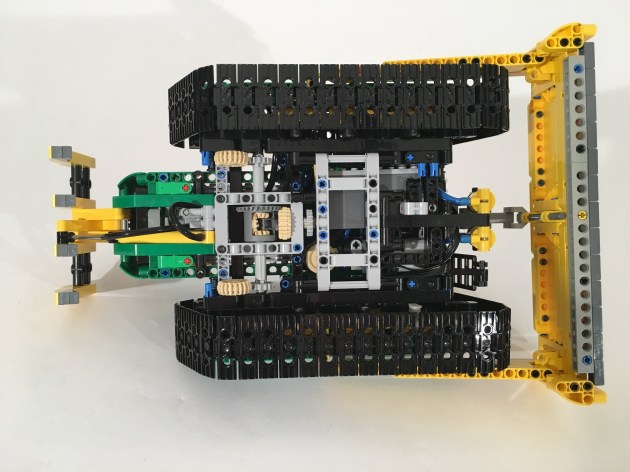
I was feeling especially creative this time, so I thought about a number of concept ideas. Pneumatics do not tend to work smoothly when lifting arms so I decided against an excavator and a loader early. Additionally, I was not willing to invest in additional parts for this project. After a couple of drafts, the idea of this bulldozer was born. Taking some inspiration from some of John Pope’s design, the basic idea was there. The dozer would have different tracks, a three movement blade, a crazy engine, and a forward thinking design.
I started with the tracks. After moving the axle points four wheels countless times, I came up with a design I liked. I made another one, and linked them together. The I worked on the blade. The dozer would have a lift, tilt, and side to side angle adjustment. After playing around with some idea, I found a solution I liked. Two pneumatic rams were on the front to lift the blade on the top. Then two links were connected low on the two sides of the blade, and then on each side of the dozer. These points on the dozer were moved fore and aft by on pneumatic ram each. These side rams would move the blade left or right individually, or together they would tilt the blade up or down. Additionally, it allowed all the tubing to be internal.
I added a small compressor powered by a Power Functions M motor, and the battery box under the cab, and added the 16 cylinder engine (coupled V-8 and Flat 8). The cab was easy to get the shape I wanted, and gave me some space for another pneumatic ram to open the hood. I then decided to add a ripper since I had one pnuematic left. The new 1×11 ram a great addition, but a little more power could have been used for the ripper.
I was pleased with the look the bulldozer. The functions worked well, but on reflection, the were not exciting enough to be competitive for a contest. After two pneumatic builds in a row, I find some of the frustrations I have with them remain, but I am discovering some charms as well. We’ll see what comes next.
I participate in only some of the contests that are available in the online LEGO community. I generally participate if it meets the following criteria: Is the challenge within my competencies? Does the contest align with other responsibilities/projects to which I have already committed? Can I be competitive? Frankly, it is the last question that often stops me. The preceding two questions determine my limitations, and considering how good many other builders are it is not often I participate. With this in mind, I decided to enter the Eurobricks Technic Challenge 9 (nine already!?).
Edit 2016.02.16 : The contest has completed, and this Model came in second! See the results page here, and all the votes here. Thanks to Eurobricks for the contest.
A full gallery with Instructions can be found here.
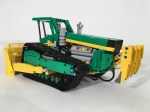
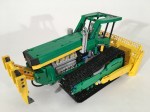
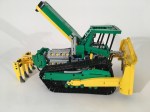
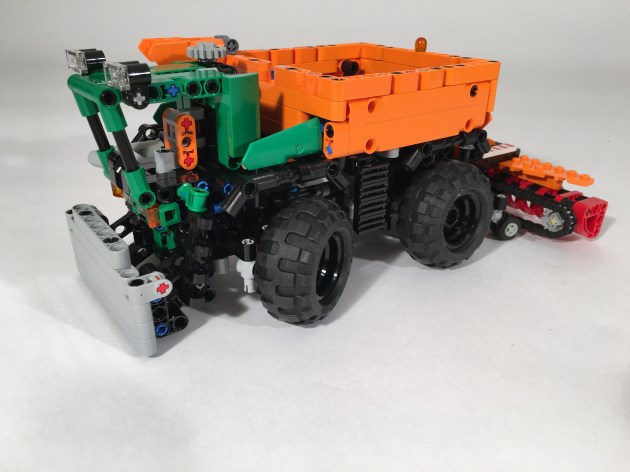
What interested me in this contest was the constraints, and to a lesser extent the topic. the constraints stipulated that both MOCs had to fit within 10,000 cubic studs. I got out my calulators, and started playing with numbers. I was hooked. Additionally, building one MOC is hard, and building two from the same parts seemed very hard. It was something I had never done, and only a few builders can develop a good B or C model. The planning stage would be critical. Both models would have to be planned together right from the beginning. I toyed with a Combine/Tractor, and a Pipelayer/Crane, and even a Airplane/Boat. With each of these designs, I realized I would be using too much space with a long appendage, such as the Combine’s implement, or the Pipelayer’s arm. The cubic studs required something more…cube shaped. I eventually settled on a Snowblower and a Tractor. Both were a little more square and had similar components (wheels, engines, colors, chain links). I knew I would need to build both together, and multiple renditions would be needed. I was ready to start building.
Pretty early, I settled on 17x17x34 studs for the Snowblower. I challenged myself to include steering, a working blower, and a working salt spreader. I build the basics of the blower implement right away, complete with rotation coming from the truck drive. On the rear, I added an implement lift using a worm gear setup, and a quick link to the truck . Next, I worked on the chassis of the truck. I added portal axles, because I could not get the 5L wheel axles to say connected to the differential. This also helped to clear the front PTO from the steering function, which was linked directly to a HOG gear on top of the cabin. The salt spreader needed a take-off gear for the conveyor belt, and the discharge plate would be driven separately from the rear differential. The mechanics were set. I then worked on the cab. I made sure the cab, the blower, and the spreader could be easily removed by removing up to four pins for each. It’s a fun modular function that allow for other attachments.
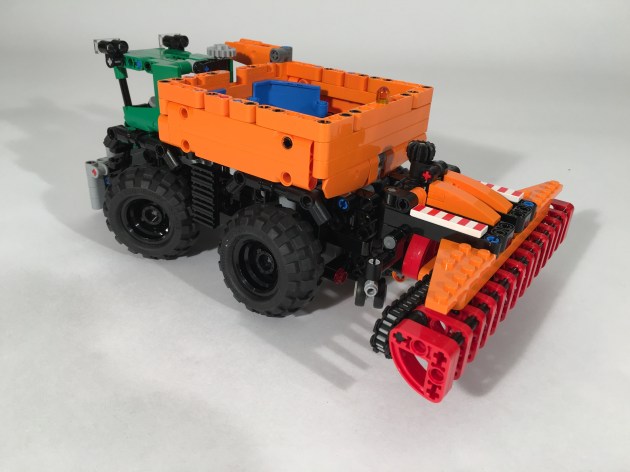
I first made a pile of all the parts used for the truck while it was still built, and made a first draft of the tractor. Based on the parts of the Snowblower, the tractor would have four wheels, a 2 cylinder engine, and something with a whole bunch of 3×3 round, red, liftarms. I first modeled it after a John Deere 7R series, but realized this would leave me with too many left over parts. I then tried modeling it after a Claas Saddletrac. This seemed to be a better fit. I then took apart the Snowblower, making instructions as I went. I then used these parts to make the official model B. Over the course of a week, I made many revisions.
Both models worked well, as none of the feature are too complicated. I was pleased with the A model as everything functioned as it should, and it looked great. The tractor was simple, and it’s simple functions worked well. I was pleased with how it all turned out. It was great working with a limited number of parts for the B model, but I would prefer to clean up the look of the tractor a little better. This was a great little contest. I loved the restriction of the cubit studs, and I loved having to make a MOC with a defined group of parts. Now let’s see how the voting shakes out.
I enjoy participating in LEGO contests, but I cannot join all of them. Sometimes the timing, my build interest, and the available parts all line up in a way that I can submit an entry. I was able to submit something for the LEGO Technic Mercedes-Benz Future Truck Competition hosted at Rebrick.com because everything fell into place. I hope you enjoy the submission.
The full gallery may be seen here (flickr) or here (brickshelf).
While I would love to see us progress to flying and fully autonomous vehicles, a complete technological and transportational paradigm shift needs more than 30 years; see where we were in 1985. I envision transportation in 2045 will be affected by a couple of features:
Cities will be more dense
Active transportation will occupy a greater share of road users
Electric charging options will be more available and more diverse
Vehicles will still have drivers, but the drivers will be heavily assisted with technology
Fossil fuels will still be used, but significantly reduced and not limited solely to petroleum
Cargo will not change, but storage will
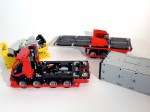
Various loads to apply to the Athane via the SmartStack System.
With this is mind the 2045 Mercedes-Benz Athane has been designed to best fit within this context. While taking this context into account, the Athane prioritizes three values as most important: Safety, Sustainability, and Versatility.
Placement of the large methane tanks. ThermoCommLink on right rear bumper.
Here is the Press Release-
May 22, 2045, for immediate release
The 2045 Mercedes Benz Athane prioritizes safety, sustainability, and versatility. The 2045 Athane is the most advanced and cost effective truck in our 150 years of truck building experience.
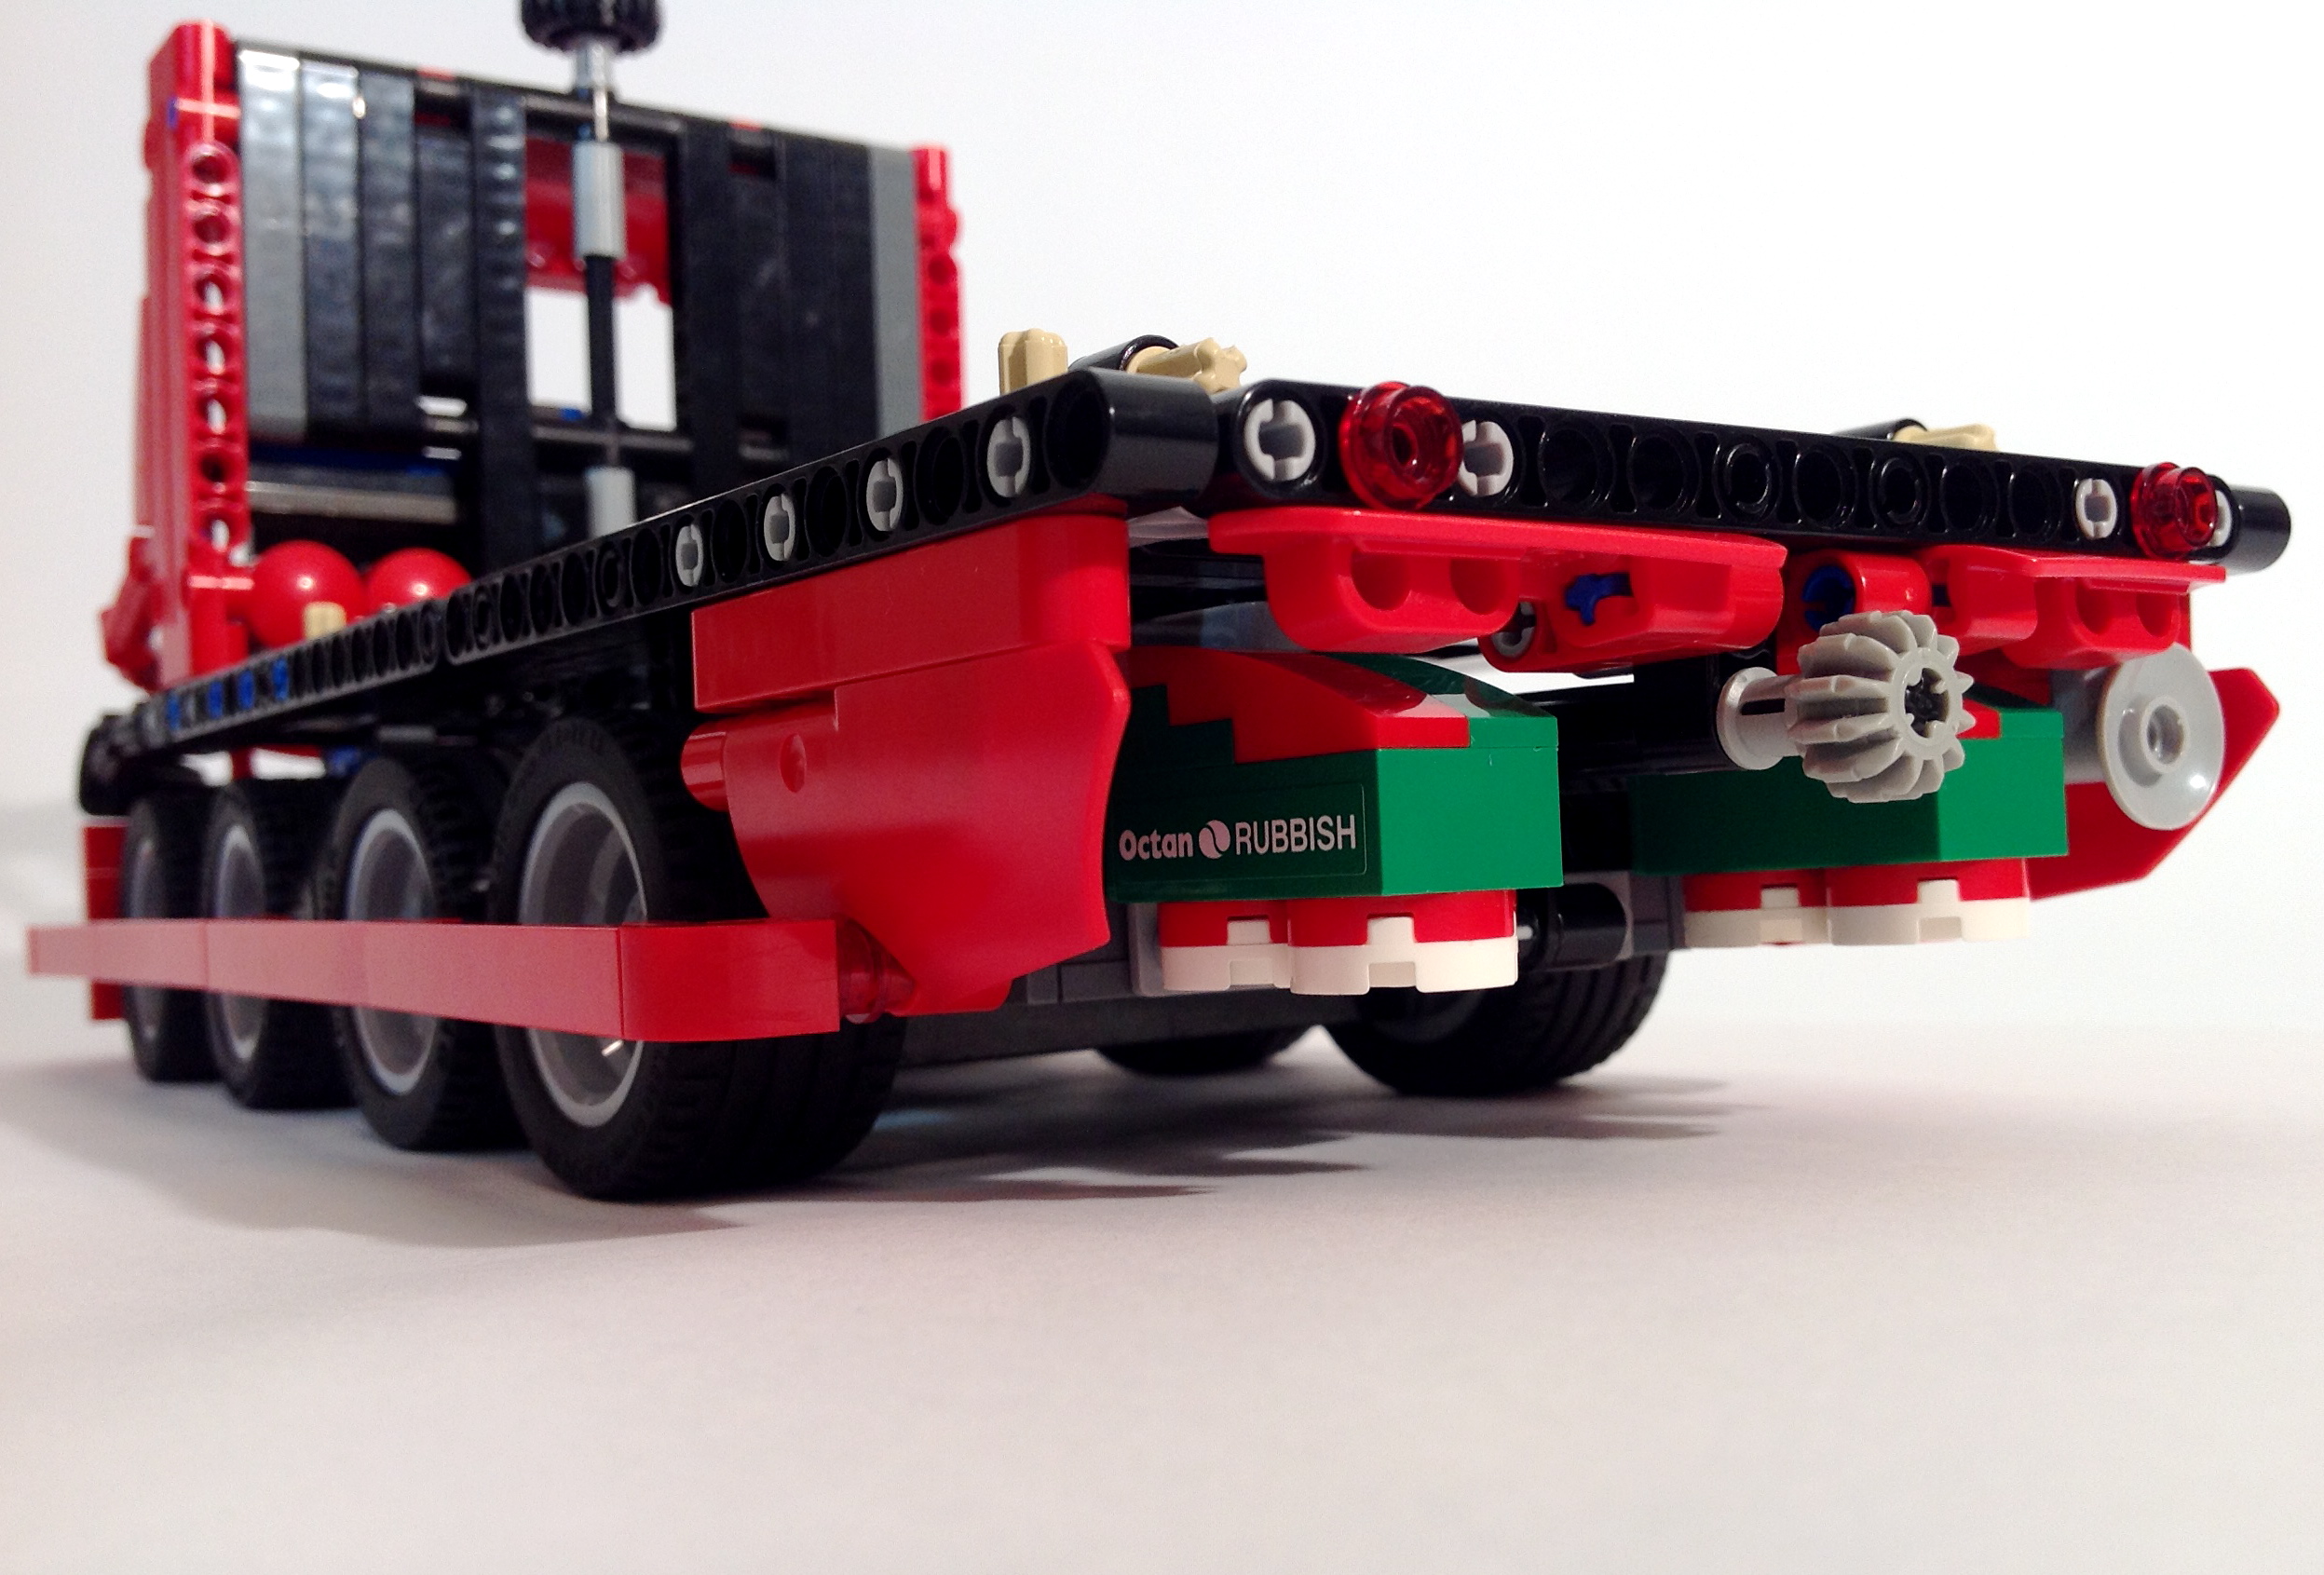
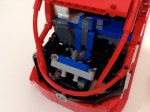
As cities become denser and multiple transportation modes are becoming more prevalent, road safety for all road users must be paramount. The Athane’s ThemoCommLink (TCL), located on the right front and right rear bumpers, allow motorized vehicles to communicate to one another. The TCL also detects the heat signature of pedestrians and cyclists. Identification and communication with other users, keeps all road users safer. The driver is seated in the center and forward in the cab to increase vision. Retention of a human driver allows for relational interaction at the job site, and helps the technology make good decisions about varying road situations. The TCL Technology assists the driver so fewer errors are made. The front bumper shaping and full length wheel guards lowers the severity of crashes with non-motorized users should they occur. The Athane uses eight steerable wheels to improve weight distribution and increase city maneuverability. While many manufactures are switching to floatation and hover type drivetrains, this setup allows for unmatched braking control, and removes disruptive air currents to those walking and cycling close to the moving truck.
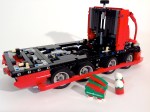
The Athane’s Methane-Hybrid driveline continues Mercedes Benz’s prioritization of decreasing fossil fuel use. The Athane uses electric propulsion using energy stored in the batteries under the cab and bed. Battery charging is done by braking and by a small methane powered combustion engine behind the cab. Additionally, the Athane can be ordered with an induction charger under the cab to work with newly developed induction charging roadways being installed in many municipalities. Methane gas is clean burning, and a significant byproduct of the waste and recycling process currently in place with Octan Rubbish. A partnership with Octan Energy and Mercedes Benz has developed a standard way to reap, store, transport, and fuel the Athane’s regeneration engine using methane gas. Removable methane tanks are house behind the rear wheels, and in smaller tanks in the cab.
Today’s logistics companies are searching for ways to improve versatility and lower cost. The Athane’s SmartStack systems allows for interchangeable bodies, cargos, and applications all with one common truck. The SmartStack system makes it easy to change the load in just minutes. The connection fits the international container standard. Many body work designers are applying this standard as well. In one afternoon, you can ship a container, deliver a load of concrete, and pull a fifth-wheel with the standard hitch.
Welcome to the future. The 2045 Mercedes Benz Athane keeps all road users safer, decreases our harm on the planet, and supports all work tasks needed.
Features:
8 wheel steering
Sleeping bed
Aerodynamic cabin
In-cab Storage System
ThemoCommLink, front and rear
SmartStack System
Fifth-Wheel Hitch
Wheel Guards
Large/Low Bumper
Methane Tanks
Hybrid Motor
Induction Charger
Batteries
Passenger Jump Seat
Front and Rear Lighting
Video Mirrors on Each Side of the Steering Wheel
Visibility Focused Driver Placement
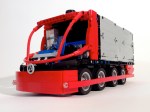
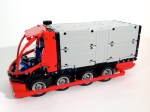
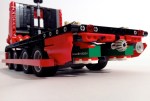
2045 Mercedes Benz Athane
MB Athane
Placement of the large methane tanks. ThermoCommLink on right rear bumper.
The various Methane Tanks which power the regeneration engine.
Driver’s seat, steering wheel, video mirrors, bed, and storage. ThemoCommLink is on the left above the bumper.
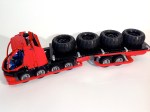
Various loads to apply to the Athane via the SmartStack System
Cement installation on the SmartStack System
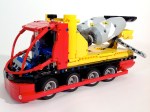
Mercedes Benz Athane with 51 stud trailer
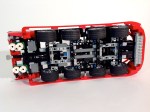
Bottom of the Athane. Note the (L to R) methane tanks, batteries, eight steering axles, and induction charger.