Coast Guard Helicopter


I enjoy helicopters very much, so as it has been some time since the MD600, it was about time to make another one.

The full gallery can be found on Flickr and Brickshelf.

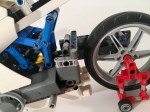
After my last helicopter, I wanted to build one that was more basic. This one would simple, small, colorful, and would make use of the excellent blades from set 9396. I wanted to do something like the Sea King, but with a Fenestron tail. I used a HH-52 as a basis for the scale. I built a mock-up of the scale, and started making the gearbox for the helicopter. The main rotor could be operated from a gear on the left of the aircraft. Two changeovers located next to the landing gear pods could be engaged to drive the land gear (up or down, on left) and the winch (up or down, on right). The main rotor was connected to the Fenstron fan at the rear. Both the landing gear and the winch are driven by worm gears, so they would stay locked when the changeovers were in neutral.

The gearbox is mounted in the bottom of the helicopter directly under the rotor. The landing gear mechanism moves forward with the pilot and co-pilot seats directly on top (I love those new panels). The winch gear moves aft, and drives a simple string spool. The compact driveline keeps enough space for a full cabin. There is enough room to add a battery box, and a M motor to power the rotor.

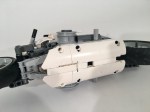
The body work came together quickly with the exception of the rear doors. I wanted to add two sliding doors with windows, and based on the color scheme of the helicopter, they had a to be white. After six drafts, I finally came up with a solution that was doable. They are not perfect, but all the other designs had windows that were comically small, or too low in on the body. Unfortunate, the design calls for six white rare parts. The rest of the bodywork turned out well. The nose, while a little clunky, looked how I wanted. The top area looked good with the three engine exhausts, and the six bladed rotor, while overdone, fit perfectly. Oh, and with clever pin placement, you can fold the rotor back towards the tail. The tail looked sharp with the ducted fan. The vertical stabilizer looked empty, but that’s a problem for all LEGO Technic aircraft with the exception of 42040 (maybe).


The helicopter worked great, though a clutch for the gearbox would have been nice. I was pleased with the bodywork of the helicopter, and the colors worked well; maybe grey and orange would be great on a rebuild. I would have lived to have a cleaner design for the wheel pods, but it worked well enough. It was a good swooshable design, as I found playing with the helicopter extensively. Now I need to make a scale Coast Guard ship on which the helicopter can land. Maybe next year.

Happy Building

Advertisement

Forest Fire Truck


Everyone once and a while I see a design I like so much, I copy it. So thanks to Horcik Designs on the fun little Fire Truck that I copied. Thanks for the inspiration.

The full gallery may be found on Flickr and Brickshelf.

When I found Horcik’s fun little Fire Truck, I was immediately enamored with the look of the truck. After deciding I was going to make it, I started looking for additional features to add to the excellent design. After finding some great ideas of a Renault version (2), I decided to get to work. The truck started with a 4×4 driveline and an I-4 engine. I used a simple live axle setup with 9l steering links to keep the sway movement in check, and both axles used a Panhard link. The steering was actuated with another 9l steering link, rather than the more common rack and pinion setup. This allowed for a lower engine mount, and something a little different in the design. The steering can be moved by both lights on the roof of the cab.

Which brings us to the cab. I wanted to use the face of Horcik’s truck, but wanted to add some changes. I added two doors to make the cab a little longer, and added four of the new panel parts that work great as seats. Then I made sure the cab could be tilted simply, and connected the two roof lights to the steering. You can see the engine and the steering when the cab is tilted.

Then off to the body. It turned out to be more simple than I had planned. I had some ideas for a hose reel, a roof mounted water gun, and various cabinets with tools inside. Every idea I tried was a little ugly, or boring. So, I closed up the design with a couple of water tanks inside the body of panels. It’s not fancy, but the design turned out clean, which is what attracted me to the project in the first place.

The design worked fine, though the front axle could be a little more robust. It was not a complicated build, but it was a fun one. Don’t worry, there will be complicated builds coming soon.

Happy Building.

BMW R nine E


As a LEGO Technic builder, form generally follows function. Sure, I make most of my MOCs aesthetically pleasing, but the joy and the priority of my builds, is what they can do. But every once and while, I flip this. I set out to make a motorcycle that looked a certain way, and adding in as many features as I could.

The full gallery can be found on Flickr and Brickshelf.

I have been planning to build a motorcycle for some time, and the 2017 Rebrick contest was a good impetus to finally make good on that claim. The contest theme was to build a BMW motorcycle for the future. So while keeping a couple design themes in mind, I could let my imagination go wild. I used Ian McElroy’s excellent Kickboxer concept as a basis. My bike would be dual single sided swingarms, a boxer electric motor, steering, and front and rear suspension, with drive front and rear. Oh, and I had to use the sweet 8420 wheels.

I started with swing arms. The front would be tough as steering with the swing arm would be tricky. I settled on a design with four steering links mounted in a square. This would allow for suspension movement, and the parallelogram linkage would allow for a virtual pivot close to the wheel centerline. I quickly learned adding a drive axle was not worth my time. The liftarm was connected to the handle bars with a series of links and liftarms. Technically, it worked, but it was a little sloppy. The rear swing arm was more simple. After toying with a rear driveline idea, I found it to be clunky looking, so I reverted to a design that mirrored the front. So now both drivelines had been given up.

The body was little more straightforward. Keeping with many BMW motorcycles, I wanted to keep the two cylinder Boxer motor. Since my bike would be electric, one motor would drive the front, and one would drive the rear. The battery was mounted low, and under motors and covered by the panels. I added a seat with seat back pod, and a tank. The tank was for small luggage, since the fuel tank was no longer needed due to the battery. I wanted to keep the sides free so you could see the frame, but it looked like it was missing something. I added two panels, which to my eyes seems about right. The small blue subframe under the seat gave a little additional color.

The bike looked good to my eyes, but the functions were lacking or did not function well. The suspension was gummy, and steering was sloppy. The bike lacked a drivetrain, which is the whole reason I build in Technic. It was fun to build a Motorcycle though, so I’ll make another one soon, but I think this time, I’ll use some more common design themes and building techniques.

Until then, happy building.