CAT 573C Feller
June 10, 2013 2 Comments
LEGO takes up space. We all know this, and yet we still seem to try to cram as many working functions into a MOC as we can. Sometimes it works out well. Sometimes we have to scrap a few functions. Other times, the functions are so dense you really cannot believe you got it to work. This is the story of my wheeled feller.
The full Gallery may be found here. Instructions may be purchased for $5 USD. 

I have been thinking about making a feller for about two years now. It is a project I have never seen done before, with the exception of two tracked fellers (OK, and my other one). Over this time, I have been planning, acquiring parts, and making plans, and over the last four months I have been building. Nothing I have made has been so complicated or so dense. There is no space left.
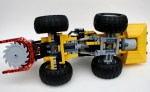
As I always do, I stared with the dimensions of the vehicle. The schematics for the CAT 573C were easily available, so I stared with the chassis. I knew space would be an issues, so the driveline had to be simple and compact. The Power Functions XL motor would be geared down 3:1 and mounted just behind the rear axle. A drive shaft would move through the steering pivot to the front axle. The rear axle would have simple pendular suspension. The steering would be completed by two linear actuators placed on either side of the pivot with a PF M motor on top. Simple enough.
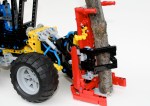
From here, things got complicated quickly. The MOC would have four remaining functions. The feller saw, the grapple arms, the feller tilt, and the feller lift. Since trees are rather heavy, fellers are designed with as many of the system mechanics behind the rear axle. As such, all of the functions I would add would need to be in the rear, as the front would not have any space. I quickly learned this would not work.
Eventually, I found what would fit. The IR Receivers would make up the rear bumper, and the battery box would be directly over them, off to the left. Two PF Ms would be on the right and would drive two mini Linear Actuators. These would move two pneumatic valves. These pneumatics would move the lift function and the grapple arms function. An air tank would supply the pressure from a pneumatic pump placed on the driveline. Another PF M would be placed over the front axle to give the feller head the tilt functions (it should be noted, 7 designs, and five weeks were spent on this feature alone). The final PF M was in the feller head, and would drive the feller saw.
After packing, repacking, and packing again, all the features we set. Then all the cabling and hosing were placed. No easy task, as I was running out of space, and 25 or so hoses, and 10 cables take up a lot of room. I added some comfort features to the cable, including a (half) chair and a roll cage. And so Mr. Technic could get in, a little step. Then a lot of paneling for the rear, including some access doors on the rear, and the model was done. Here it is in action.
As you can see in the video, the MOC worked well, but some of the functions did not work as clean as I would have liked. The drive and steering were fine, with an easy drivability. There was a lot of mass in the back, so sometimes the torque from the drive motor would cause the back to tip. The saw worked well enough, and for the most part so did the tilt, but the pneumatic lift struggled. It was a little overloaded because the saw unit was too heavy. The grapple arm worked well, but for both pneumatic rams were hard to control. As always with LEGO pneumatics, they too often are off or on.
Until the next MOC, happy building.


![]()


