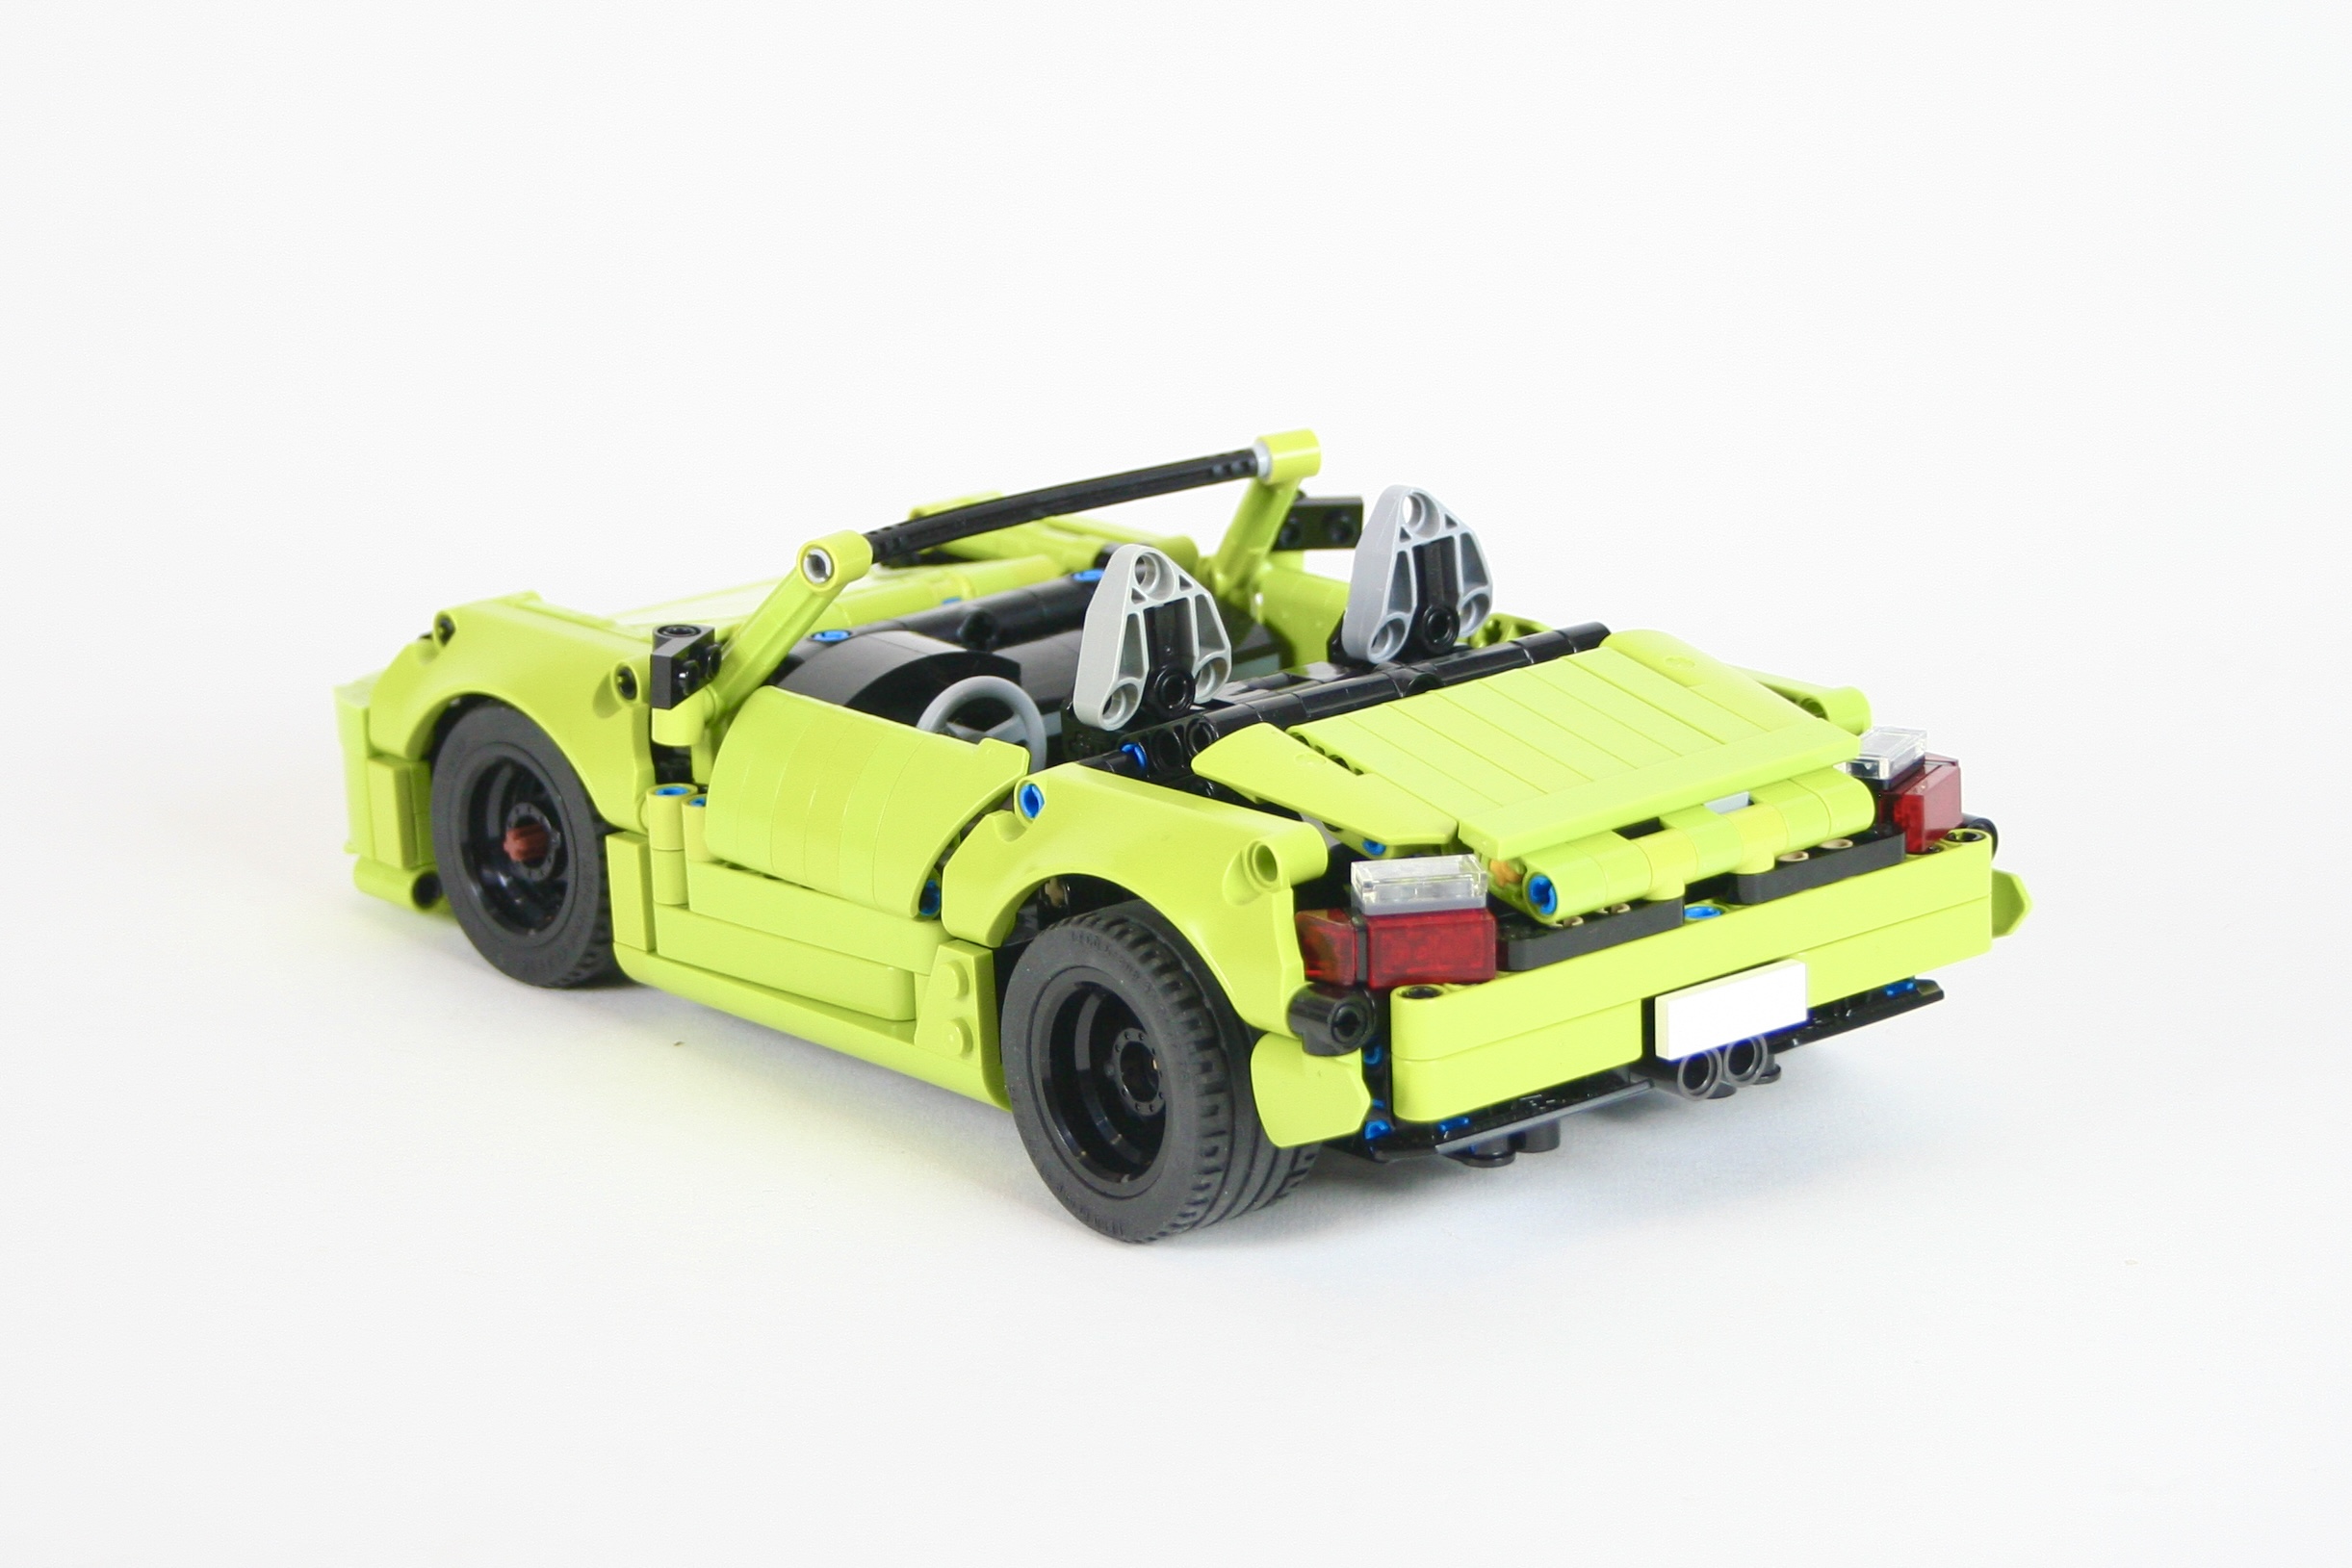
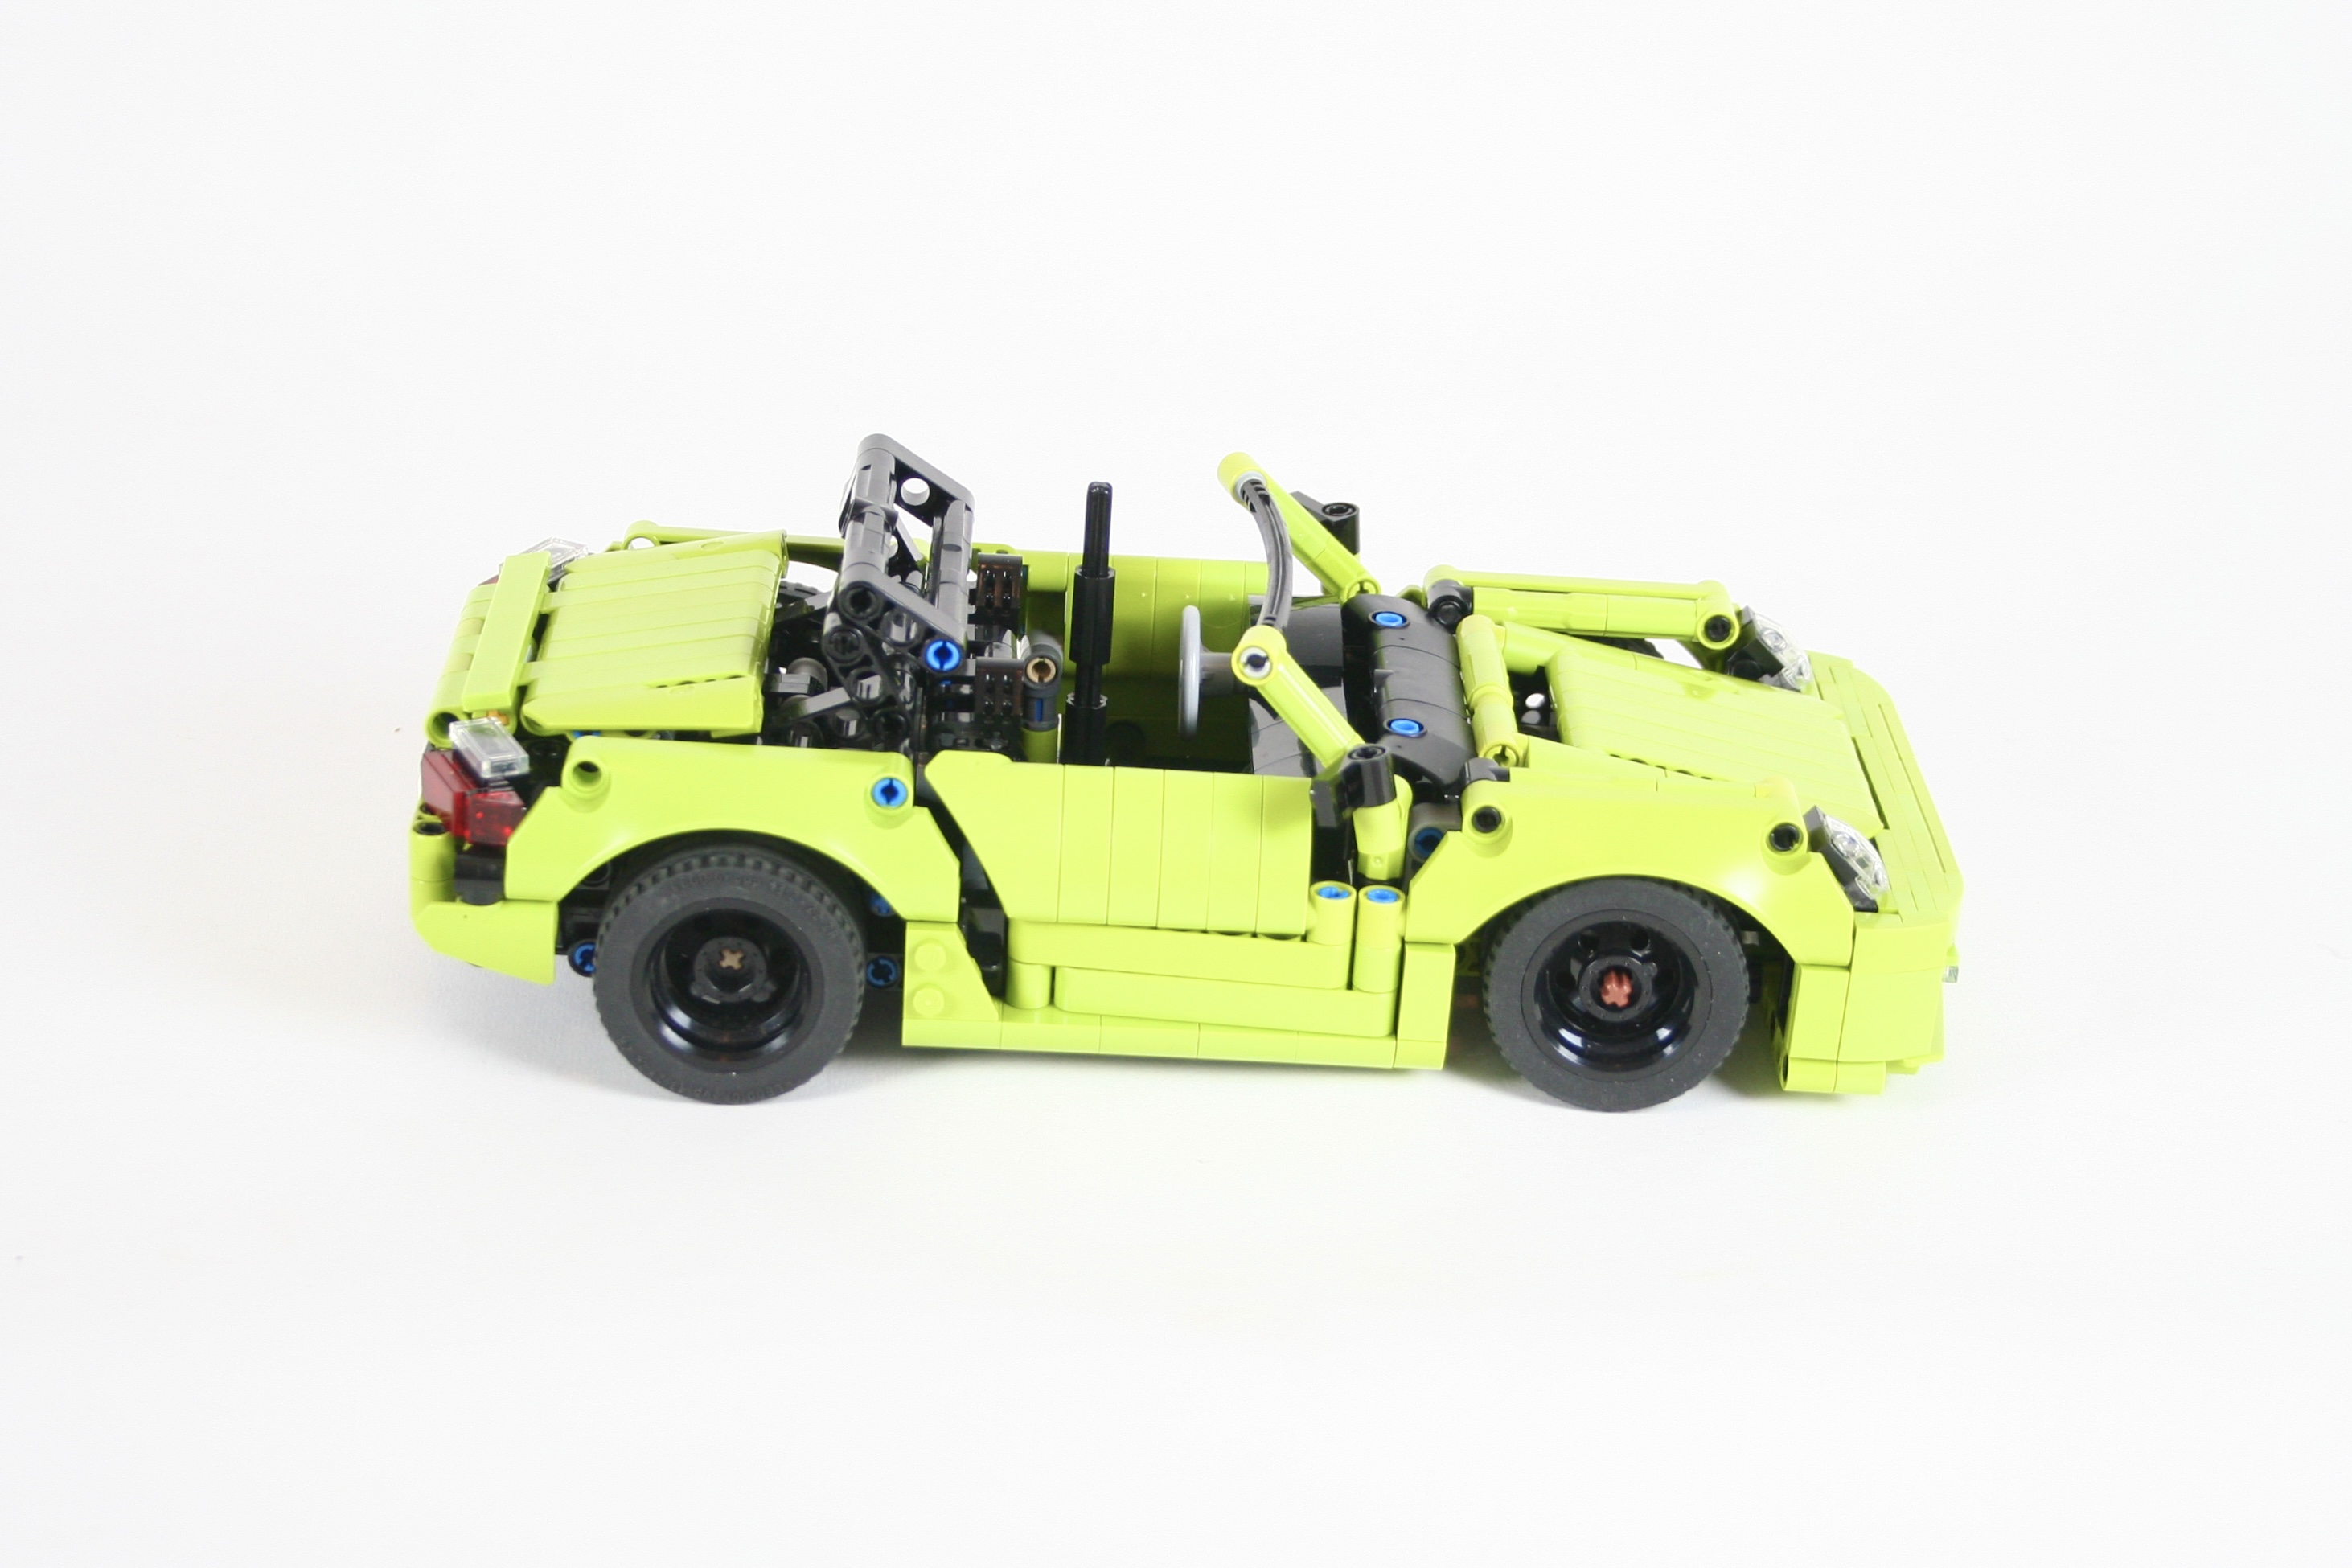
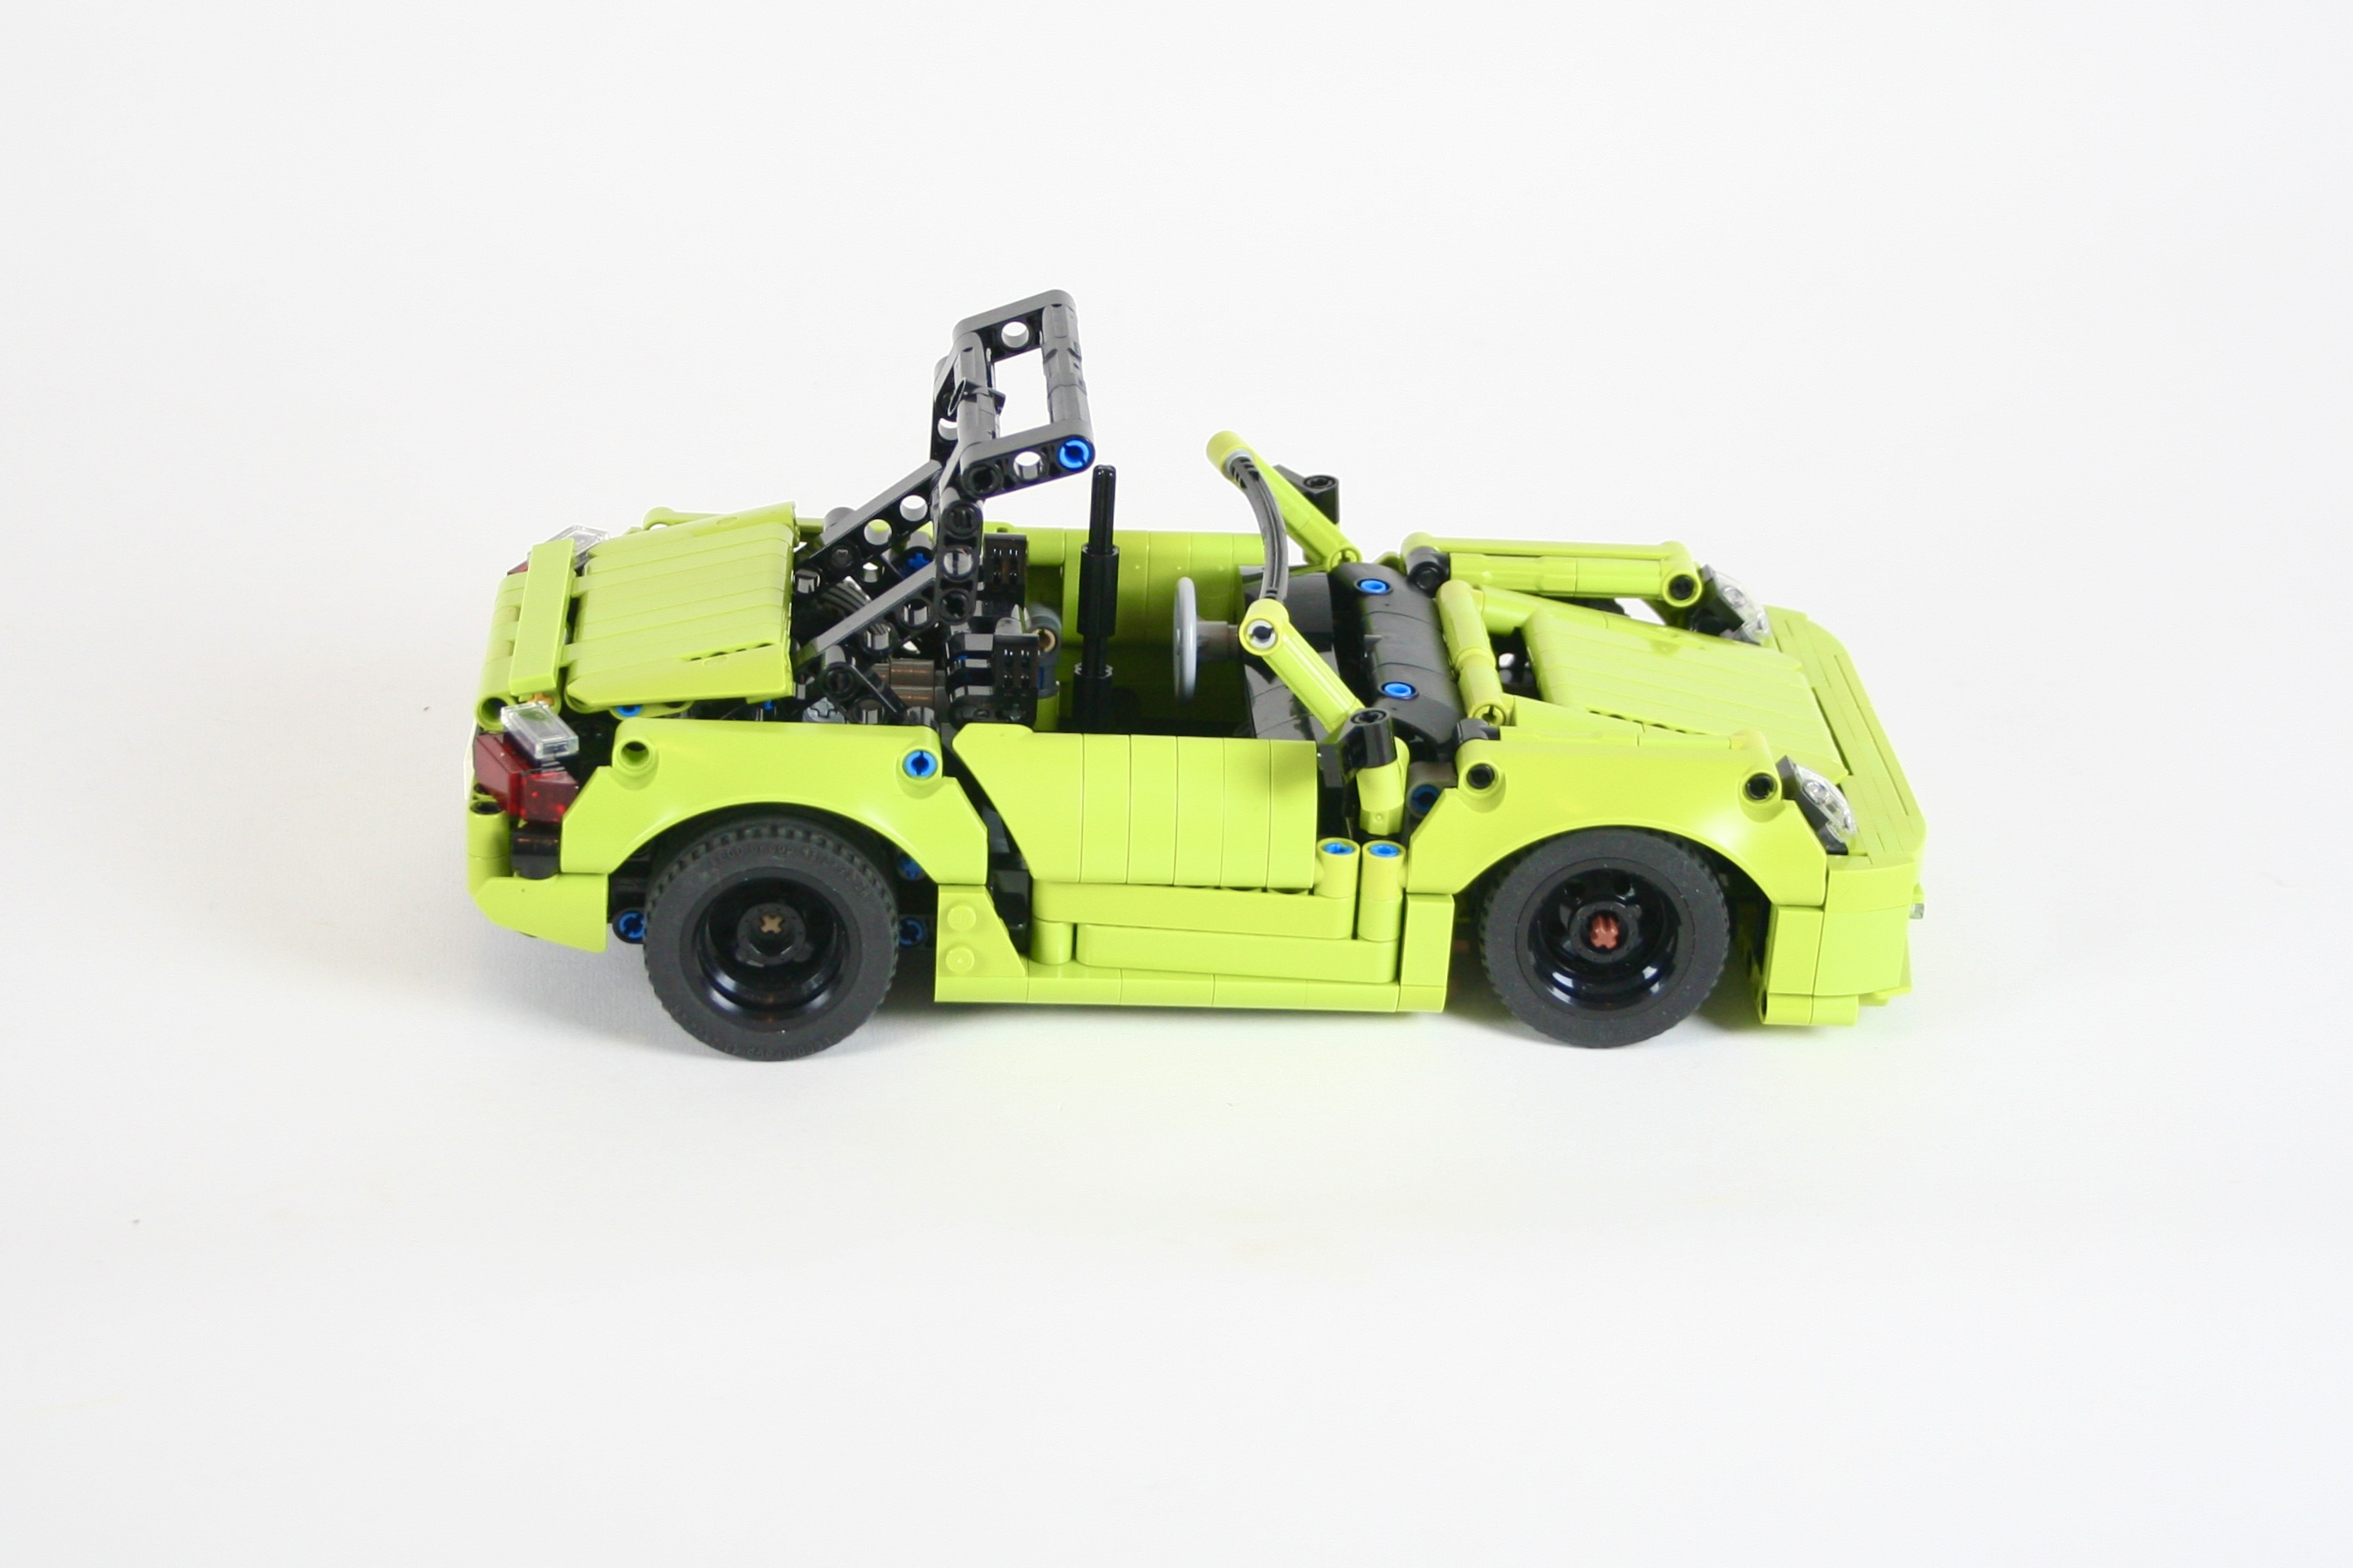
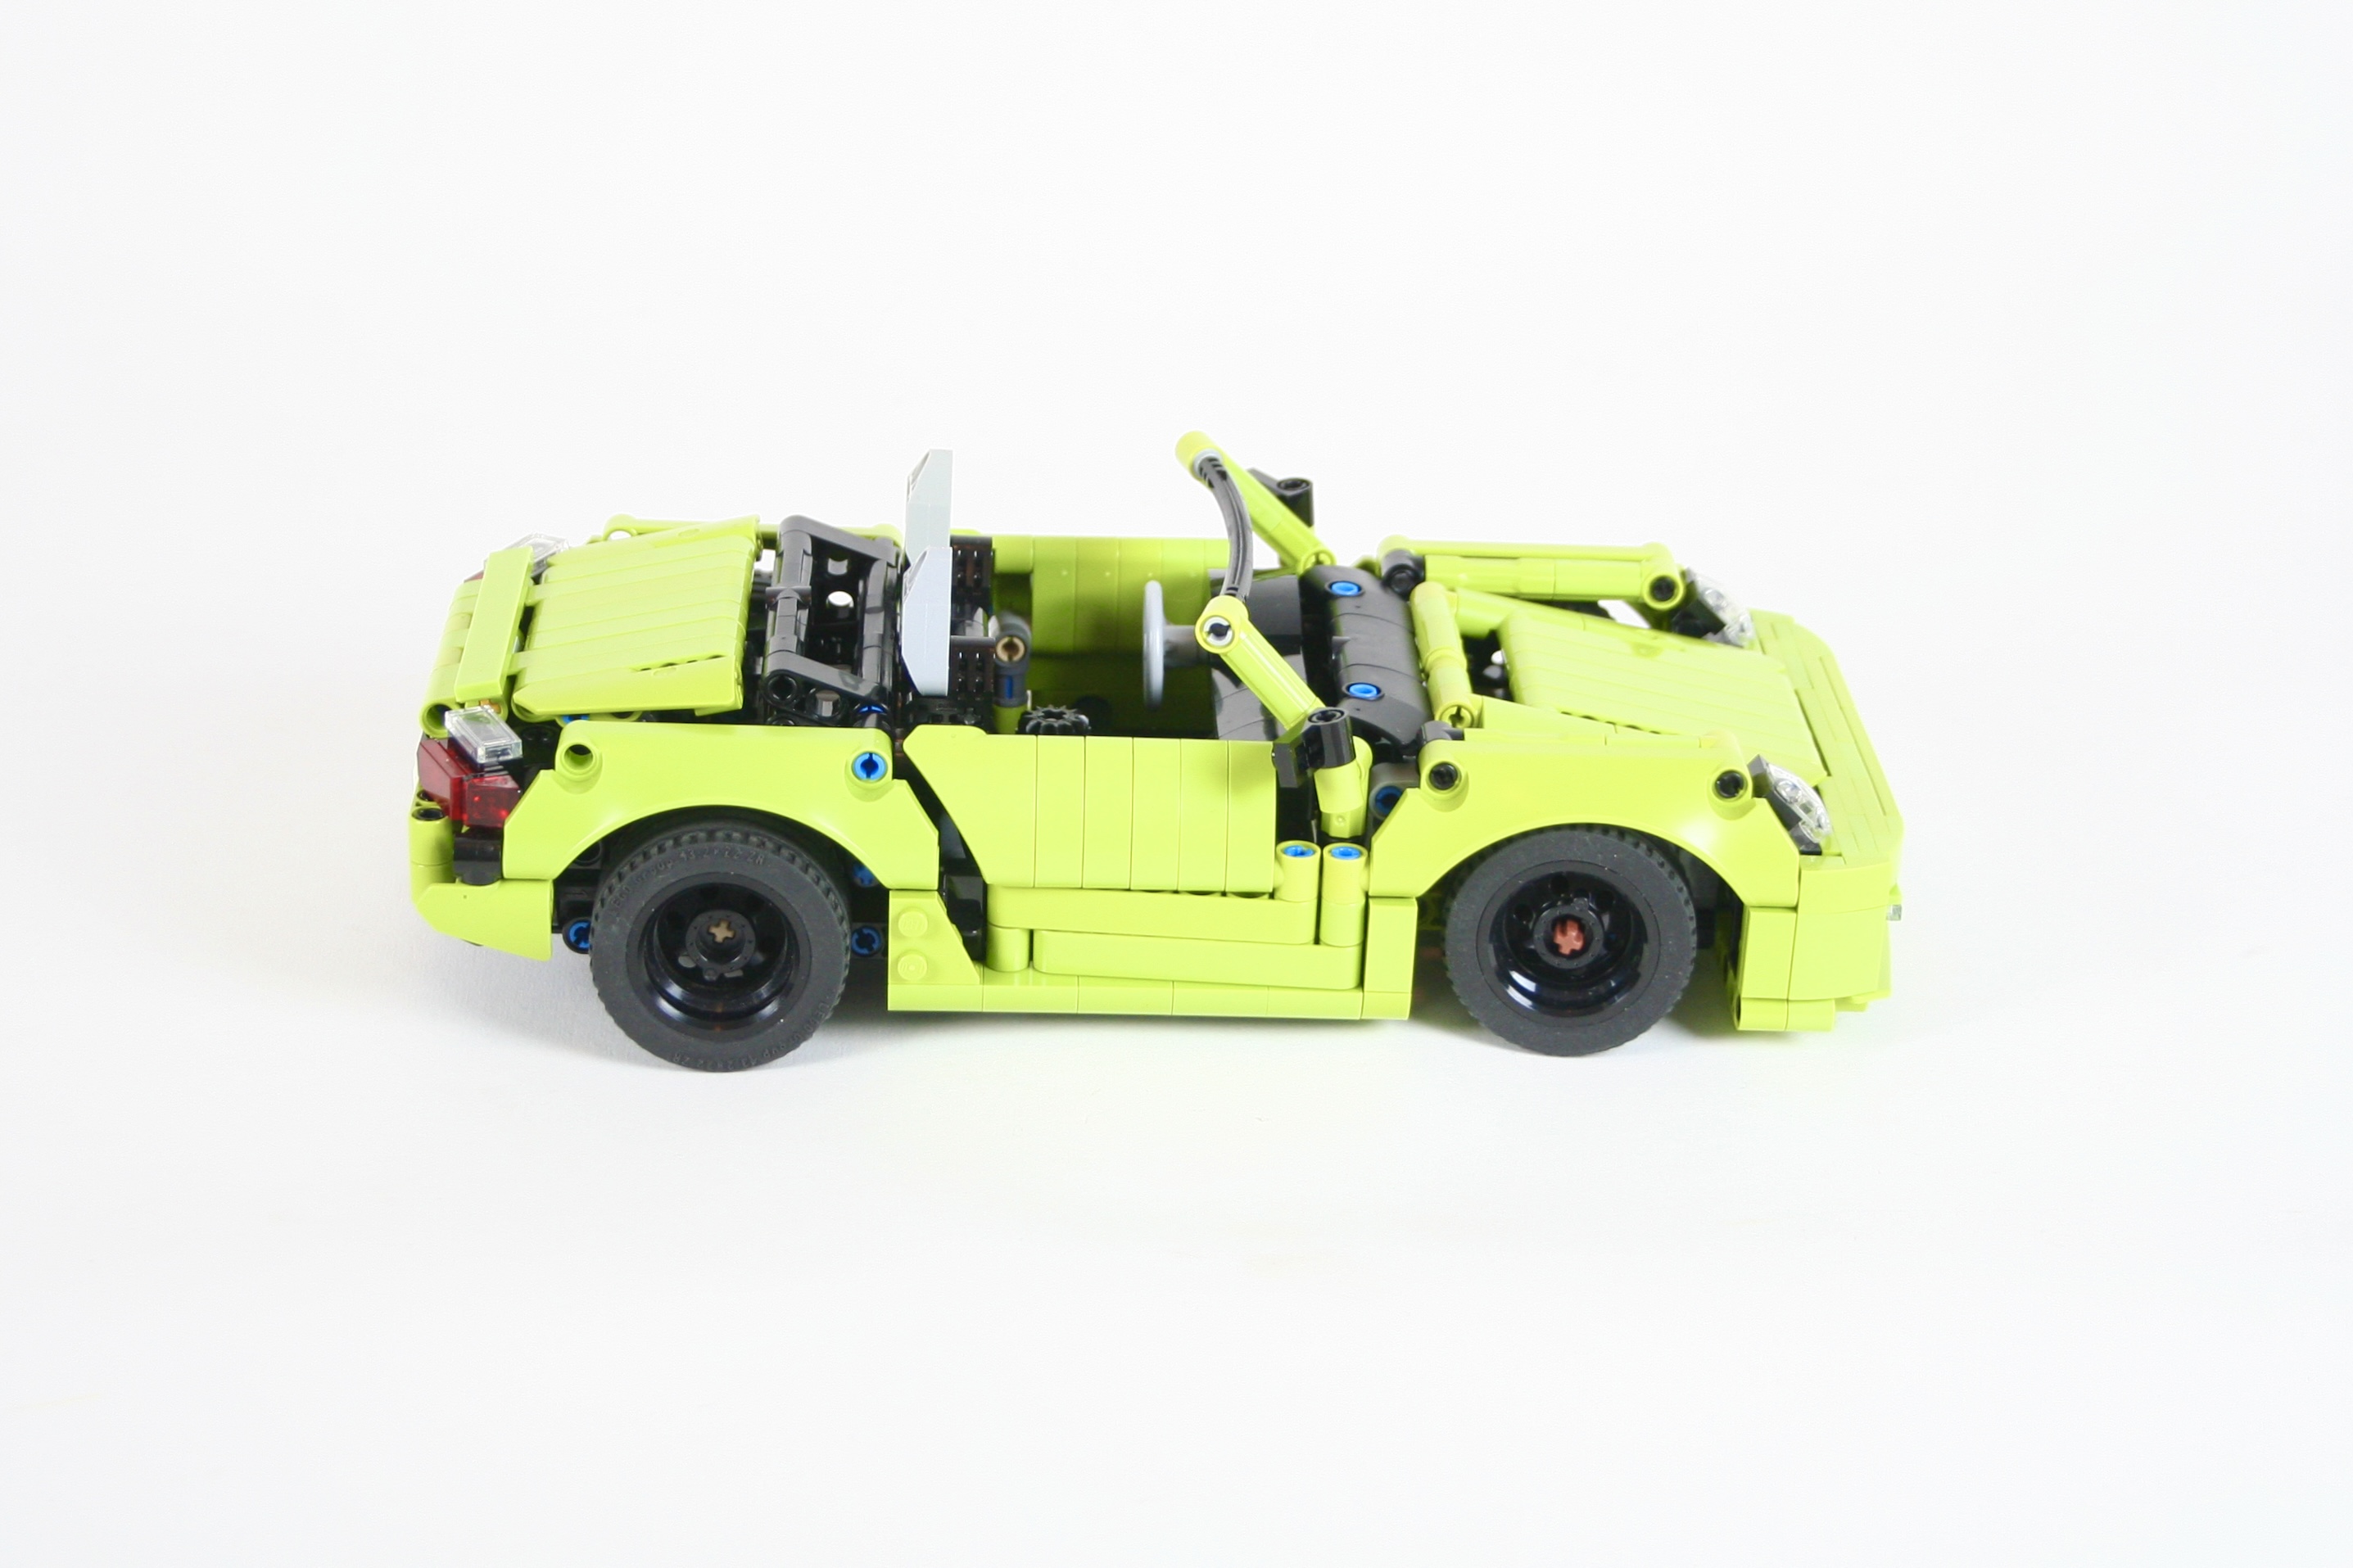
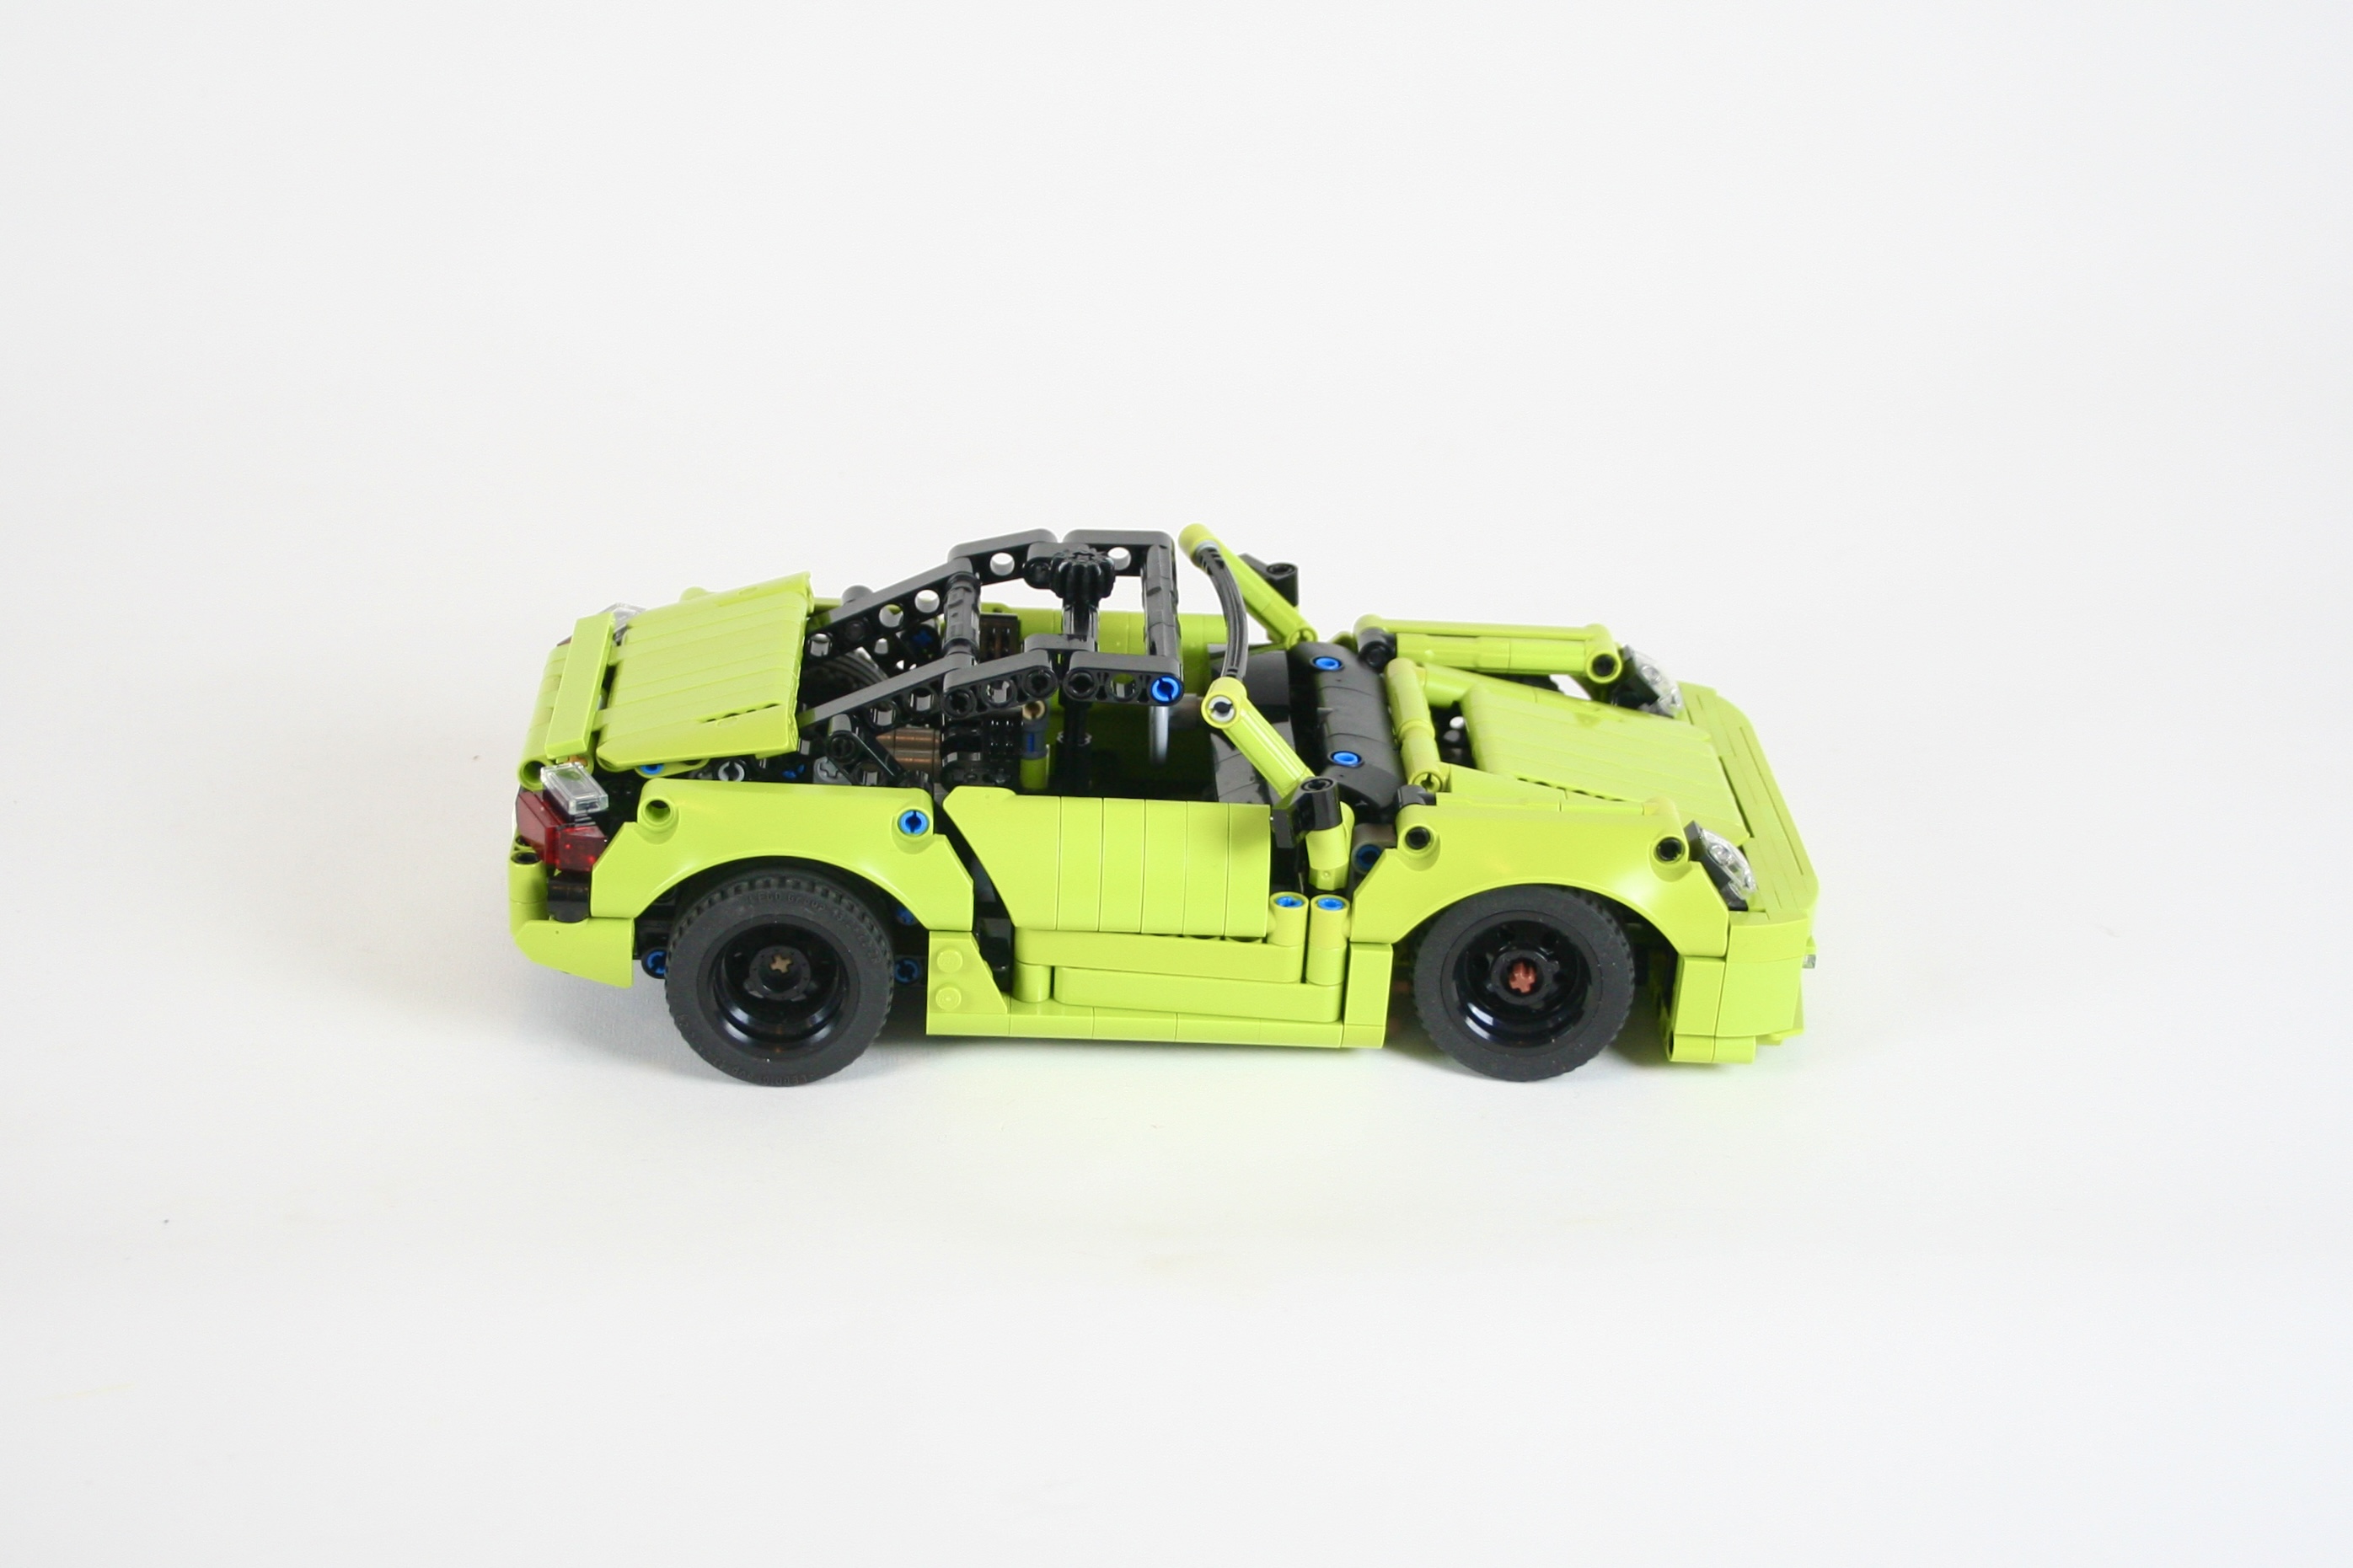
Like many car enthusiasts, I am love any Porsche. I have made my fair share of 911s, which is right of passage for LEGO car designers. But at some point, I looked around and did not find any Boxsters. So it was time to design one.
I had been playing around with some boxer engines for years, and I was finally able to come up with a design that I liked for this scale. The little axle based engine that has worked well for many smaller Technic builds is a great, and versatile design. It’s a little tall for small scale builds, but generally works well and is great to watch in these smaller cars. But it works because of gravity, so a flat engine design does not work. I tried ways to connect the axle pistons, but then the engine got so wide it would not work in this size car. Finally, after a number of drafts, and way too many months, a little design started to take shape. Built around a cam based crankshaft, pistons are mounted on a Technic connector and swing in and out to represent the engine. It is not a true flat engine, but it works smoothly, looks the part, and fits these small cars well.
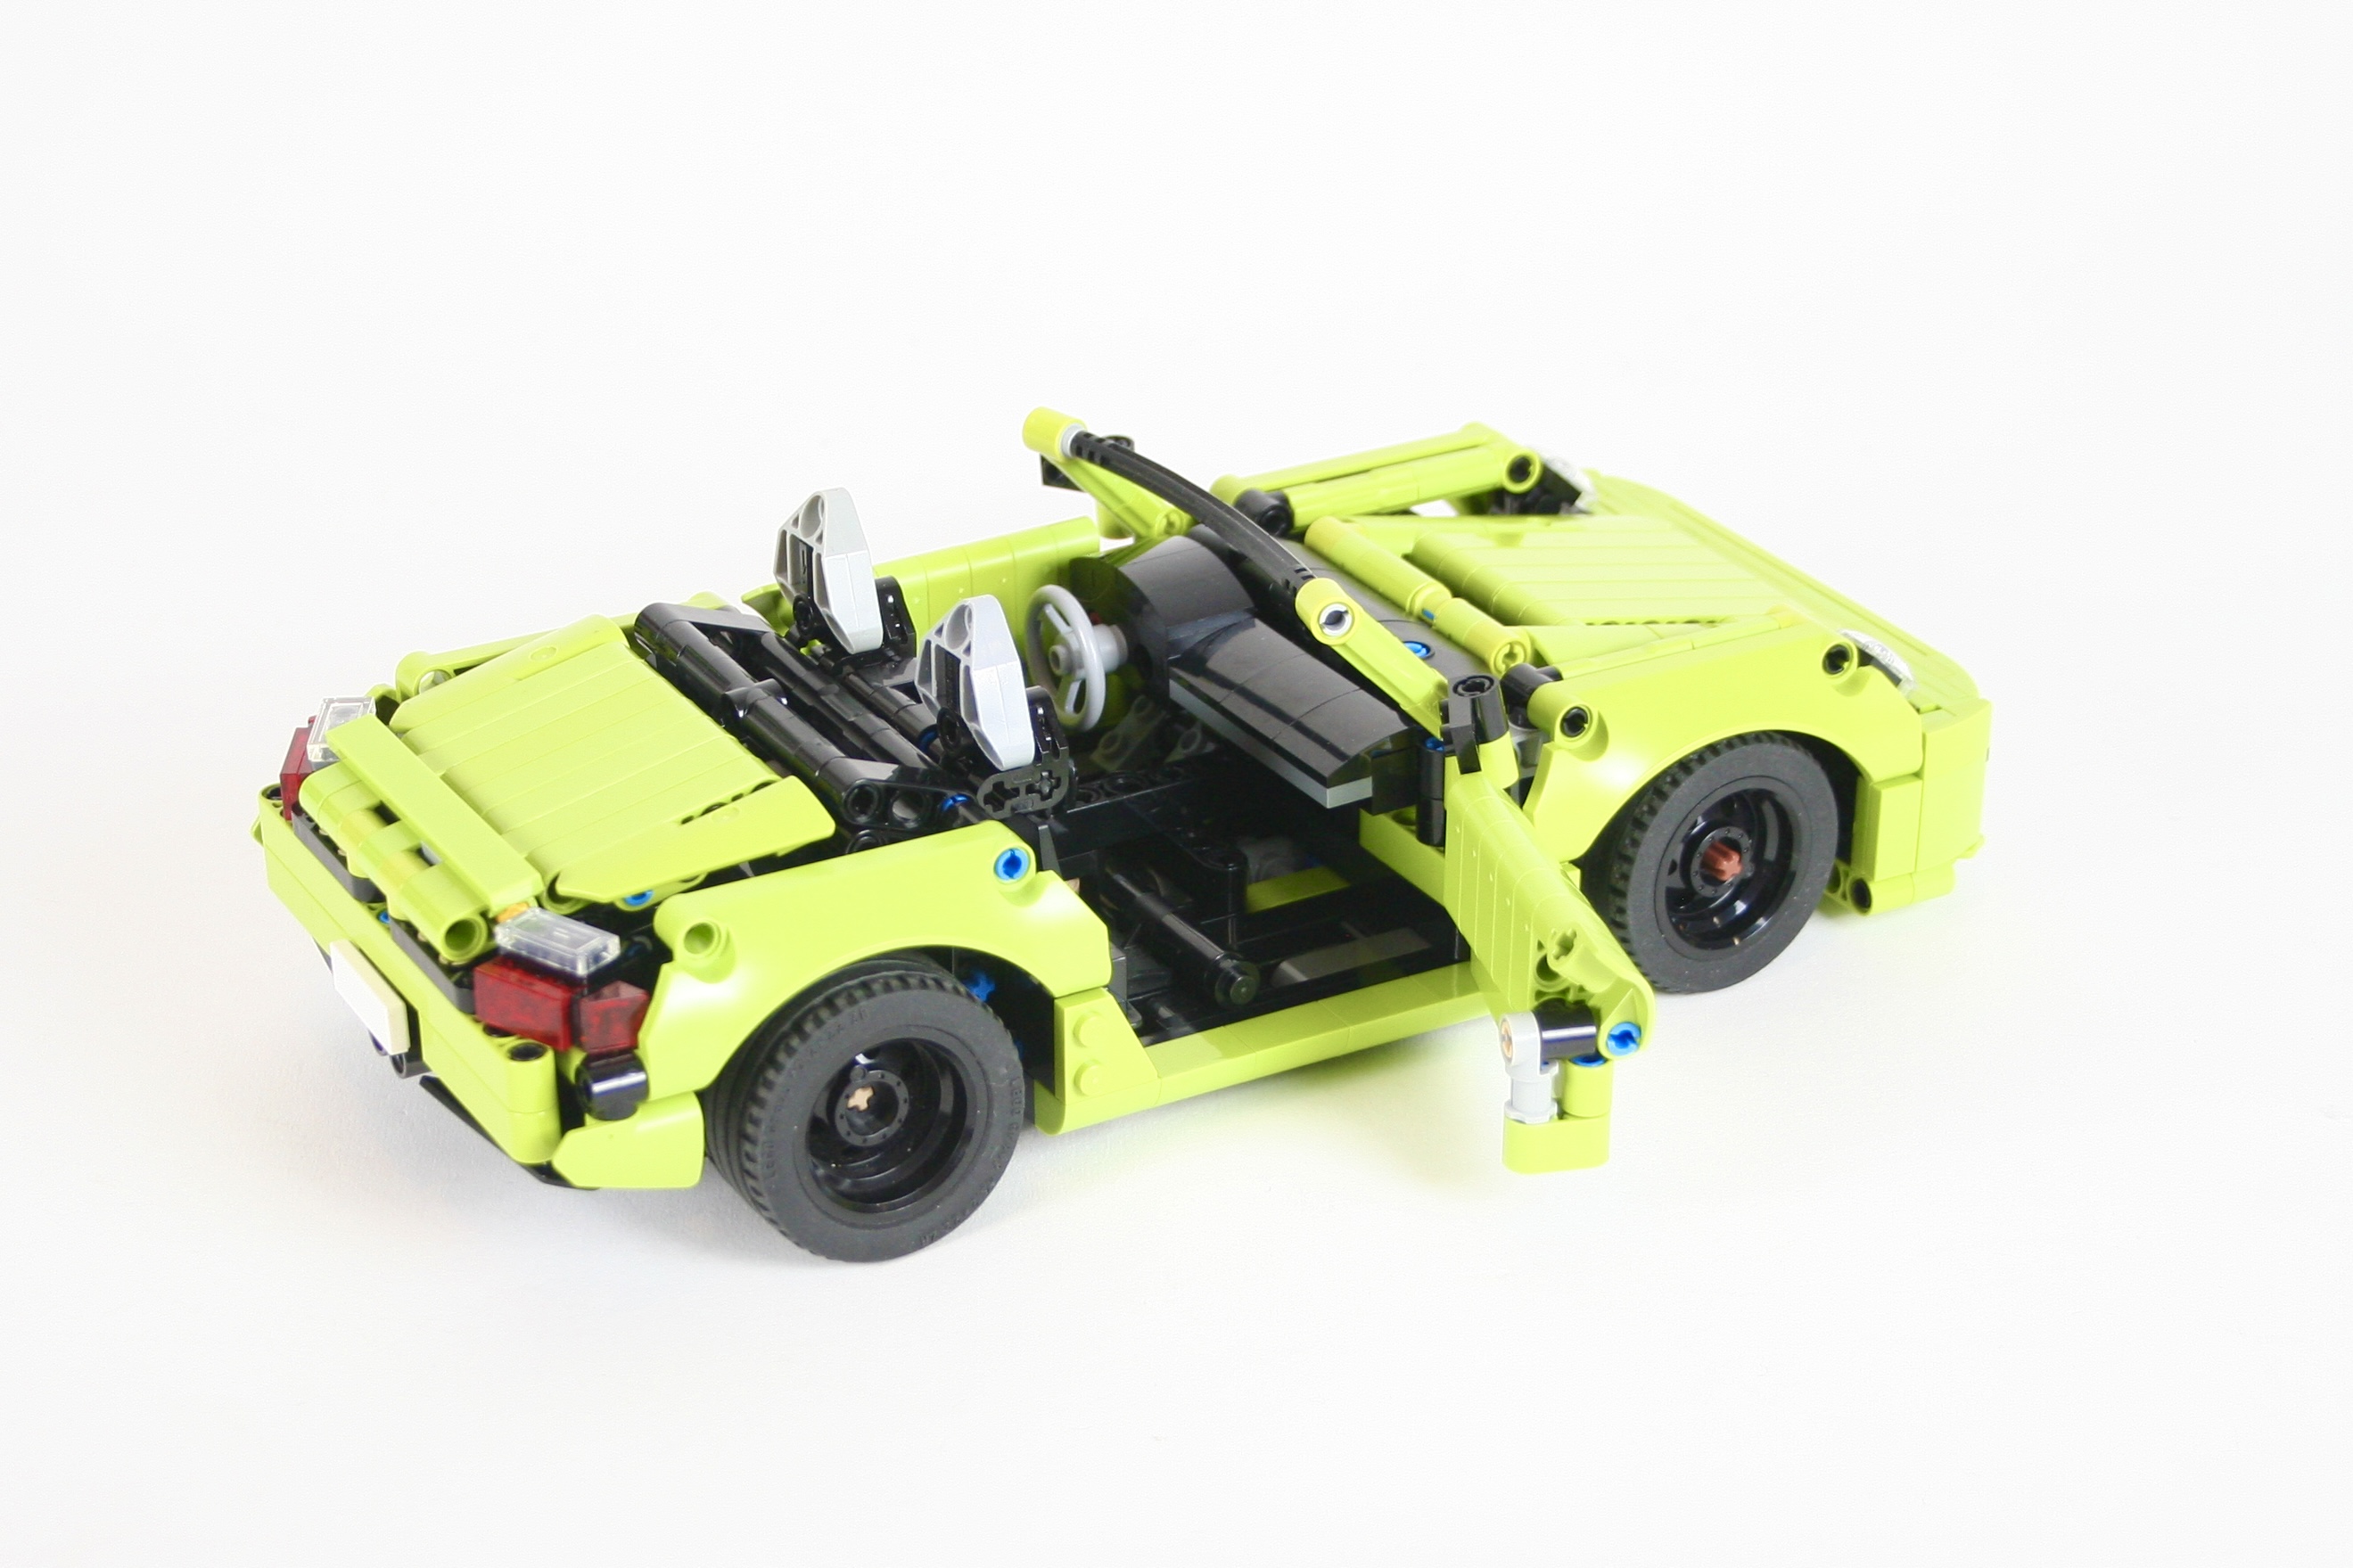
Once the engine was done, building the car around it was rather fun. I worked on the doors and side of the car next, and it was at this point, I decided on the Lime color. Adding the fenders and rear deck came next, then I had to pause to build the roof. It took some time, and a number of drafts, but I finally came up with a simple roof design that would fold into the rear of the car. The roof was not too stable when up, so I use a HOG extension in the middle of the roof to give it a little support.
The car turned out to be a great little testbed for another engine design. I am pleased with how it works, and will be an idea I use in another build. The front bumper could be a little more rounded, but maybe I will update that on a future Cayman or something.
I have been enjoying the small LEGO car theme that has been growing ever since the release of LEGO set 42098. Not only was it a well designed set, it opened up the 15 stud wide car theme which has been going strong ever since. I have enjoyed many builds by a lot of other designers, and I have had a lot of fun with many of my own builds.
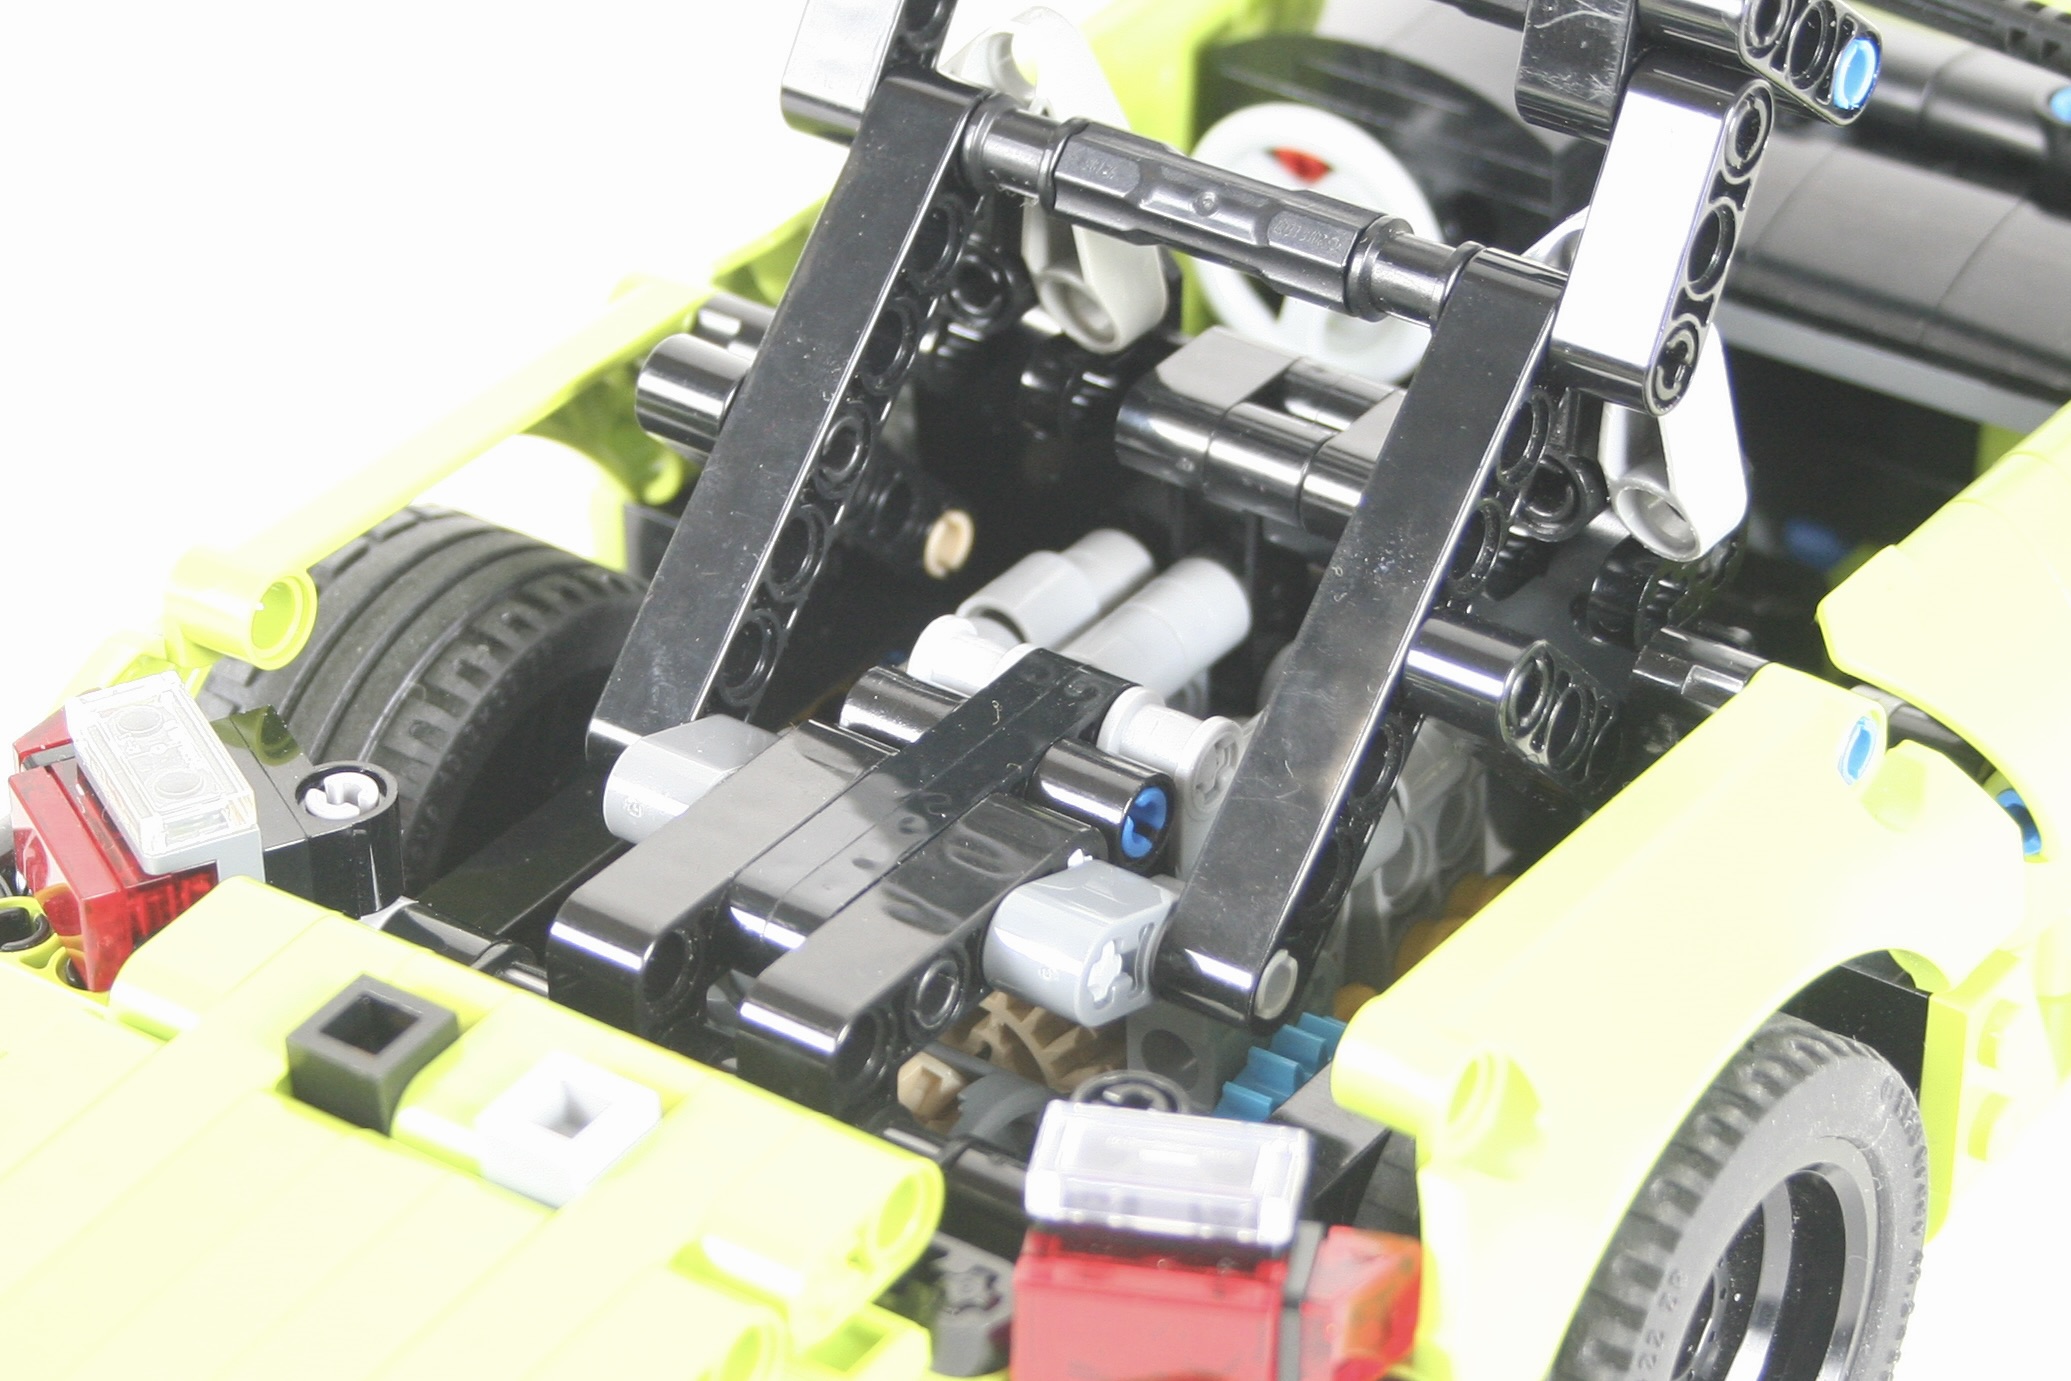
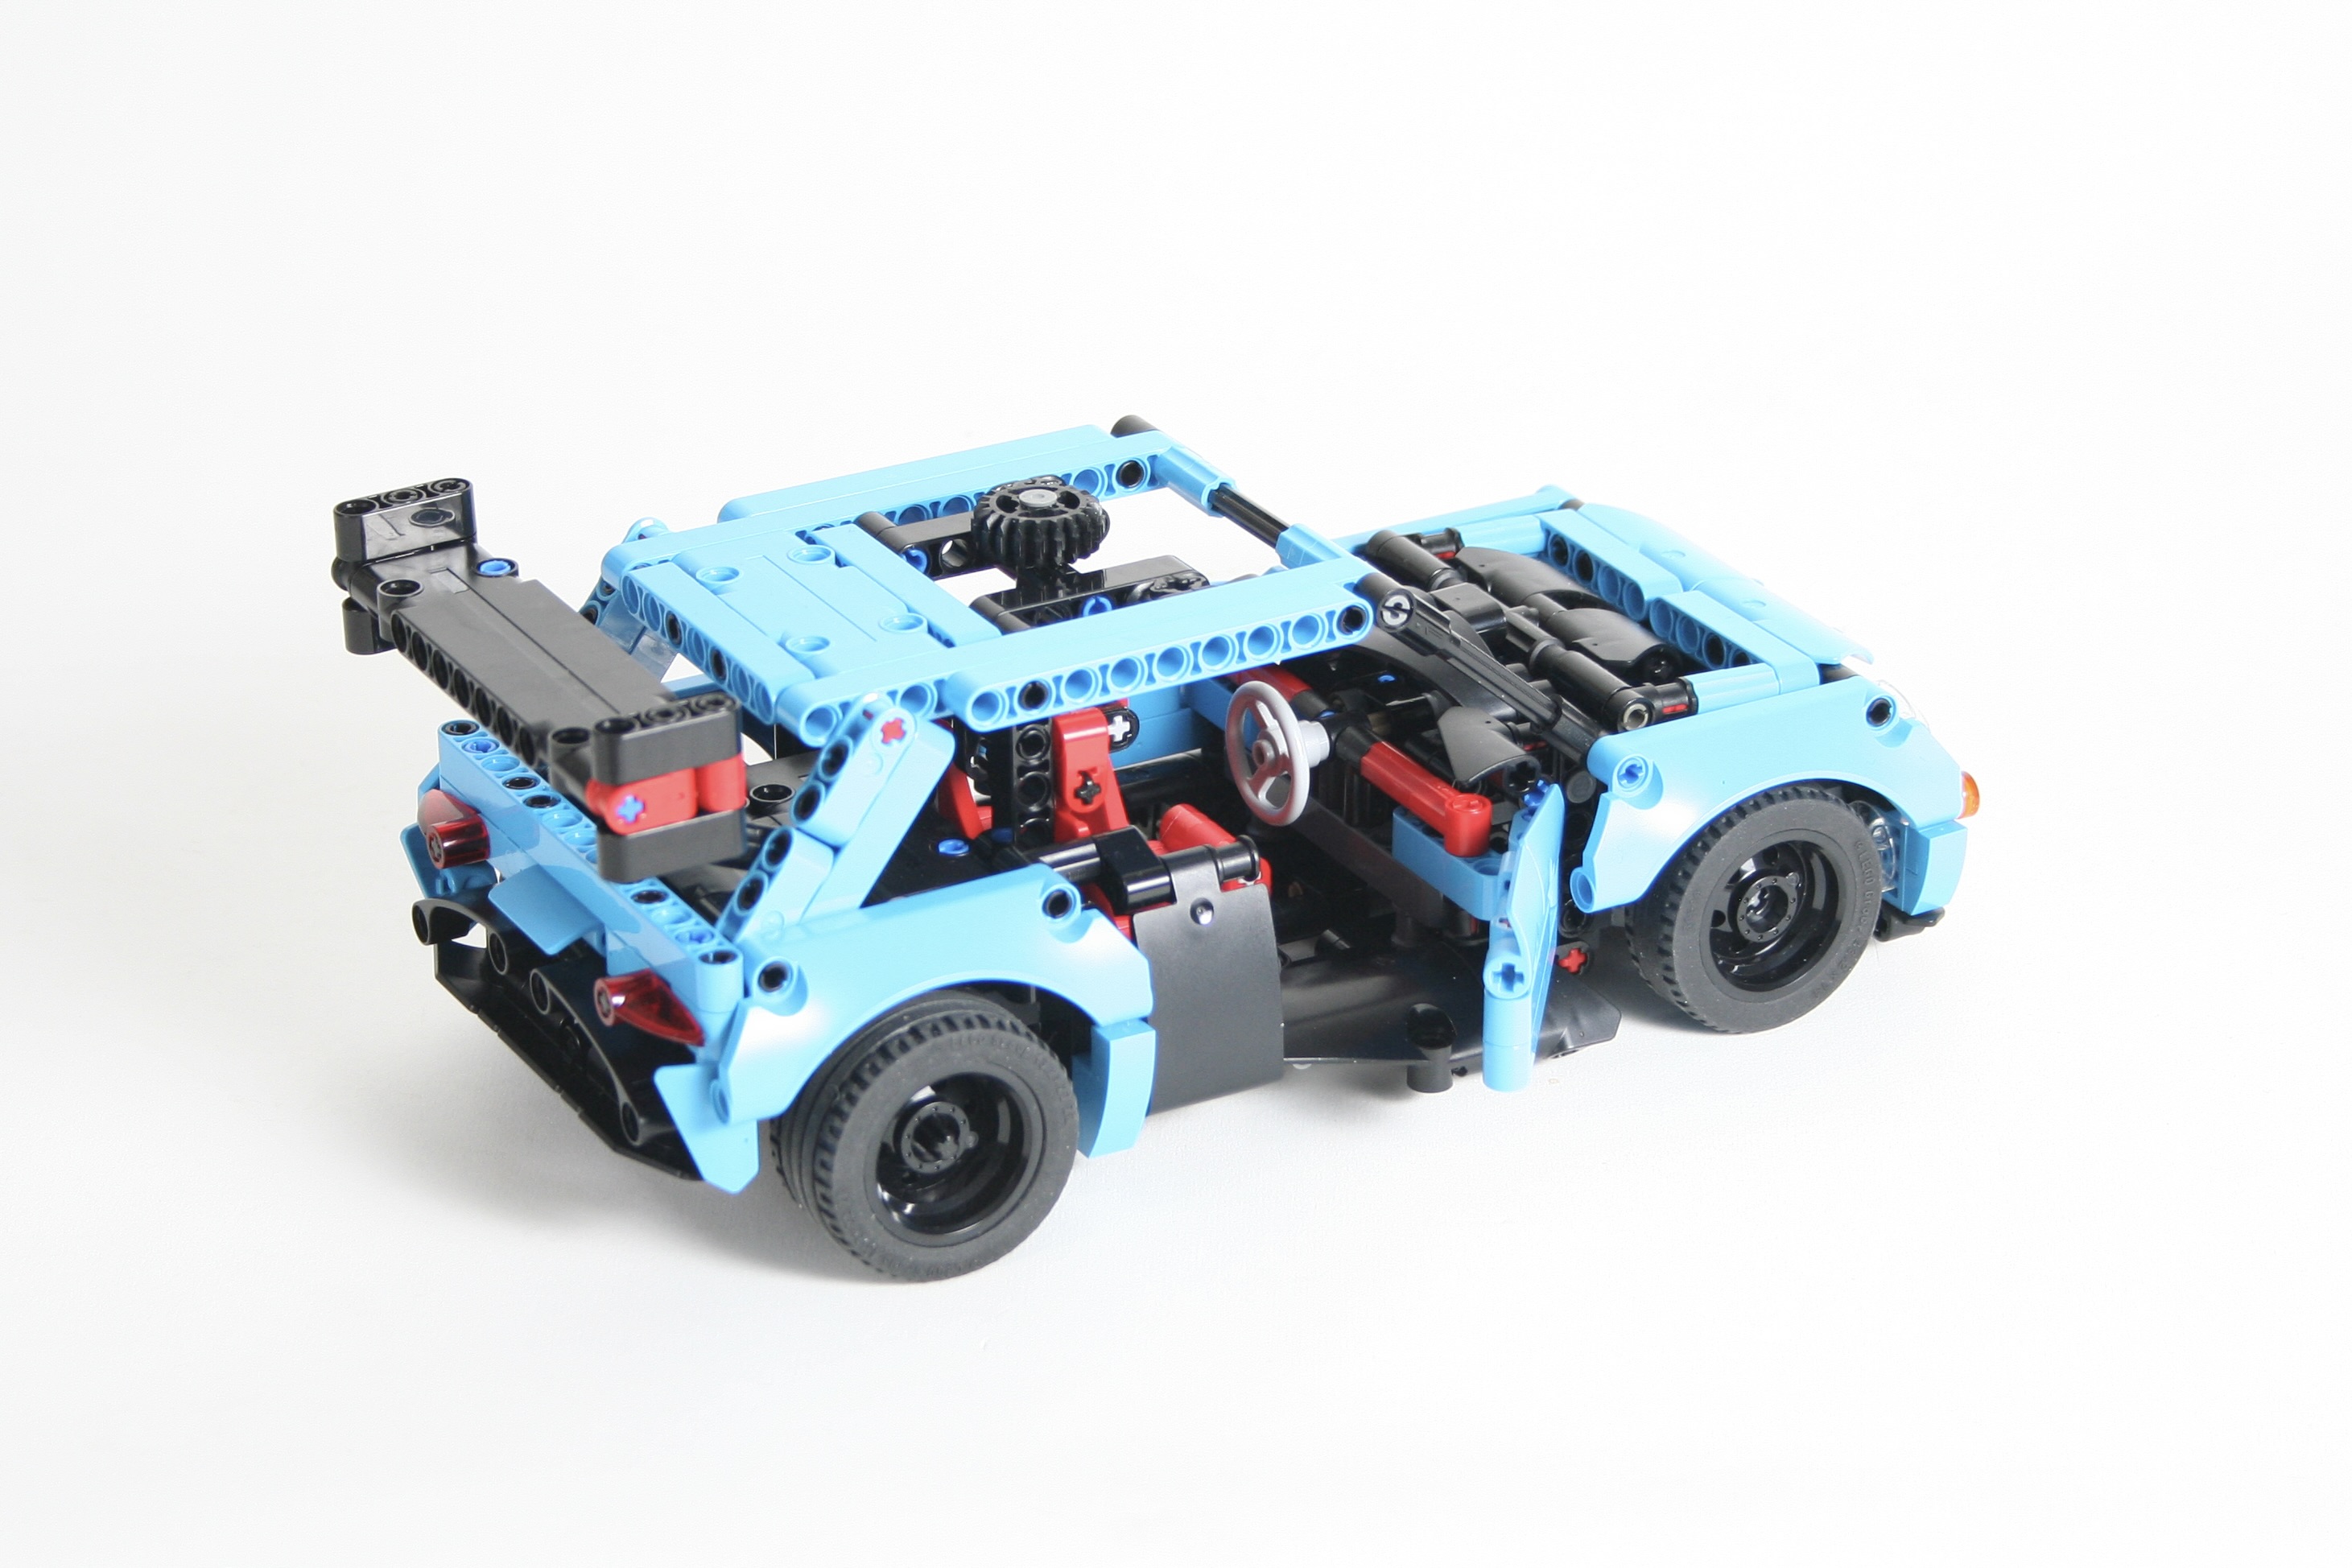
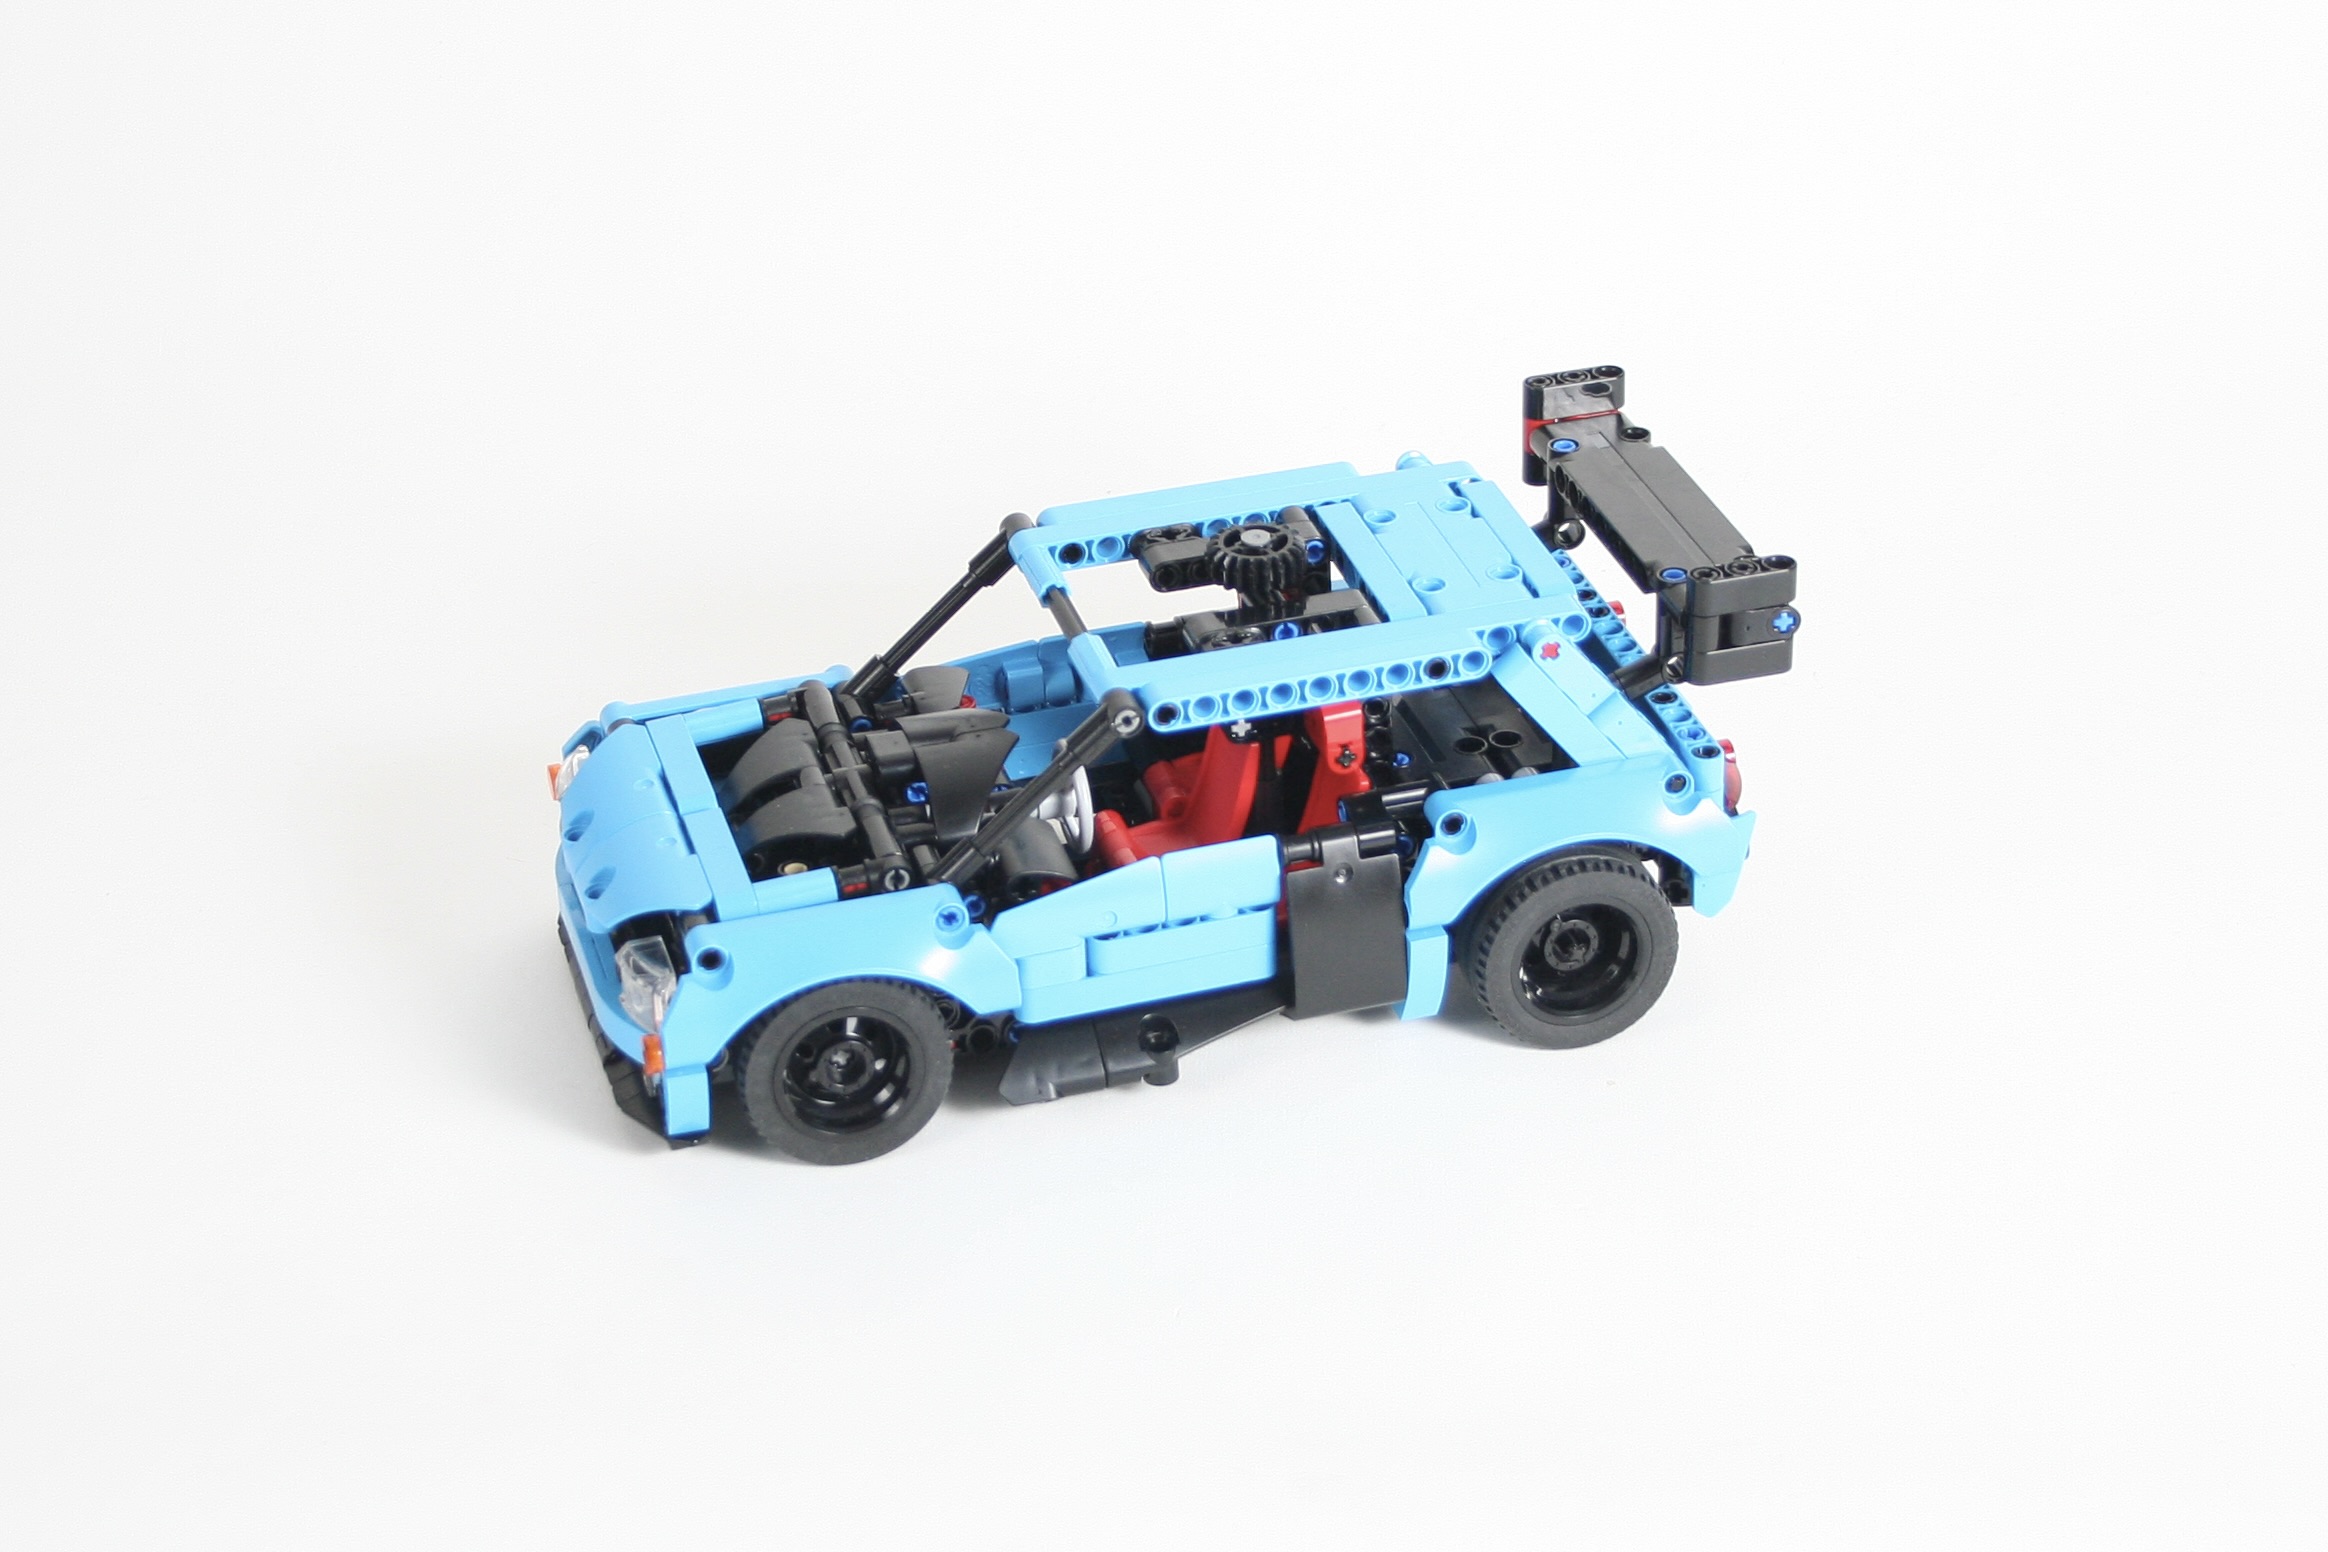
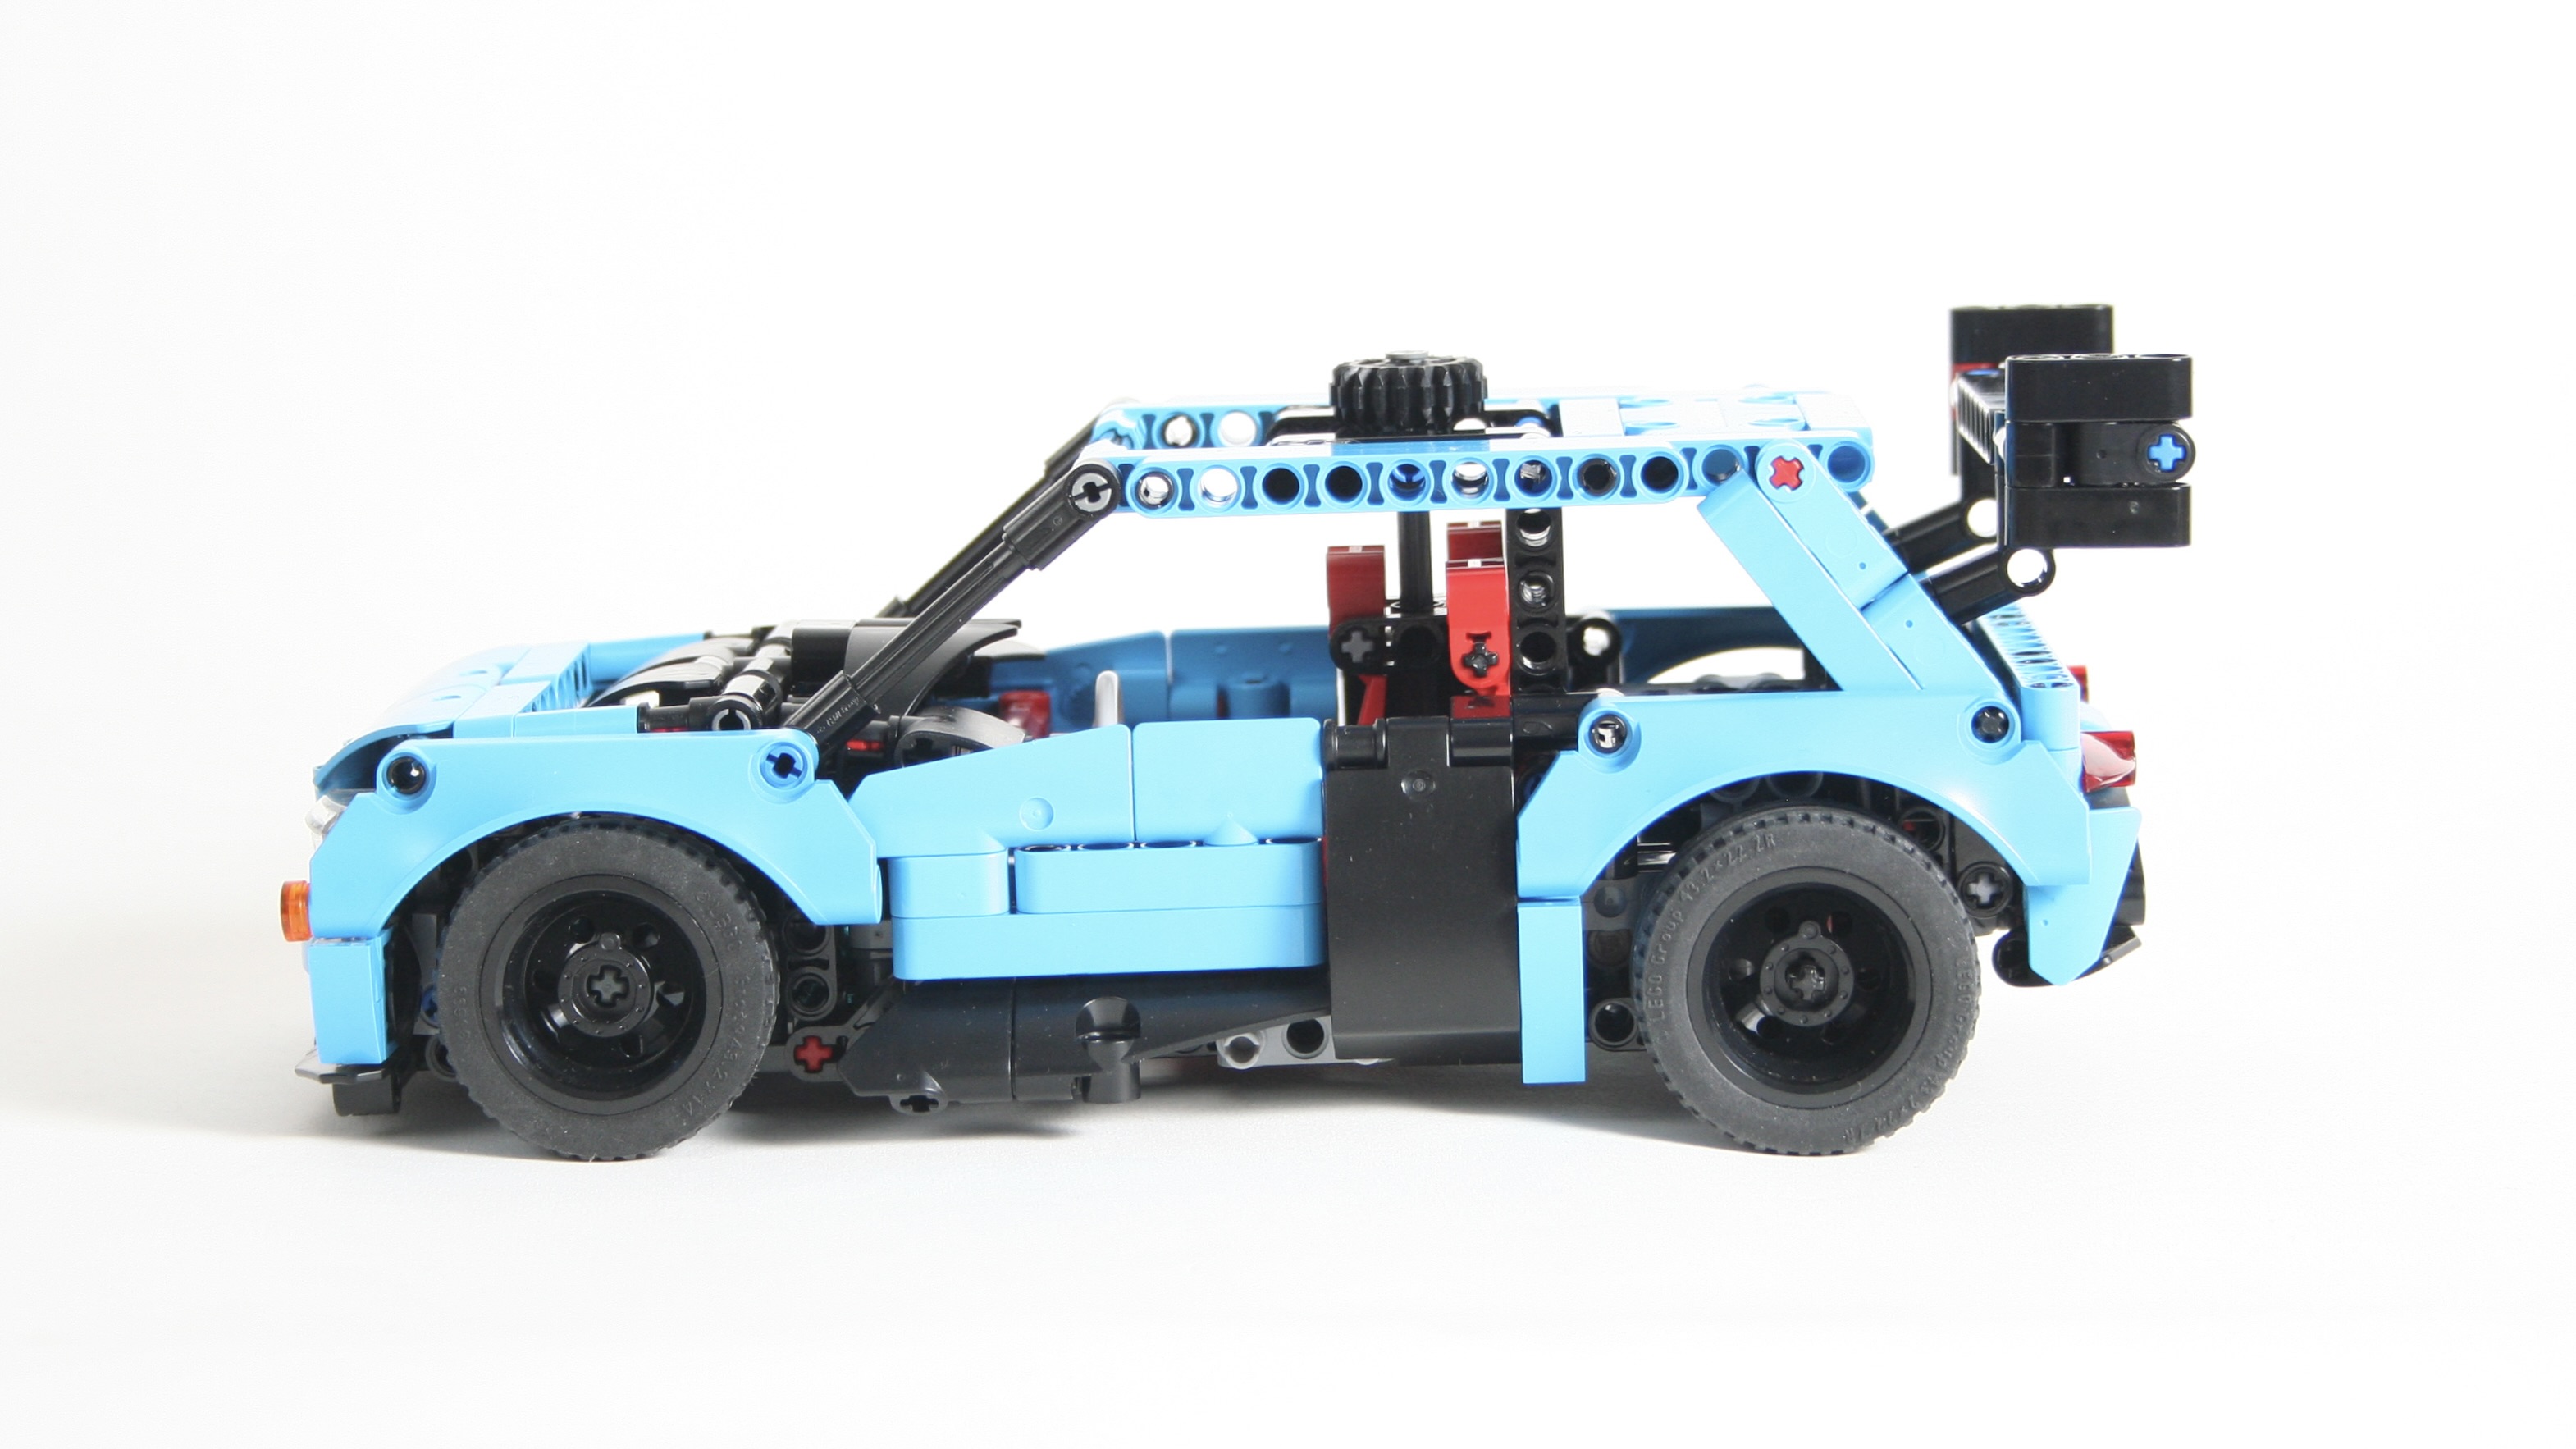
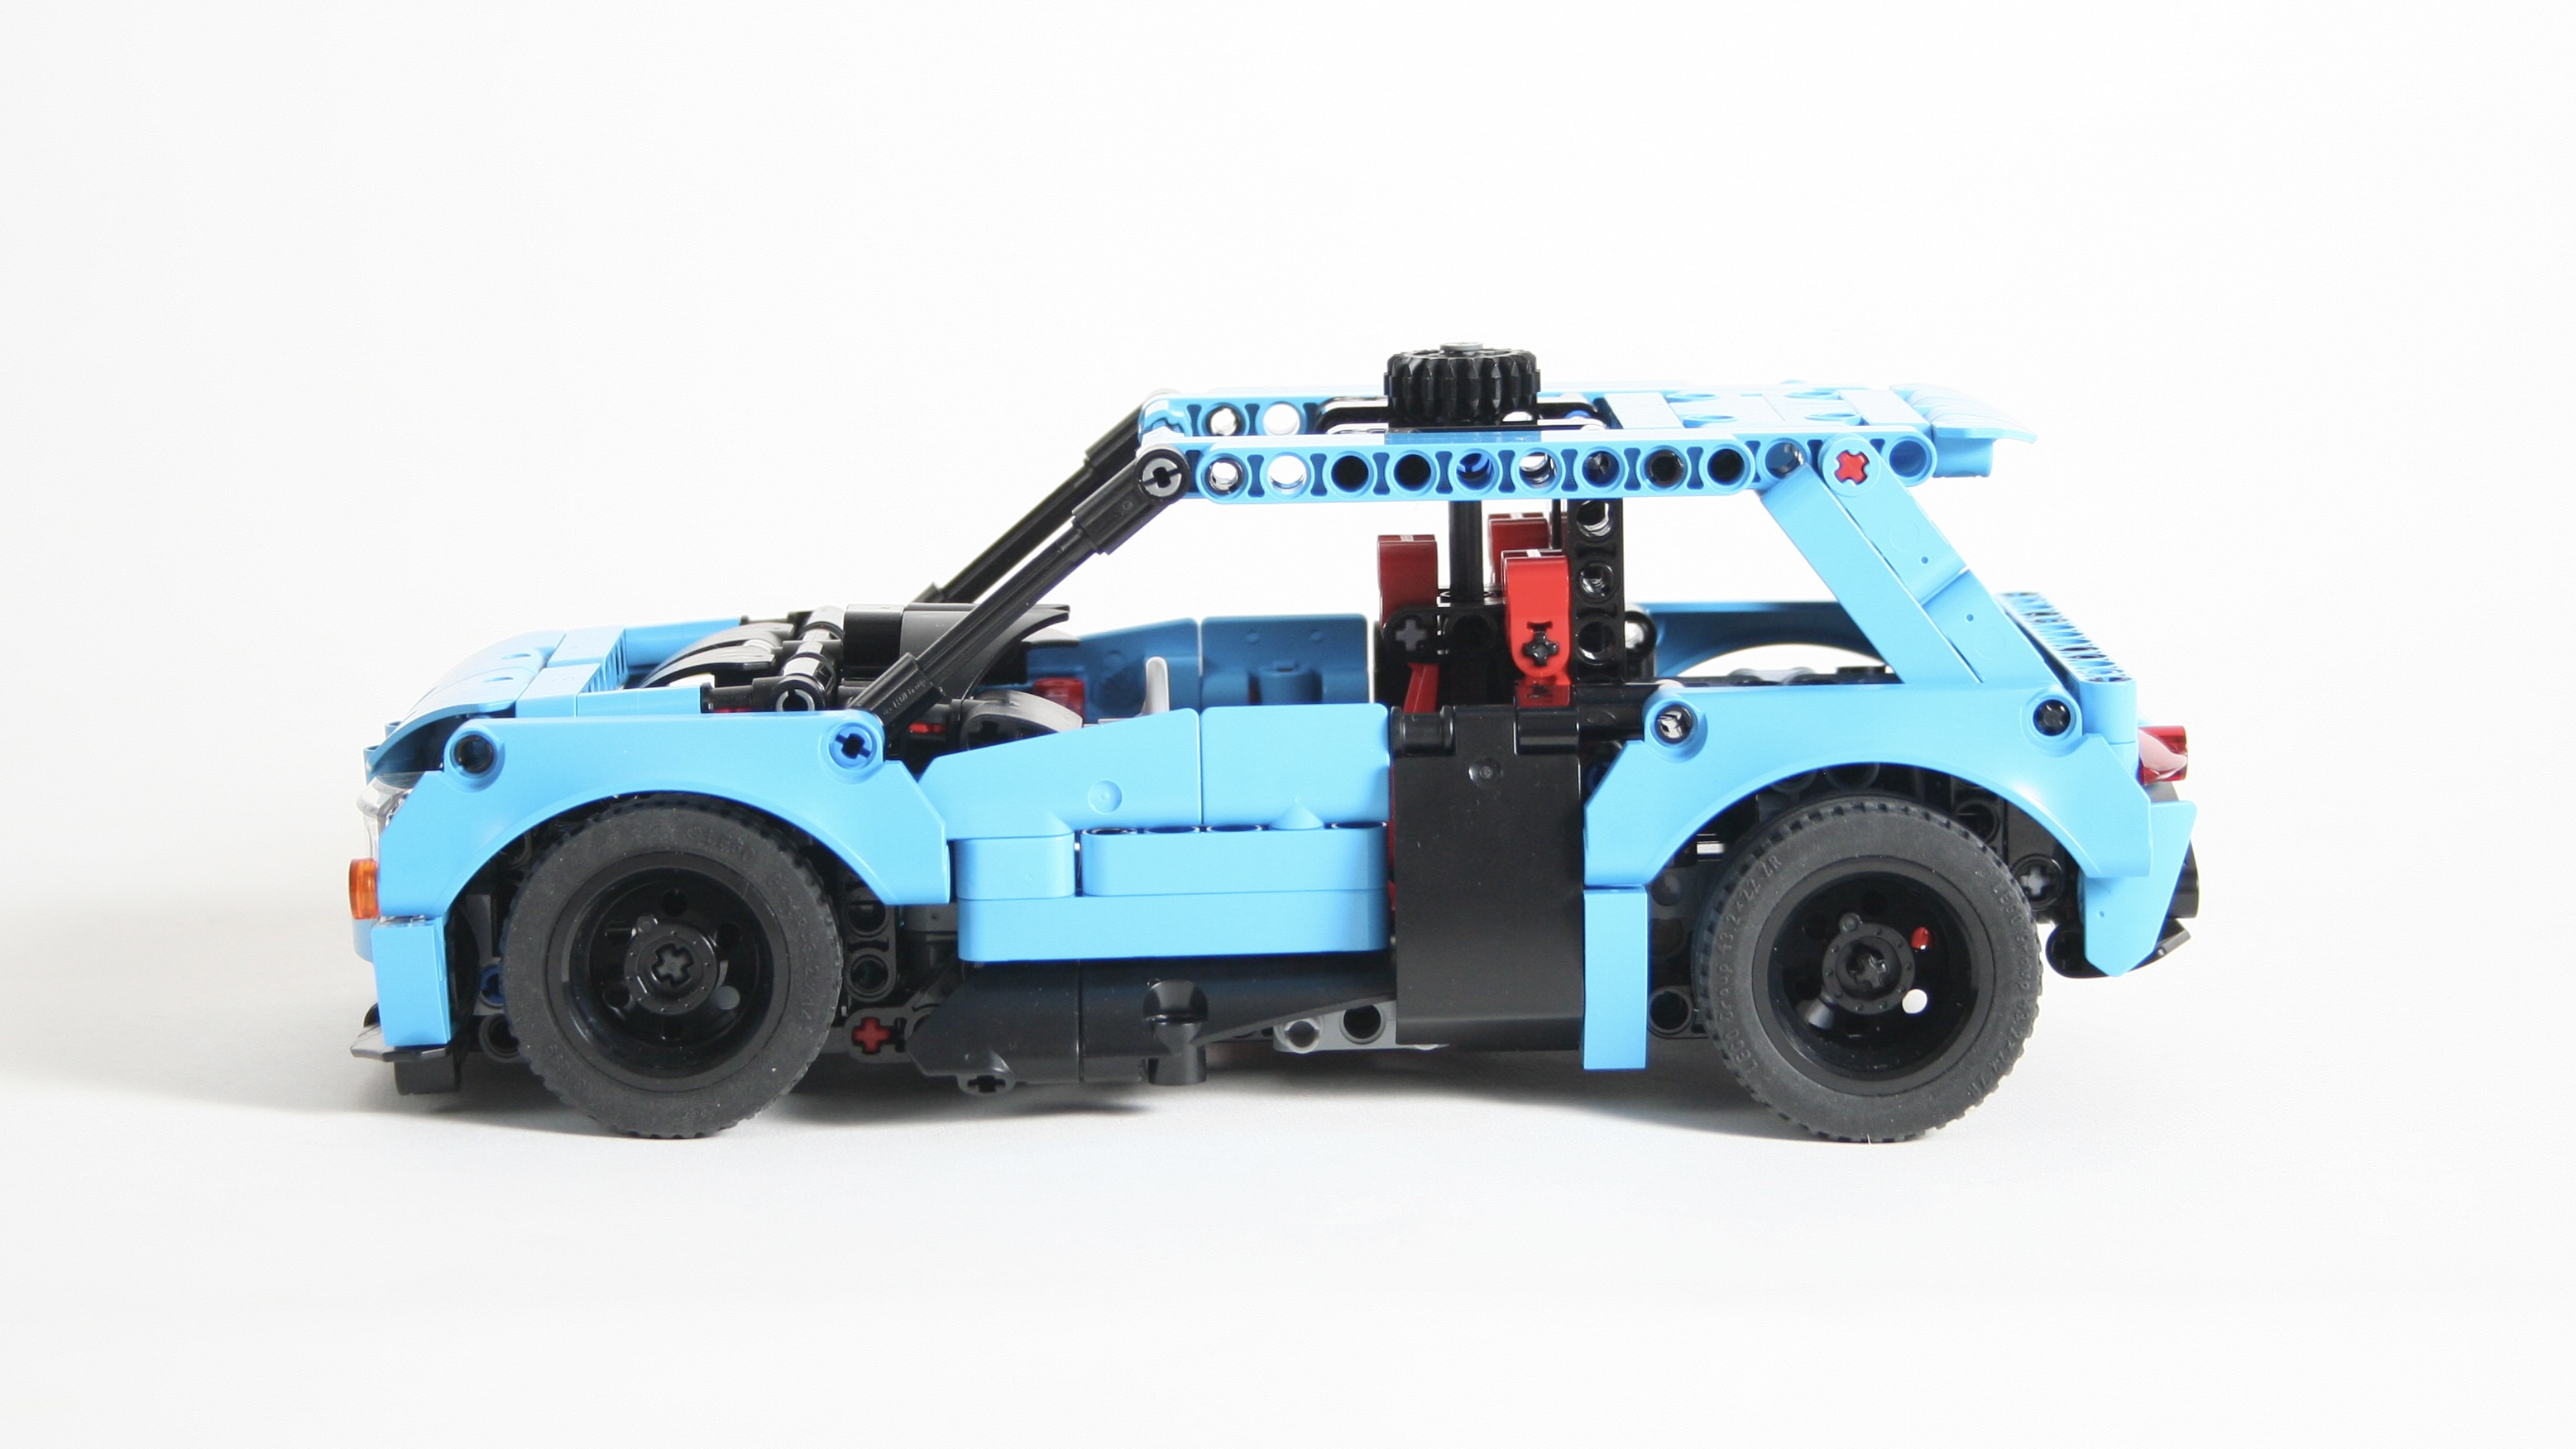
I was tinkering with some ideas recently on a fake electric drive for this scale, and through this tinkering I found another idea that would work well for a front steering axle. Applying a fake motor to the rear axle was simple enough as the differential could drive an electric motor directly. But for the front, I removed the differential, but still used the gear to drive a fake motor. Using a CV joint on each side on which to mount the wheel would allow for the steering to work. The steering knuckle pivots are out of line of the CV joint pivot, but since the CV joint allows for frictionless movement of an axle, it allowed for a the center axle to flex a little bit during the steering movement. The center axle is mounted on a pivot that manages the movement.
The system works well, and means the front fake electric motors is always turning when the car is moving. The steering gets a little gummy at full lock as the front axle would be better with a differential, but the idea works well enough.
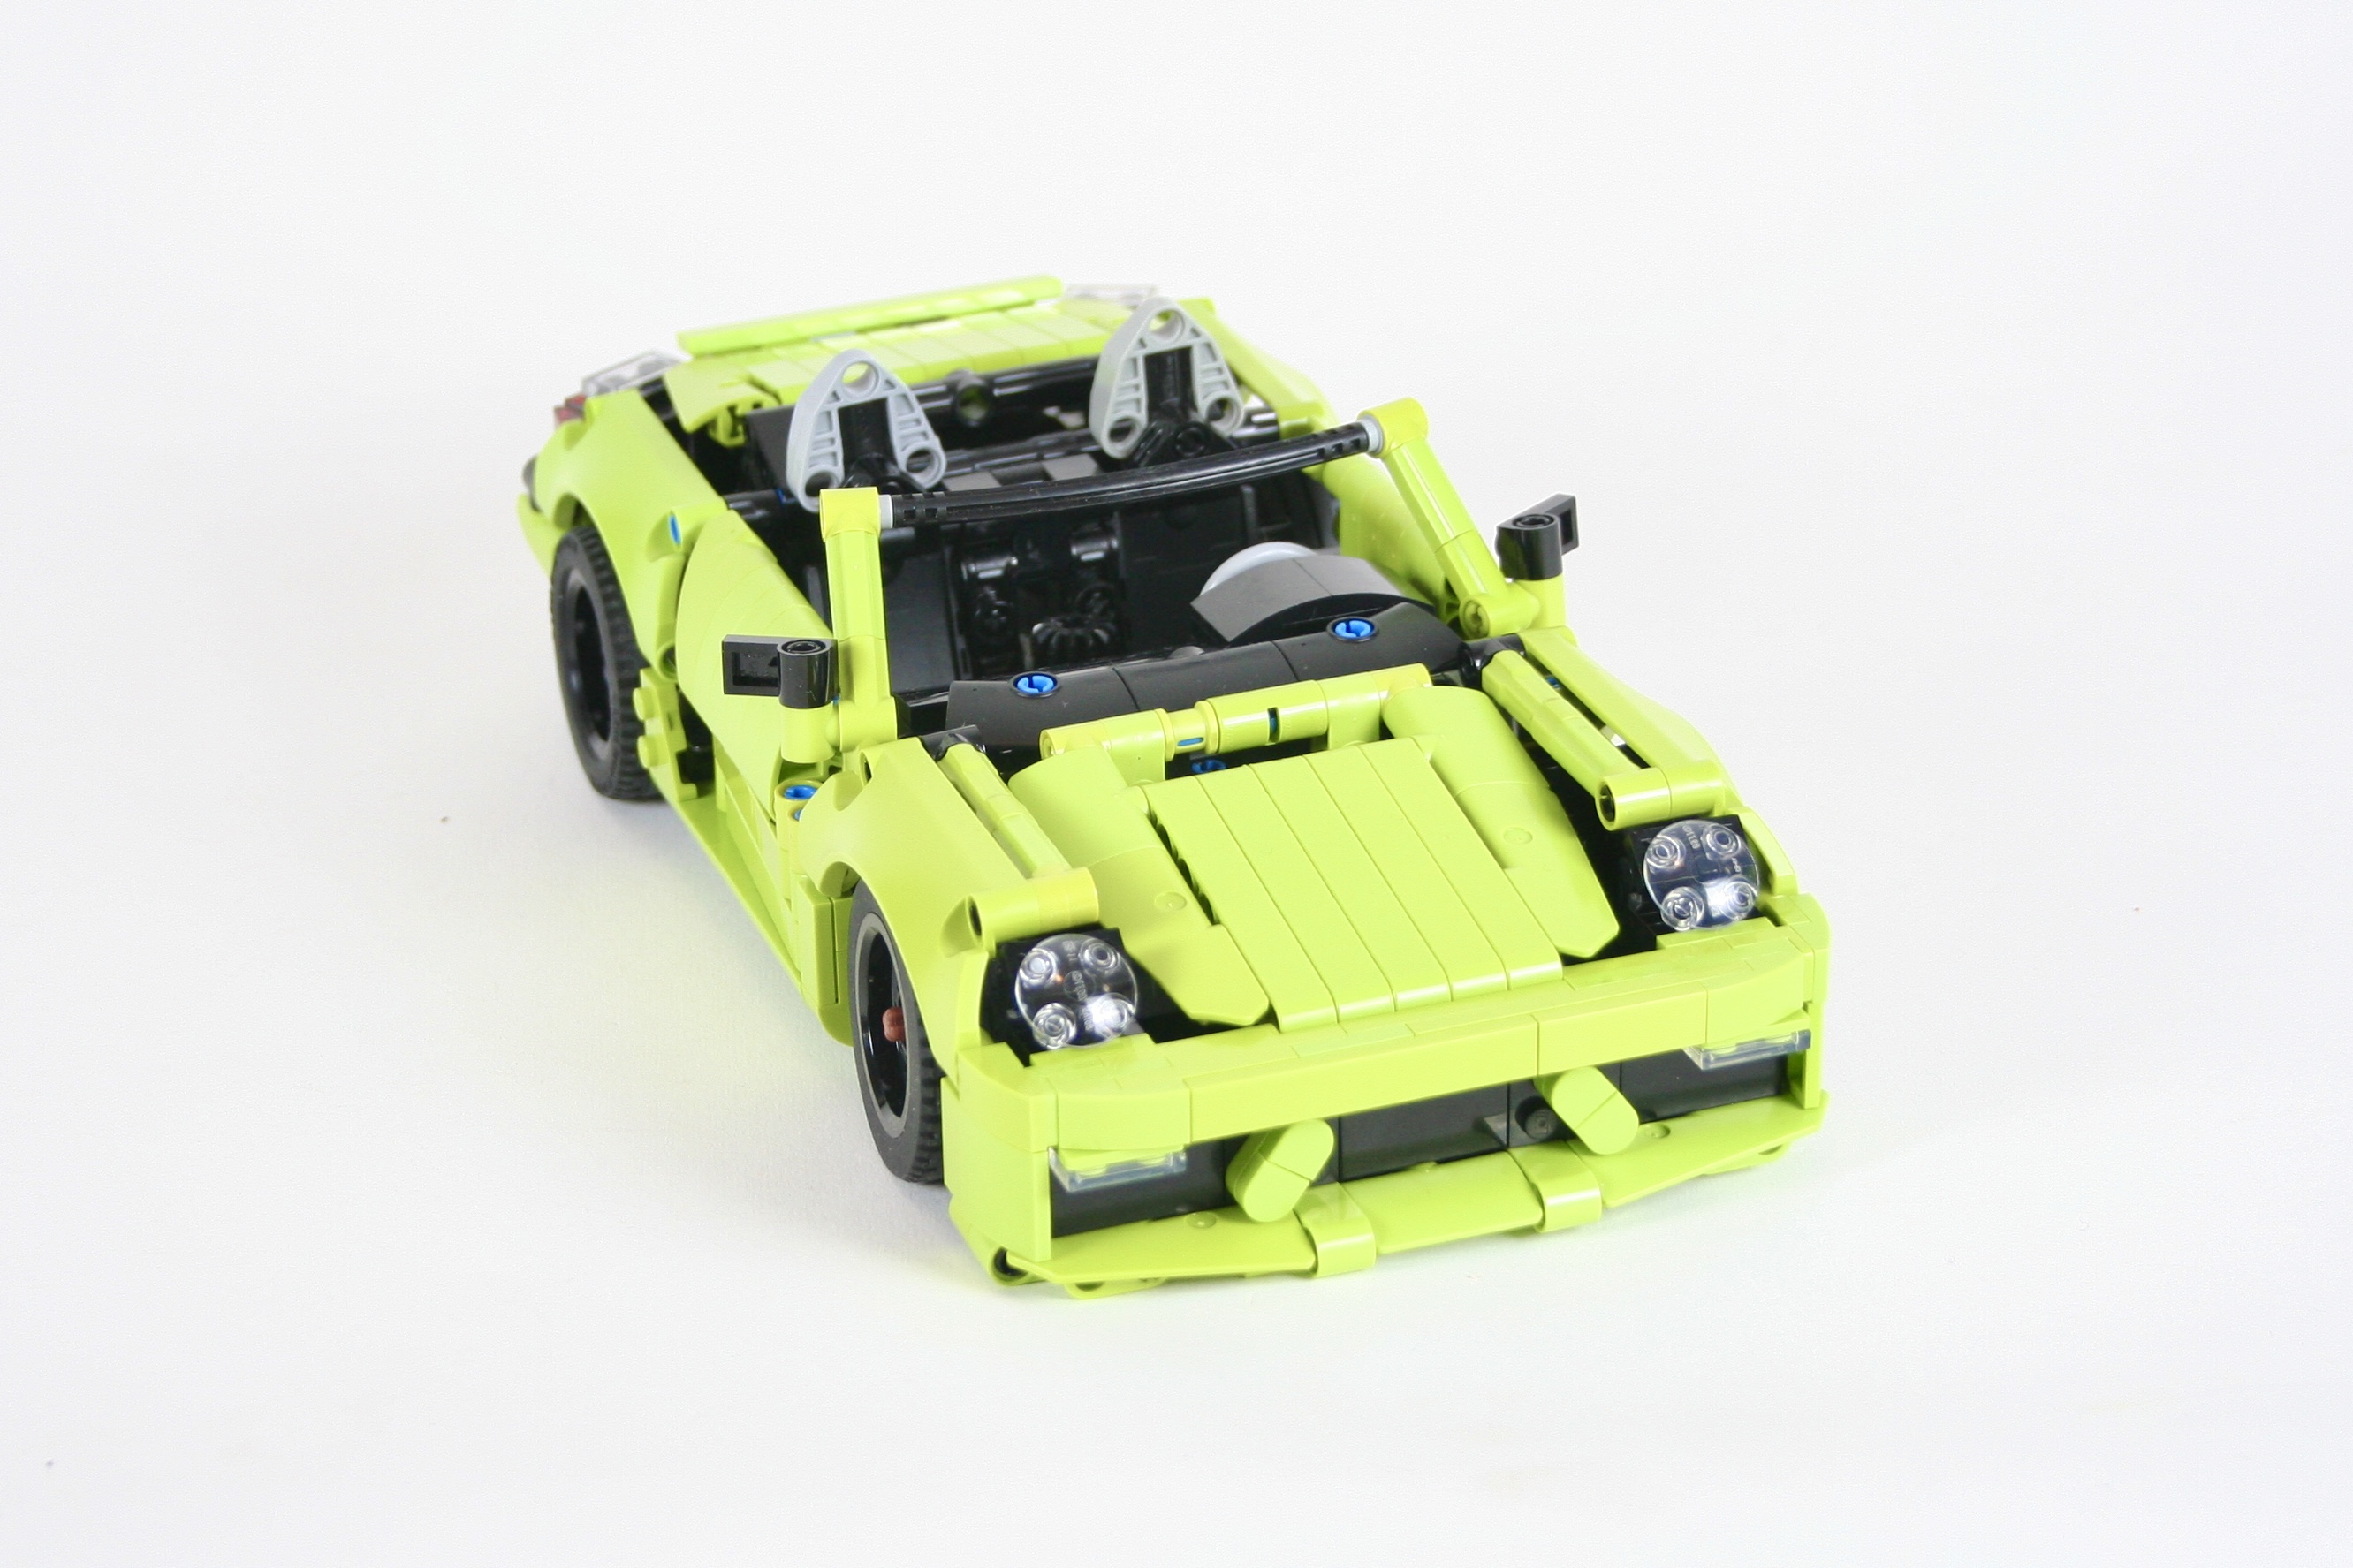
Adding in a HOG was simple enough, and I had enough space to add a connection to the front steering wheel. I wanted to try a different interior setup with seating for three, so this worked well with the center steering. Also, I complicated things just a little bit on the front axle, by having the axle a half stud lower than the rear to give the car a leaning forward look.
Finally, I worked on the bodywork to give an updated look to the classic rally hatchback from yesteryear. The comically large wing, and the large side intakes harken to the Renault Turbo 5 and the more recent R5 Turbo 3E.
I have enjoyed building in this scale, and it will not be the last time I do so. It was fun to try another feature for this scale, and I think with a little more work, the front axle will be perfect. I love the design on the car as the black, red, and dark azure look great with the proportions and bodywork. I hope you enjoy too.
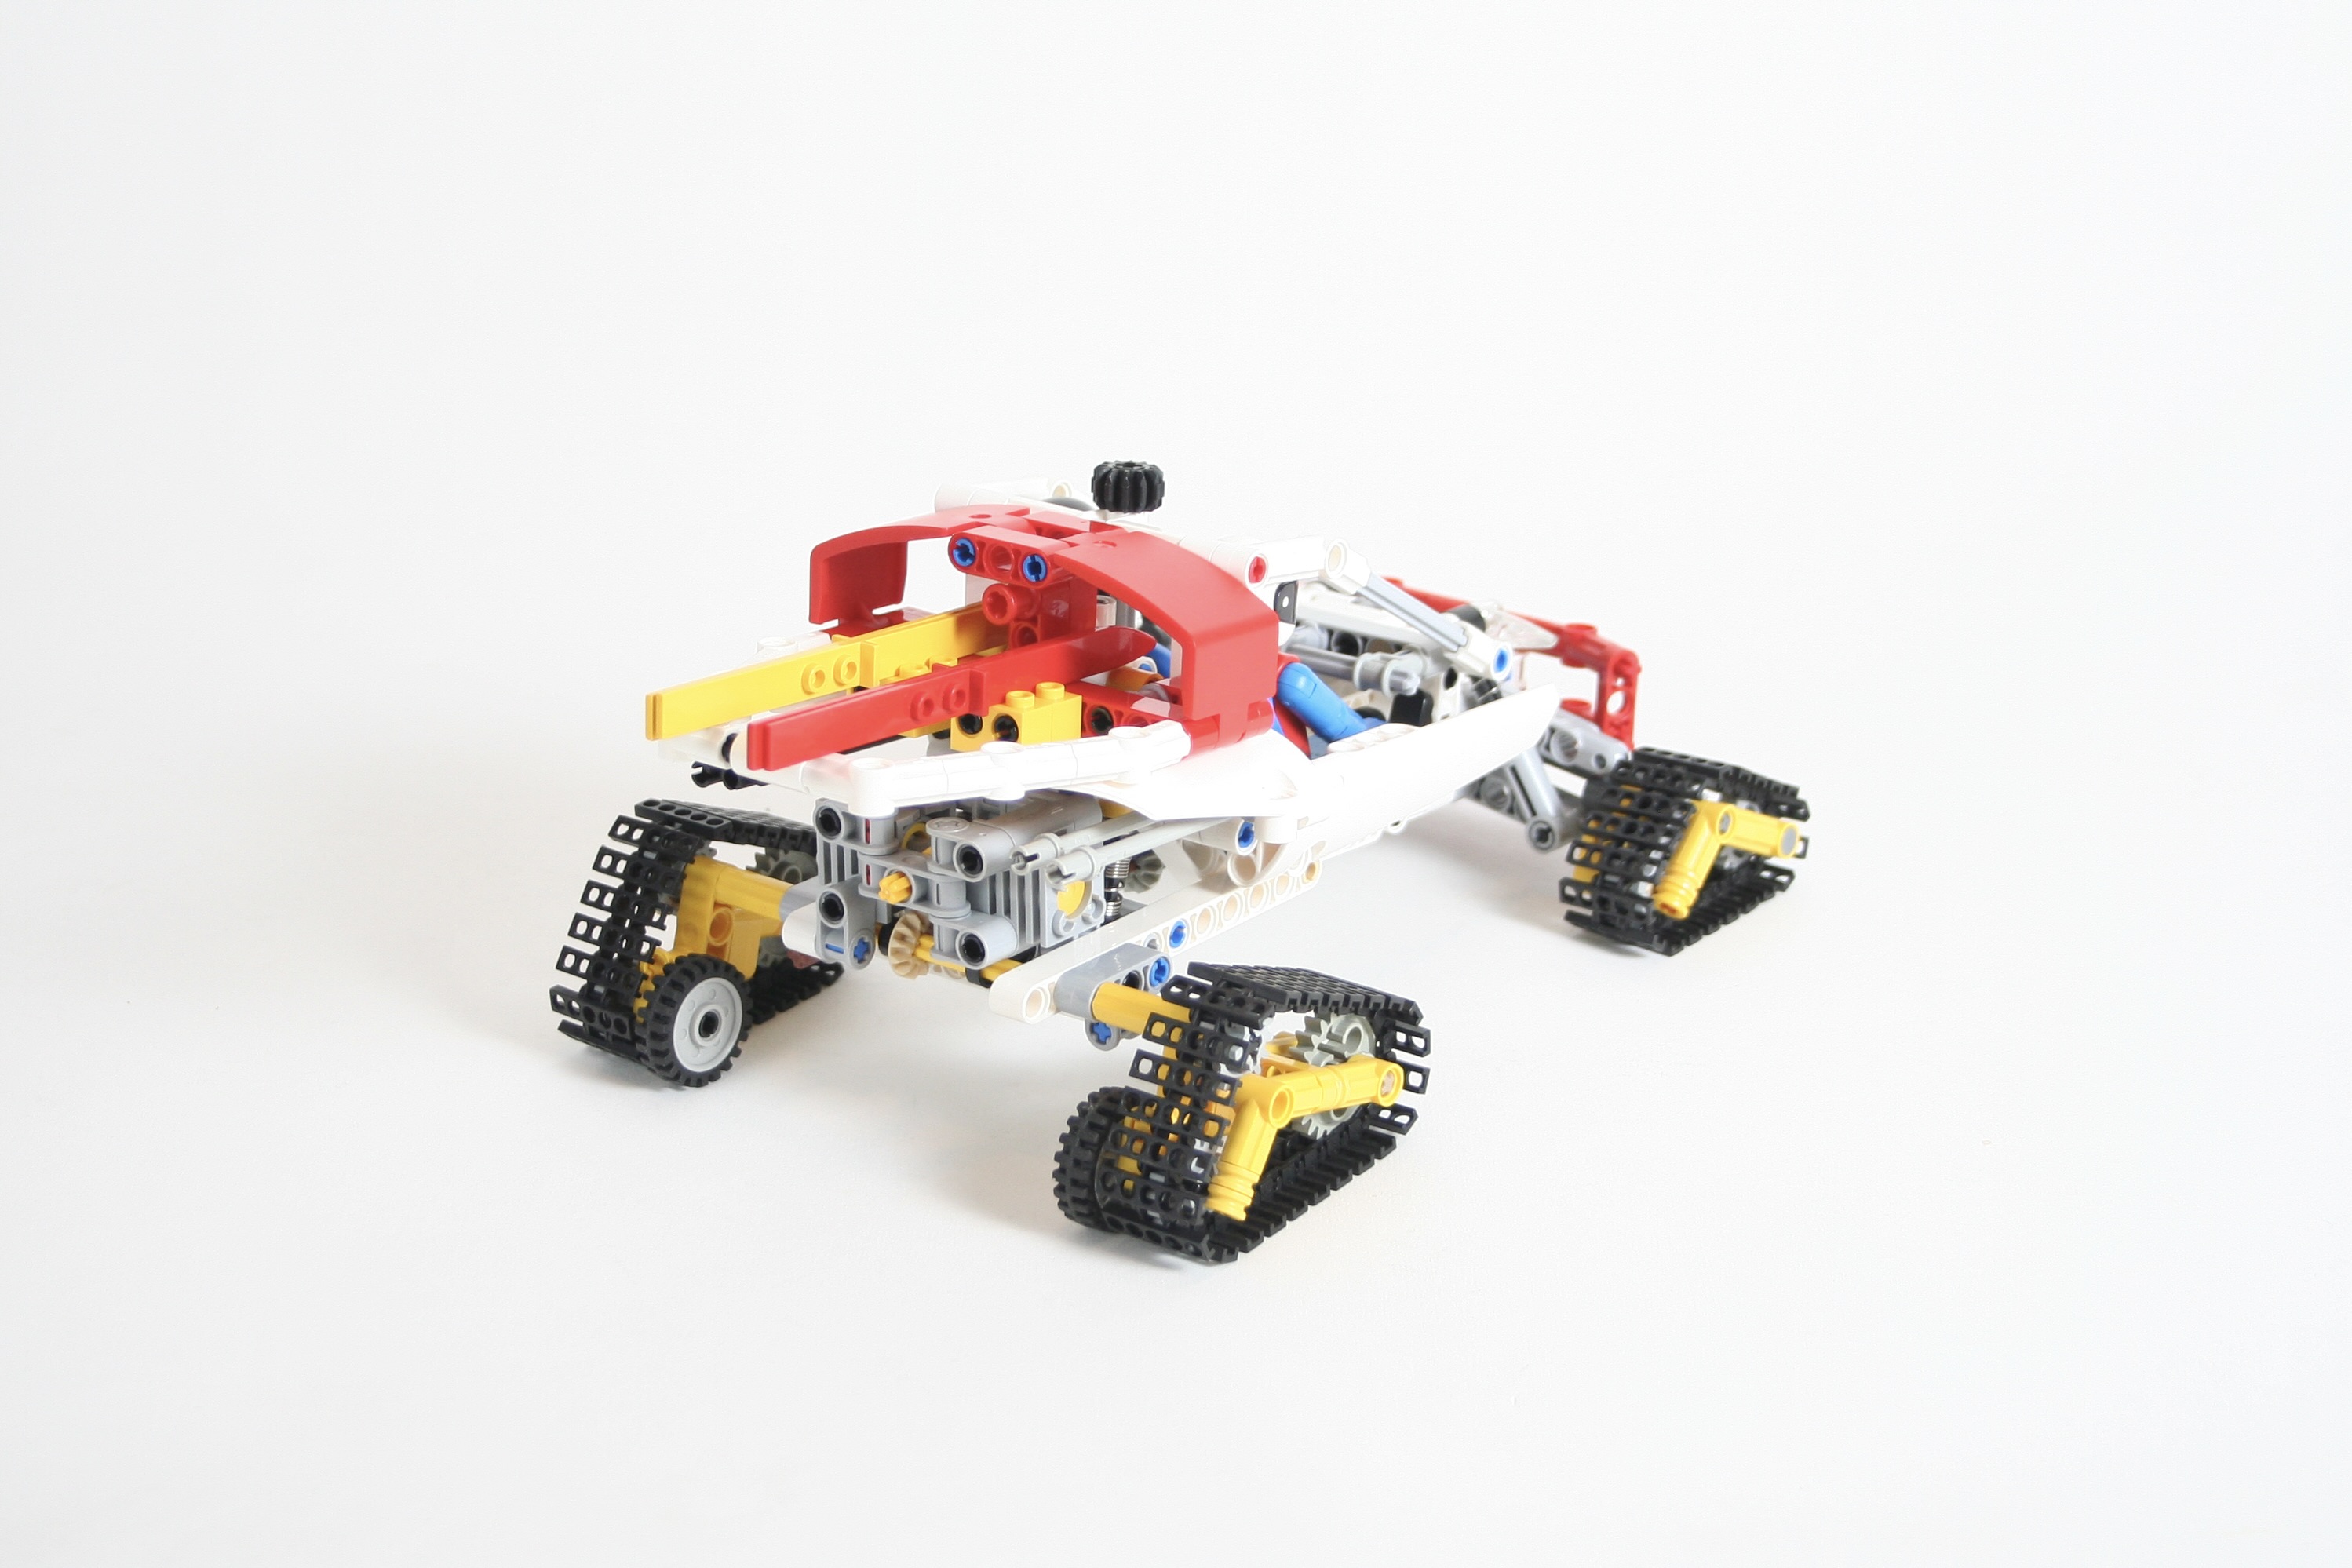
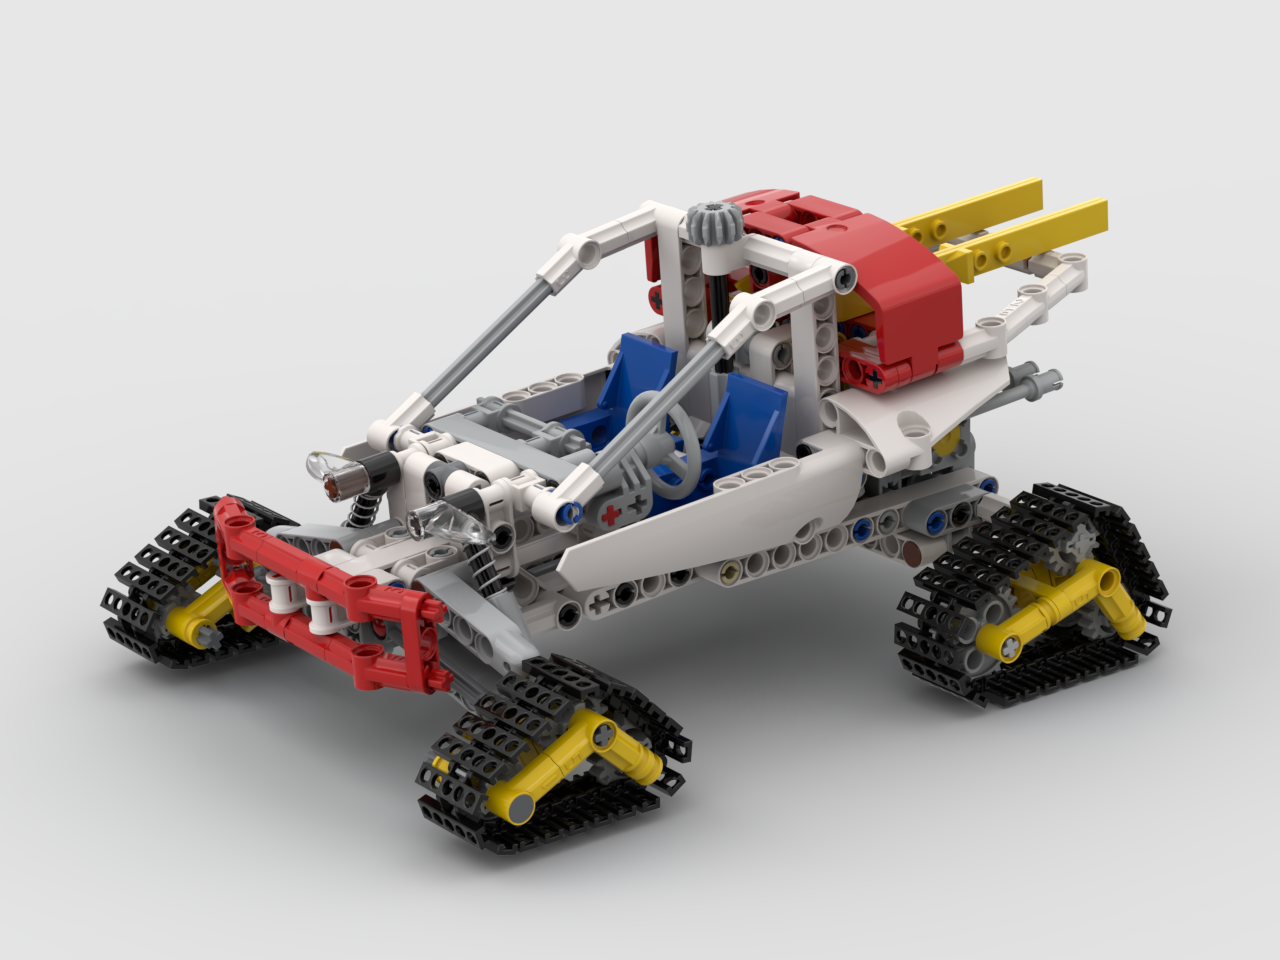
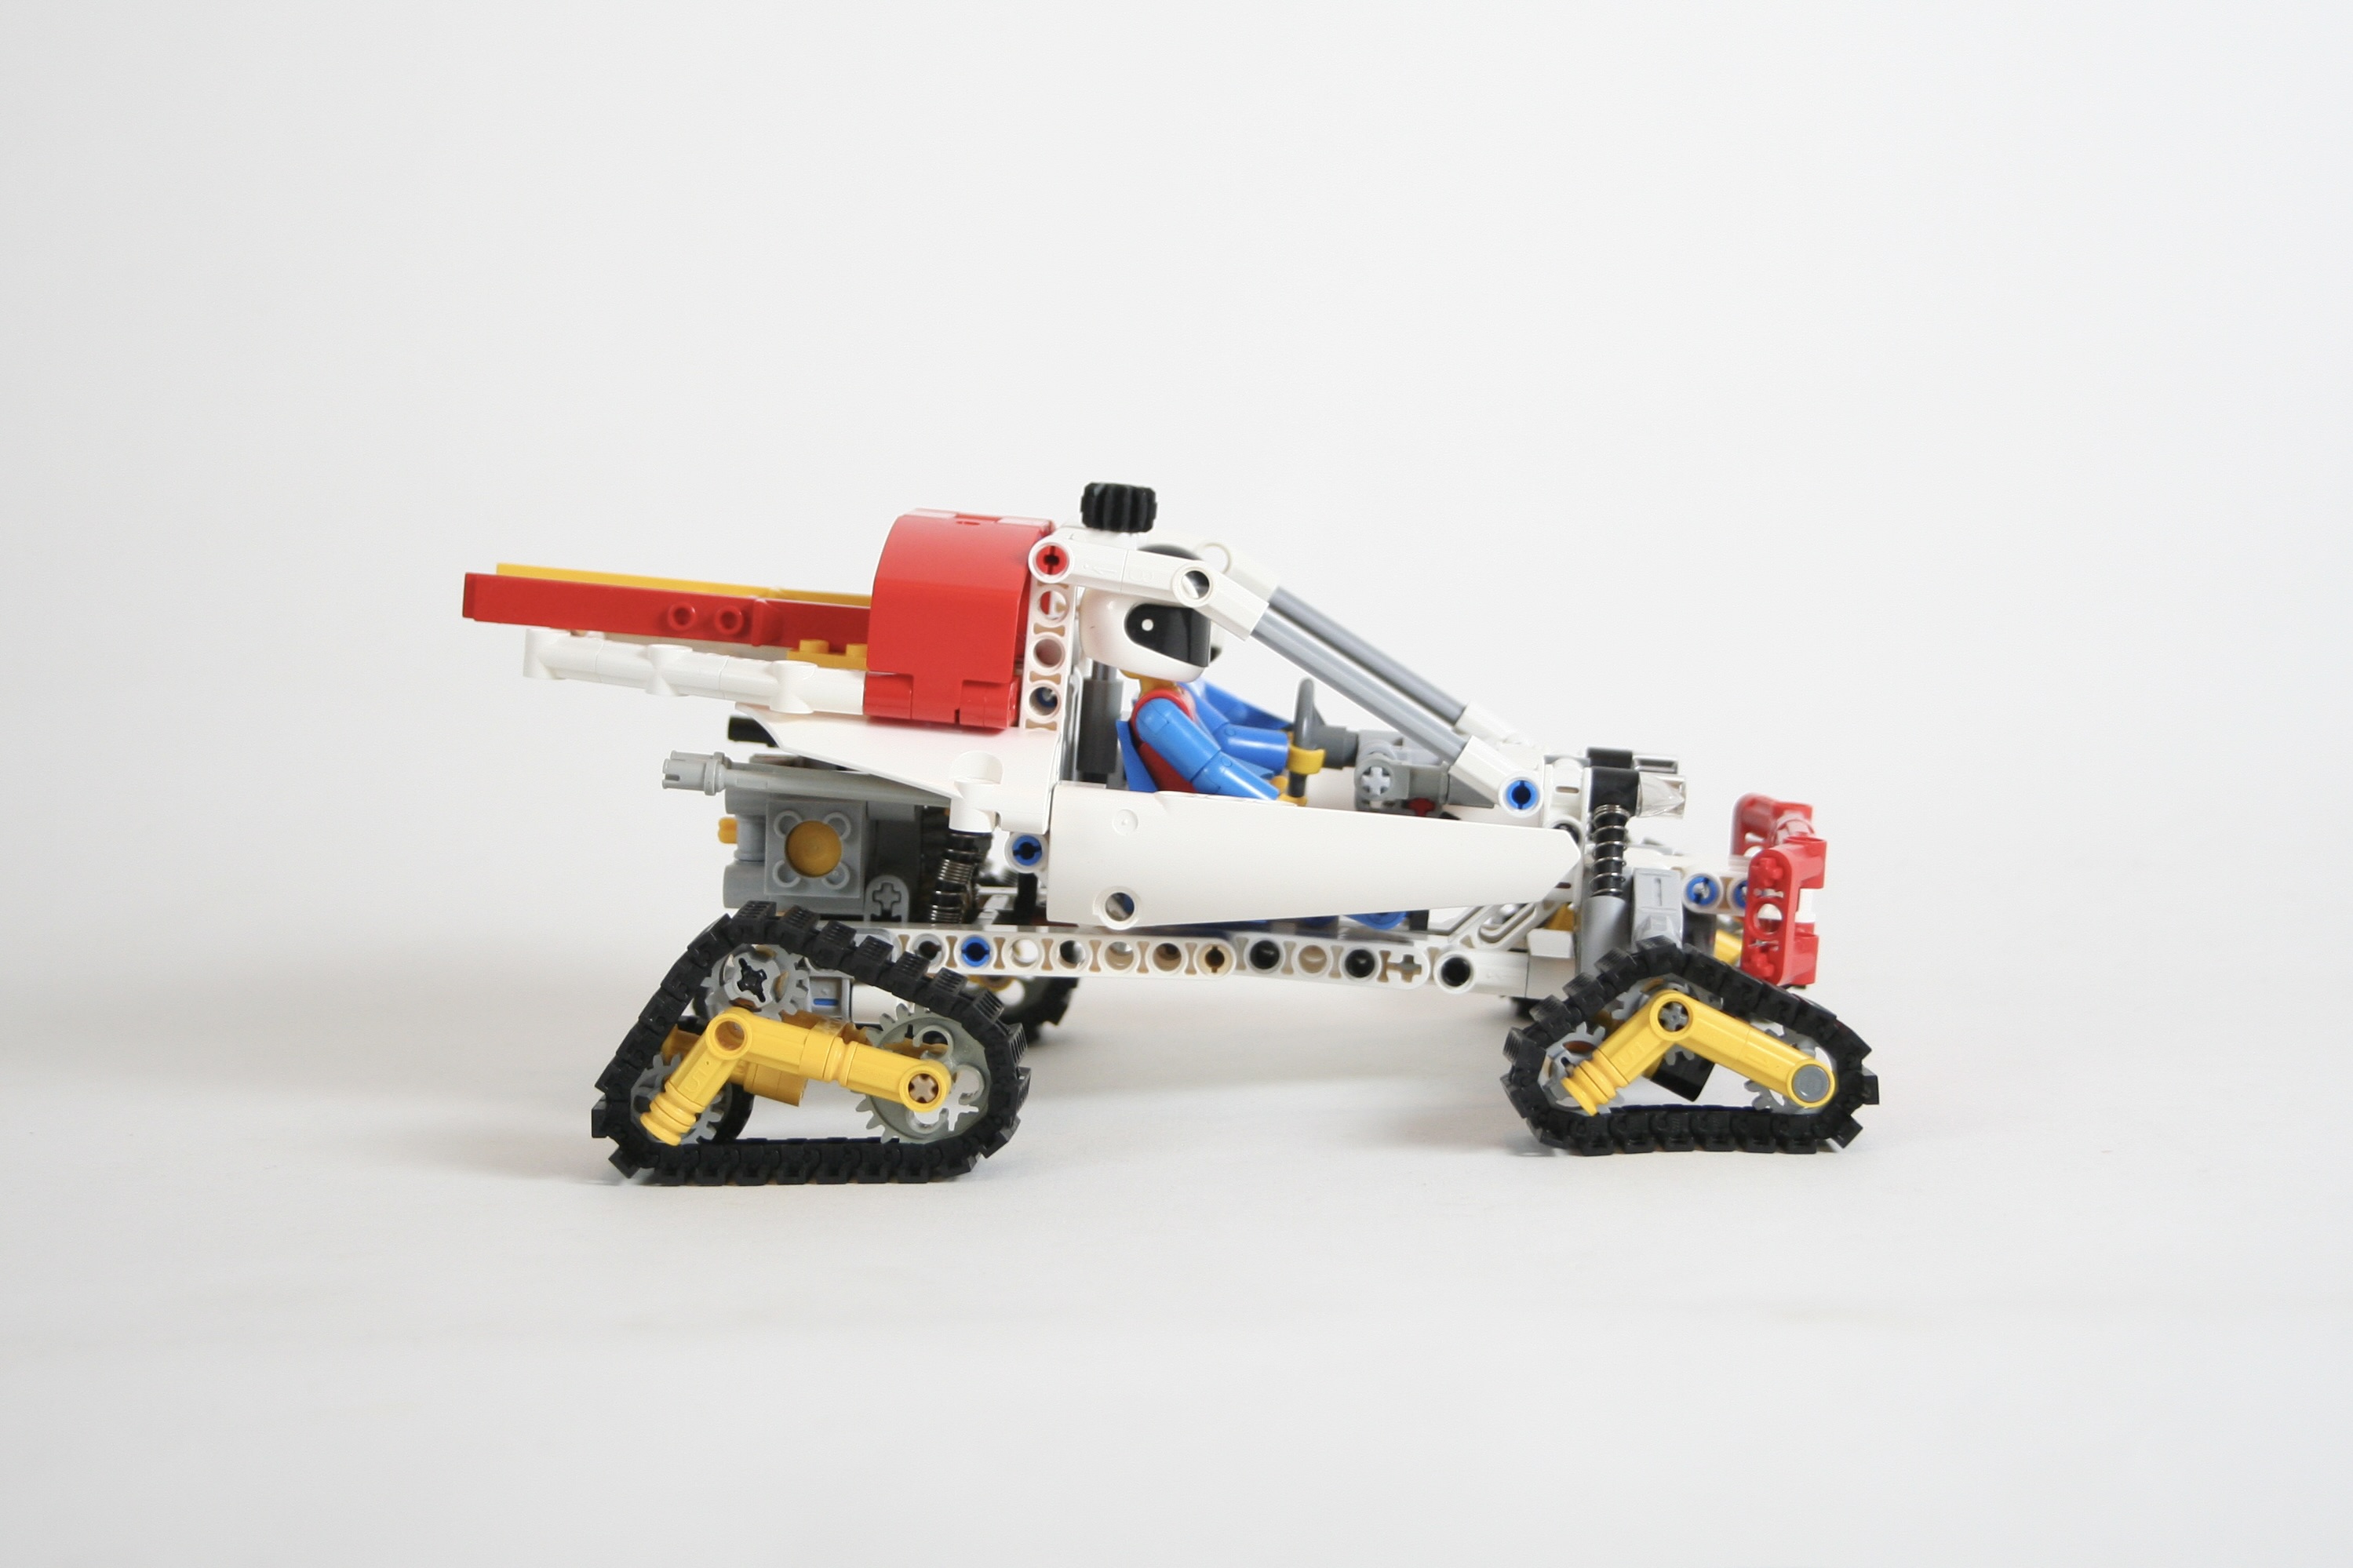
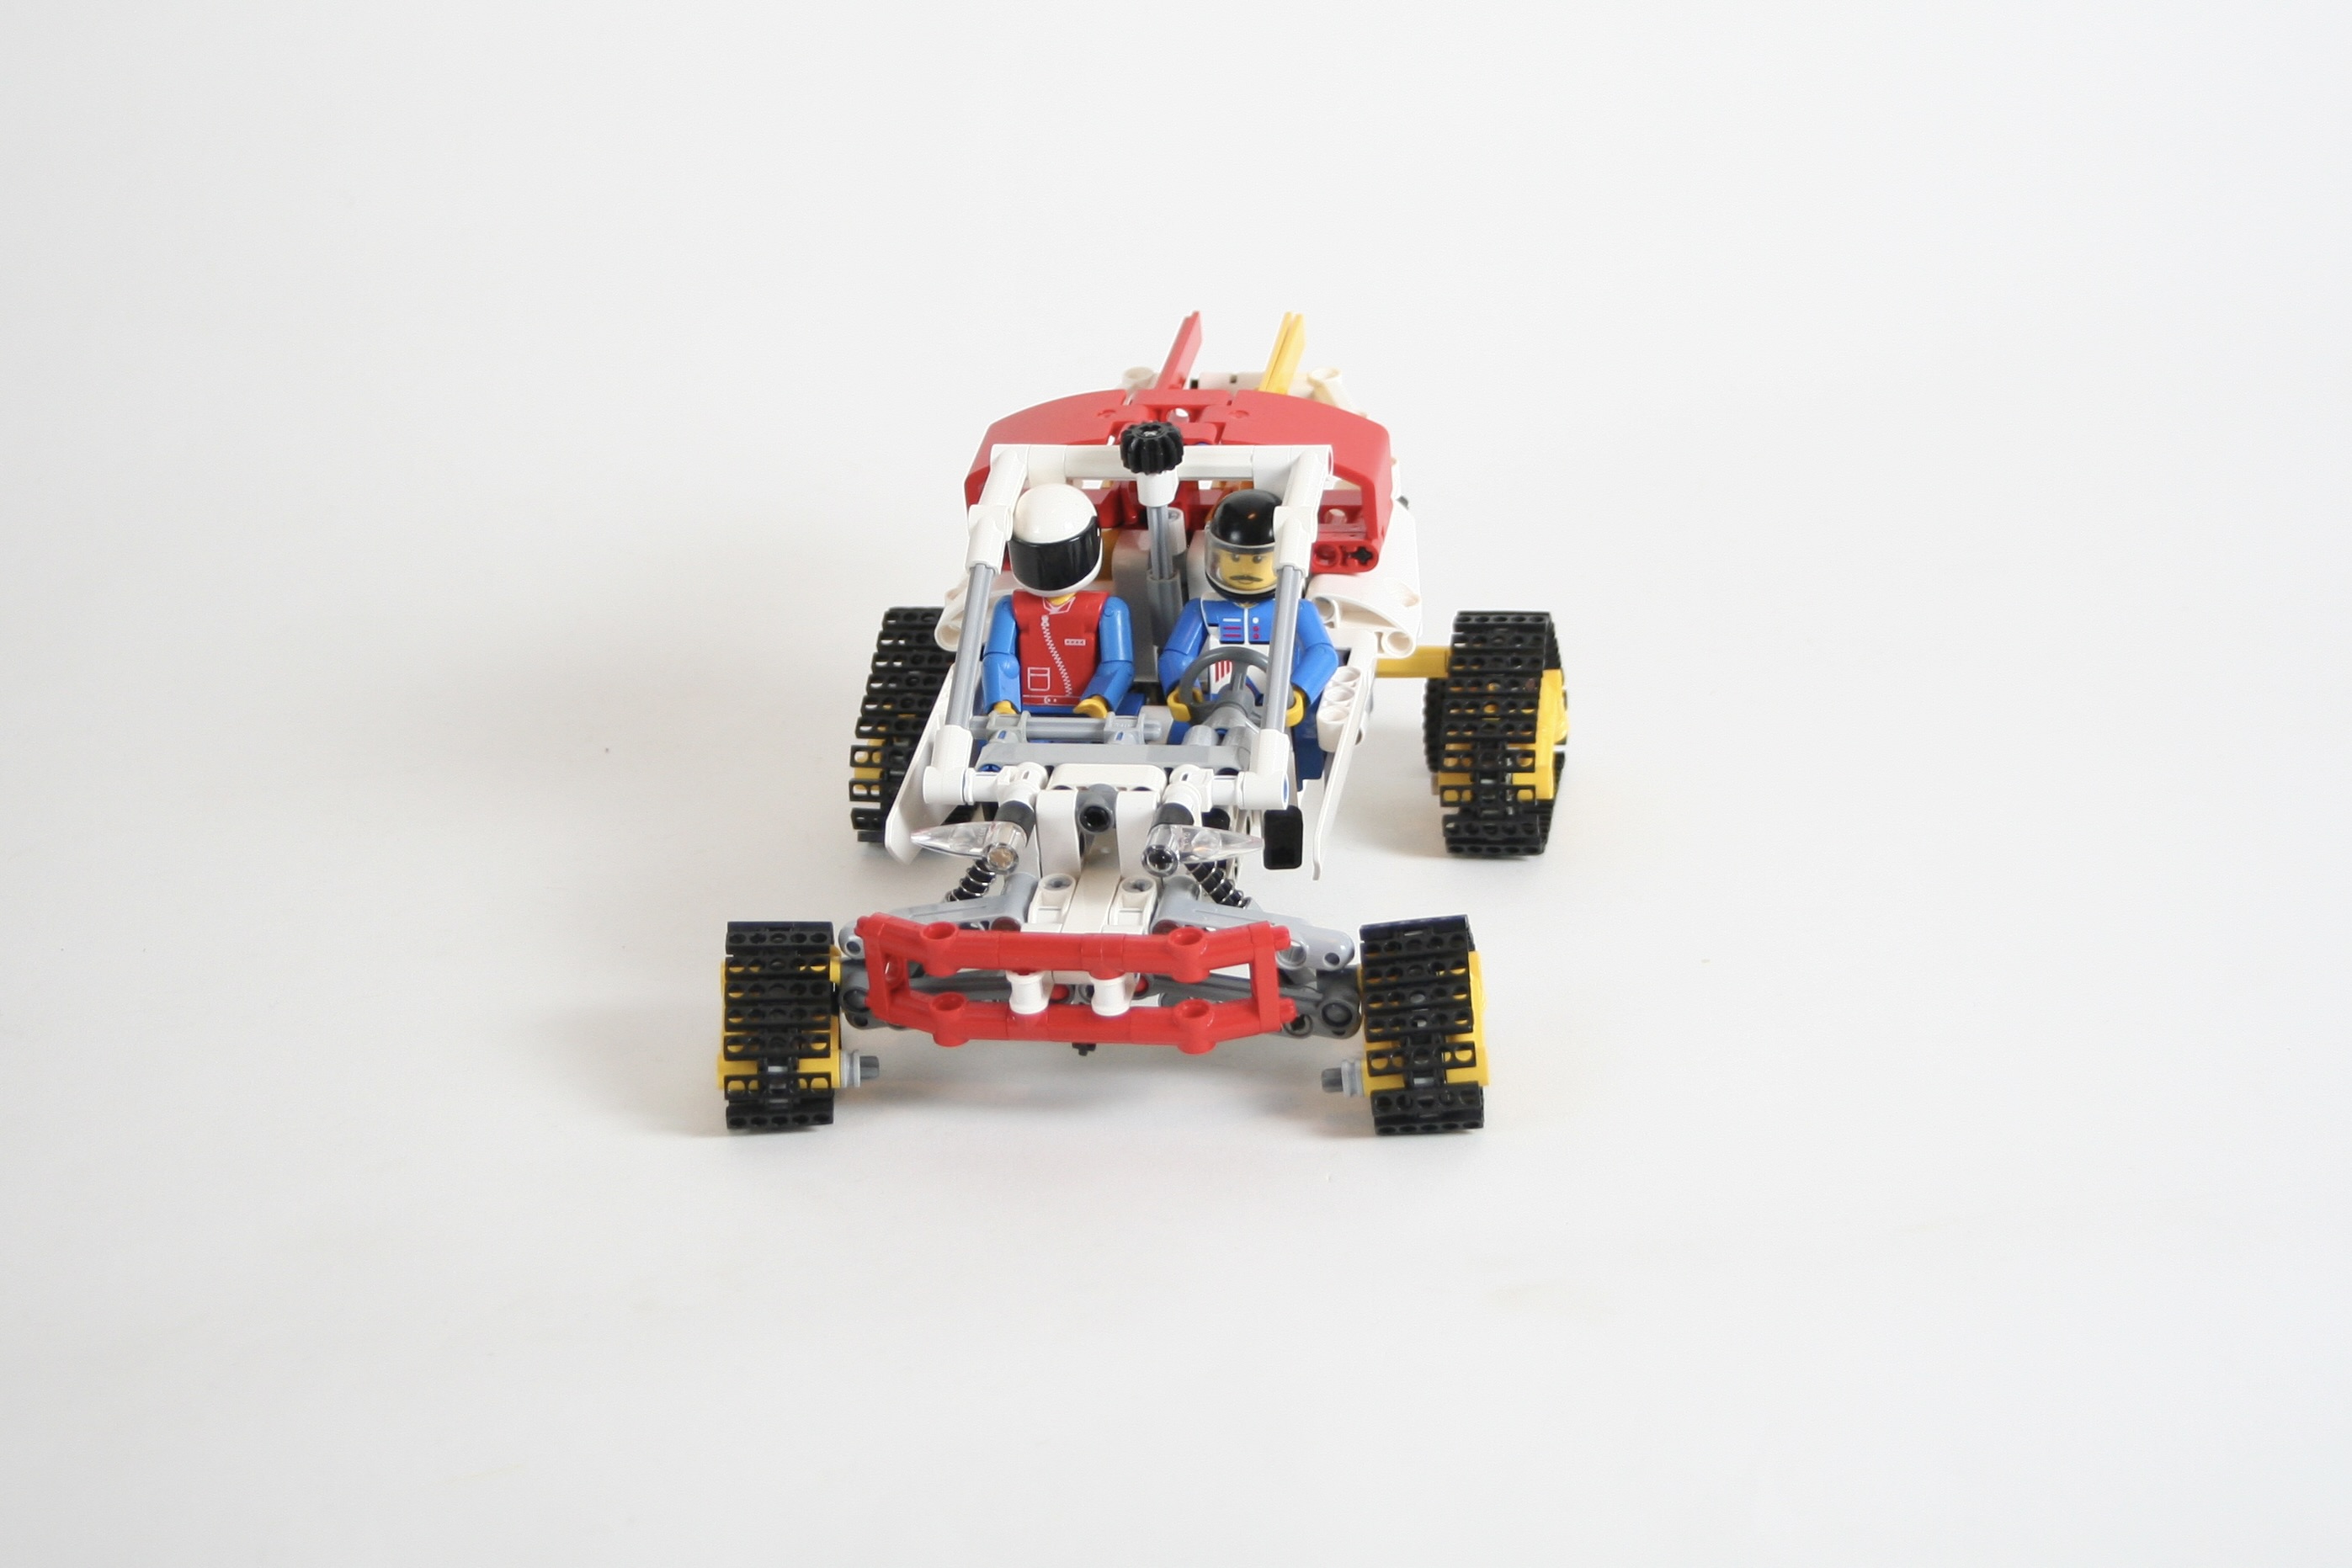
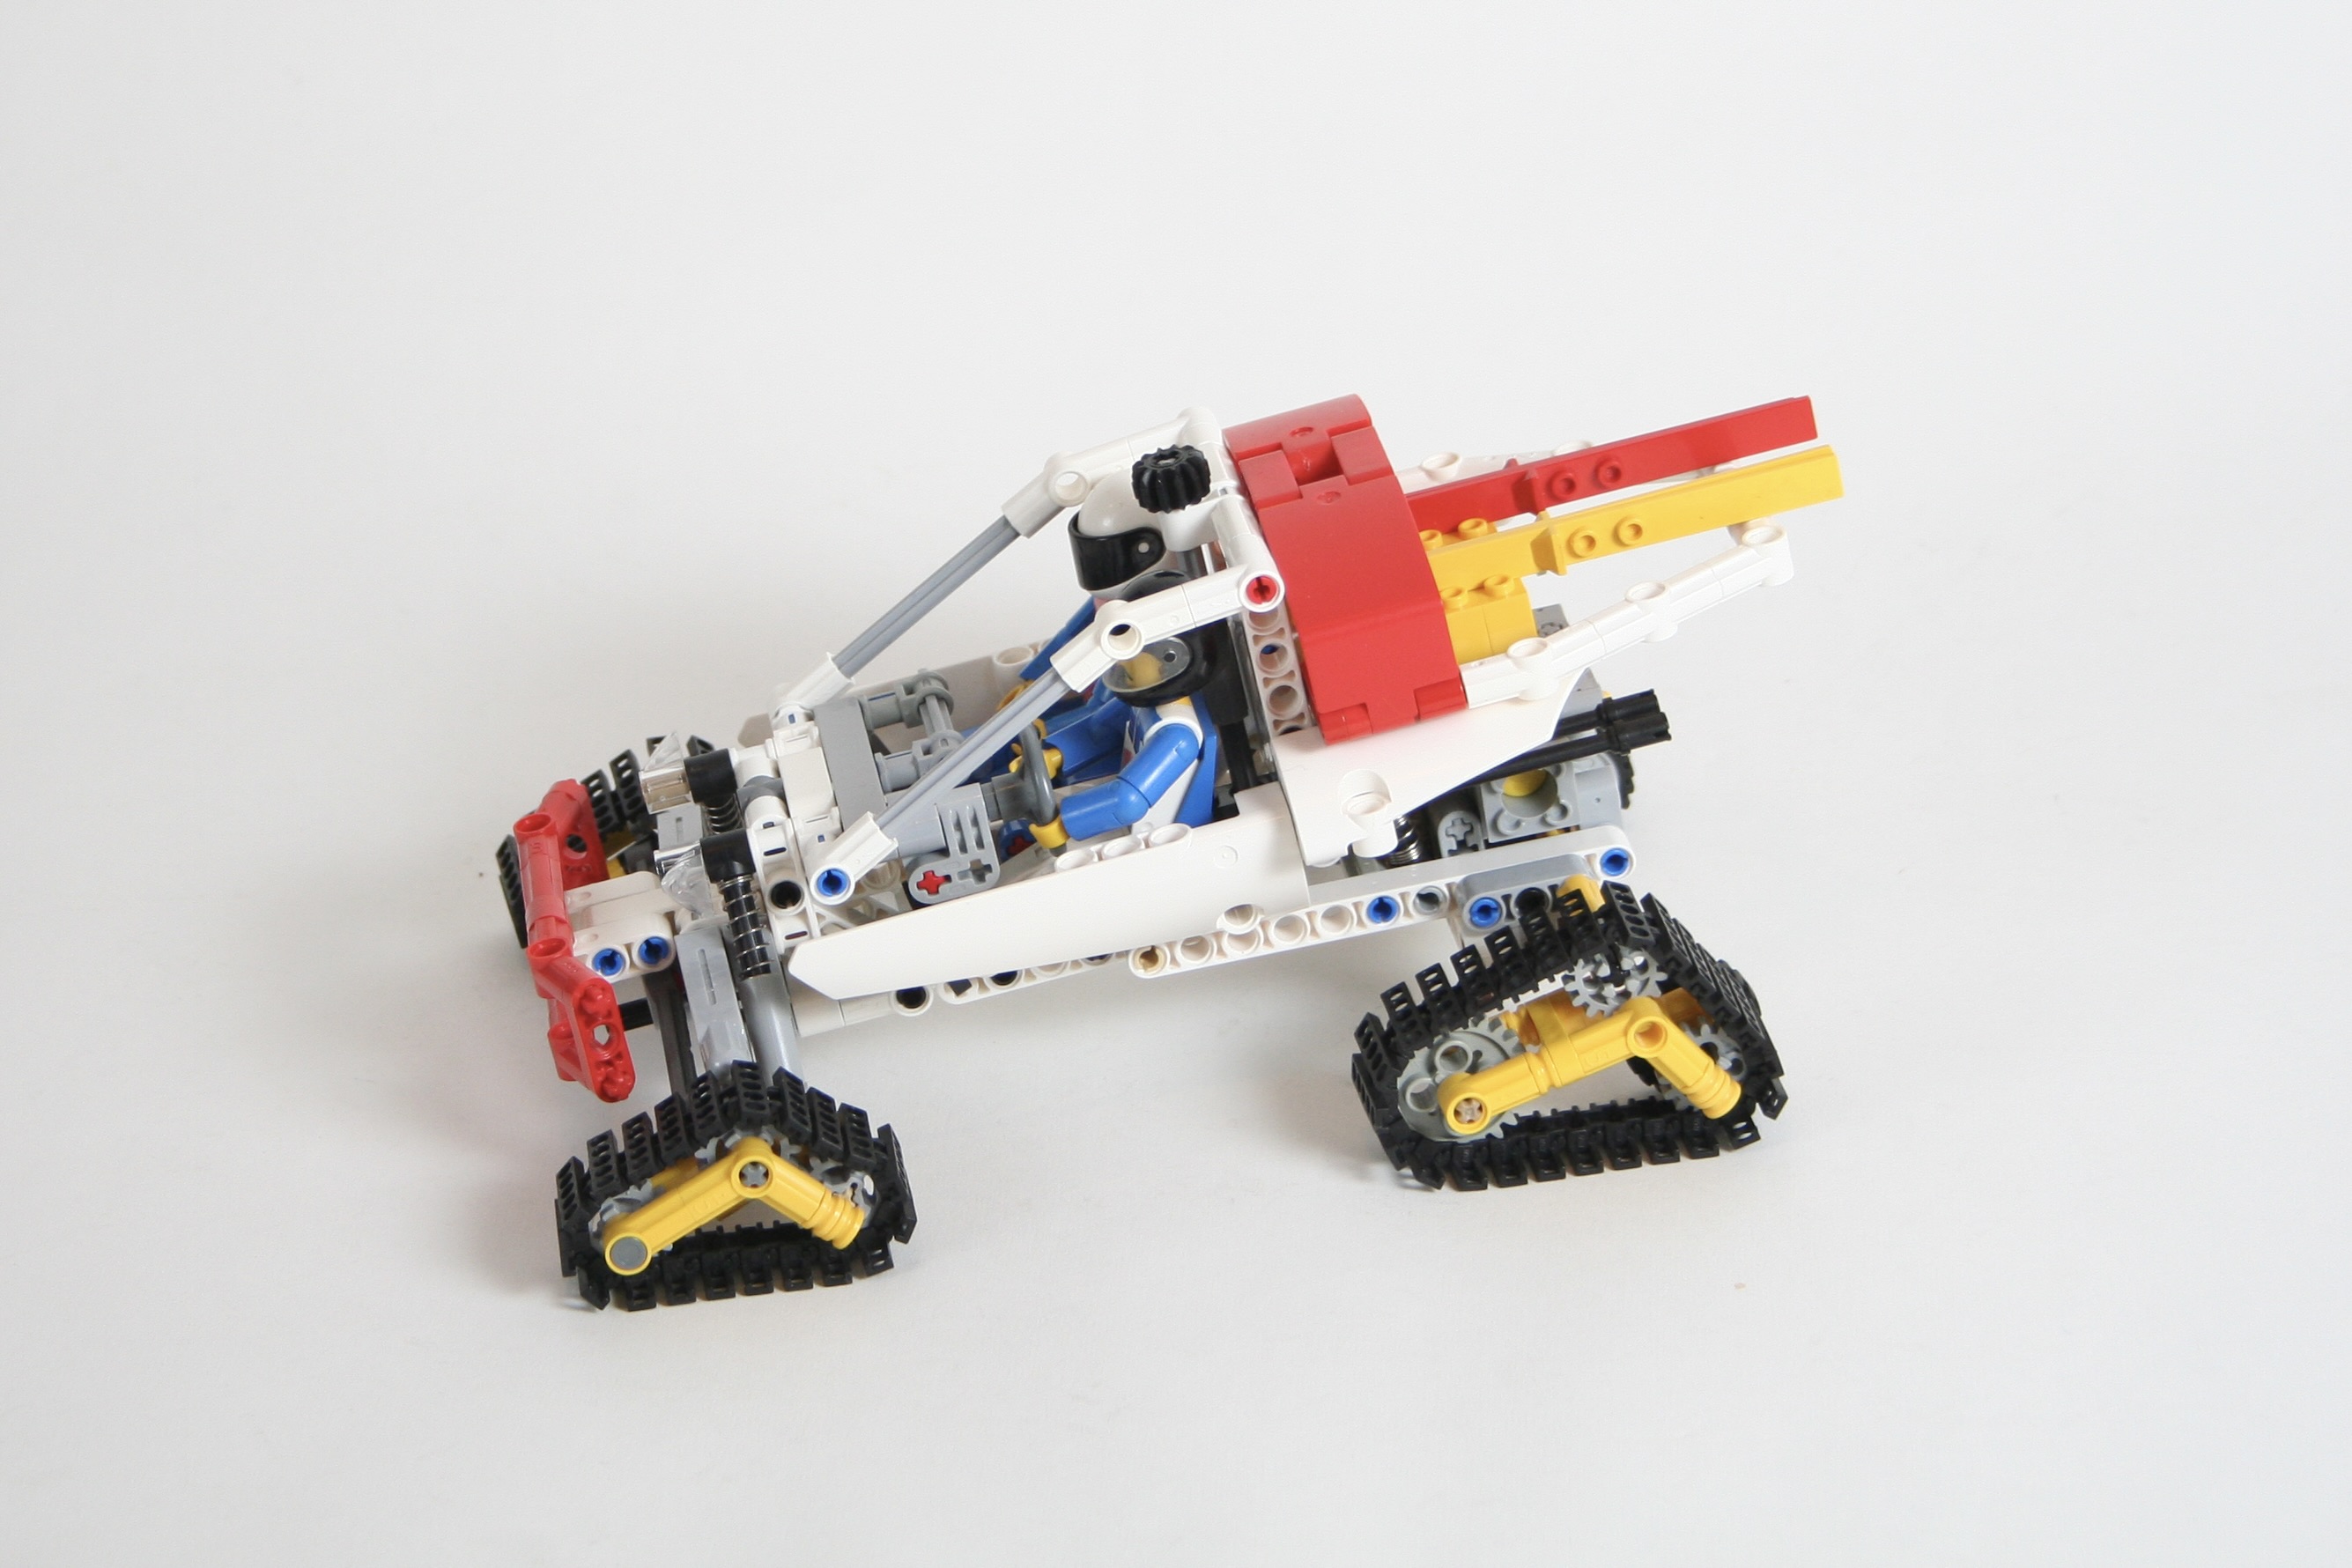
About twice a year, Eurobricks hosts a Technic build challenge, and I try to participate in as many as I am able. It keeps me building, and challenges me to build something I usually do not. And a friendly competition is always a good idea. This winter, TC26 was launched, and asked participates to build an arctic vehicle. I wanted to participate, but I did not have too much extra capacity during this season, so I decided to build something a little smaller.
The theme called for either an orange build, or a build that matches the colors of the original arctic theme technic had during the late 80’s. I, of course, decided to use the 80’s theme because this would allow me to use my seldom used Technic figures, and their skis. Also, the build would have to use tracks, and I felt this was a requirement for a snow vehicle. I was inspired by some side-by-side vehicles recently, so that was the idea I would move forward with for the build.
I designed the front suspension first to get an idea of the front track, and then each of the four track units. This gave me a rough size of the vehicle. Then a little engine and rear suspension unit was developed.
I then added the two seats and Technic figures. I have used these seats and figures before, and every time I do, I am reminded about how different the old studs and pins technic system is from the newer liftarm based system. There is no strong, simple, and compact way to add a Technic figure seat into a liftarm body. After some work, I was able to come up with something that would work. Then I was able to finalize a body around these features.
The design was simple, and nothing too fancy. The steering could have been a little better, and the tracks were not quite as smooth as I wanted, but it looked good enough, and allowed me to participate in another contest, which is always fun. Feel free to give the build a try for yourself.
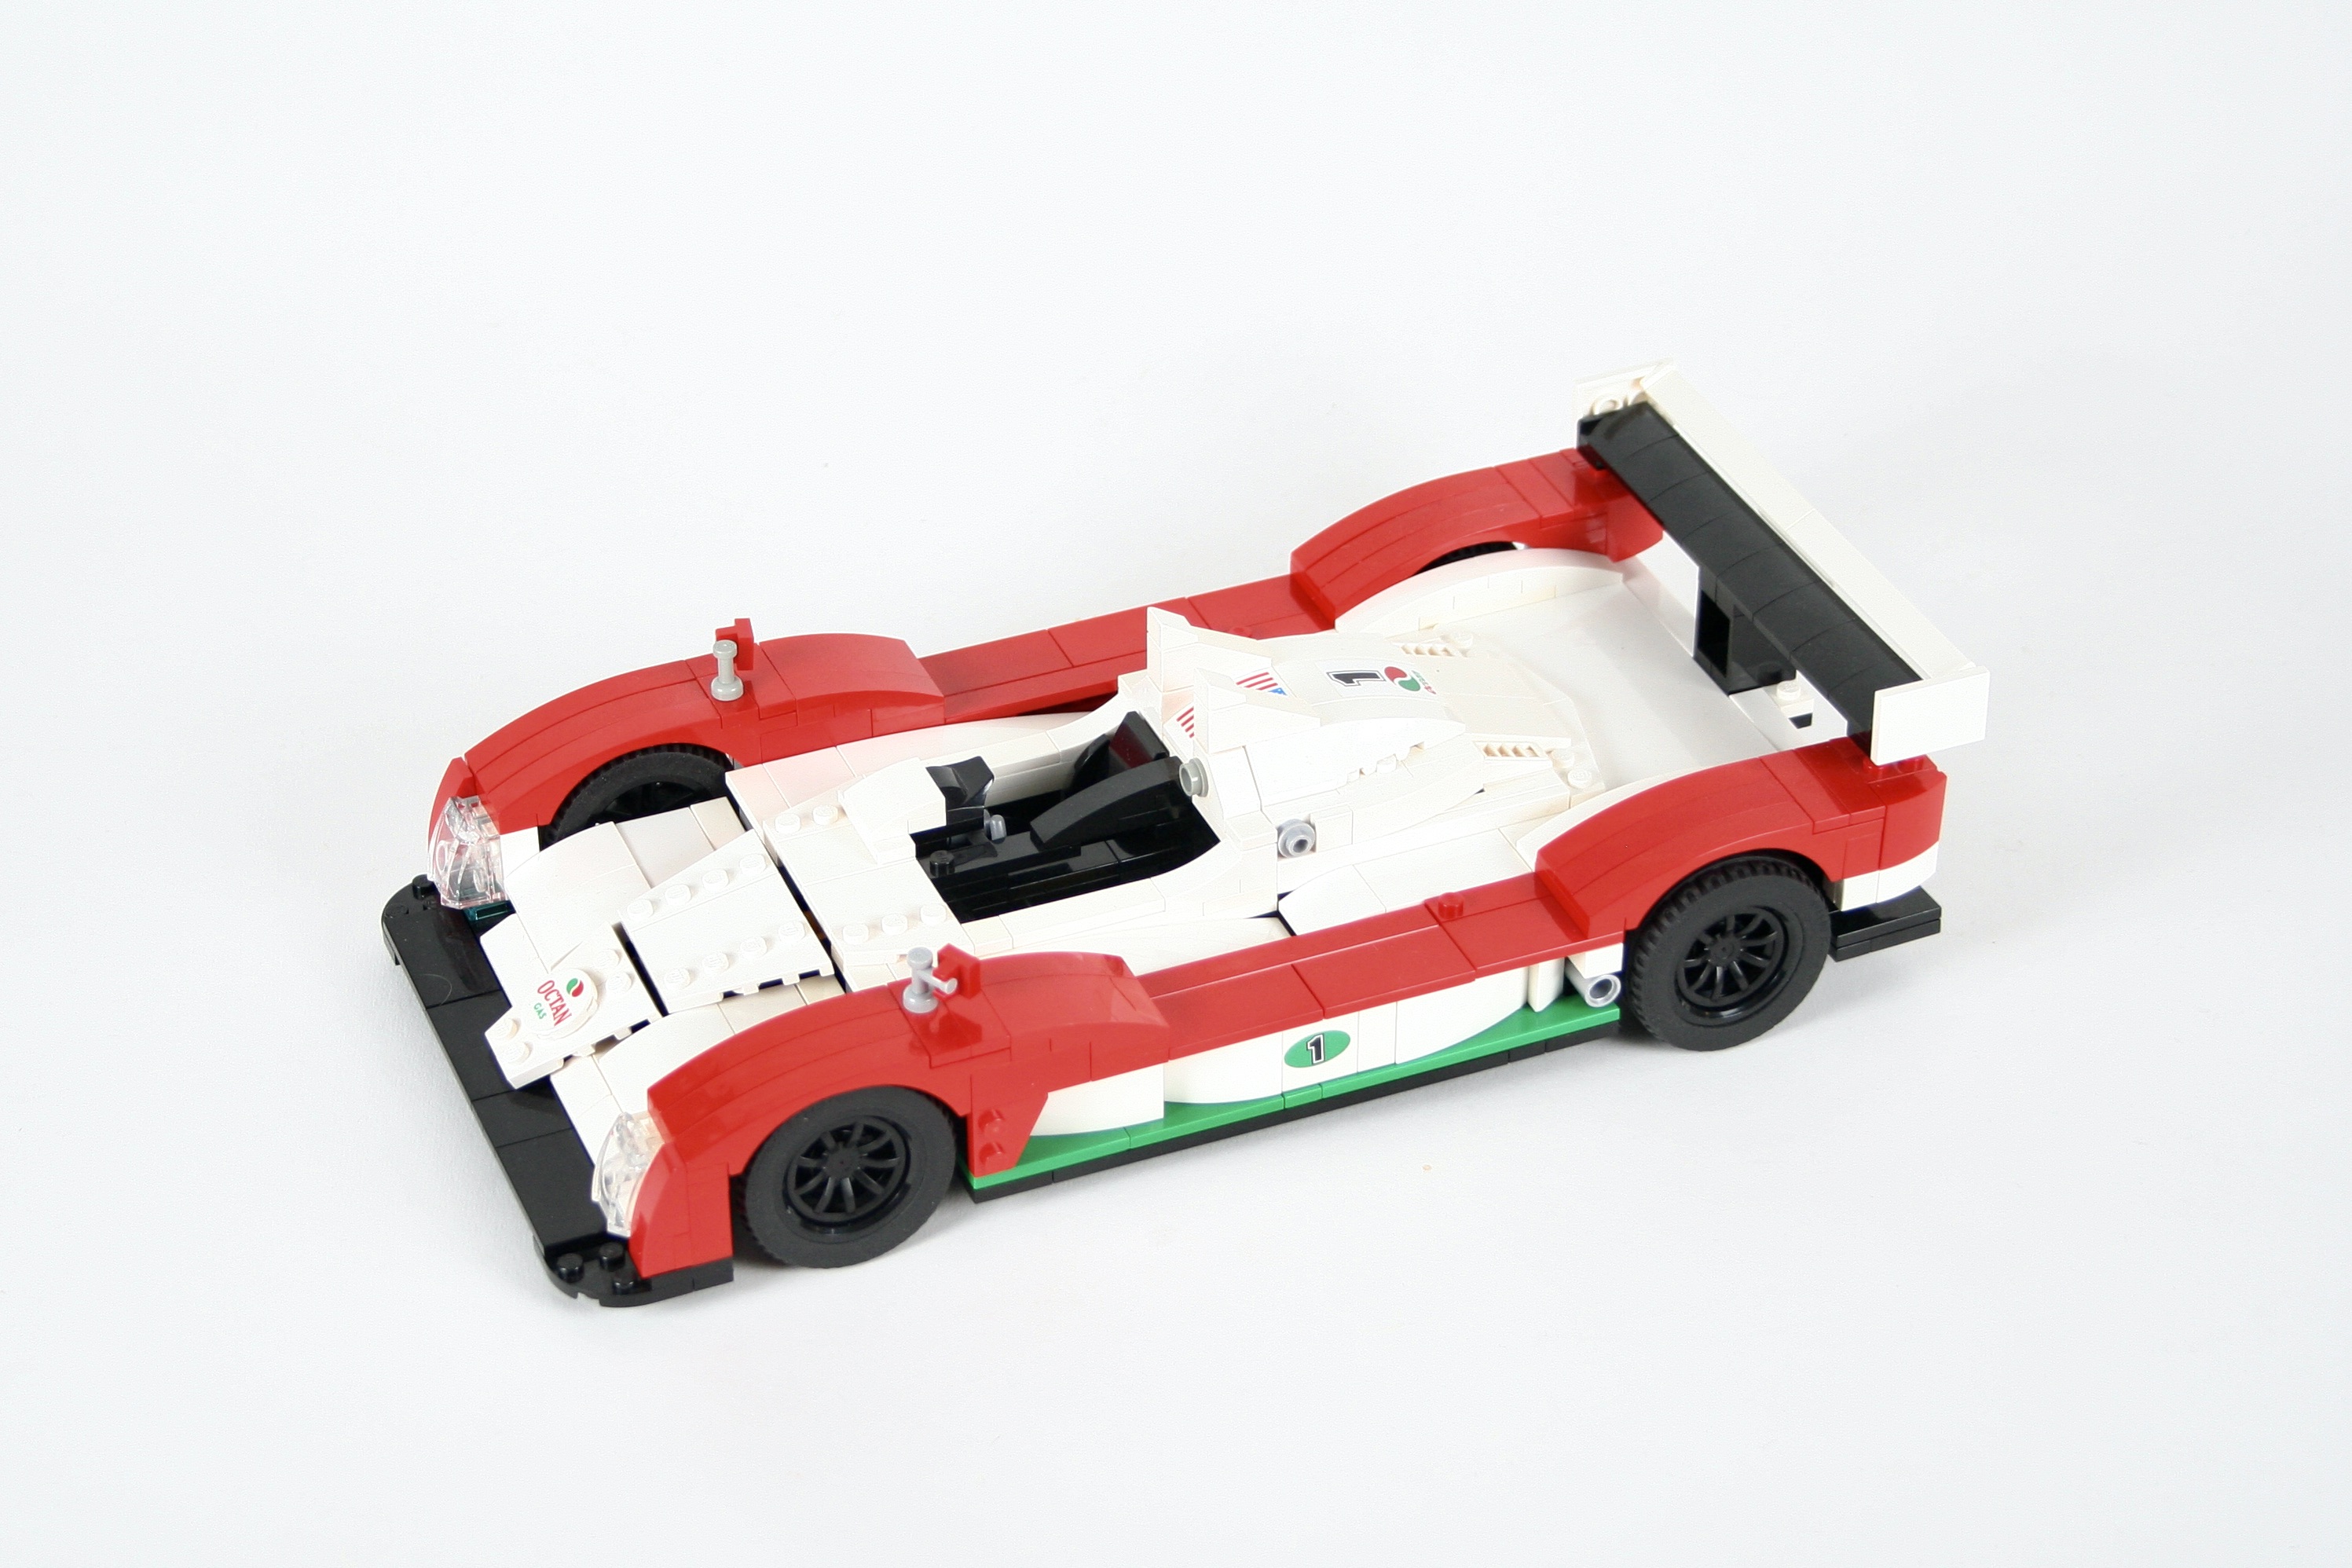
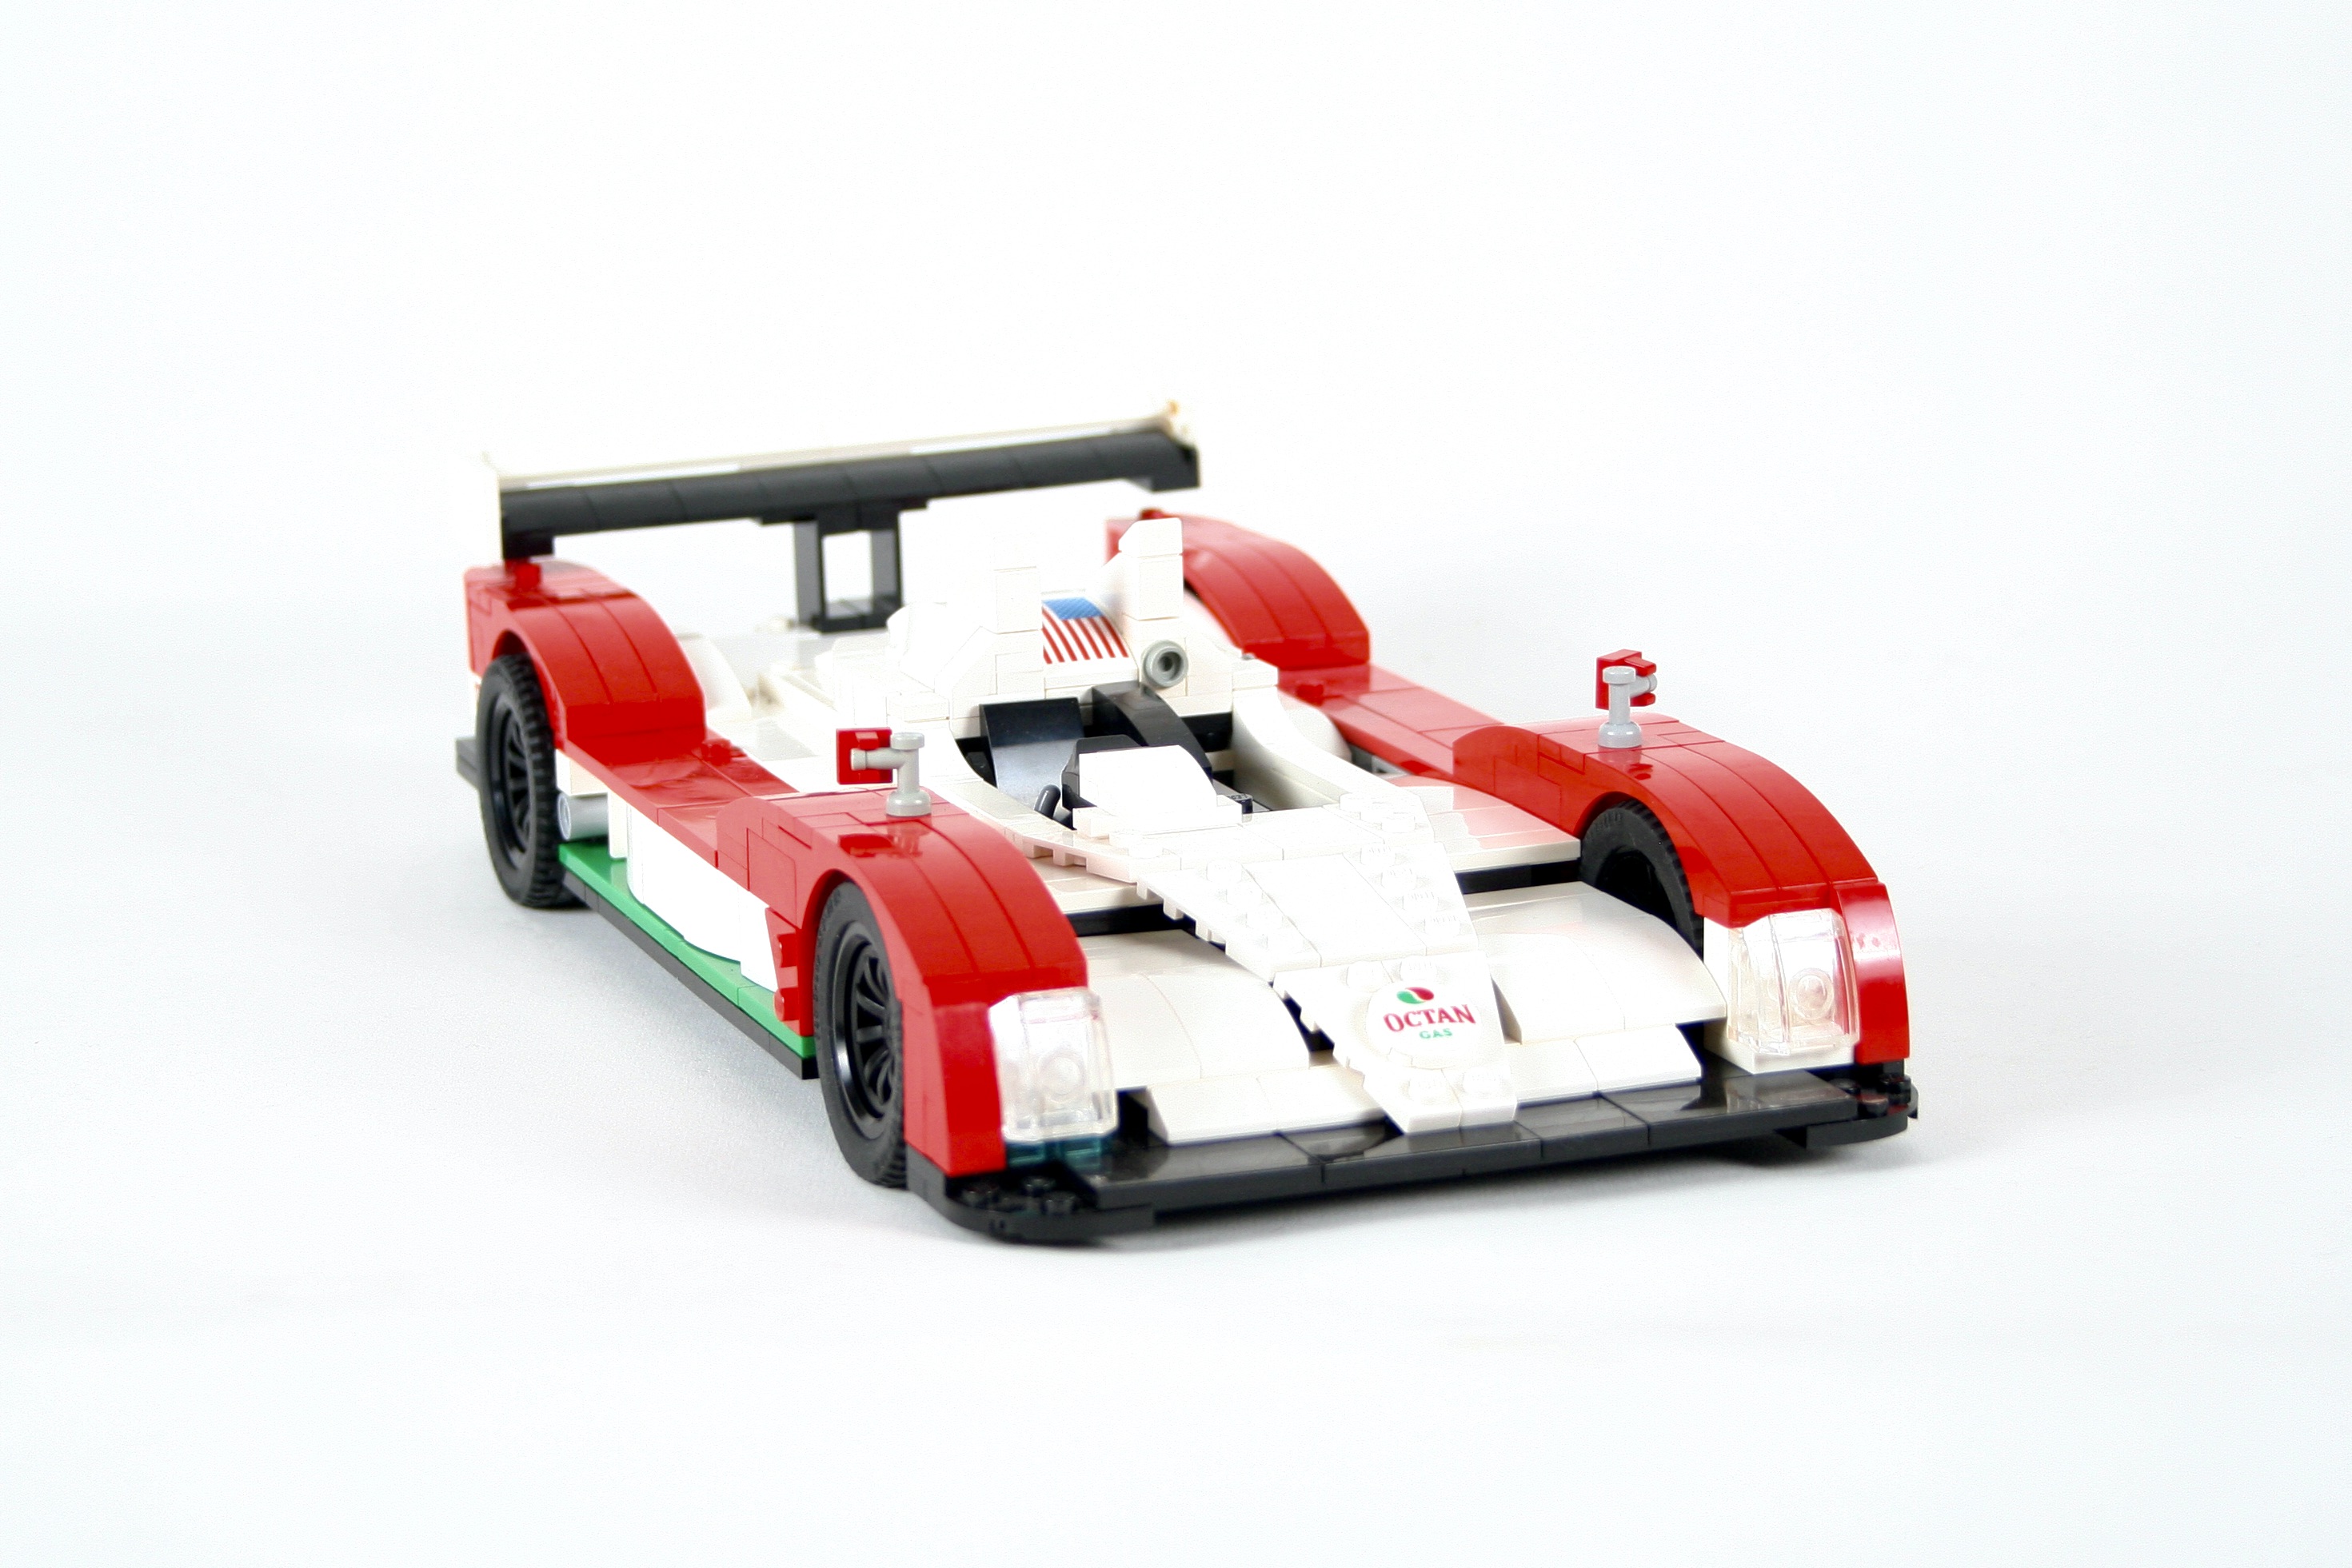
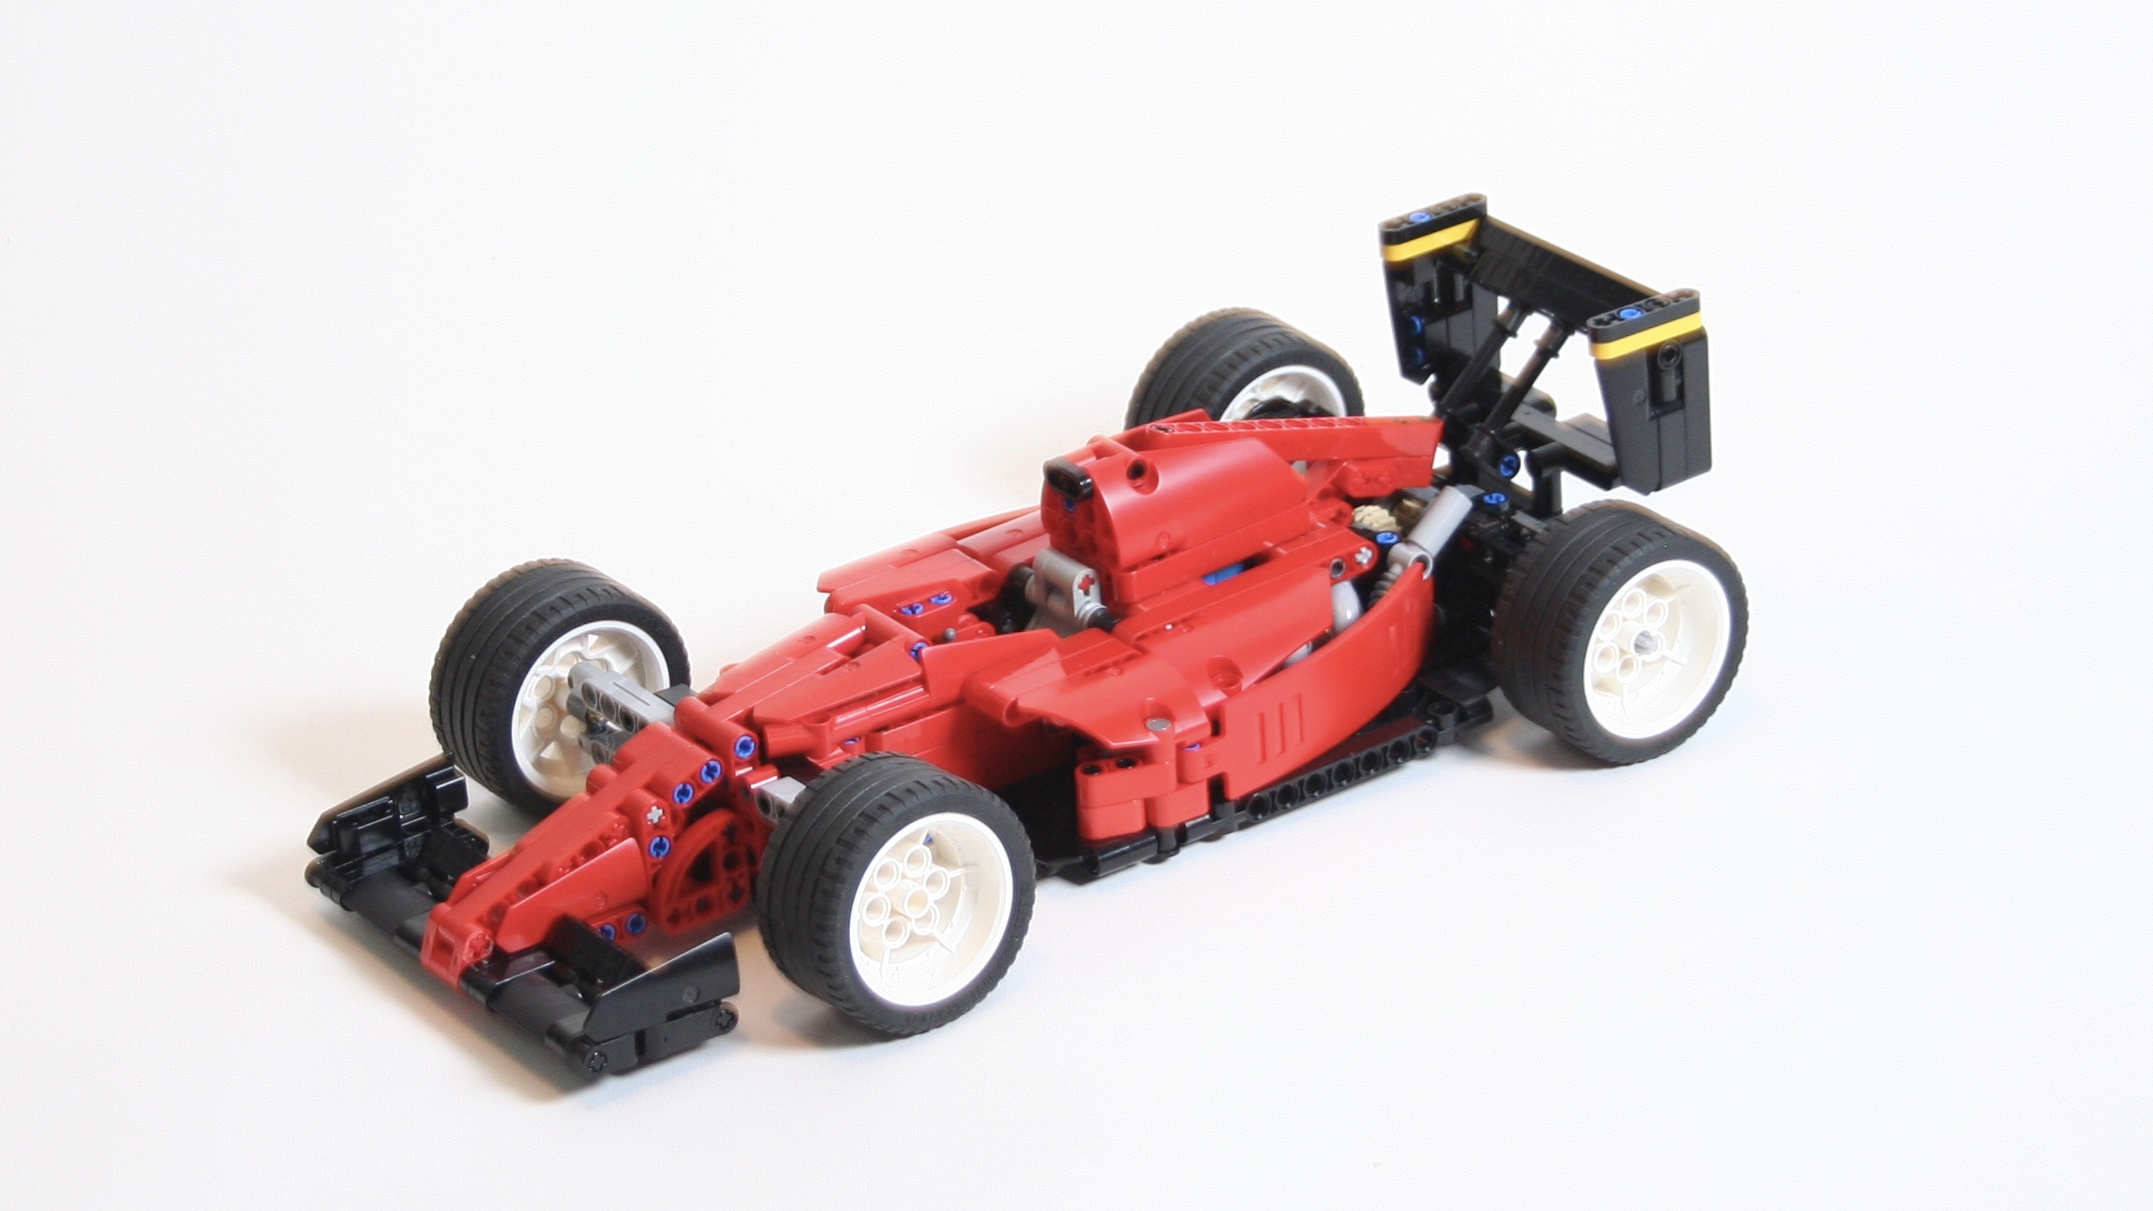
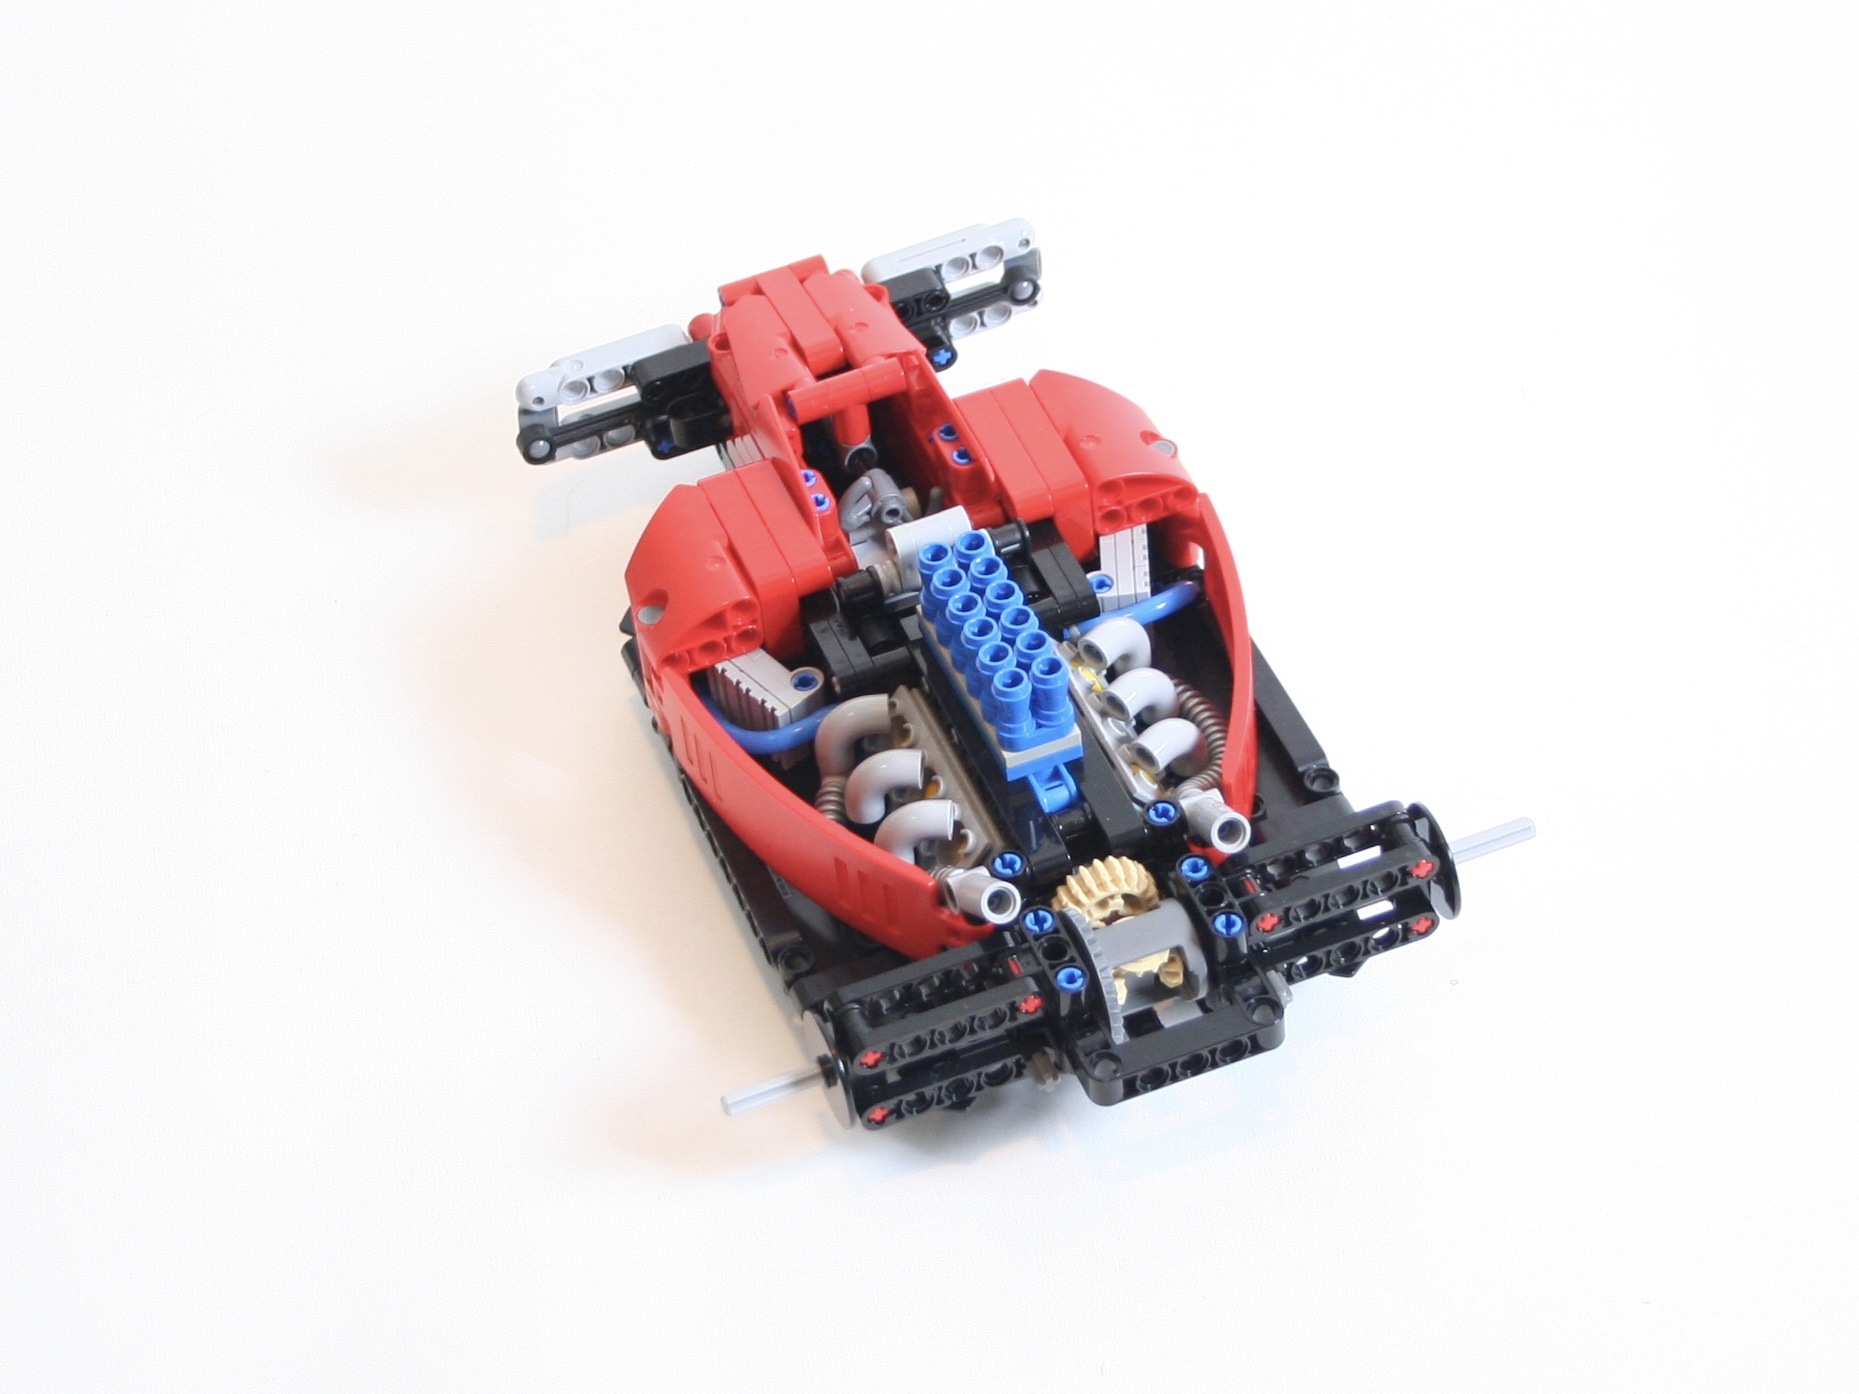
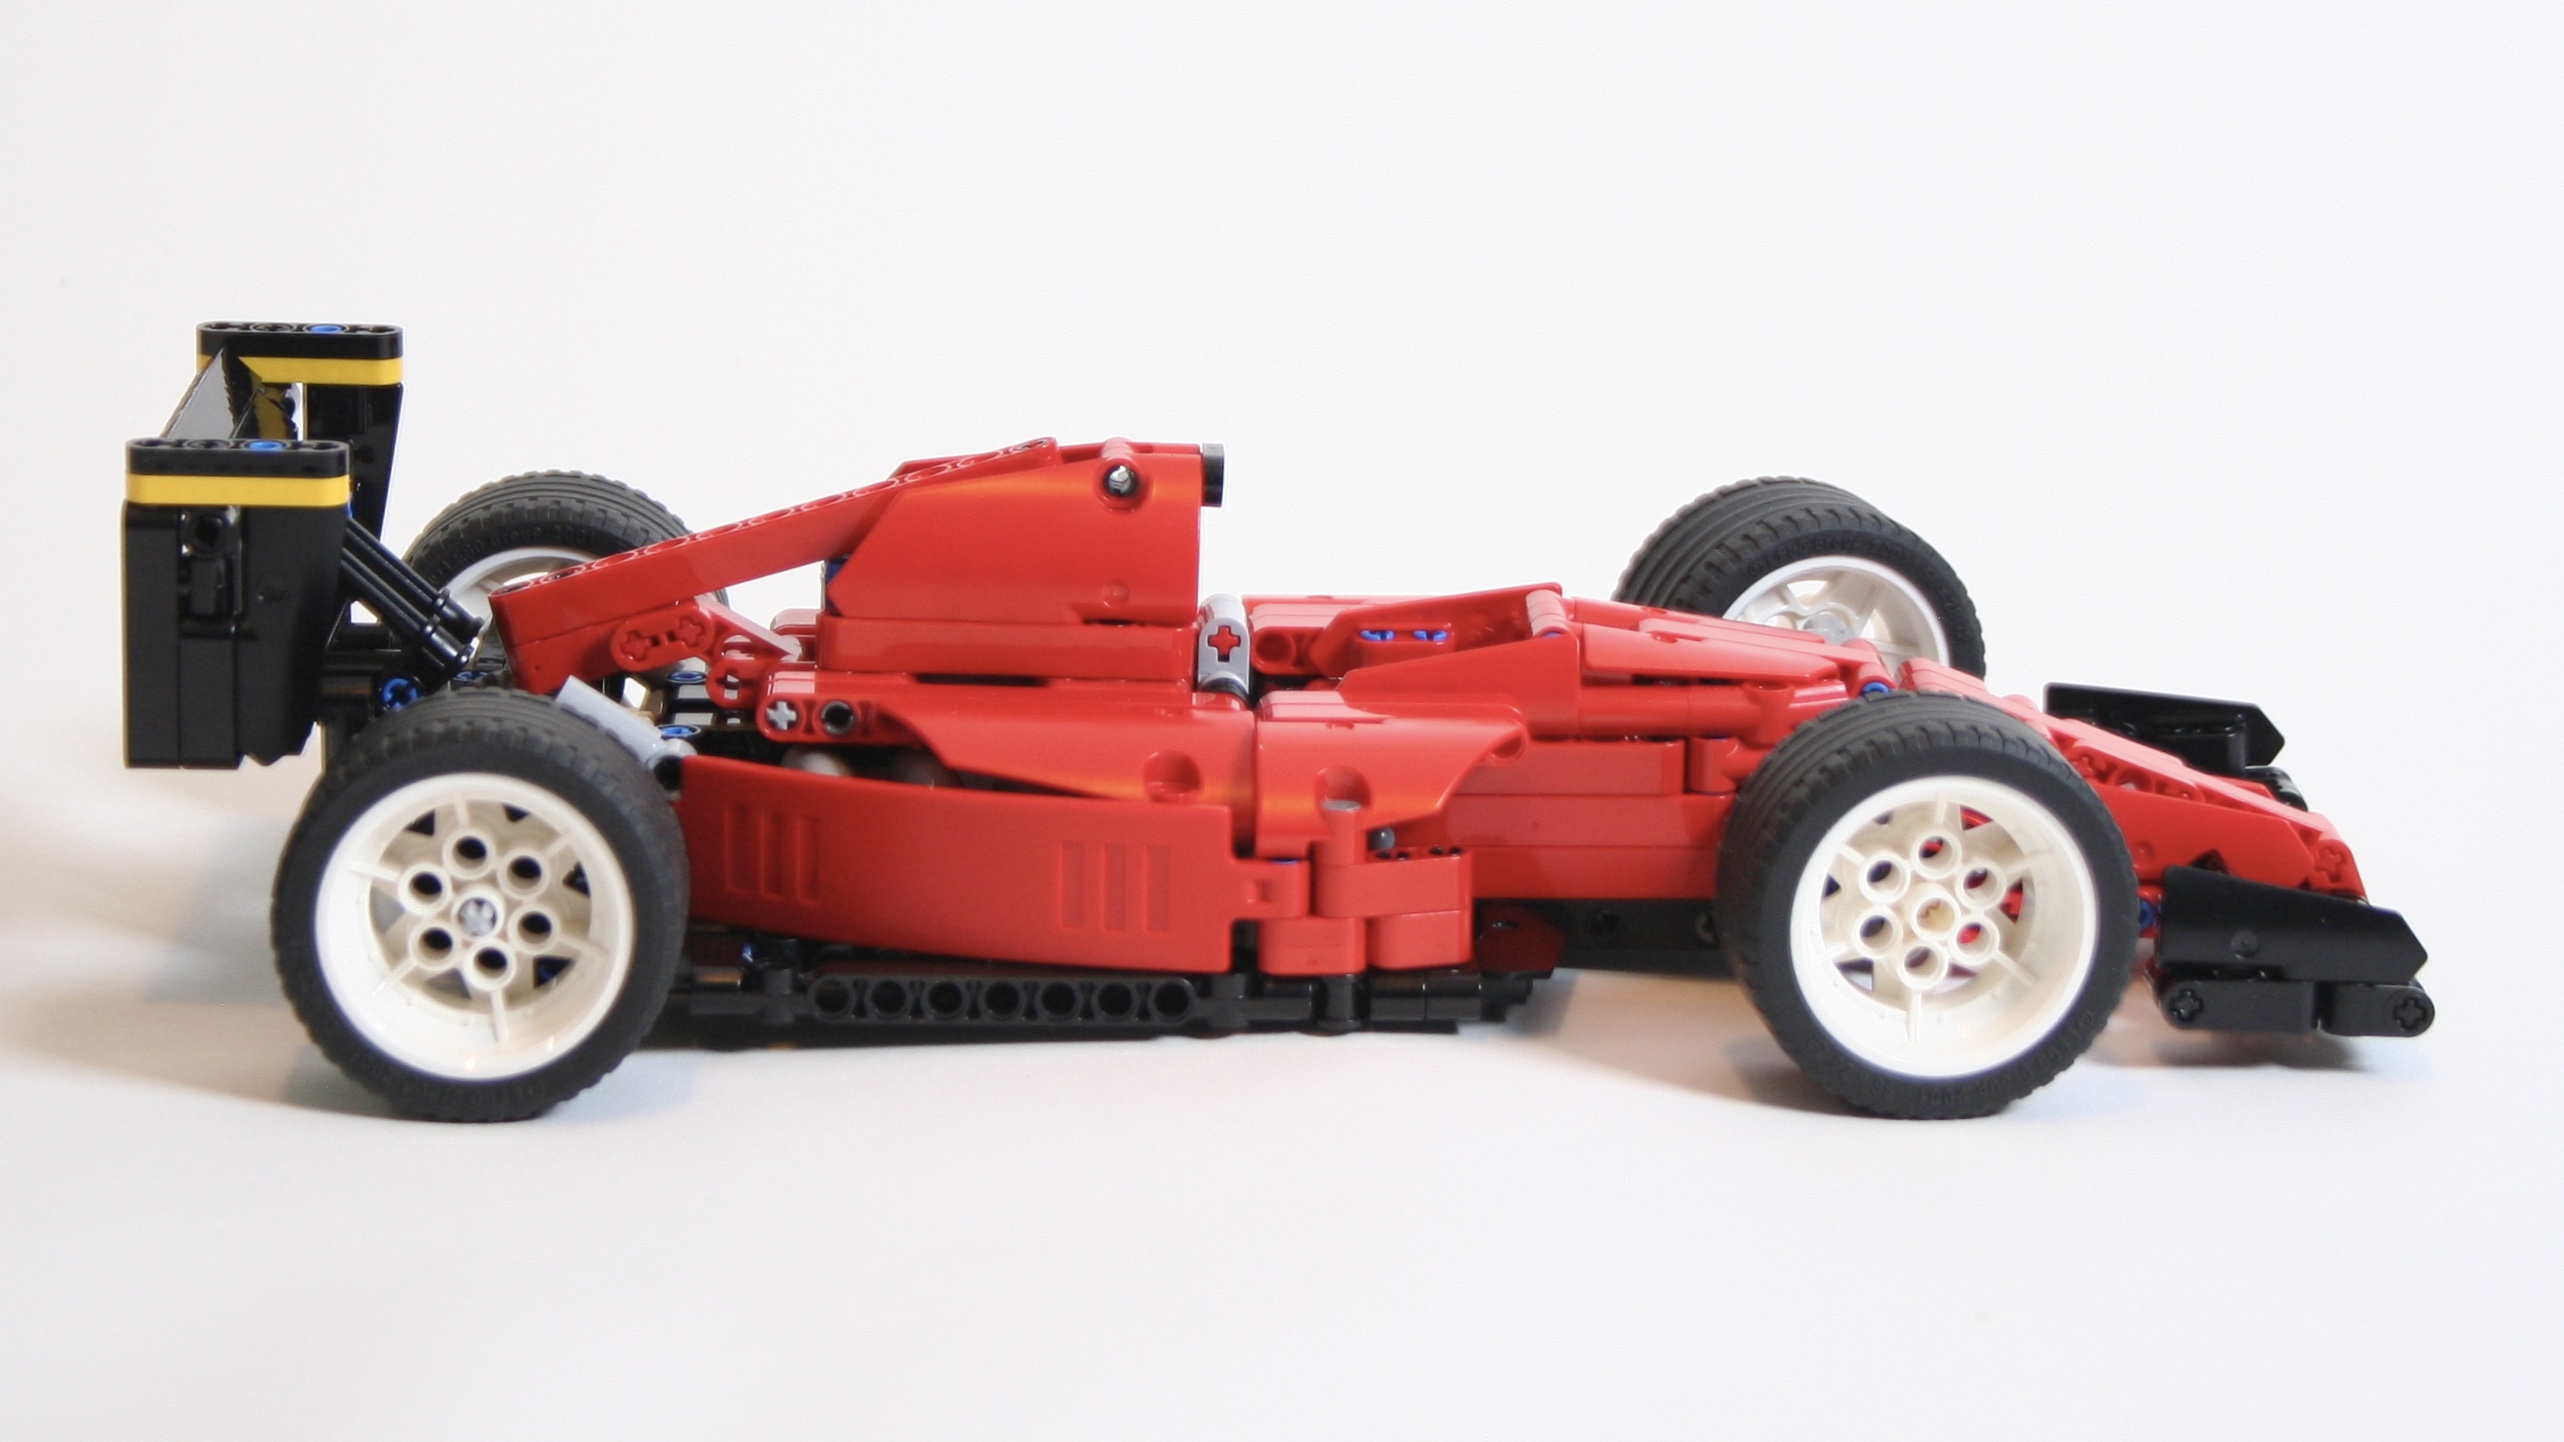
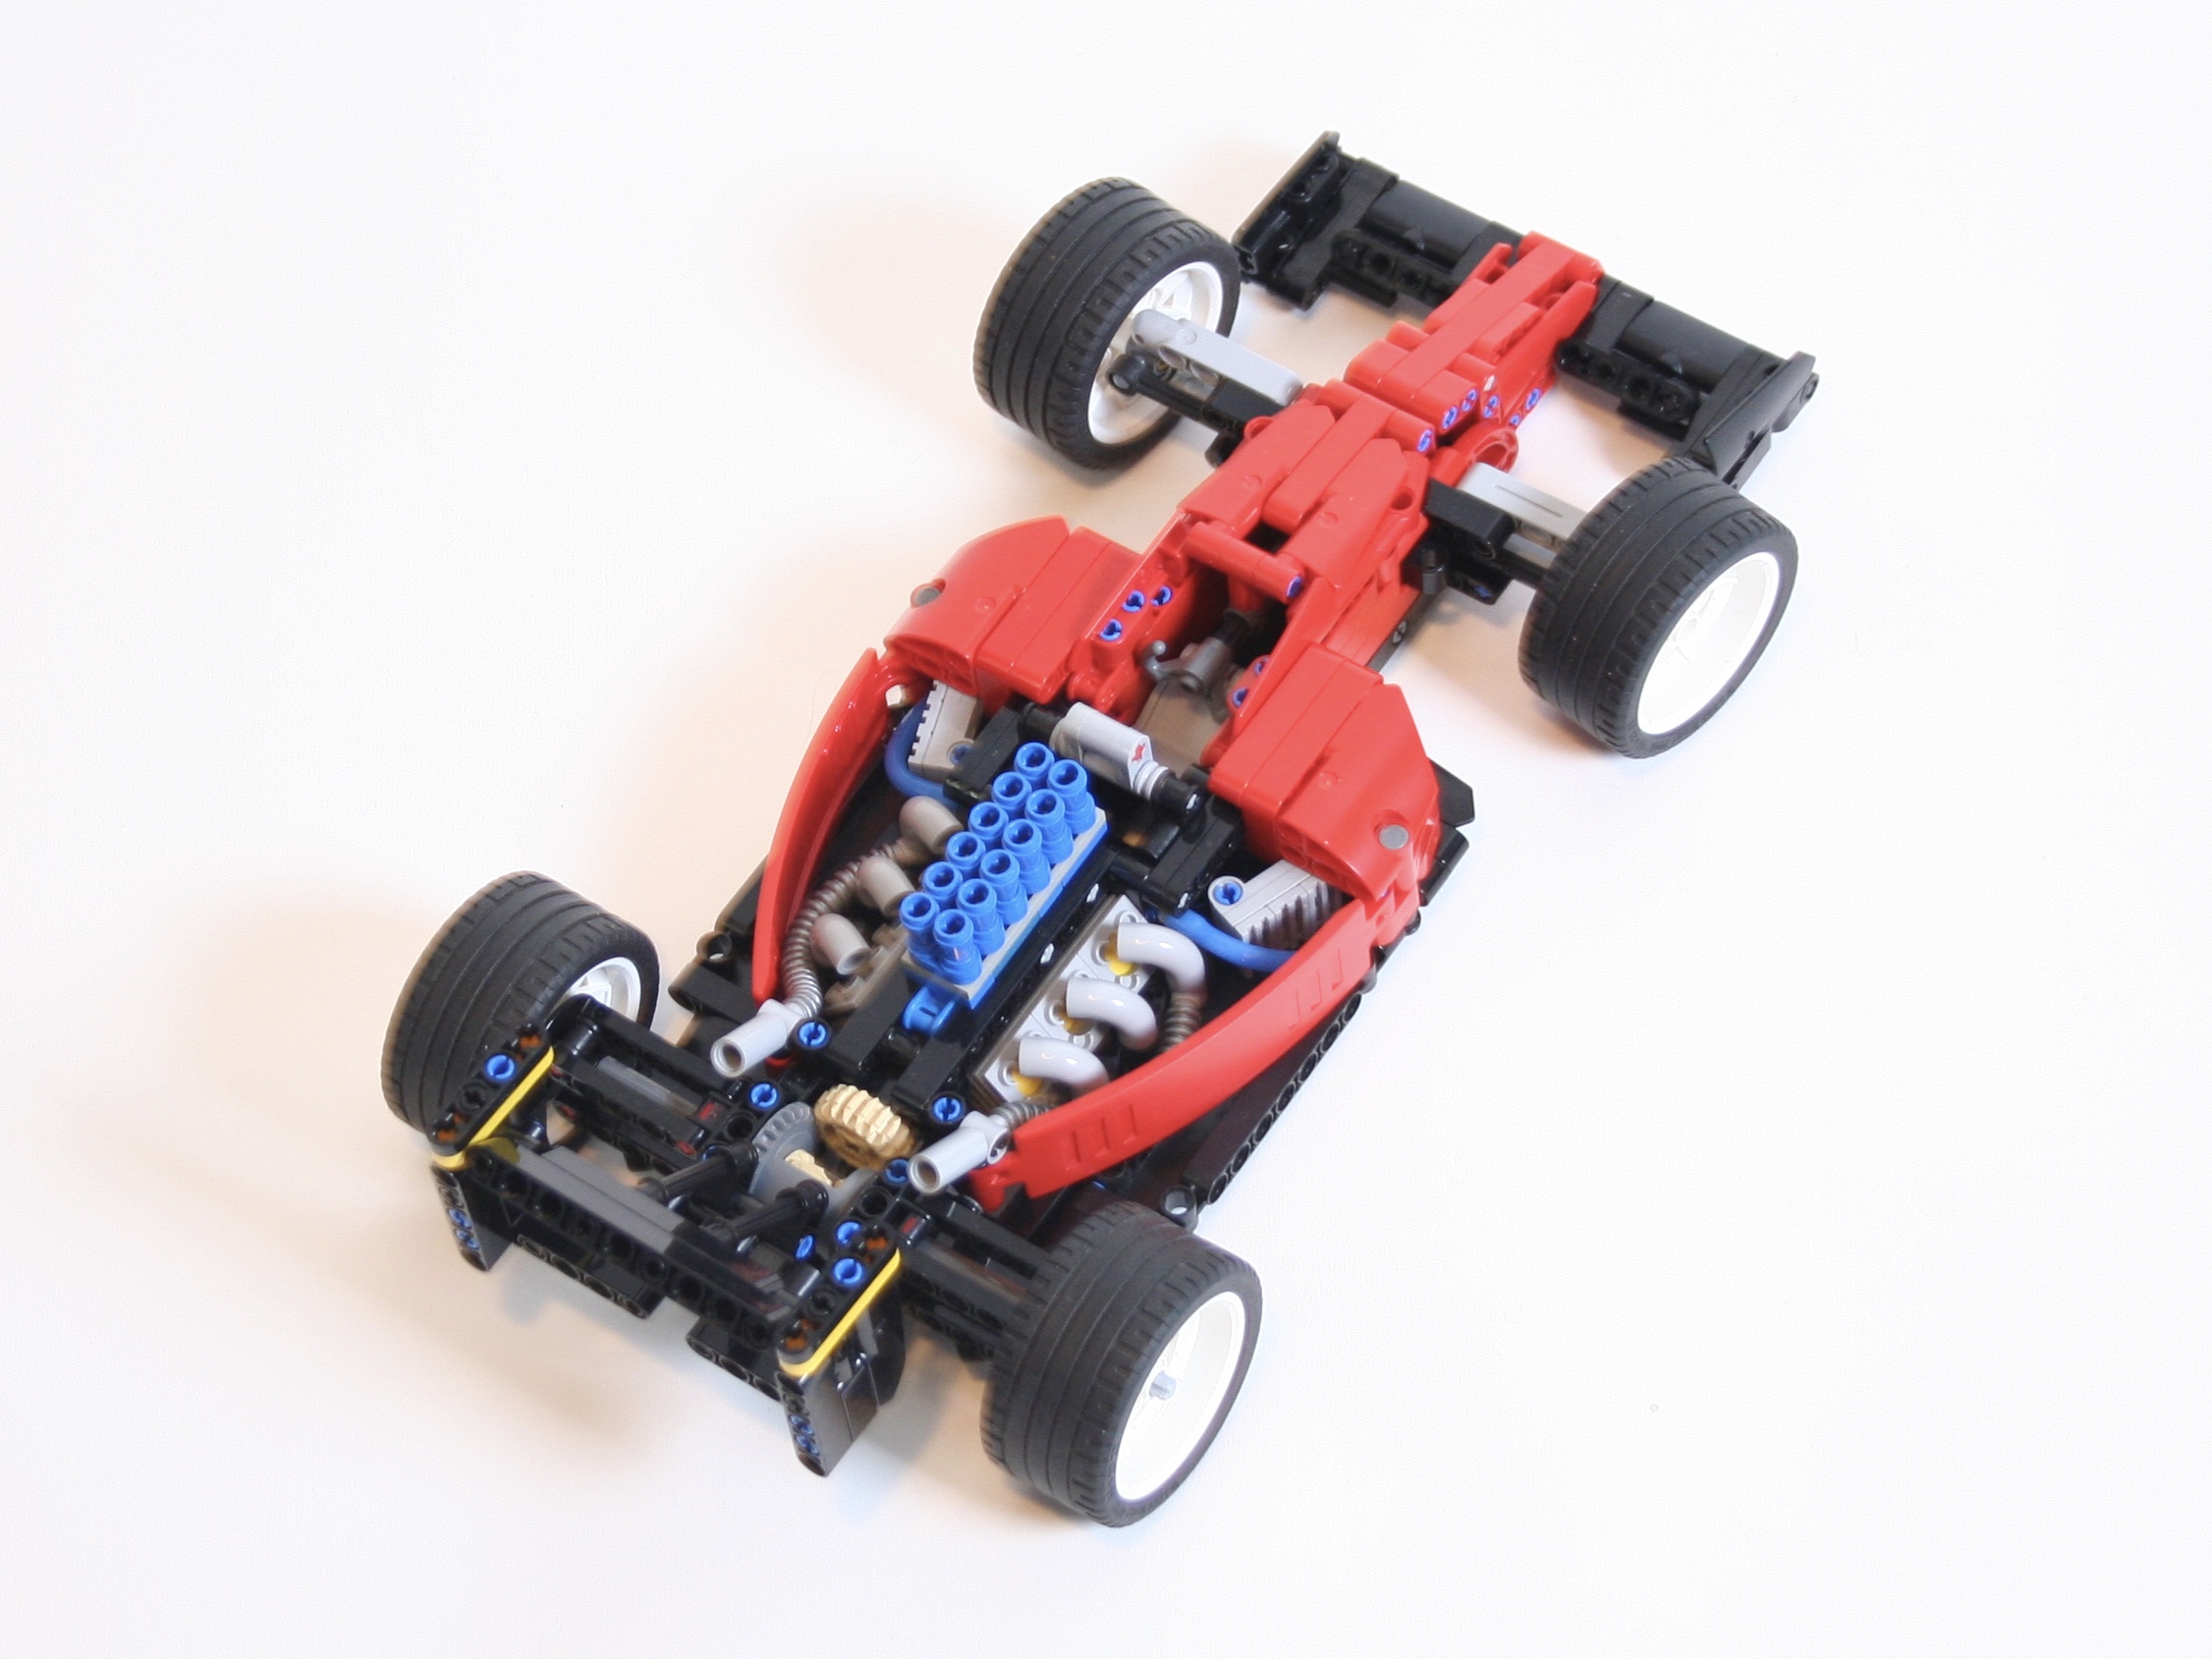
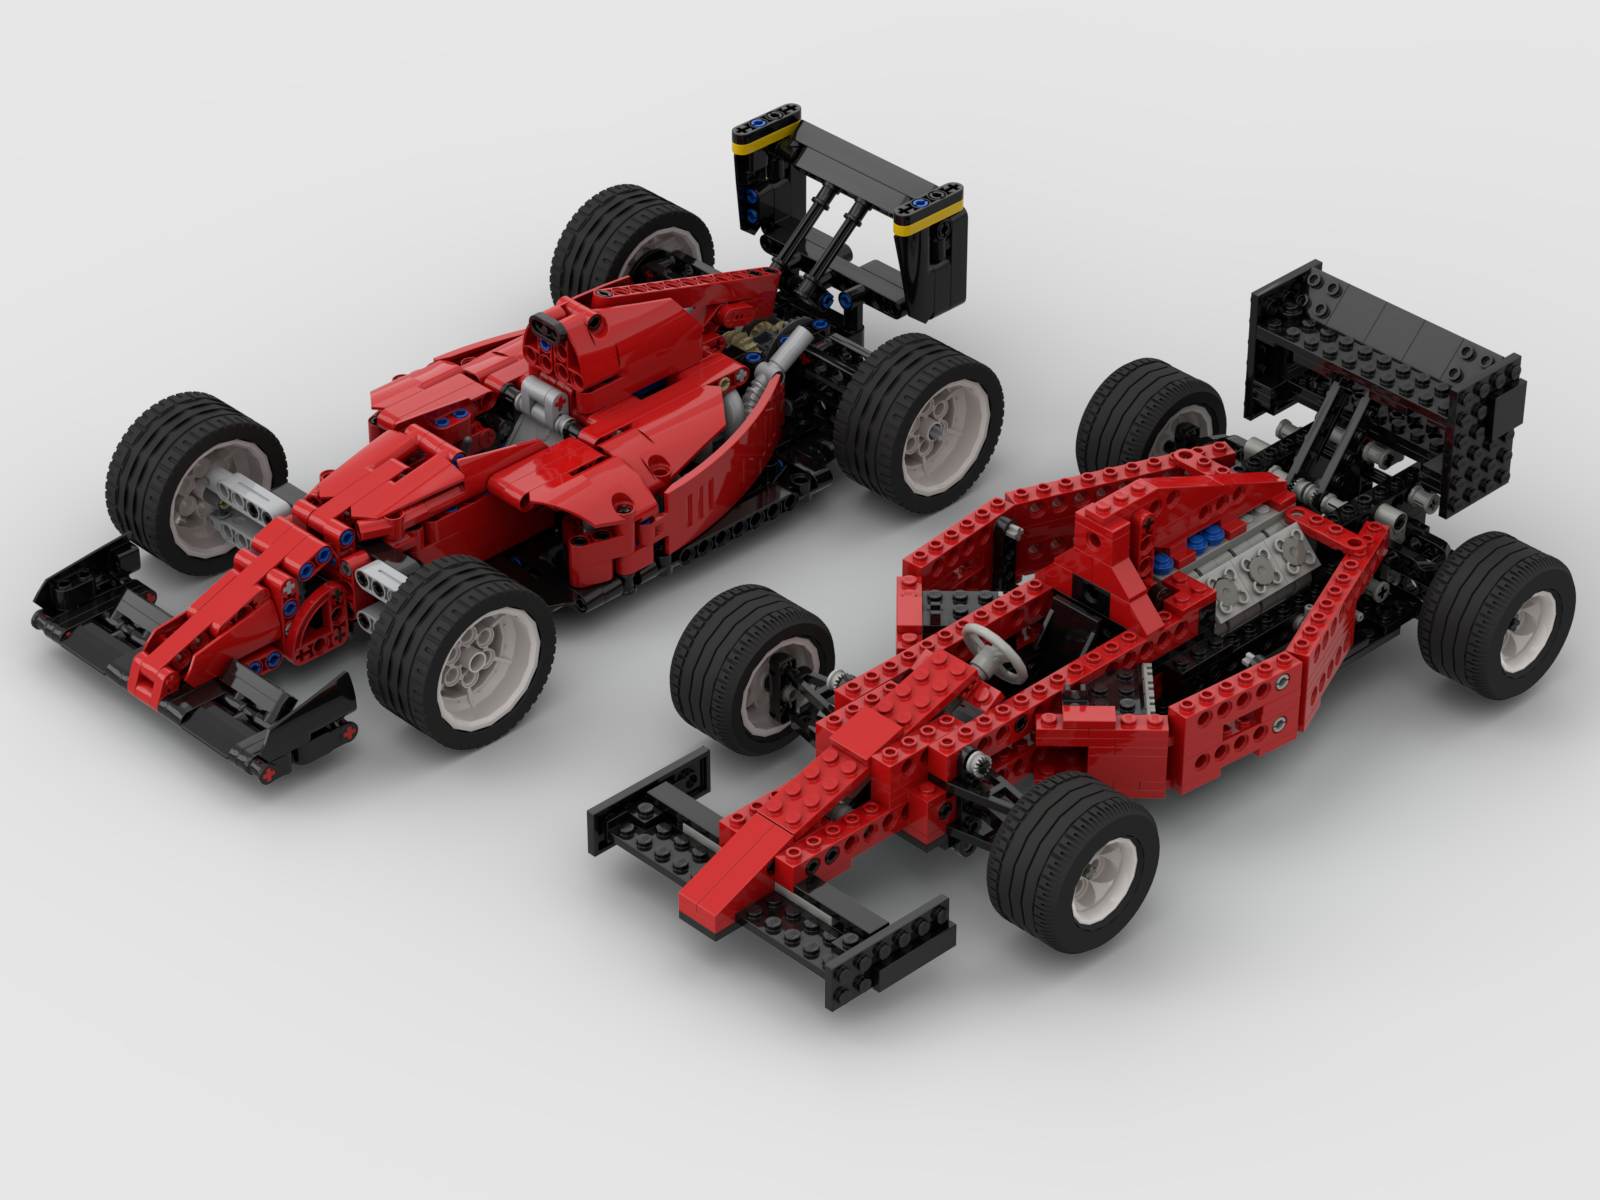
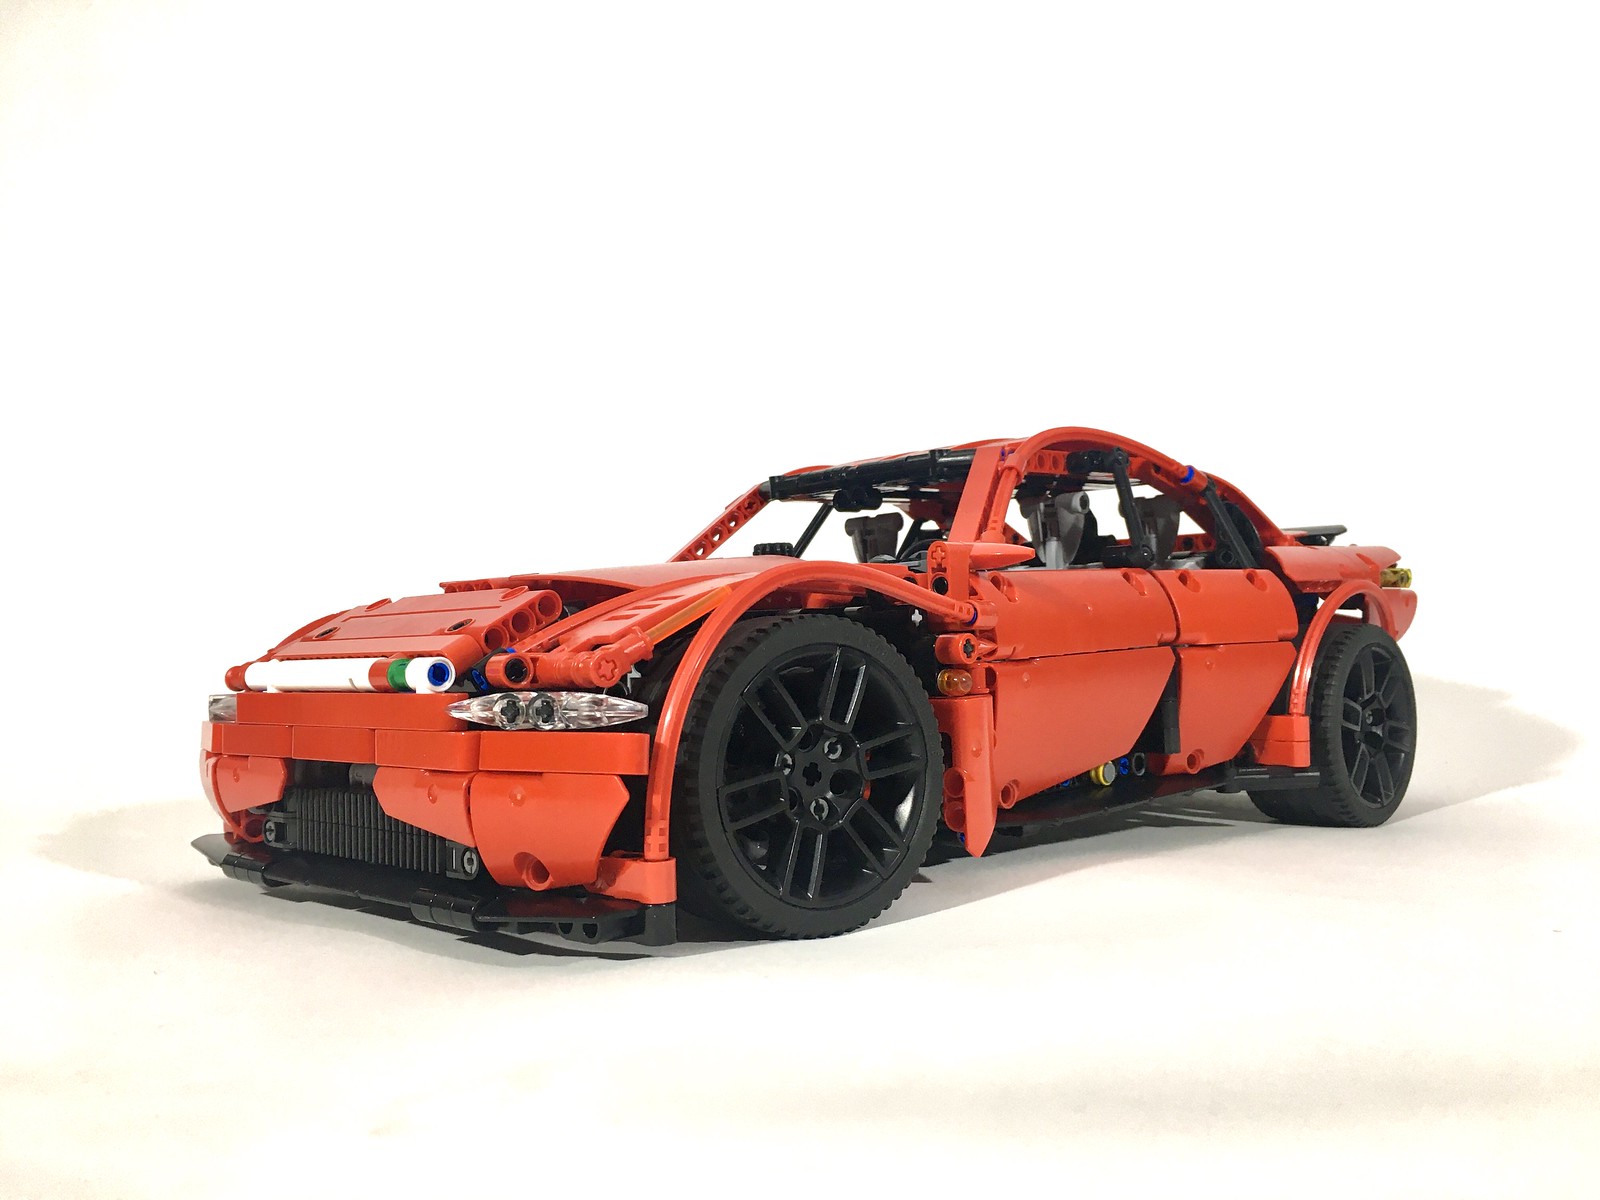
During COVID I had a little home office that was set up right next to all of my system bricks. I keep my Technic parts in a different place, so I could not get too distracted while I worked. But with this little parts so close, I did find myself tinkering with some of these system parts while I was on countless video meetings. As time went on I started to piece together some ideas that would work well for a full LMP car.
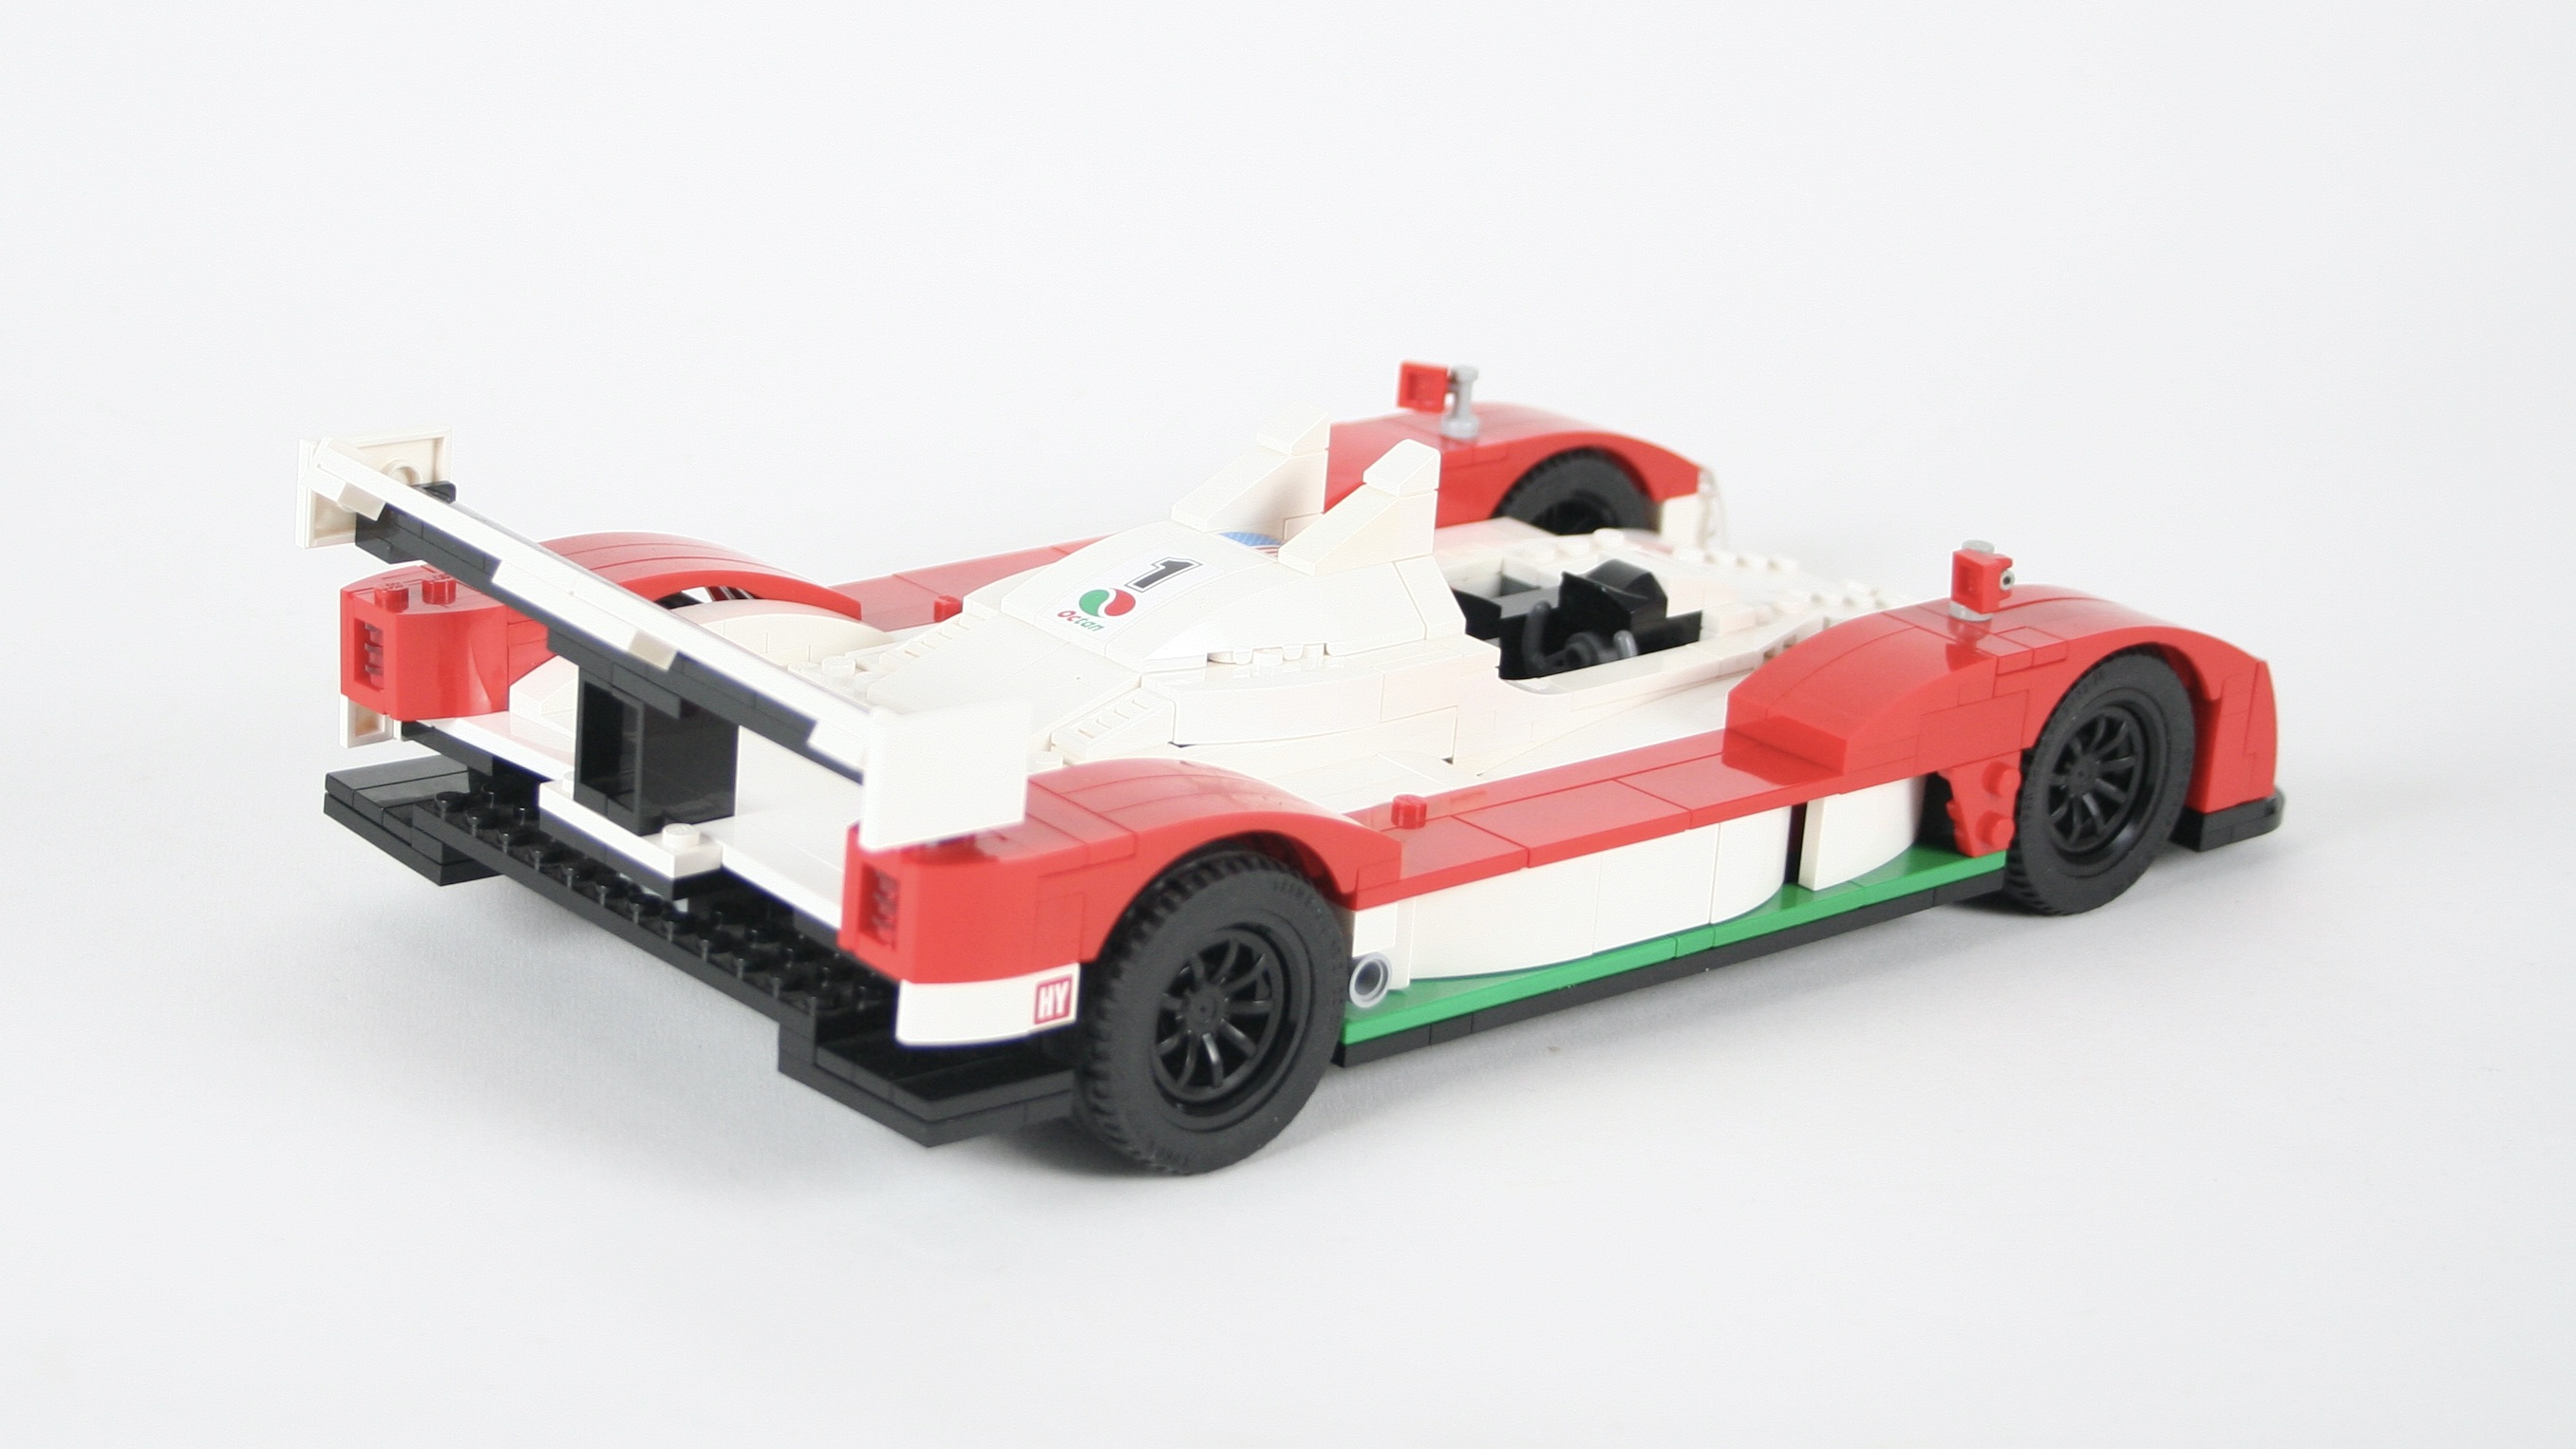
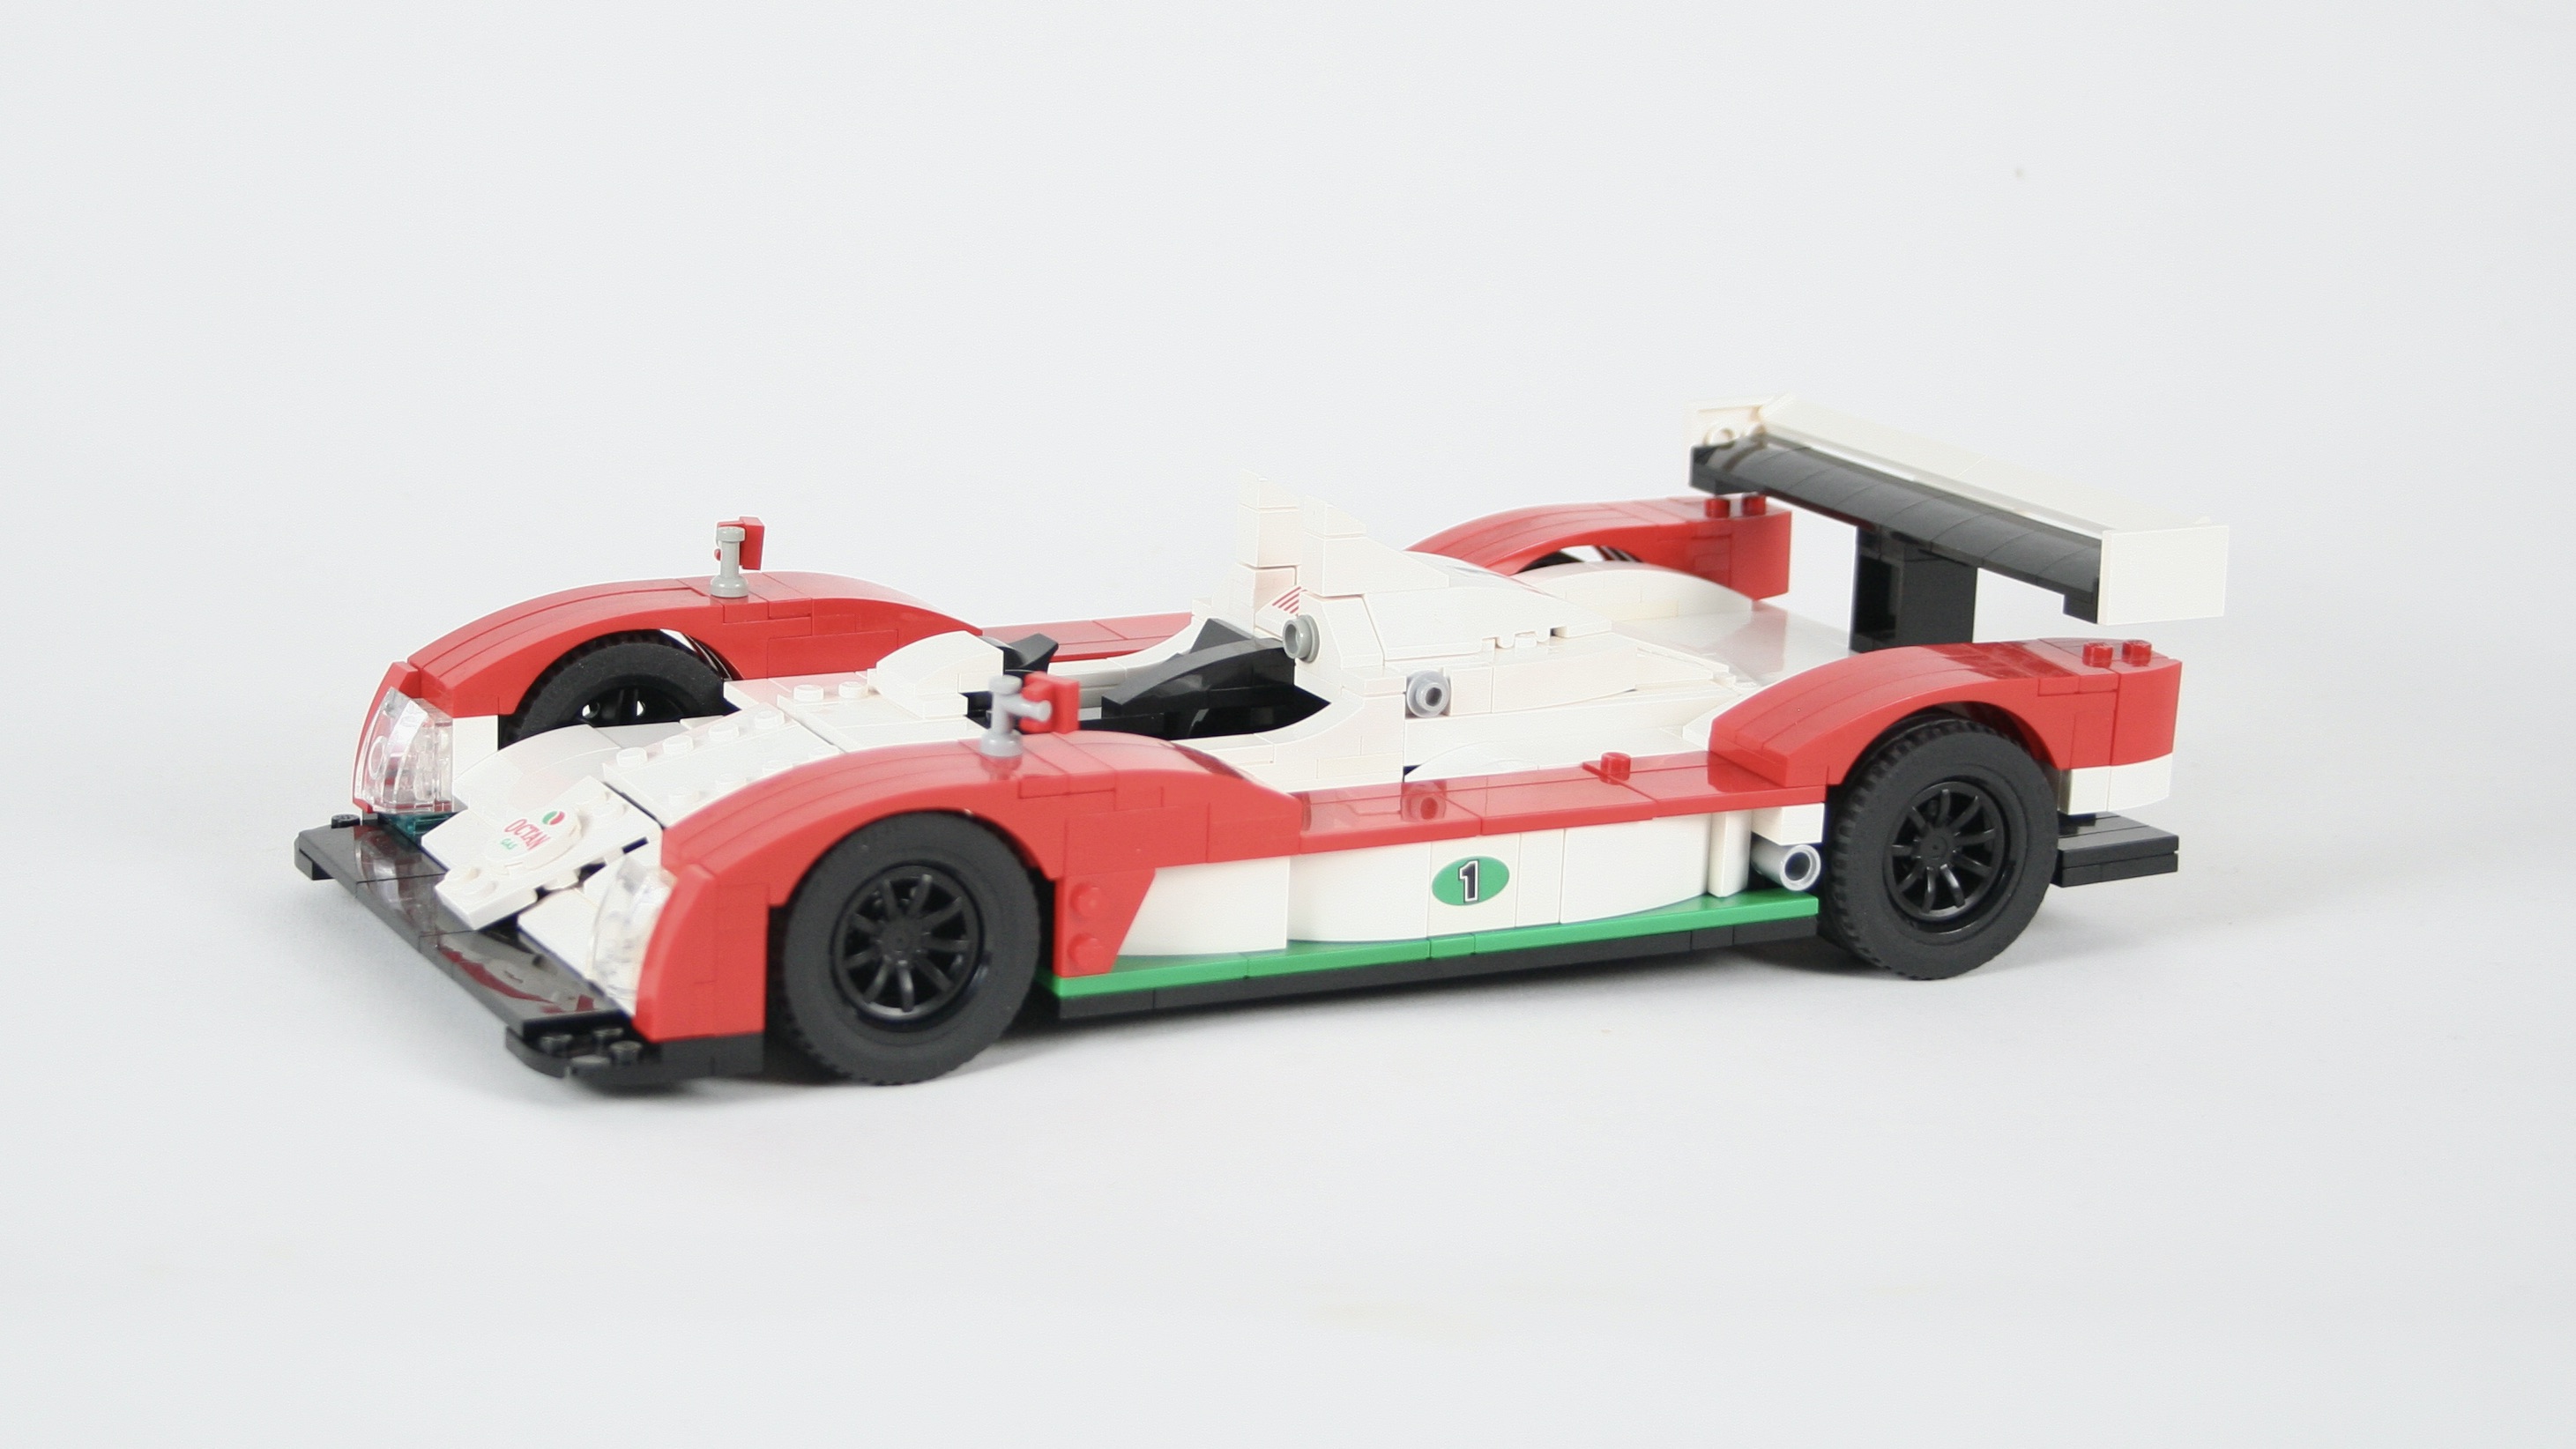
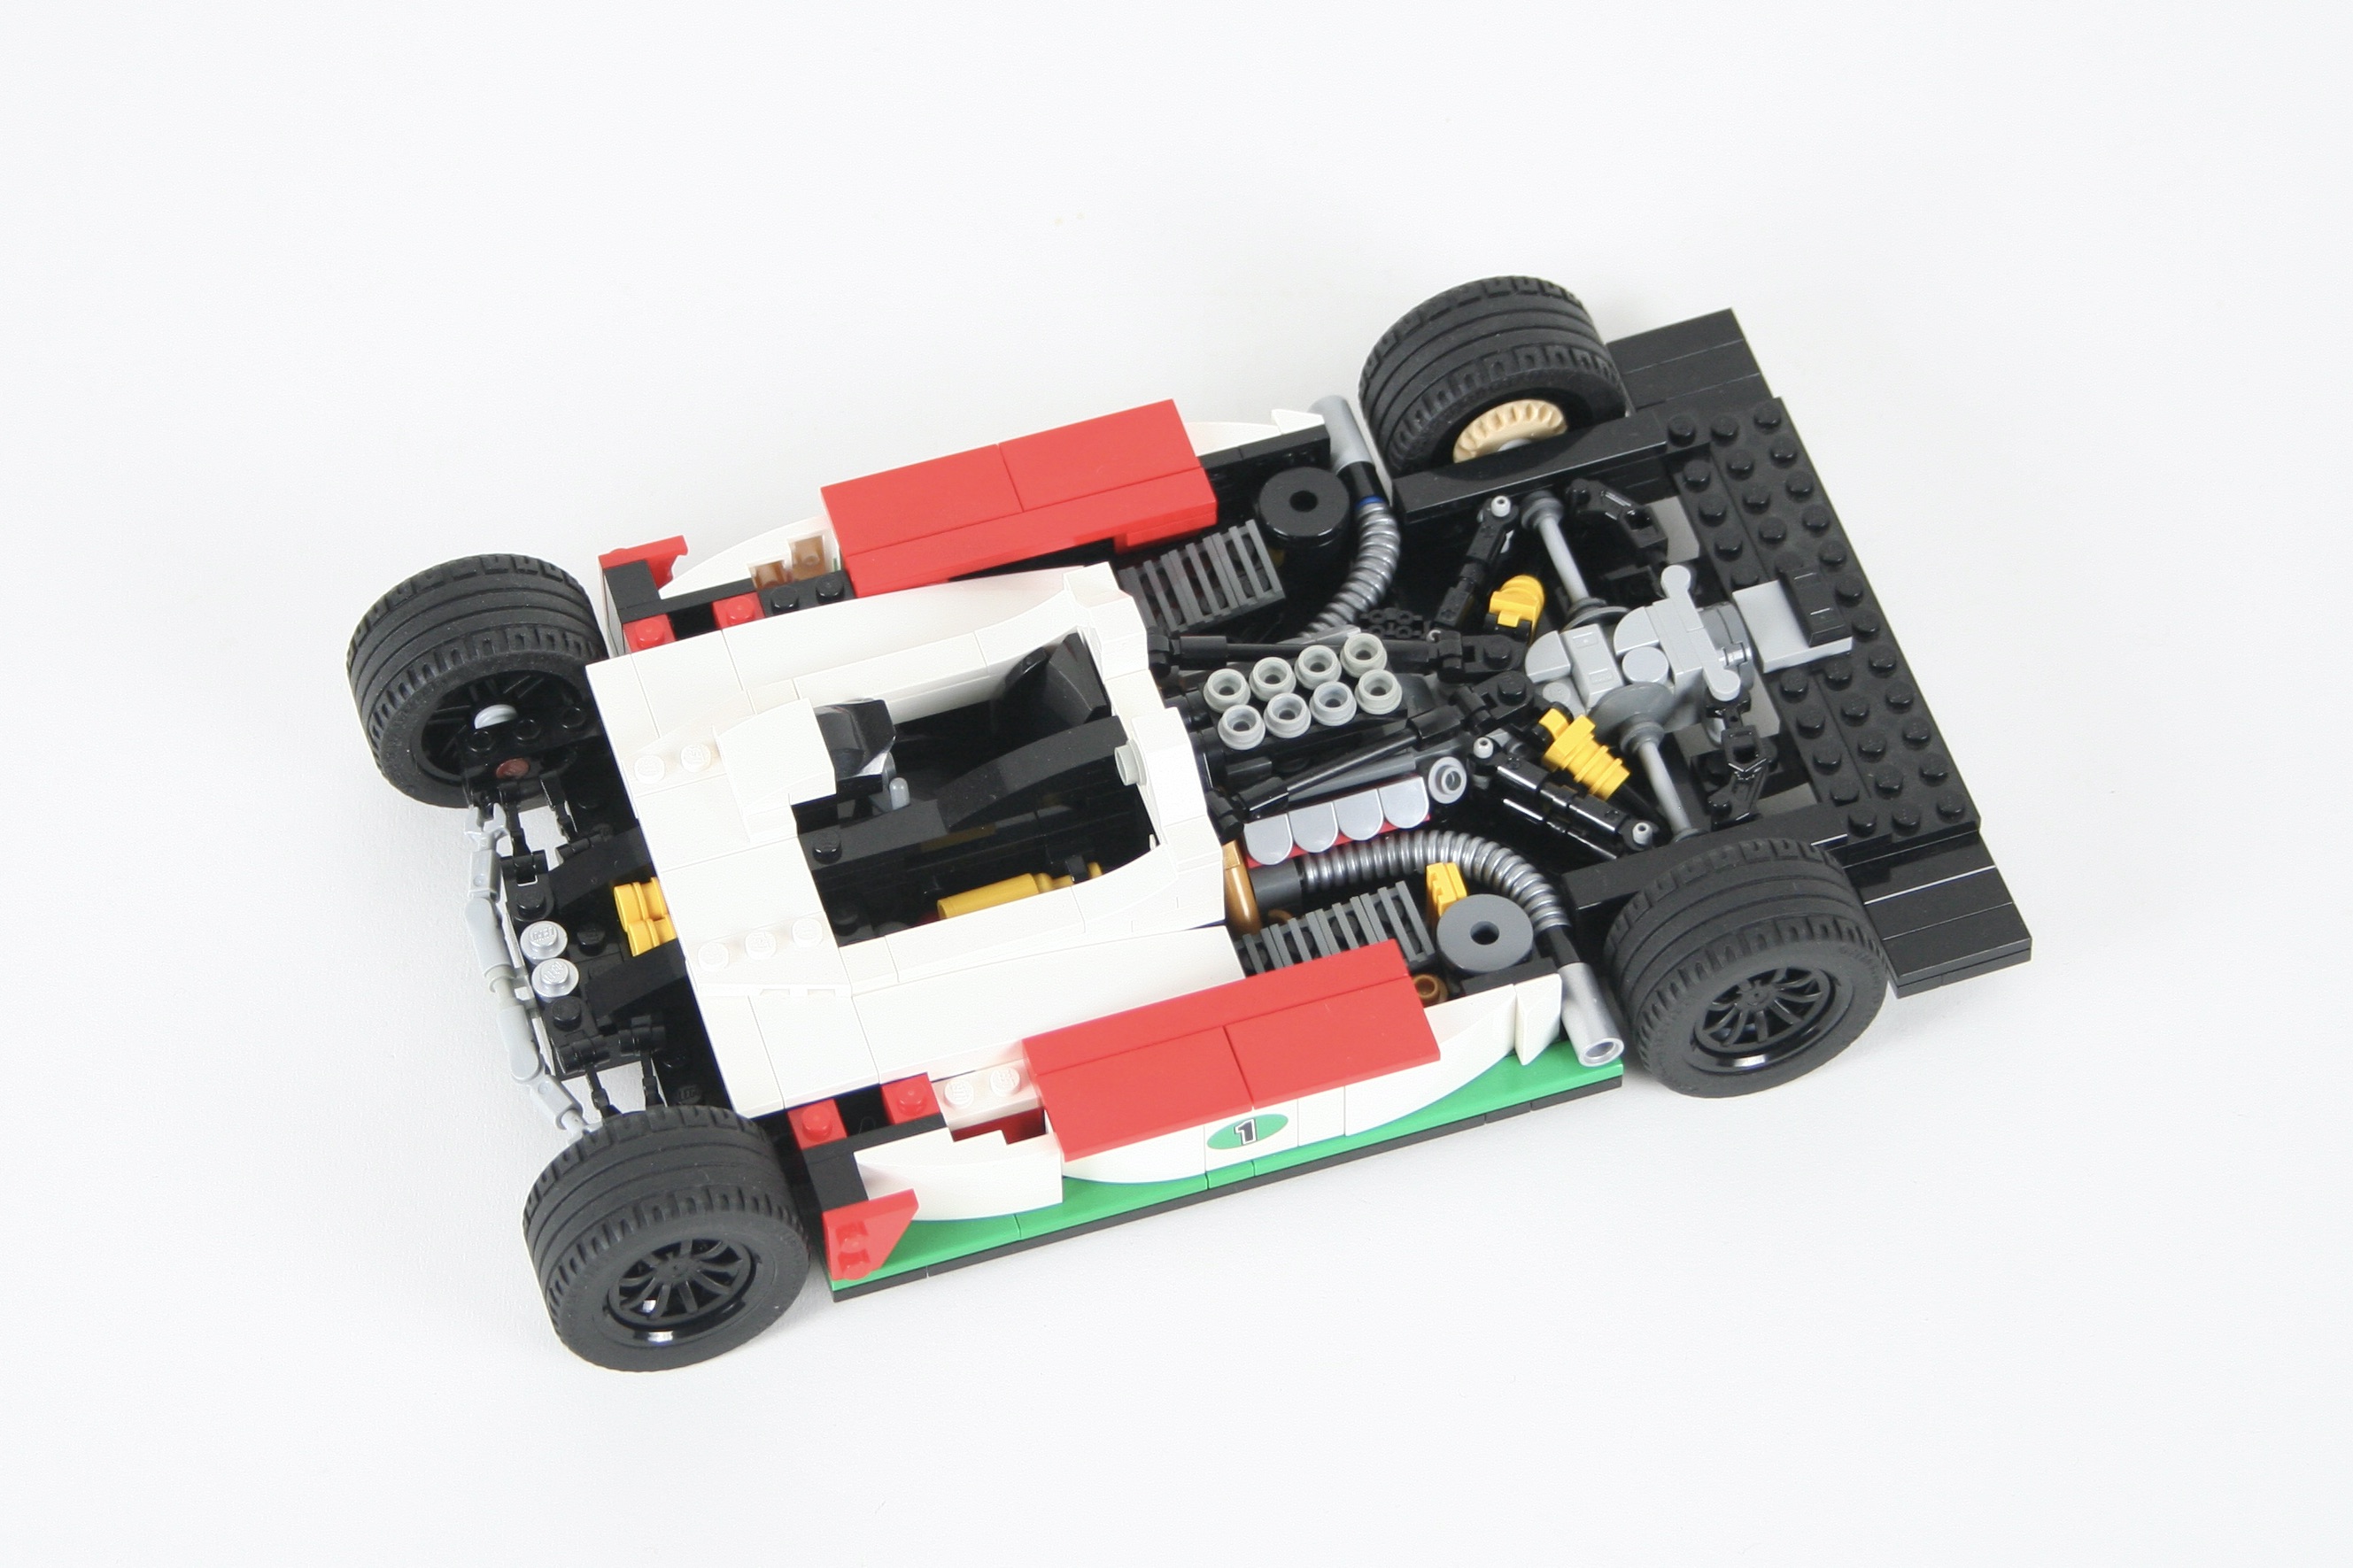
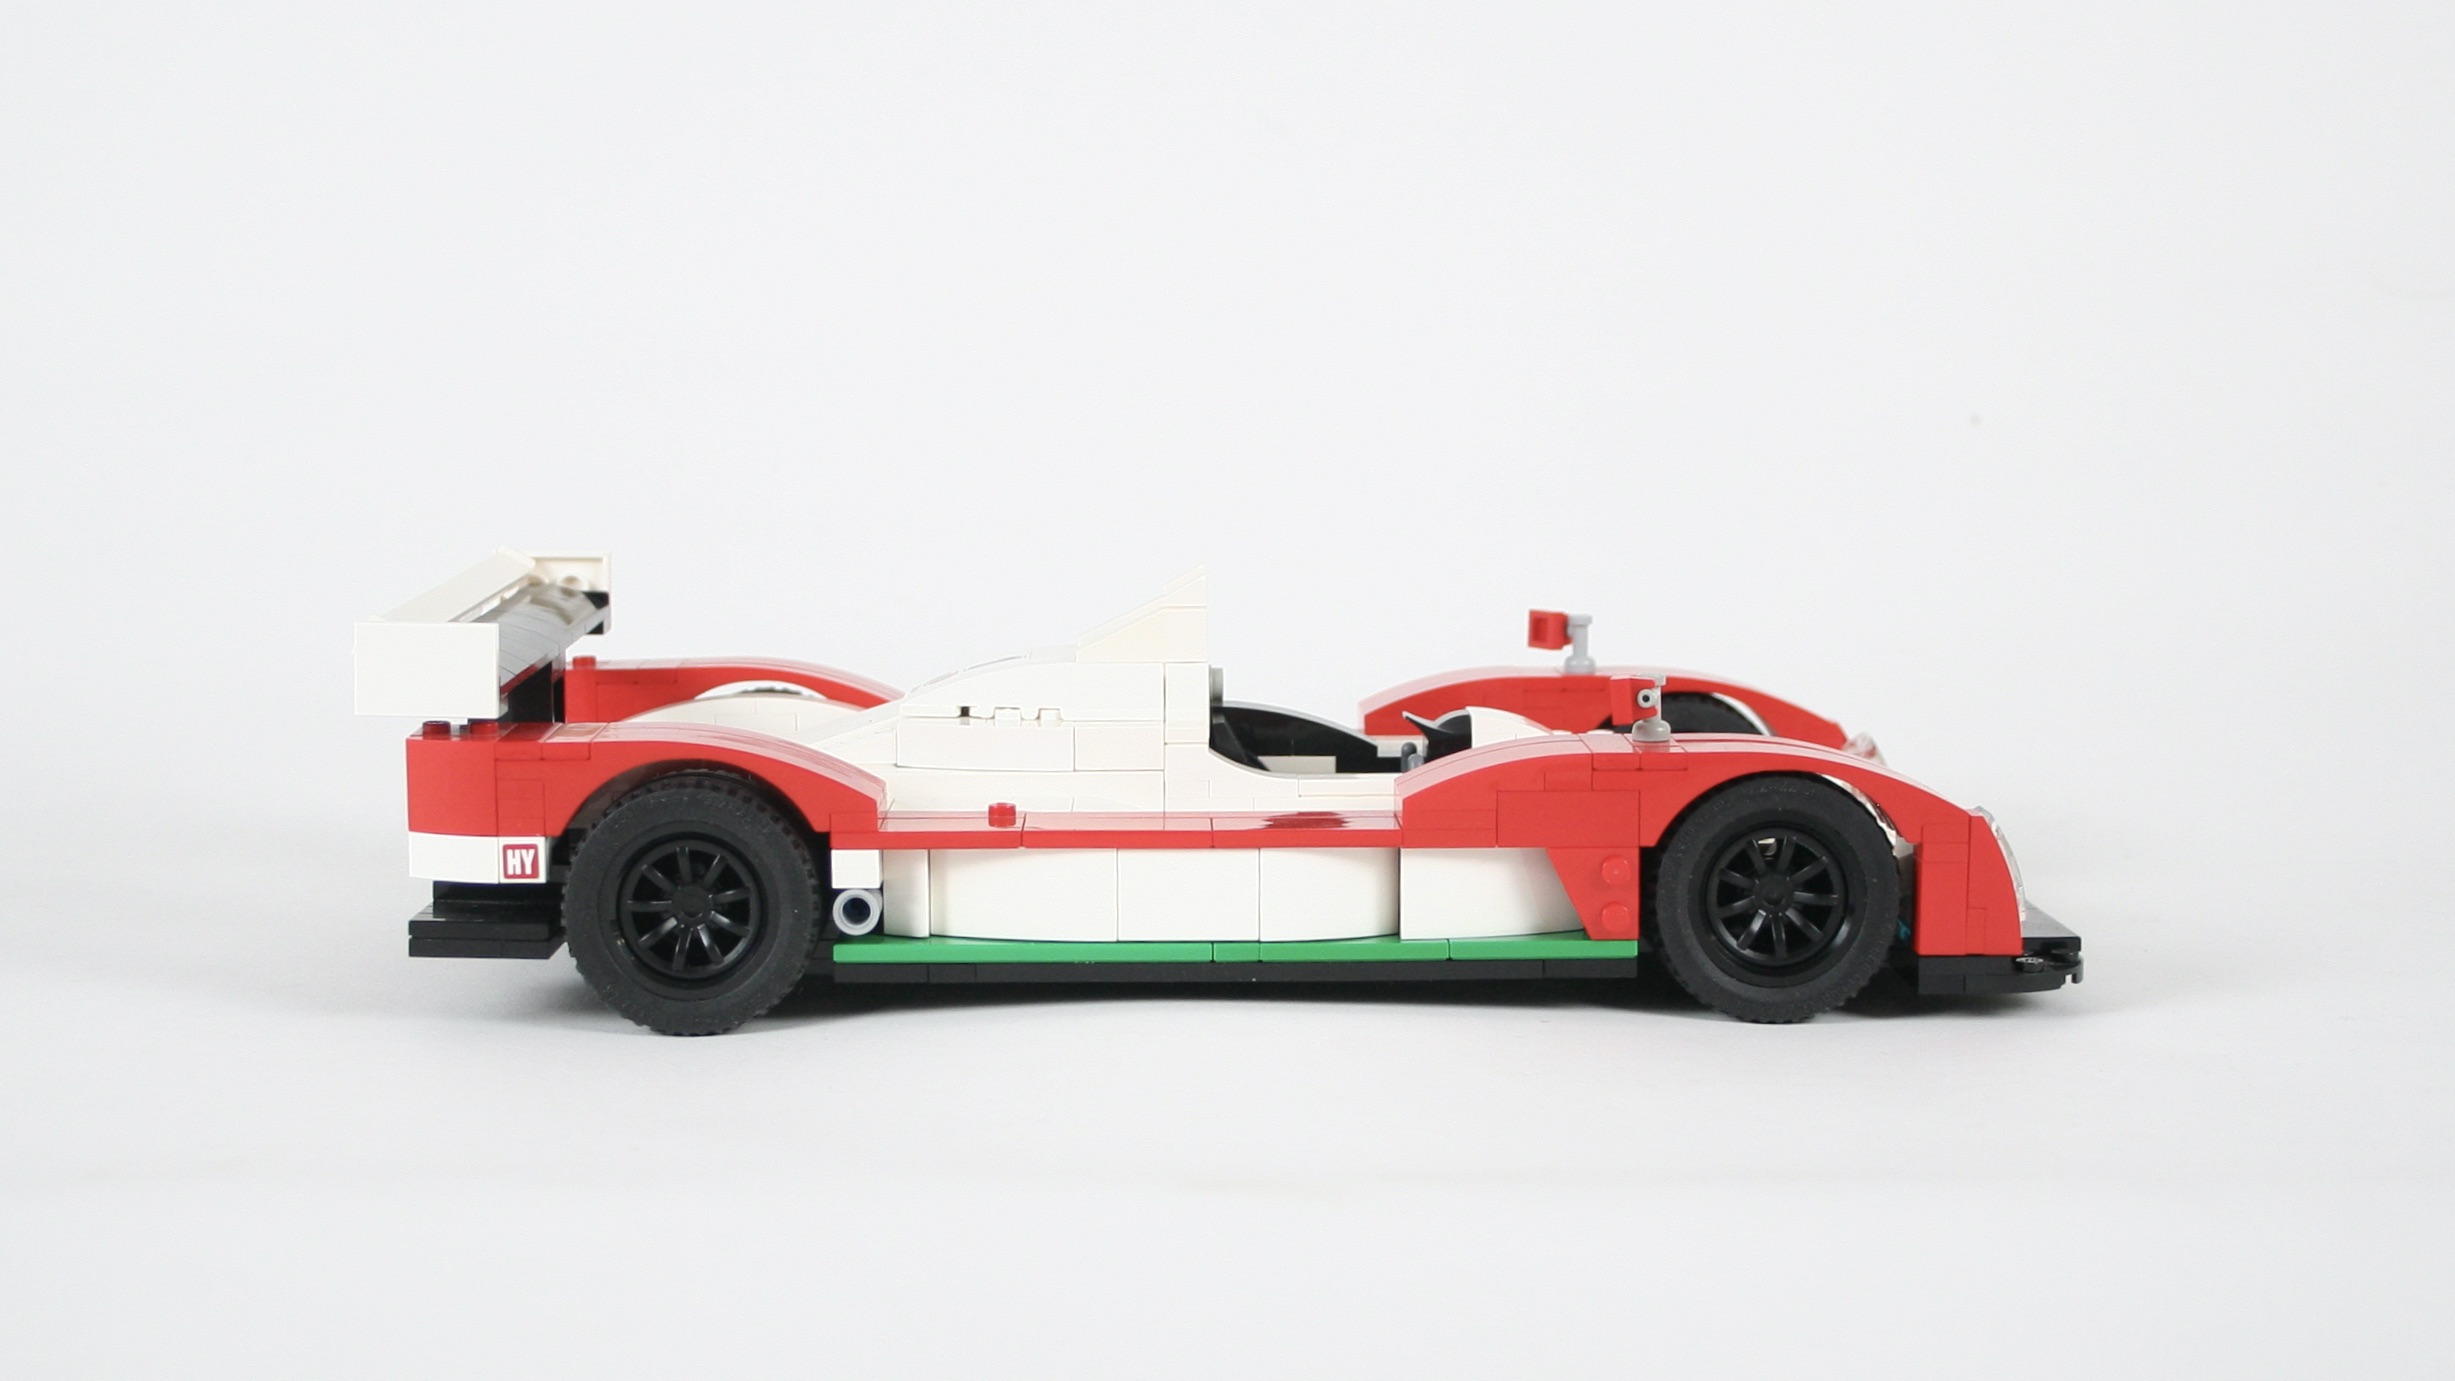
The LMP cars from the mid-90s to about 2008 were some of my favorite race cars. I love the look of the open cockpit, the long, aerodynamic bodywork, and the high rear wing of this generation of race cars. Though I do find this type of car difficult to build in LEGO. The cars are so low, and the wheel fenders are so slim. Both make it tricky to replicate in LEGO.
But after all this tinkering, I had some ideas that stared to work on their own. So I spend a couple of evening tying it all together. The bodywork guided the rest of the car. Once the engine cover and side pods were finalized, I started adding in the interior: engine, suspension, cooling parts. Which each added detail, I had to make sure the bodywork would continue to fit. The rear engine cover comes off in one part, and the front bodywork comes off as well, though not in one piece.
This car had no functions, but I was pleased with how I looked. I love the white, green, and red of OCTAN racing, even if this car could use a little less red. But all and all, the bodywork looks the part, and glancing at the car you know who the main sponsor is. I will keep this little build in my office for some time, and maybe I’ll try another little LMP car…
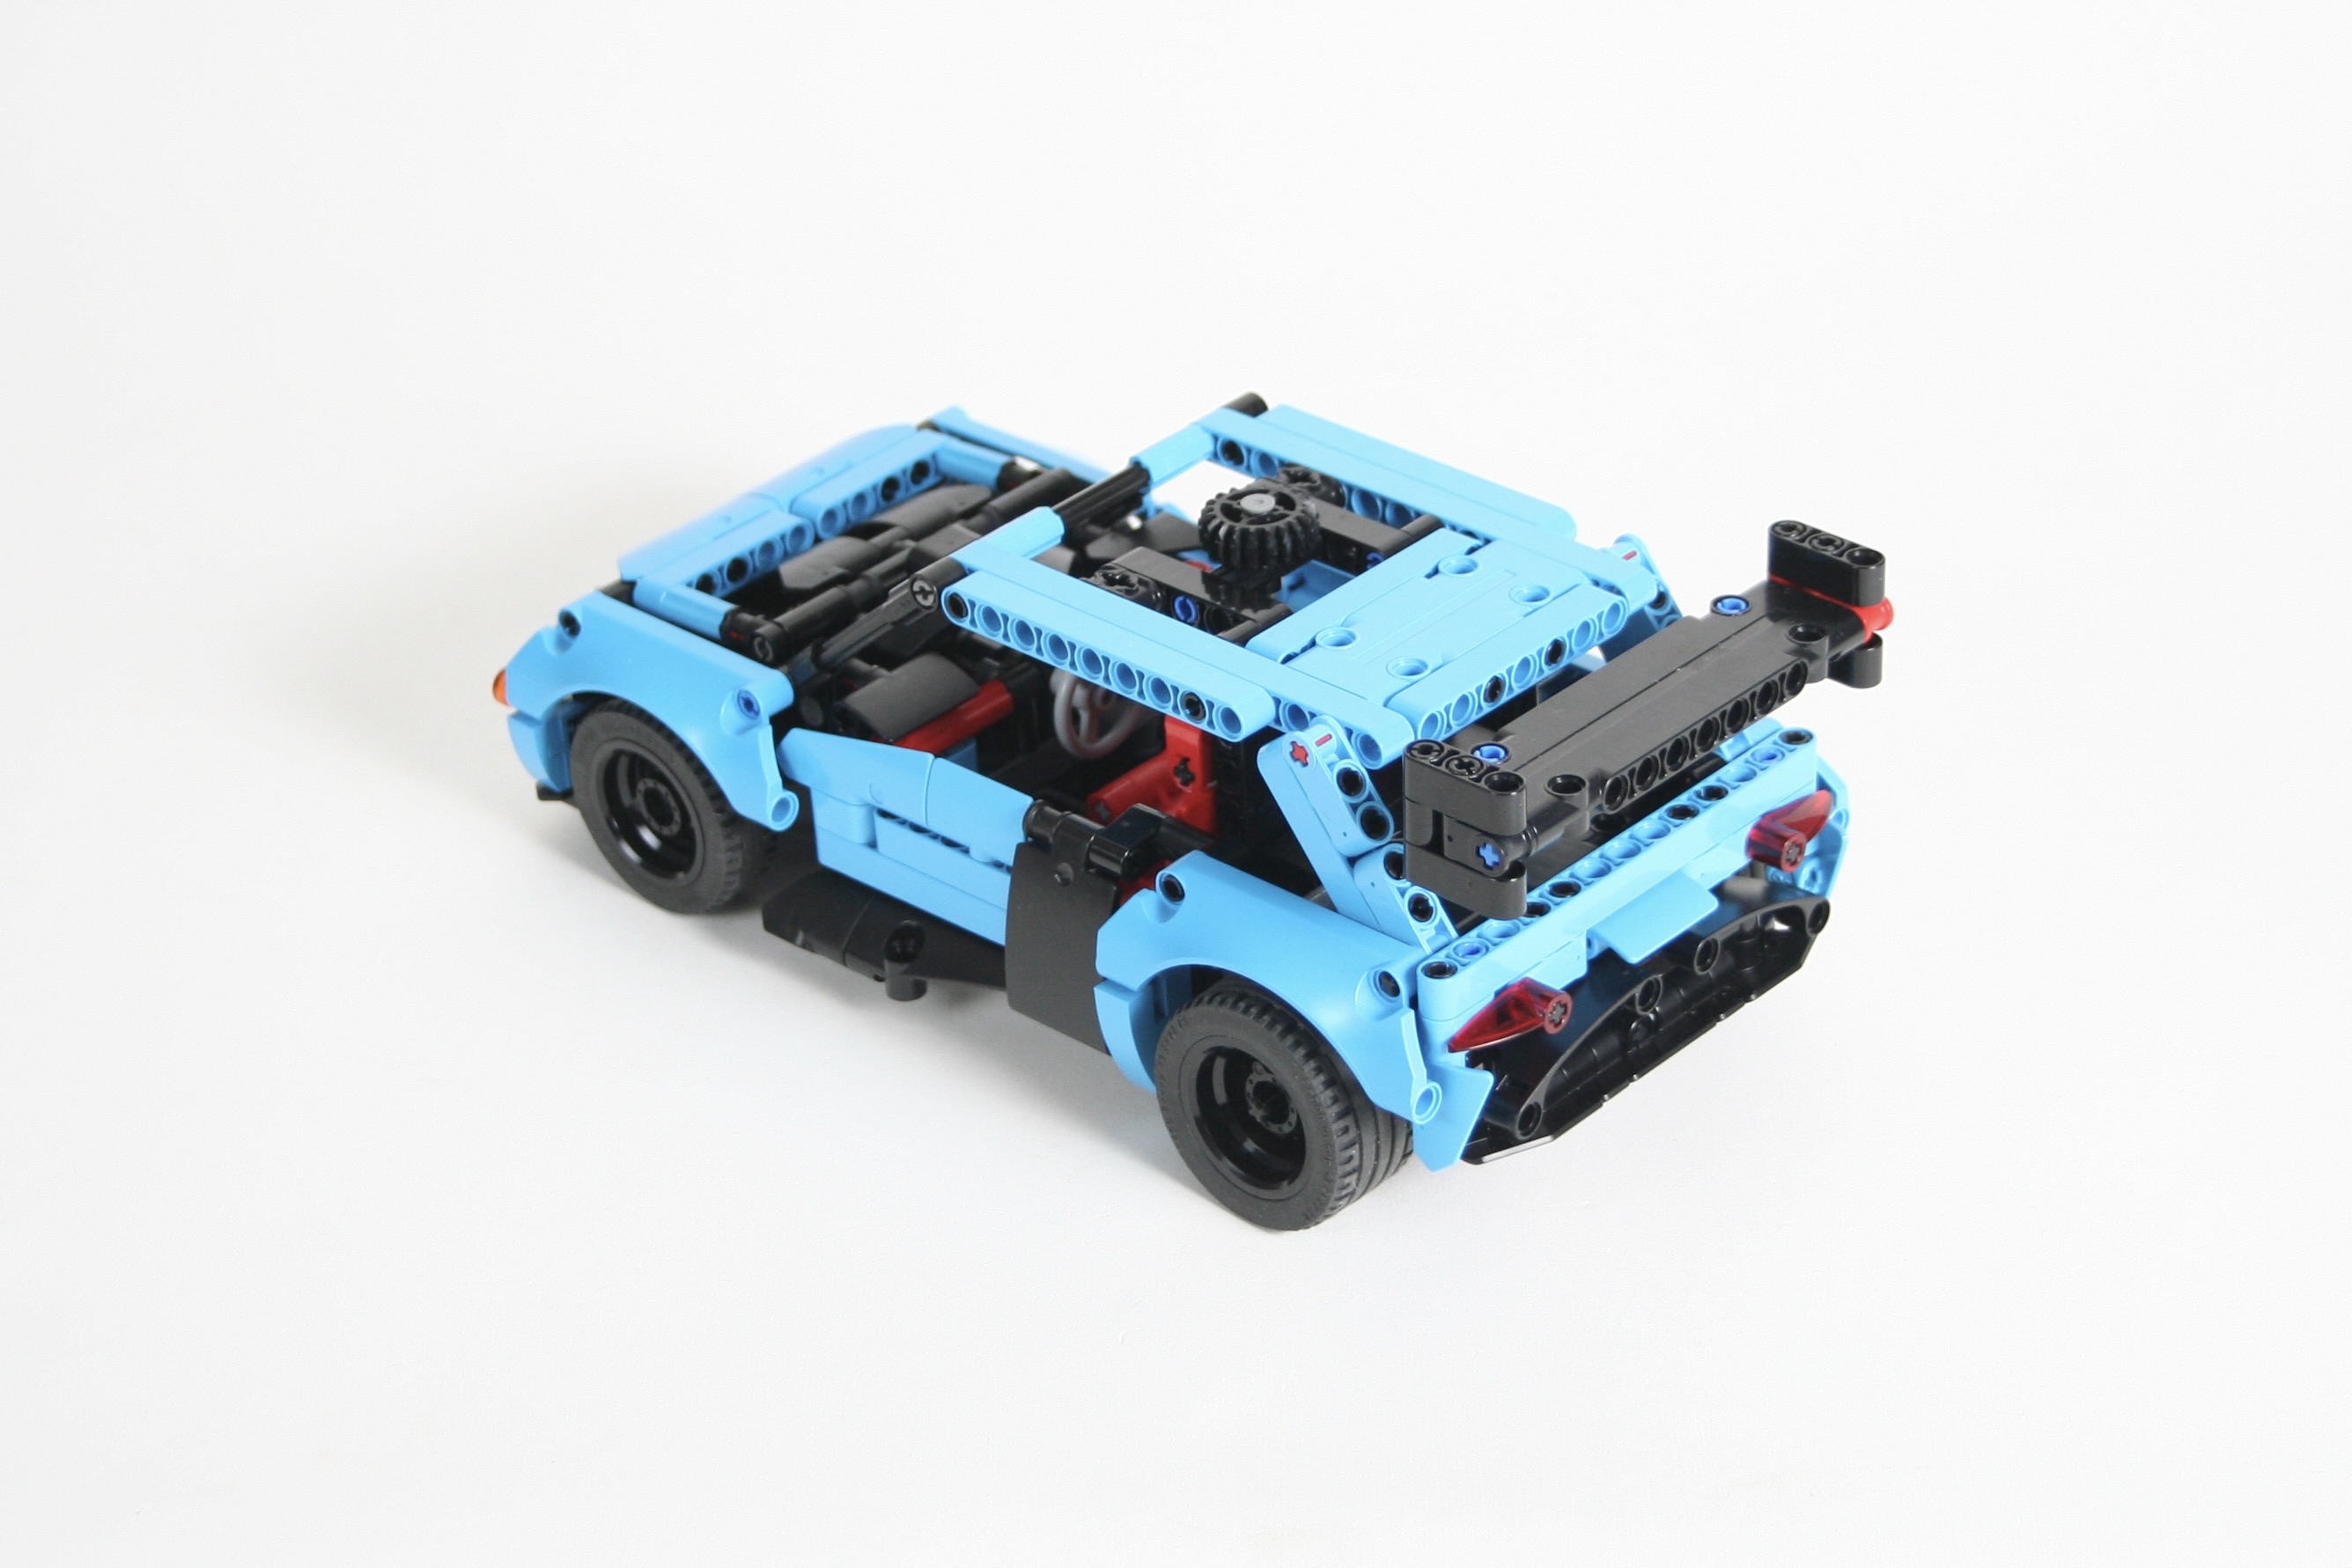
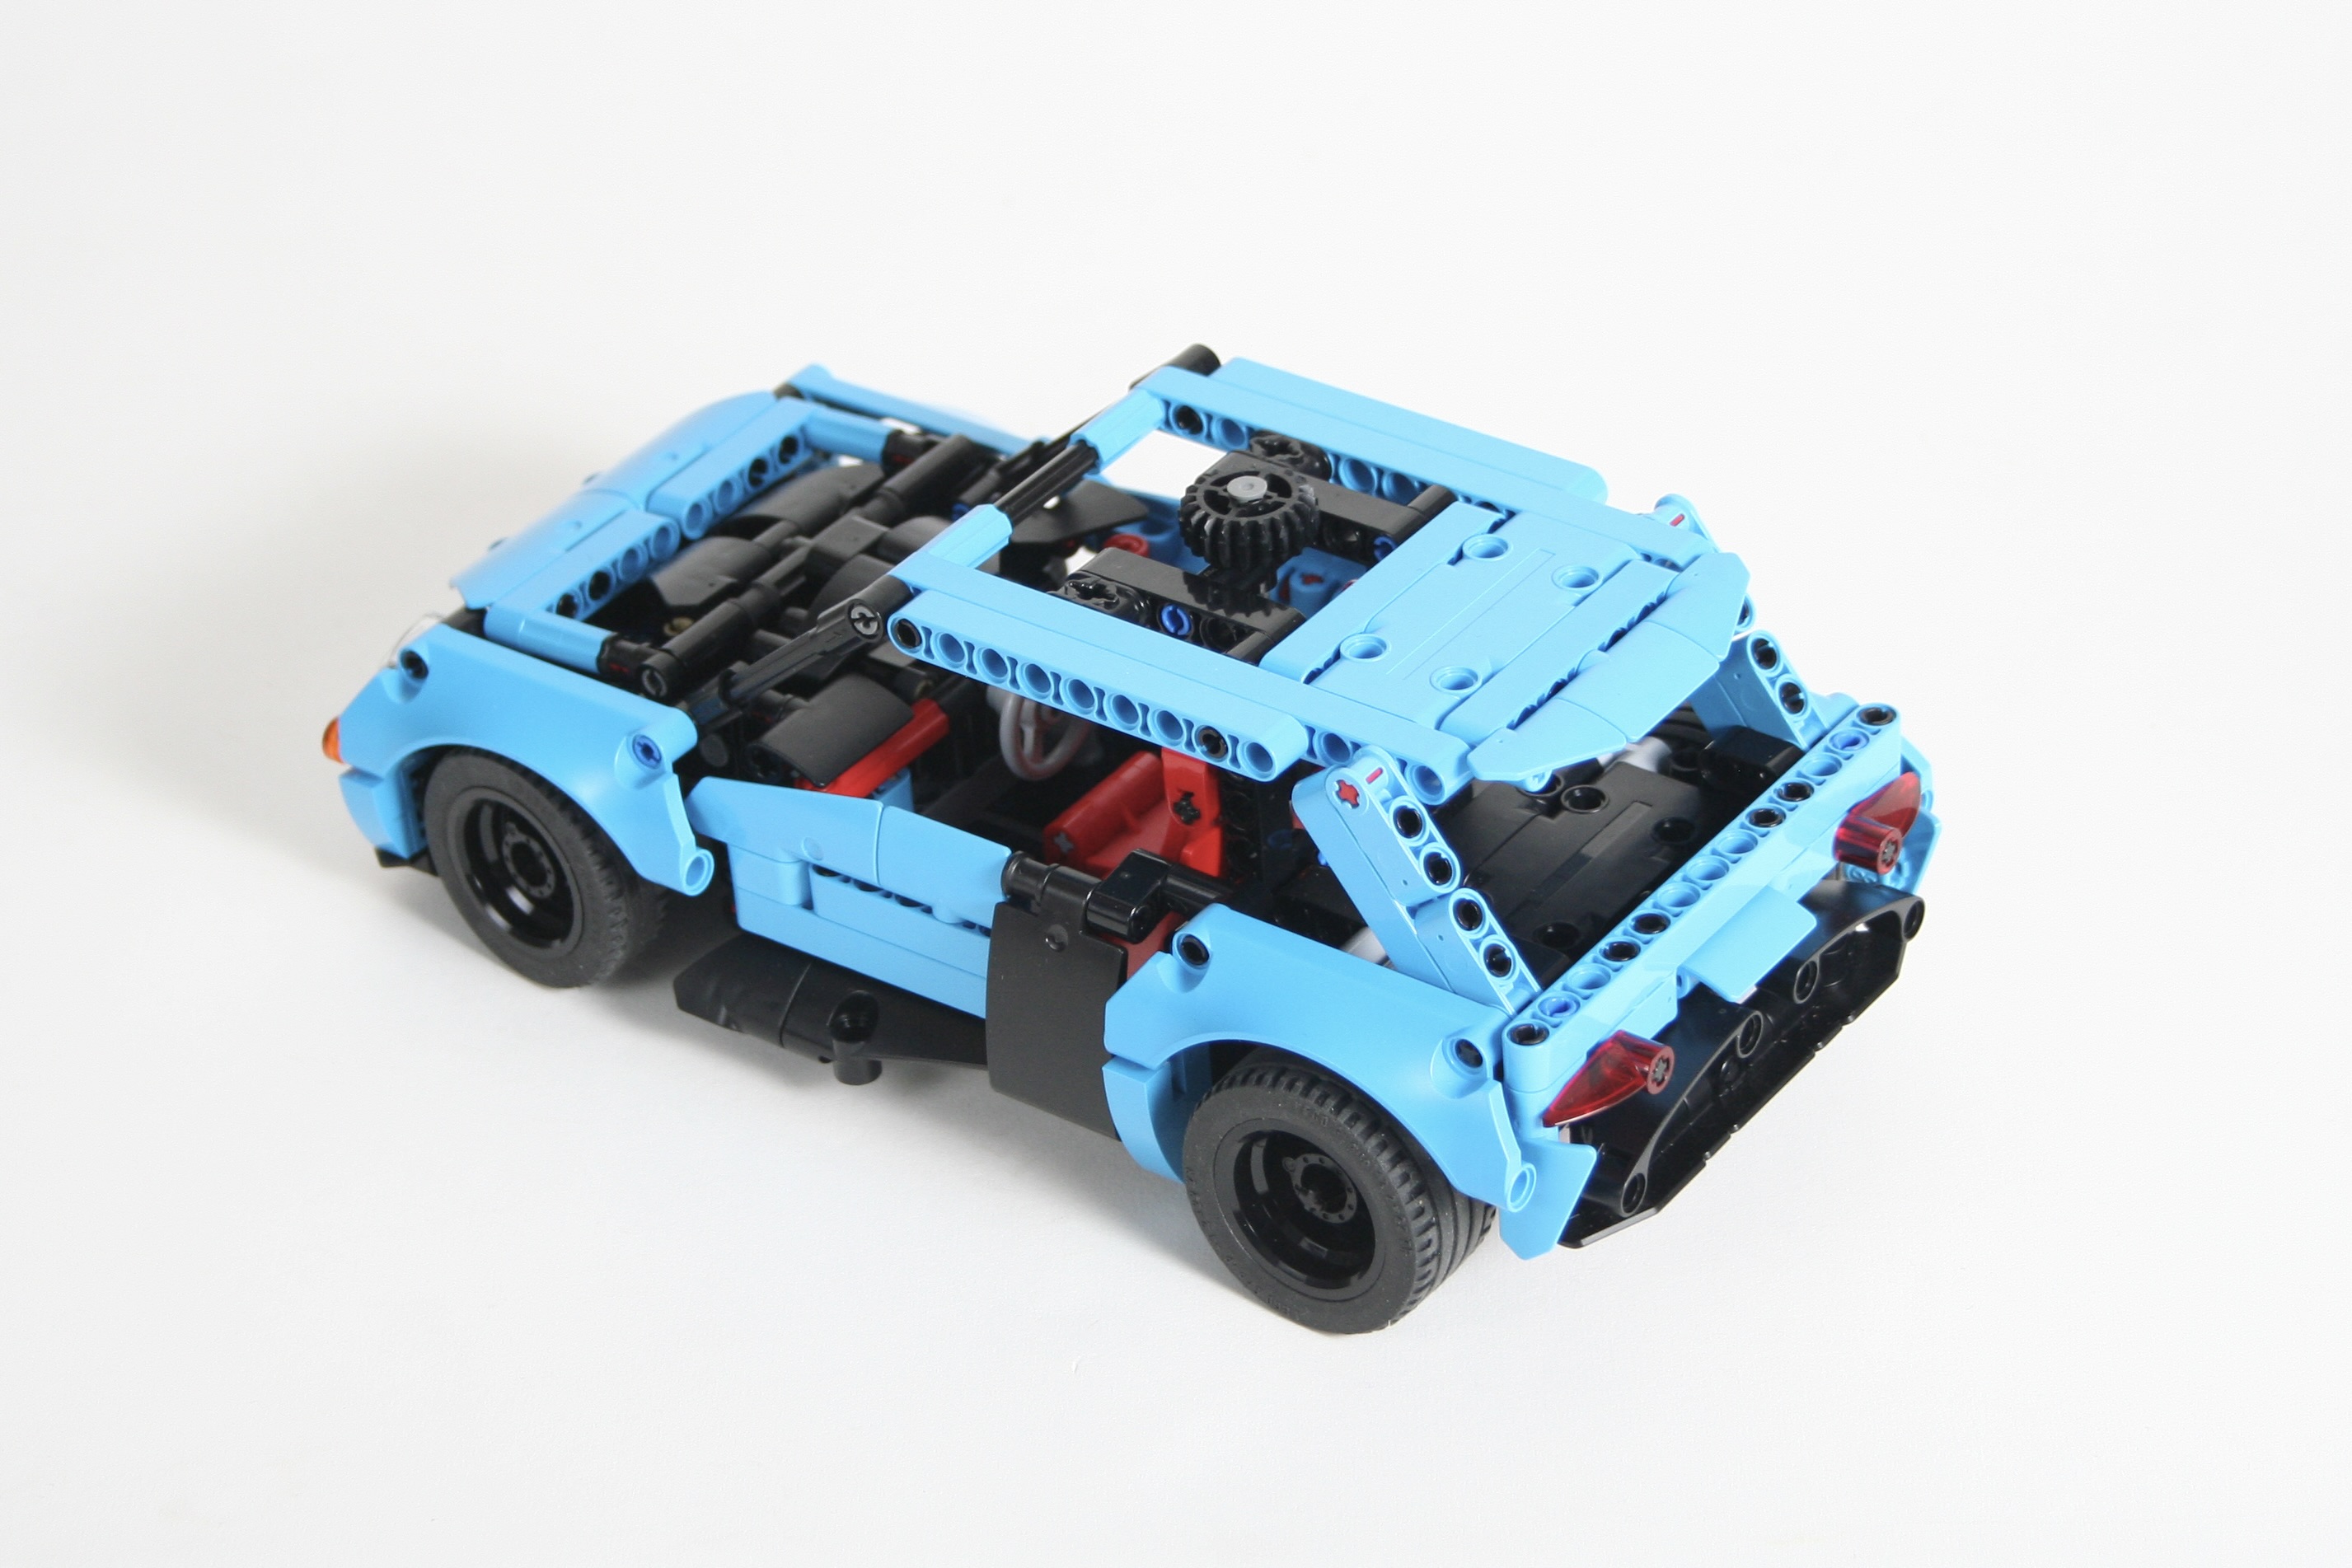
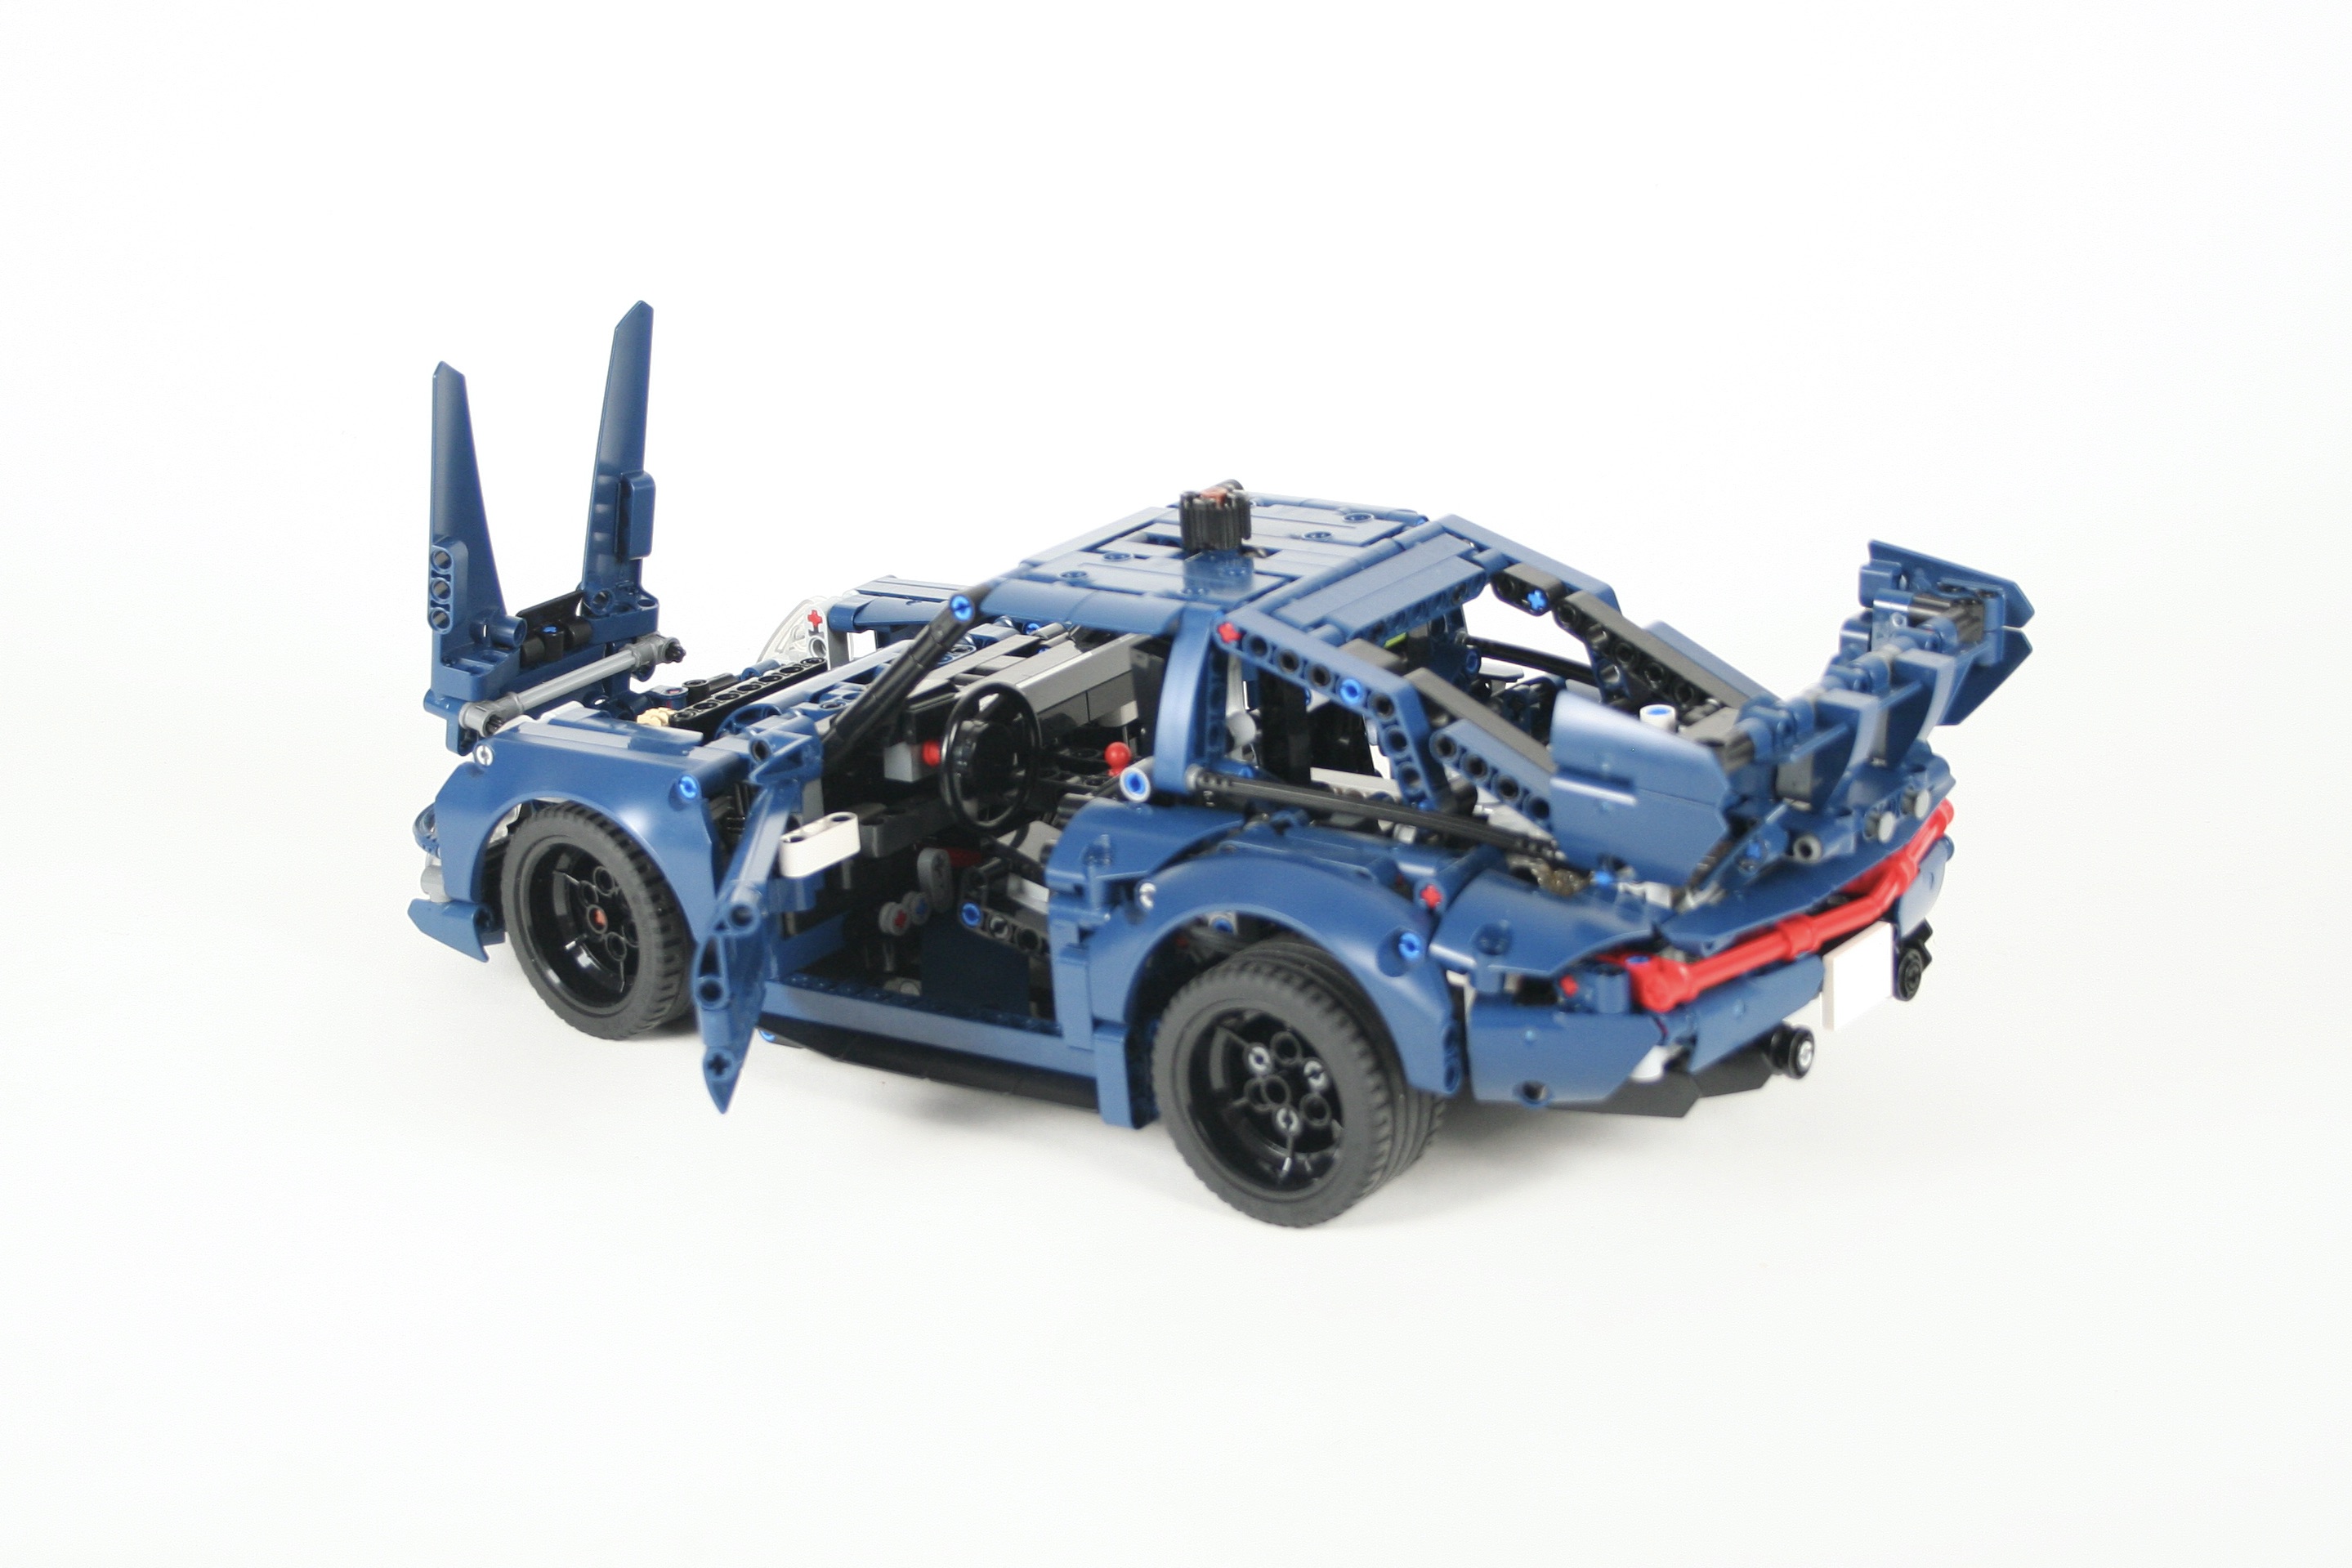
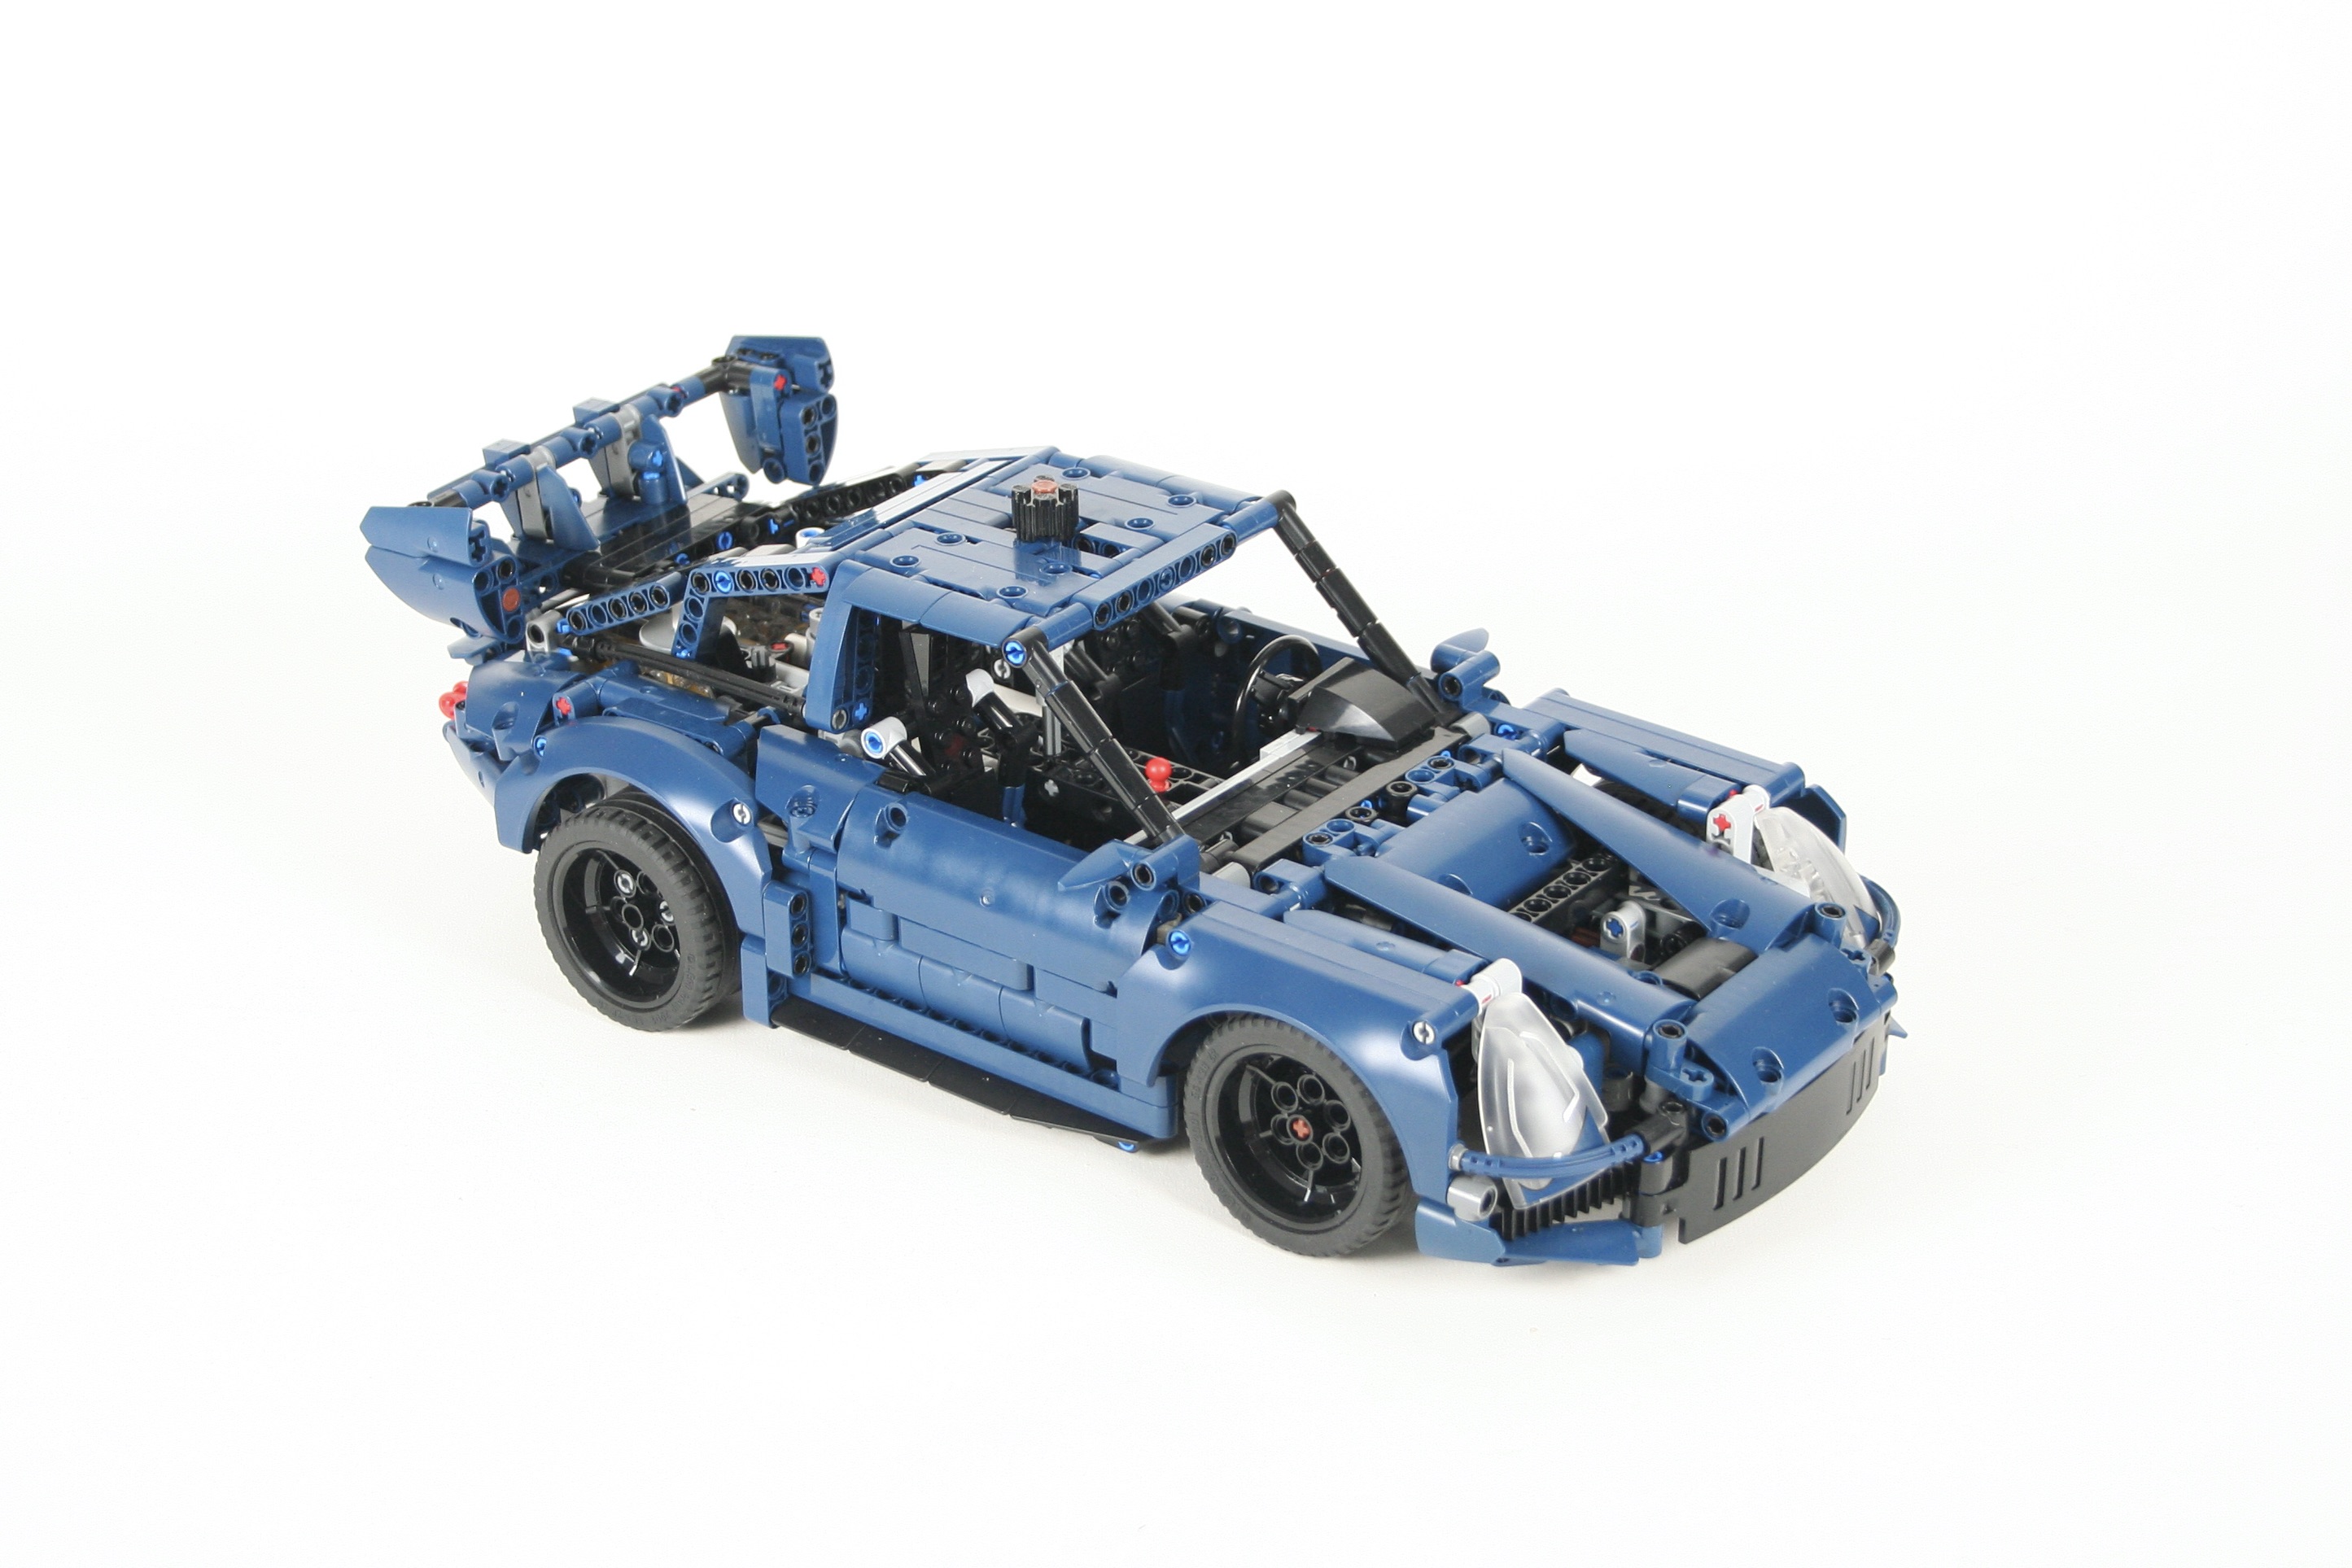
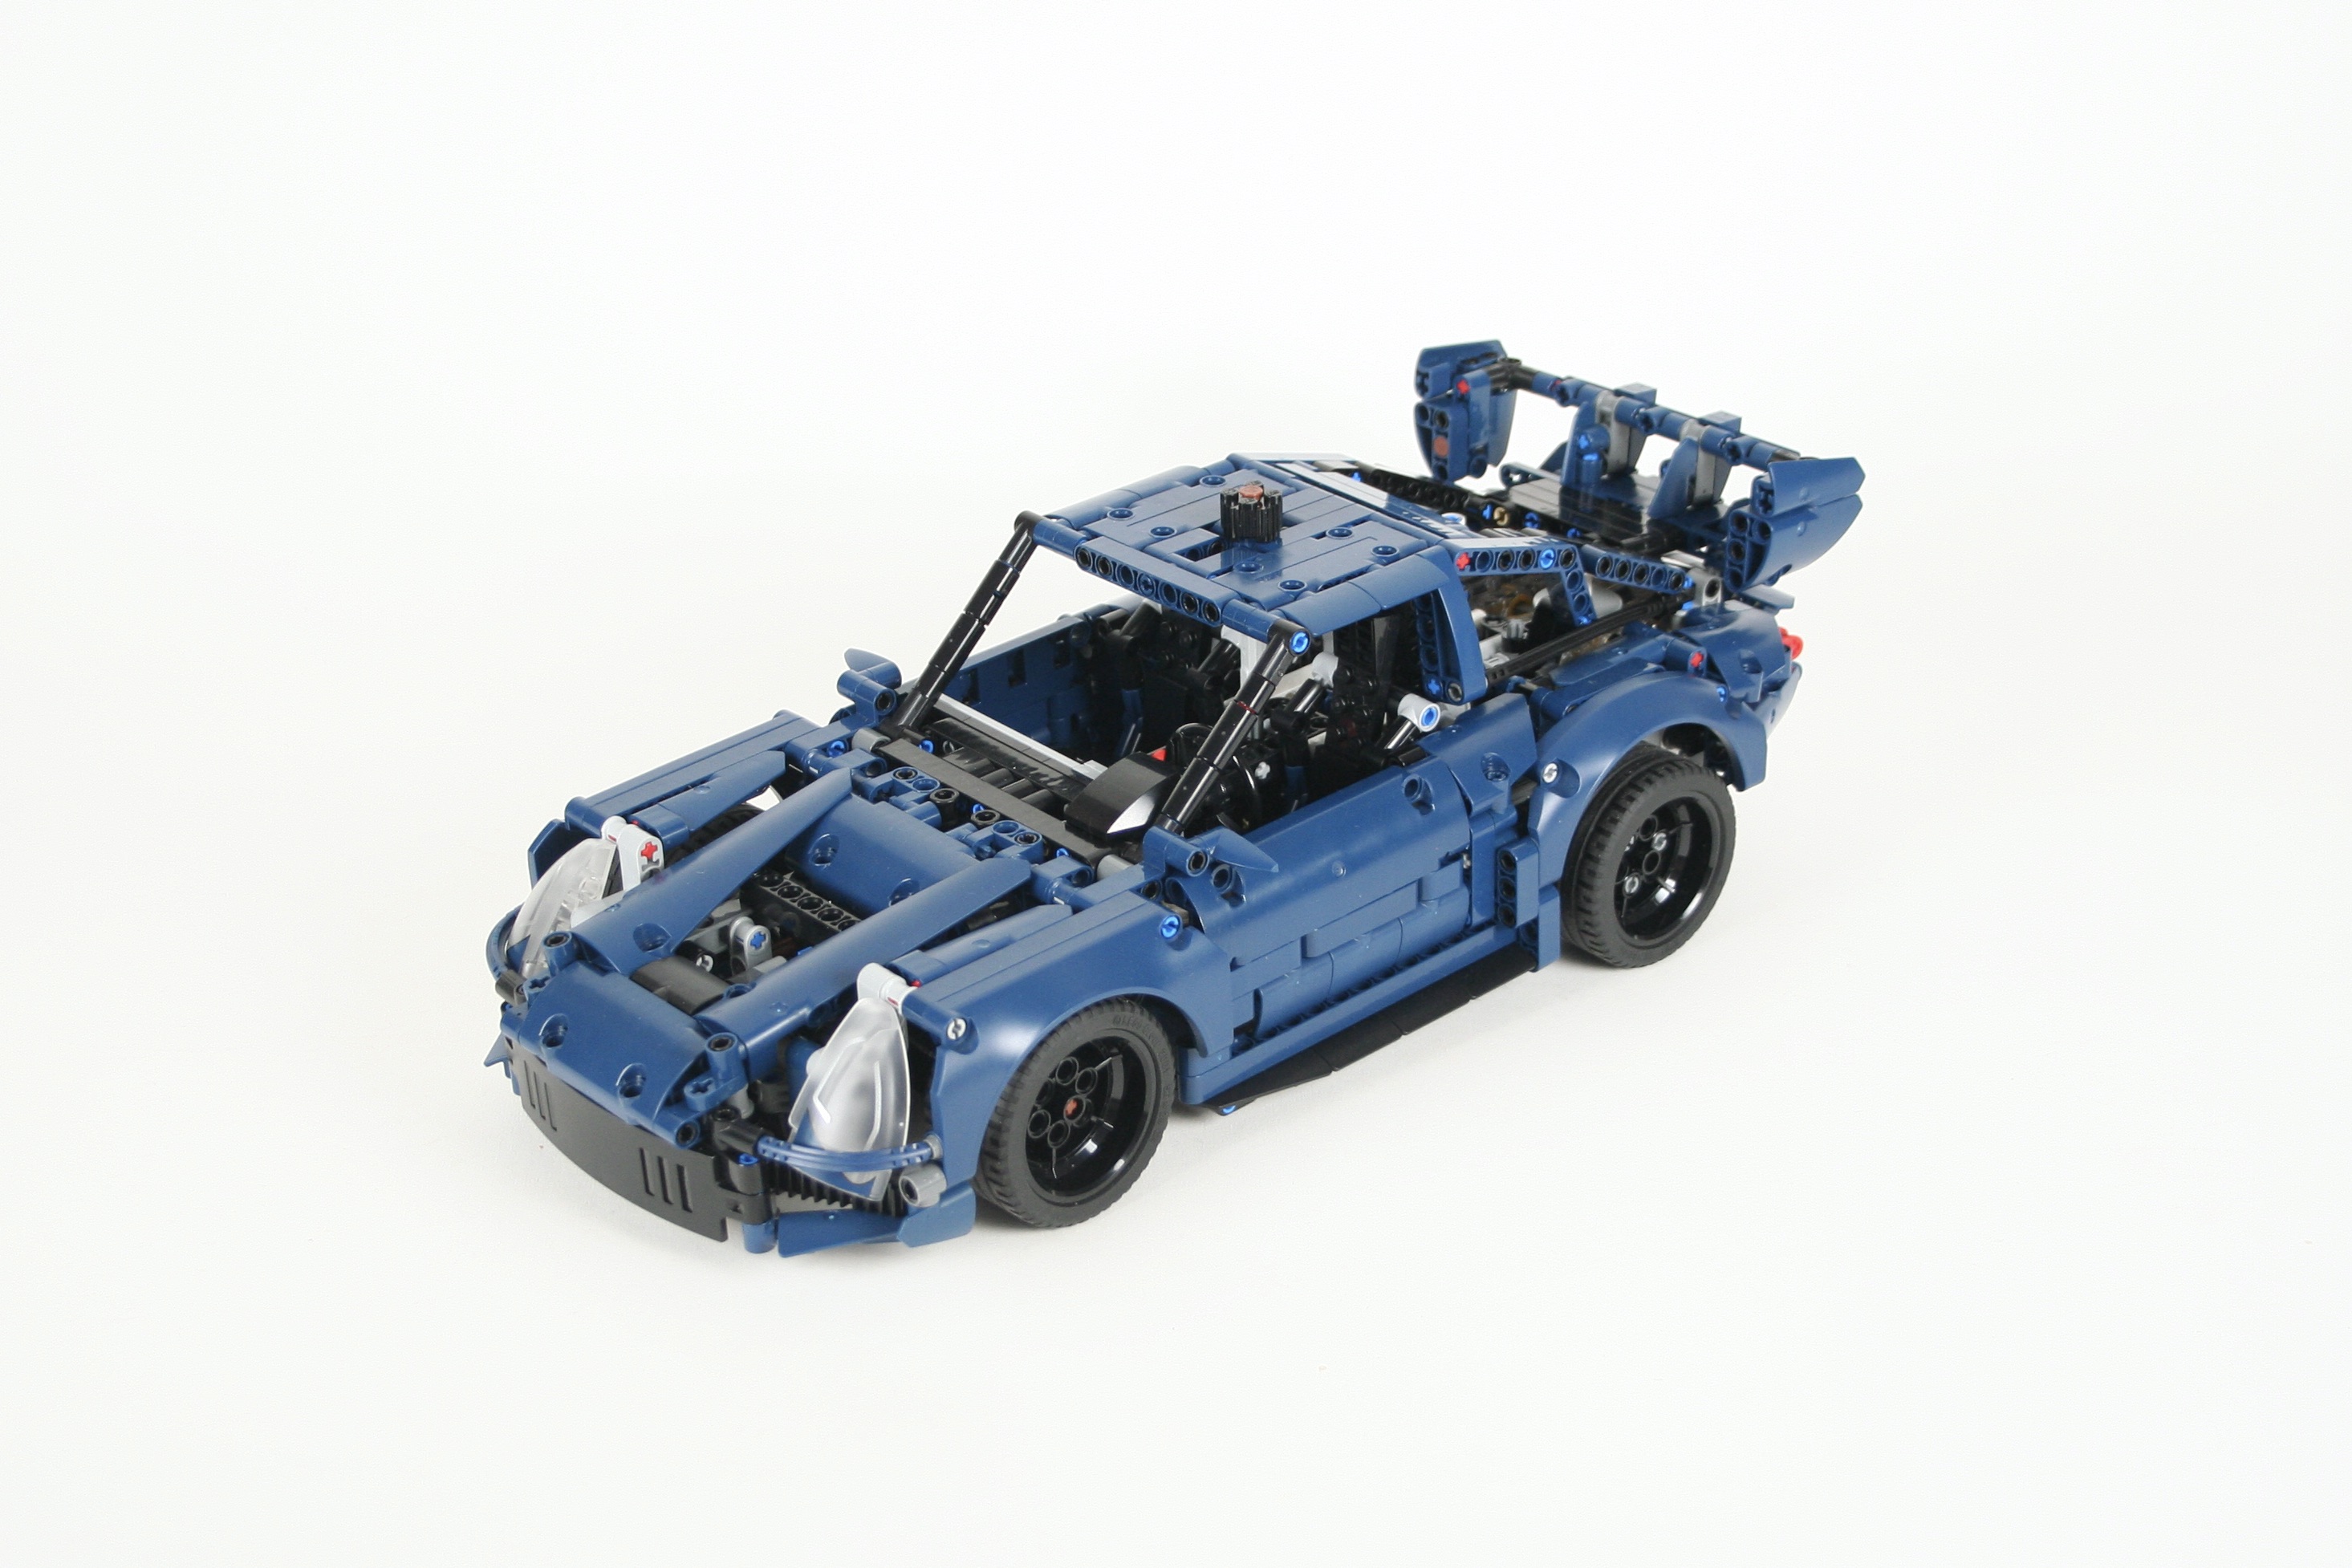
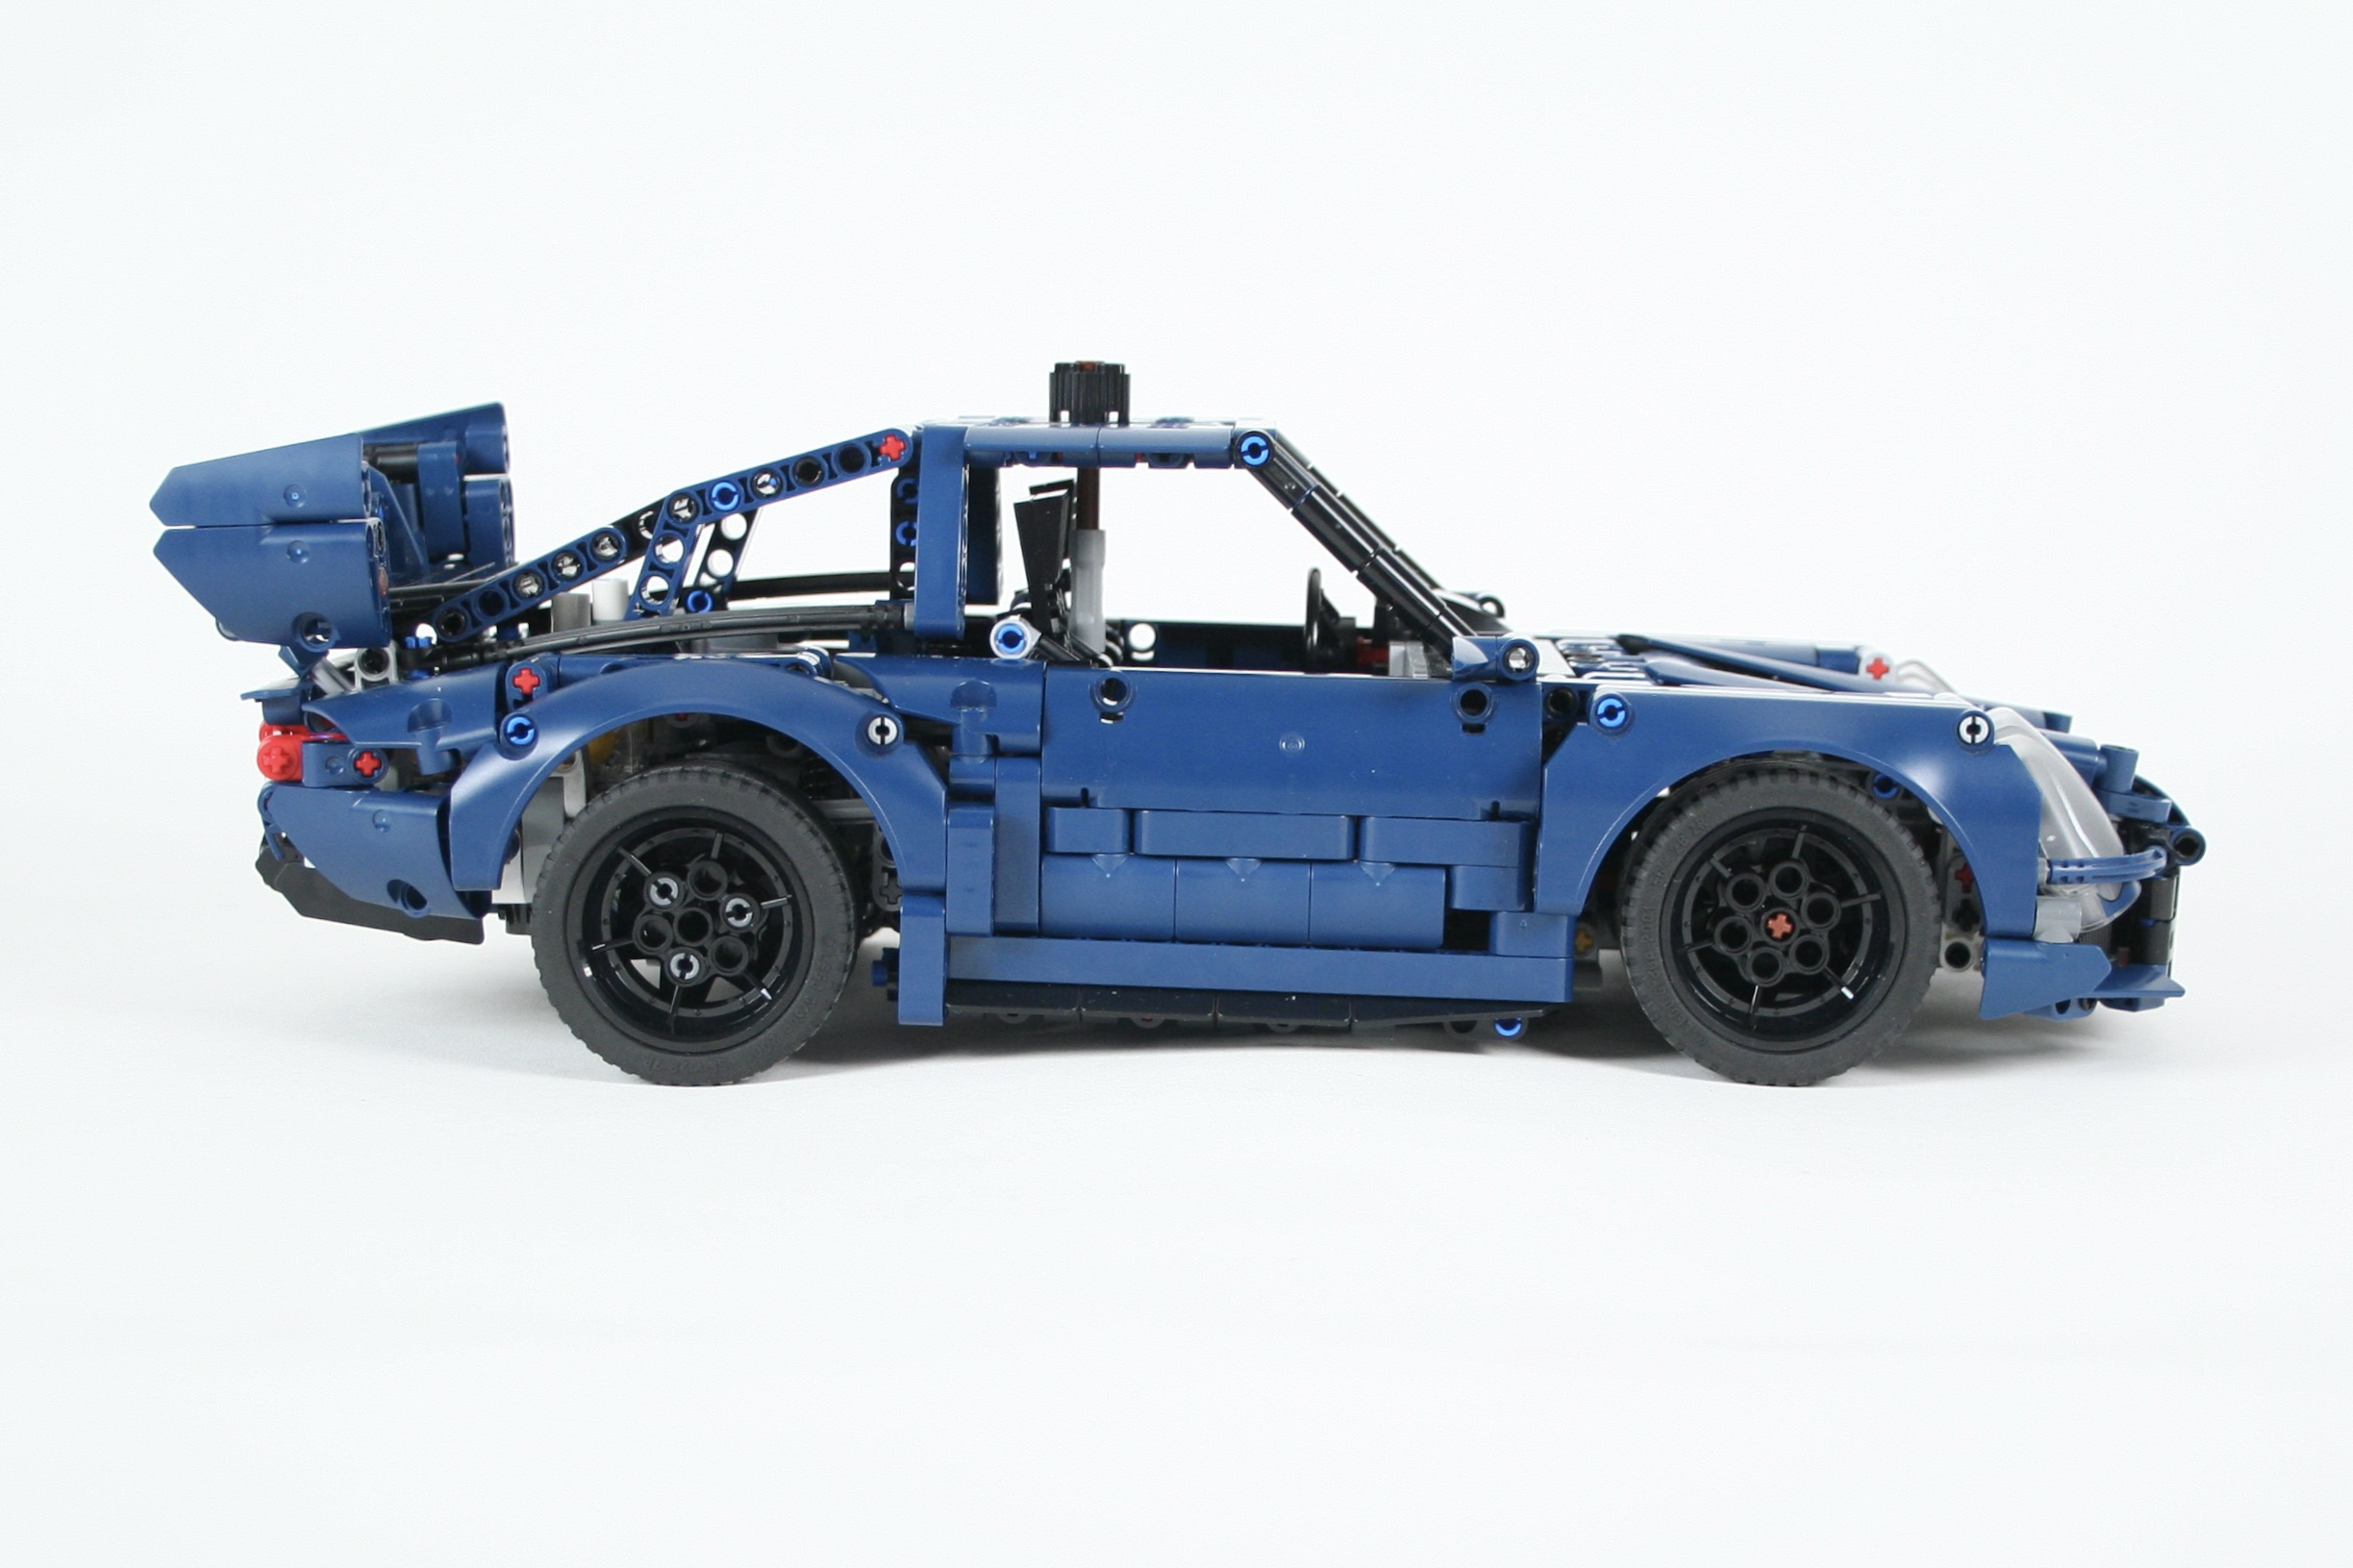
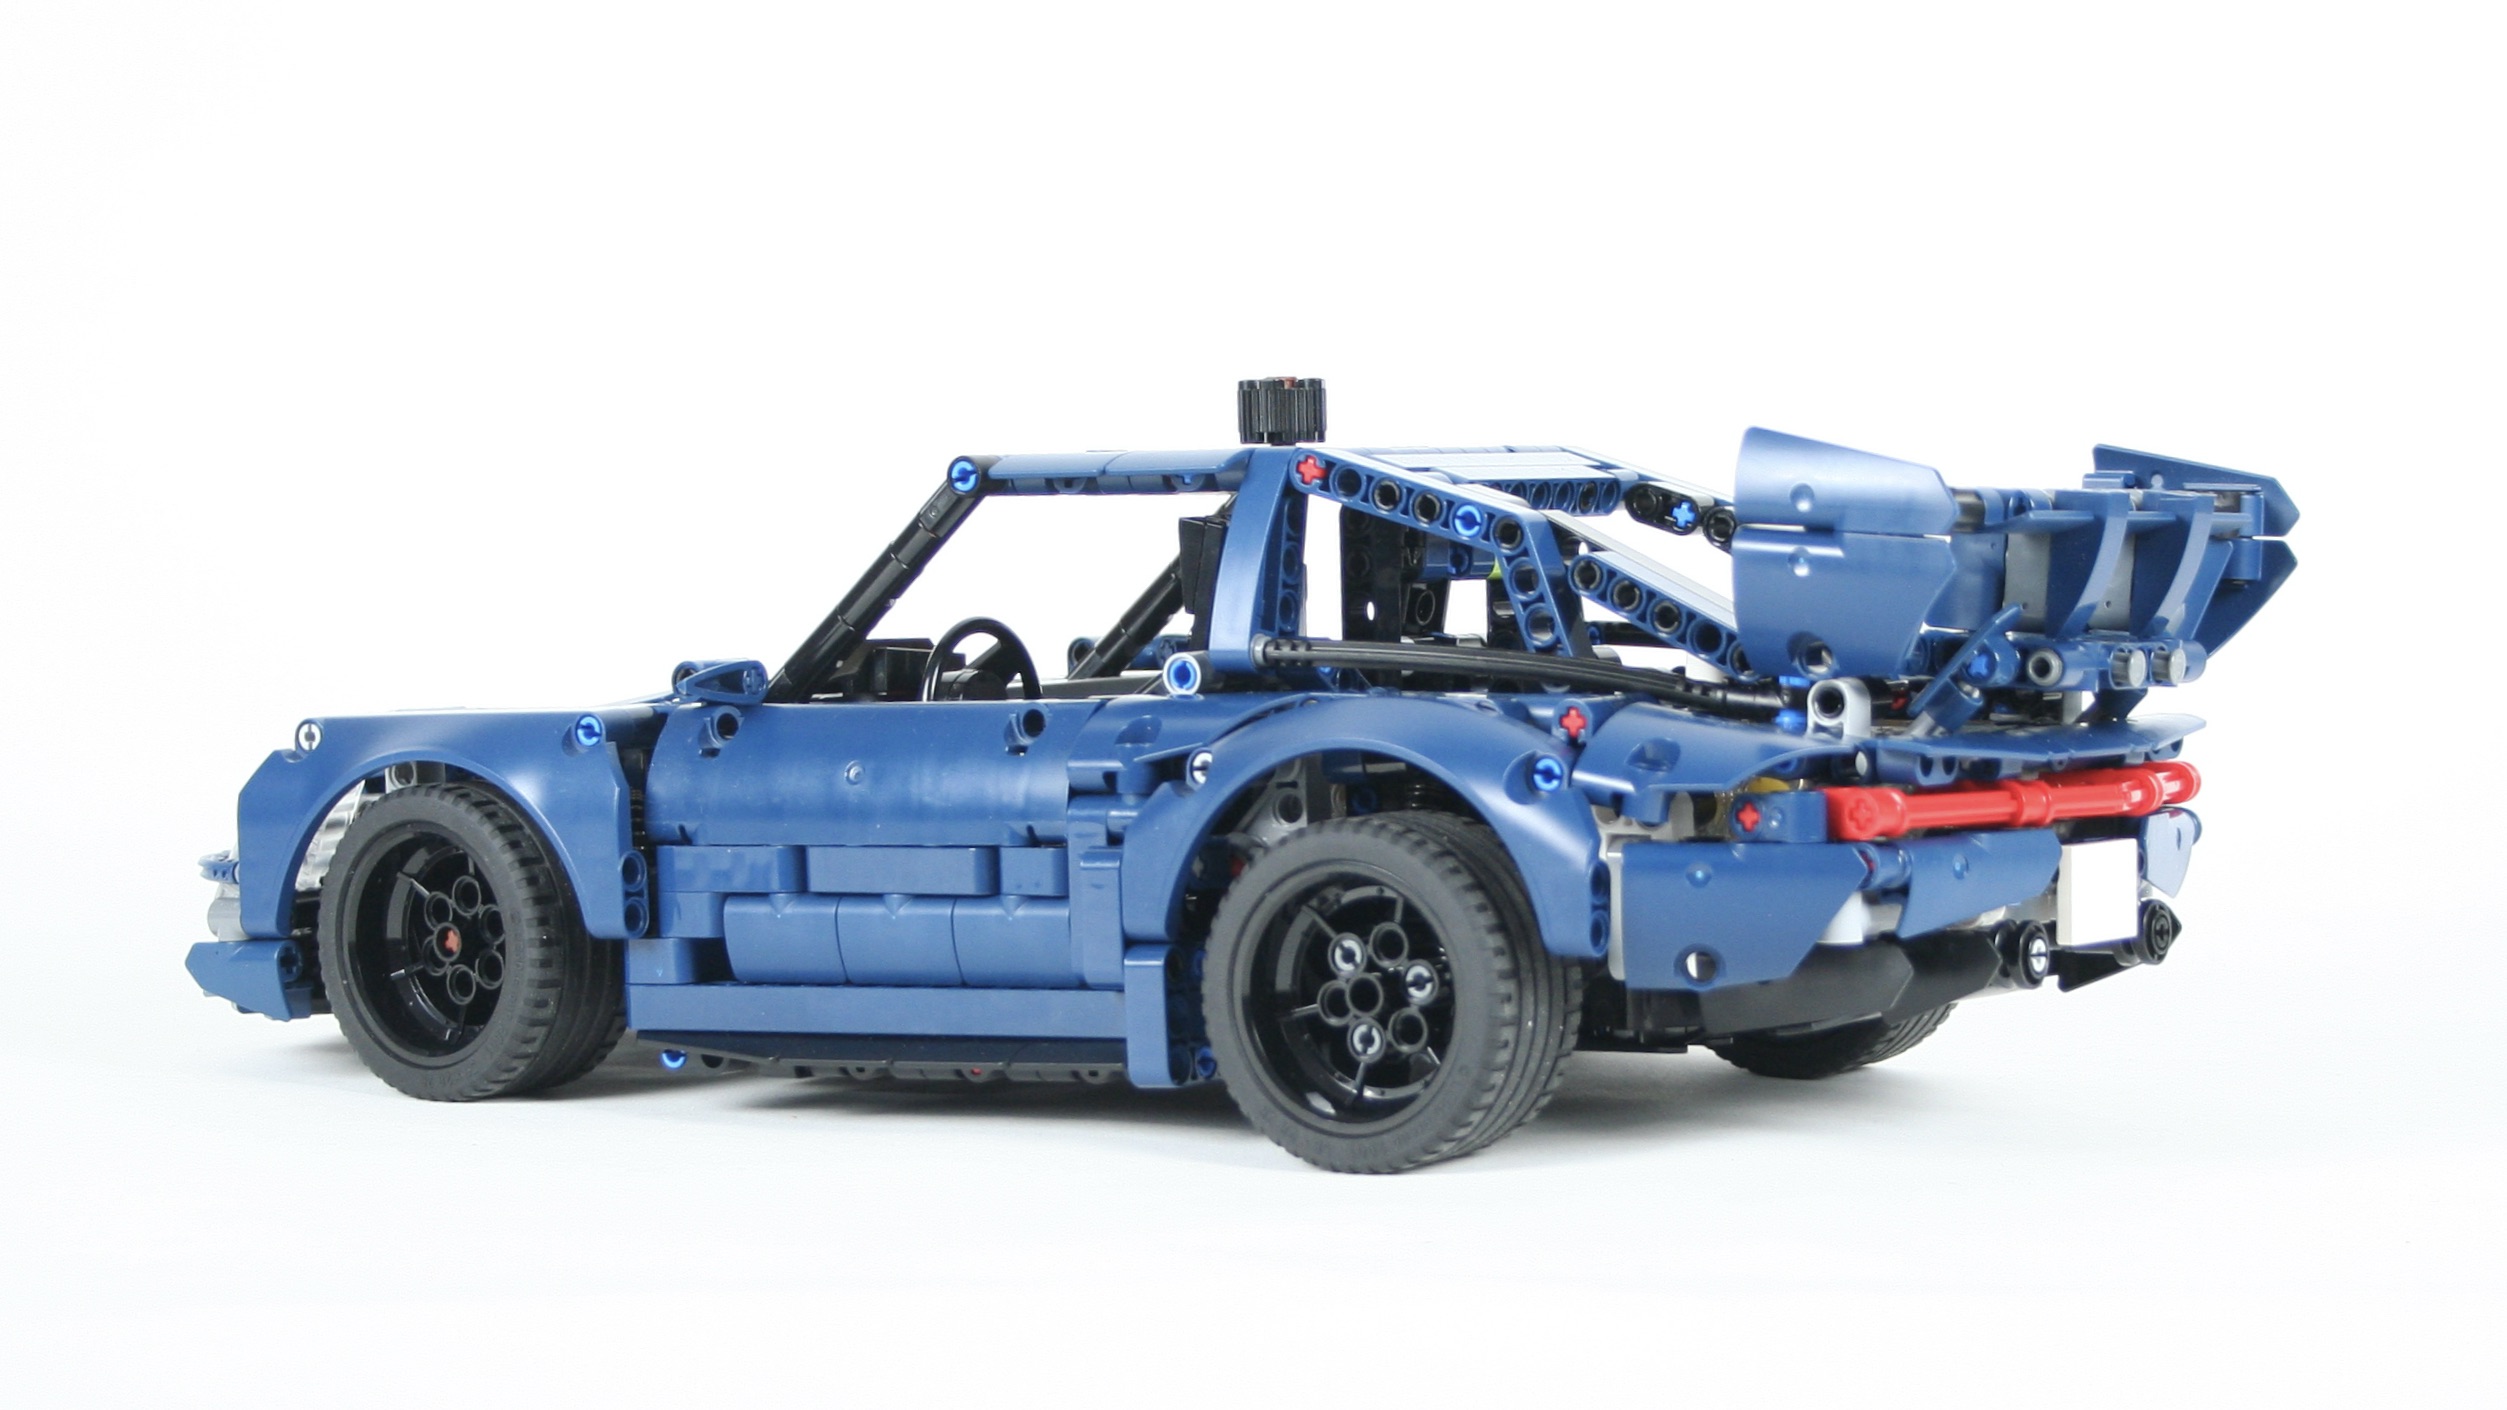
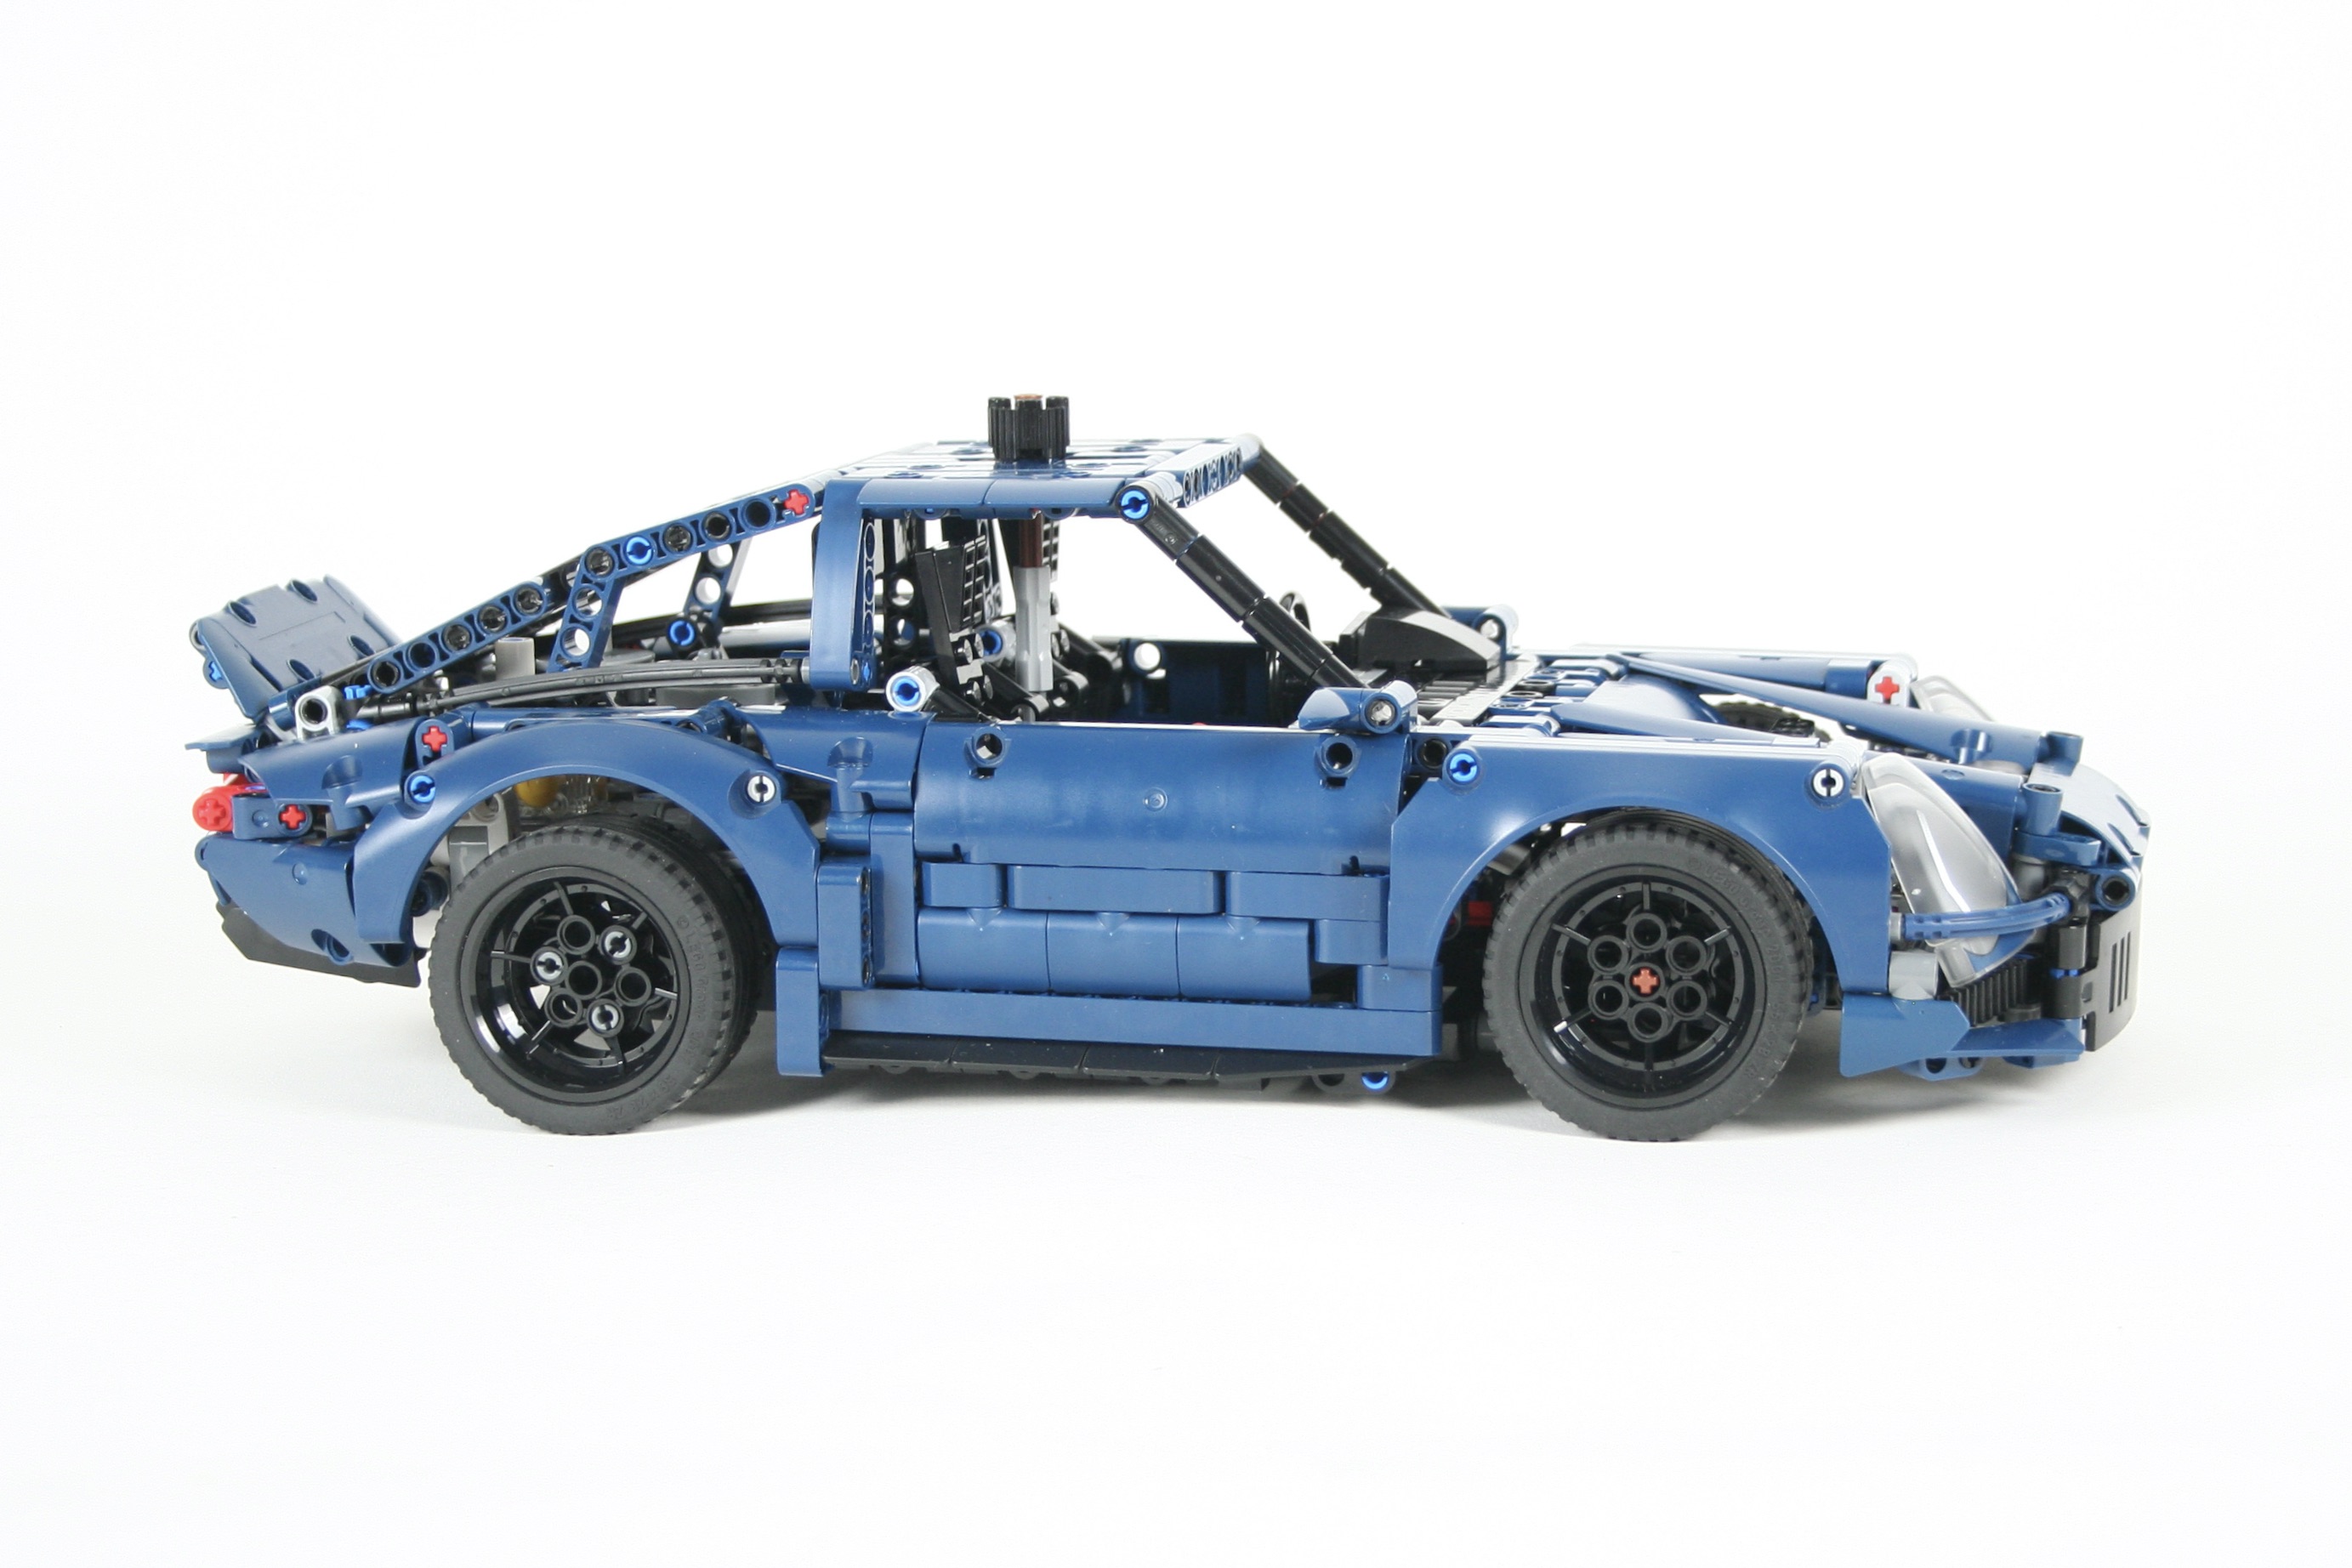
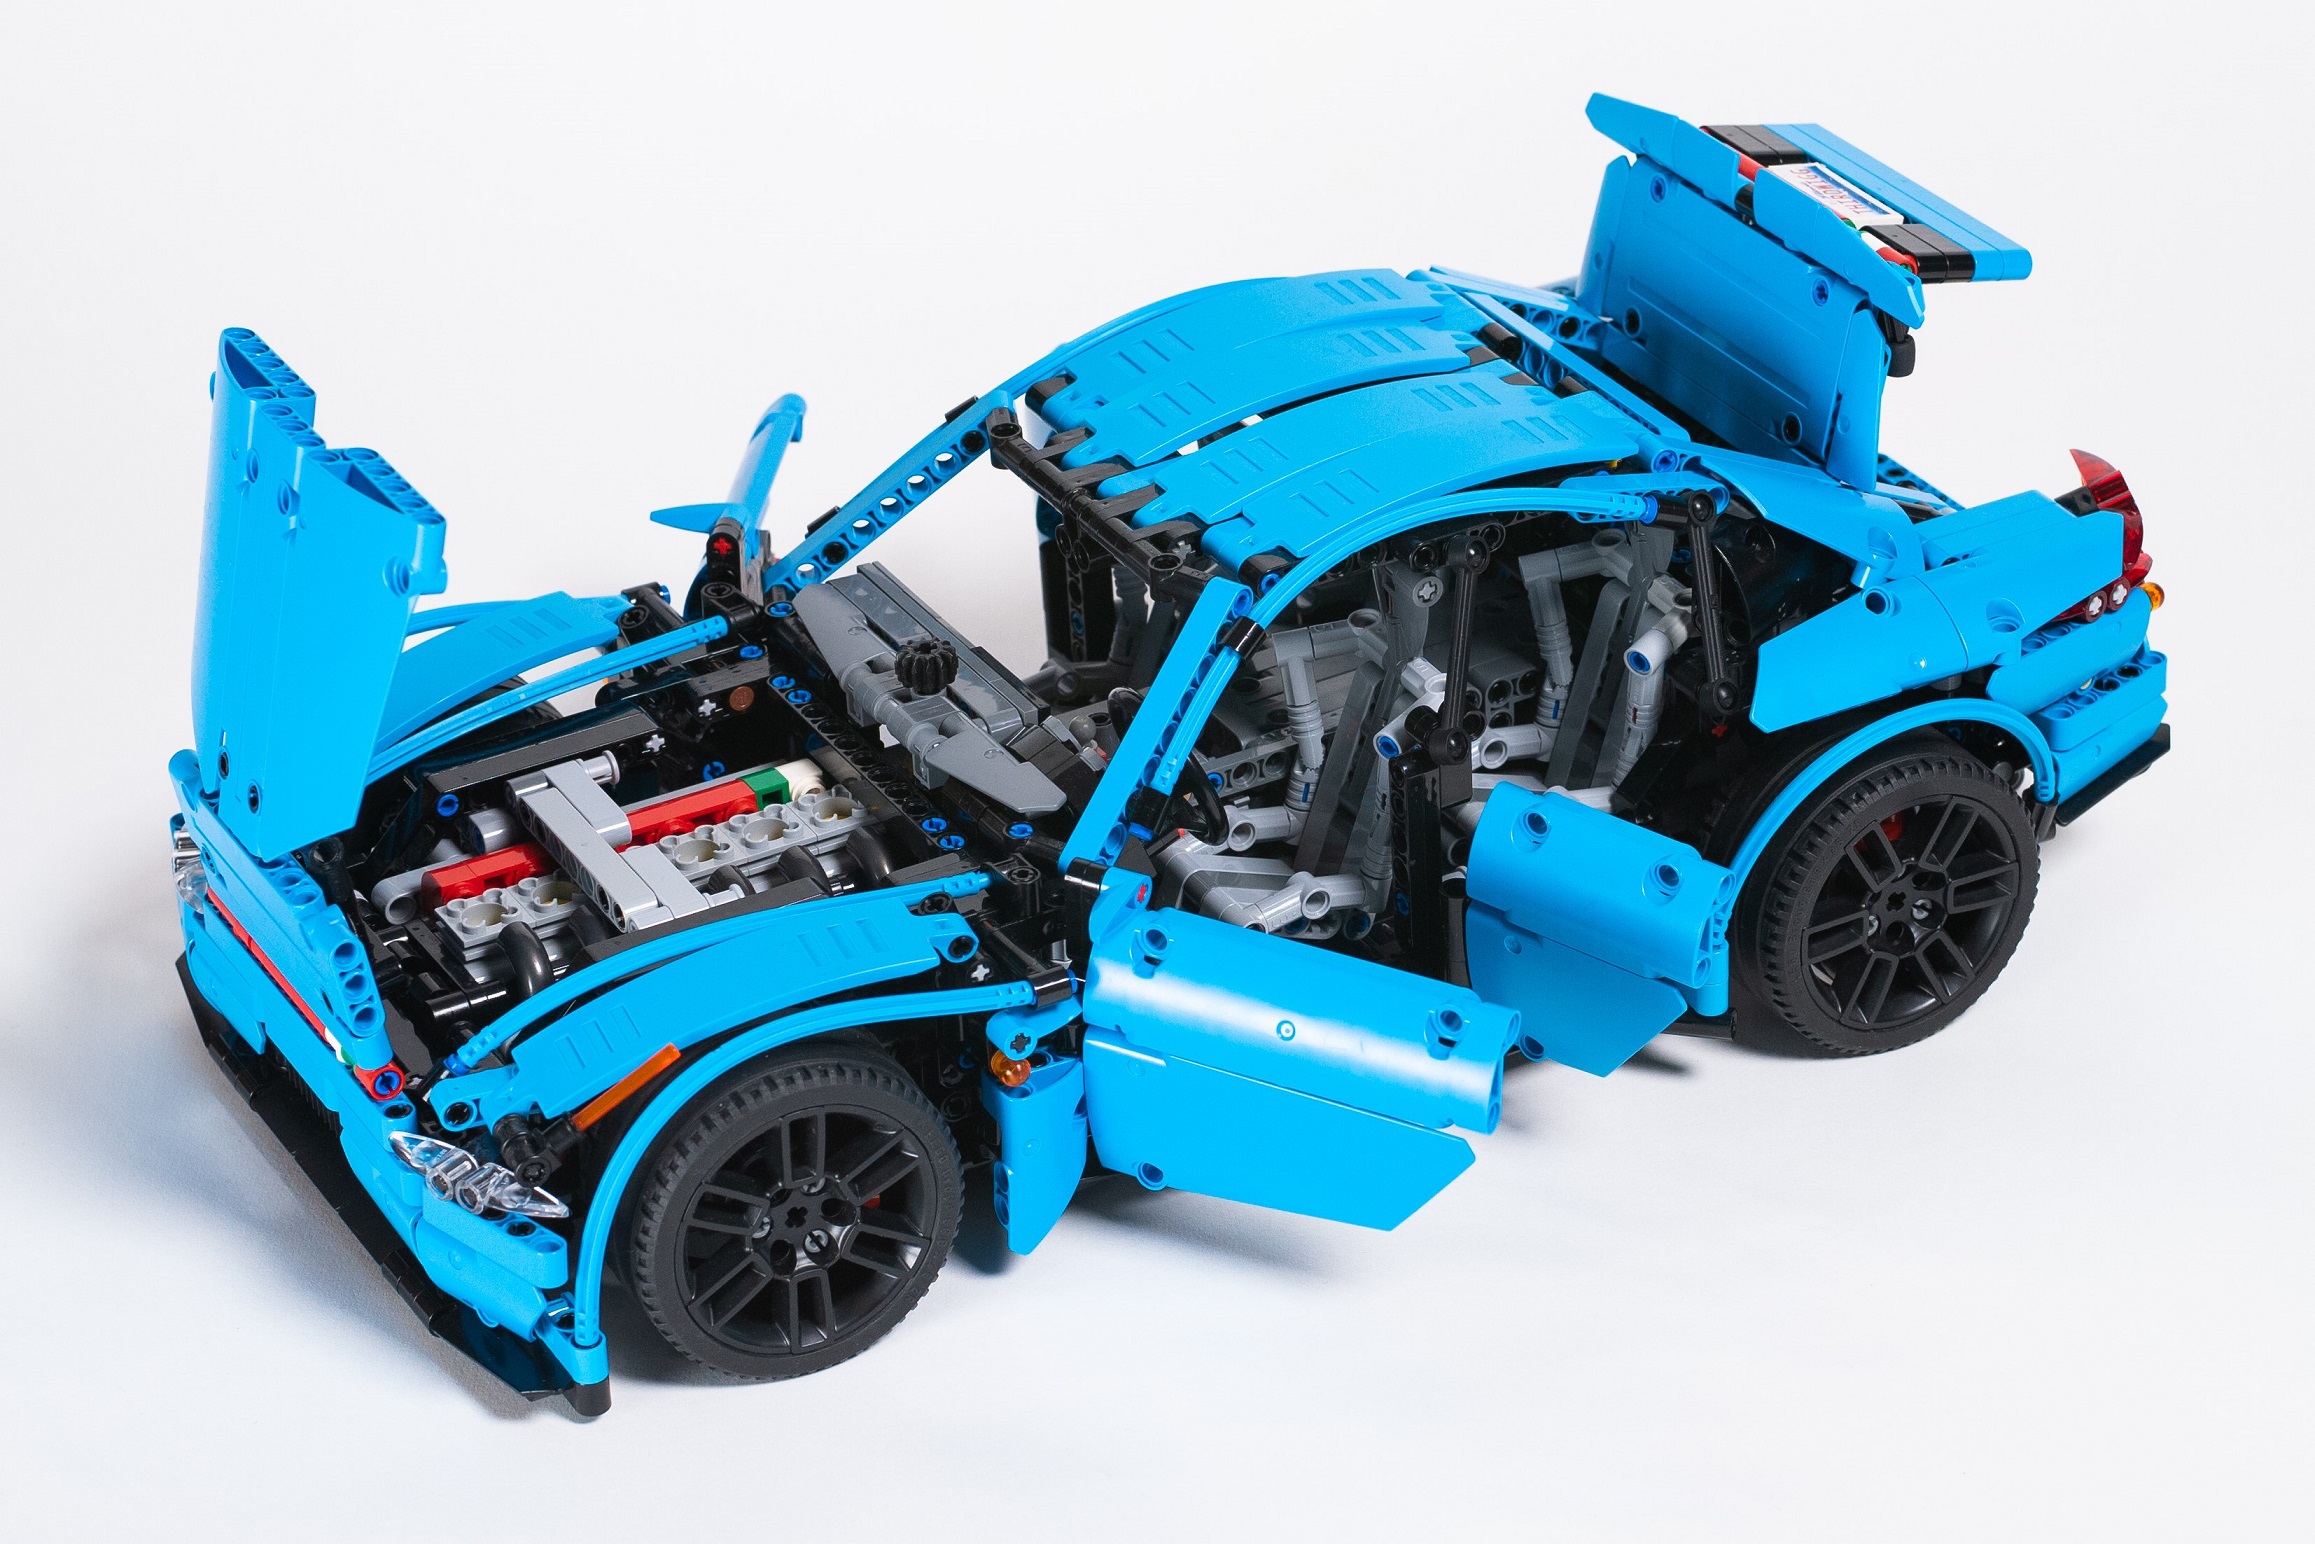
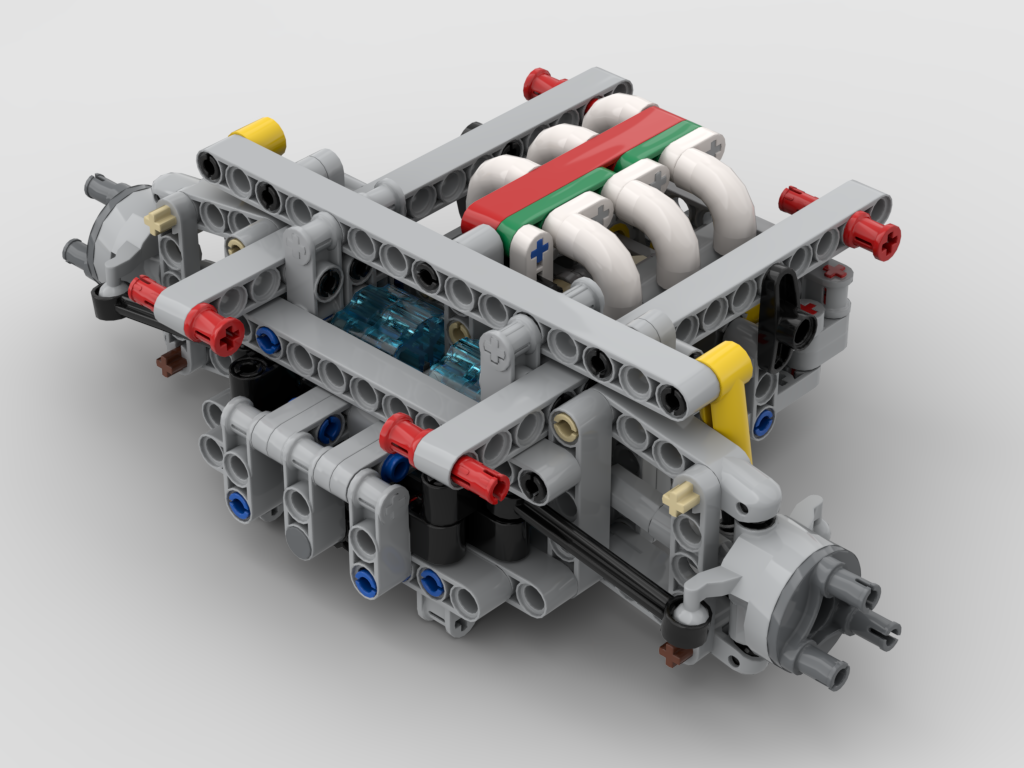
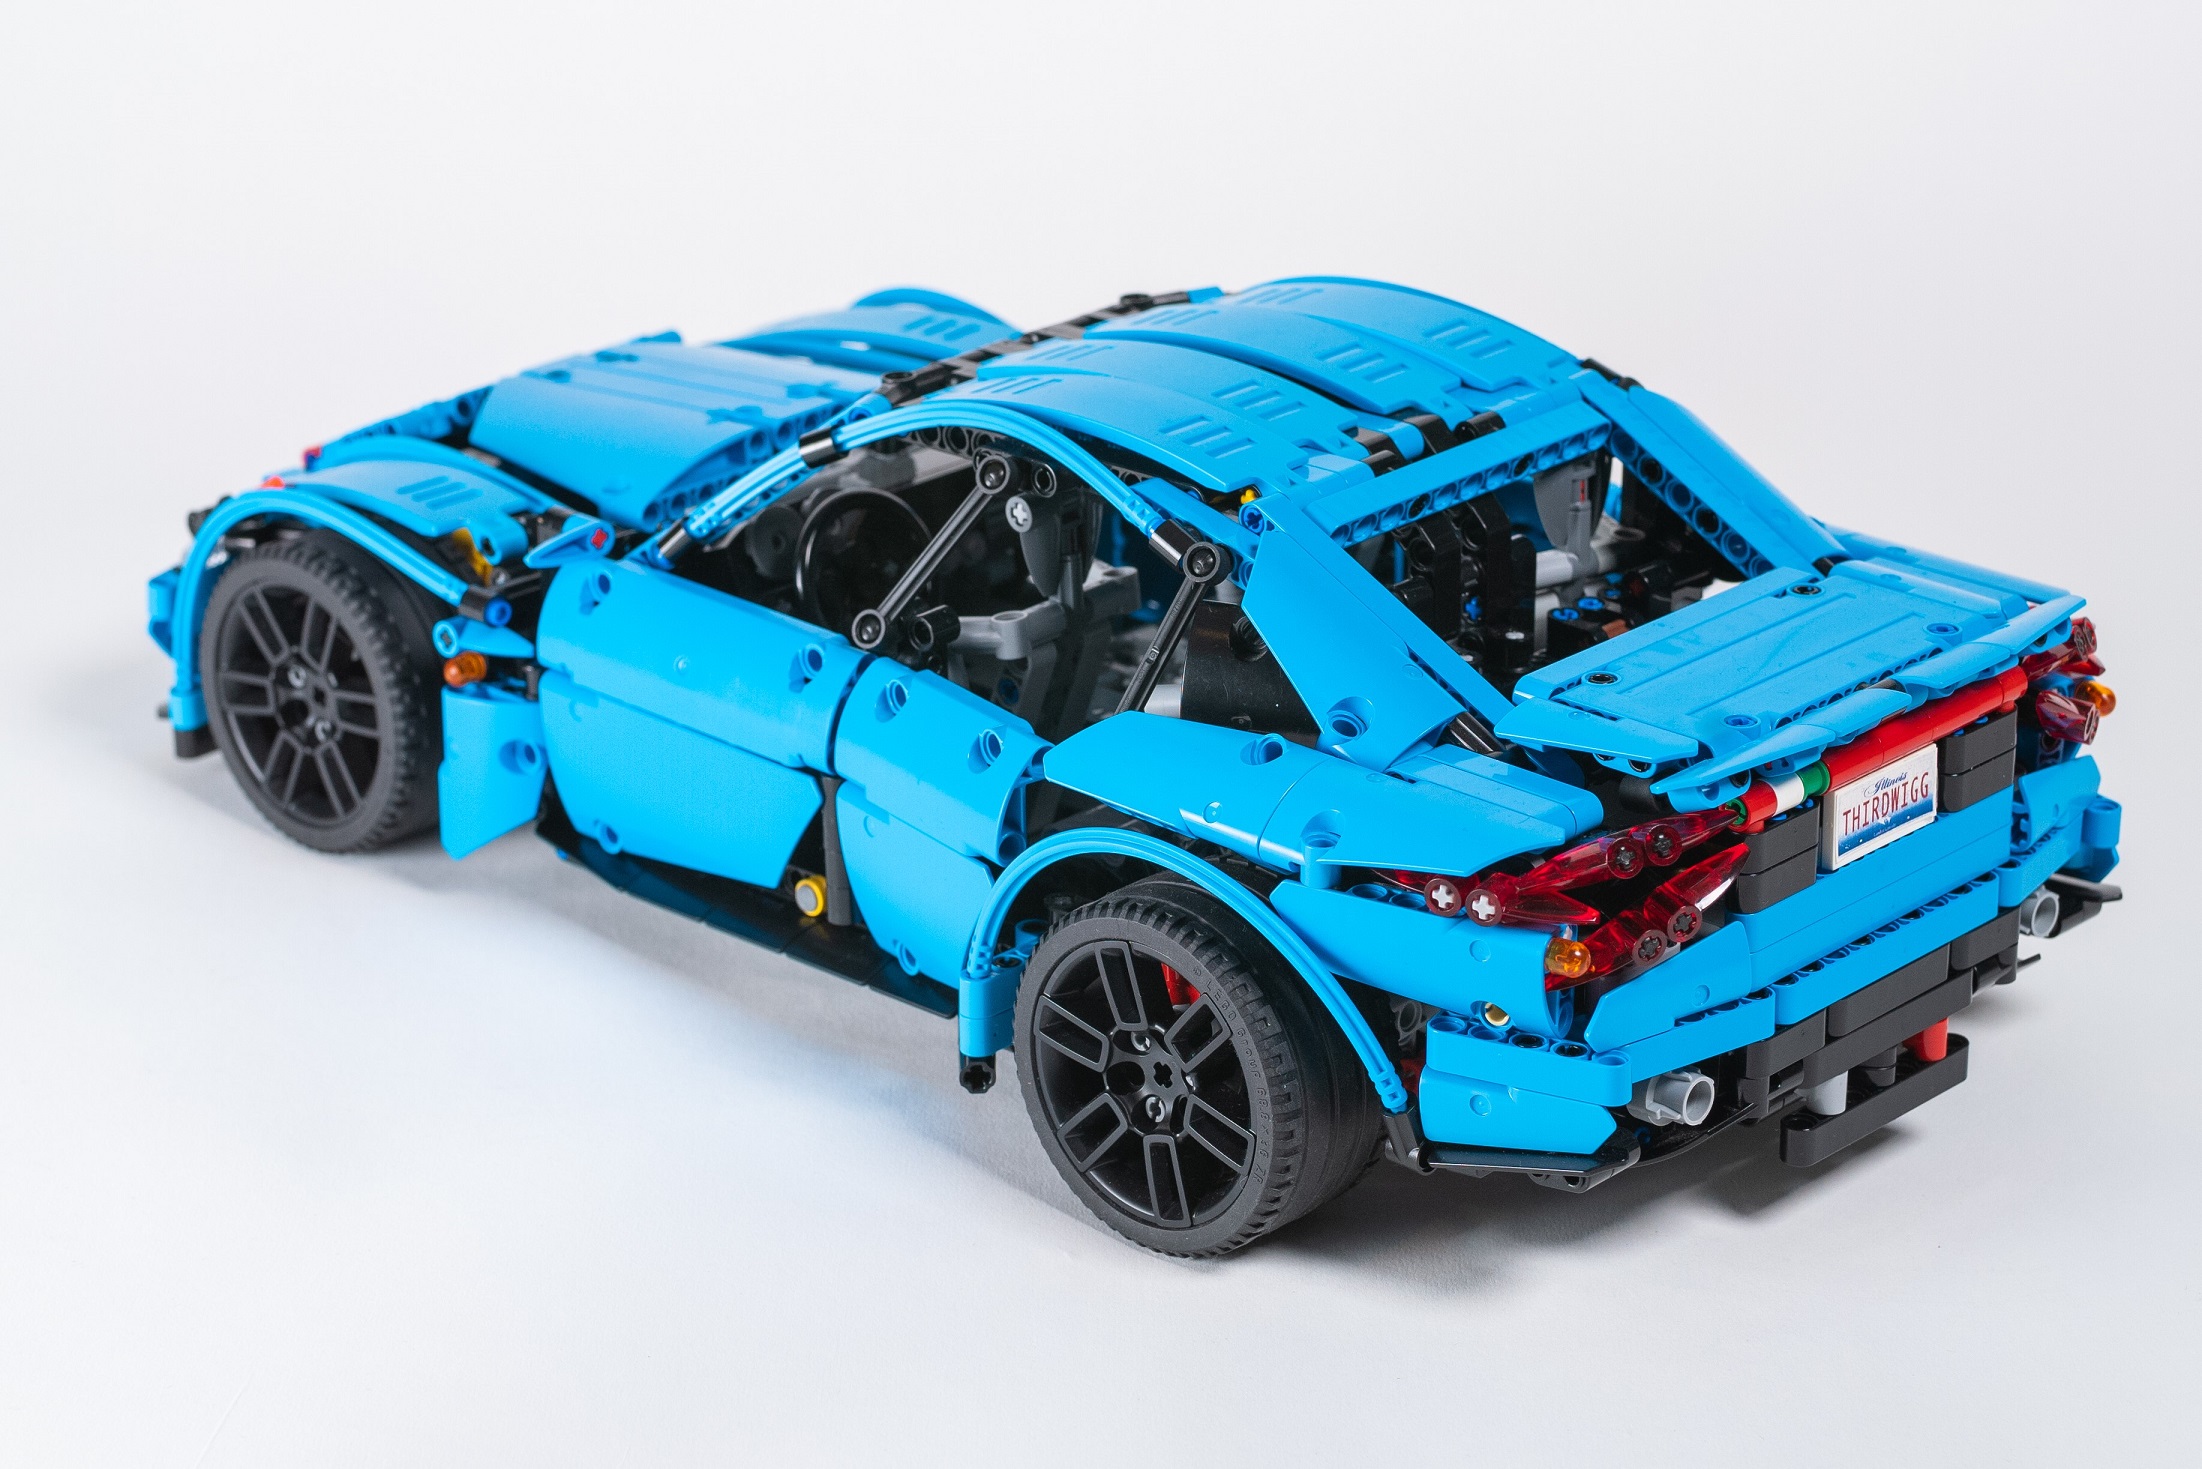
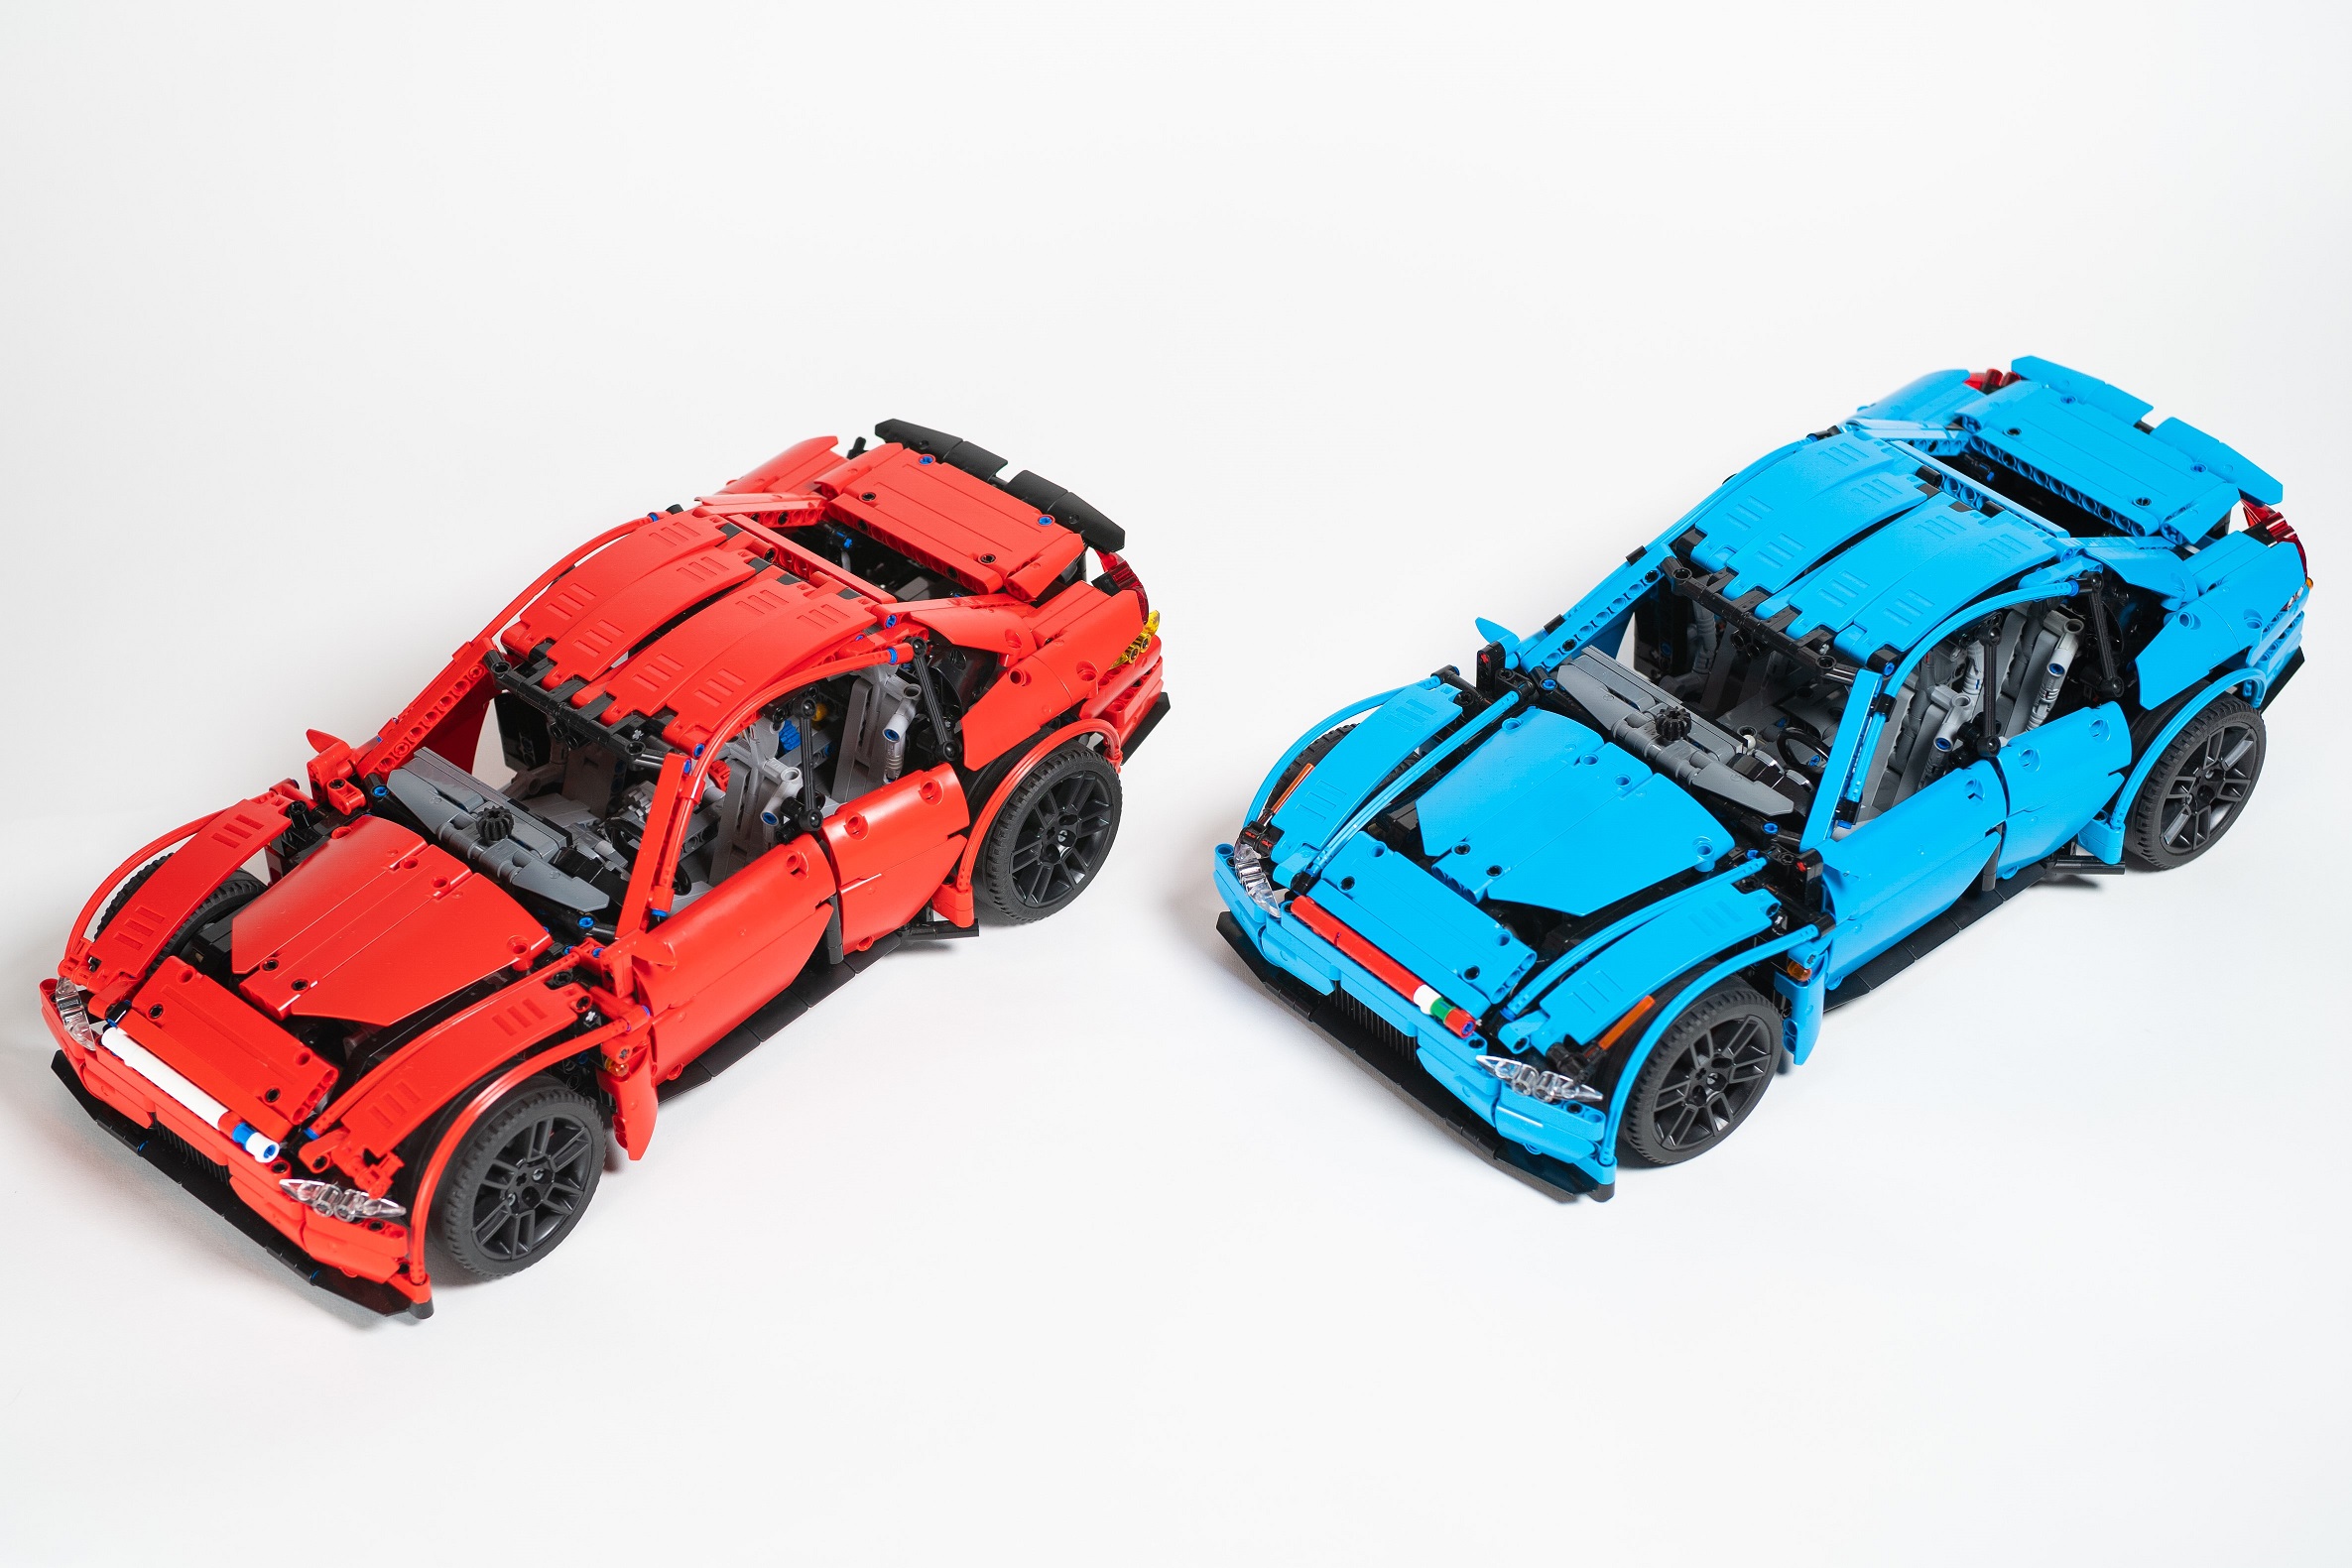
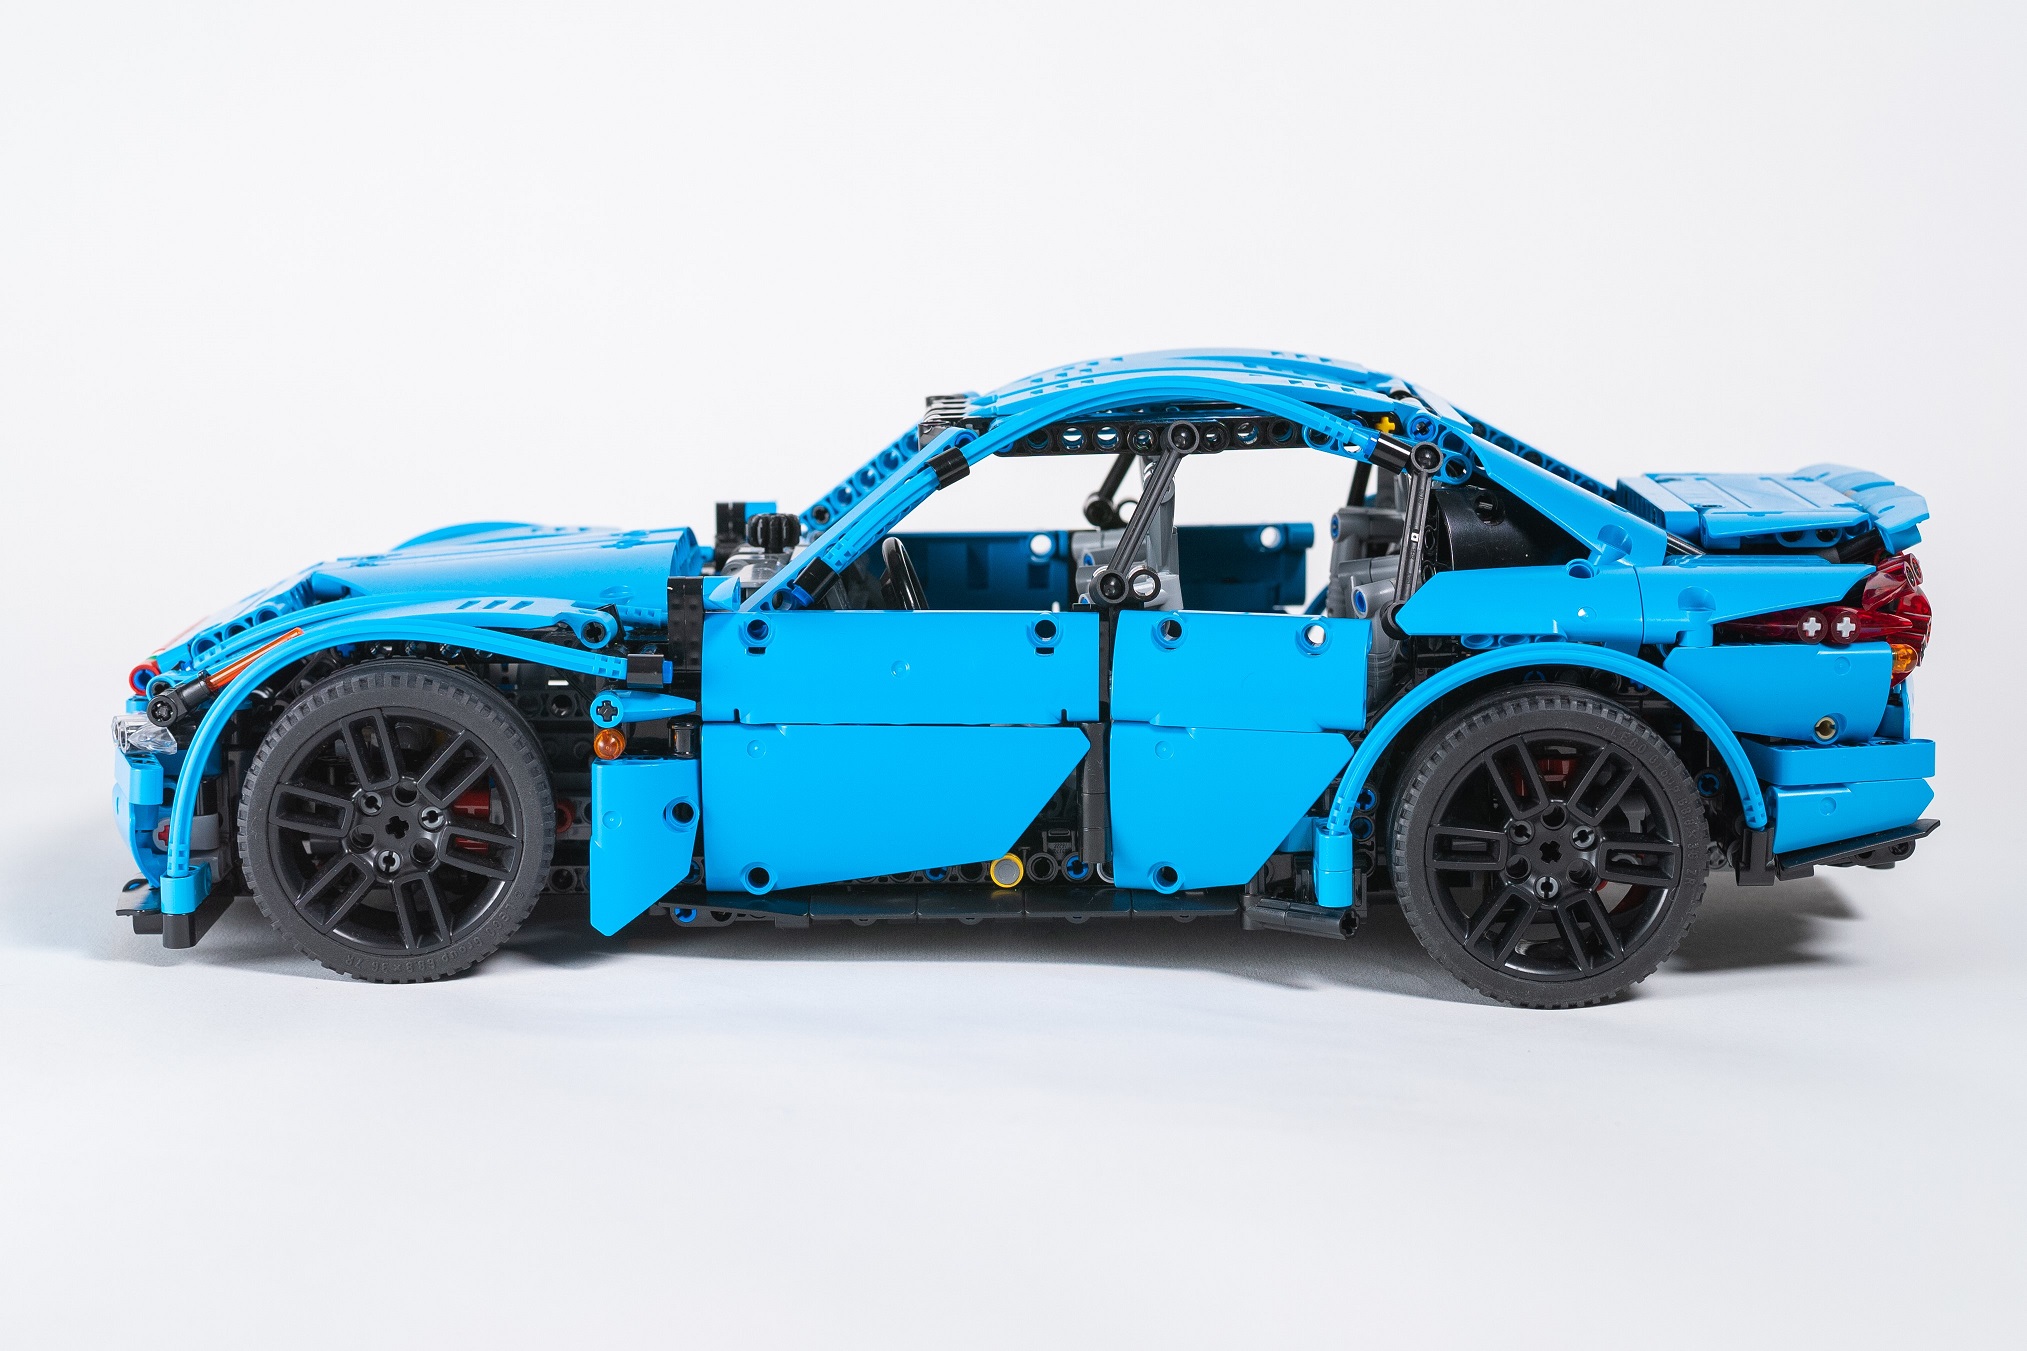
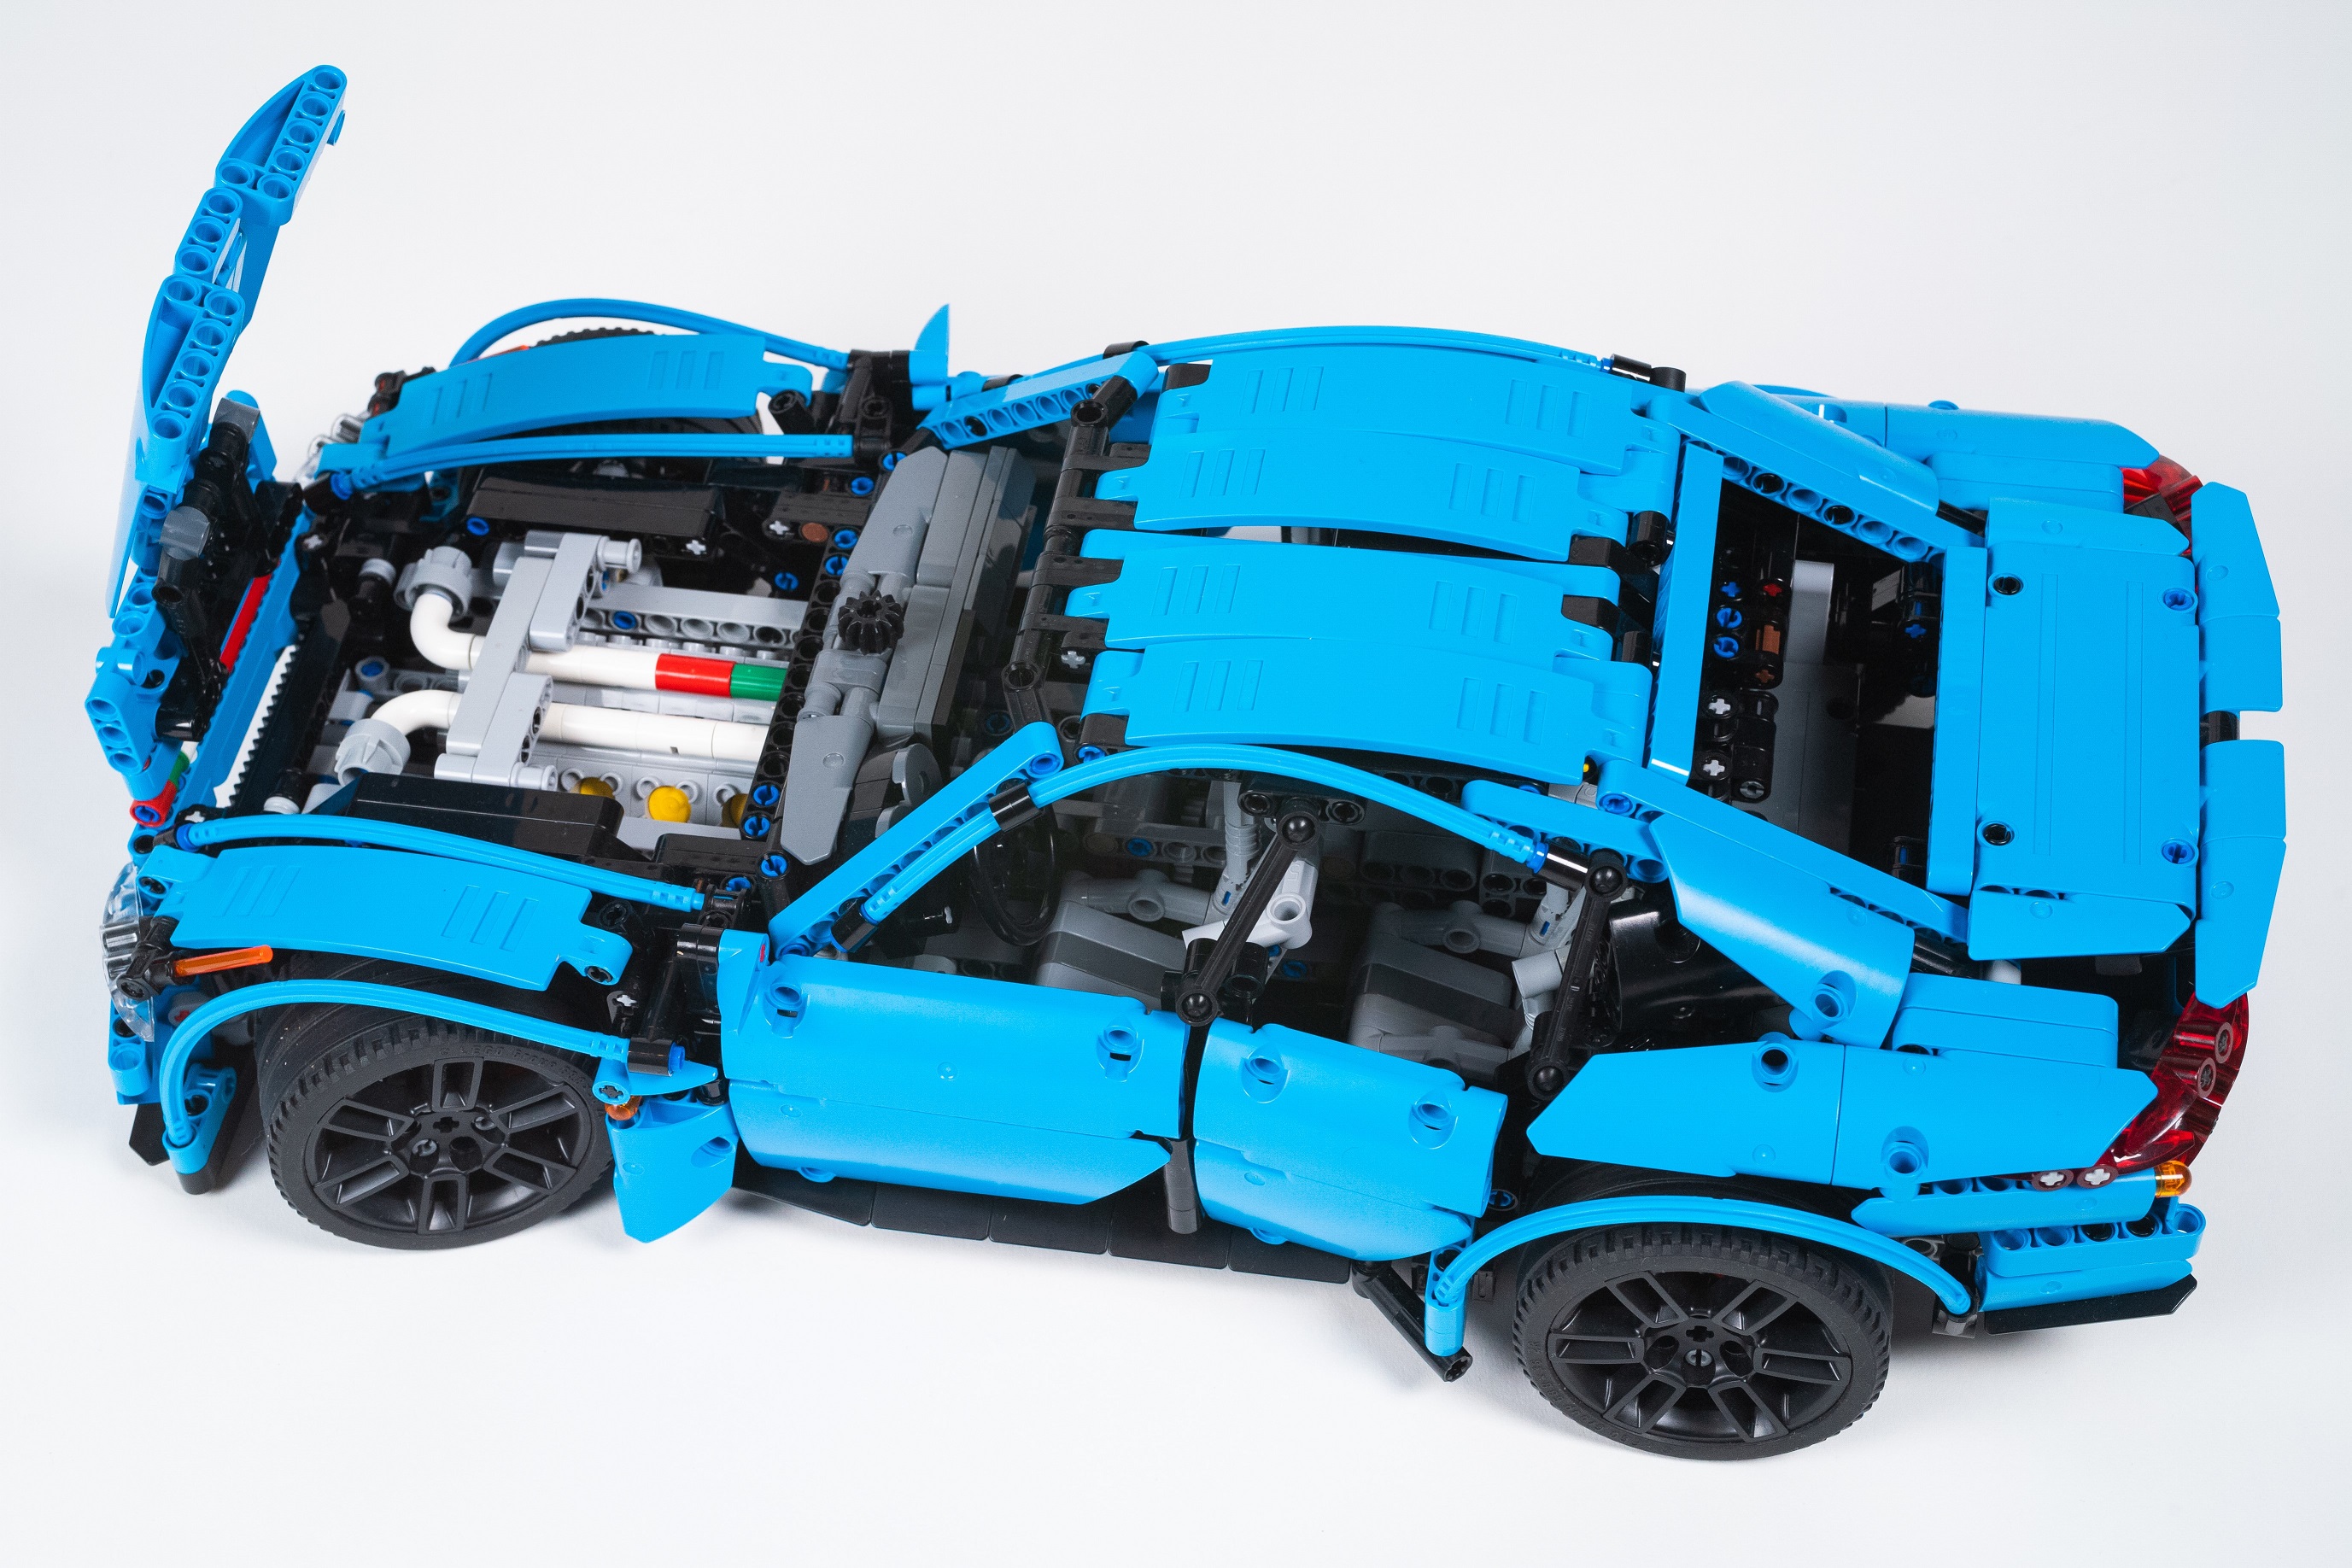
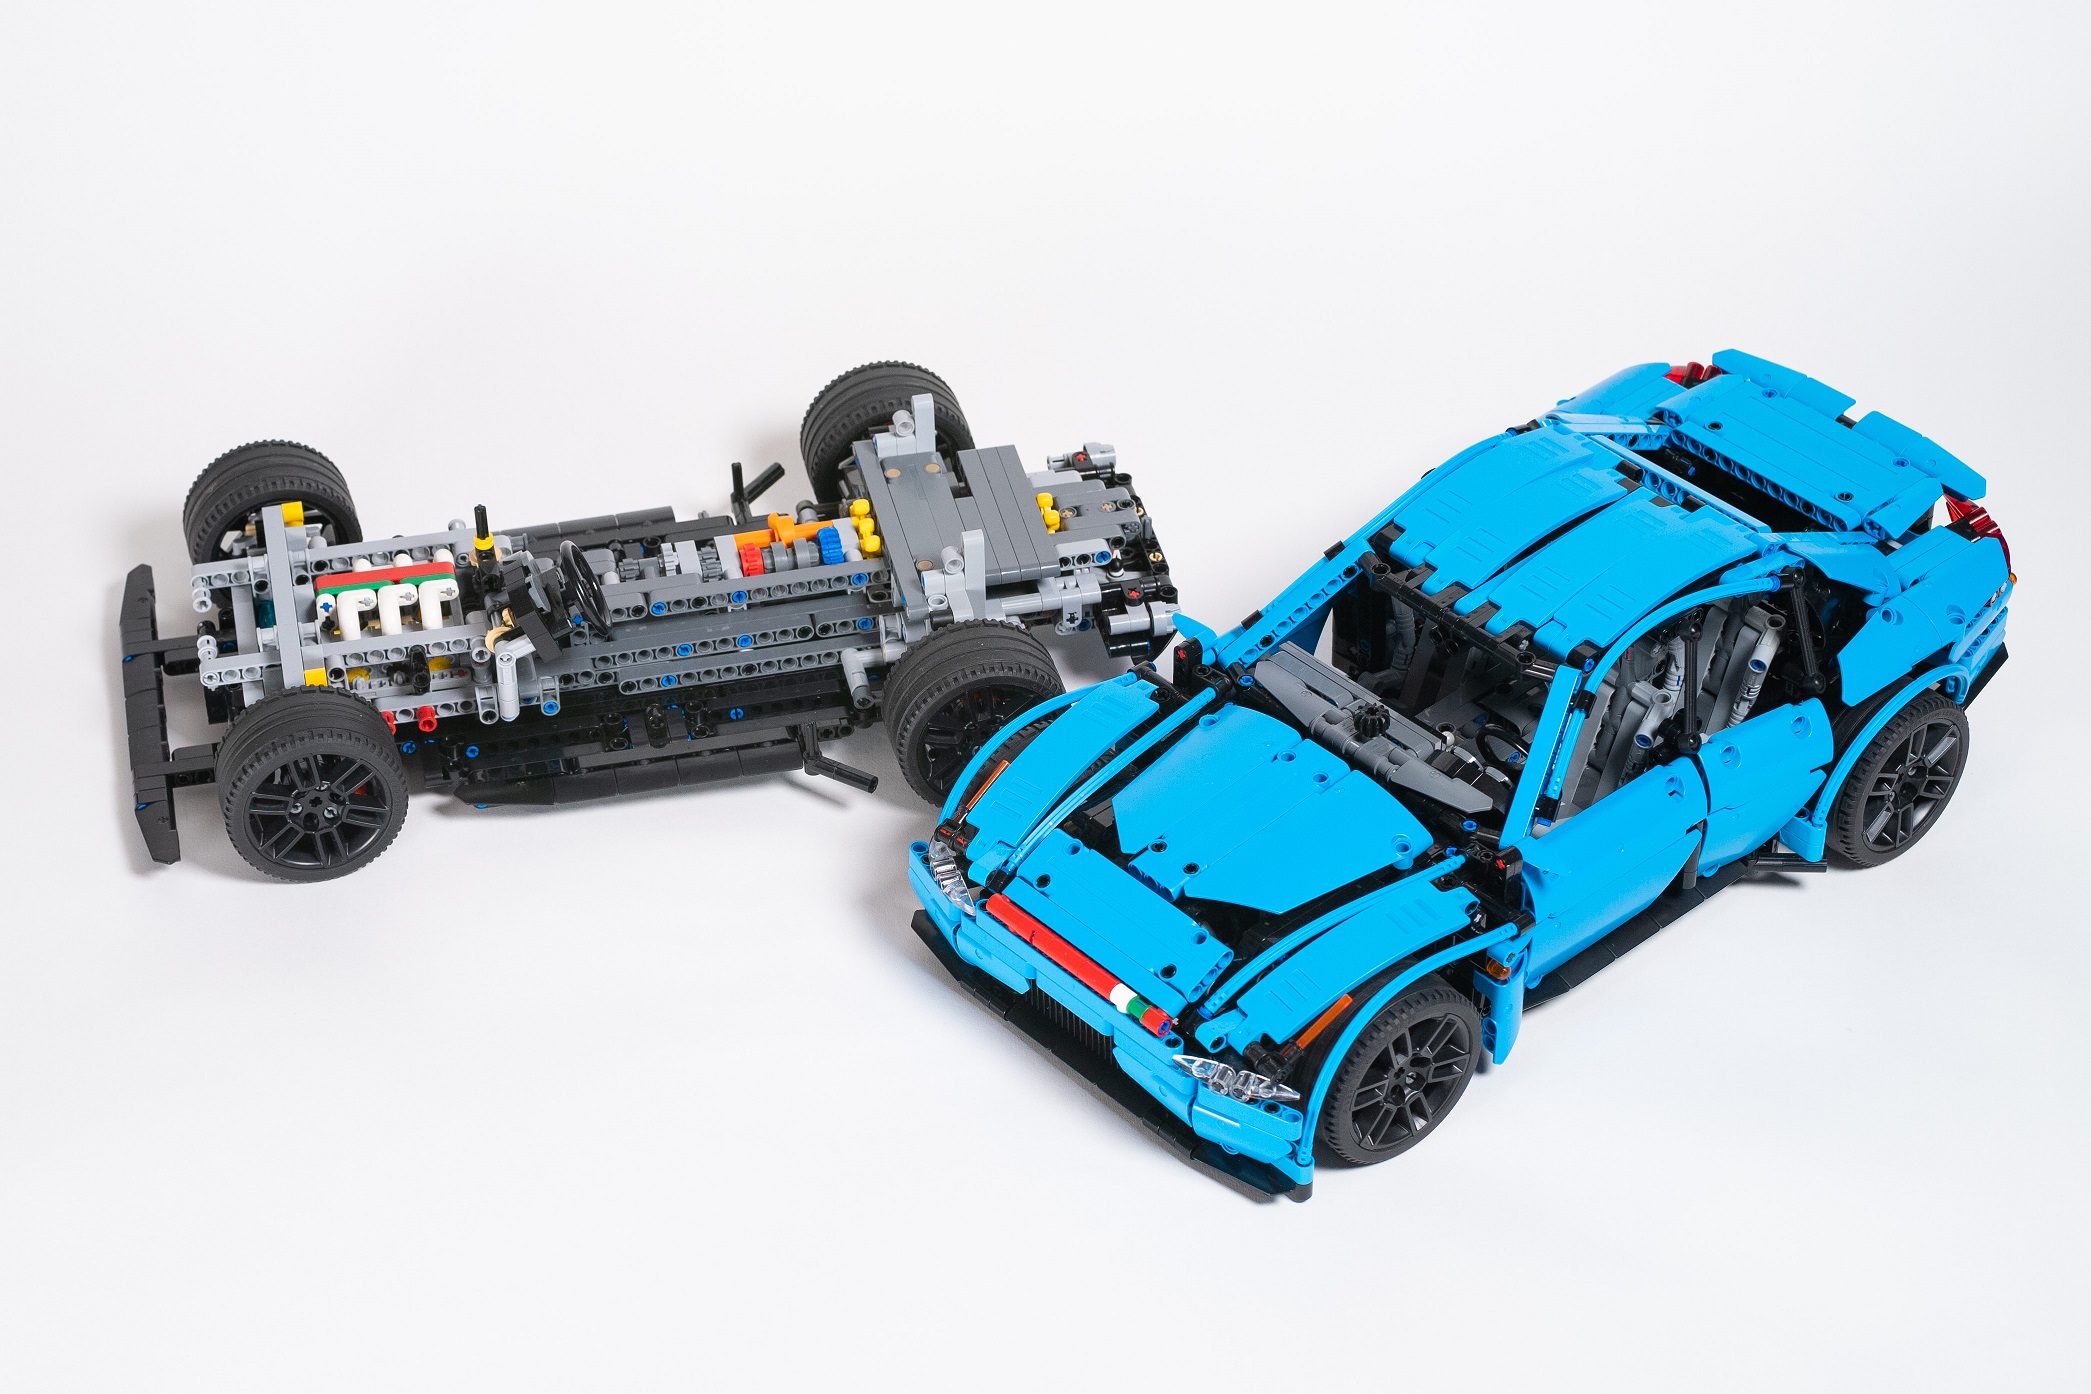
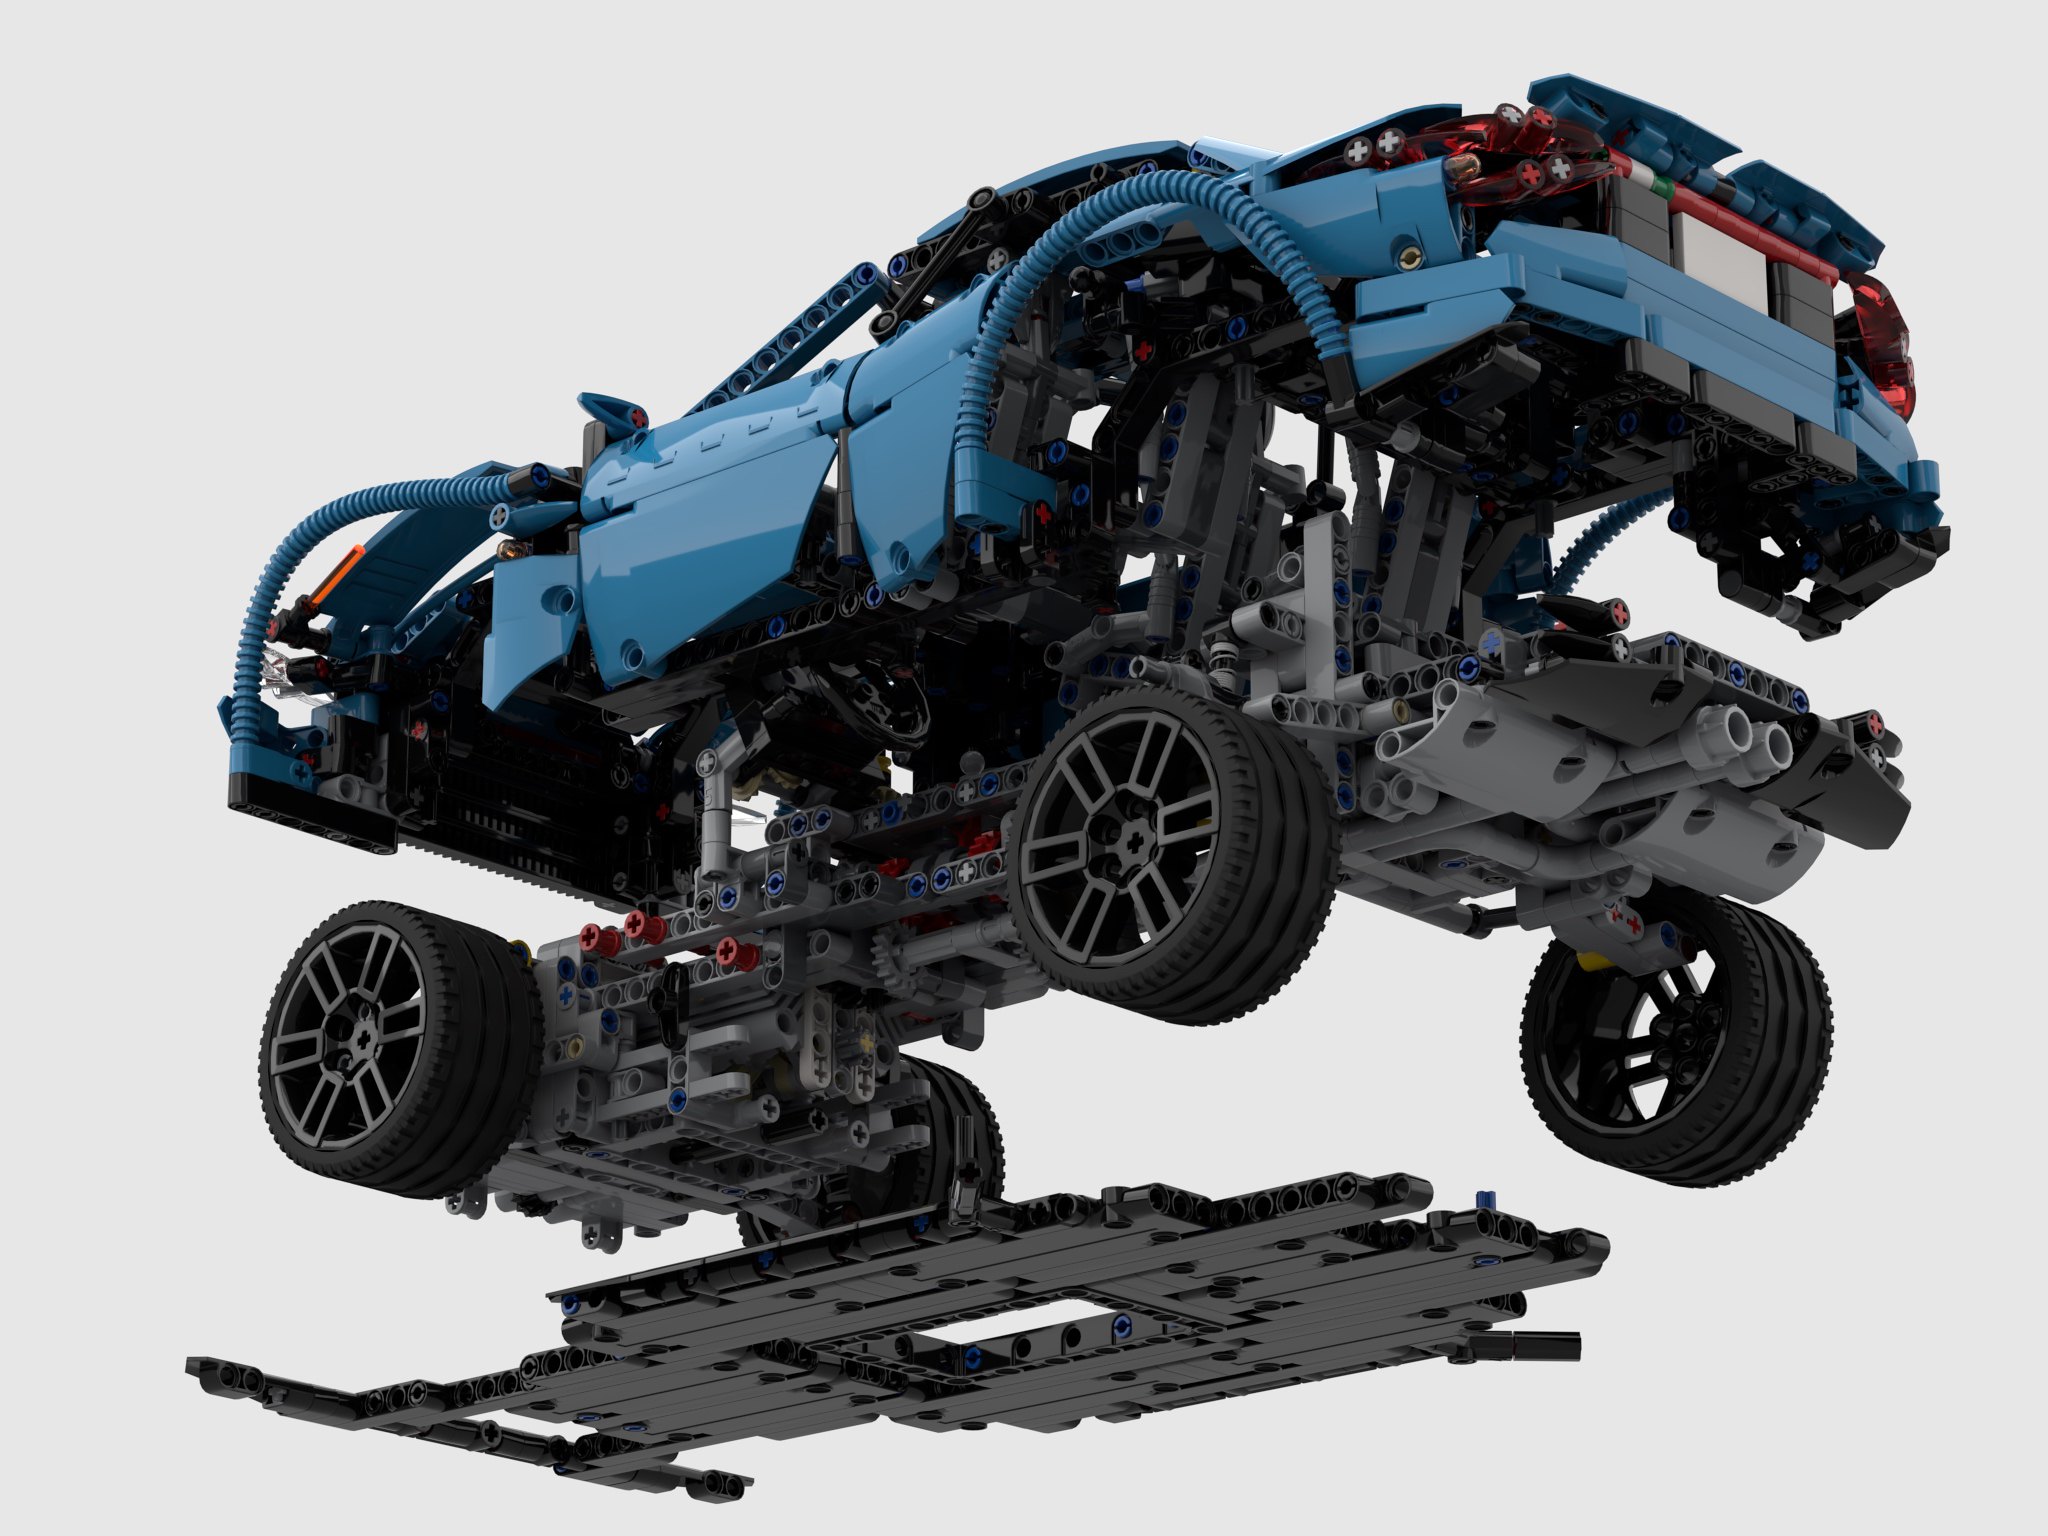
The alternative build is becoming a popular theme in the current LEGO culture, and LEGO Technic is no different. Many people buy a set or two, and look for ideas what to make with the sets they have purchased. Rebrickable has made this even easier. Certainly I would like to share some of my creativity with them, but I also like the challenge of trying to design a creation with a limited amount of parts. I have built a couple of alternative builds now, so I wanted to try something a little bigger. LEGO set 42154 is a good size, has a lot of fun parts, and has a beautiful dark blue color. I love any Porsche, so I stared with a 911.
When I do an alternative build, I start with the big parts first: namely where do the panels go. For 42154 this meant I started with the fenders, the door panels, and the transparent panels. After a quick draft, I knew I would be able to get the general shape of the 911 right.
Then I worked on the interior. The car would keep a four wheel independent suspension setup with steering at the front. A flat 6 engine was mounted at the rear with drive connected through a differential between the rear wheels. I was able to keep the HOG steering link on top of the roof. Two seats are include, but no jump seats.
It took some time working on all the remaining parts. 42154 does not have many liftarms, so I had to design and redesign what parts are used where a couple of times. At the end, I had a lot of parts leftover, so I was able to make two rear end designs: a rear wing, and a little duckbill spoiler (my favorite 911 look). Both are easily interchangeable.
I was pleased to have finished another alternative build. They are hard for me to complete, but a good exercise in working with constraints. I like the way this one turned out, as I like the stance and the proportions of the design. The size is right for my desk, and the dark blue looks great in LEGO. Plus any 911 is a good 911 in my mind.
I go through stages of inspiration like so many other builders, and sometimes when I idea is working, you just need to follow where it leads. I had the idea to do a little 15 module wide sedan, and after a simple little draft looked like a boxy, old sedan, I decided to embrace that direction. From there I determined, with a little bit of effort, I could turn this little sedan into a trio of MOCs.
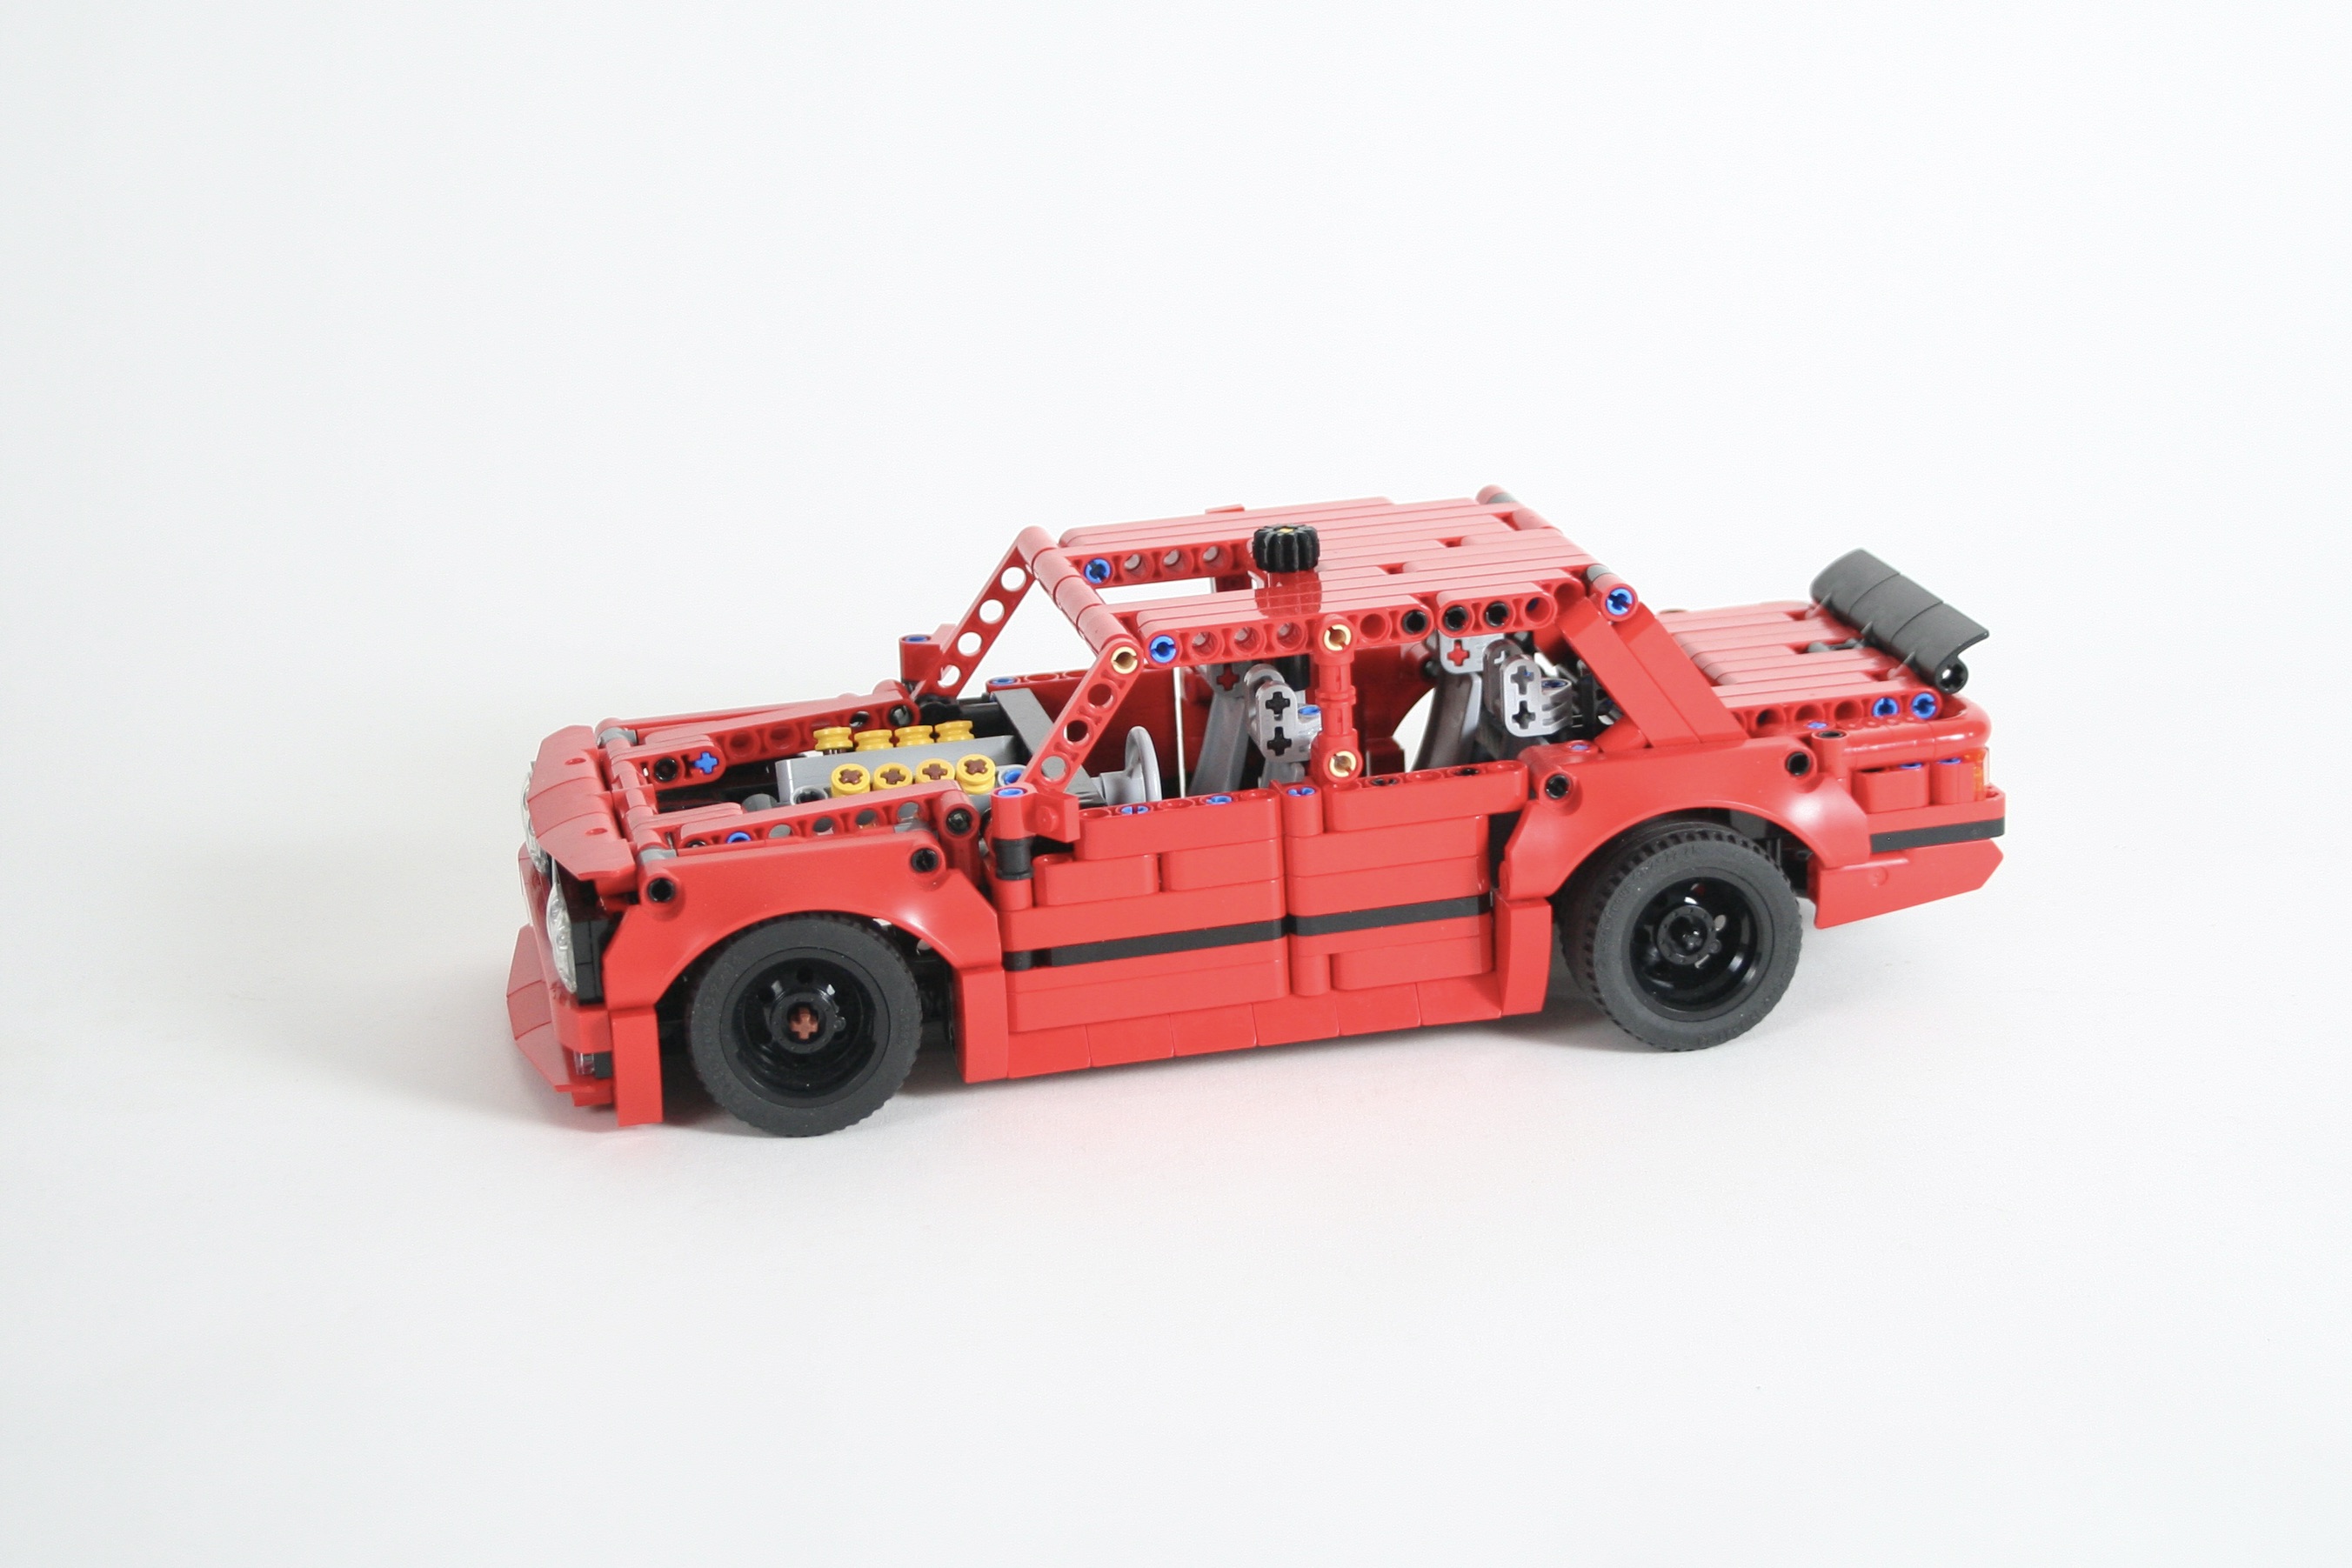
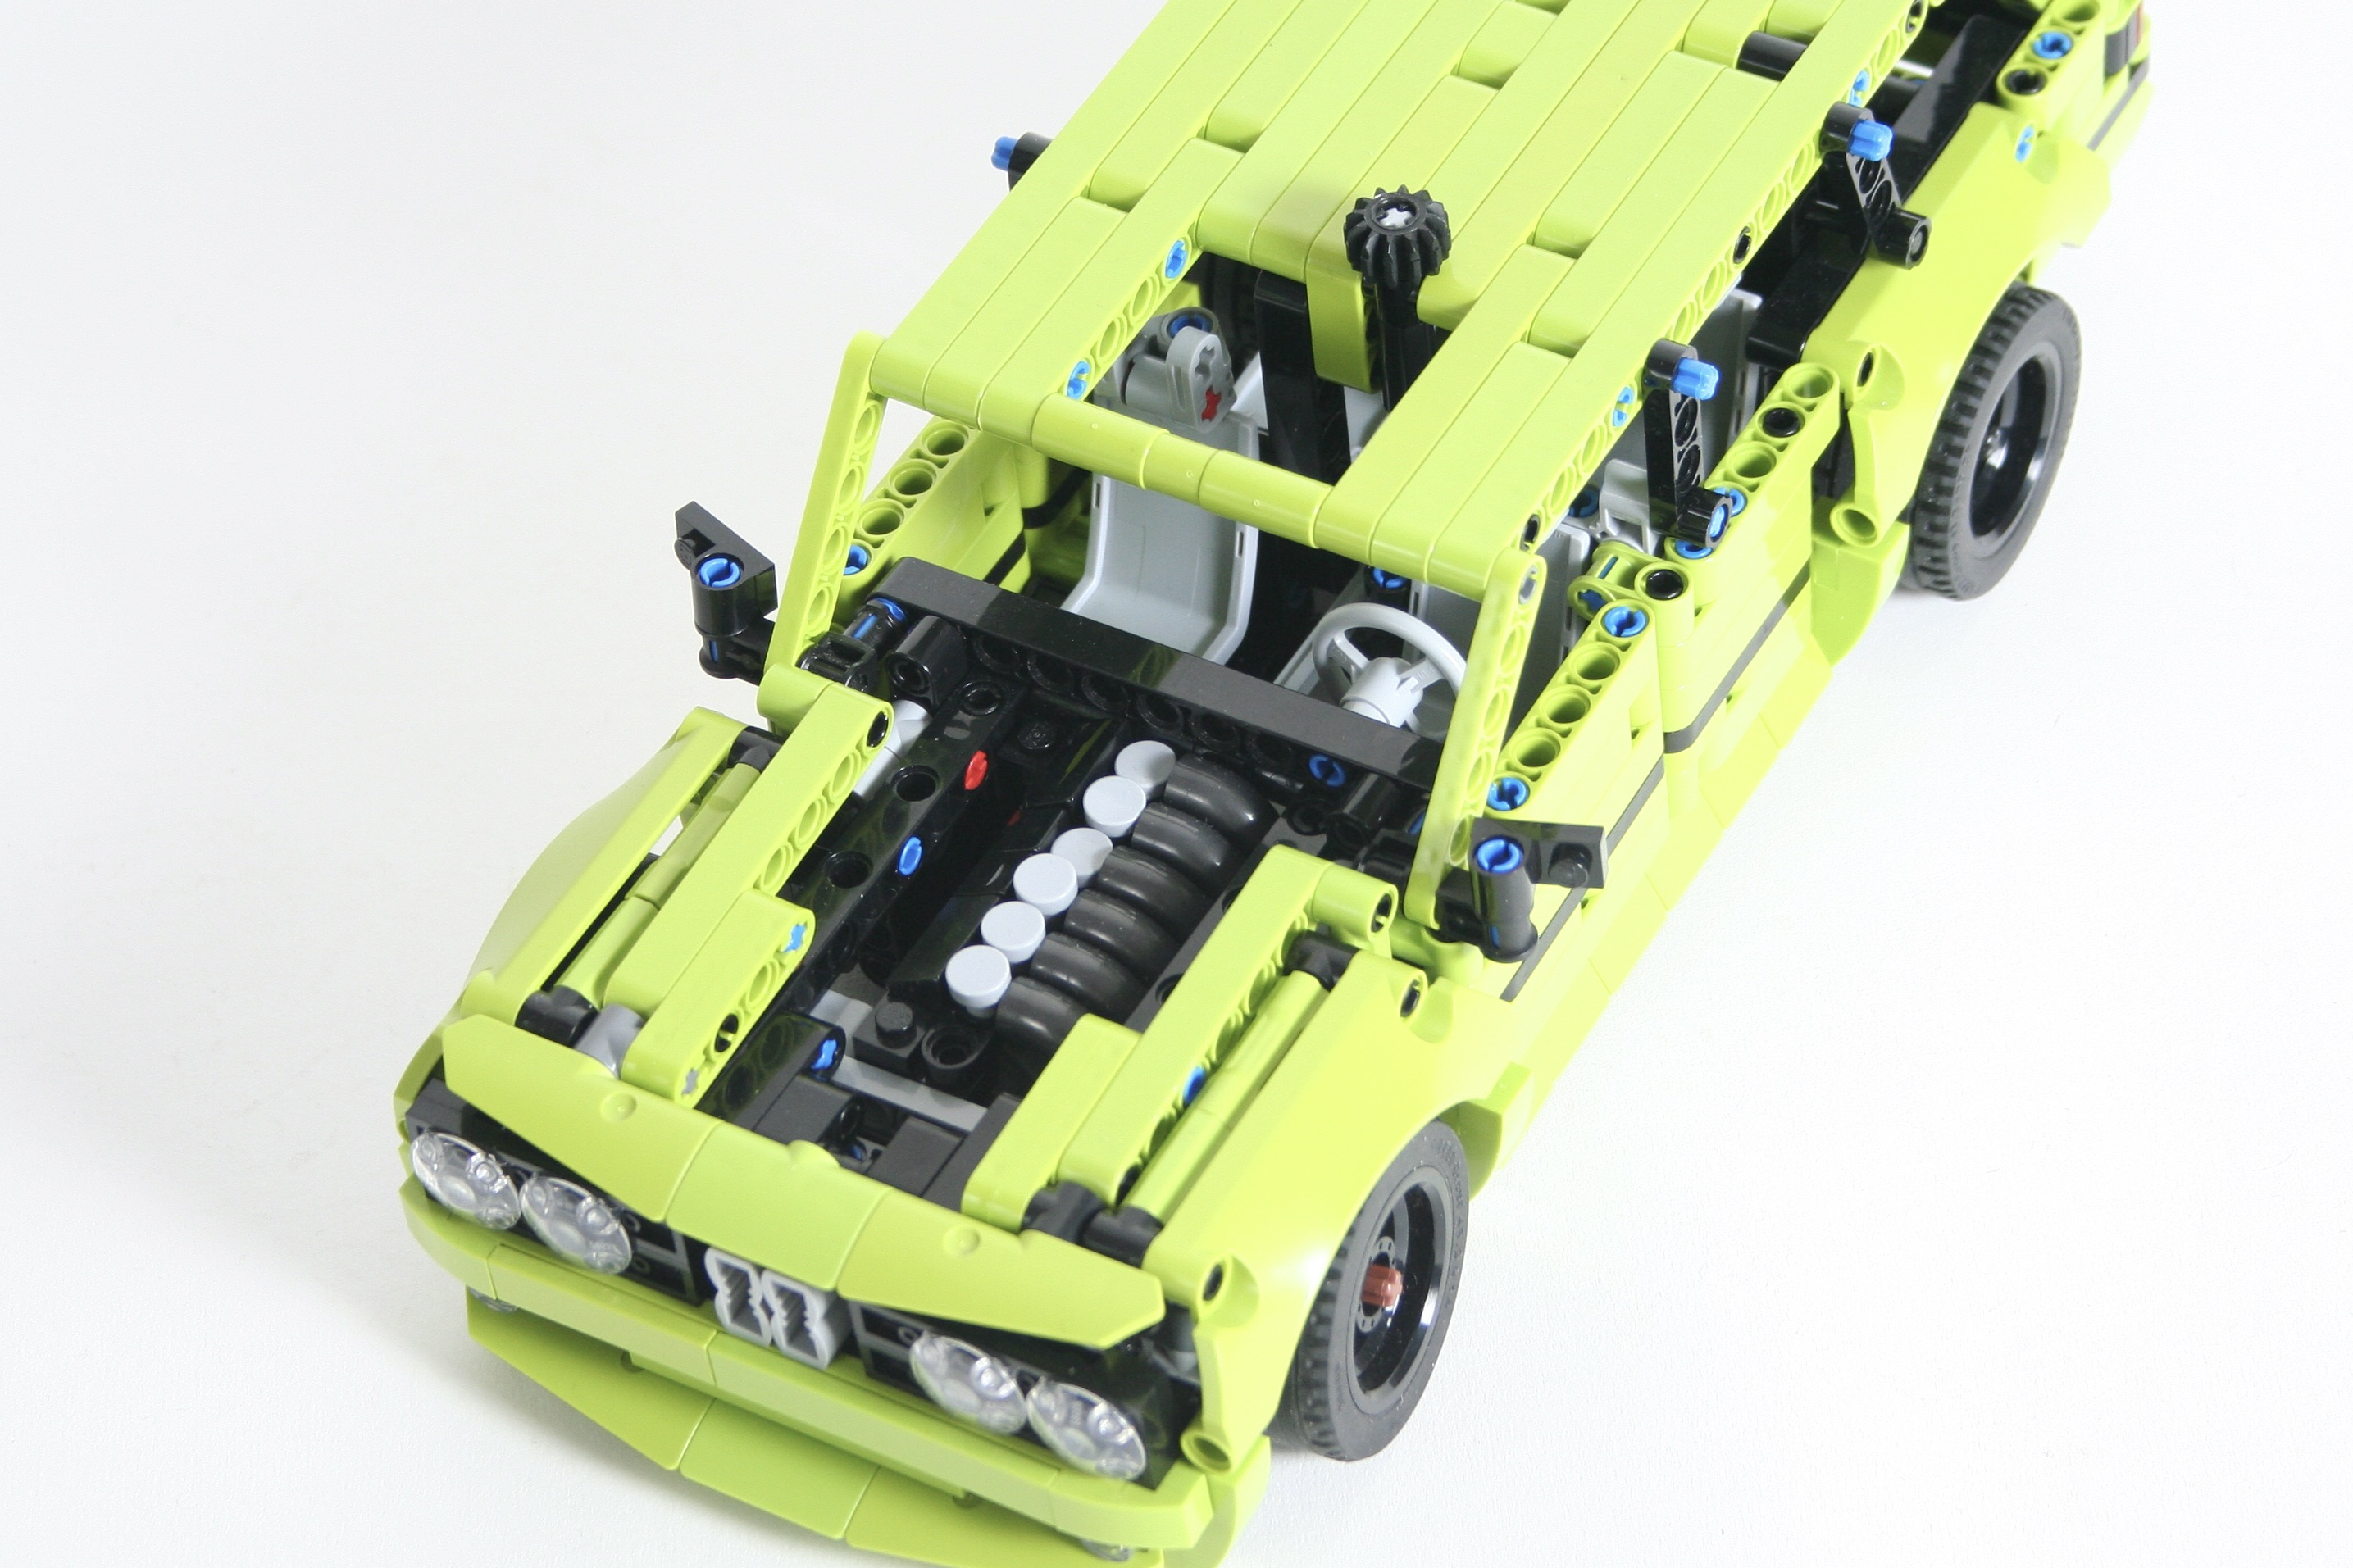
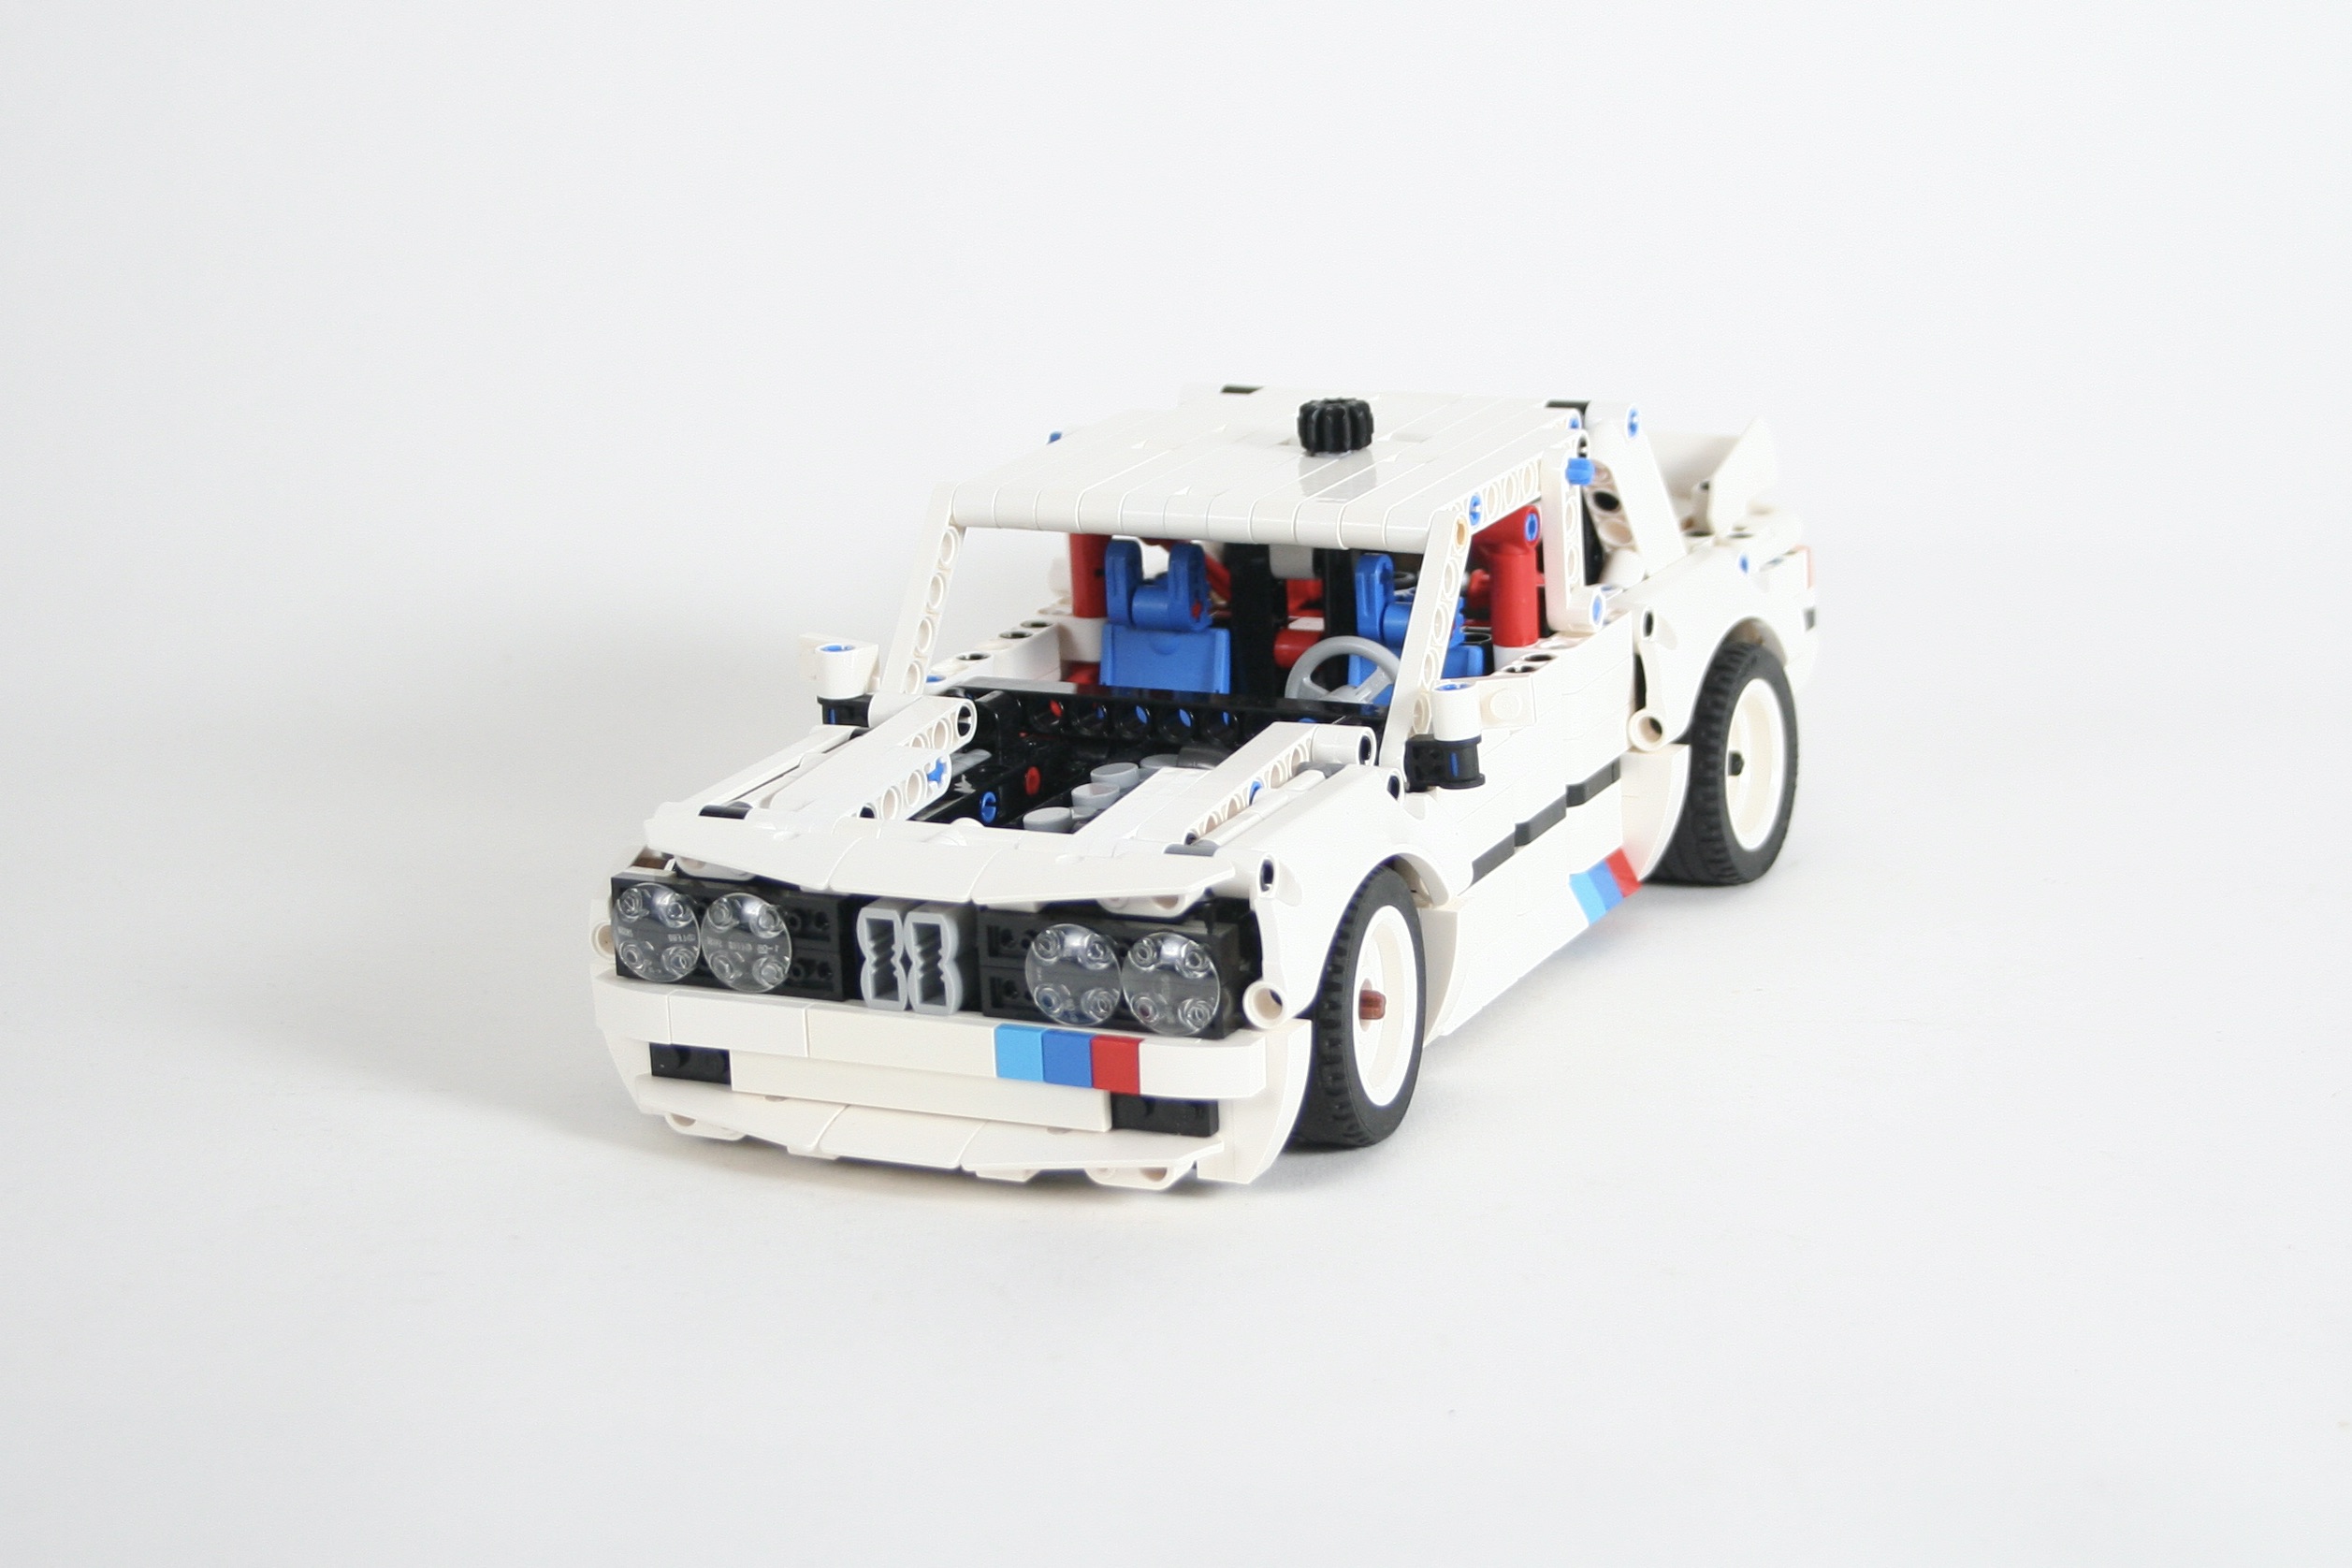
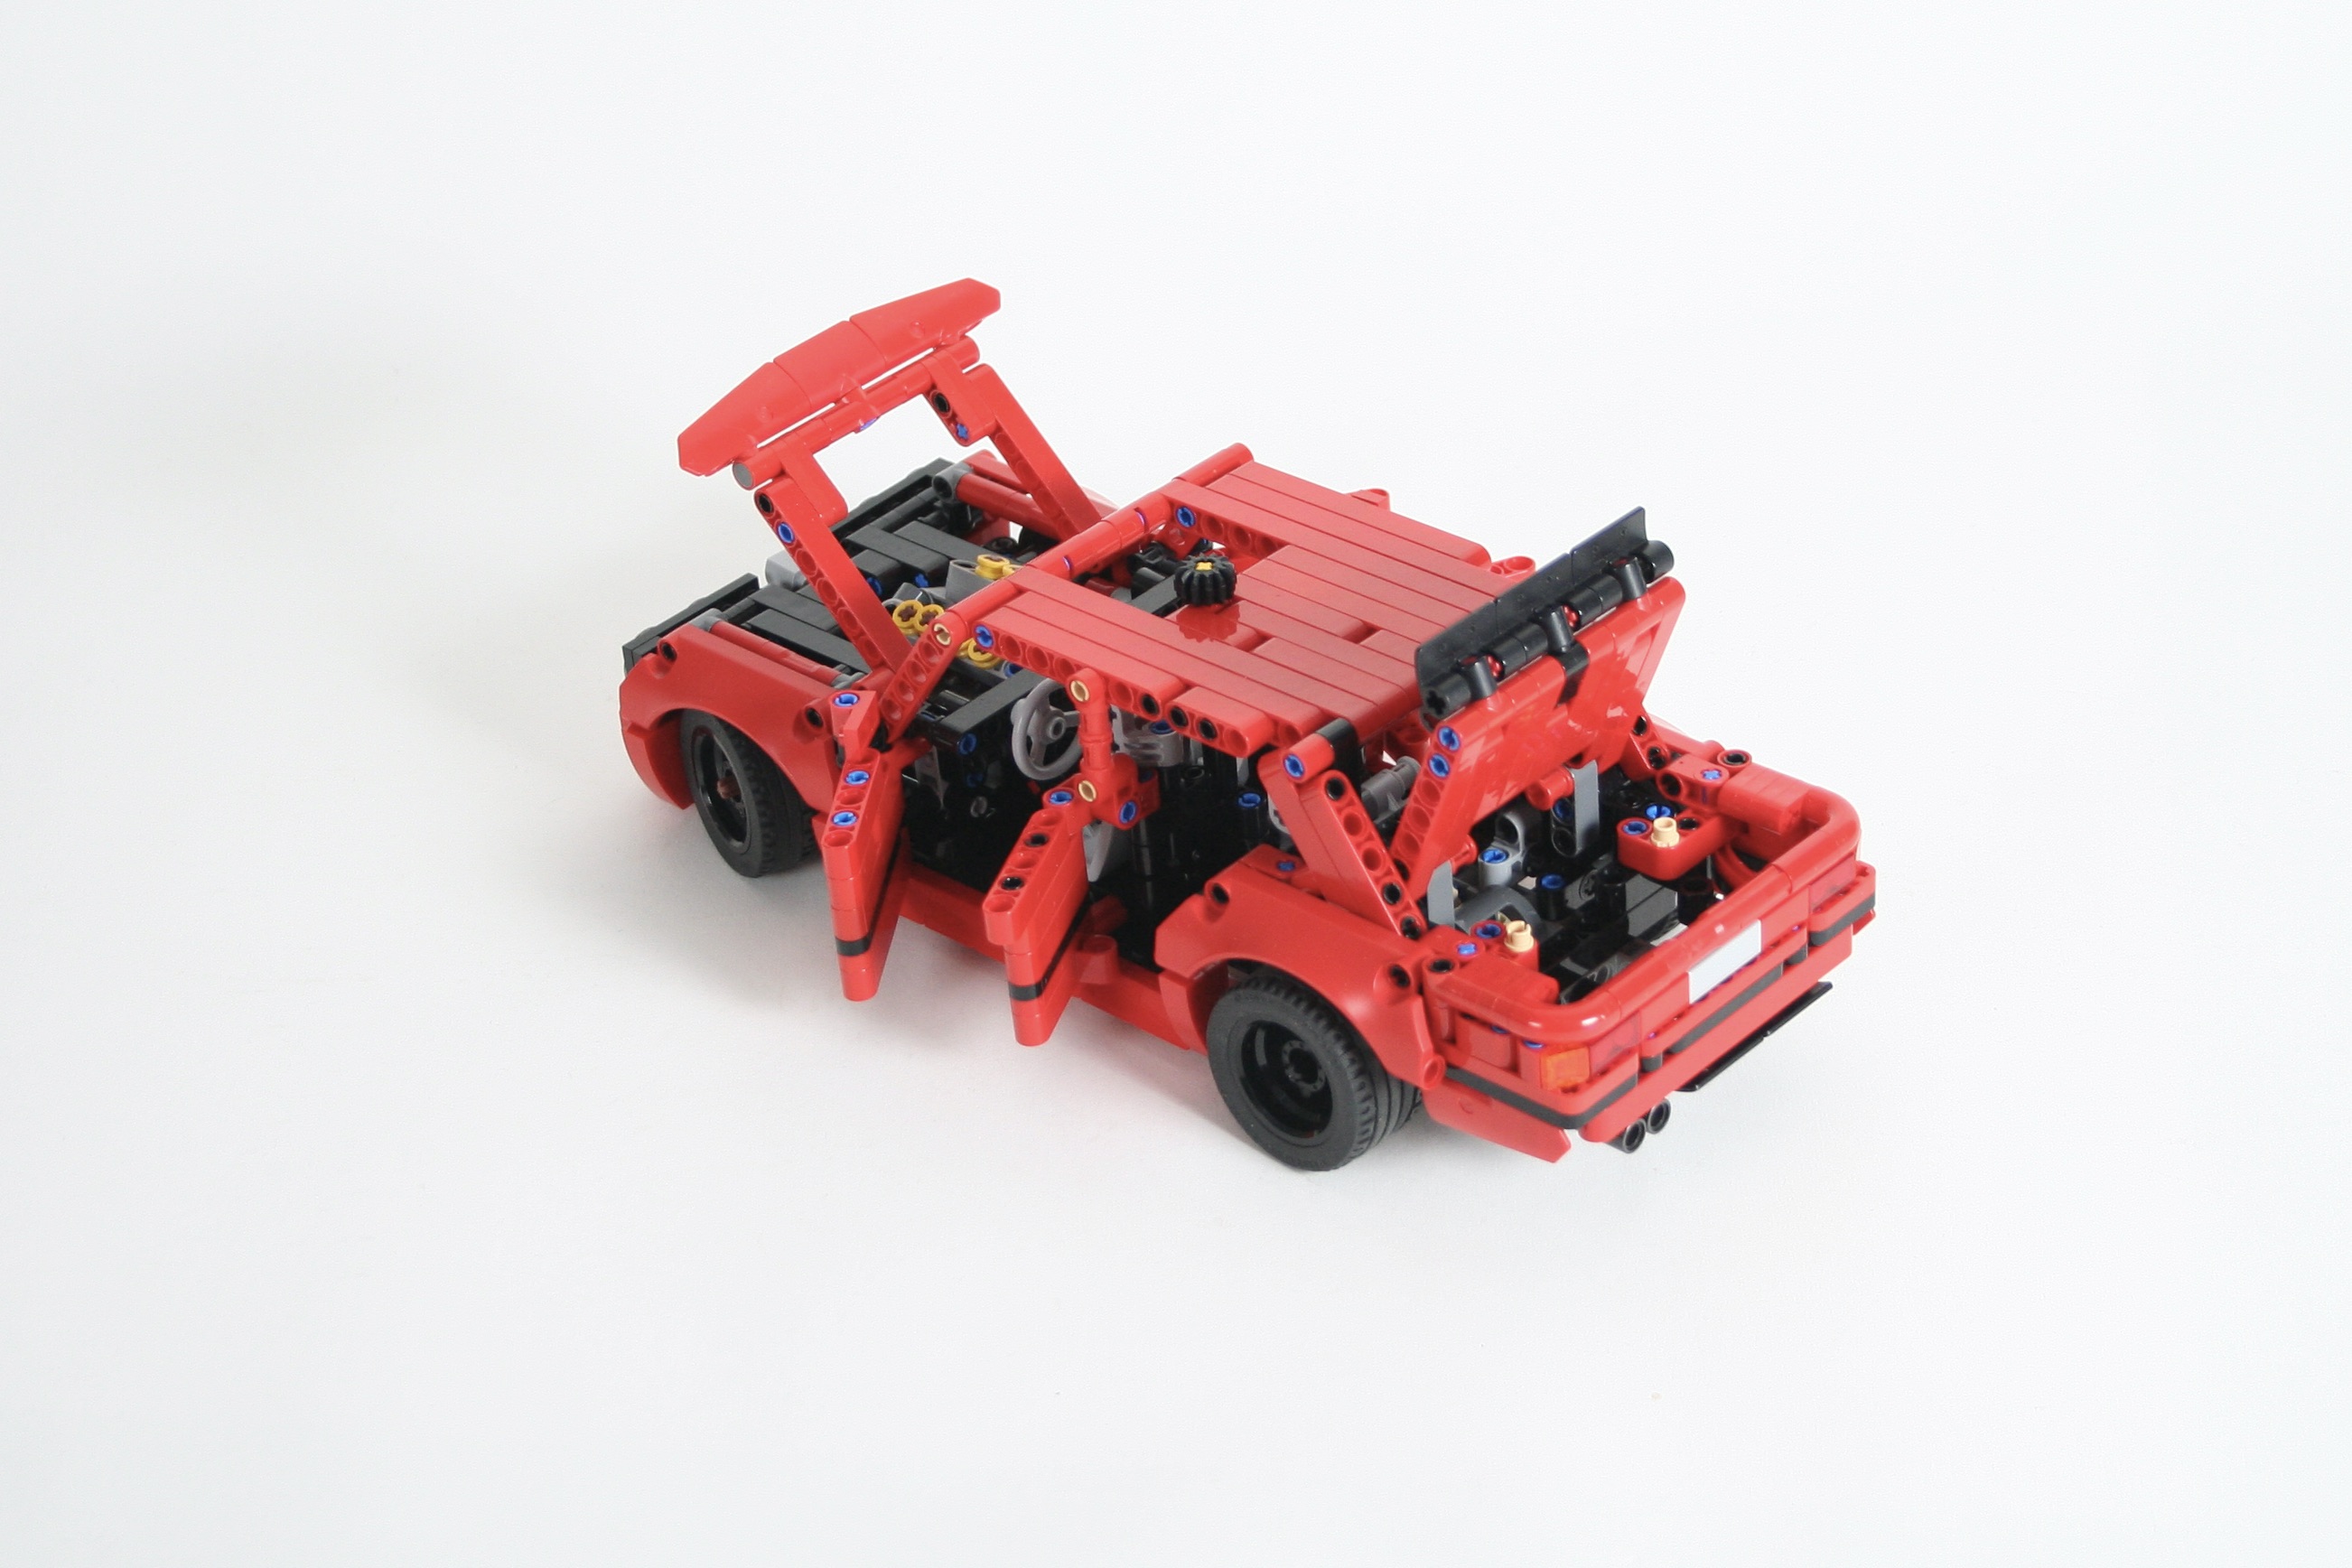
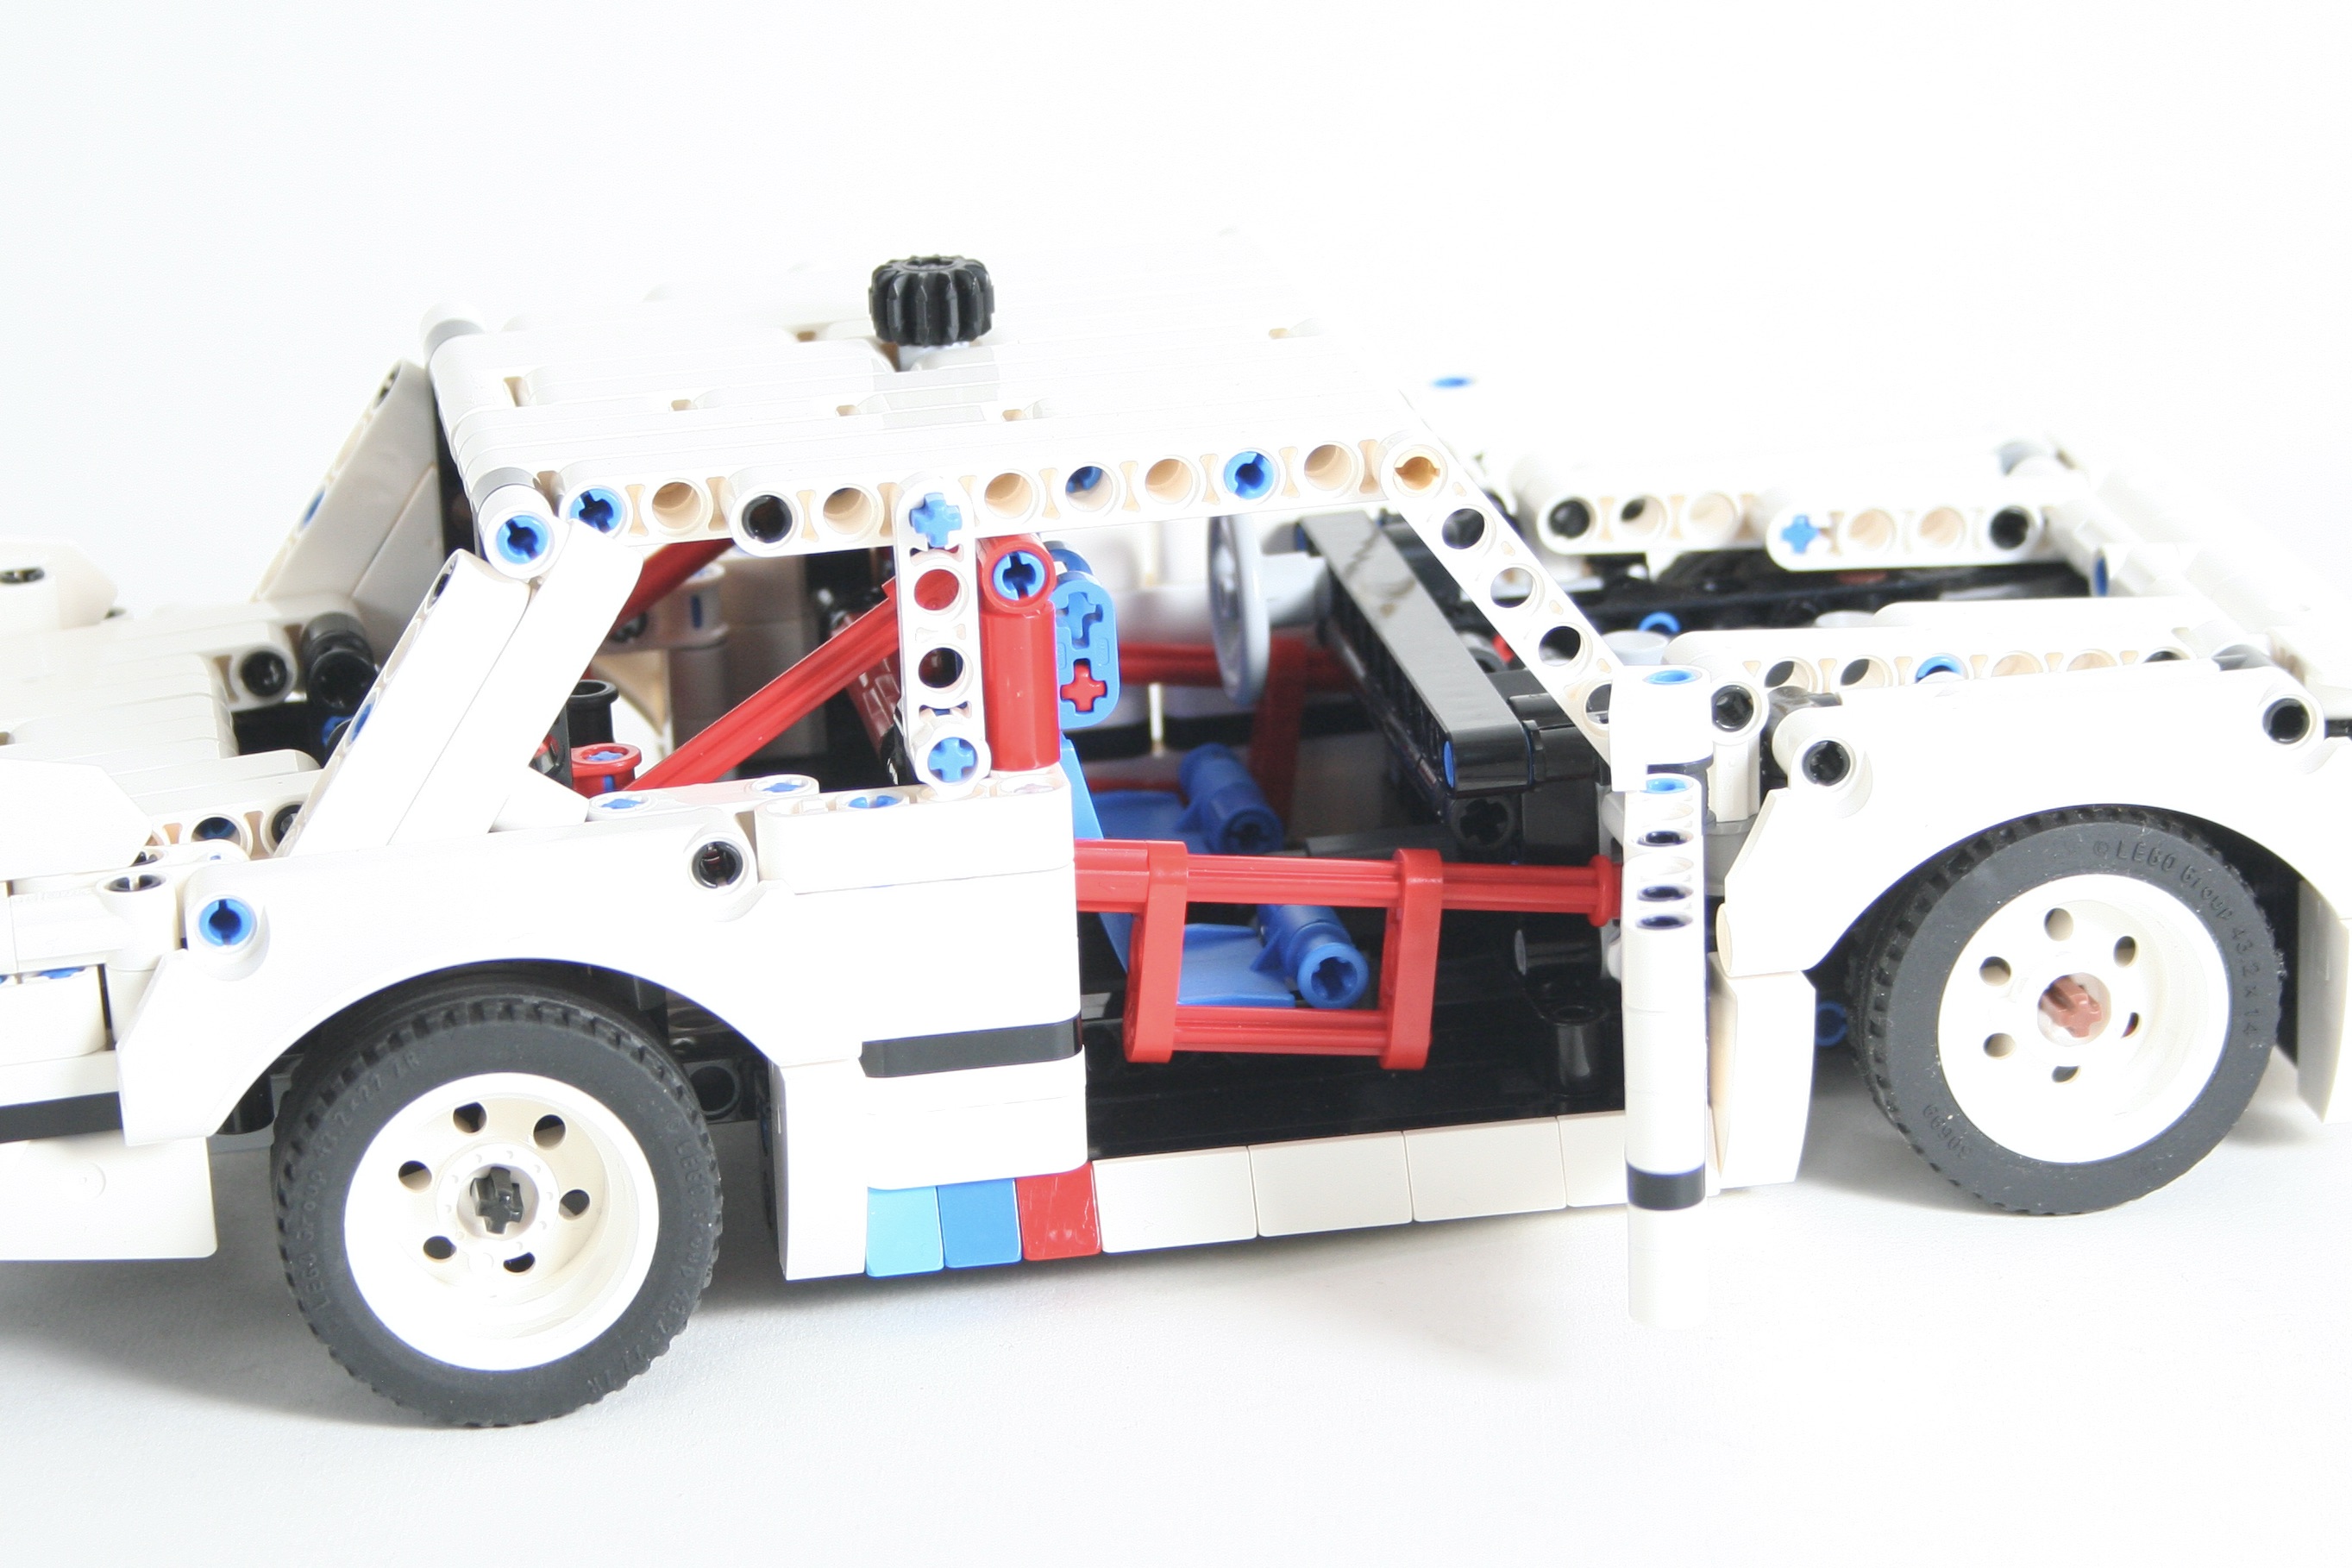
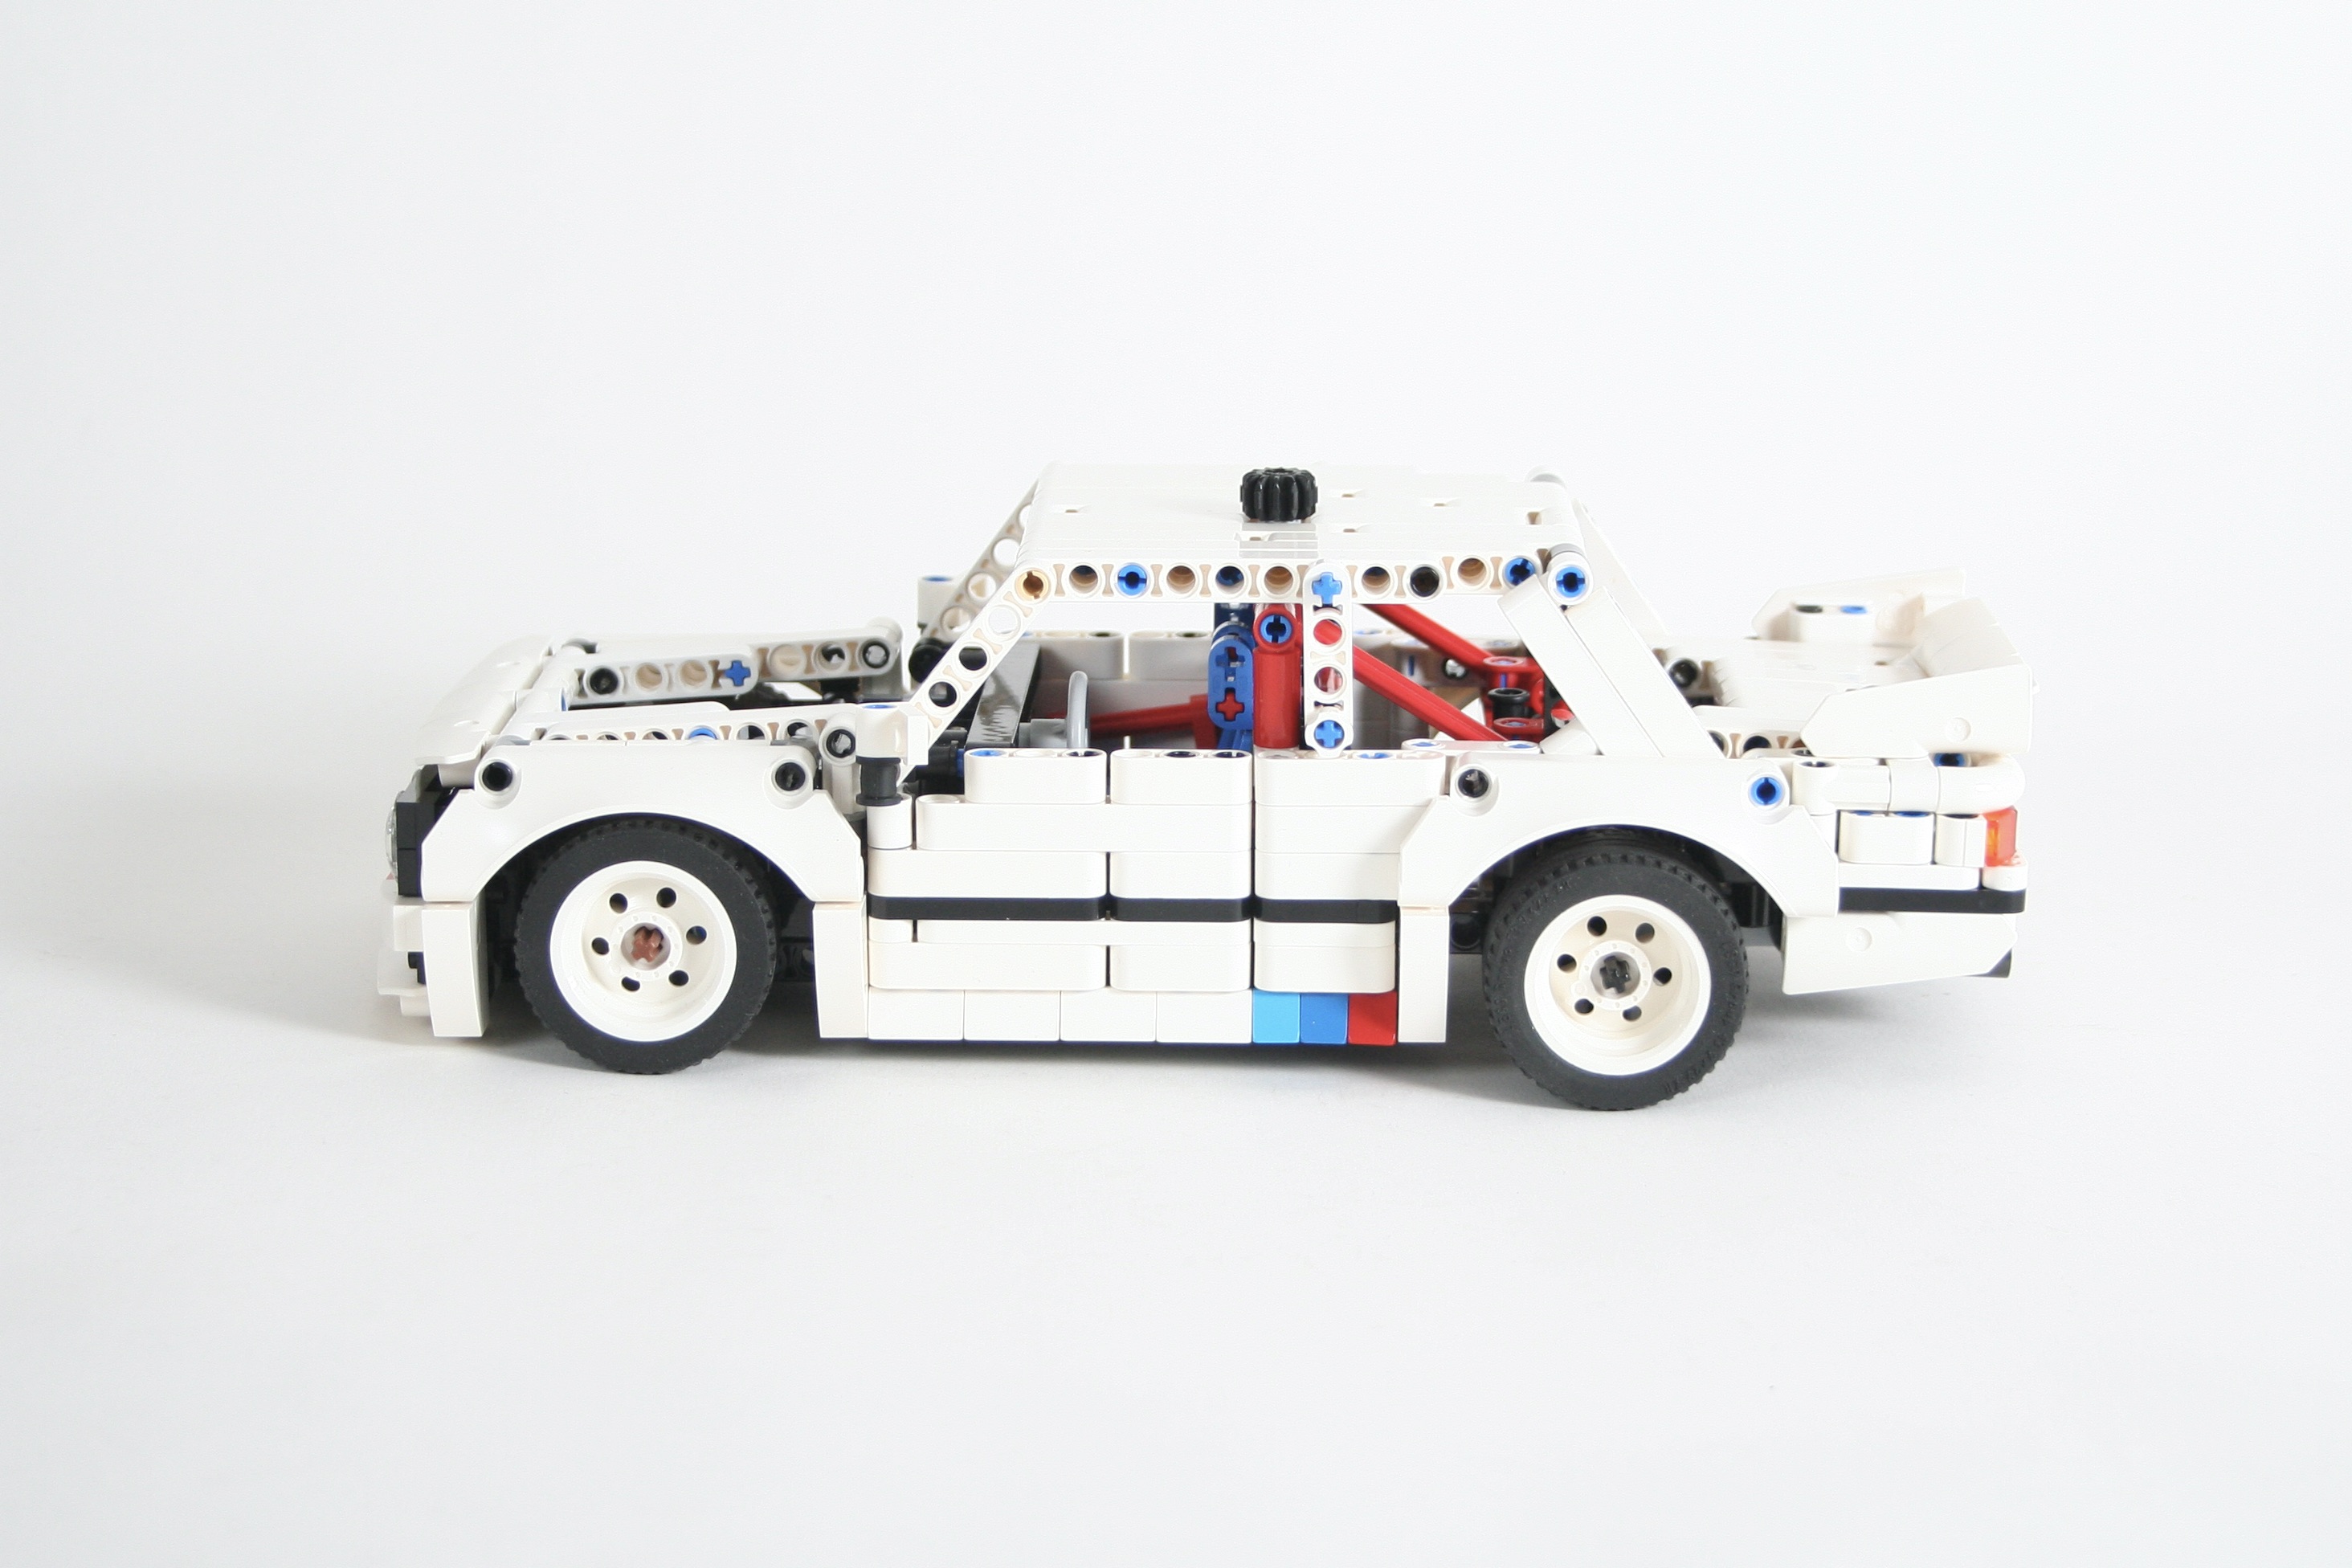
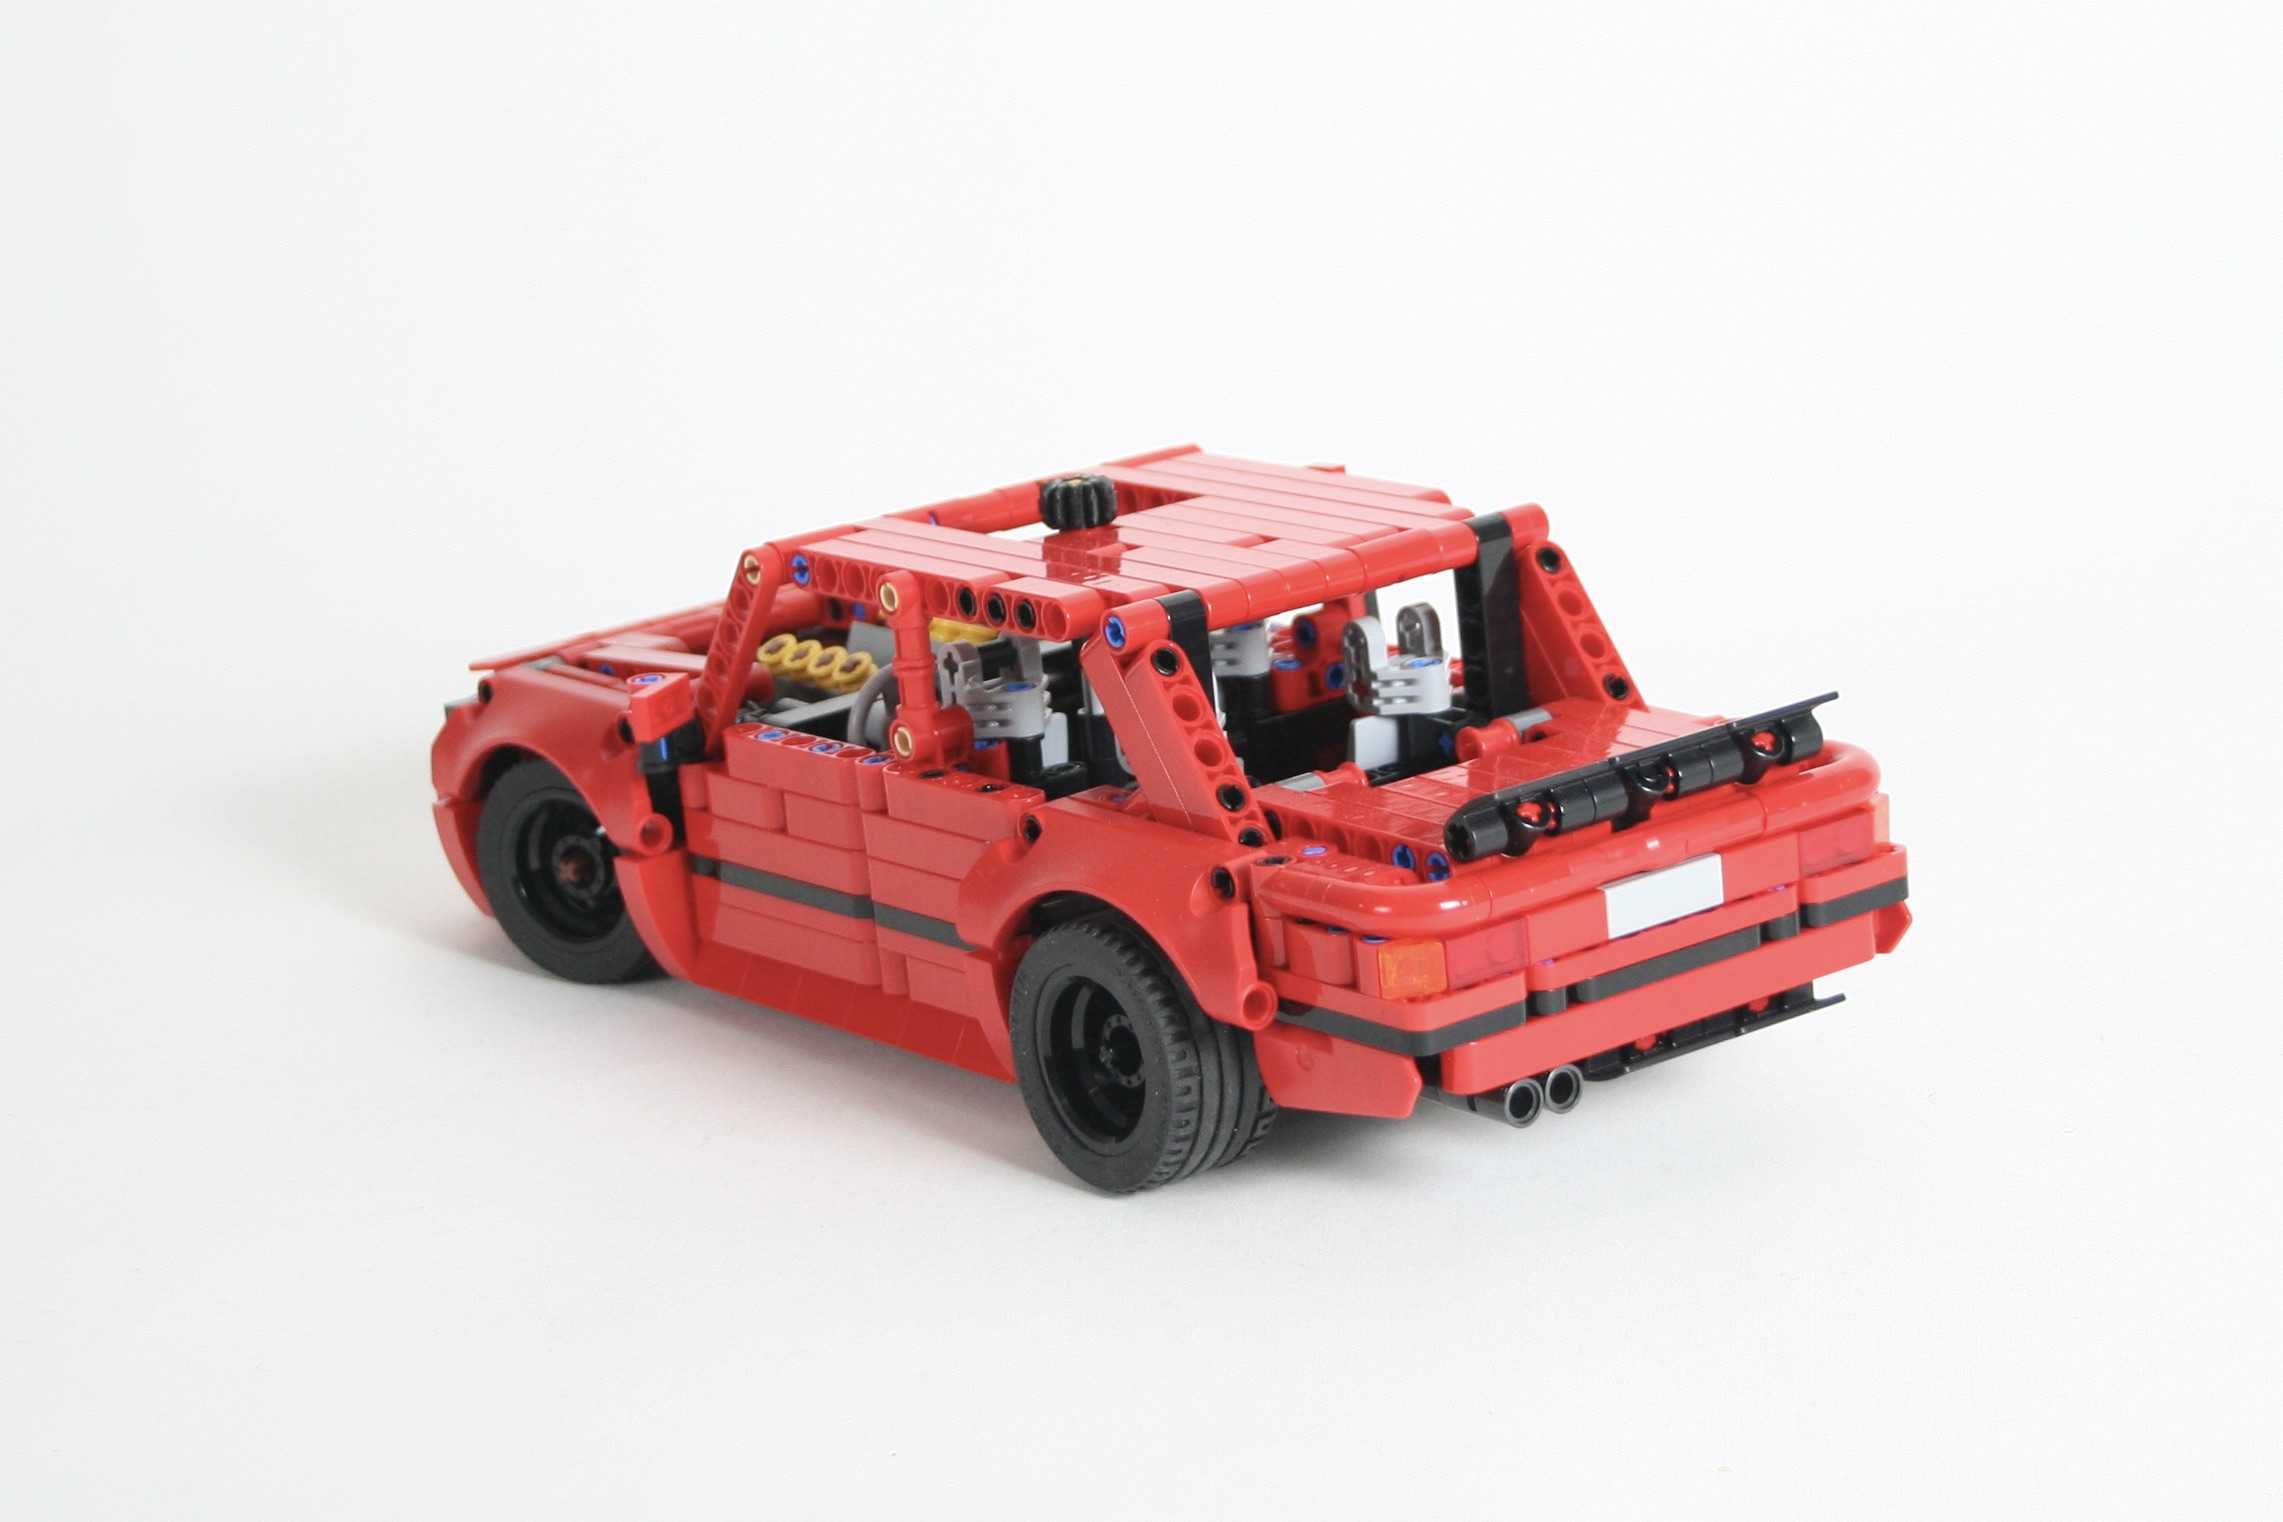
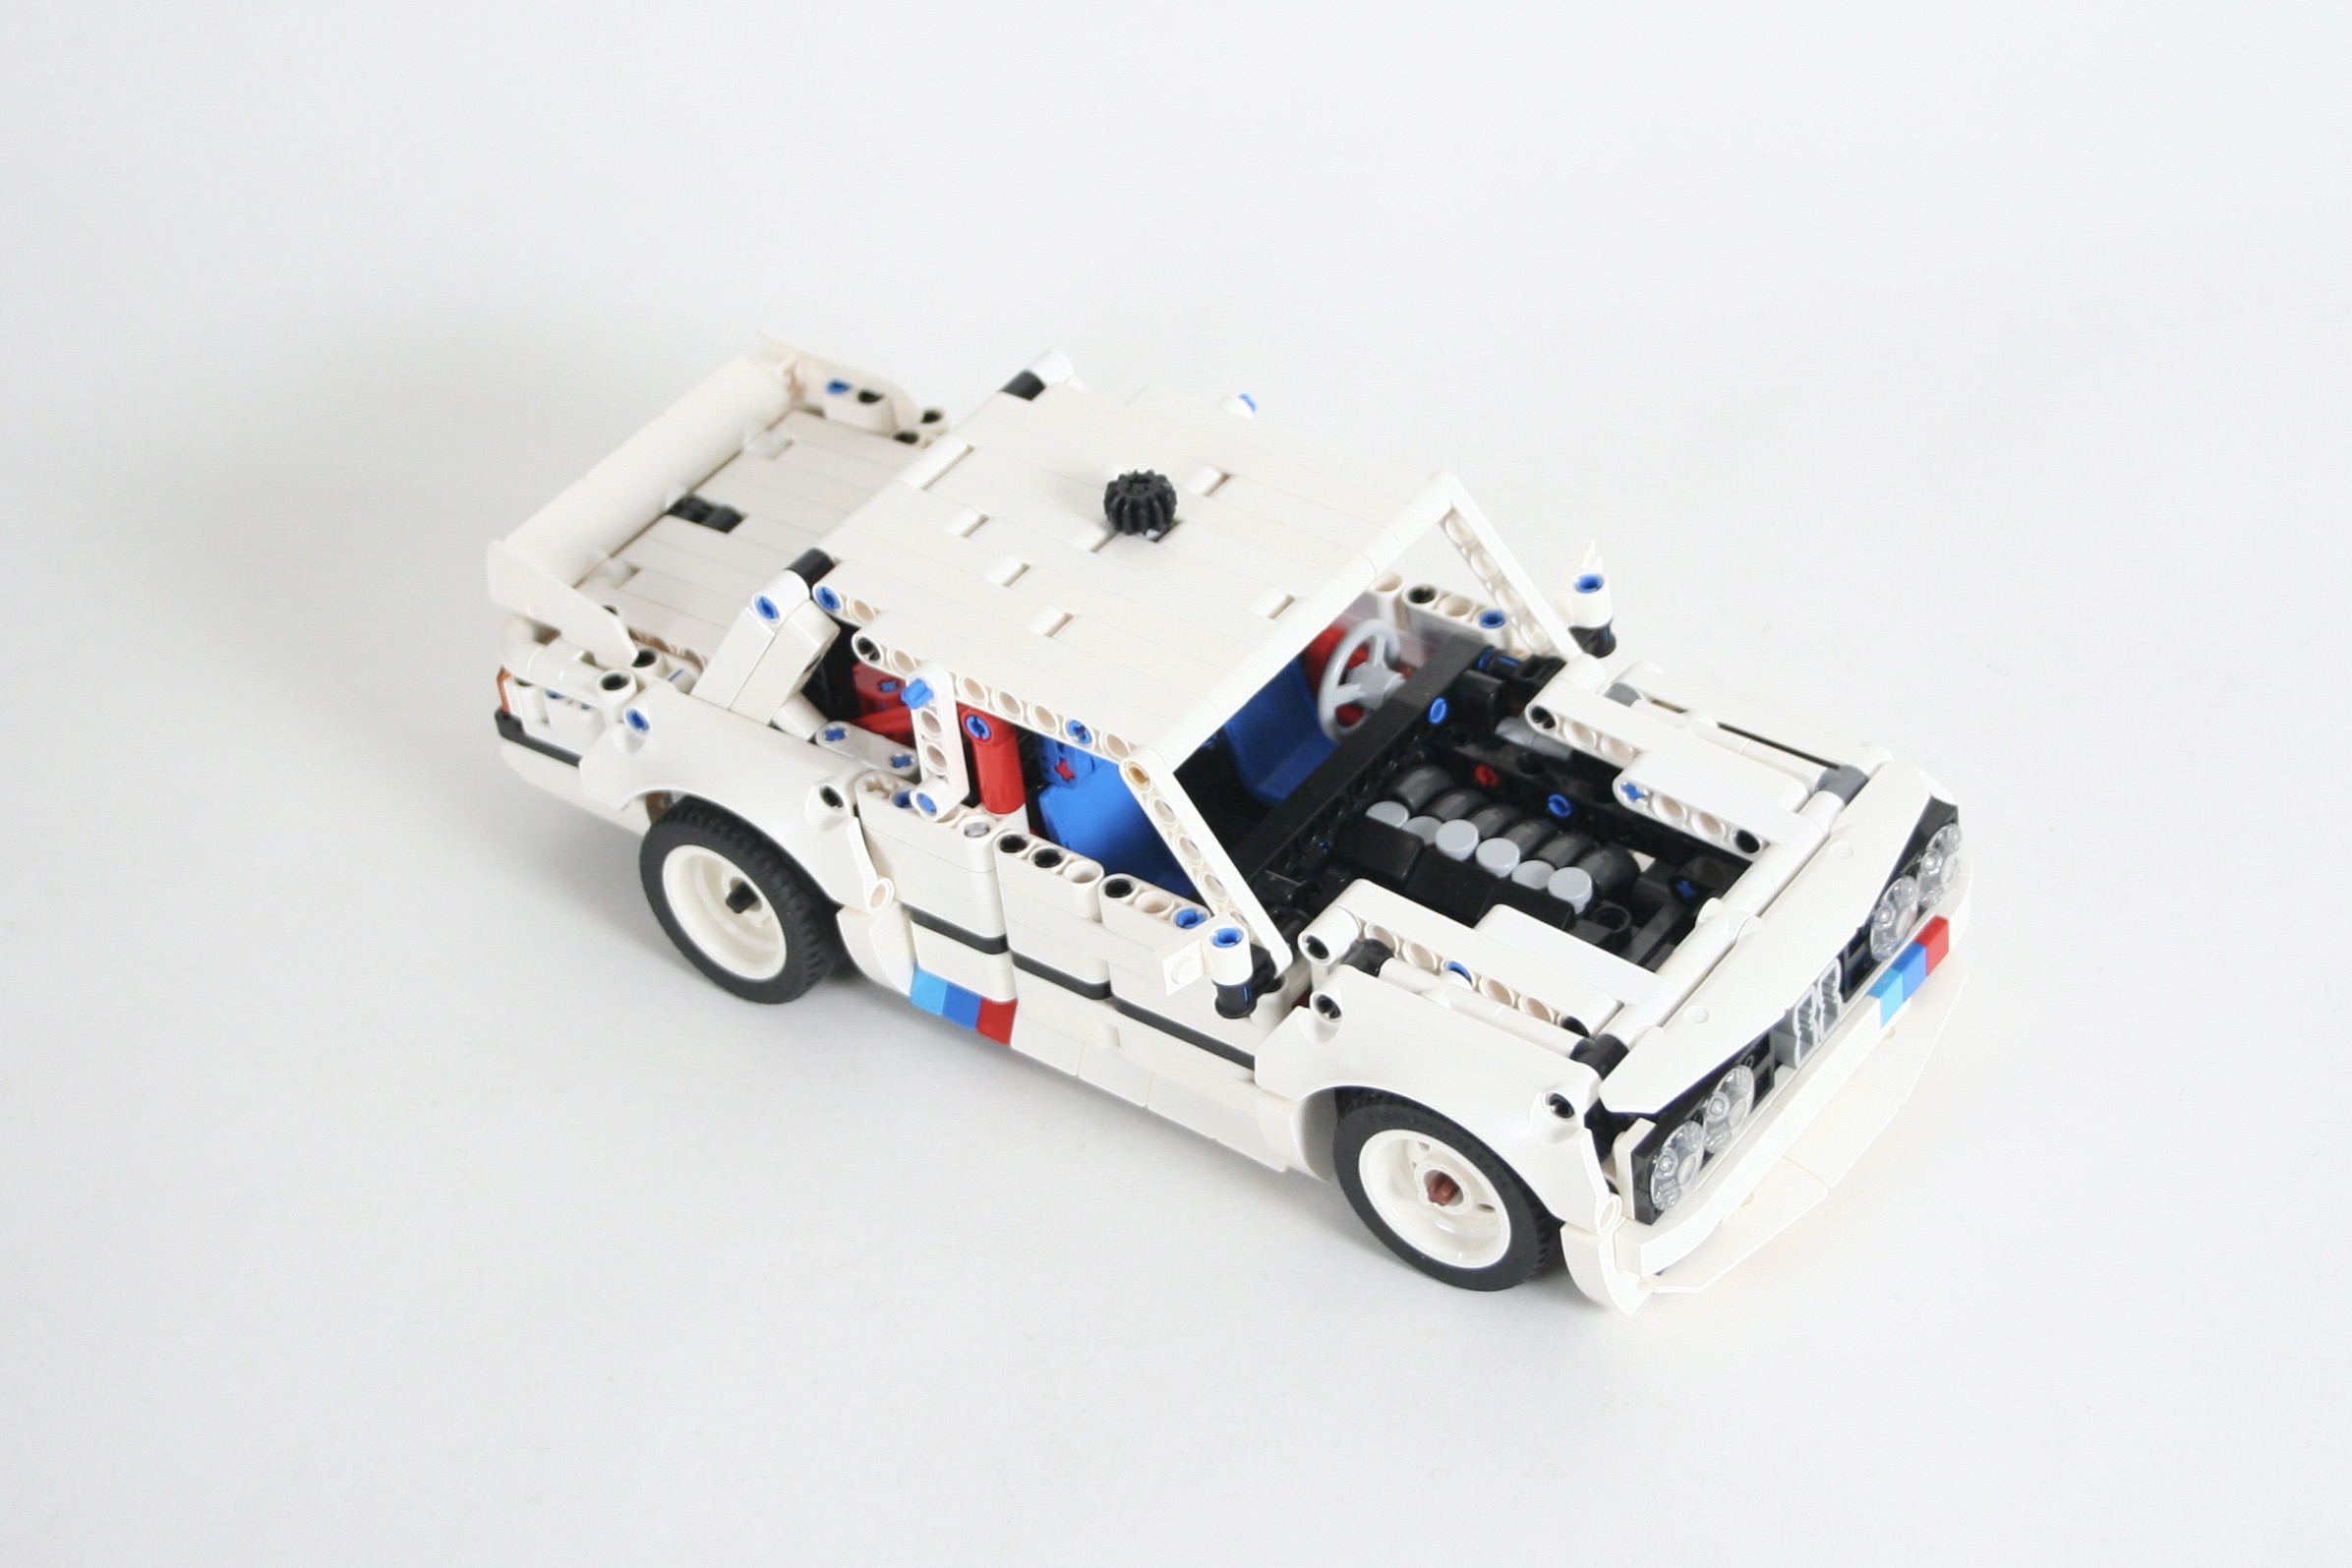
Like many a car enthusiast, I have a soft spot for BMW sports sedans of the past. The E30 translates to LEGO well as that generation 3 Series is a little bit boxy, and has some great fender flairs. I started with a sedan in Red, and the project expanded quickly. As suggested by LEGO set 42138 Shelbey GT500 Mustang, I was convinced that every 15 wide car going forward should have a half stud front axle drop to give the car a little forward leaning stance. I was able to develop a steering system that would work well for this, which would also give space for an engine. I used the standard axle based V-8 for the sedan, and gave it a spoiler that was just a little too big.
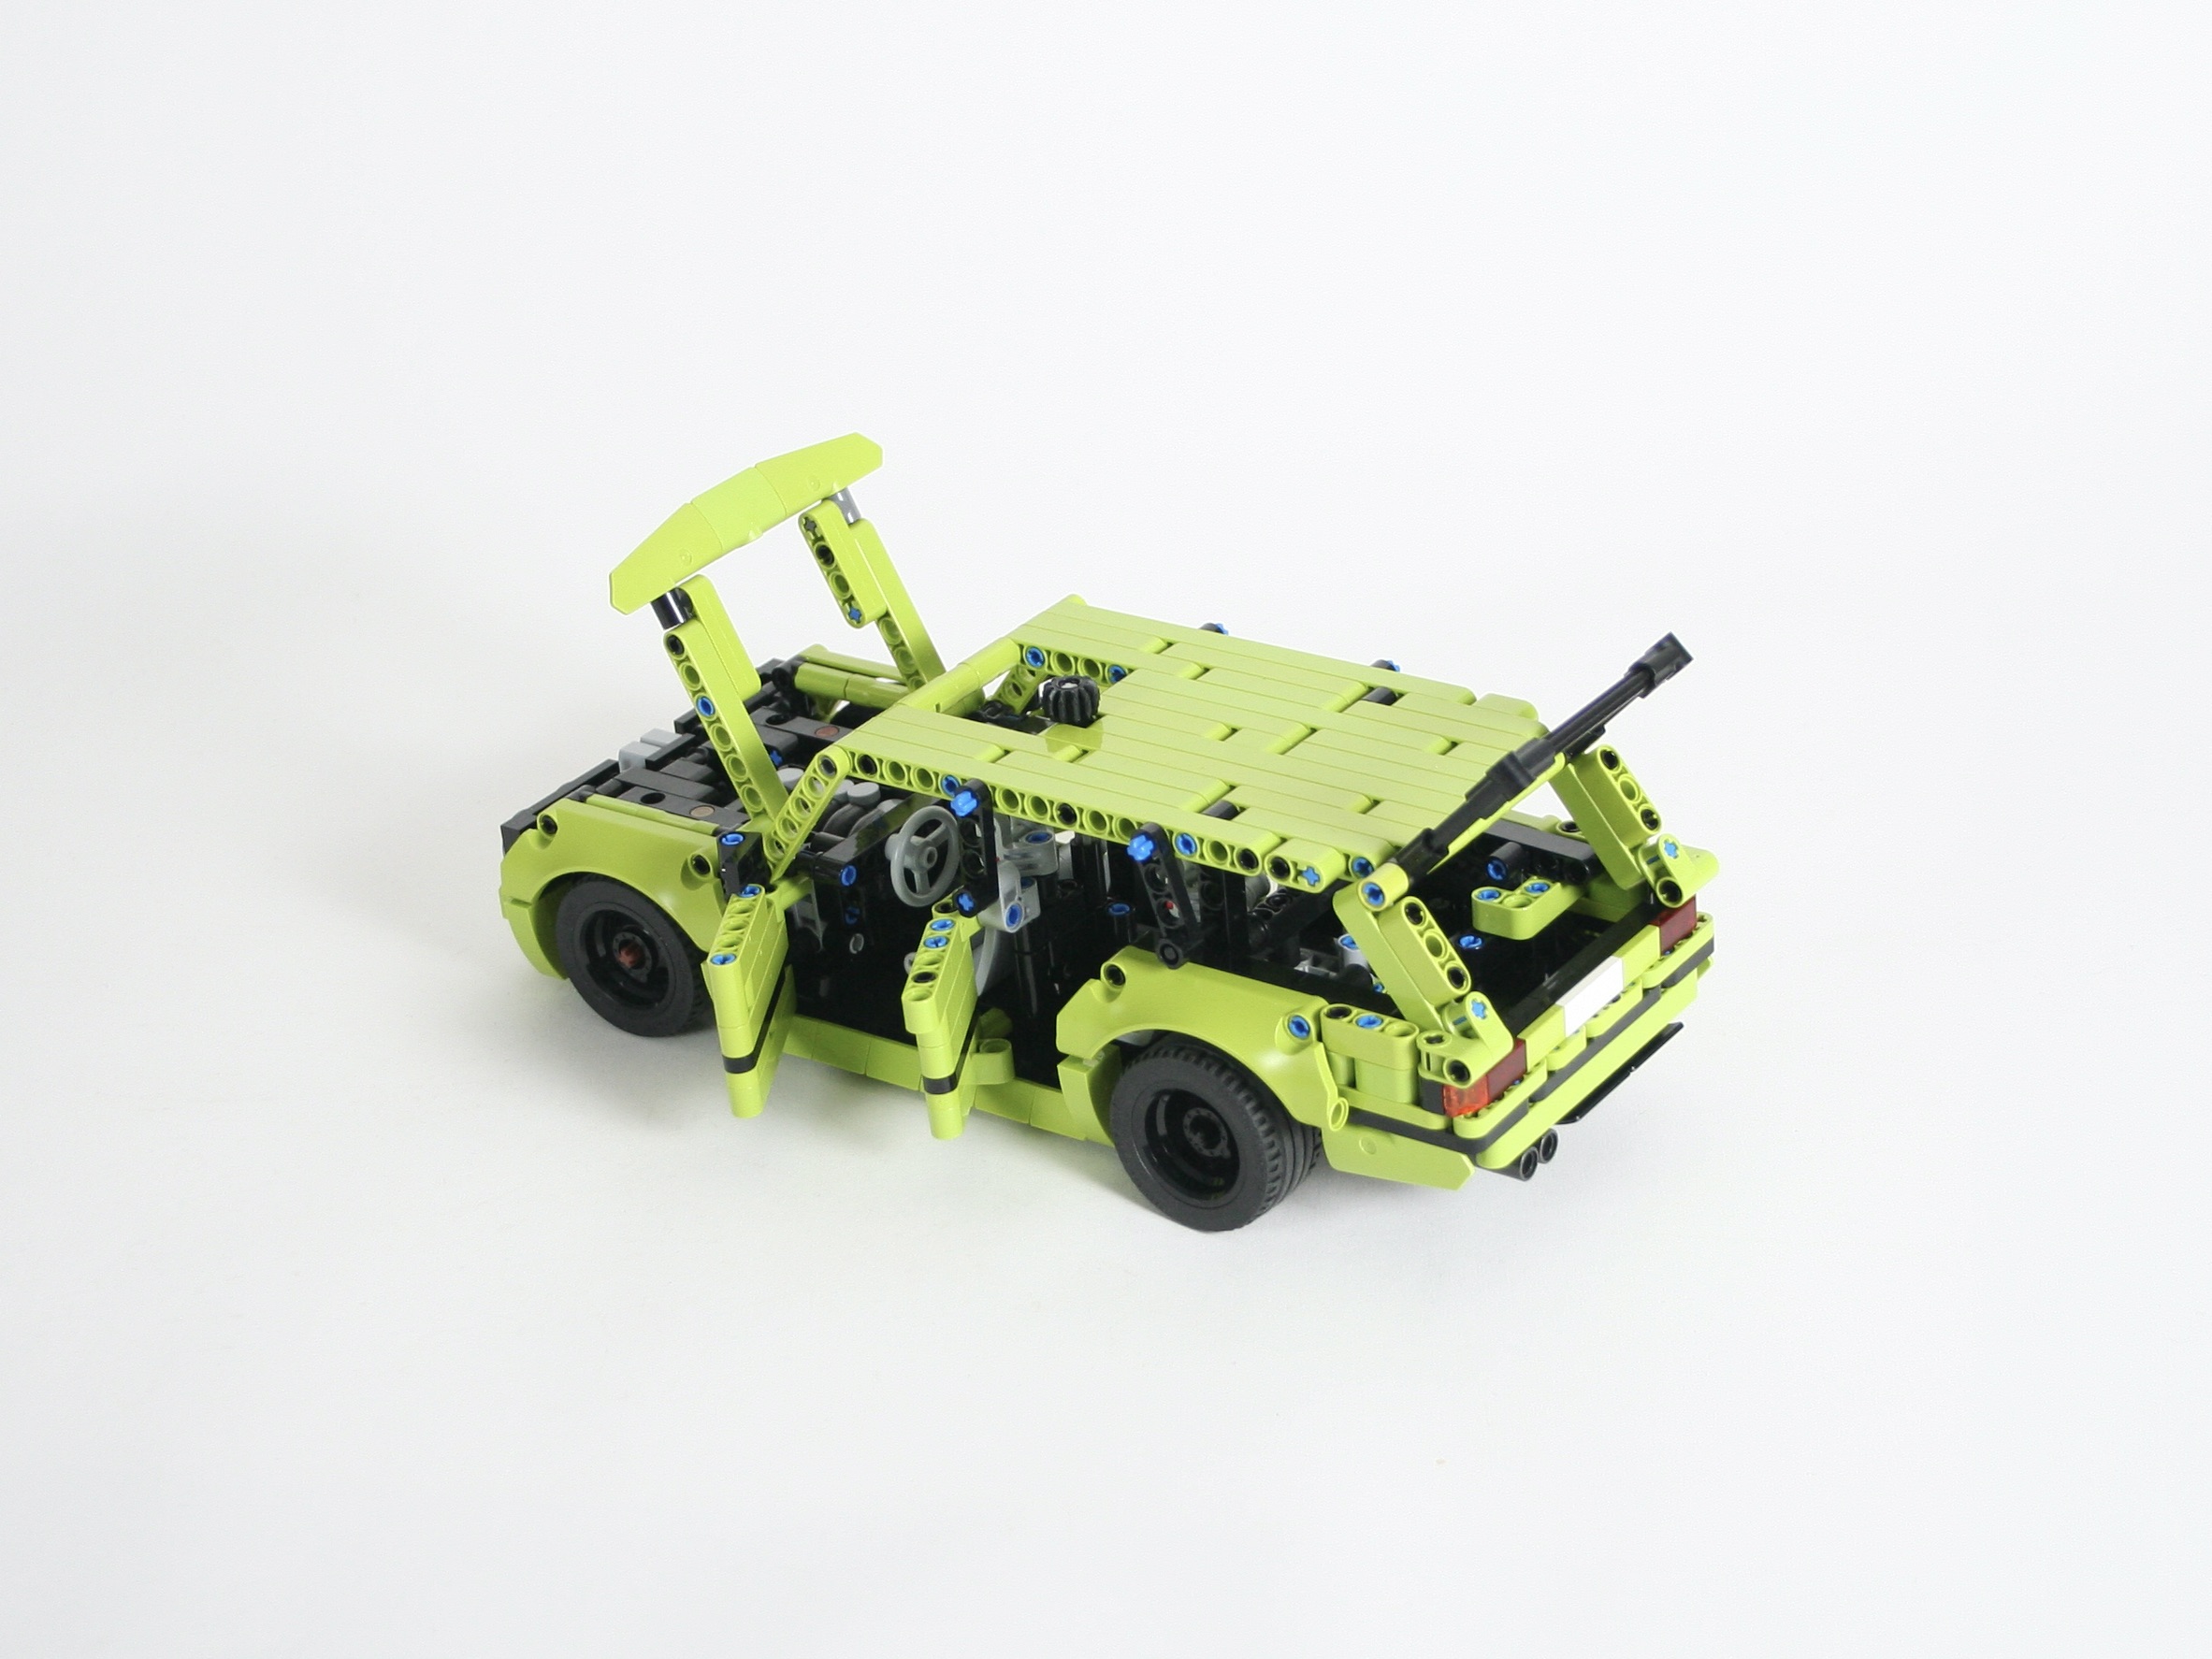
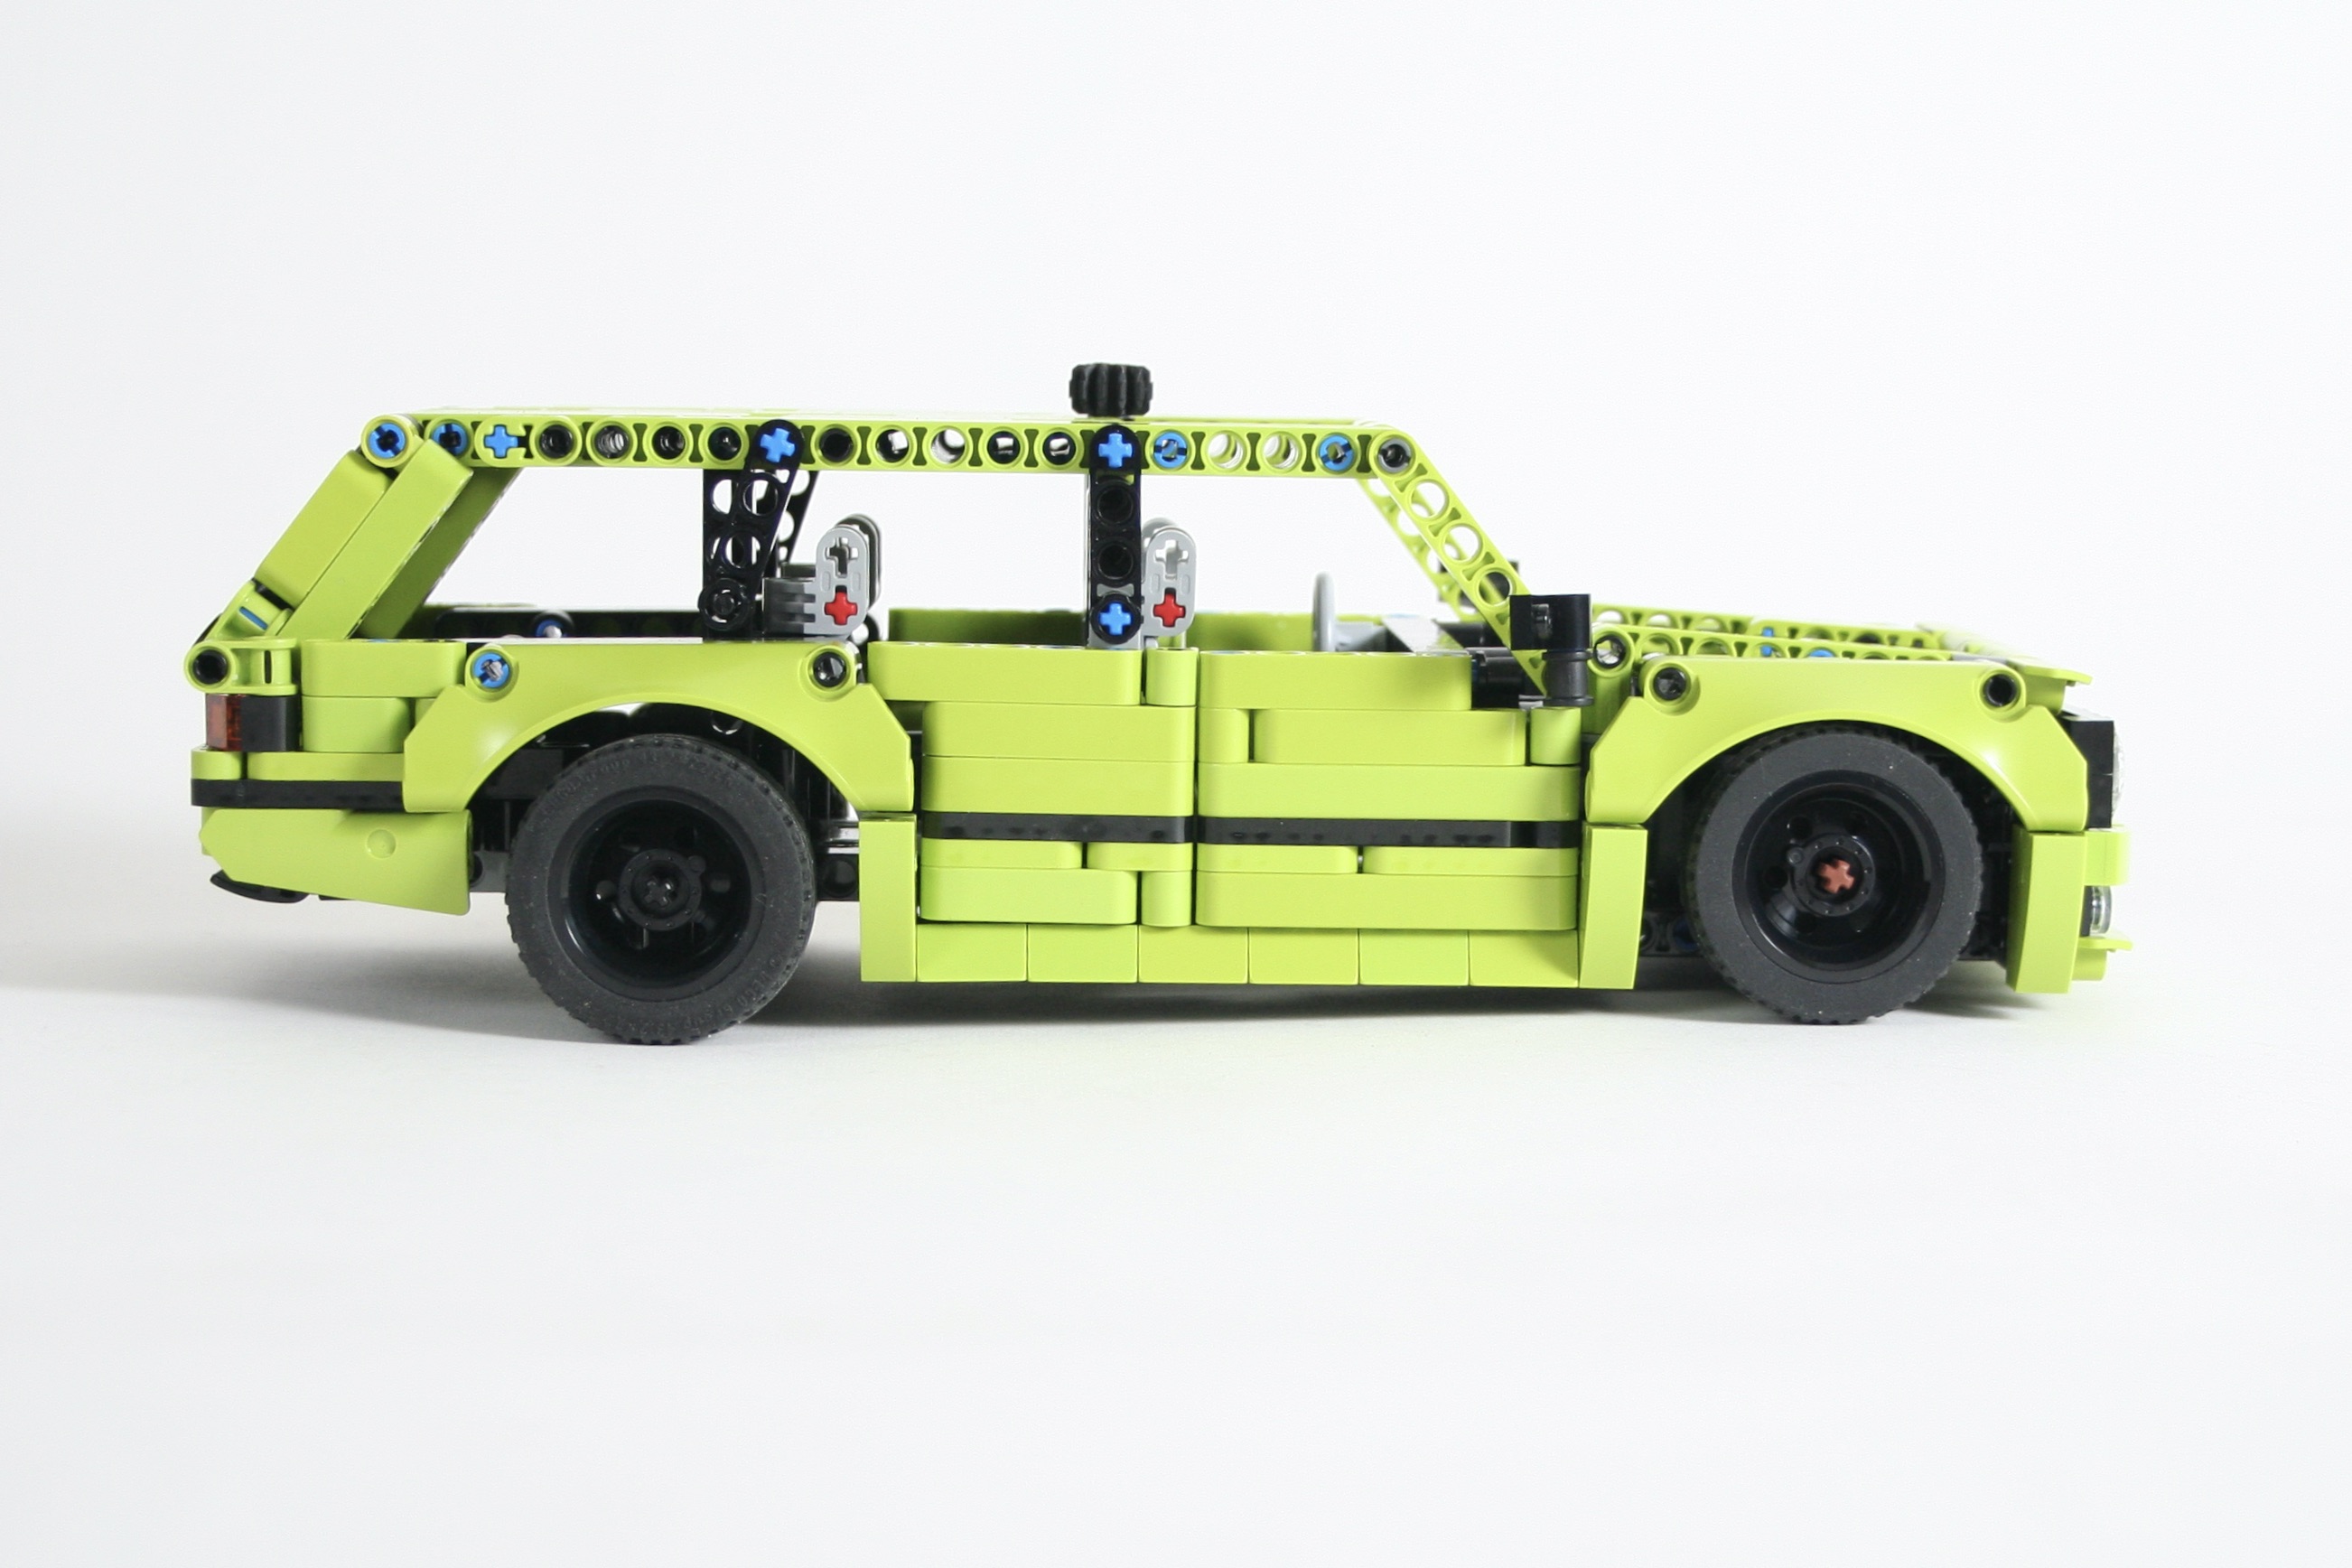
I loved the car so much, I couldn’t stop! I started making a lime version, and then I saw a Touring in my neighborhood, and decided this version would be a wagon. In lime! Then with a little more tinkering, I was able to change the V-8 for a Straight 6, like all perfect cars have. (Don’t tell your friends, but only 5 of the 6 pistons move) The chassis of the sedan and the wagon are the same.
Finally, as BMW Motorsports has an iconic livery, I decided a racing version would be complete the group. This car is mostly the same, but the wheelbase is 1 module shorter, and features the I6 engine. And BWM racing colors. I added a little roll cage, and white wheels and took out a door.
This build is a fan favorite. When I presented these at a local show, many people came up and wanted to talk about the BWMs. They are simple, playable, highly robust, and visually interesting. I loved this build, and will be doing more cars at this scale. They are a lot of fun. Until next time,
When I do an update, I like to add features, but keep the look and feel of the original in a way that you see the build and know what it is referencing. It’s is easy to see the old studded design and have the impulse to recreate the set with studless beams. But there are a lot of new parts that have been released since those old sets were released and many of the new parts allow for a lot of new functions.
For this set, I started first with the bodywork. Once the bodywork was where I wanted, I would fit in as many new functions as I could. It turned out that not many functions were added. But at least the bodywork was a nice update to the original.
Updated 8440 (red) over original 8440 (light trans-blue)
I kept the V6 that 8440 had, and devised a new rear transmission to the rear wheels. It is single speed, but it is geared up in a way that the engine spins faster than it does in the original. I then started adding details to the engine that would fit under the engine cover. I had to keep some exhaust pipes, and cooling radiators, but it took a little time to get those to look the way I wanted. I finally found a solution that was a step up from the old pneumatic tubes.
8440 Update Chassis
Keeping the front steering was simple, but fitting it into the narrow nose was a little bit of a trick. The final result is not too interesting but works well, and allows for a removable nose. A simple rear wing was added as well, and can be easily removed.
The remake did not add as many new functions as I originally wanted to add. True, the design stayed faithful to the original, but a wanted a little more than that. Everything worked well, and looked great, but it was a little too simple. Maybe the next update I do will have a little more opportunity to make some updates. Until then, happy building.
I loved LEGO set 8081 because it gave me a lot of modification ideas, and LEGO 42126 is similar.
Instructions may be found at Rebrickable for the SVT10 and the SVT8.
LEGO 42126 SVT10 Front
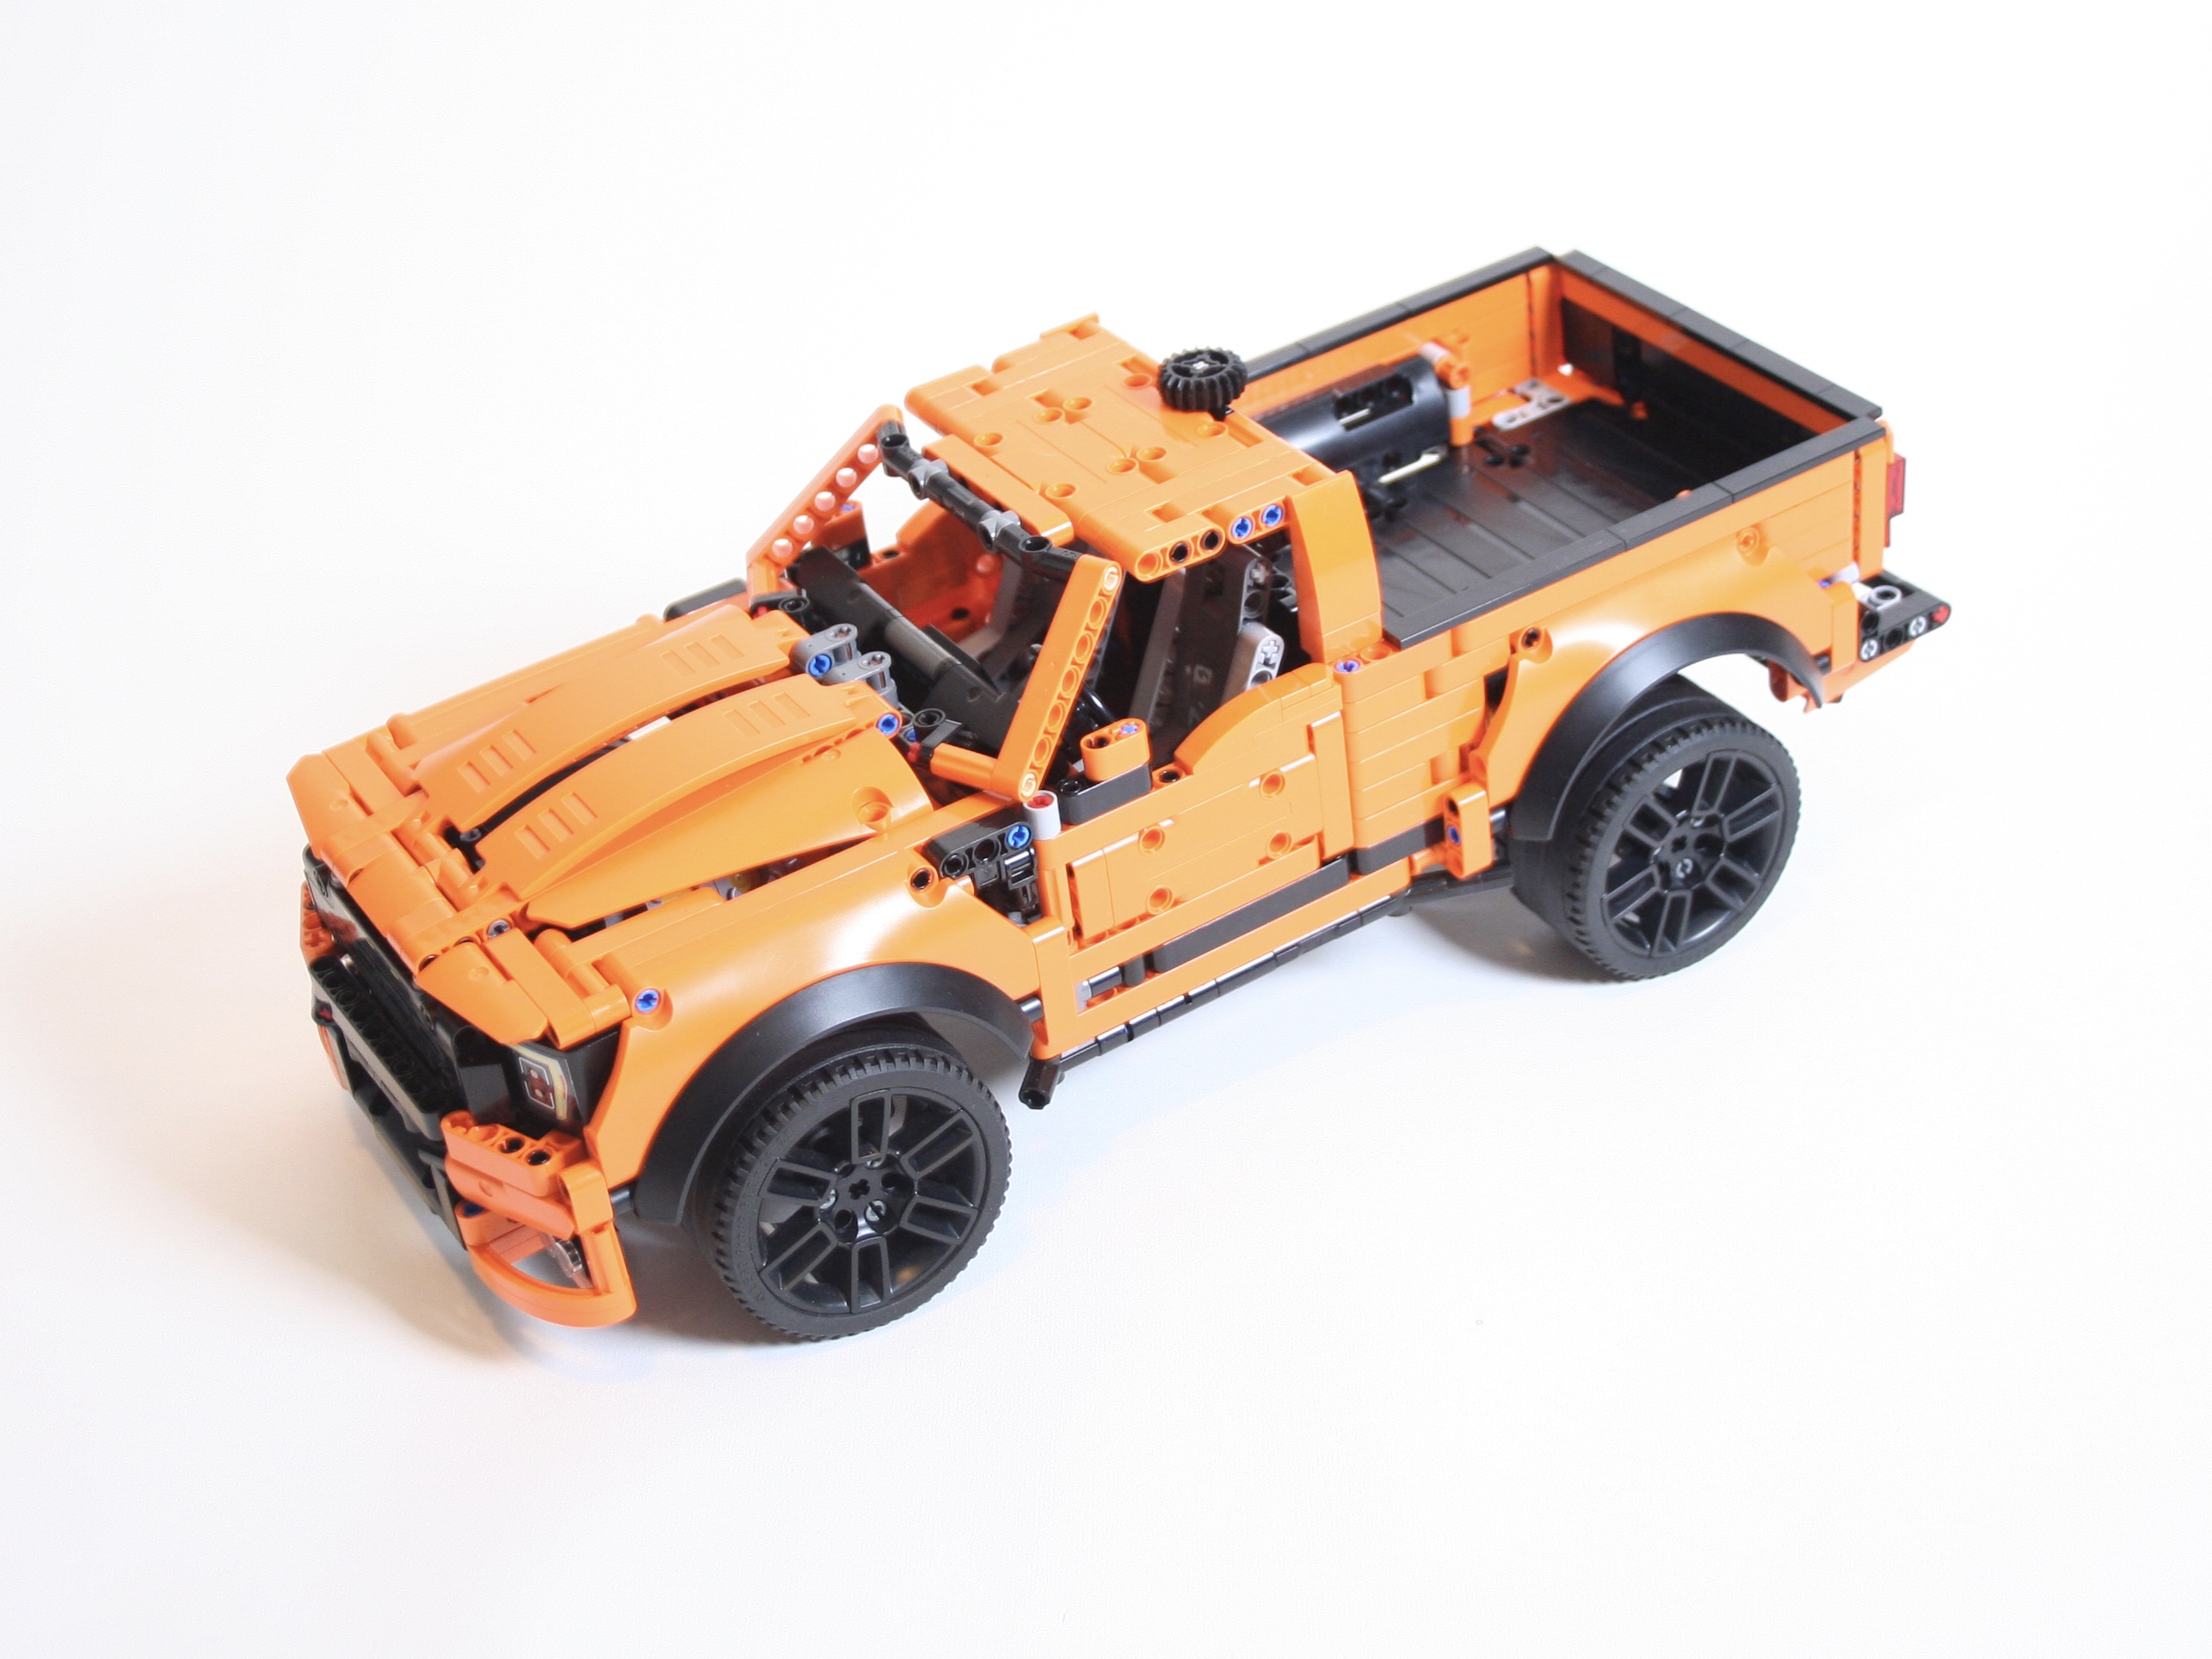
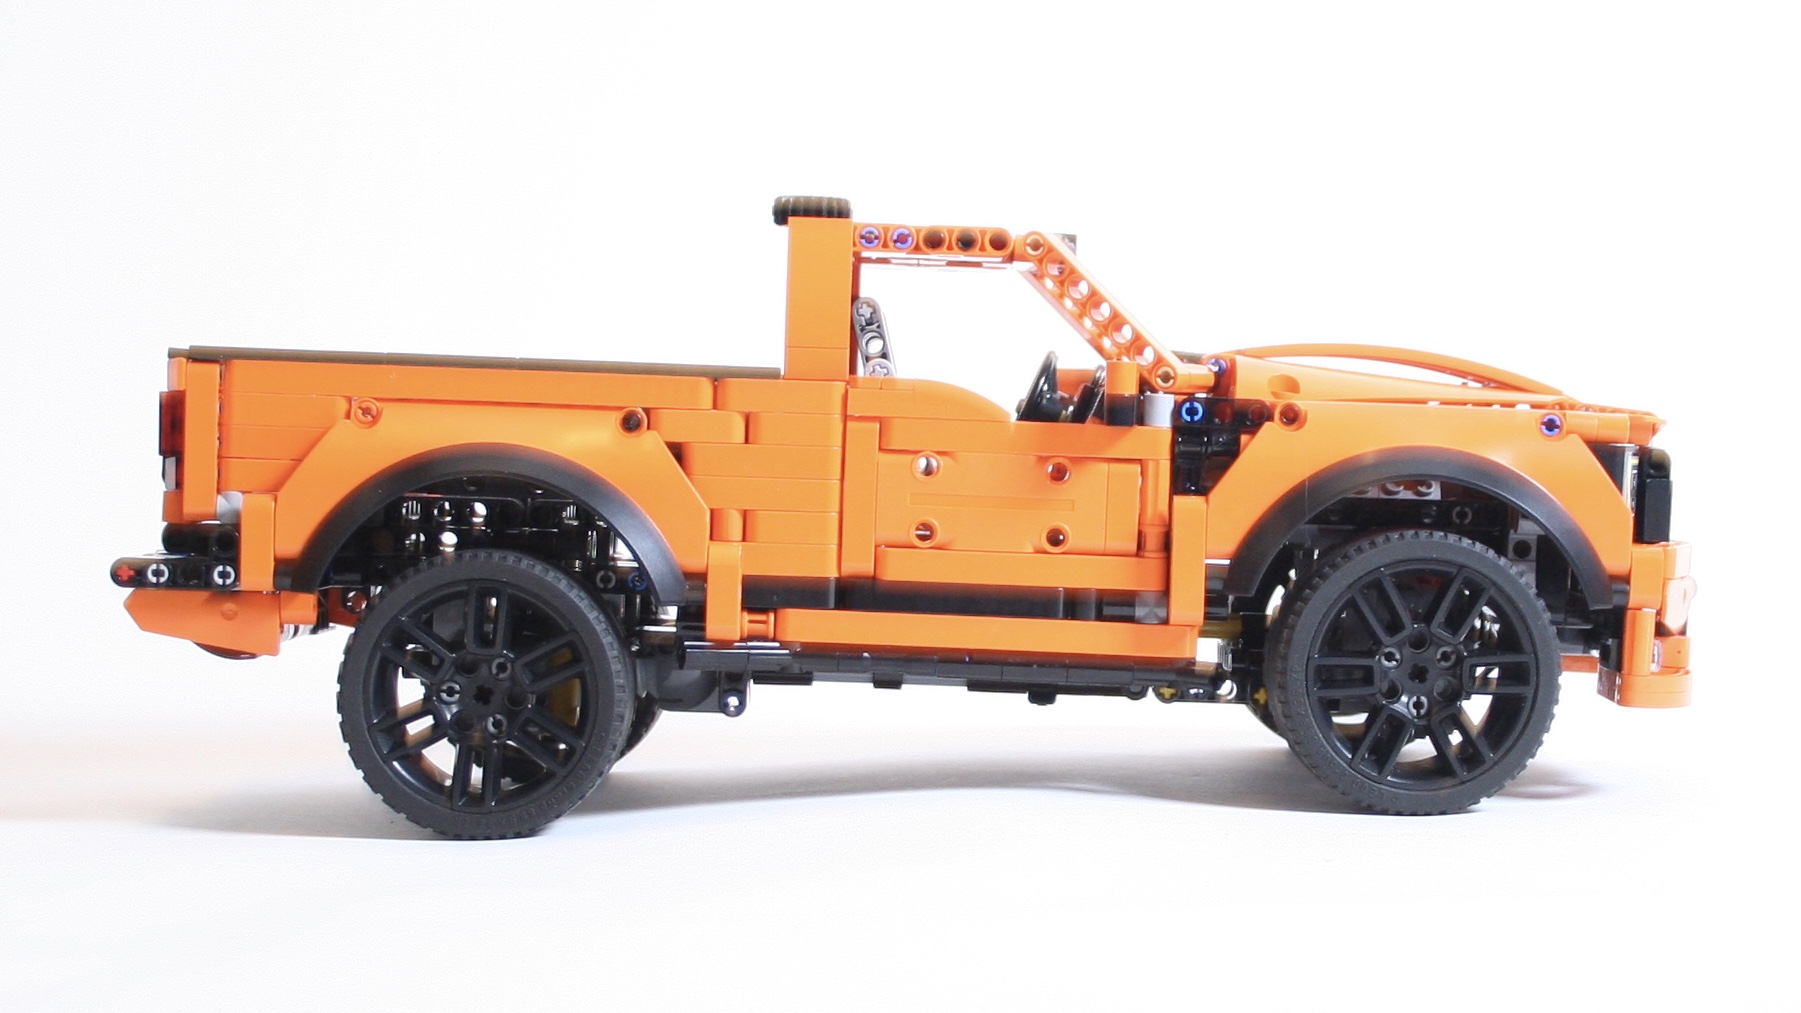
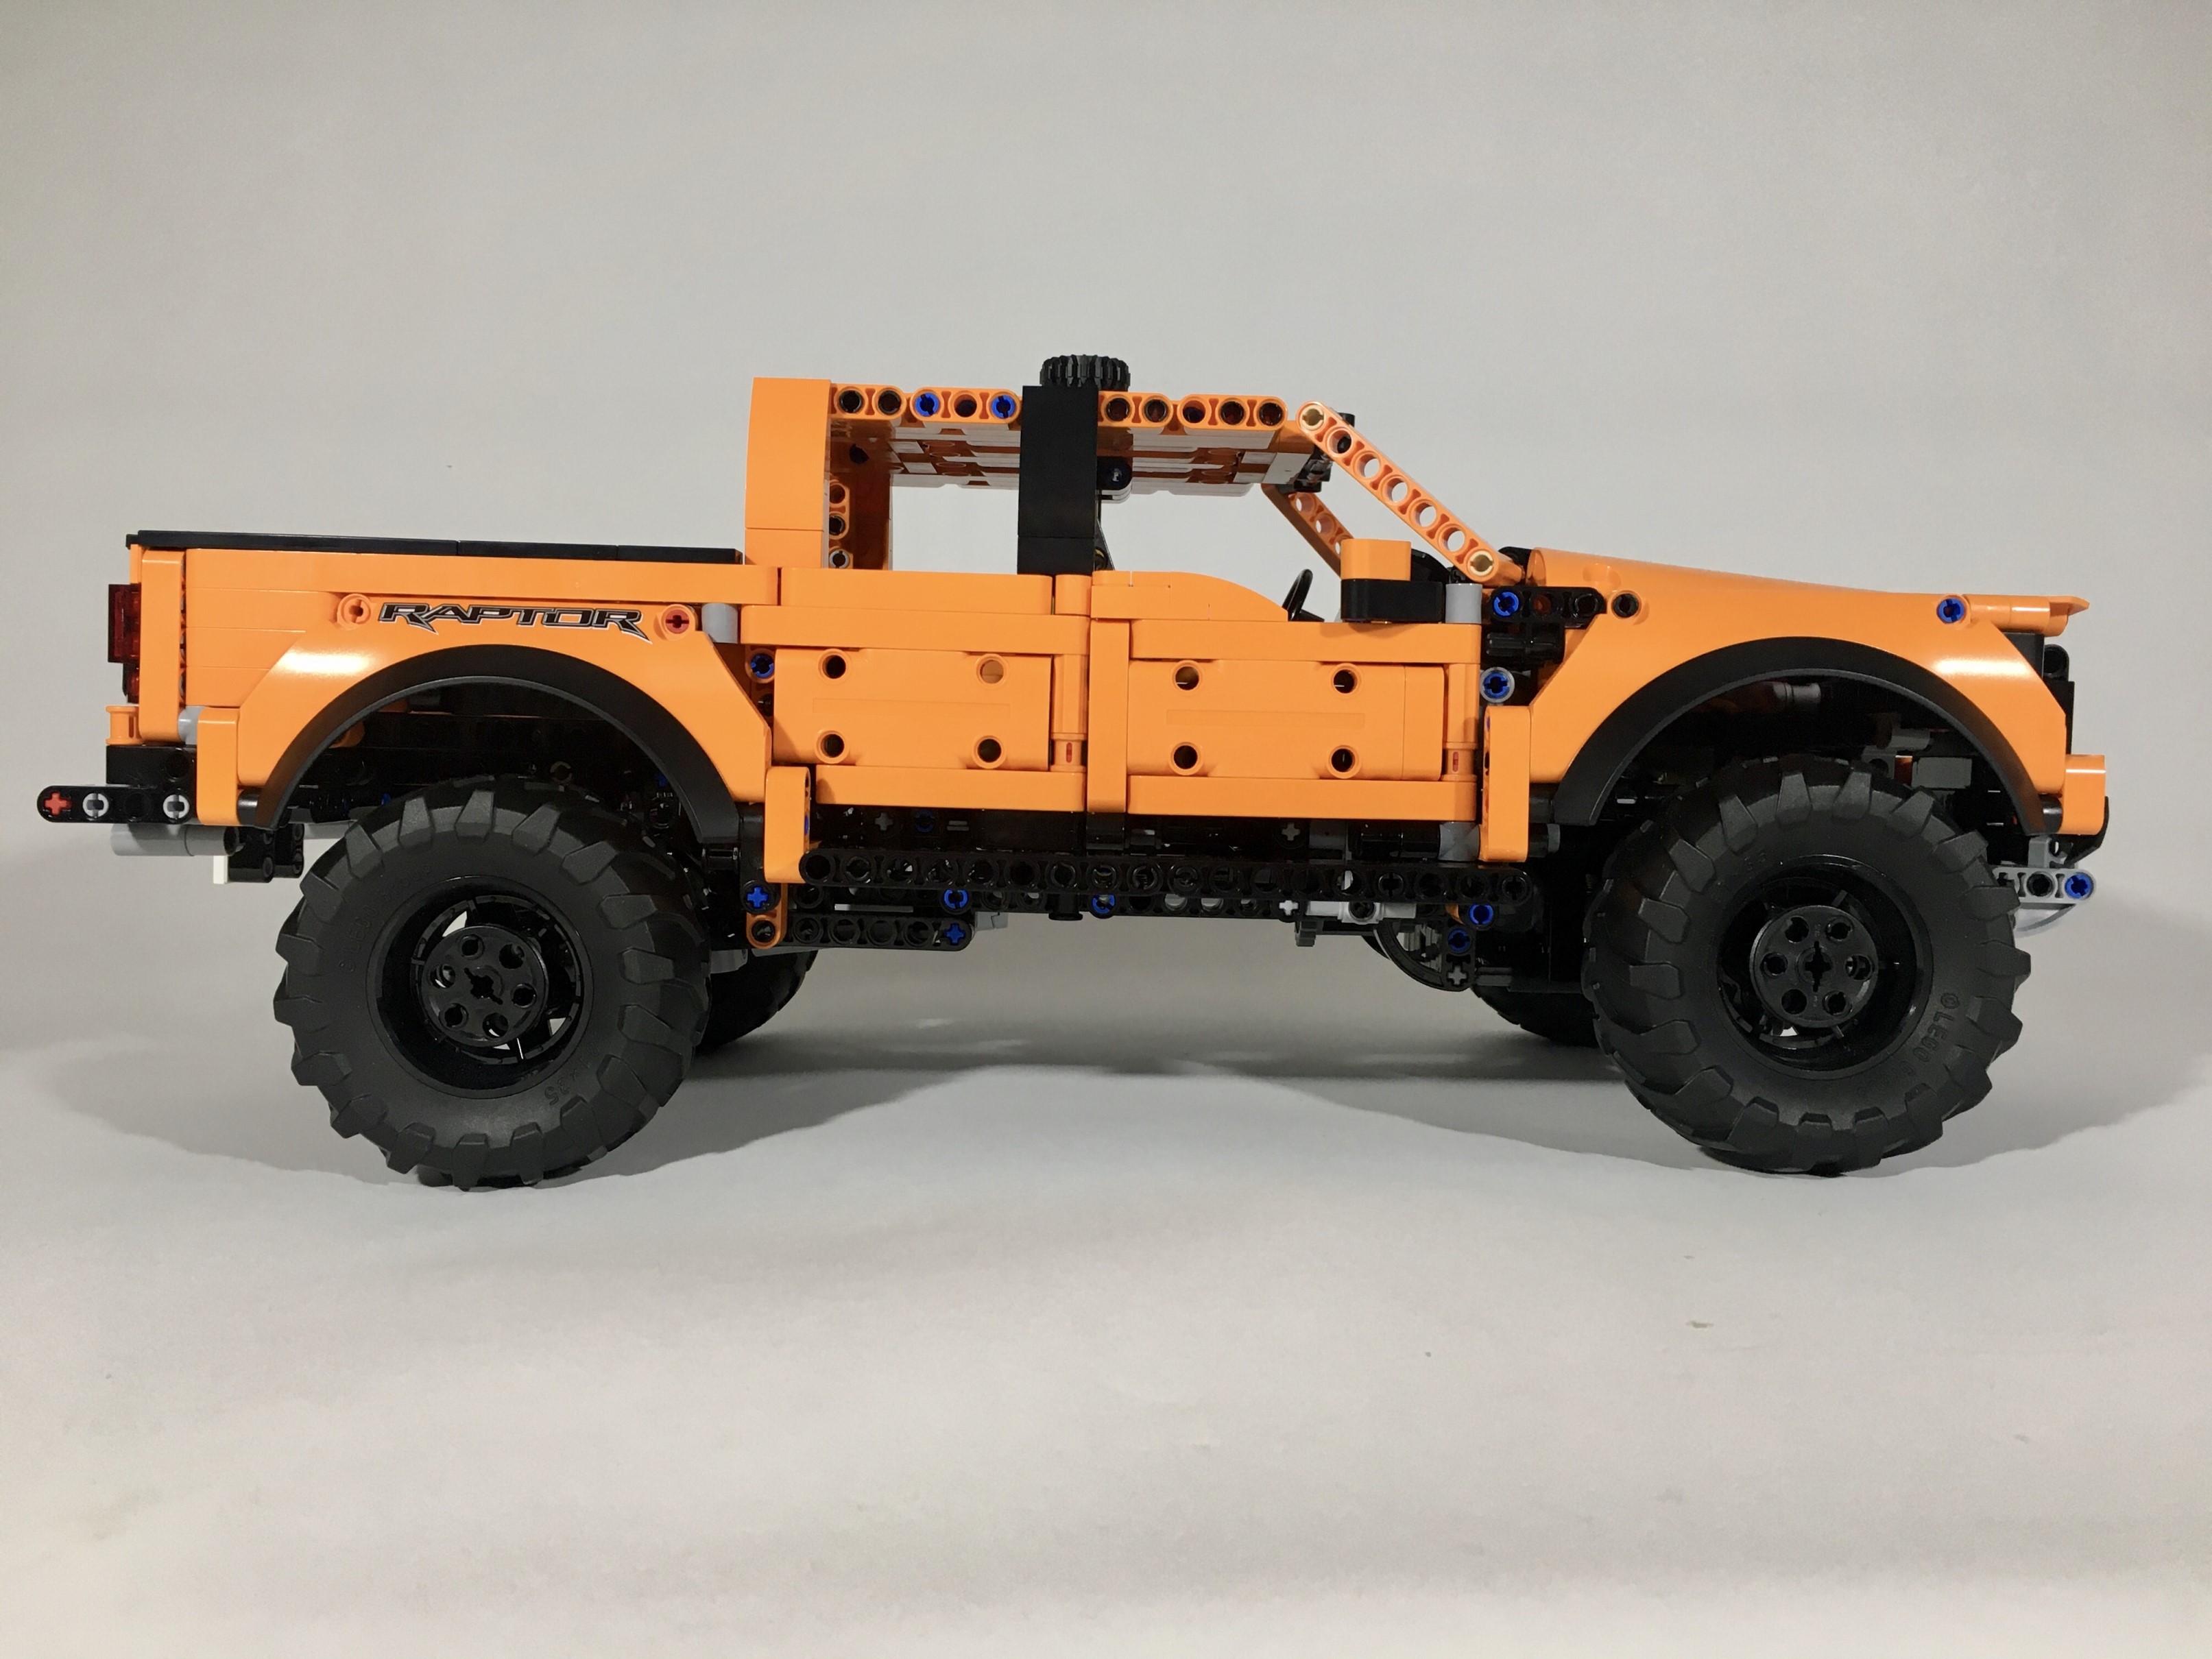
In addition to the 4×4 version of 42126, I was immediately interested to making a sport version of the pickup. The sport pickup is one of those silly American contributions to the automotive landscape, so naturally I had to turn the most American of vehicles, the F-150, into a sport truck.
First, I had to figure out how to set the ride height. I decided on the wheels for the truck right away, so it was clear the truck had to come down a little bit. It was clear this would be a significant modification. Since I was already changing the whole frame for the ride height drop, I decided early that i would change the rear suspension to an independent design.
Second, I had to decide on what engine I would use. It was clear at this point, I would have a two door and four door version so I decided a V8 for one, and a V10 for the other. 42126 has a lot of space under the hood, so both would fit without a lot of changes. I added a chain driven supercharger for the V8 to give it a little different look.
LEGO 42126 SVT8 Open
Finally, I wanted to keep the bodywork similar to 42126, but with a sporty look. I designed a new front bumper that is lower, and looks less rugged. I removed the side steps from 42126, and replaced with some simple panels. A new hood was also designed.
Video for the SVT10.
Video for the SVT8.
Functionally, the truck worked better than the Raptor. The suspension worked very well, thought the rear ride height was a little high. The steering worked well, and the front wheels tracked better than on 42126. I liked the look a little better as well, as the wheels and tires make 42126 look out of scale with itself. I pleased with how the updates turned out, so we’ll see if I come up with another MOD to do at some point.
Sometimes I cannot make a decision. This is the LEGO result of that problem.
You may find free instructions for the AWD and the RWD (my favorite).
At the end of 2020, I decided to make a sport sedan. I find the sport sedan to be my favorite kind of car (see here and here), and it was time to do another one. I acquired a couple of the Defender wheels, which look more sporty than the other 56mm wheels. These would be the center of the build. The car would be long hood, short deck, with faired fenders. Then more questions happened, and I could not make up my mind.
What transmission did I want? What engine would be best? Could I fit all wheel drive? Was that appropriate? As I found myself asking these questions, I began answering “well why not that too?” It was here, the project took a dramatic turn. The car would be fully modular and interchangeable. After playing around with some dimensions and simple structures, I decided on the following setup: Two different transmission and rear suspension modules, one floorplan, one body (in two colors), two engine tubs for all wheel drive and rear wheel drive, and three engines. Demensions were set with a width of 27 studs at the rear tires, and 25 studs at the front tires, and a wheelbase of 33 studs.
Each of the 9 modules were build in constant flux with each other as I managed attachment points, size, and interchangeability. I settled on a 4 speed manual transmission module, and a 4 speed sequential transmission module. The manual is shifted in the cabin, and the sequential has a shift lever on the rear bumper. While four speeds is basic for a LEGO car these days, it kept space inside for four seats. Once the transmission modules were basically set, I was off to another module.
The engine tubs were a lot of fun and took less time than I thought they would. There are two tubs. The first, is built to support the front independent suspension and two different engine designs. The Straight Six is my favorite engine, so I wanted to make this options possible. The steering race for this module is placed far forward to allow for the I-6 to fit. In fact, the front of the engine is two studs from the front of the car. The V-8 fits well, and is placed behind the front axle centerline. The second engine tub features a fixed Flat 6 engine, and two fake electric motors; one for each side of the front axle. This unit is the hybrid and All Wheel Drive engine tub. Each tub attaches to either transmission module with six pins and one axle for steering. Drive connects by a 8 tooth gear off the engine.
Then I built the floorpan. This simple build provides the floor to both the cabin and the underside of the car. It is connected at six points, four to the chassis, and two to the center of the body. These points stiffen the car, and connect it all together. The body took the most time as this is what most people would see. Early, I committed to the sides panels including the doors and the part just behind the front wheels, and the roofline. Otherwise everything else was fair game. The front bumper took some time in order of the two studs of space, but I was pleased with the design. Next I managed to get the A, B, and C pillars to look the way I wanted. The C pillar took some trial and error but finally got a shape that was fast looking without the coupelike lines that seems to be permitting sedan design these days.
The rear took the longest. It was at this point where my focus on the MOC was starting to wain. Over months I tinkered with different trunks, different lights, and different rear bumpers. Eventually, I got to where I am now which could be improved, but I was pleased enough to call it complete. I added a little spoiler, and the body was done.
Ionos Sequential Rear
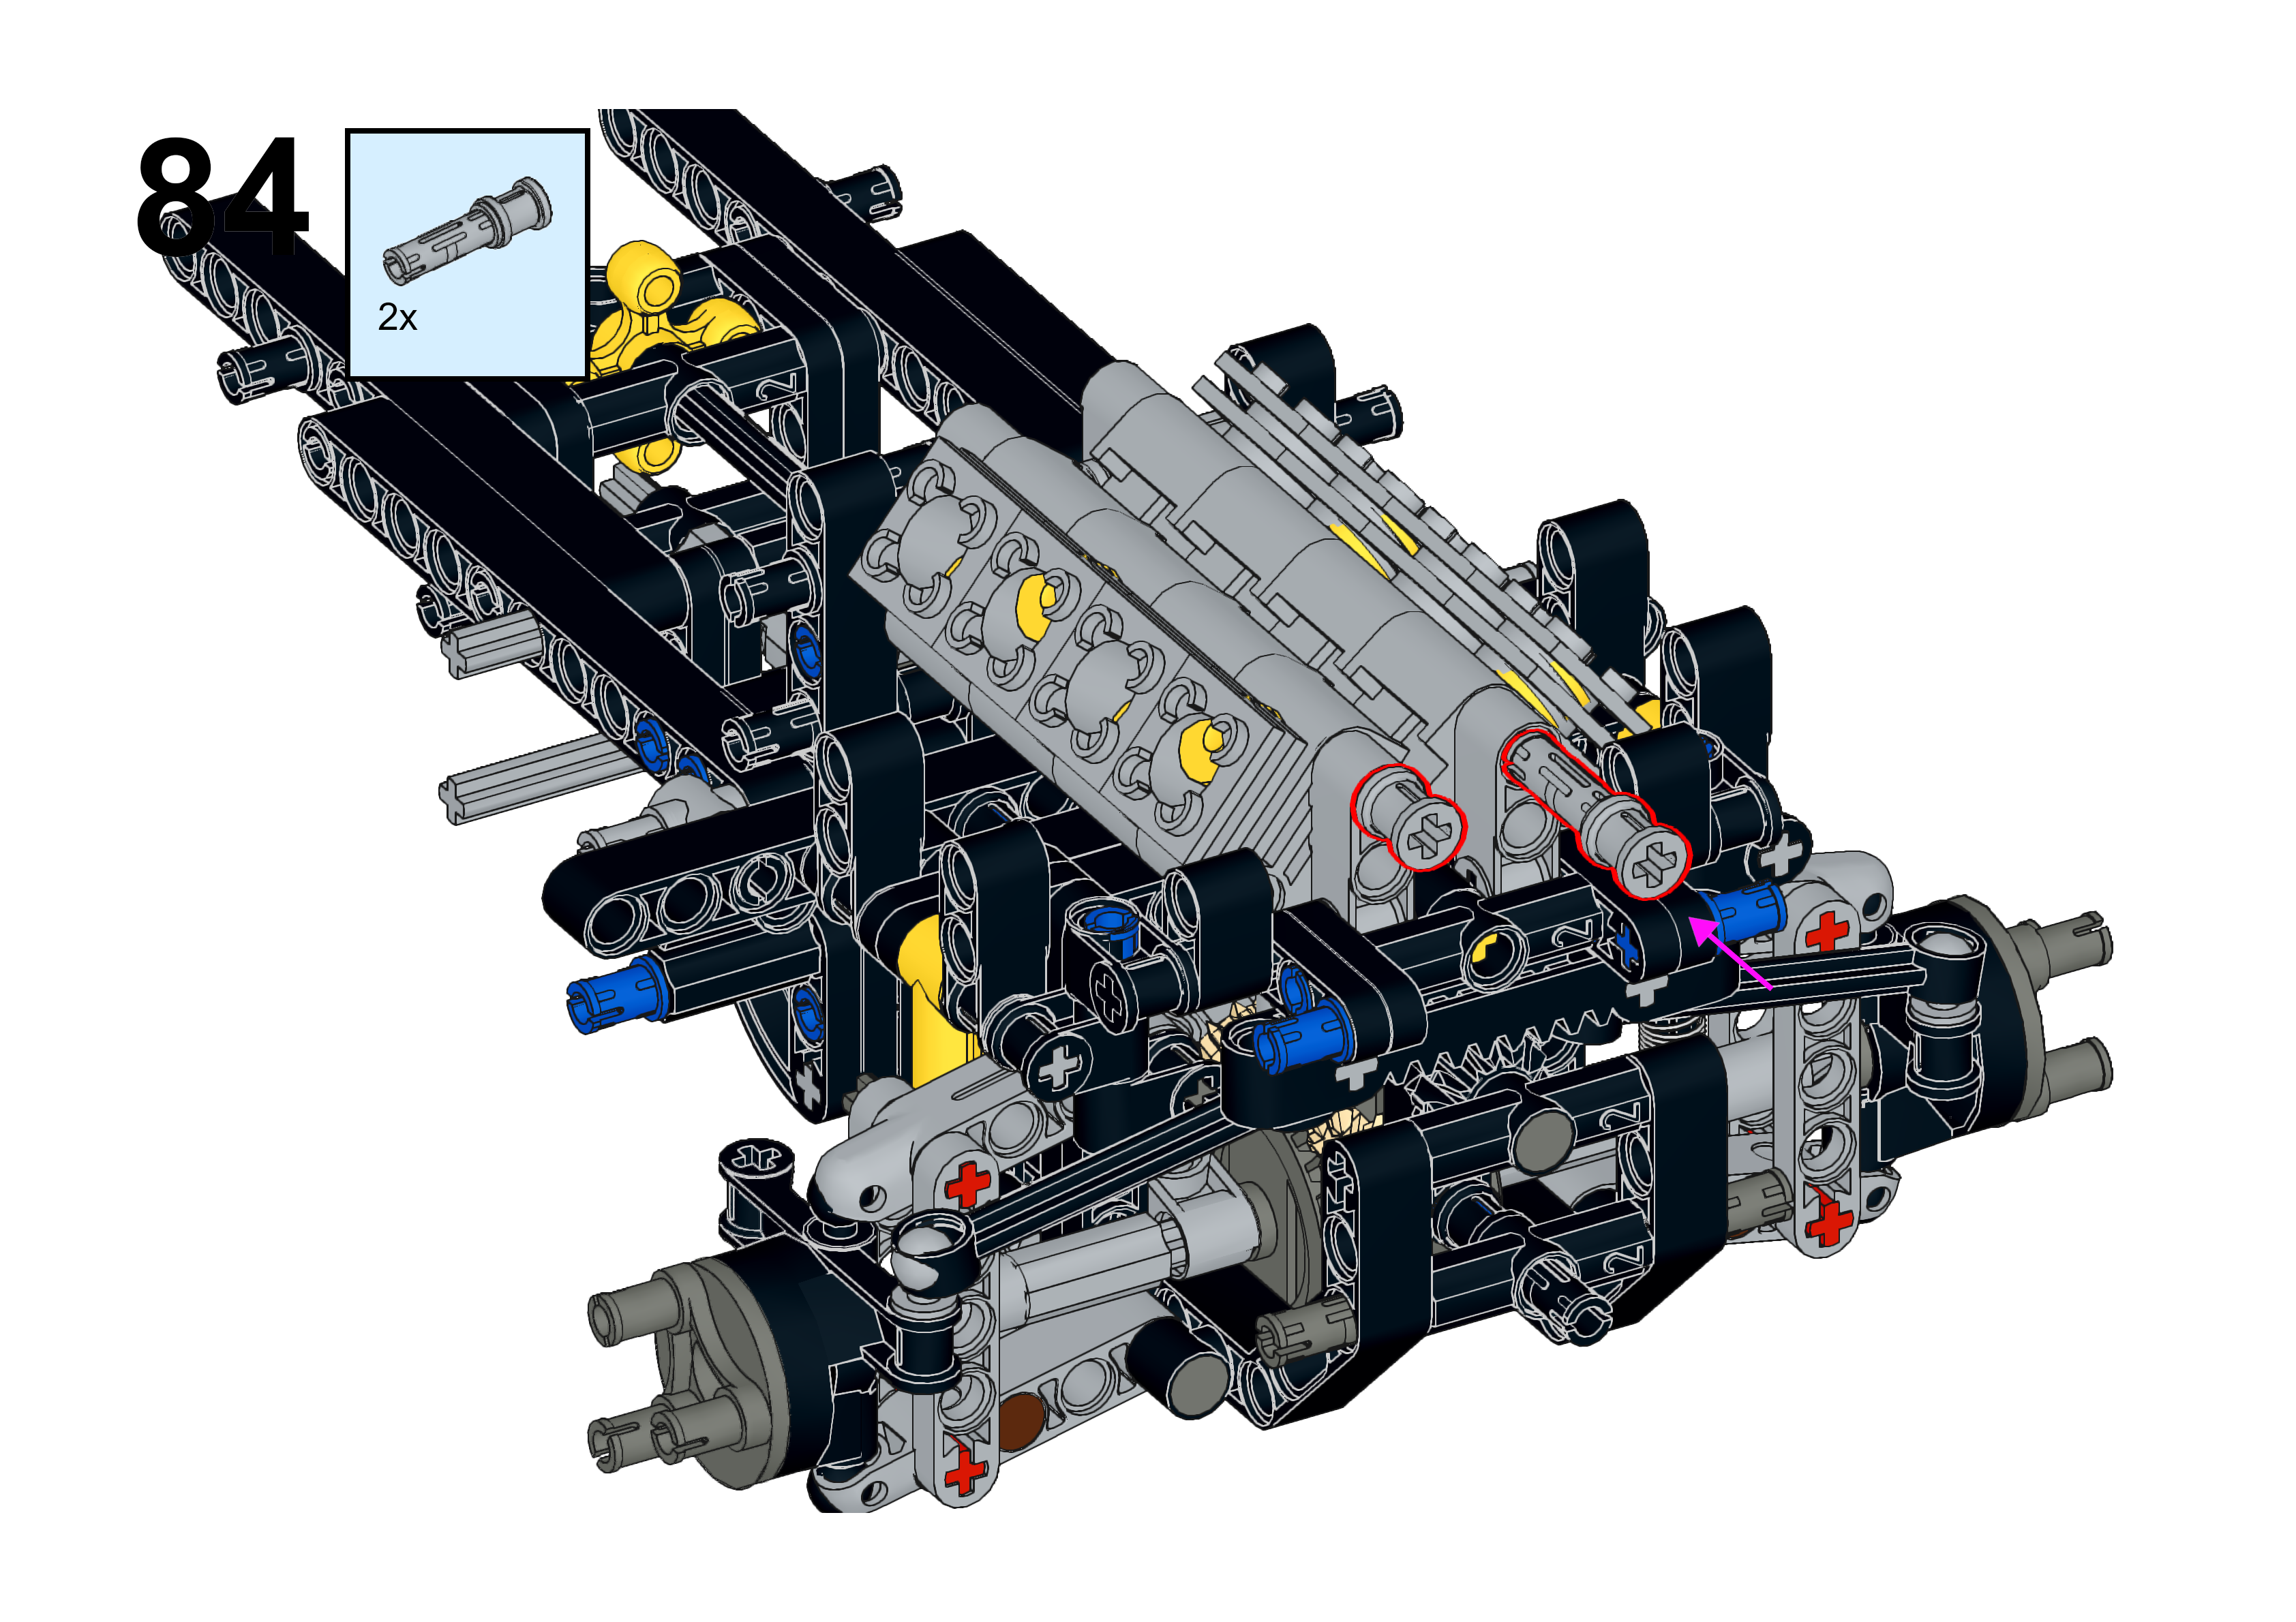
After everthing was built set, I rebuilt the whole car. As I did, I checked fit and built a Bricklink Studio file. With each step I found improvements along the way, and learned how to make better instructions. The result was a car system that fit together well, and gave for an interesting build. Again, if you are interested in the detail, or building your own you may find the instructions here and here.
This was my most favorite build in a long time. If you are interested, the Dark Azure, Manual, AWD version is my preference. The integration of all the parts was fun to do, and the build, test, rebuild process that went through every stage was a case study in continuous improvement. Both transmission work flawlessly. The suspension is stiff and functions as they should for a car of roughly 2500 parts. The varied engines were a fun inclusion. The design of the car is sporty and keeps the lines and proportions of a traditional Rear Wheel Drive Executive Sedan: long hood, short deck, short front overhang. I hope you enjoyed the car, and if you build it, I hope you enjoy the build. I definitely did, and will do something similar in the future.
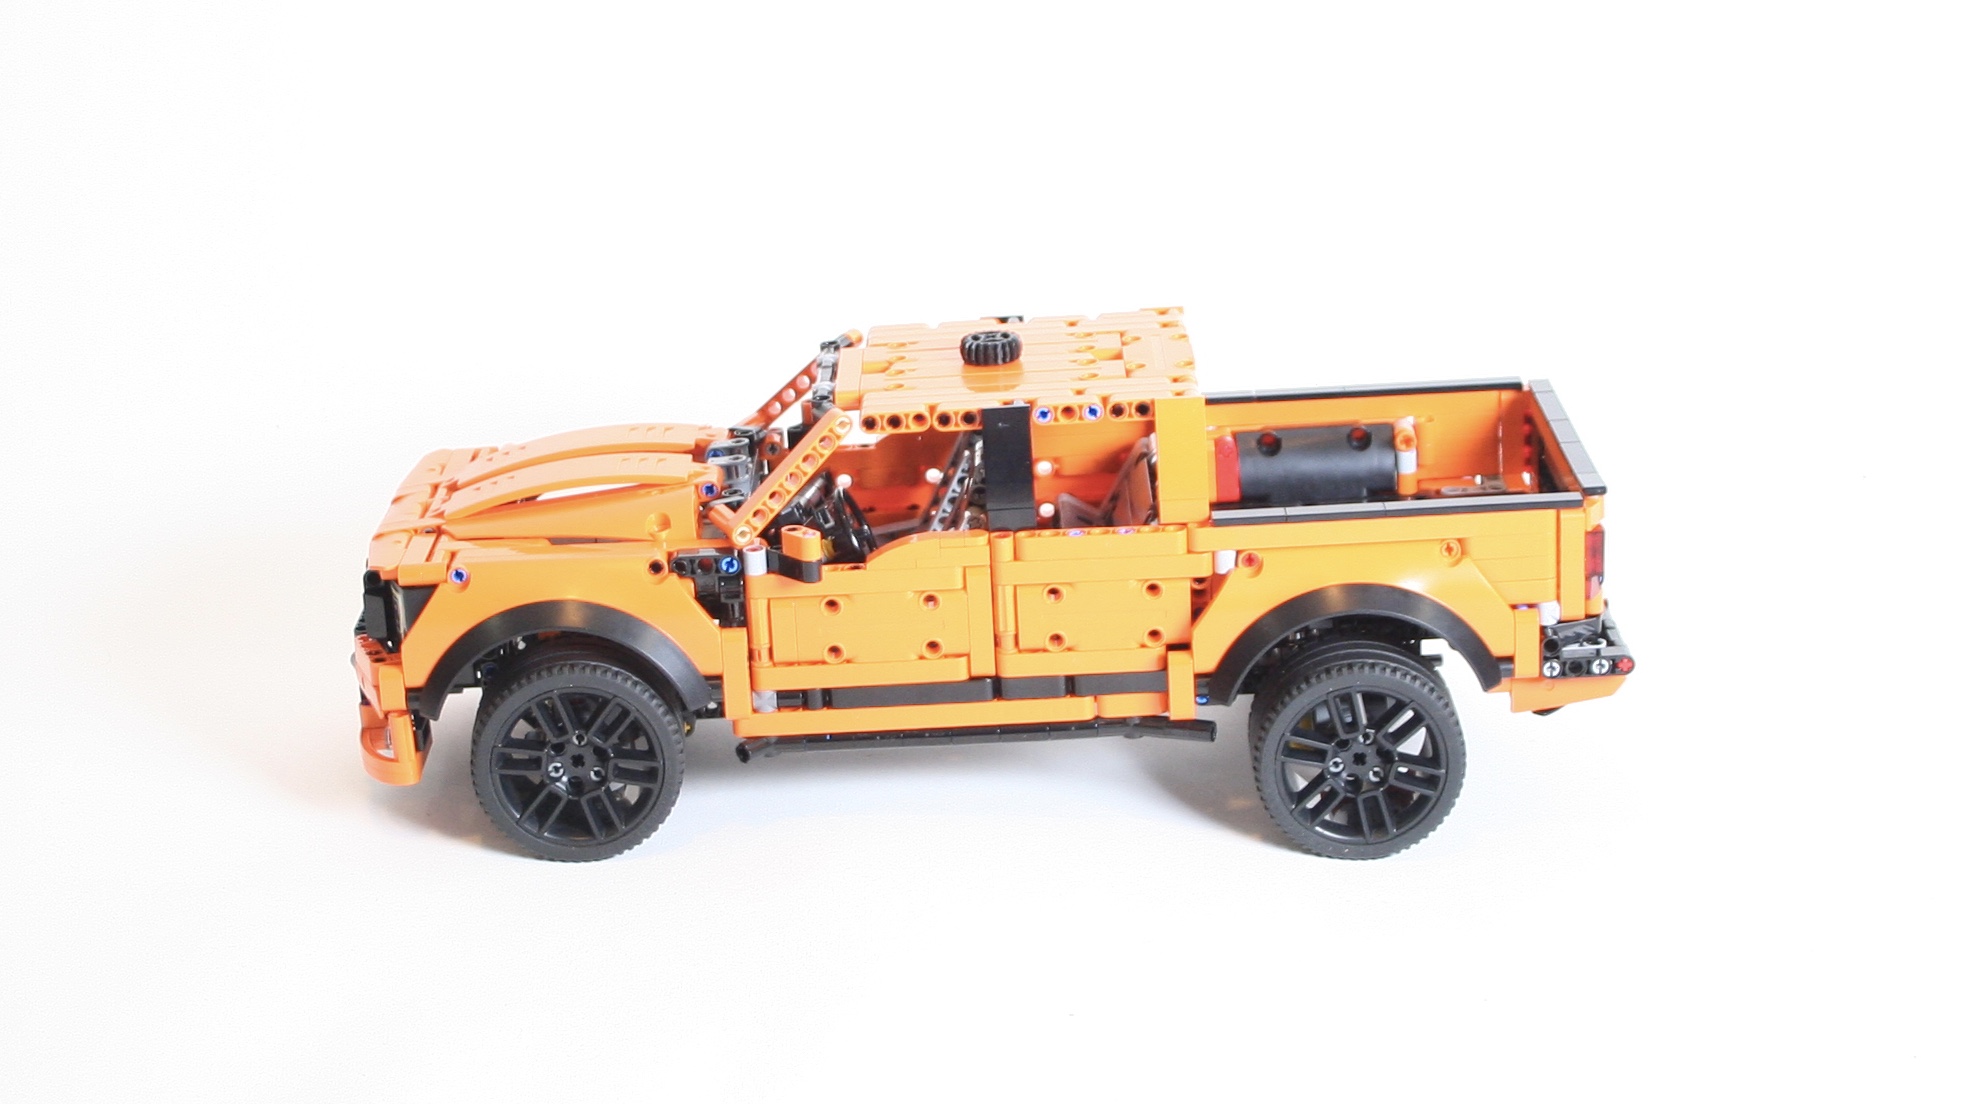
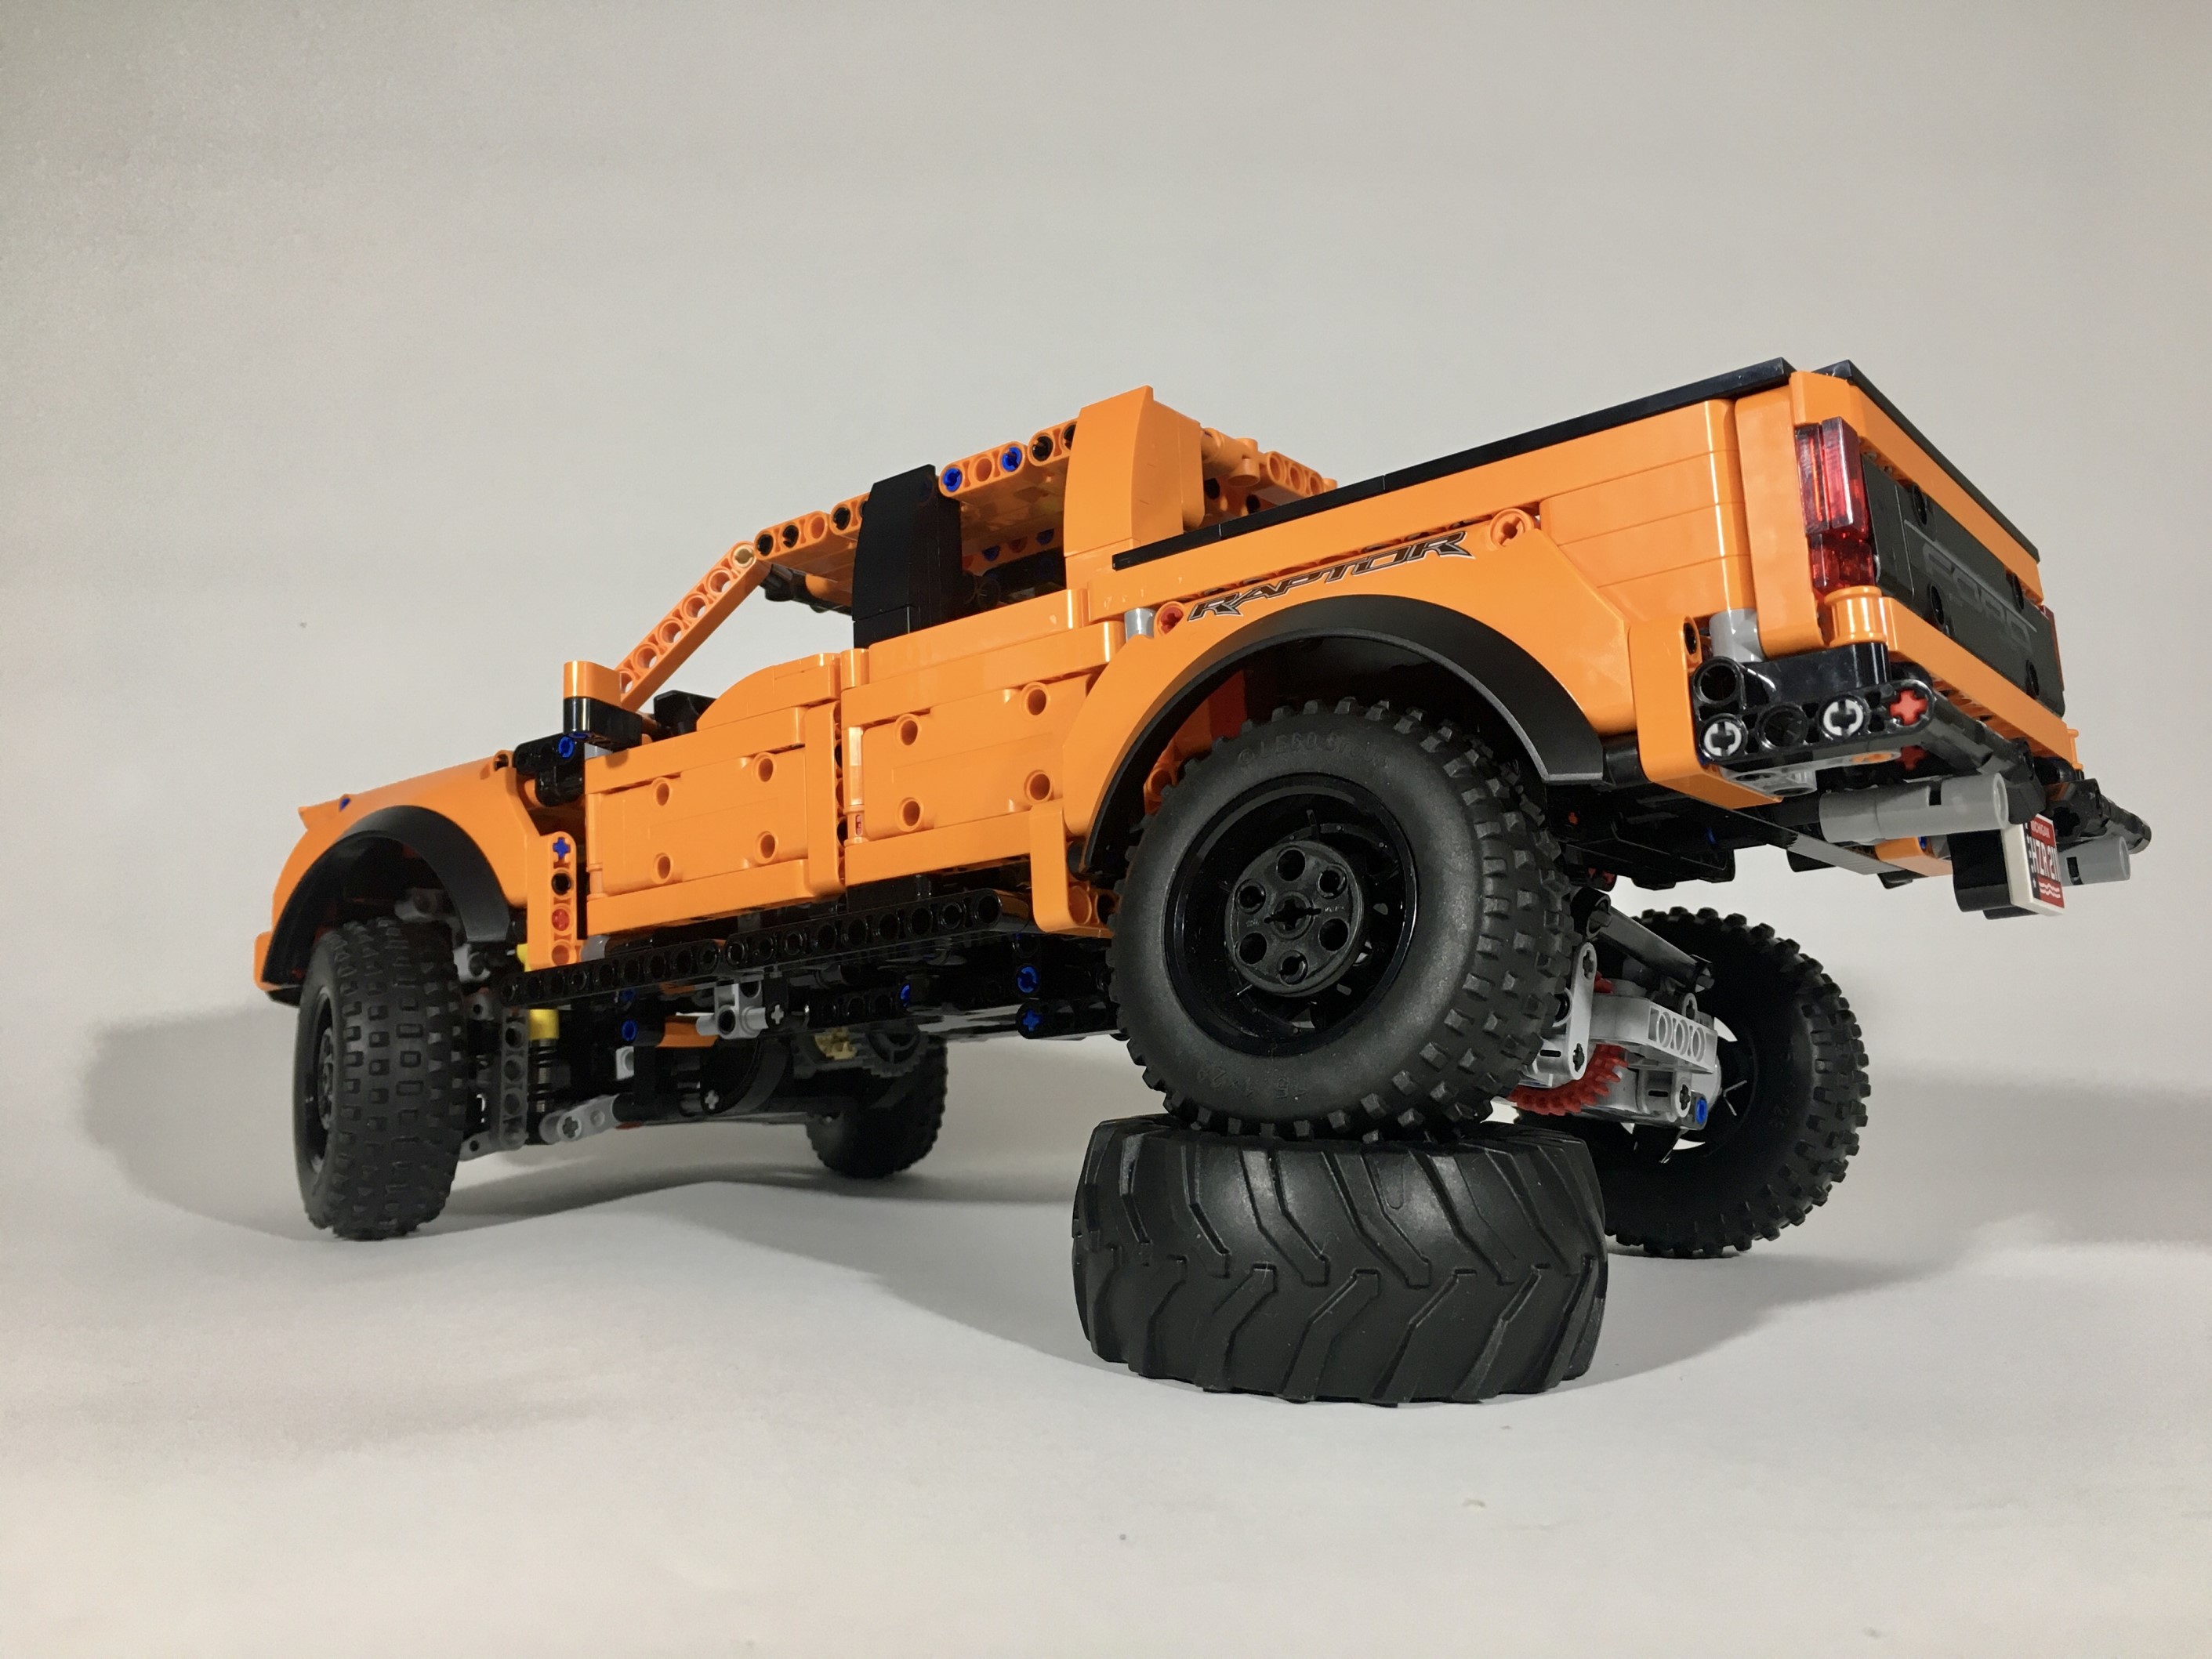
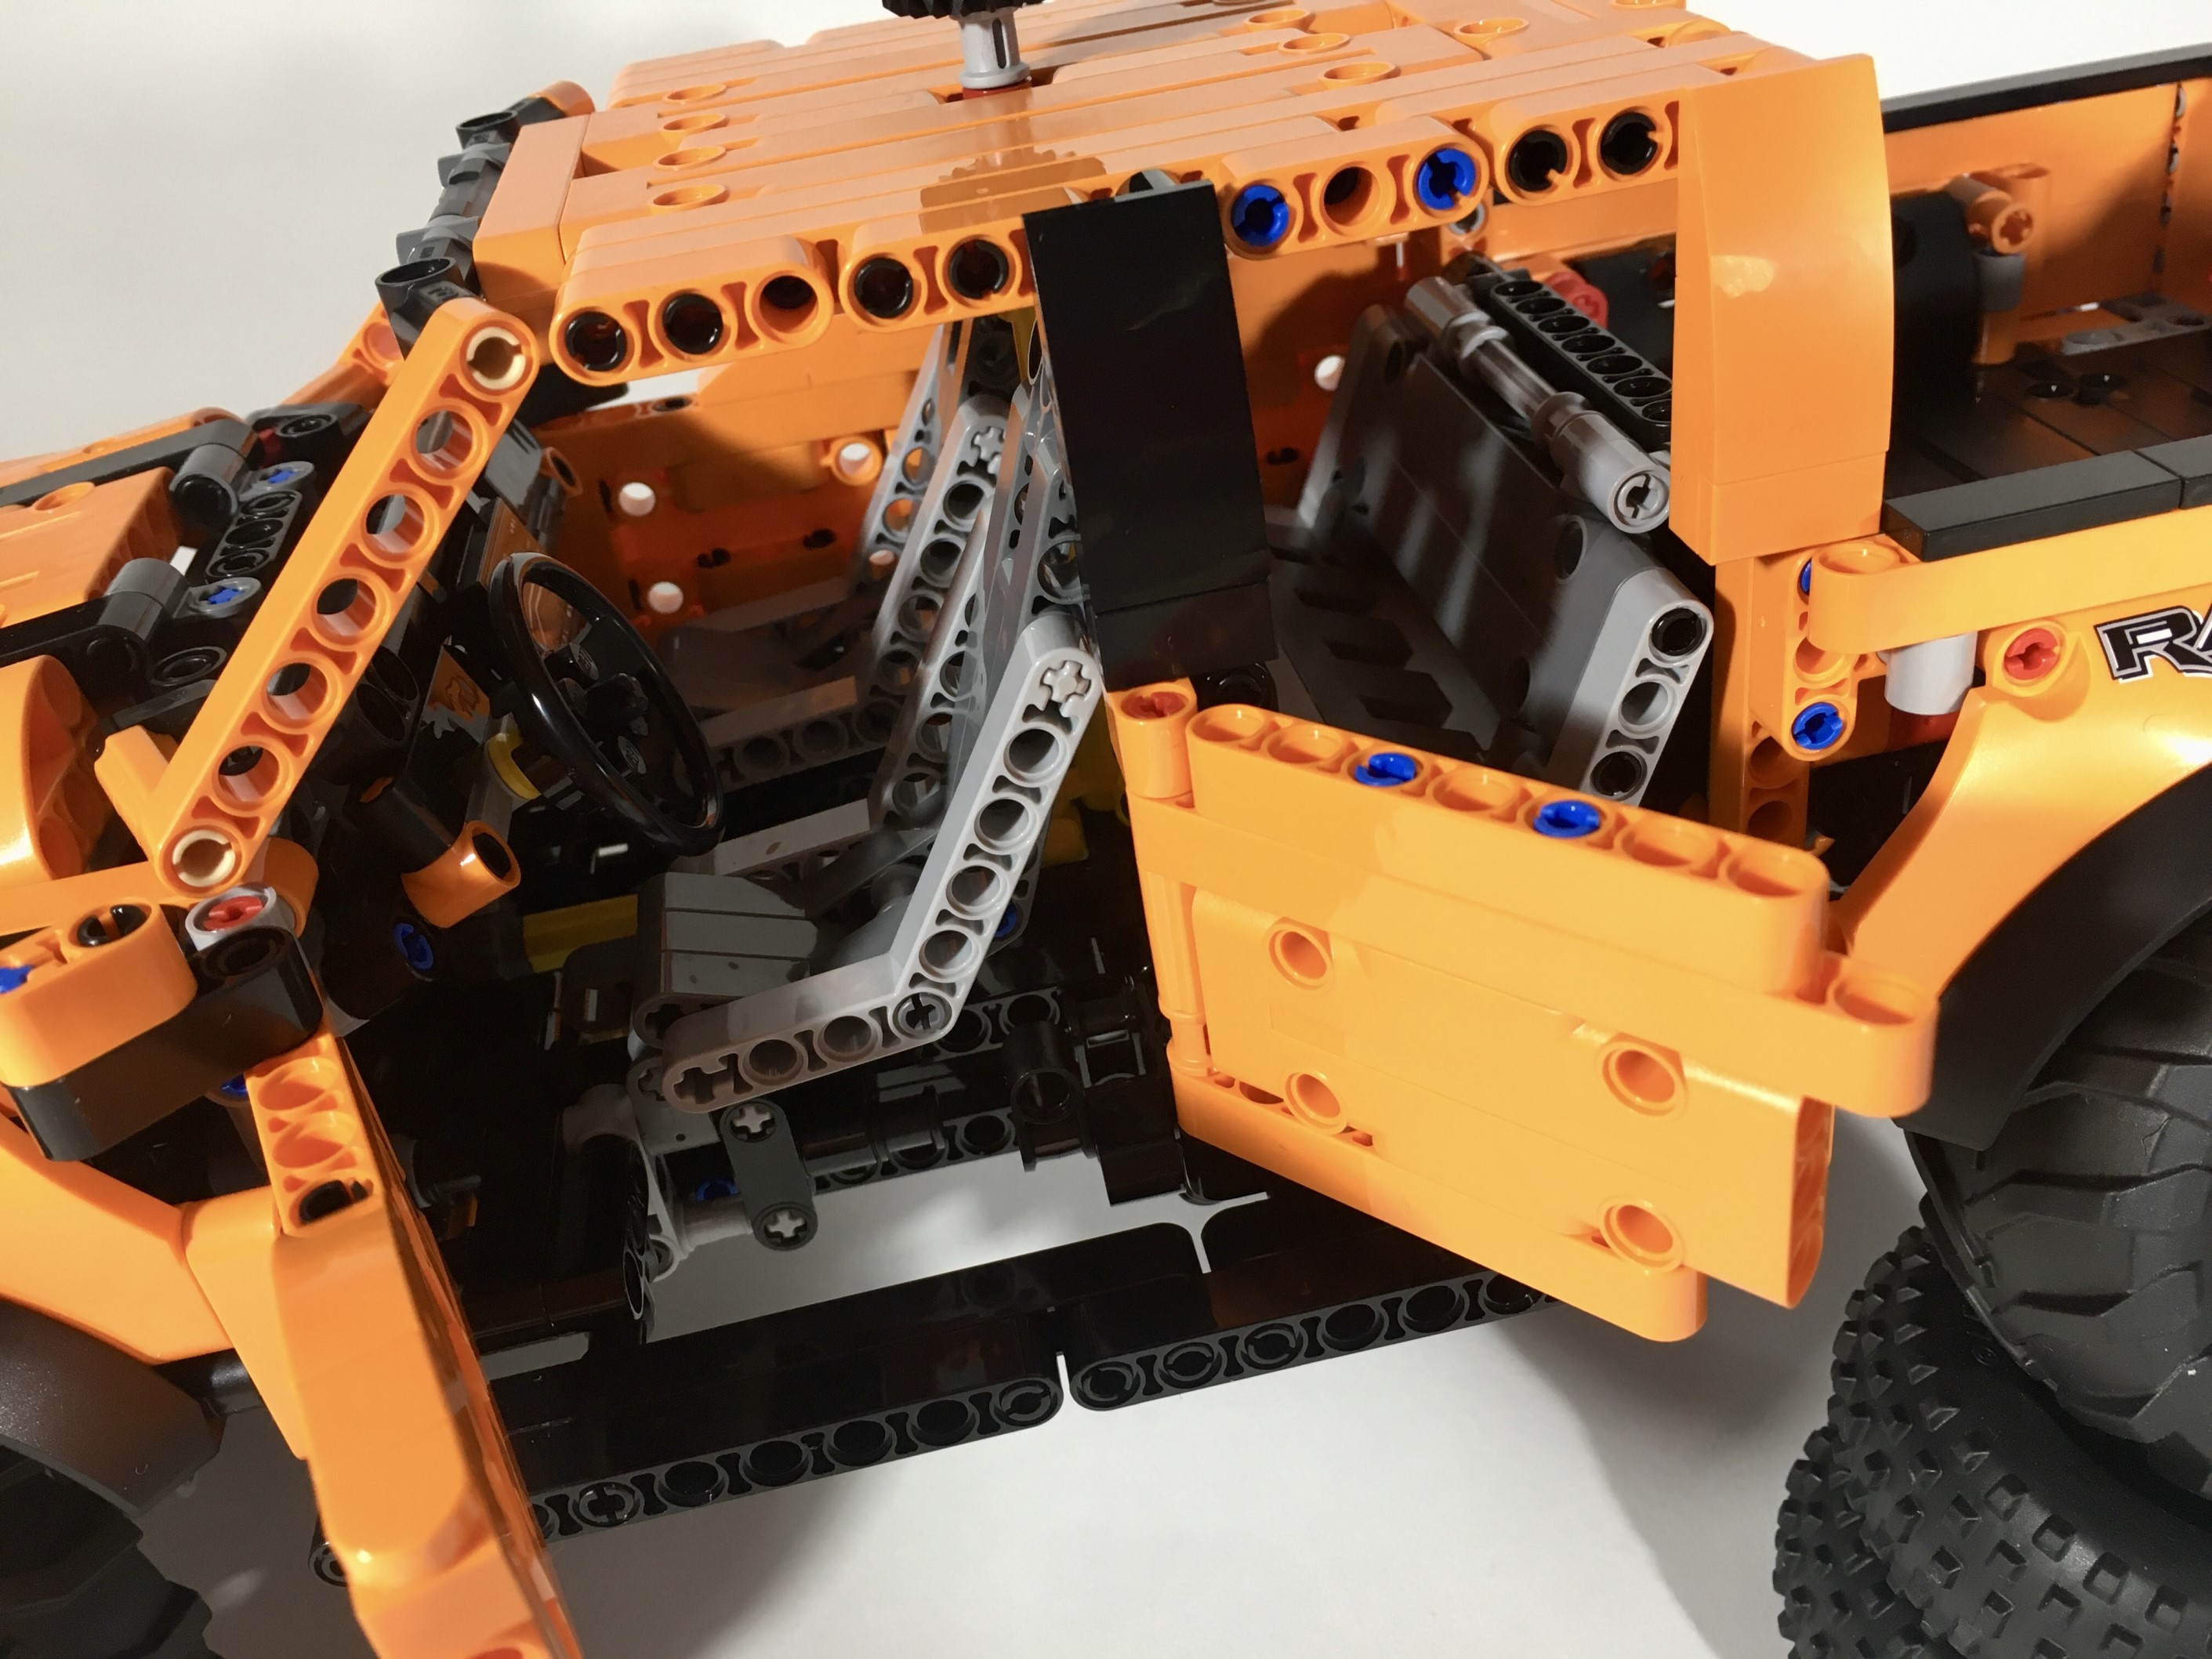
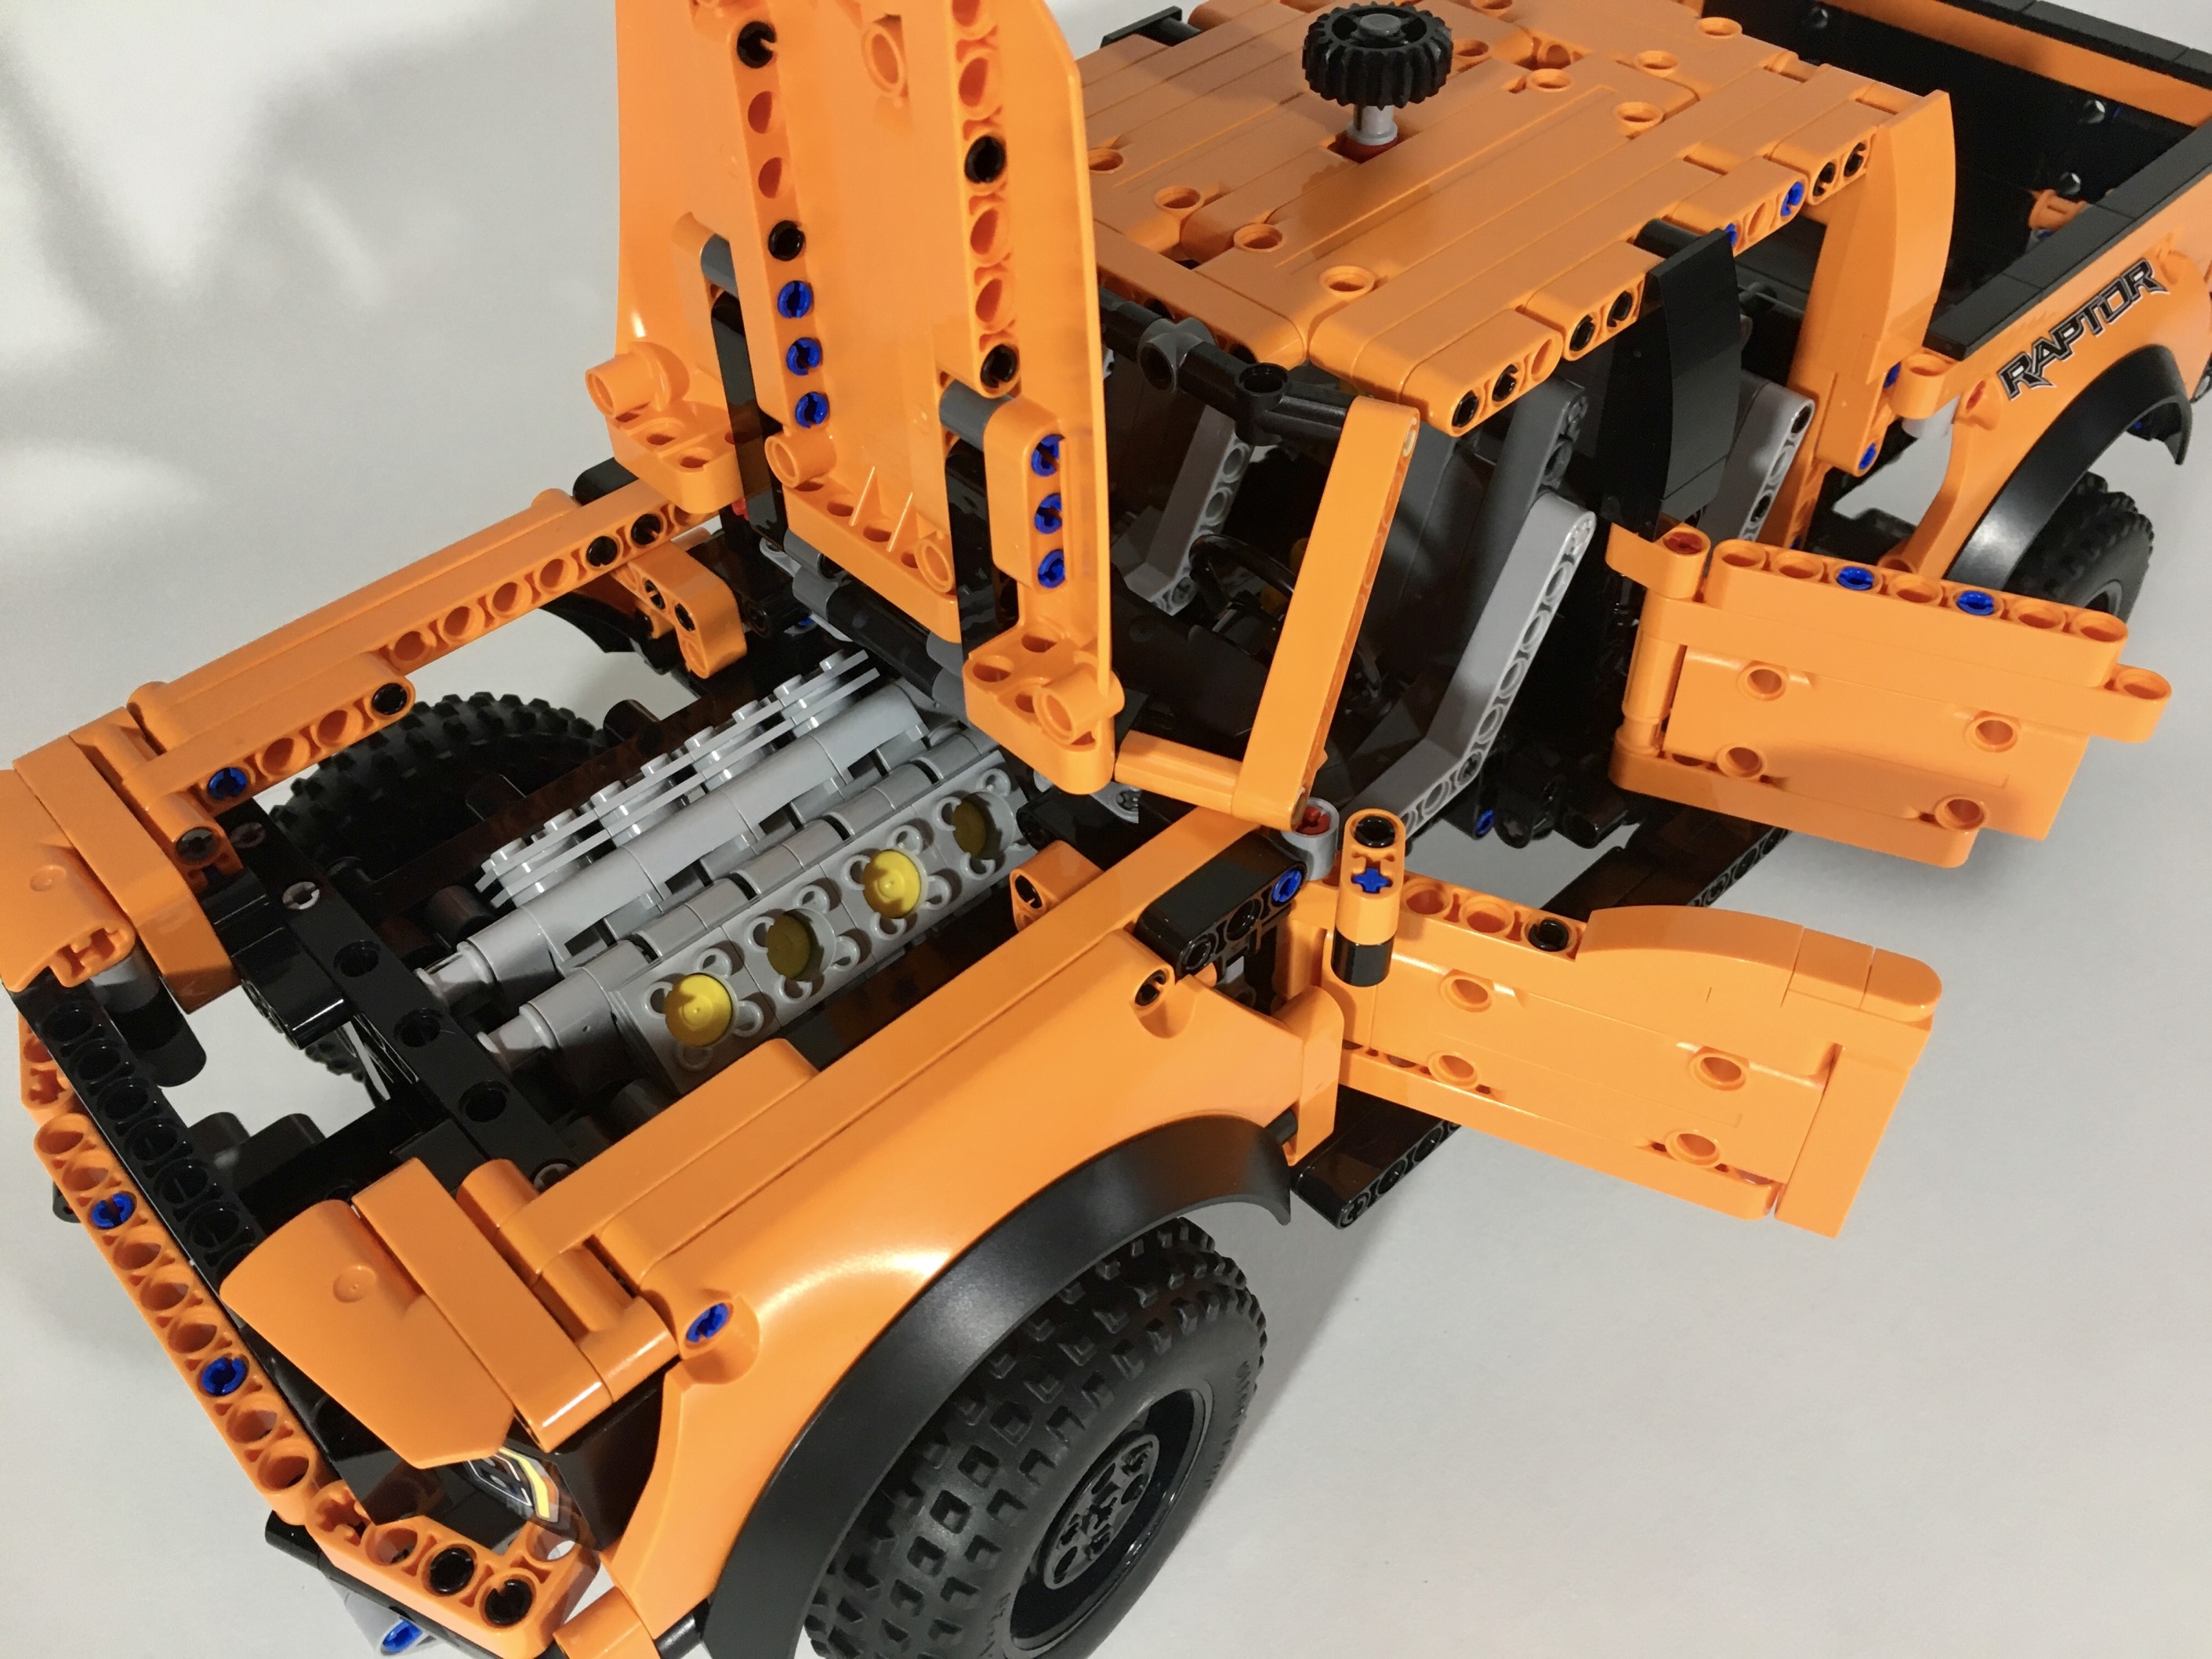
LEGO 42126 was introduced in the Summer of 2021, and I was immediately drawn to the pickup as it included some features I like, such as steering, suspension, a decent (at least in the USA) price, and it’s Orange! But there were serious features lacking such as four wheel drive, a V-8 (I know, I know, a Raptor, and many of Ford’s F-150s use a turbo V-6), and the rear suspension geometry was weird. I agree with others, that some parts of the design like the rear taillights and the front headlights are a little off. But, like 8081, I saw some potential here, and I ordered the set.
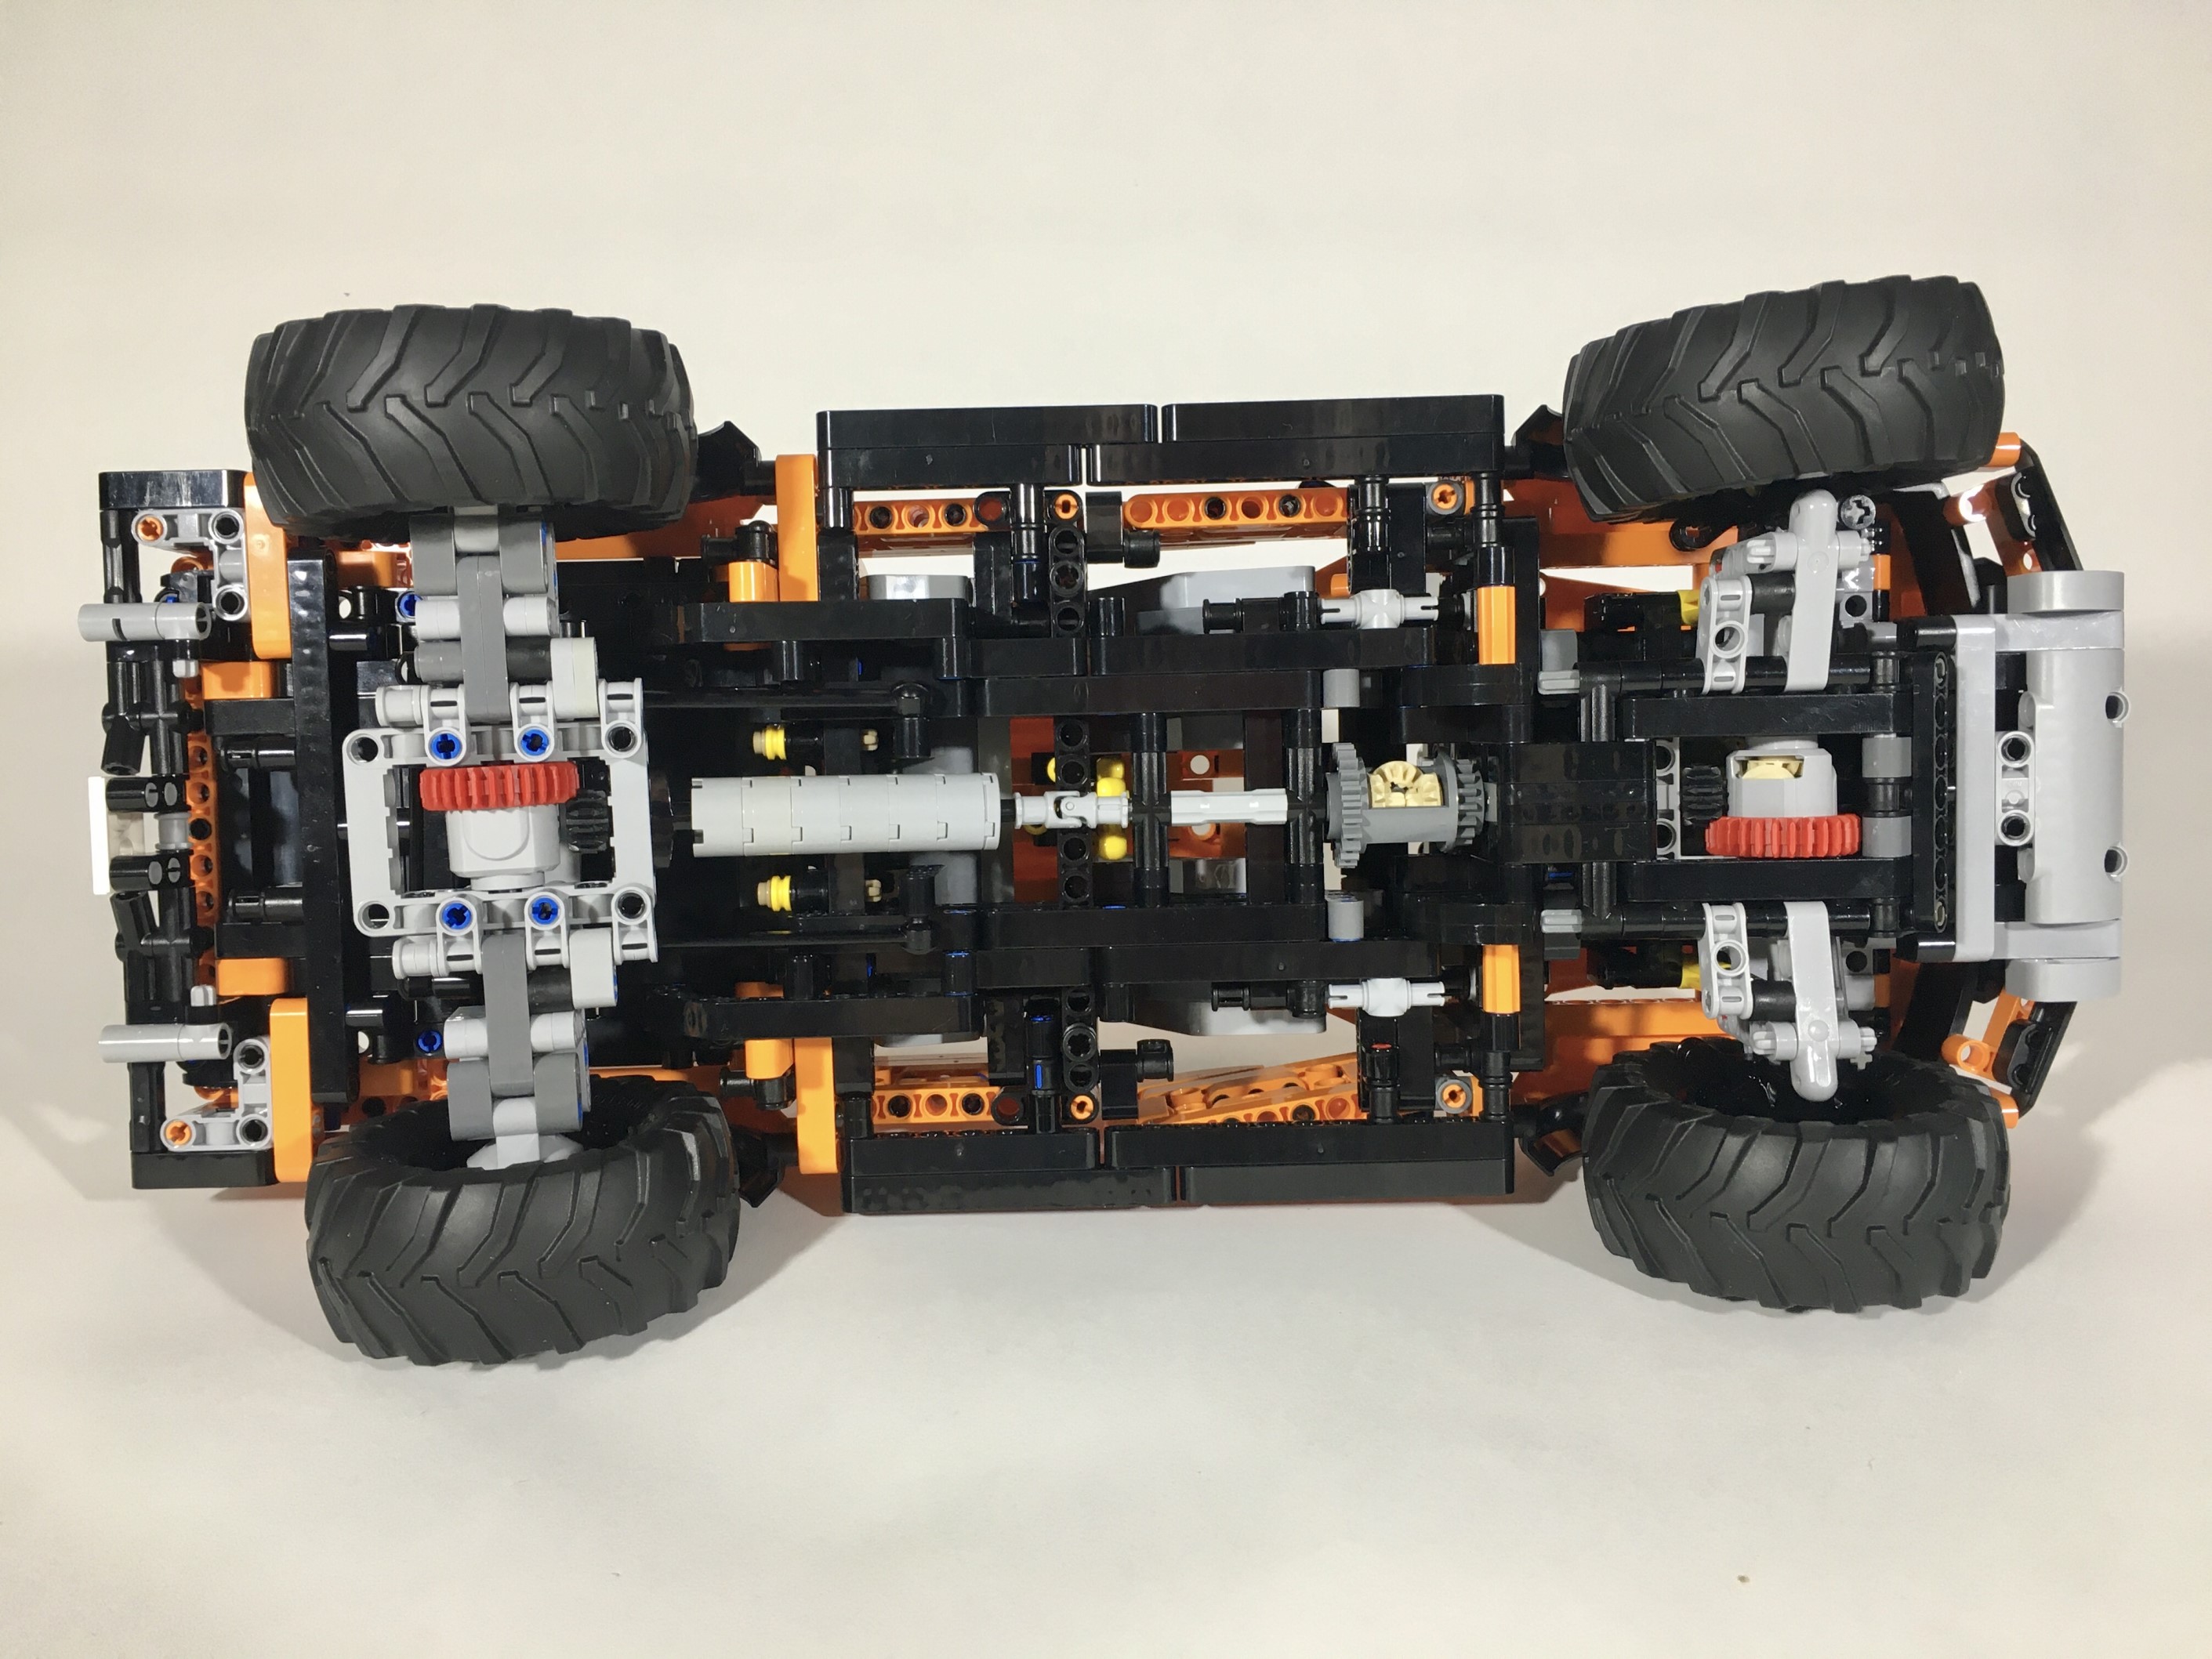
In fact, before I even received my copy of 42126, I was designing and a building a new chassis. The V-8 was easy enough to add, as the space under the hood is extensive. Adding in a front drive axle was a little more complicated. To keep the width, steering geometry, and suspension travel the same as 42126, adding a front drive axle would take a little work. I used a floating differential design, which allows the differential to move freely as the suspension travels through its movement. The steering link was flipped upside down, and relocated in front of the drive axle. The suspension swingarm and shock absorber mounds did not change.
42126 V-8 4×4 Chassis
Immediately behind the engine firewall a differential that connects to the V-8, and the rear axle. The rear axle is changed to replicate a better movement of the rear Raptor. LEGO noted how the half module offset of 42126 was a feature they had to work on to get the placement of the axle correct. However, this feature was only needed as the pivot point of the rear axle was so to the rear of the pickup. By moving the pivot point of the rear axle farther forward, the travel pivots less, and creates a better axle movement of more up and down. This also helps place the axle better when one side is up, and the other down.
While I made no changes to the exterior, I made minor changes to the interor. The colors of the seats have been changed so they match one another a little better. Finally, with a little bit of cross frame bracing, the pickup was done. When 42126 finally arrived, I removed the bed, the doors, the hood, and the roof from 42126, and my F-150 was done.
I like making modifications of sets more than I like making B or C models of them. As such, this project was an enjoyable one for me. I worked fast, and I liked the improvements I was able to make to the original. I like the look of 42126, so keeping this consistent was fine for me, and the additions of the V-8 and the four wheel drive was a fun challenge to pursue. Now to see if I can do a Sport Truck version of 42126. Stay tuned….