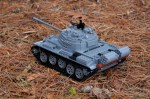
T-55A


The T-72 that a made a couple of years ago is still the most popular MOC I have made; at least in terms of internet analytics. This year, I committed to making another tank, so I figured keeping in line with old Soviet armor would be rather apropos.

The main gallery may be found on Brickshelf or at Flickr. Instructions may be found here.

T-55

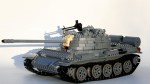
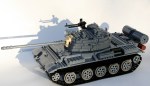
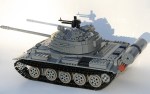
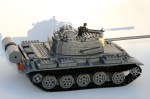
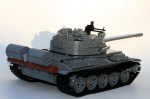
The T-54/T-55 line of tanks have been produced in greater numbers than any other tank. The MOC represented here is a T-55A, representing types that were assembled starting in 1970. This series included an updated NBC and antiradiation system, an upgraded engine, and also added back in the 12.7mm anti-aircraft DShK on the loader’s hatch that was part of the original T-54 spec.

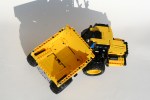
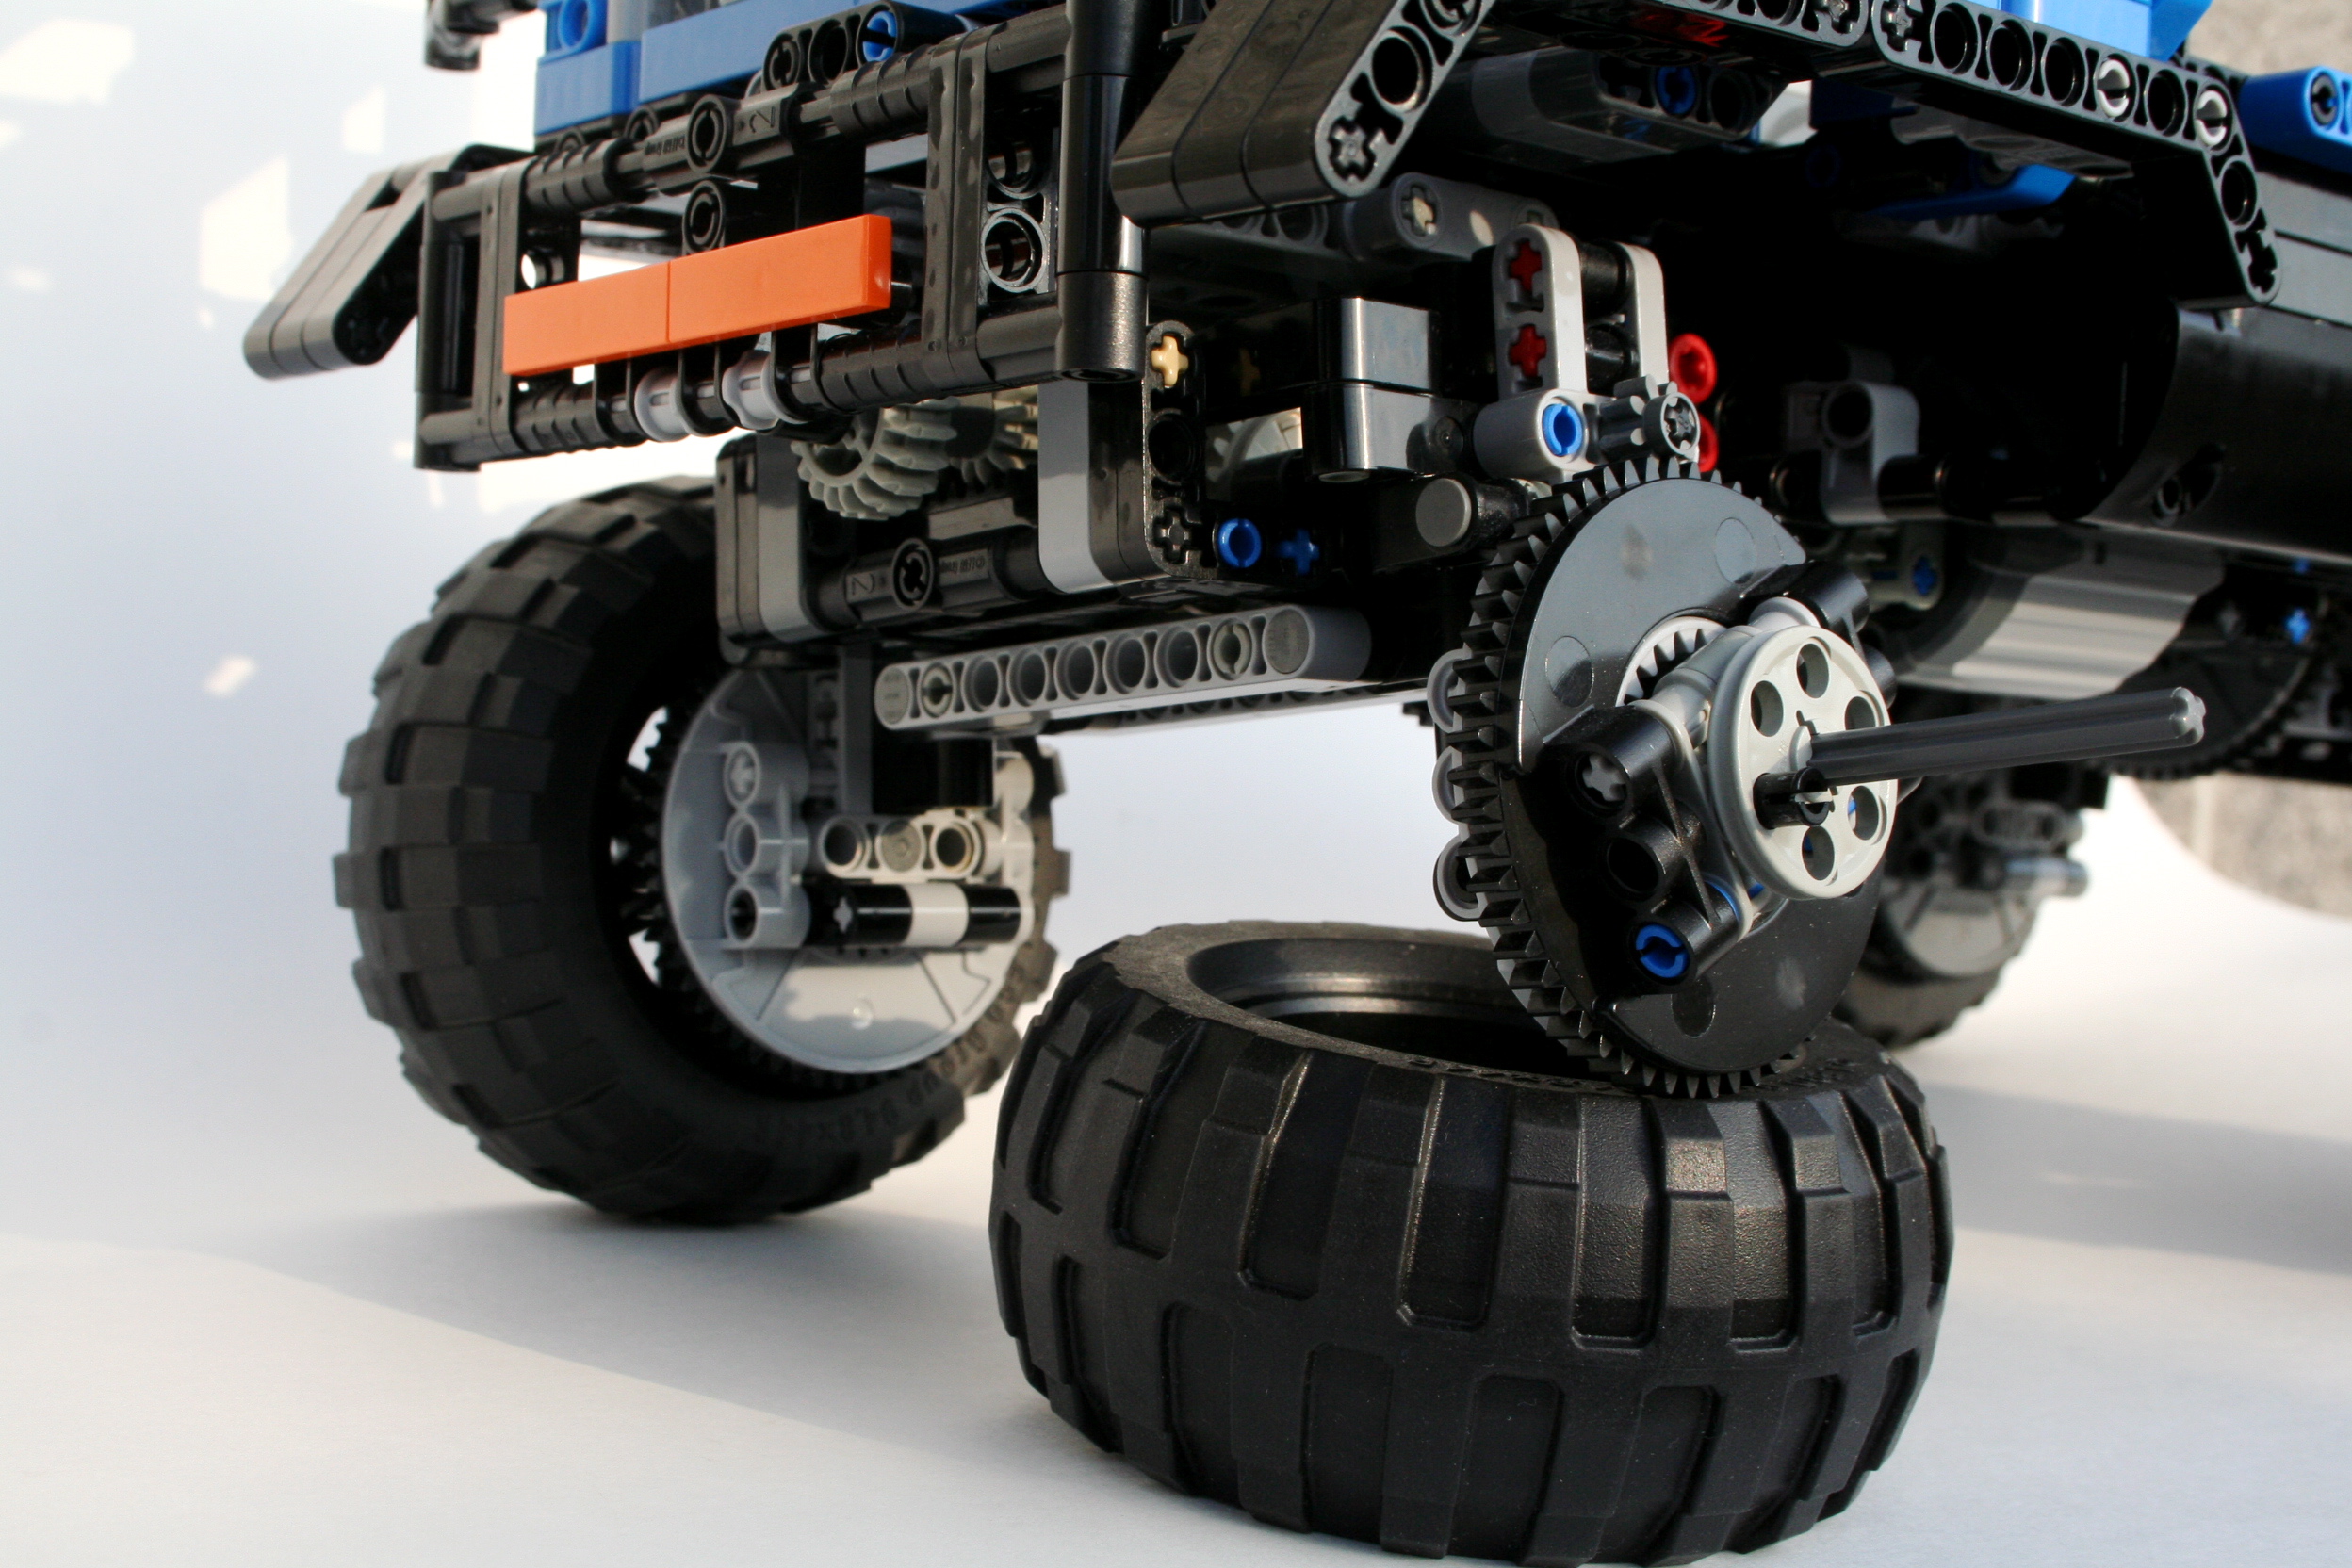
As with most of my MOCs, I starting scaling the tank before any building took place. I knew I wanted to use the newer, larger track links, and I knew I wanted to use the old mid-sized wheels. This set my scale, so I got to work. Starting with the chassis and the hull I worked first on the driveline and suspension. I used simple 2×4 liftarms to connect the road wheels to a suspension axle which activated a shock absorber inside the hull. Each road wheel has its own shock absorber. Fitting them all in took some creativity, but they are all mounted inside on the left and right sides of the hull. In the end, each wheel has about 3 studs of vertical travel.

T-55 Chassis

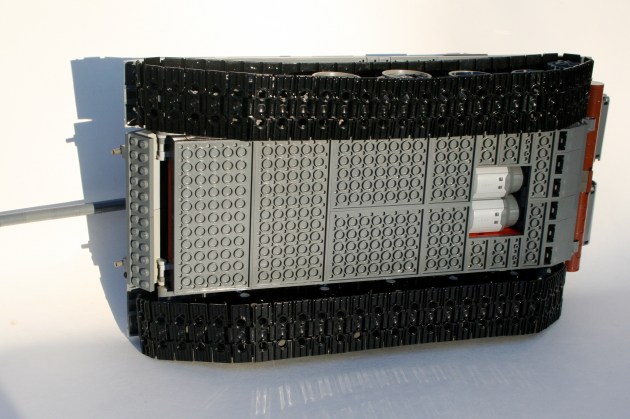
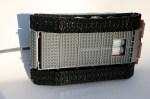
In between each suspension bank are the remaining mechanics.  After the suspension was set, I worked on the turret functions. Right from the beginning, I knew the tank would have a rotating turret and an elevating gun. It was clear having the elevation mechanics for the gun in the turret would be tight, so I decided instead to have the functions placed in the hull rather than in the turret. Using a vertically mounted mLA, connected directly to the breach of the gun, I was able to develop a method that would elevate the gun throughout the full turret rotation. The turret rotation was driven by a 8z gear connected to the turntable, and reduced by a worm gear. Both motors for the elevation and rotation are placed directly in front of the turret.

T-55 Mech
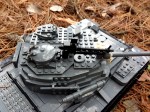
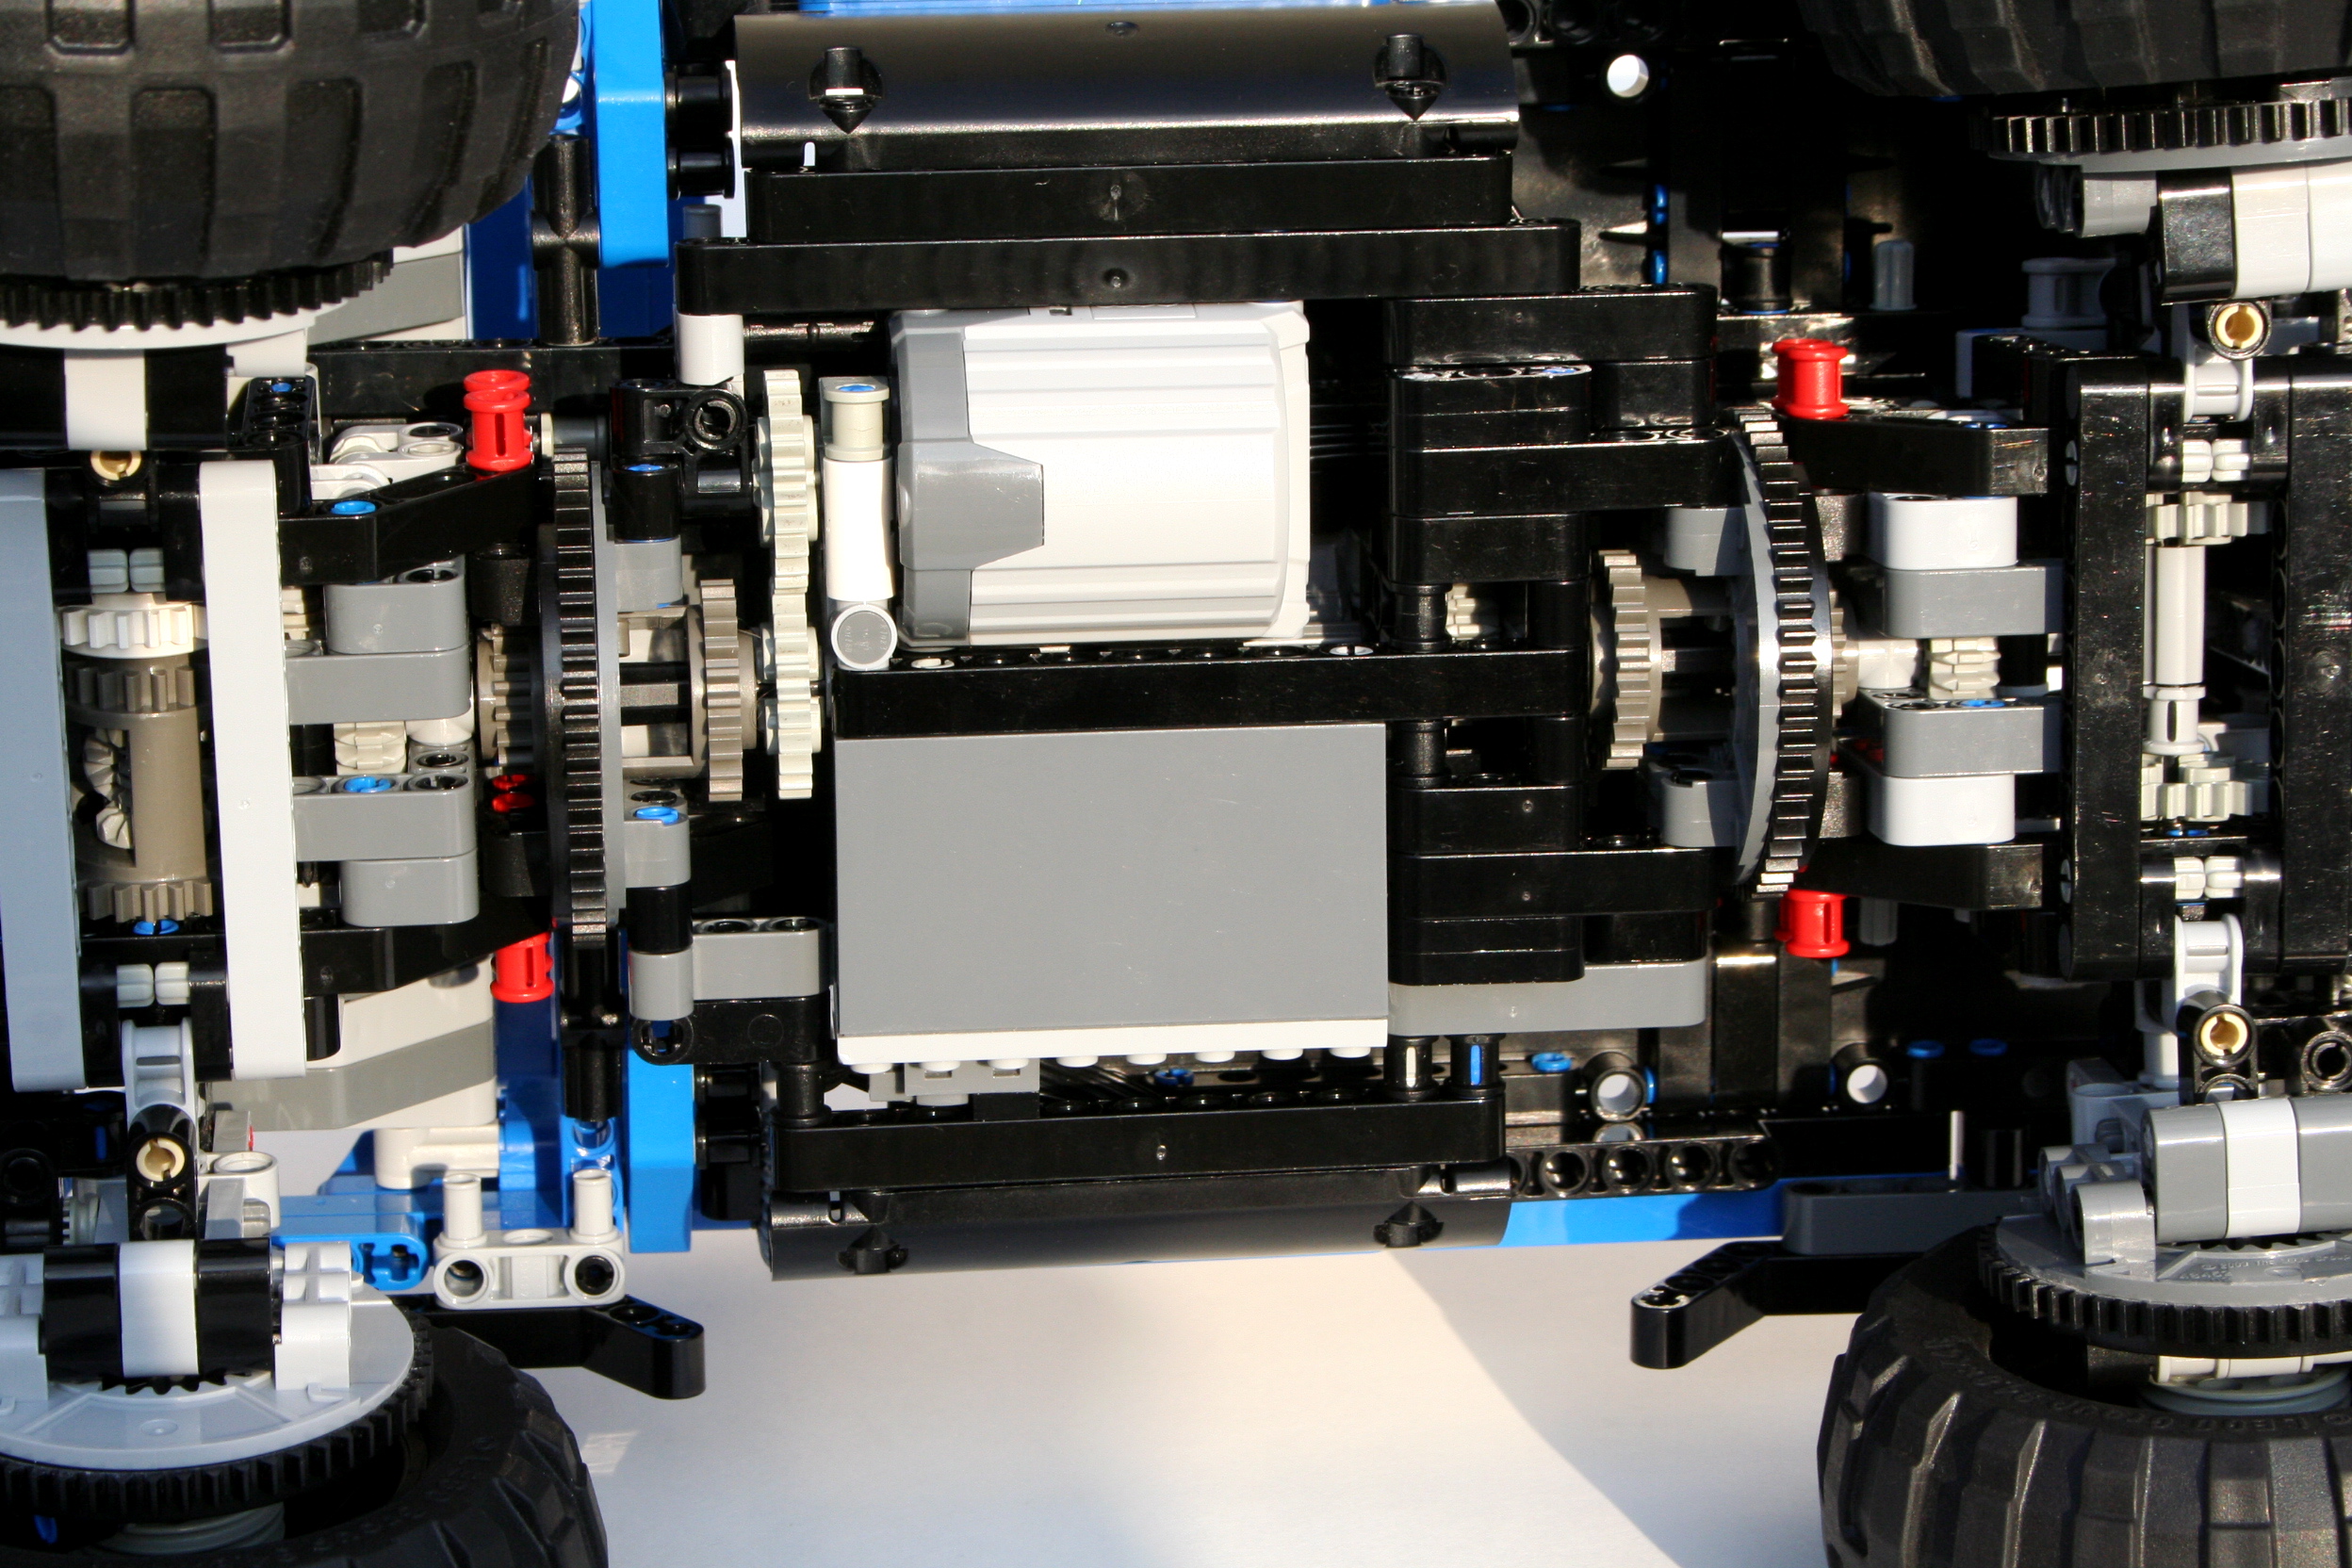
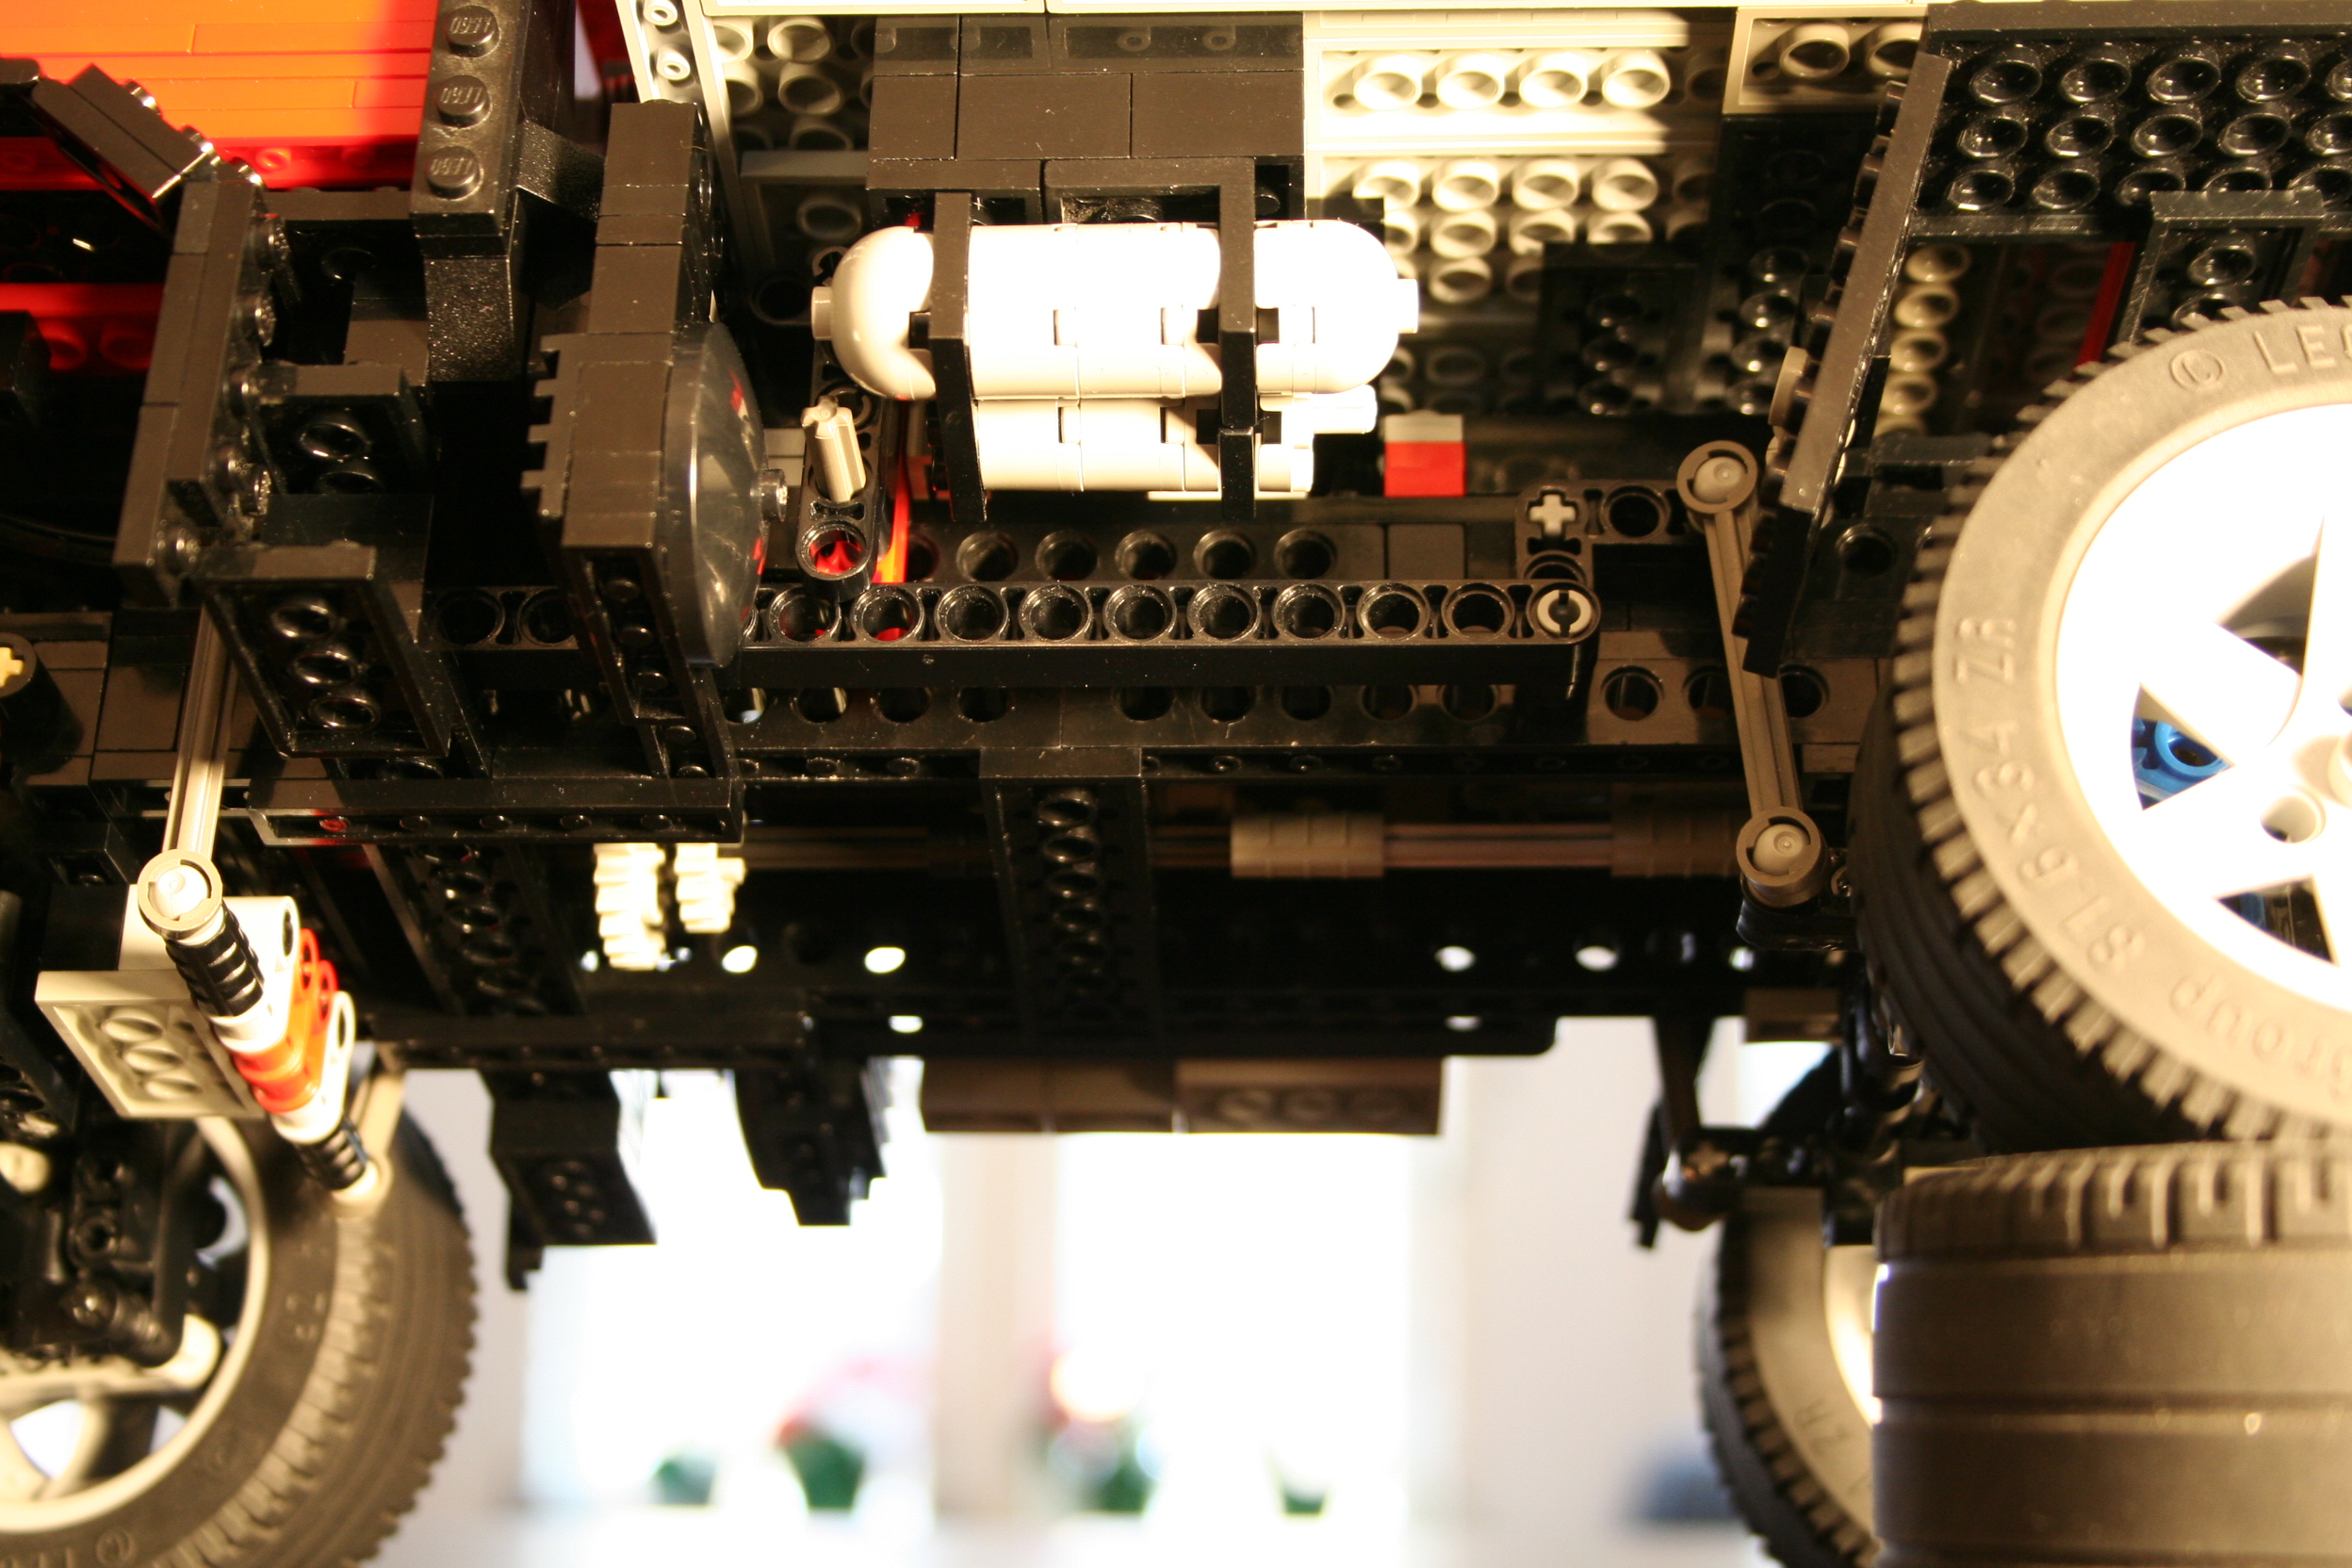
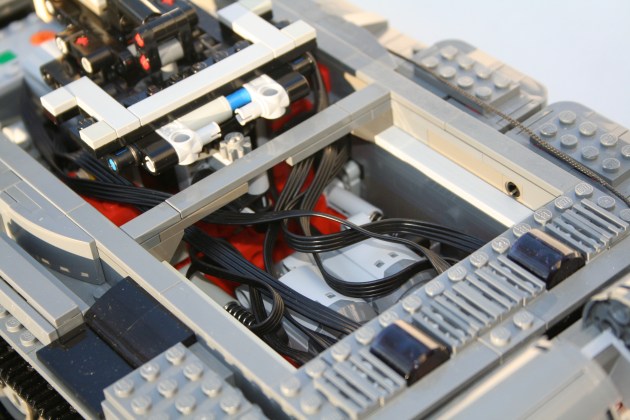
Behind the turret are two PF L motors mounted transversely side by side. They drive a 1:1 gearbox which connect directly to each rear drive sprocket. The IR receivers are placed above the gearbox. For those keeping score at home, the internals are (f to r) the battery box, the turret motors, the turret mechanics, the drive motors, and finally the IR receivers.

Working on the exterior of the MOC is what took the most time. The hull came together pretty quickly, with the exception of the details over each track. Most of the finishing time came with the turret exterior. Most Soviet tanks have the distinctive mushroom turret, which considering LEGO’s cube orientation presented some challenges. The turret of the T-55 also has a slight triangle orientation when viewed from the top. Like the T-72, I designed the turret with four side orientations (left, right, front, and rear), and one top orientation. Starting from the rear, I added a basic curved structure. The sides each had a couple levels of slopes, each tapering in toward the gun. The front was a little more complex. There are two “slope blocks” made of 4 curved slope bricks, and a supporting structure. One slope block is mounted on each side of the gun. The support structure is a mess of bricks with a stud on one side, headlight bricks, and plates. The top of the turret is plates on the front, and two sloped plate sections under each hatch. The two hatches are mounted to the turret support under the sloped plate sections. The AA machine gun is placed on the top, and various external mountings are placed in various ways around the turret.

T-55 Turret Detail

After making a lot of non-powered MOCs, it was nice to get back into Power Functions. I was pleased that everything worked flawlessly. The drive had adequate traction and power. The suspension worked well, and provided good floatation and travel. The turret rotation was smooth and allowed for precise directions changes. The gun elevation worked great, though I had to limit turret rotations to under four before the clutch on the mLA would snap. After a number of smaller builds, and frustratingly long builds, I was nice to finish something that worked well, provided constant entertainment throughout the build, and turned out quite nice.

Happy building.

Advertisement

JCB 714


My repertoire has become quite diverse over the years. I have made large cars, large planes, MODs, and many other types of builds. I enjoy those builds, and I get an immense amount of satisfaction completed them. Recently I have enjoyed making smaller, non-powered, Technic MOCs. I can generate more small build ideas, I can stay motivated better, and I enjoy the playing with final result more. So I made another small MOC, the JCB 714.

The full gallery may be found here. Instructions may be purchased for $5 USD.

Buy Now Button

JCB 714

This MOC started when I was browsing the JCB UK website. I thought the 714 would be a fun little project that would have some nice features, and would utilize some of my collection that is not currently being used. I started working on the frame. The MOC would have a four wheel drive system, suspension, steering, and a dumping back. I designed two suspension/steering designs, and while the first one was awesome, it was not as stable as I would have preferred. So I reverted back to the design utilized on the real JCB. It was not as flashy, but it worked well. A turntable is planted behind the steering pivot, with the drive axle moving through the center of both. A liftarm was placed on the left to operate the steering function. The drive axle would connect to both axles through a 12/20 gear reduction which connected them to two differentials. The I3 motor was placed in front of the forward axle.

The rear was more challenging than I expected. First, I had to plant the mLA’s in such a way that they could be connected by a single axle that would not impede the driveline. Second, the mLA’s had to operate in such a way that the bucket could do the full range of motion; nearly 90 degrees. Third, the shape of the bucket did not work well in LEGO, as there were limited flat surfaces. Thankfully the sides were flat, and some of the bottom. The bottom was connect to the dump pivot, and the sides would hold the angled panels. Finally, it had to make sure the rear wheels could still move freely. While there are still some holes in the dump, it works well enough to transport a bunch of bricks.

The cab built up fairly quickly, and allowed me some space to add the rear window grate, and a exhaust pipe. The hood can open, and there are steps to get into the cabin. Safe egress is important.

As I am finding with MOCs that do not utilize Power Functions, the MOC functioned well, every time. No maintenance is needed, gears do not skip, and the MOC works as it is designed. This is part of the reason I am building these kind of MOCs more often. The MOC worked as it was designed, just like a MOC should.

Thanks for reading and happy building.


Iveco XTR


After a couple of more complex projects it is nice to take a break to do two simpler projects. When I need a little bit of a design rest, I do a trial truck, and usually a fictional one, so I can build as I please.

The full gallery can be found here, and free instructions can be found here.

Iveco XTR

After building a number of trial trucks, I have found some features I like to have on my trucks. Note, these features may be prioritized differently if I was participating in a Truck Trial race. These features I like are linked suspension, PF XL motor for drive, tall clearance, and a center mounted battery box. As I was making this truck for my own pleasure, I forced myself to include all of these features.

I usually start a truck with the axles, and the Iveco was no different. I created the axle with a portal axle build around my favorite piece for both the front and the rear. I also added the space to fit both a differential, or knob wheels for the final drive (though the pictures only show the latter). This would allow me to switch the traction of the truck, and allow for a minor gearing change. While the changeover takes a little bit of time, it’s a nice feature and the gives the truck some versatility. I placed the steering motor directly on the front axle with allowed the middle of the truck to be simplified vastly. In the center of the truck is the battery box mounted longitudinally, and a Power Functions XL motor in the rear. This keeps the heaviest components of the truck in the center and low.

The linked suspension is a setup developed by other that connect two pendualar axles together. Each left side has a linkage that connects the two left wheels together, and the right wheels have the same. This keeps the wheels planted as the pressure from the terrain is balanced across all four wheels. When one wheel has to go up to follow the terrain, the rest of the wheels adjust. It is simple, effective, and keeps the truck a little more planted than a suspension utilizing shock absorbers. Otherwise the truck bounces a little during an obstical.

As you can see in the video, the battery box is getting a little tired, and the snow as a little mushy, but the setup worked well. The truck stayed planted, and it was nice to have two final axle options. It is a simple design that does not require too many hard to find parts, so if you need a good little afternoon project, give the Iveco XTR a build, and tell me what you think.

OK, off to some more complicated builds. Check The Queue. There is some fun stuff coming. Until then, happy building.

MAN TGS Tipper Crane


I like to have a LEGO MOC on my desk at work. I find it to be a good conversation starter for visitors. It also gives my fidgety fingers something to do while I am on the phone. Plus it’s just cool. After I finally removed my 4×4 8081, I figured it would be time to add something new.

The full gallery may be found here. Instructions may be purchased for $5 USD.  Buy Now Button

MAN TGS

After a little research, I decided to make a MOC based on a MAN TGS tipper crane truck. I knew the MOC would not have any Power Functions, so I had the space to add a number of features. The truck would have 3 axles, a 4 function knuckleboom crane, three way tipper bed with drop sides, working outriggers, and of course working steering.

I started with the crane. It gave me a little trouble, but after trying countless linkages and connections, I came up with a simple design. I worked from the hook down to the truck. I started with the extending boom which was simply a 13L gear rack, and then added it to the main boom. I used a mini linear actuator (I love these) connecting to a simple linkage to the boom could rotate nearly 180 degrees. While the linkage could be a little more sturdy, it functions well and is controlled from a gear on the back of the crane. Finally, I mounted the second mini linear actuator directly on the turntable to lift the crane. This would be controlled with a gear on the back of the truck.

After the crane, I added the outriggers directly to the turntable. After toying with a lot of complex designs, I settled on something simple. Two 13L gear racks would move to out of the truck, and a pin with stop would be connected at the end and would move to stabilize the truck. I worked with the gearing for the stabilizers and the crane, and managed to get a working system. The center of the truck is pretty dense.

Next was the bed. I developed a simple linkage that would allow another mini linear actuator to tip the bed up. I connected the linkage so the bed could tip three ways. The whole system is three studs tall. At each corner of the bed, I added a simple connector so the bed could tip each way. The direction of tip could be adjusted based on which axles are removed. You can also remove a axle for each side, so contents could be dumped in three directions.

Finally, I worked on the body and the finishing of the truck. I think I got the look of the TGS pretty close, and added features like working doors, an exhaust pipe and an intake. Also, every Technic model in this scale needs to have blue seats, so I added them.

I wish the crane on the truck could support a little more, but other than that, I am pleased with the results. I really liked how the bed turned out. It’s simple and effective. And it all looks quite nice on my desk.

Until my next MOC (or MOD?), happy building.

Instructions can be purchased for $5 USD. Send and email to thirdwigg@gmail.com if you want a set.

Cargomaster Crane


We all have our favorite LEGO sets.  Then we also have sets that we think were pretty cool.  Set 6352 from 1991, the Cargomaster Crane was one of these sets for me.  It was a set simple set, it was perfect for a growing child.  Small, playable, yellow, and it could lift things.

Recently, I decided I wanted to make a little Technic crane.  I researched a number of designs, none of which really struck me as something I wanted to pursue.  I kept coming back to 6352. Why not make a crane like that?  Perfect.  I wanted it to be a nice homage to this classic set.  I was going to make is just like 6352.  Double the size, same shape, complete with container and tractor, and of course a driver.  The full gallery may be found here, and instructions can be found here.

6352 Technic

I stared with a simple frame built for the outriggers at both ends.  I knew I was not going to be able to add a more complex outrigger system at this scale that would reflect the original crane, so I made manual outrigigers just like the original.  I added two steering axles so the crane could drive to and from the site, then I placed a turntable right on top of the chassis.

As I started the superstructure, it become very clear very early, that having an offset crane boom like the original model, was not going to be a good idea.  My model was going to look off, and the balance of the offset boom was going to make stability, both for the superstructure, and the crane as a whole, a problem.  I knew the size of the boom, and decided to place it in the center of the crane.  I then placed the cabin, and set it up for the little technic figure.

The boom was relatively simple; two stage, and 23 studs long.  The outside was simple and straightforward, meant to be sturdy and strong.  The pivot was at the rear on top of the winch, and the elevation ram was connected forward under the front of the boom.  There was a simple worm gear under the front that would drive a set of gear racks, to drive the inner boom.  The inner boom would hold the final boom which was only a series of plates.  Each stage was connect by a two cables to make sure all the booms moved together in unison.  It worked well, even under load, as you can see in the video.

The model worked well, and had perfect balance.  The simple boom extension worked well, as did the winch.  The outriggers gave appropriate stability through all positions.  And it looked very similar to the original model, even with the little tractor.

Mini Skidder


My Mini Feller started after I made this MOC.  I wanted to do a small little project, and I wanted to do something fun and simple, and I thought the Mini Feller would be a great partner to the Mini Skidder.  The skidder is a simple design, that uses simple construction techniques, unlike the Feller.  Also, you can build your own.  Feel free to check out the instructions here.

I started with the rear grabber.  I added a simple worm gear to 8z connection that moved one of the arms, and connected it to the other arm with a 16z to 16z connection.  The axle that connected to the worm gear would exit out of the top of the grabber and allow for movement with your hand.  I attached it to an arm that would attach to the MOC.  The arm would be connected by two arms on each side of different lengths, so the grabber would move in an arc, and connected to the chassis.  On the chassis I connected the rear arm to a 24z gear, and placed a worm gear above it.

I connected the rear part of the skidder to the front part with the new small turntable.  This allowed for simple gear connection with a 20z gear to the Hand-Of-God steering.  This worked well, and kept the model simple.  Just in front of the steering mechanism, I added another 24z gear for the plow.  Taking a cue from set 8069, I set the worm gear vertically, and connected it to the exhaust stack; simple and pretty.  I then filled in the space.  A simple body was added, as was the plow, and wheels, though not in the cleanest of ways.

It was fun little design with simple solutions for the functions.  It’s not as complicated or compromised as my Feller, but still a playable MOC.  Also, its easier to build should you feel the need.

The full gallery may be found here.

Thanks for reading.

Mini Feller


Building with Lego is a continuous formation of compromise.  While my ideal of what my Mini Feller would include was significant, what I could actually accomplish was a compromise of space, function, realism, and frankly the amount of frustration I was willing to tolerate.  So while the final result is a watered down version of what I would have liked, it was the result of me compromising amidst the situation.

Instructions can be found here.

I wanted to make a small model go with my Mini Skidder.  The MOC had to be the same scale, have a decent level of fuctions, and work with my Skidder.  A feller seemed like a good option.  As I looked at what function this MOC would have, I ambitiously stated it must have a working blade, working steering, working grapper, and a working tilt function.  All these functions would be controllable on the back or on top of the cab.

The steering was simple enough.  I added a small turntable at the bottom of the chassis to give the frame some support.  The HOG steering axle would come out at the top of the cab, and join the front and the rear with a small link arm.  Simple enough.  Likewise, I added a differential in the rear part of the chassis, geared up the rotation, sent it though a couple of universal joints to the front of the Feller, connected it through a pair of 12z bevel gears, and attached a saw blade.  Again, simple enough I had steering and a working blade.

It got complicated as I tried to add the arm features.  The lifting of the arm would be done with a 8z gear with a worm gear.  Because there was a driveshaft to the front blade, the 8z gear needed to be placed on the axis of the arm, but out of the way of the driveshaft.  The required a 1 stud offset that also needed to be directed back through the steering axis to the rear of the Feller.  I used a CV joint to allow the axle to slip as the feller would steer.

The tilt feature would require a parallel control that would allow the elevation happen while keeping the feller blade parallel to the ground.  This would require another 8z worm gear connection at the lower rear pivot point of the arms.  I was running out of space.  Of the 7 studs to work with, one was used for the universal joint, one was used for the lifting gear, one for the mounting liftarm, and one for the lifting arm.  I could not add another worm gear system, while being able to actually lift the feller blade.  Additionally, adding a link for the gathering arms would also have to work through this pivot point if I wanted to isolate the movement from the lifting and tilting feature.  I had to give.  A compromise was necessary.  I felt the stability of the feller blade had to be paramount, so I added another support arm.  I also felt gathering arms must remain as they are essential to a feller.  Sorry, but the tilt feature got the ax.  It was the correct decision, but it still tasted a little sour.

It was a great little MOC, and I had a good time creating it.  I hope you enjoy building your own.  The full gallery can be viewed here and the instructions can be viewed here.

Thanks for reading.

Kenworth T55


Traction.  It’s all about traction when designing a trial truck.  Because of this, many builders have tried a number of different solutions in designing their own trucks: differentials, gearboxes, various numbers of wheels, various gears ratios, countless suspension designs, and on and on.  So why would it be any different for my trucks?  Every truck I make is a reaction to some set of problems I have encountered with a previous truck.  This is my current solution.

The full gallery is here. Instructions are here.

The Kenworth T55 started as a proof of concept, and turned into a design of a fictional truck.  I wanted to somehow see if there was a way to use differentials in a successful trial truck.  For this to work, two things had to be accomplished.  First, there had to be a way to keep the tires from spinning uncontrollably when they lost contact with the ground.  And second, the torque going through the differential had to be low enough that it would not shred the gears inside the differential when the truck encountered an obstacle.   Could I make axles that had a limited slip differential while having all of the gear reduction at the hub?

Enter turntables.  I have seen some ideas before, most sigificantly from Borec, including this truck, so I went to work.  I designed a mount for the wheels and tires, and placed the universal joint as close the wheels as I could.  Then I used a limited slip differentail design, and sent the driveshaft back to the body.  A simple steering design was used, and the two fuctions passed through the common design of using a differental body through a turntable.

The chassis was designed to keep the weight low, both is mass and location.  As is common, I used the Power Functions XL motor for drive, and I decided to use the 8878 Battery box as it was significally lighter than the other design.  In addition, I would have a drive shaft and a steering shaft running the length of the truck, so the motor and power pack needed to set on both sided of the truck.  Also, because I used the turntables, the drive shaft was very high.  This gave great ground clearance, but I needed to keep the heavy components low.  By having both large components on the side, I was able to keep a short wheelbase of 30 studs, and keep the mass centered and low.  The driveline was complete.

Ever since my GMC 2500, I have held to the belief that a linked suspension is the most efective setup for four wheel trial trucks.  The design keeps all four wheels firmly planned, and does not have the wobbling feel of many pendular suspension designs.  But as is often the case, I ran out of room to place a link rod between the two wheels so I opted with useing the rubber connectors to keep the axles level.    I added a body, and a steering motor, wired everything together, and I was done.

So how did it work.  As you can see in the video, the suspension was effected by the steering and drive shafts.  This further confirms my thoughts on the linked suspension.  Second, the turntables did not really add much.  They added a lot of friction to the driveline, and though they kept the differentials safe because of the tall final gear they did not really isolate the forces on the differential as much as I would have liked.  Third, the limited slip differentials worked well, but still allowed for too much wheel slip.  I ended up replacing the rear with a locked axle, which seemed to work well.  So, for the next truck, bring back the linked suspension, and find a better differential solution.  Maybe then I can find some more traction.