Mini Feller
November 18, 2012 9 Comments
Building with Lego is a continuous formation of compromise. While my ideal of what my Mini Feller would include was significant, what I could actually accomplish was a compromise of space, function, realism, and frankly the amount of frustration I was willing to tolerate. So while the final result is a watered down version of what I would have liked, it was the result of me compromising amidst the situation.
Instructions can be found here.

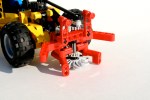
I wanted to make a small model go with my Mini Skidder. The MOC had to be the same scale, have a decent level of fuctions, and work with my Skidder. A feller seemed like a good option. As I looked at what function this MOC would have, I ambitiously stated it must have a working blade, working steering, working grapper, and a working tilt function. All these functions would be controllable on the back or on top of the cab.
The steering was simple enough. I added a small turntable at the bottom of the chassis to give the frame some support. The HOG steering axle would come out at the top of the cab, and join the front and the rear with a small link arm. Simple enough. Likewise, I added a differential in the rear part of the chassis, geared up the rotation, sent it though a couple of universal joints to the front of the Feller, connected it through a pair of 12z bevel gears, and attached a saw blade. Again, simple enough I had steering and a working blade.
It got complicated as I tried to add the arm features. The lifting of the arm would be done with a 8z gear with a worm gear. Because there was a driveshaft to the front blade, the 8z gear needed to be placed on the axis of the arm, but out of the way of the driveshaft. The required a 1 stud offset that also needed to be directed back through the steering axis to the rear of the Feller. I used a CV joint to allow the axle to slip as the feller would steer.

The tilt feature would require a parallel control that would allow the elevation happen while keeping the feller blade parallel to the ground. This would require another 8z worm gear connection at the lower rear pivot point of the arms. I was running out of space. Of the 7 studs to work with, one was used for the universal joint, one was used for the lifting gear, one for the mounting liftarm, and one for the lifting arm. I could not add another worm gear system, while being able to actually lift the feller blade. Additionally, adding a link for the gathering arms would also have to work through this pivot point if I wanted to isolate the movement from the lifting and tilting feature. I had to give. A compromise was necessary. I felt the stability of the feller blade had to be paramount, so I added another support arm. I also felt gathering arms must remain as they are essential to a feller. Sorry, but the tilt feature got the ax. It was the correct decision, but it still tasted a little sour.
It was a great little MOC, and I had a good time creating it. I hope you enjoy building your own. The full gallery can be viewed here and the instructions can be viewed here.
Thanks for reading.


Pingback: Mini Skidder « Thirdwigg.com
See the Lego Digital Designer (LDD) .lxf Building Instructions file on Rebrickable.com: http://rebrickable.com/mocs/thirdwigg/mini-feller . Click on the blue “Yes” hyperlink at the “3D FIle Available” words on that website.
Thanks David, I am grateful for your work.
Great model, found this on rebrickable and was looking forward to bldg this. 1 question, the first step includes the mini technic turntable, but it’s not on the inventory, has me a little stumped as I’m short that crucial piece.
Phil, you can find the part on Bricklink.com, and the top here. The part is currently in three sets. Happy building. Thanks for reading.
Pingback: CAT 573C Feller | Thirdwigg.com
Pingback: 2013 | Thirdwigg.com
Pingback: Windrower | Thirdwigg.com
Pingback: CAT 586C | Thirdwigg.com