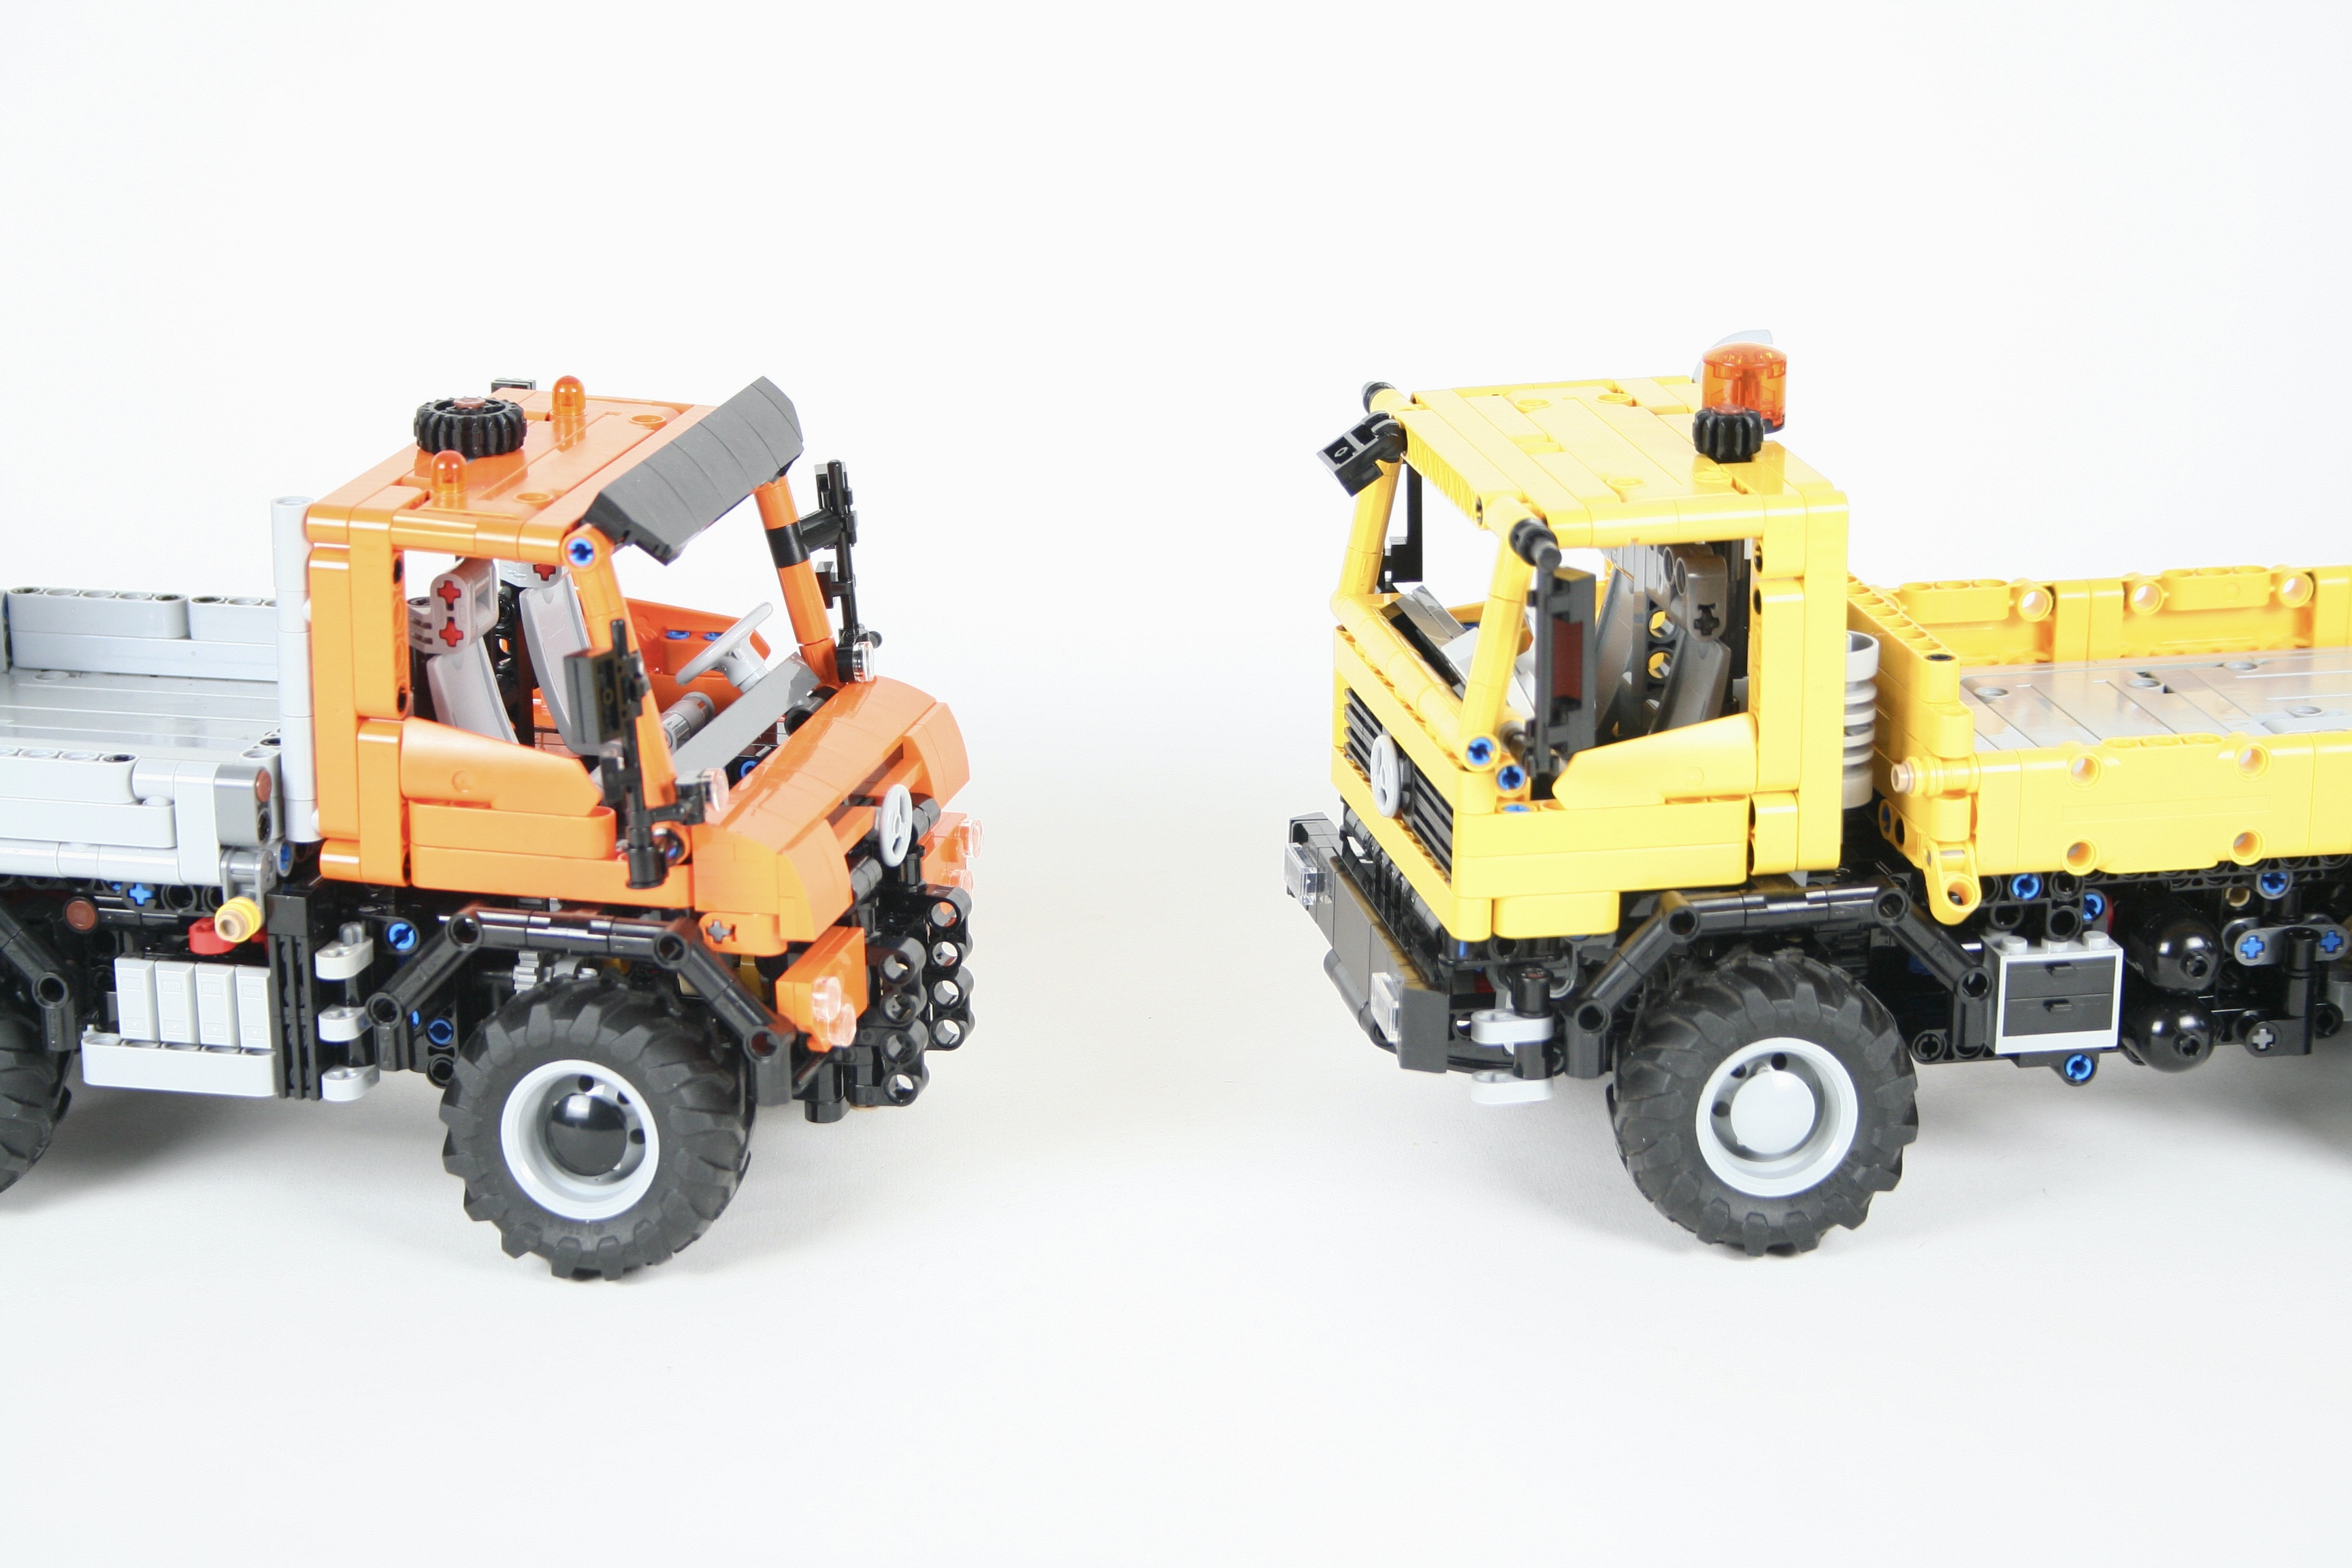
I am beginning to get more efficient in my builds. Many of the axles, drivetrains, and little mechanisms I have designed over the years are finding their ways into other builds. When I completed the Off Road Truck, it was clear there was a lot that could be turned into another build, rather quickly. The Off Road Truck had a great, strong chassis, a little fake engine, a working transmission, and a tipping bed. With a couple of changes it could turn into another truck.
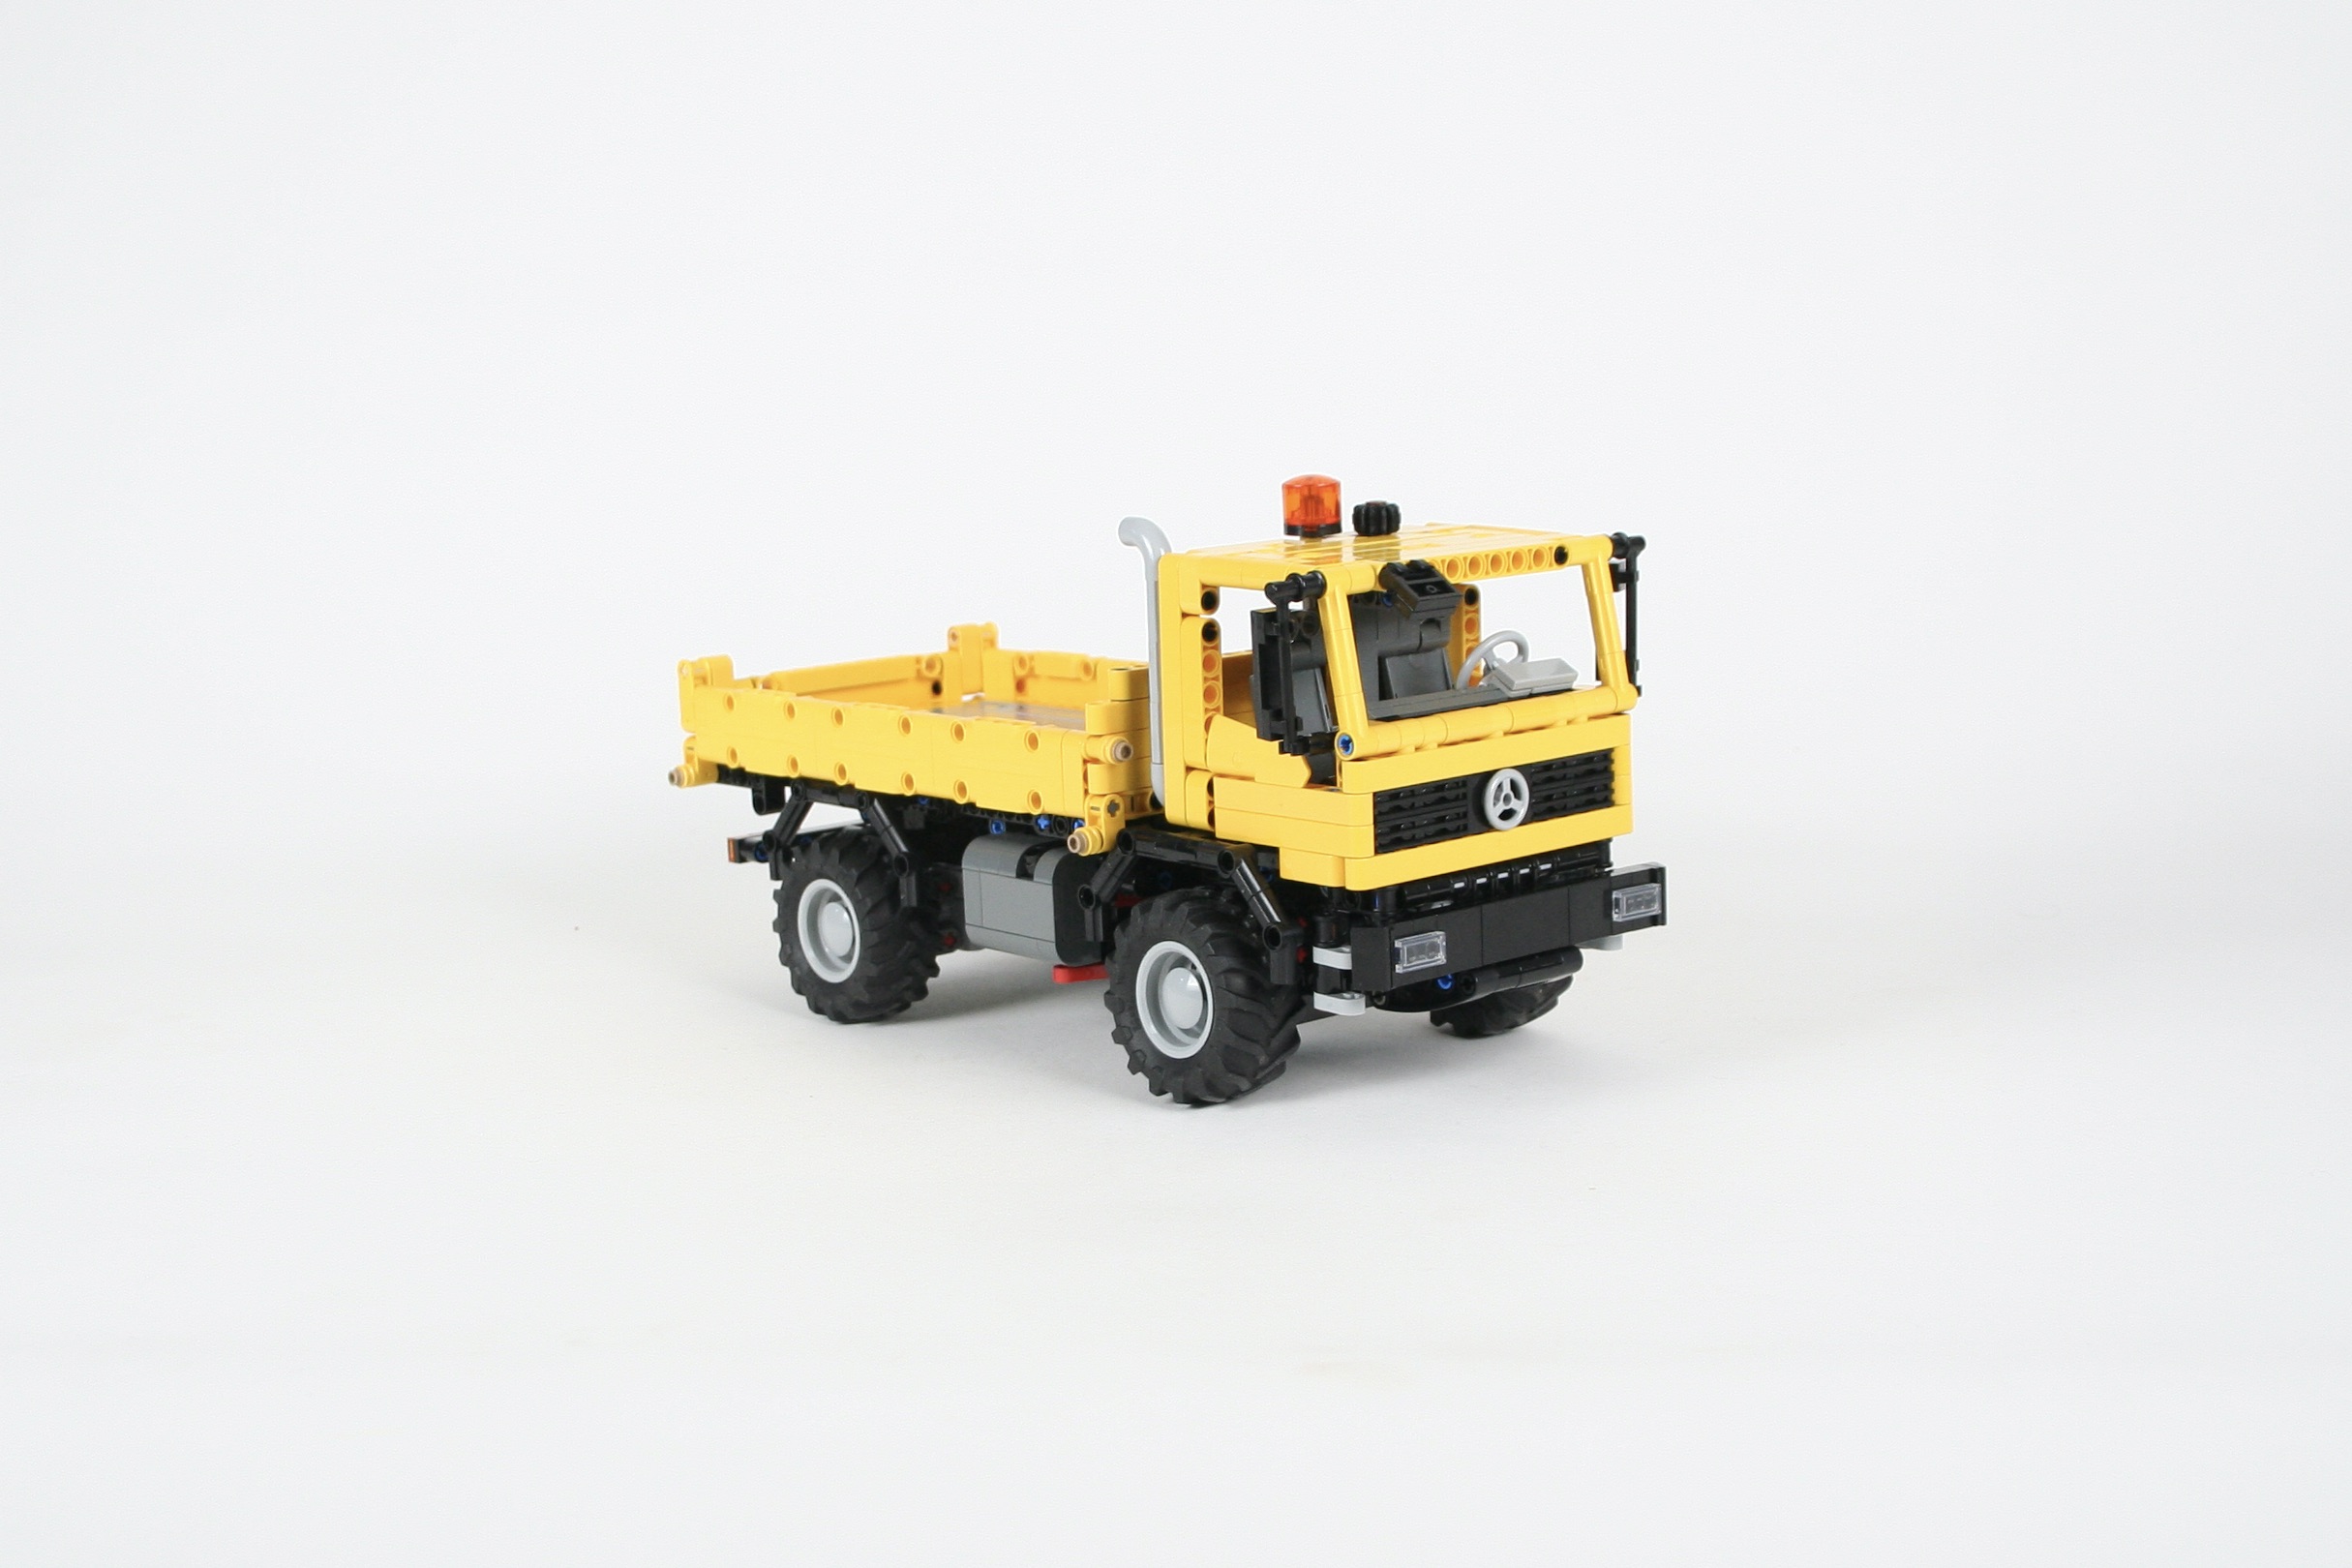
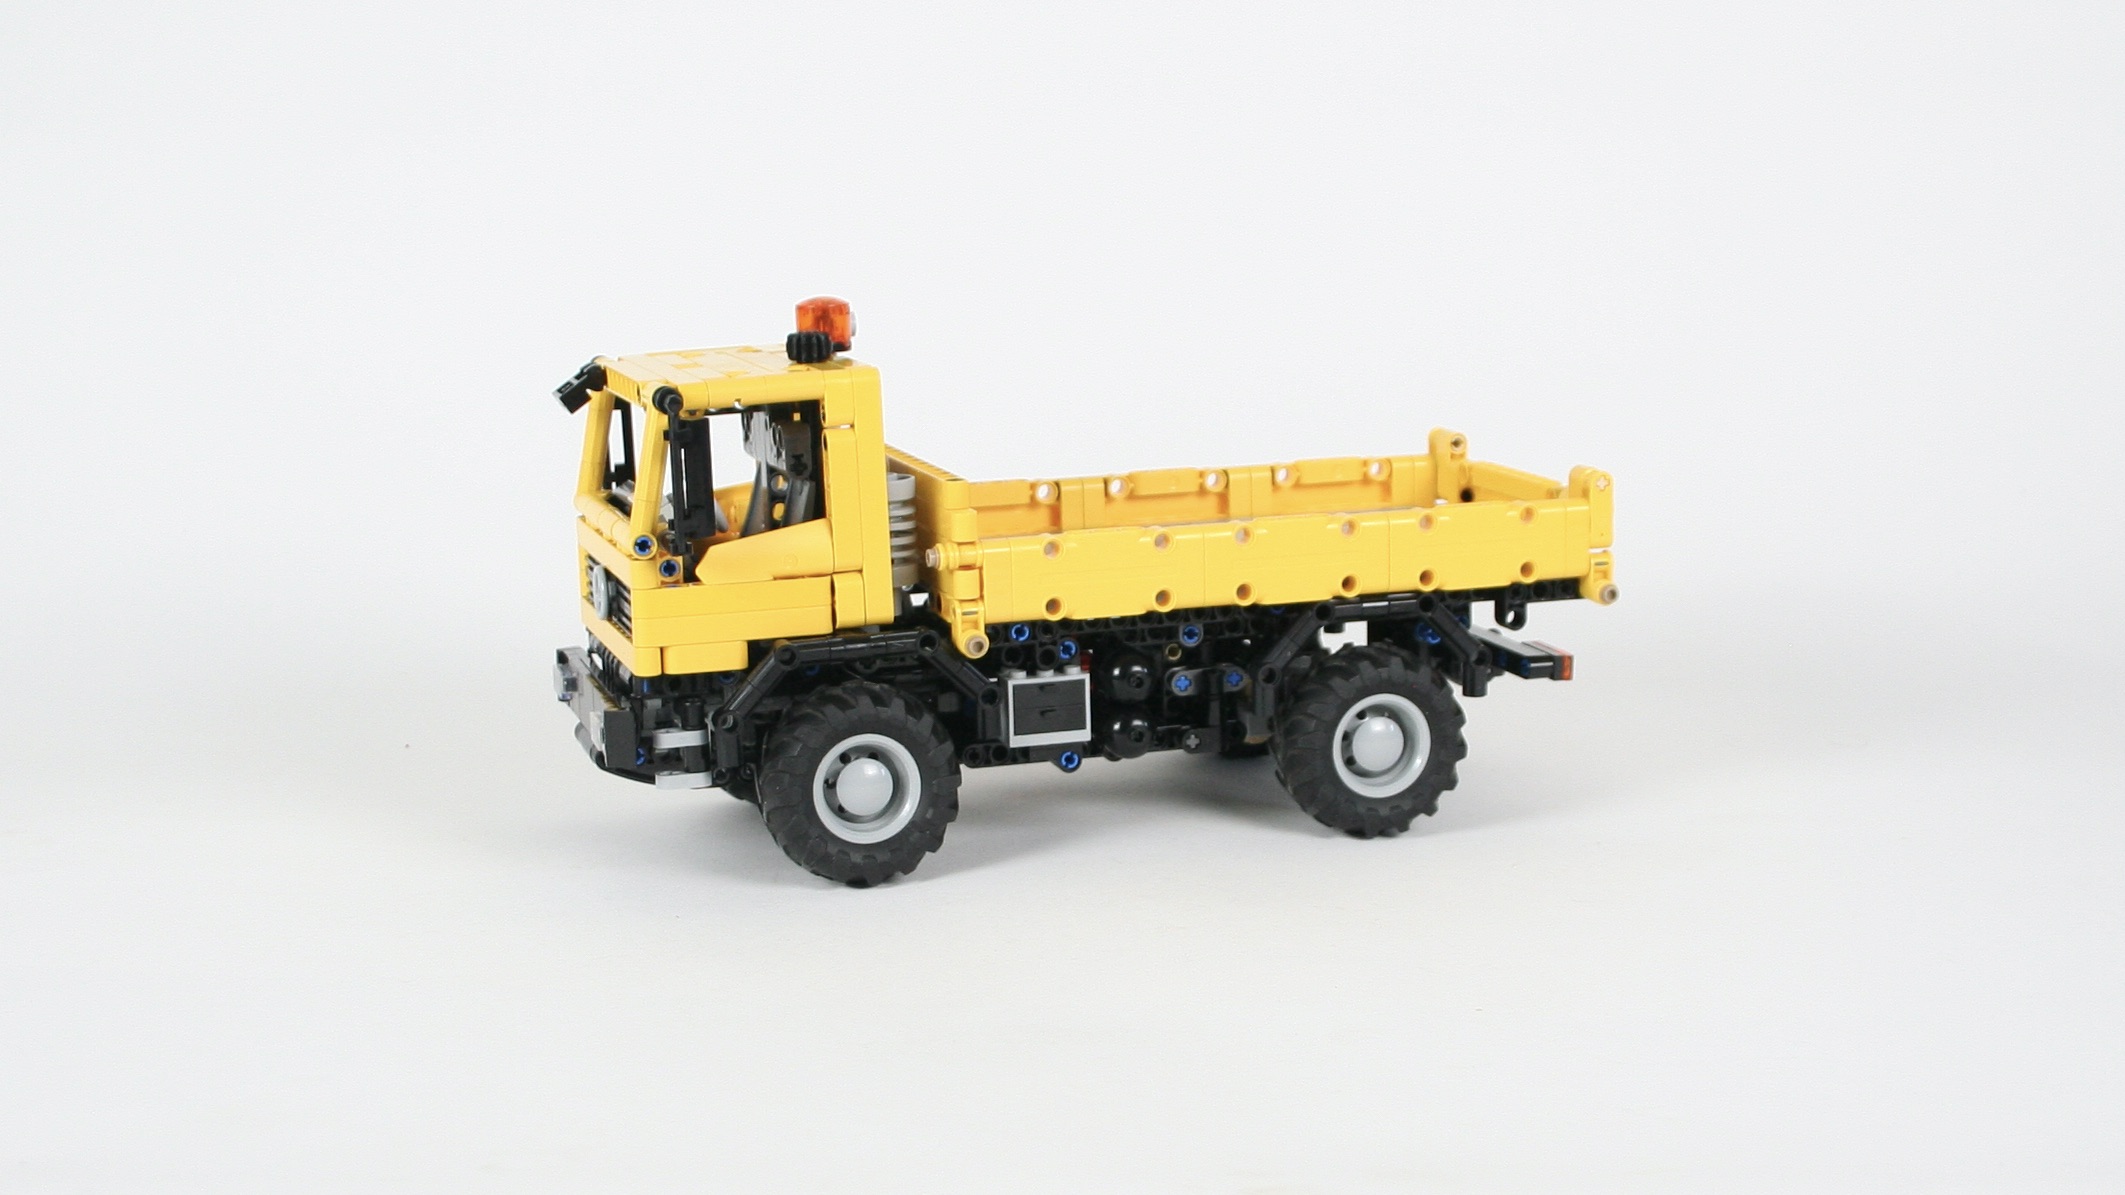
I lengthened the chassis, and removed the crane. I added a longer bed and changed how the tipping function worked. The cab stayed the same for the most part, but I changed the grill to match the look of the Mercedes Benz 917 truck. Since much of the truck is the same as the Off Road Truck, this one still retains the I3 fake engine, the pendular rear suspension, rear wheel drive with two speed transmission, and the tilting cab. Two HOGs are on the roof, one for the steering, and one for the bed tipping function. The bed can tip in all three directions.
Sometimes these type of builds feel a little bit like cheating, as they use much of a previous build. But this little truck was a nice addition to my builds that is fun to play with and is easily built by others people who have a moderate Technic collection.
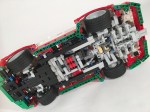
Sometimes I cannot make a decision. This is the LEGO result of that problem.
You may find free instructions for the AWD and the RWD (my favorite).
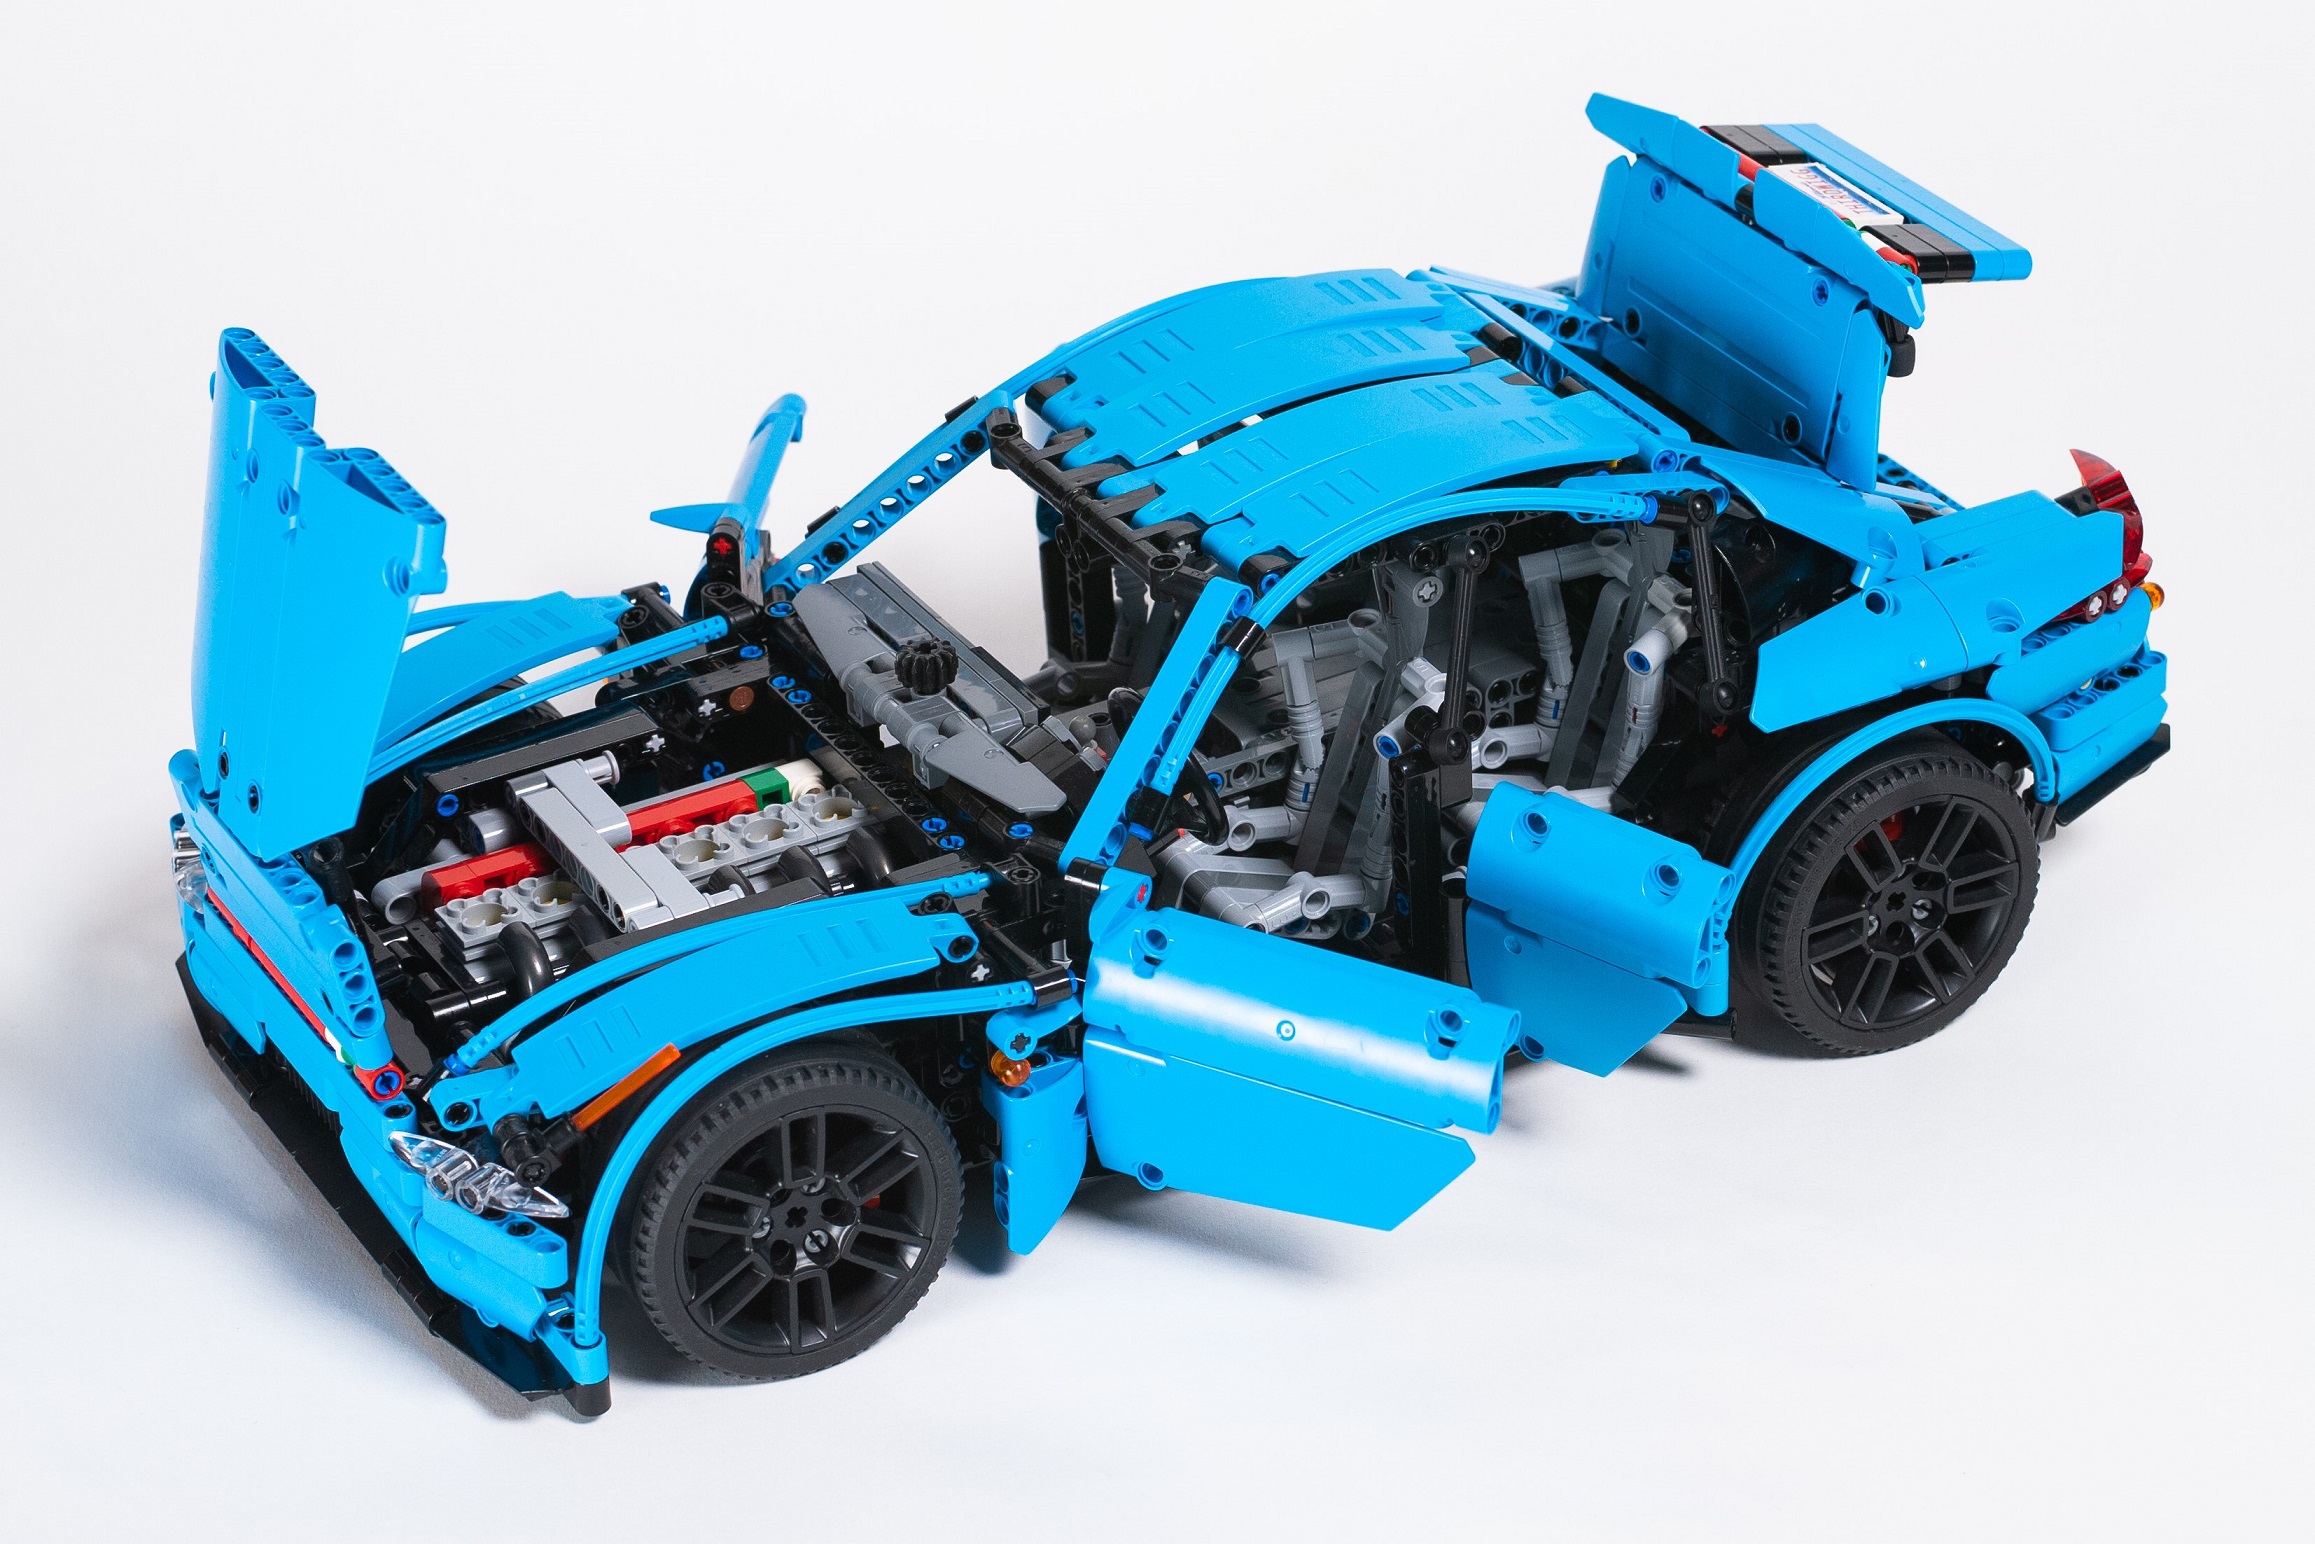
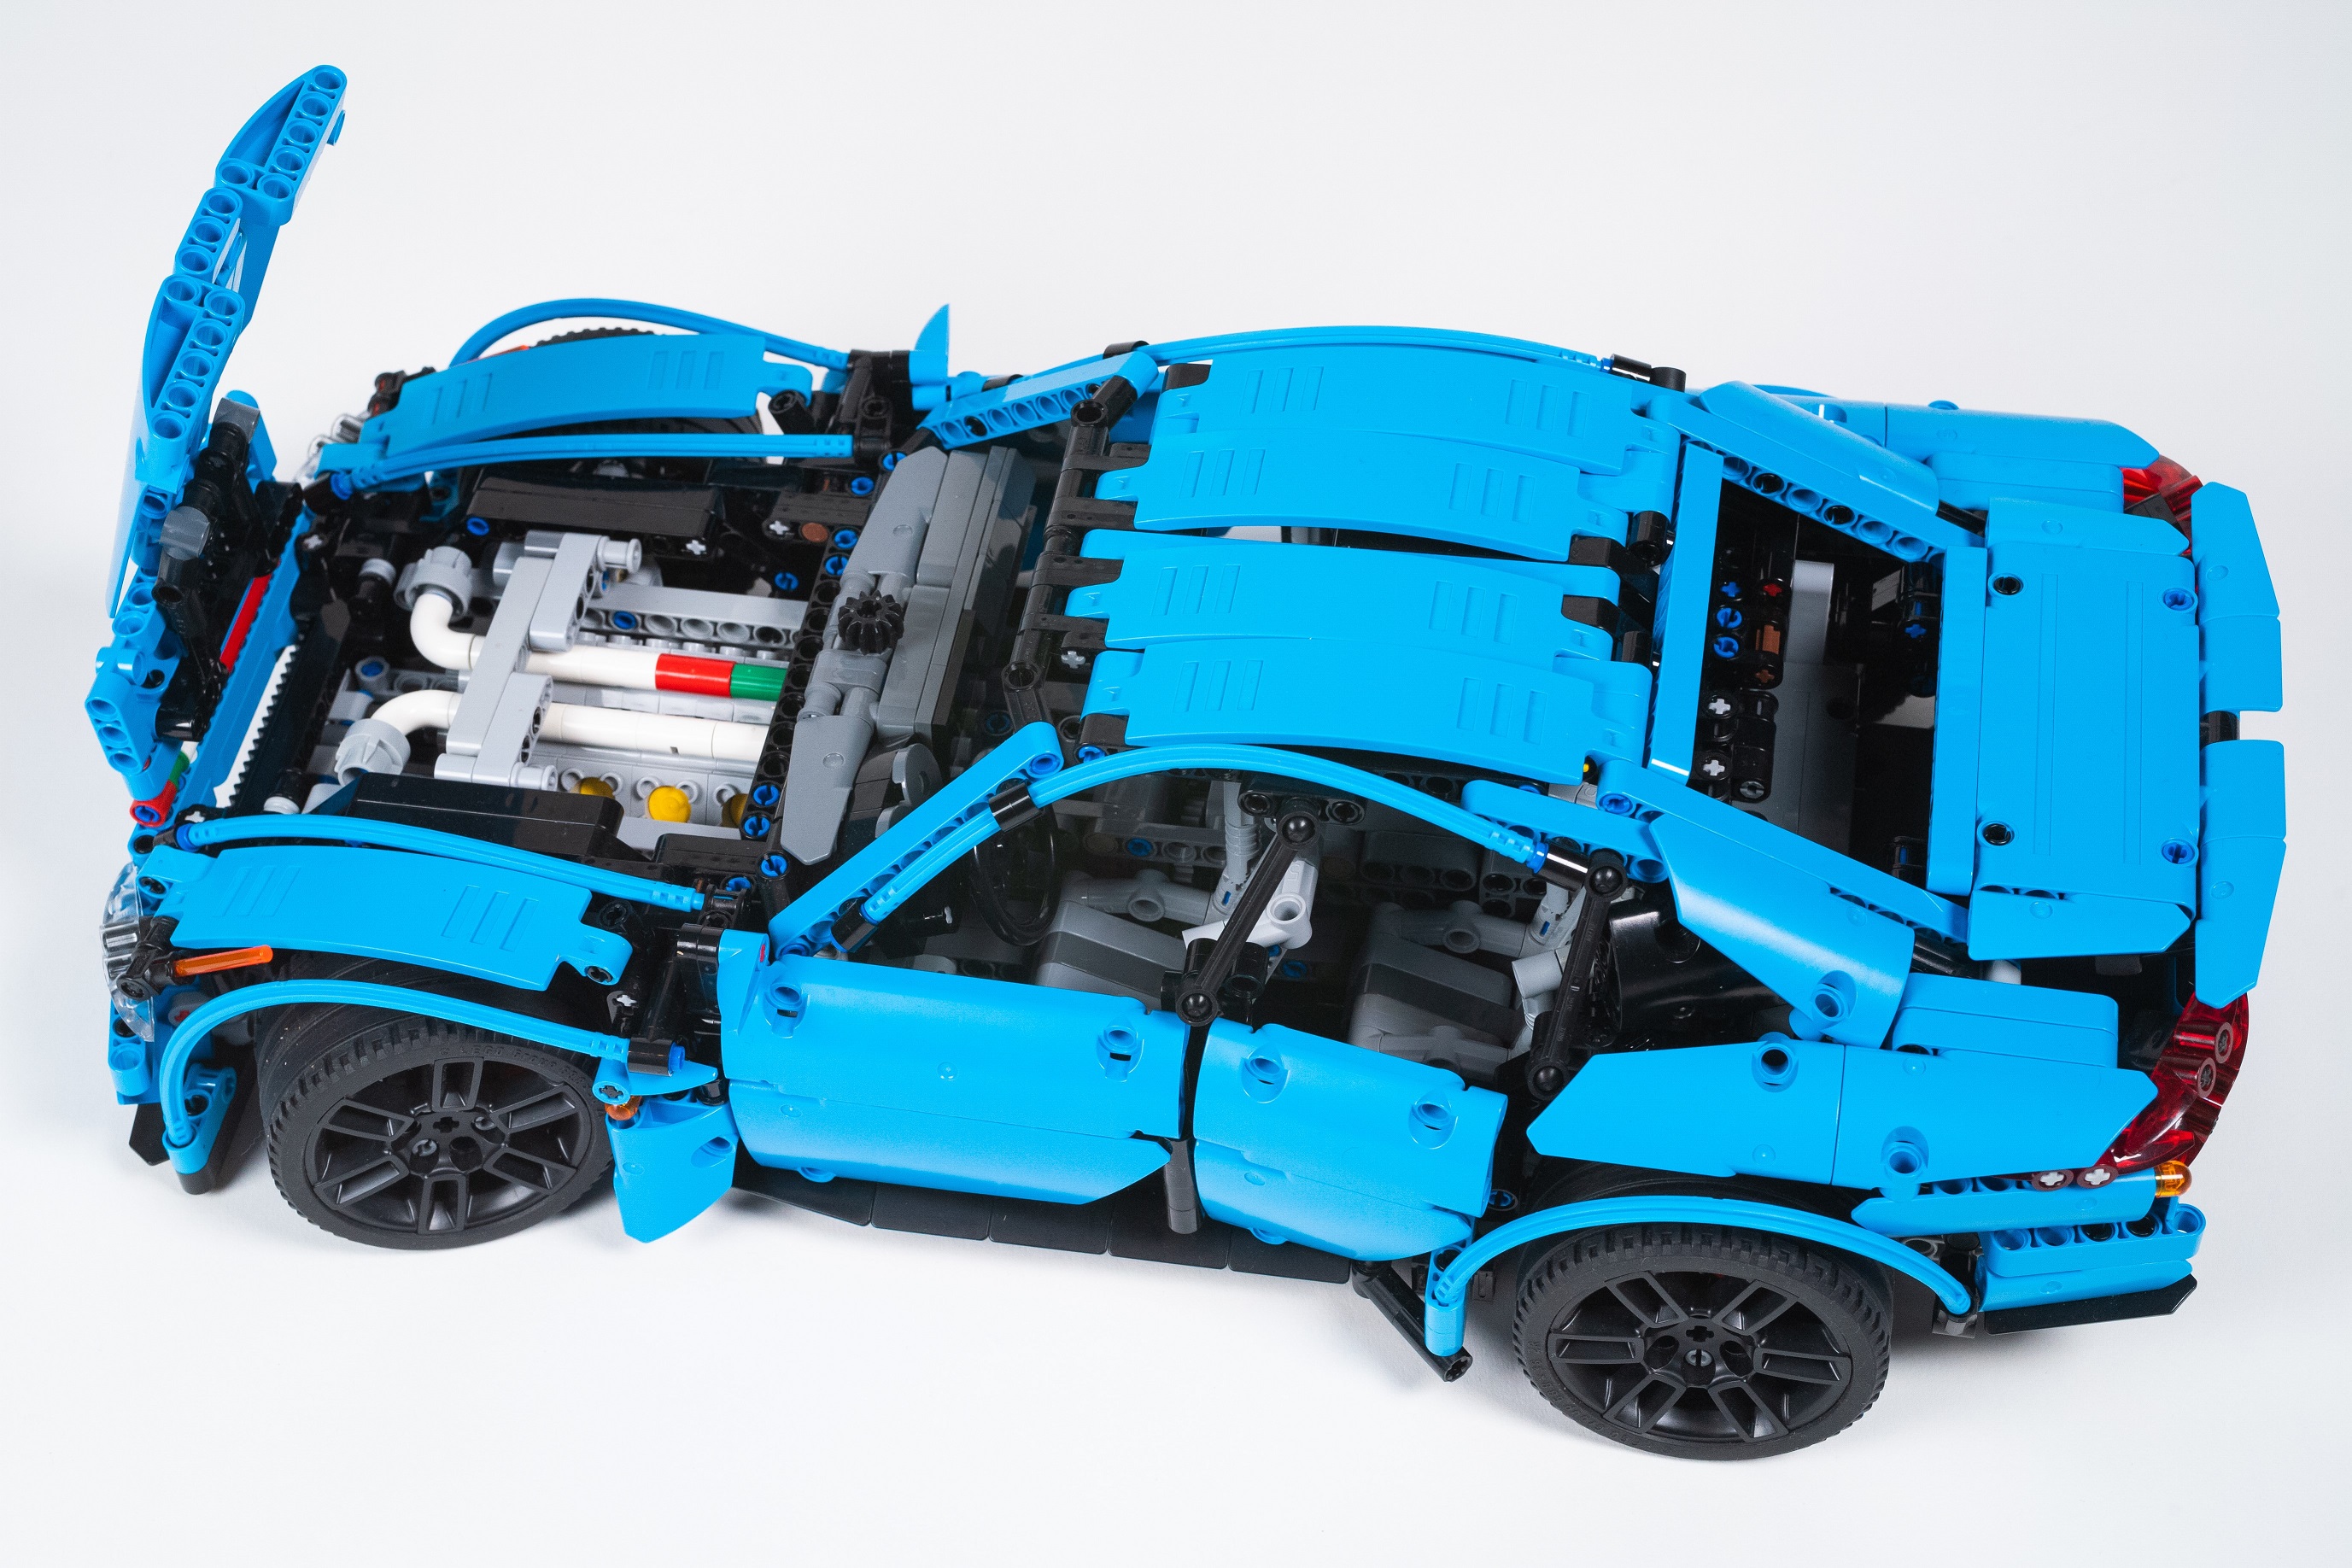
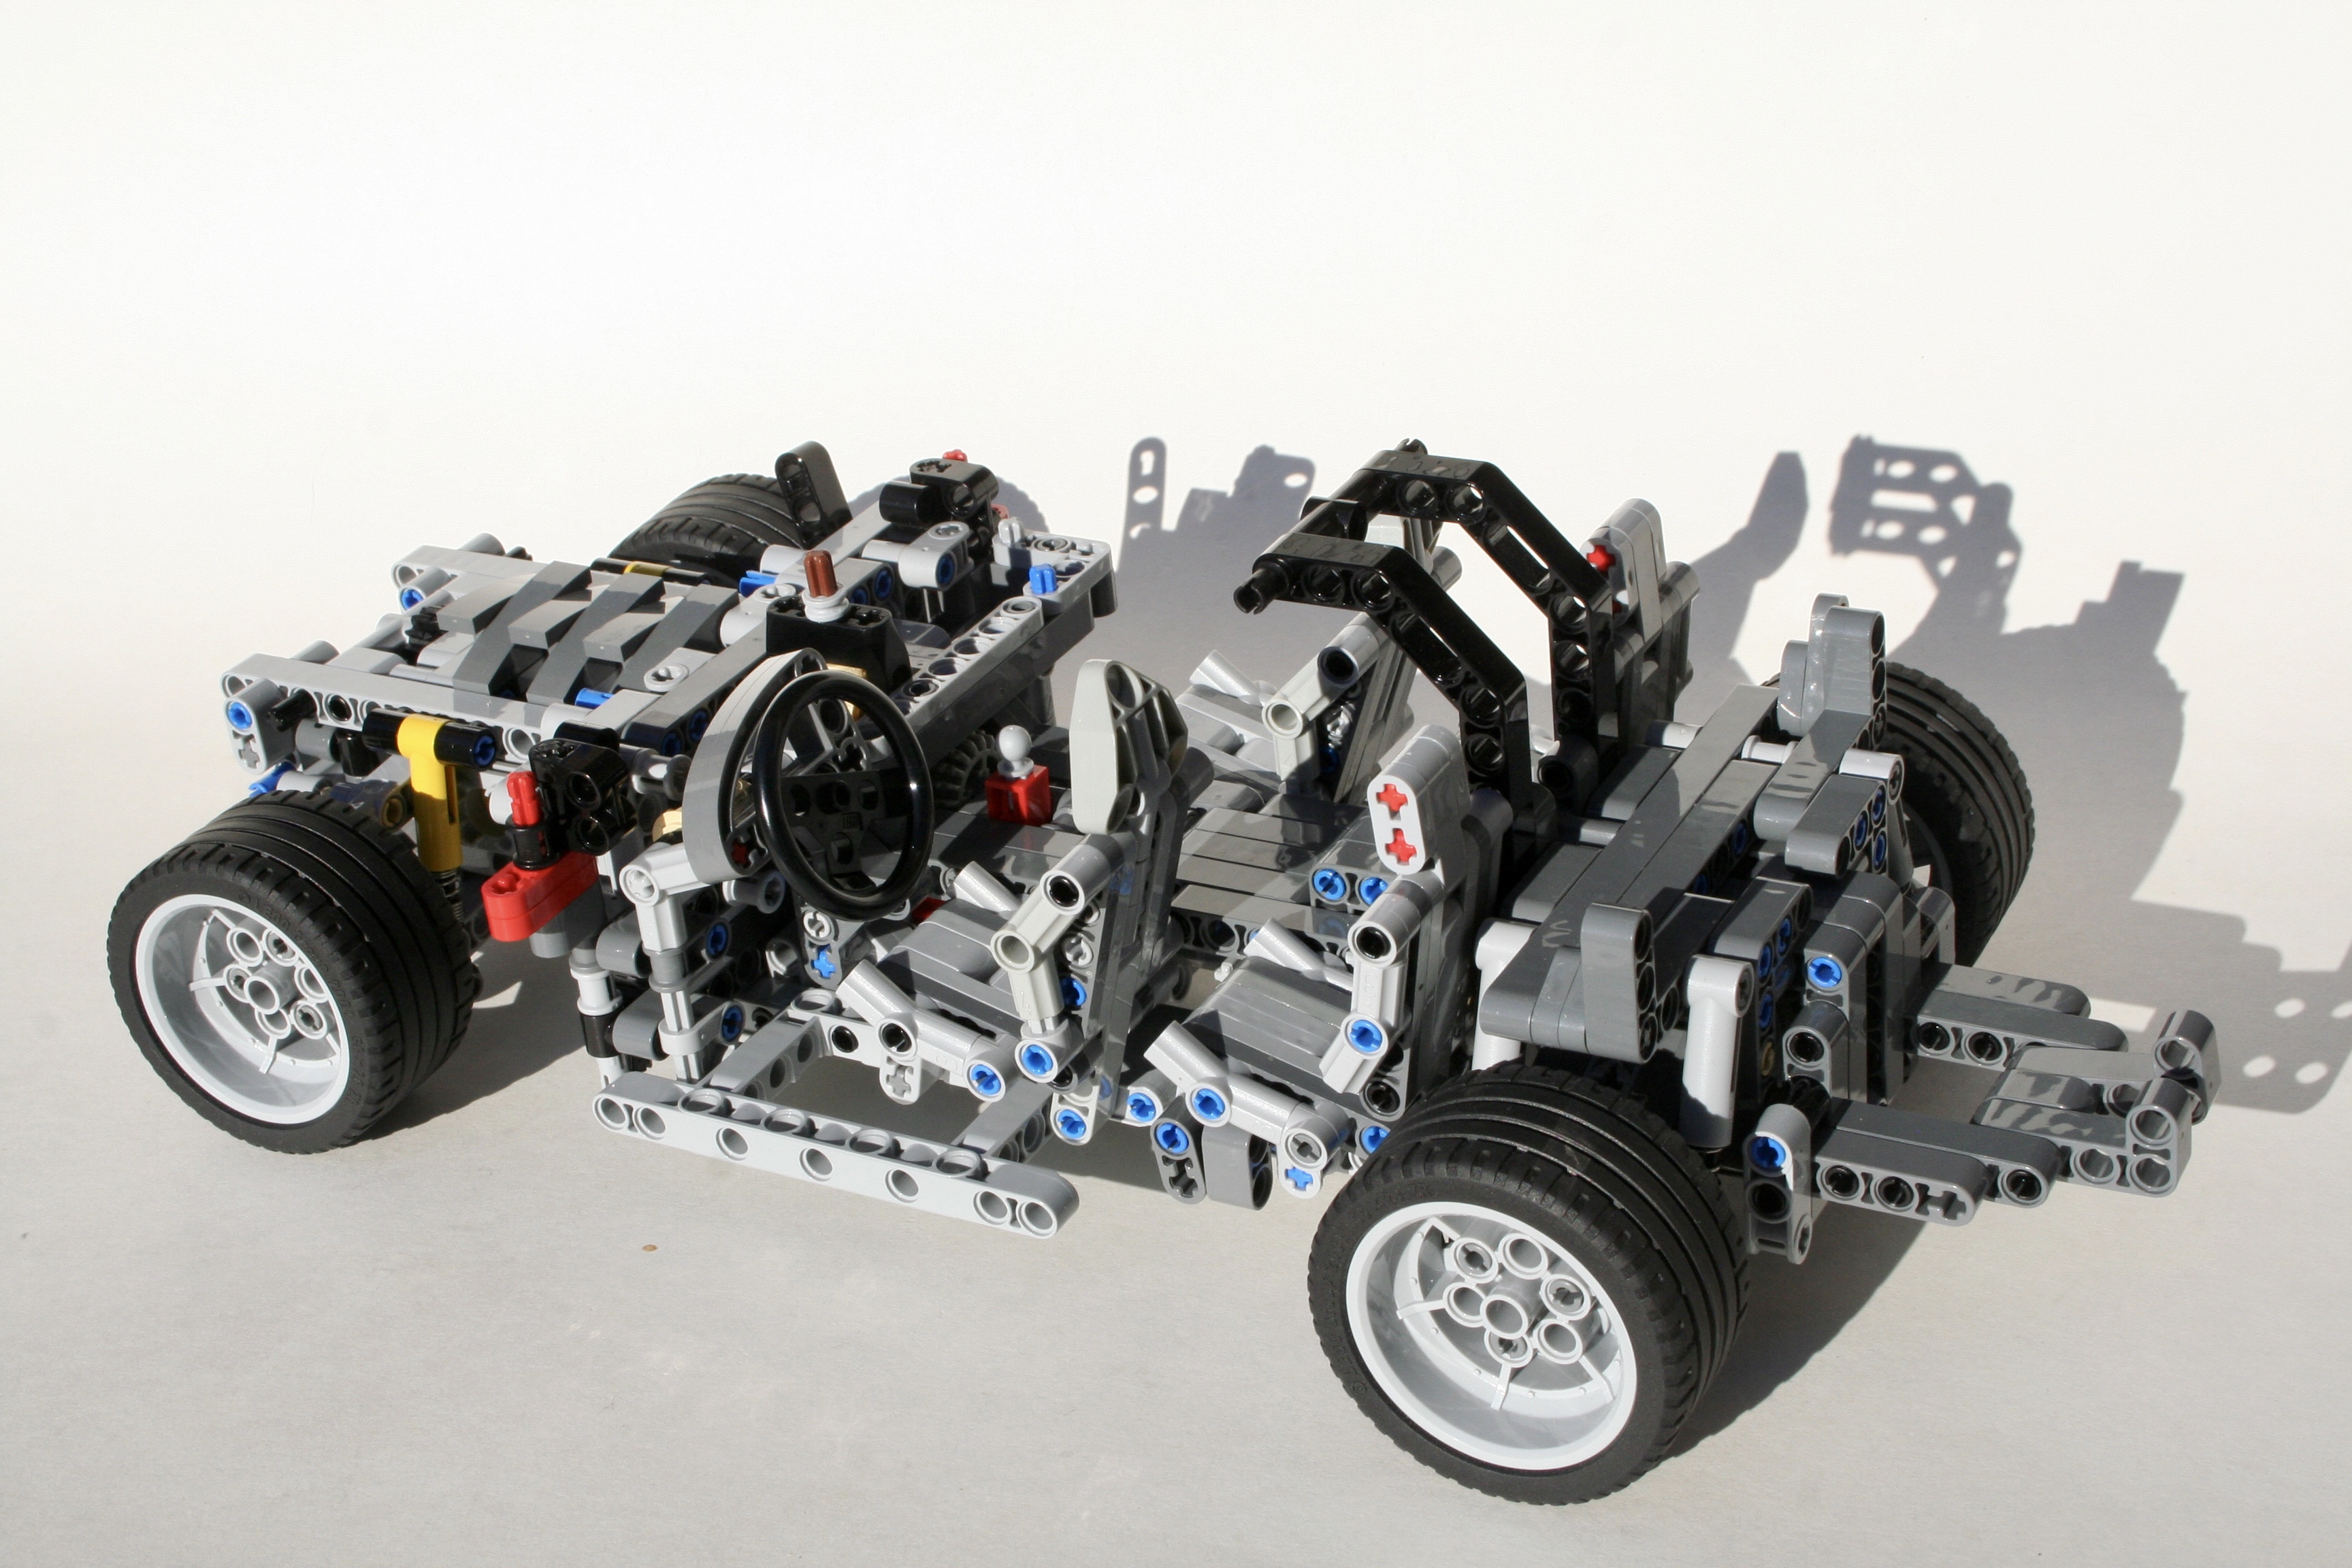
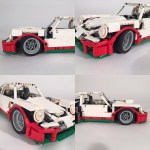
At the end of 2020, I decided to make a sport sedan. I find the sport sedan to be my favorite kind of car (see here and here), and it was time to do another one. I acquired a couple of the Defender wheels, which look more sporty than the other 56mm wheels. These would be the center of the build. The car would be long hood, short deck, with faired fenders. Then more questions happened, and I could not make up my mind.
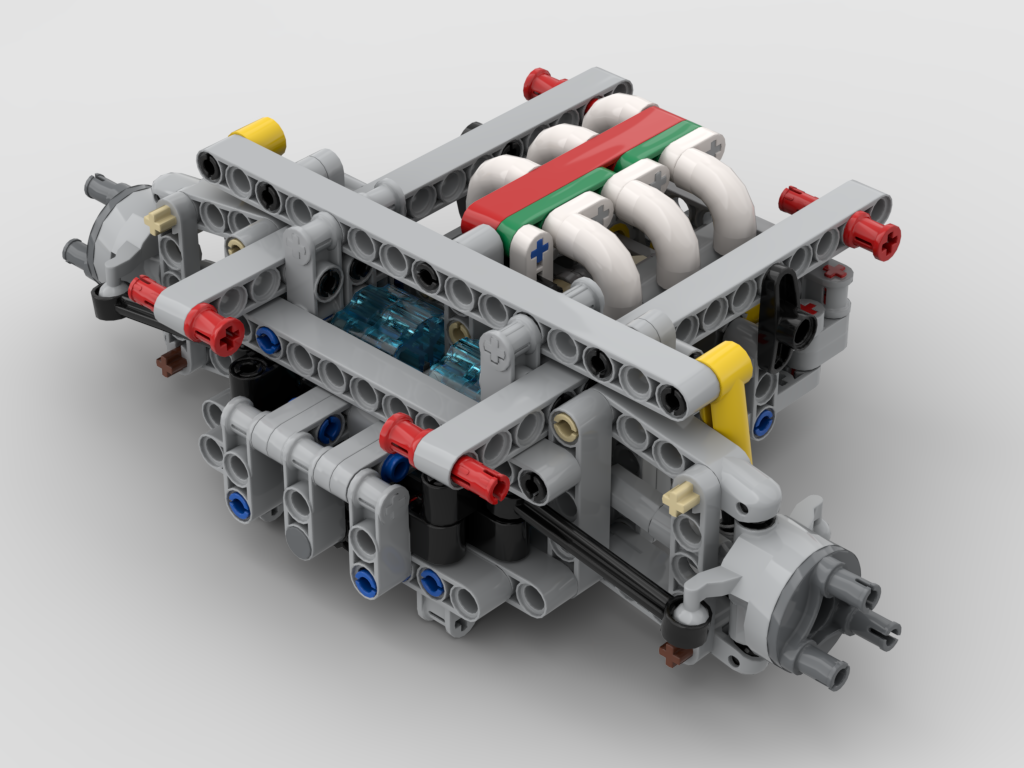
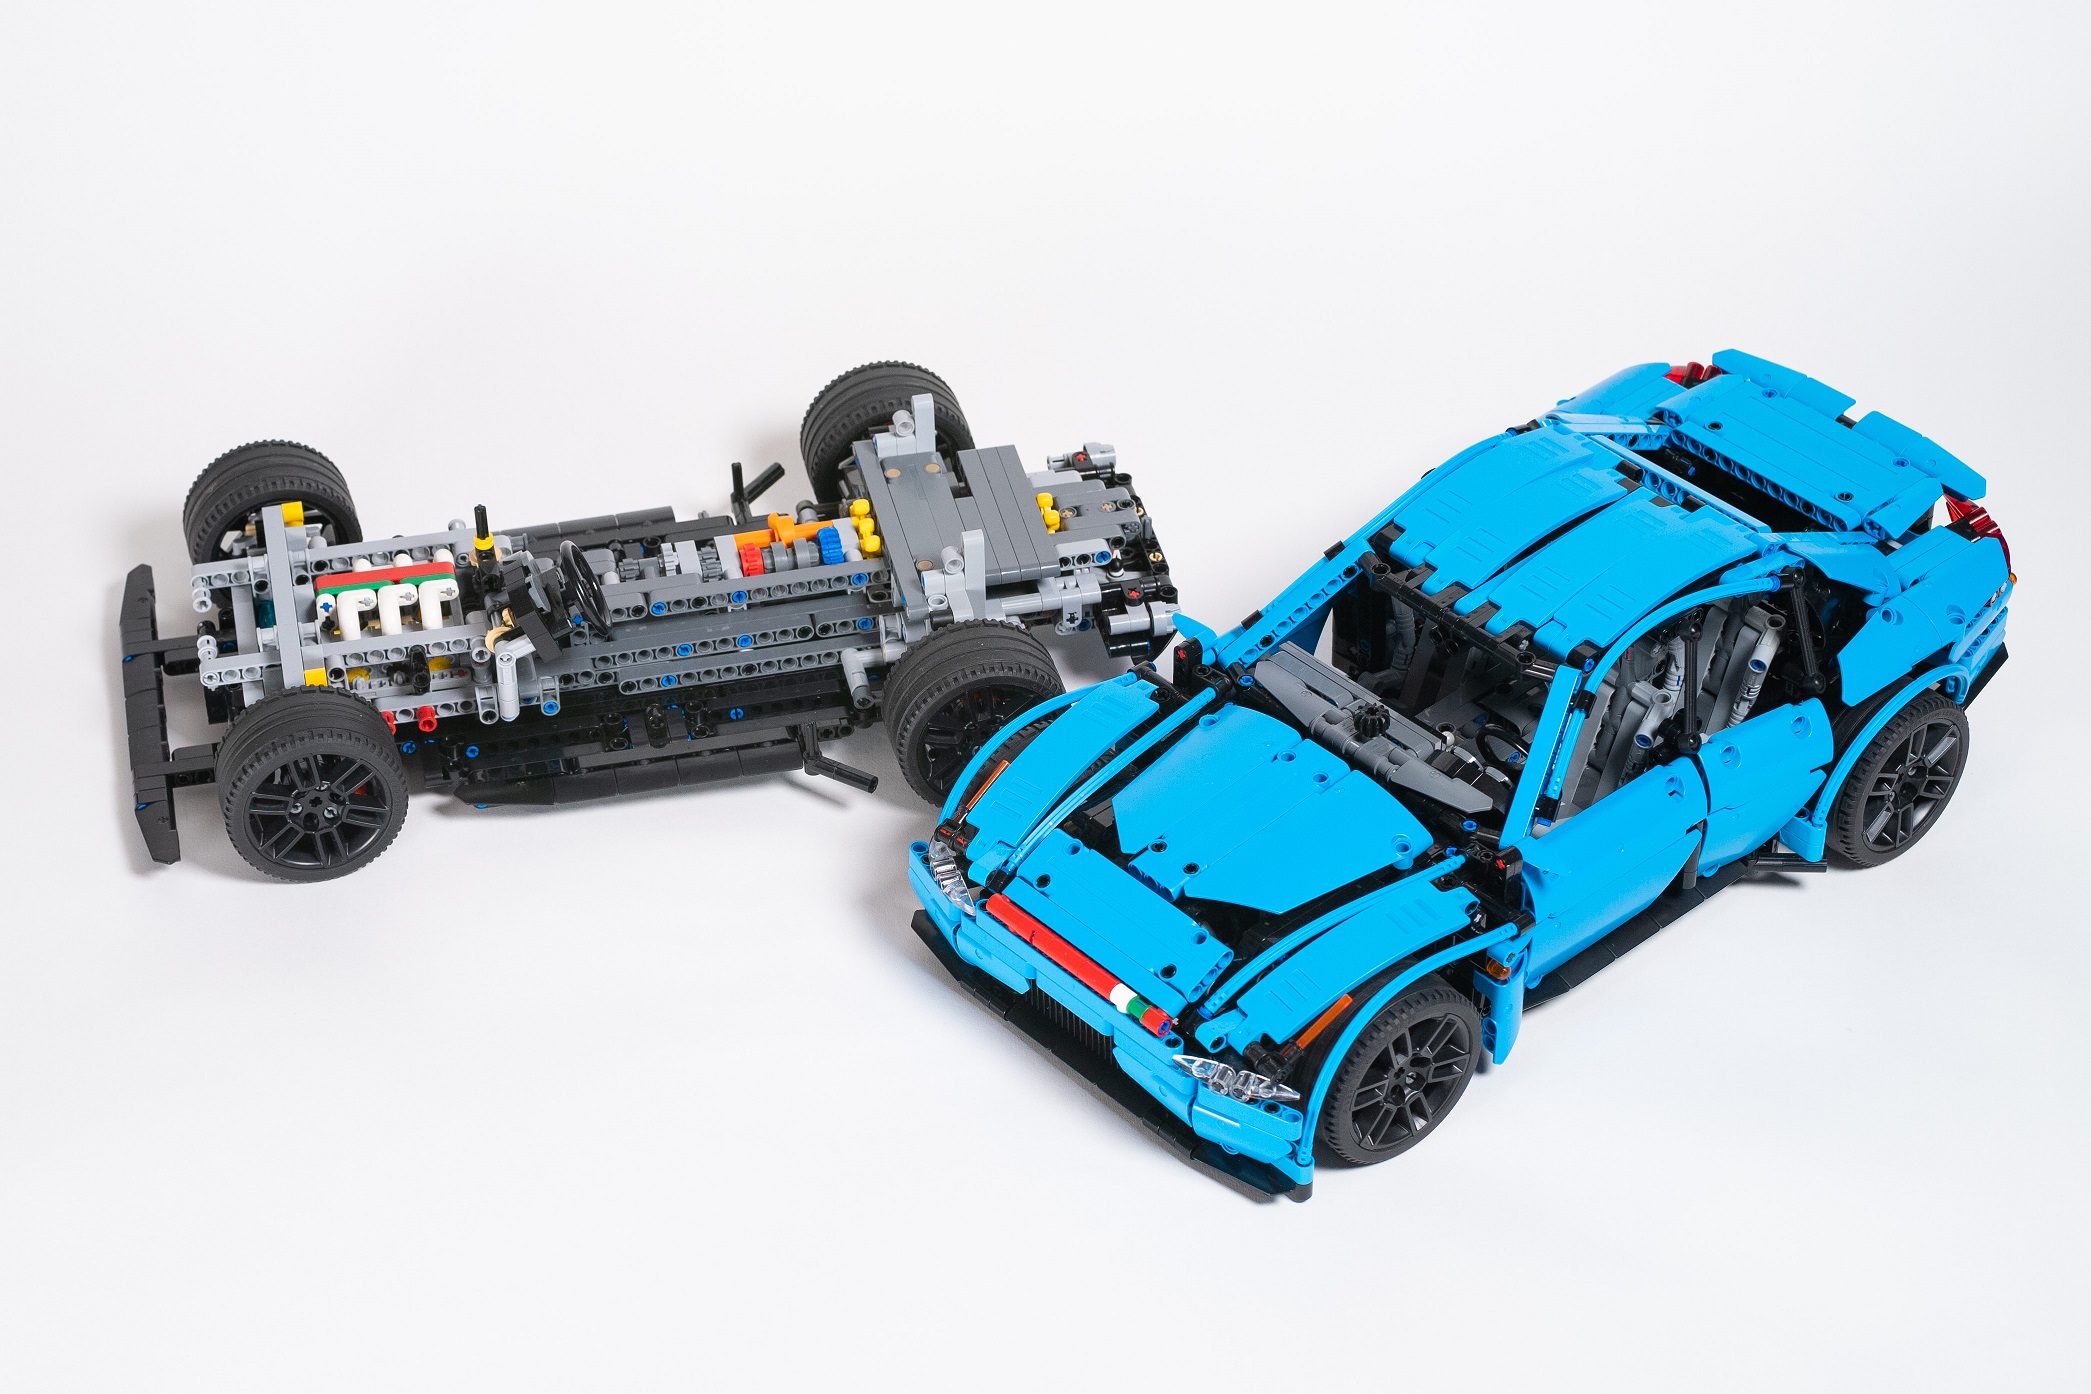
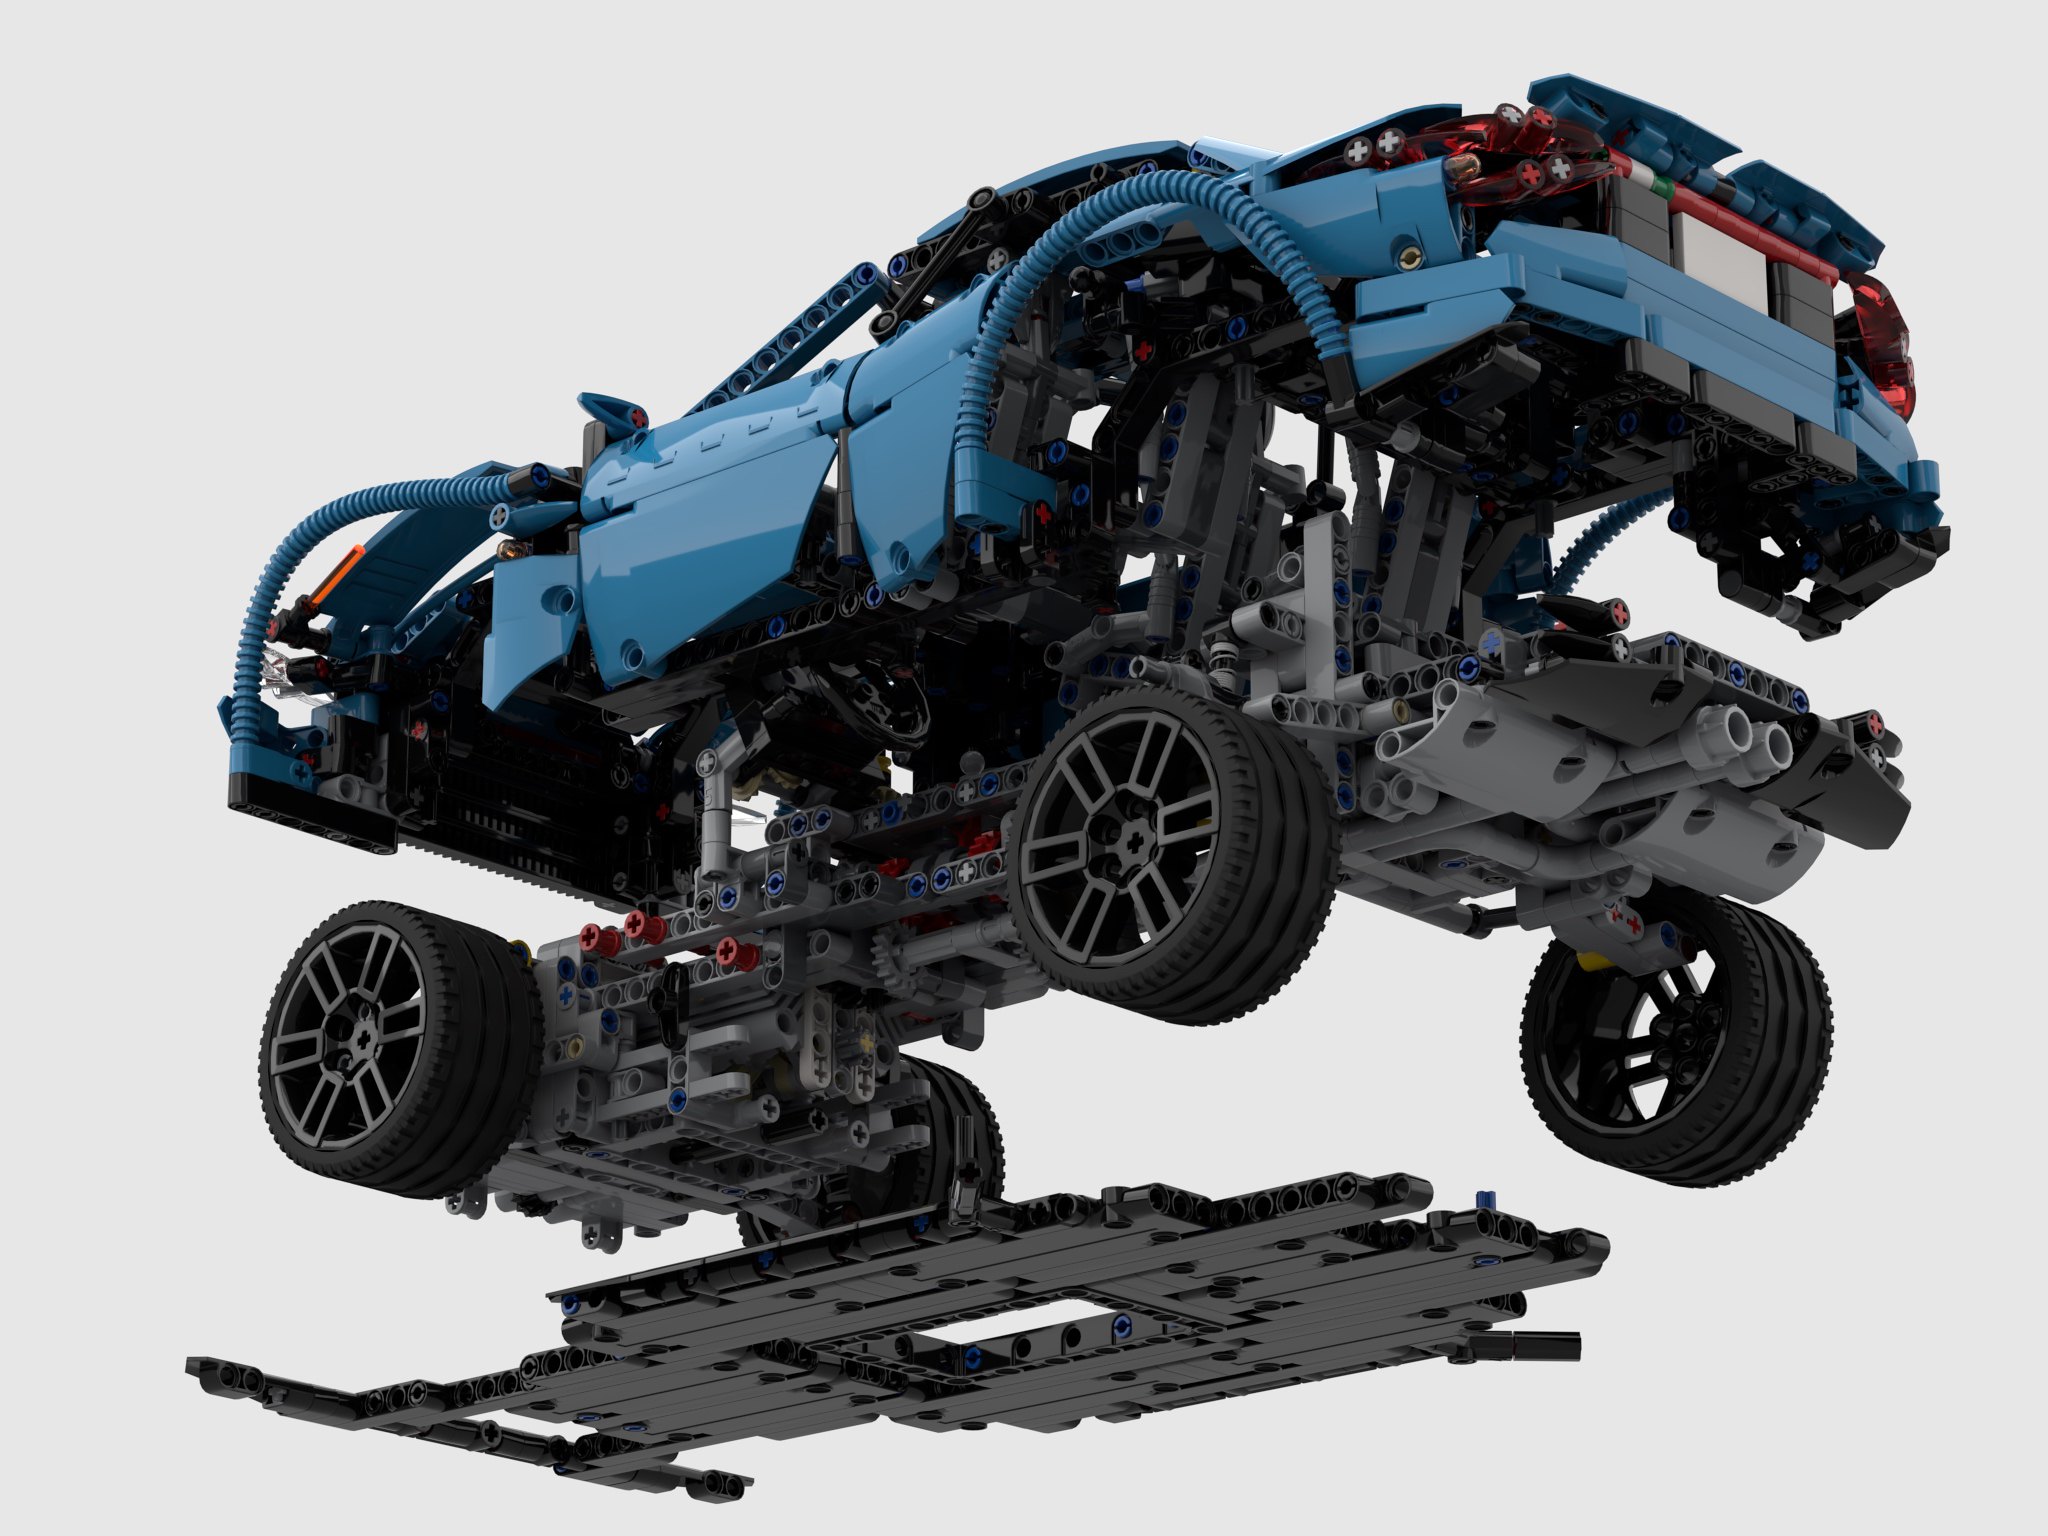
What transmission did I want? What engine would be best? Could I fit all wheel drive? Was that appropriate? As I found myself asking these questions, I began answering “well why not that too?” It was here, the project took a dramatic turn. The car would be fully modular and interchangeable. After playing around with some dimensions and simple structures, I decided on the following setup: Two different transmission and rear suspension modules, one floorplan, one body (in two colors), two engine tubs for all wheel drive and rear wheel drive, and three engines. Demensions were set with a width of 27 studs at the rear tires, and 25 studs at the front tires, and a wheelbase of 33 studs.
Each of the 9 modules were build in constant flux with each other as I managed attachment points, size, and interchangeability. I settled on a 4 speed manual transmission module, and a 4 speed sequential transmission module. The manual is shifted in the cabin, and the sequential has a shift lever on the rear bumper. While four speeds is basic for a LEGO car these days, it kept space inside for four seats. Once the transmission modules were basically set, I was off to another module.
The engine tubs were a lot of fun and took less time than I thought they would. There are two tubs. The first, is built to support the front independent suspension and two different engine designs. The Straight Six is my favorite engine, so I wanted to make this options possible. The steering race for this module is placed far forward to allow for the I-6 to fit. In fact, the front of the engine is two studs from the front of the car. The V-8 fits well, and is placed behind the front axle centerline. The second engine tub features a fixed Flat 6 engine, and two fake electric motors; one for each side of the front axle. This unit is the hybrid and All Wheel Drive engine tub. Each tub attaches to either transmission module with six pins and one axle for steering. Drive connects by a 8 tooth gear off the engine.
Then I built the floorpan. This simple build provides the floor to both the cabin and the underside of the car. It is connected at six points, four to the chassis, and two to the center of the body. These points stiffen the car, and connect it all together. The body took the most time as this is what most people would see. Early, I committed to the sides panels including the doors and the part just behind the front wheels, and the roofline. Otherwise everything else was fair game. The front bumper took some time in order of the two studs of space, but I was pleased with the design. Next I managed to get the A, B, and C pillars to look the way I wanted. The C pillar took some trial and error but finally got a shape that was fast looking without the coupelike lines that seems to be permitting sedan design these days.
The rear took the longest. It was at this point where my focus on the MOC was starting to wain. Over months I tinkered with different trunks, different lights, and different rear bumpers. Eventually, I got to where I am now which could be improved, but I was pleased enough to call it complete. I added a little spoiler, and the body was done.
Ionos Sequential Rear
After everthing was built set, I rebuilt the whole car. As I did, I checked fit and built a Bricklink Studio file. With each step I found improvements along the way, and learned how to make better instructions. The result was a car system that fit together well, and gave for an interesting build. Again, if you are interested in the detail, or building your own you may find the instructions here and here.
This was my most favorite build in a long time. If you are interested, the Dark Azure, Manual, AWD version is my preference. The integration of all the parts was fun to do, and the build, test, rebuild process that went through every stage was a case study in continuous improvement. Both transmission work flawlessly. The suspension is stiff and functions as they should for a car of roughly 2500 parts. The varied engines were a fun inclusion. The design of the car is sporty and keeps the lines and proportions of a traditional Rear Wheel Drive Executive Sedan: long hood, short deck, short front overhang. I hope you enjoyed the car, and if you build it, I hope you enjoy the build. I definitely did, and will do something similar in the future.
I have done a lot of difficult LEGO projects over the years, but this project was the hardest in a while.
You may find free instructions for this MOC at Rebrickable.com.
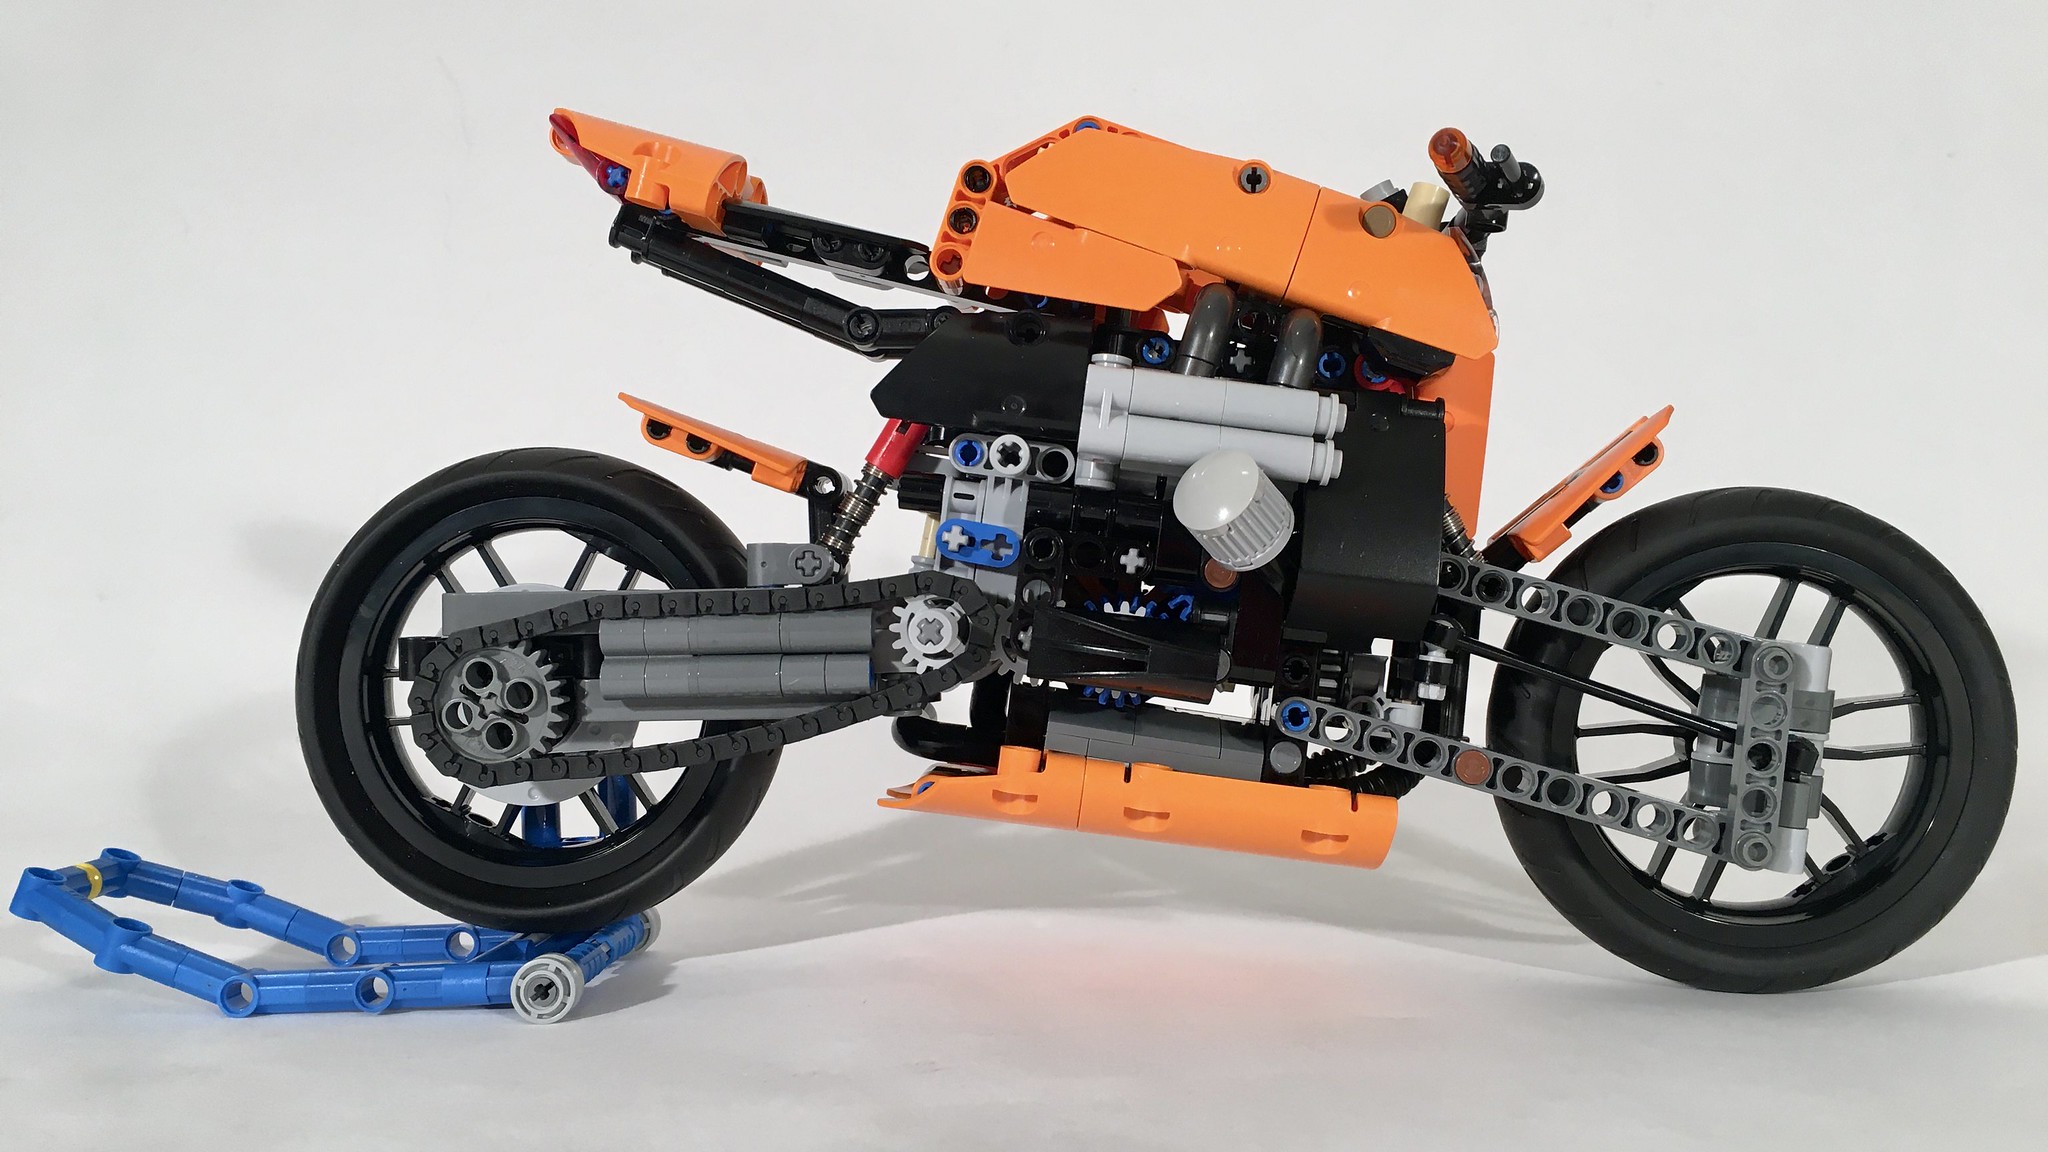
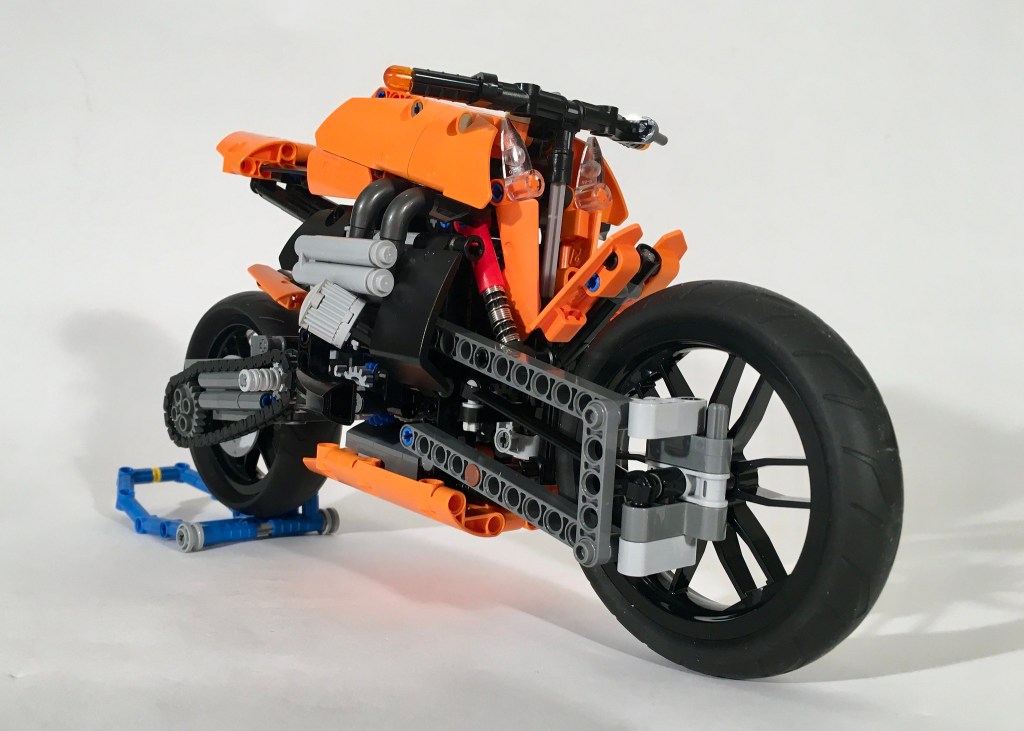
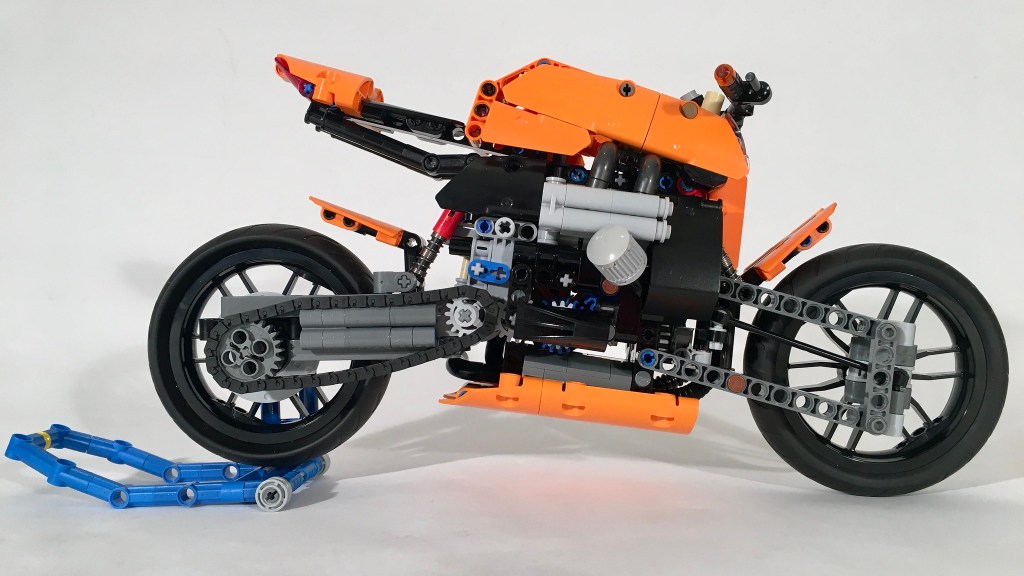
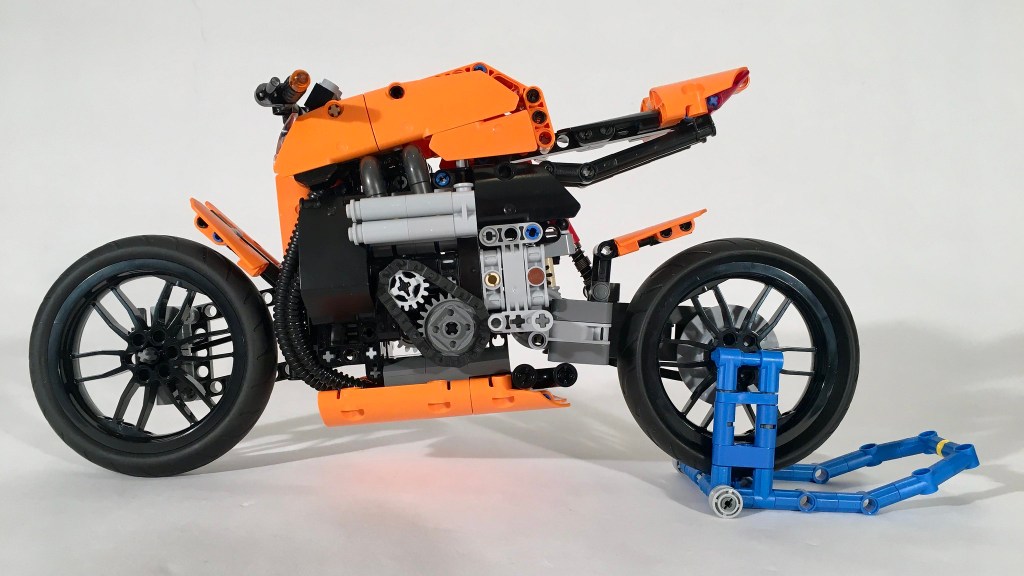
I often participate in Eurobricks Technic contests, and this last winter, I chose to participate in TC19 Technic Motorbike Contest as I enjoy Motorcycles, and I have built only one. This was an oportunity for me to develop some skills in a MOC that I have not done in the past. I had no idea, how much it would stretch me. From the start I committed to the following features: steering , suspension, an engine, and a transmission.
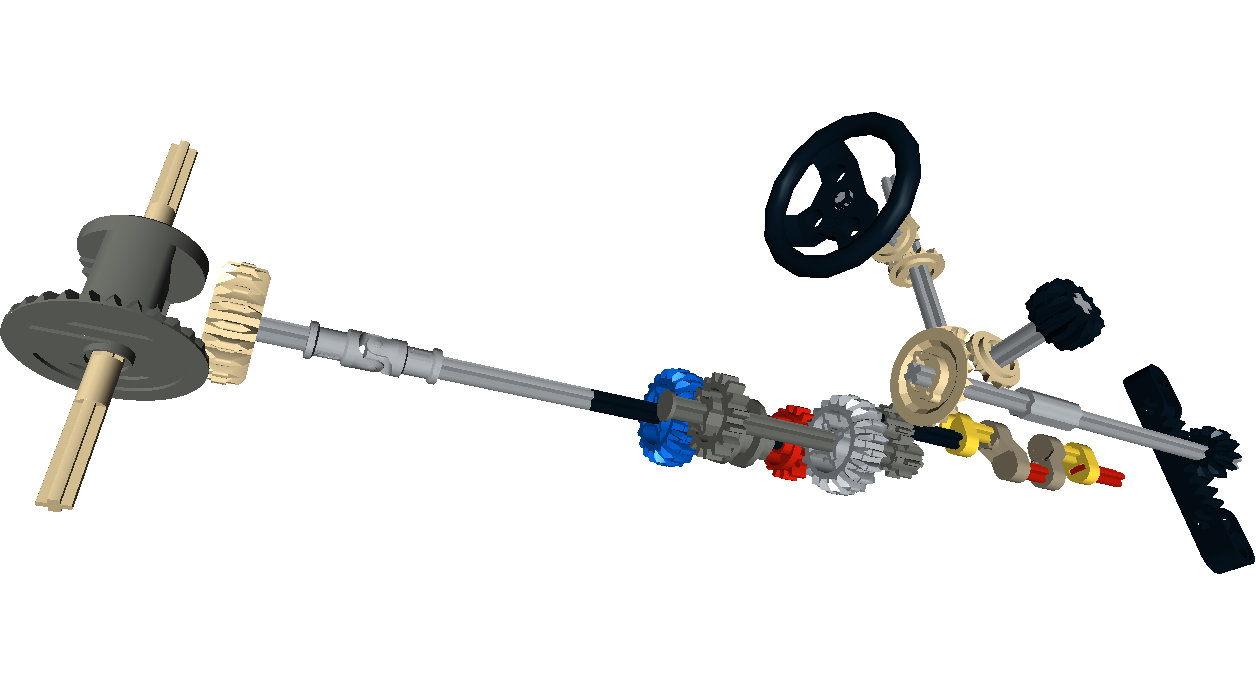
I quickly picked a motorcycle to replicate, the fantastic Kickboxer, and got to work. First I set the scale and did a rough draft of the suspension. I built a little flat 4 engine.
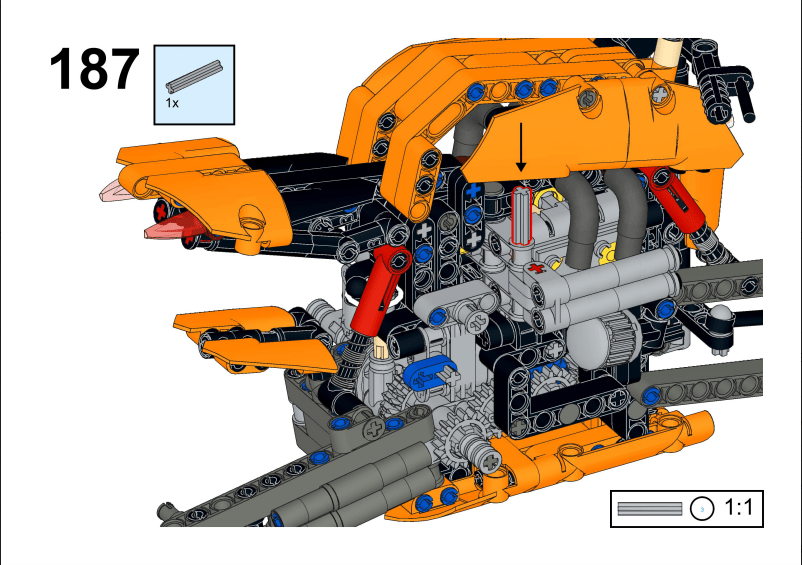
Then I started on the transmission. The transmission is a four speed sequential transmission that is shifted on the left of the motorcycle. I took a while to get the design to work, and then took a lot of time to get it to fit into the motorcycle. Finally, I was able to get the final solution to work. It’s dense and complicated. I encourage you to take a look at the instructions to explore it a little more.
The suspension worked until I finished much of the bike. Then it sagged, and required a complete rebuild. I was able to retain much of what I wanted even after the redesign.
The motorcycle was a build I was very happy to finish. I was frustrated multiple times in this build, so I had a high sense of accomplishment when it was done. The transmission works flawlessly. The suspension is sufficient, and the steering is a little gummy. But all in all, it’s a build I am proud of. I hope you enjoy it too.
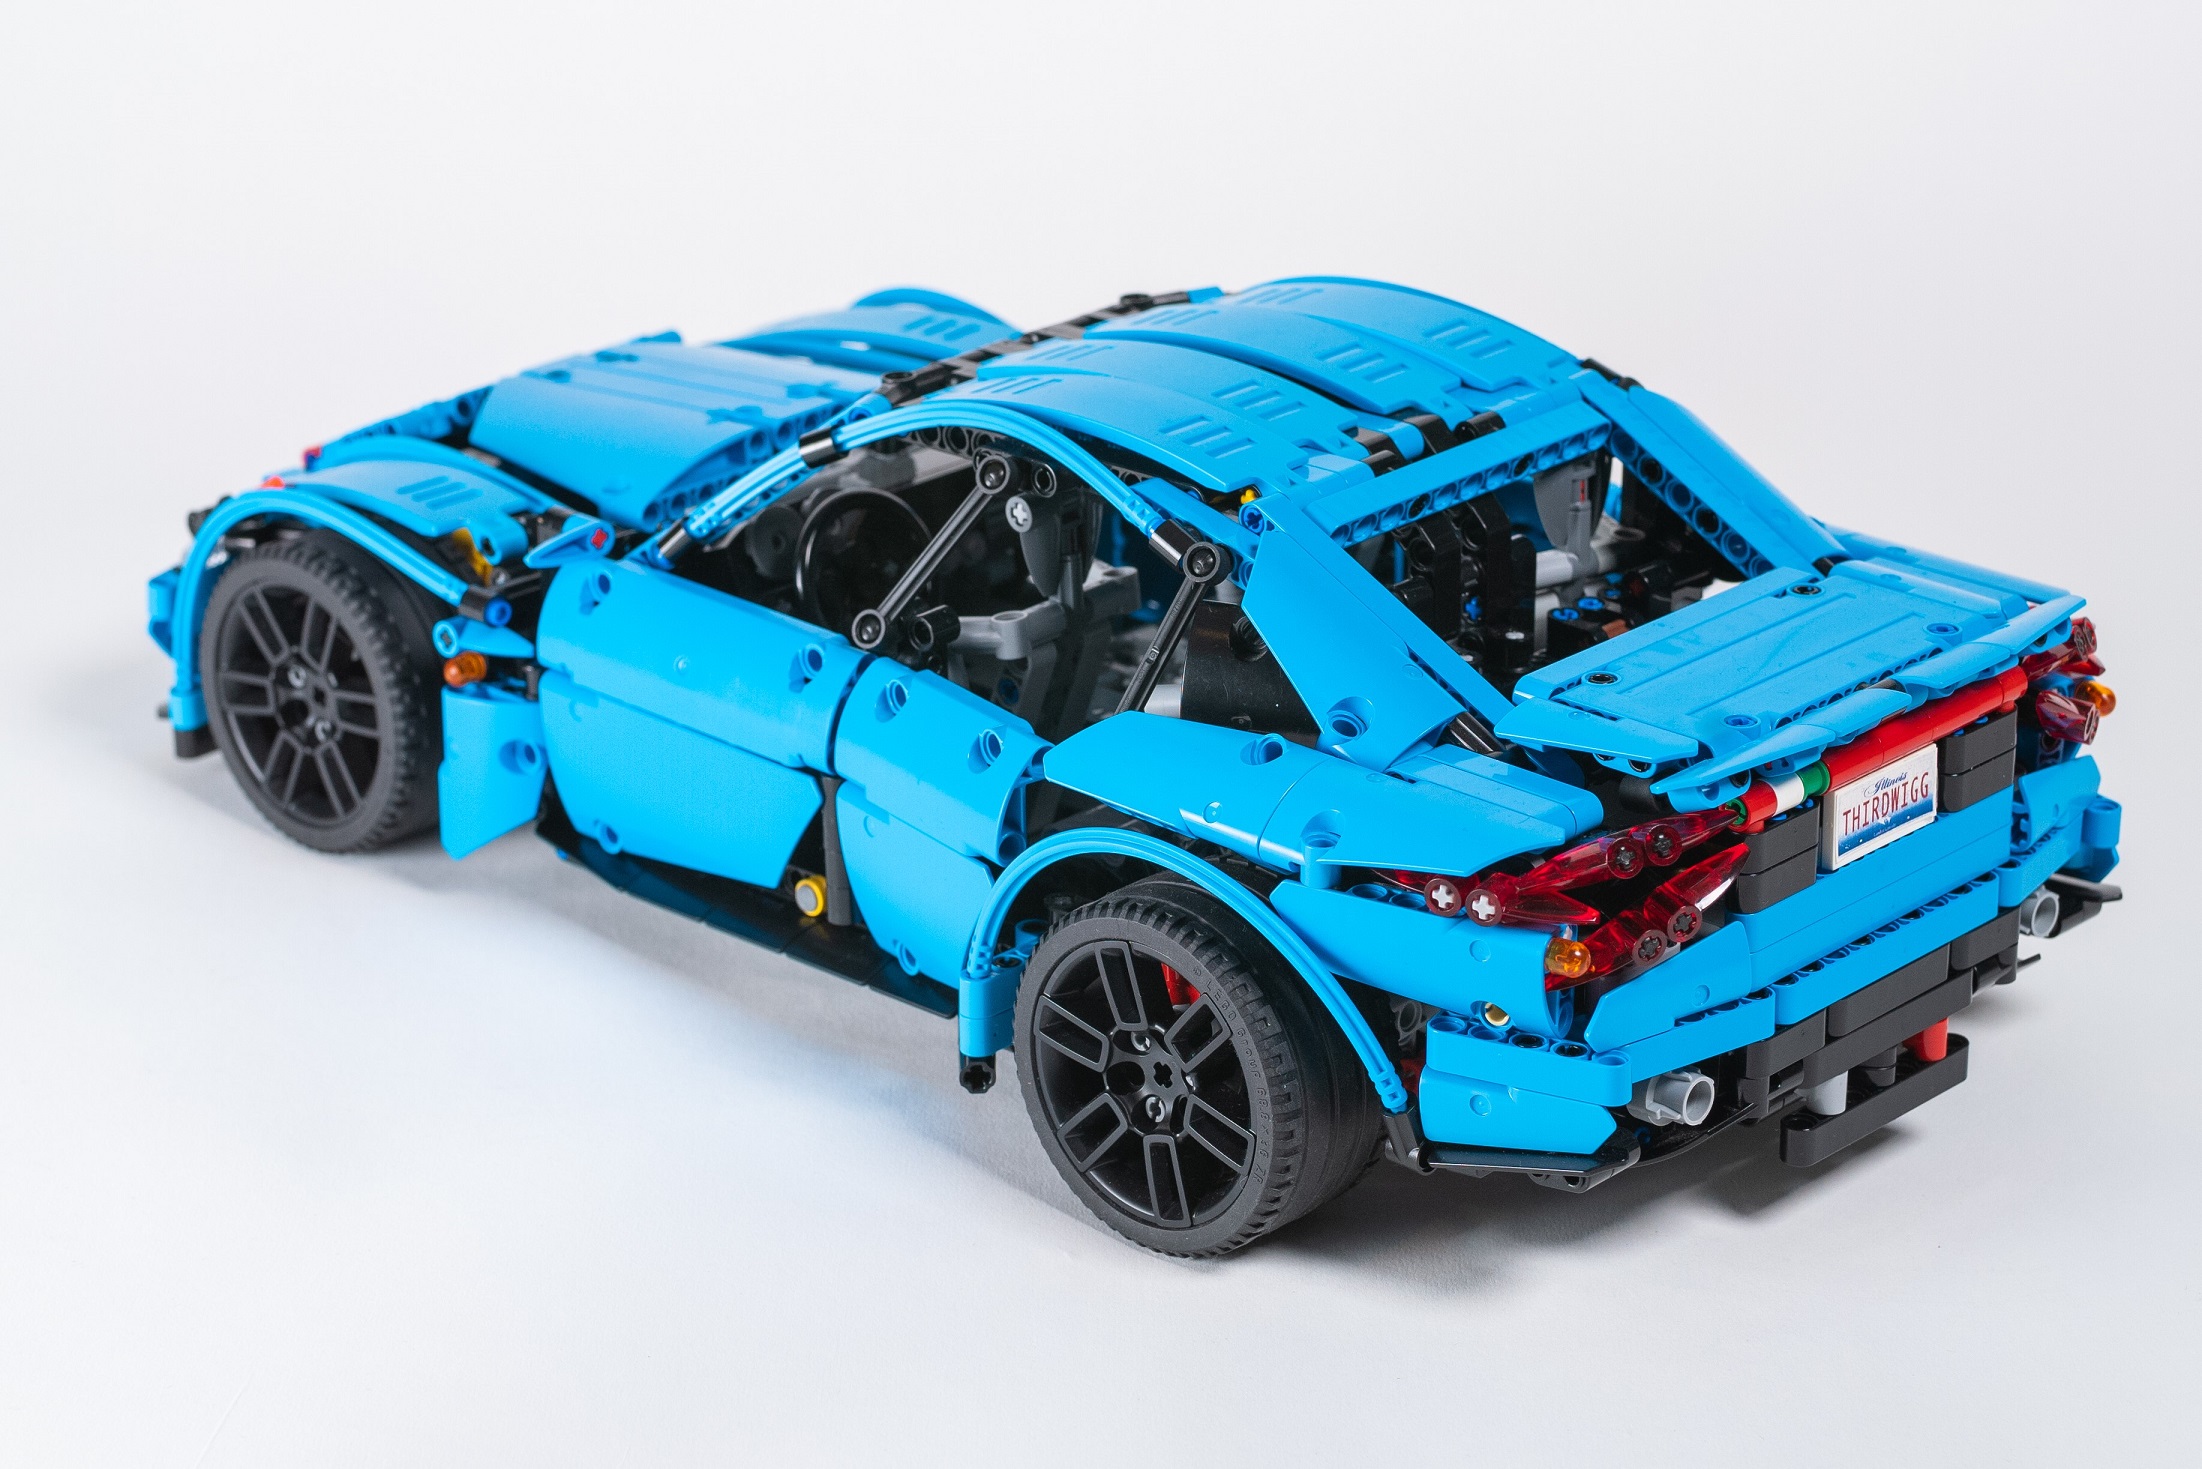
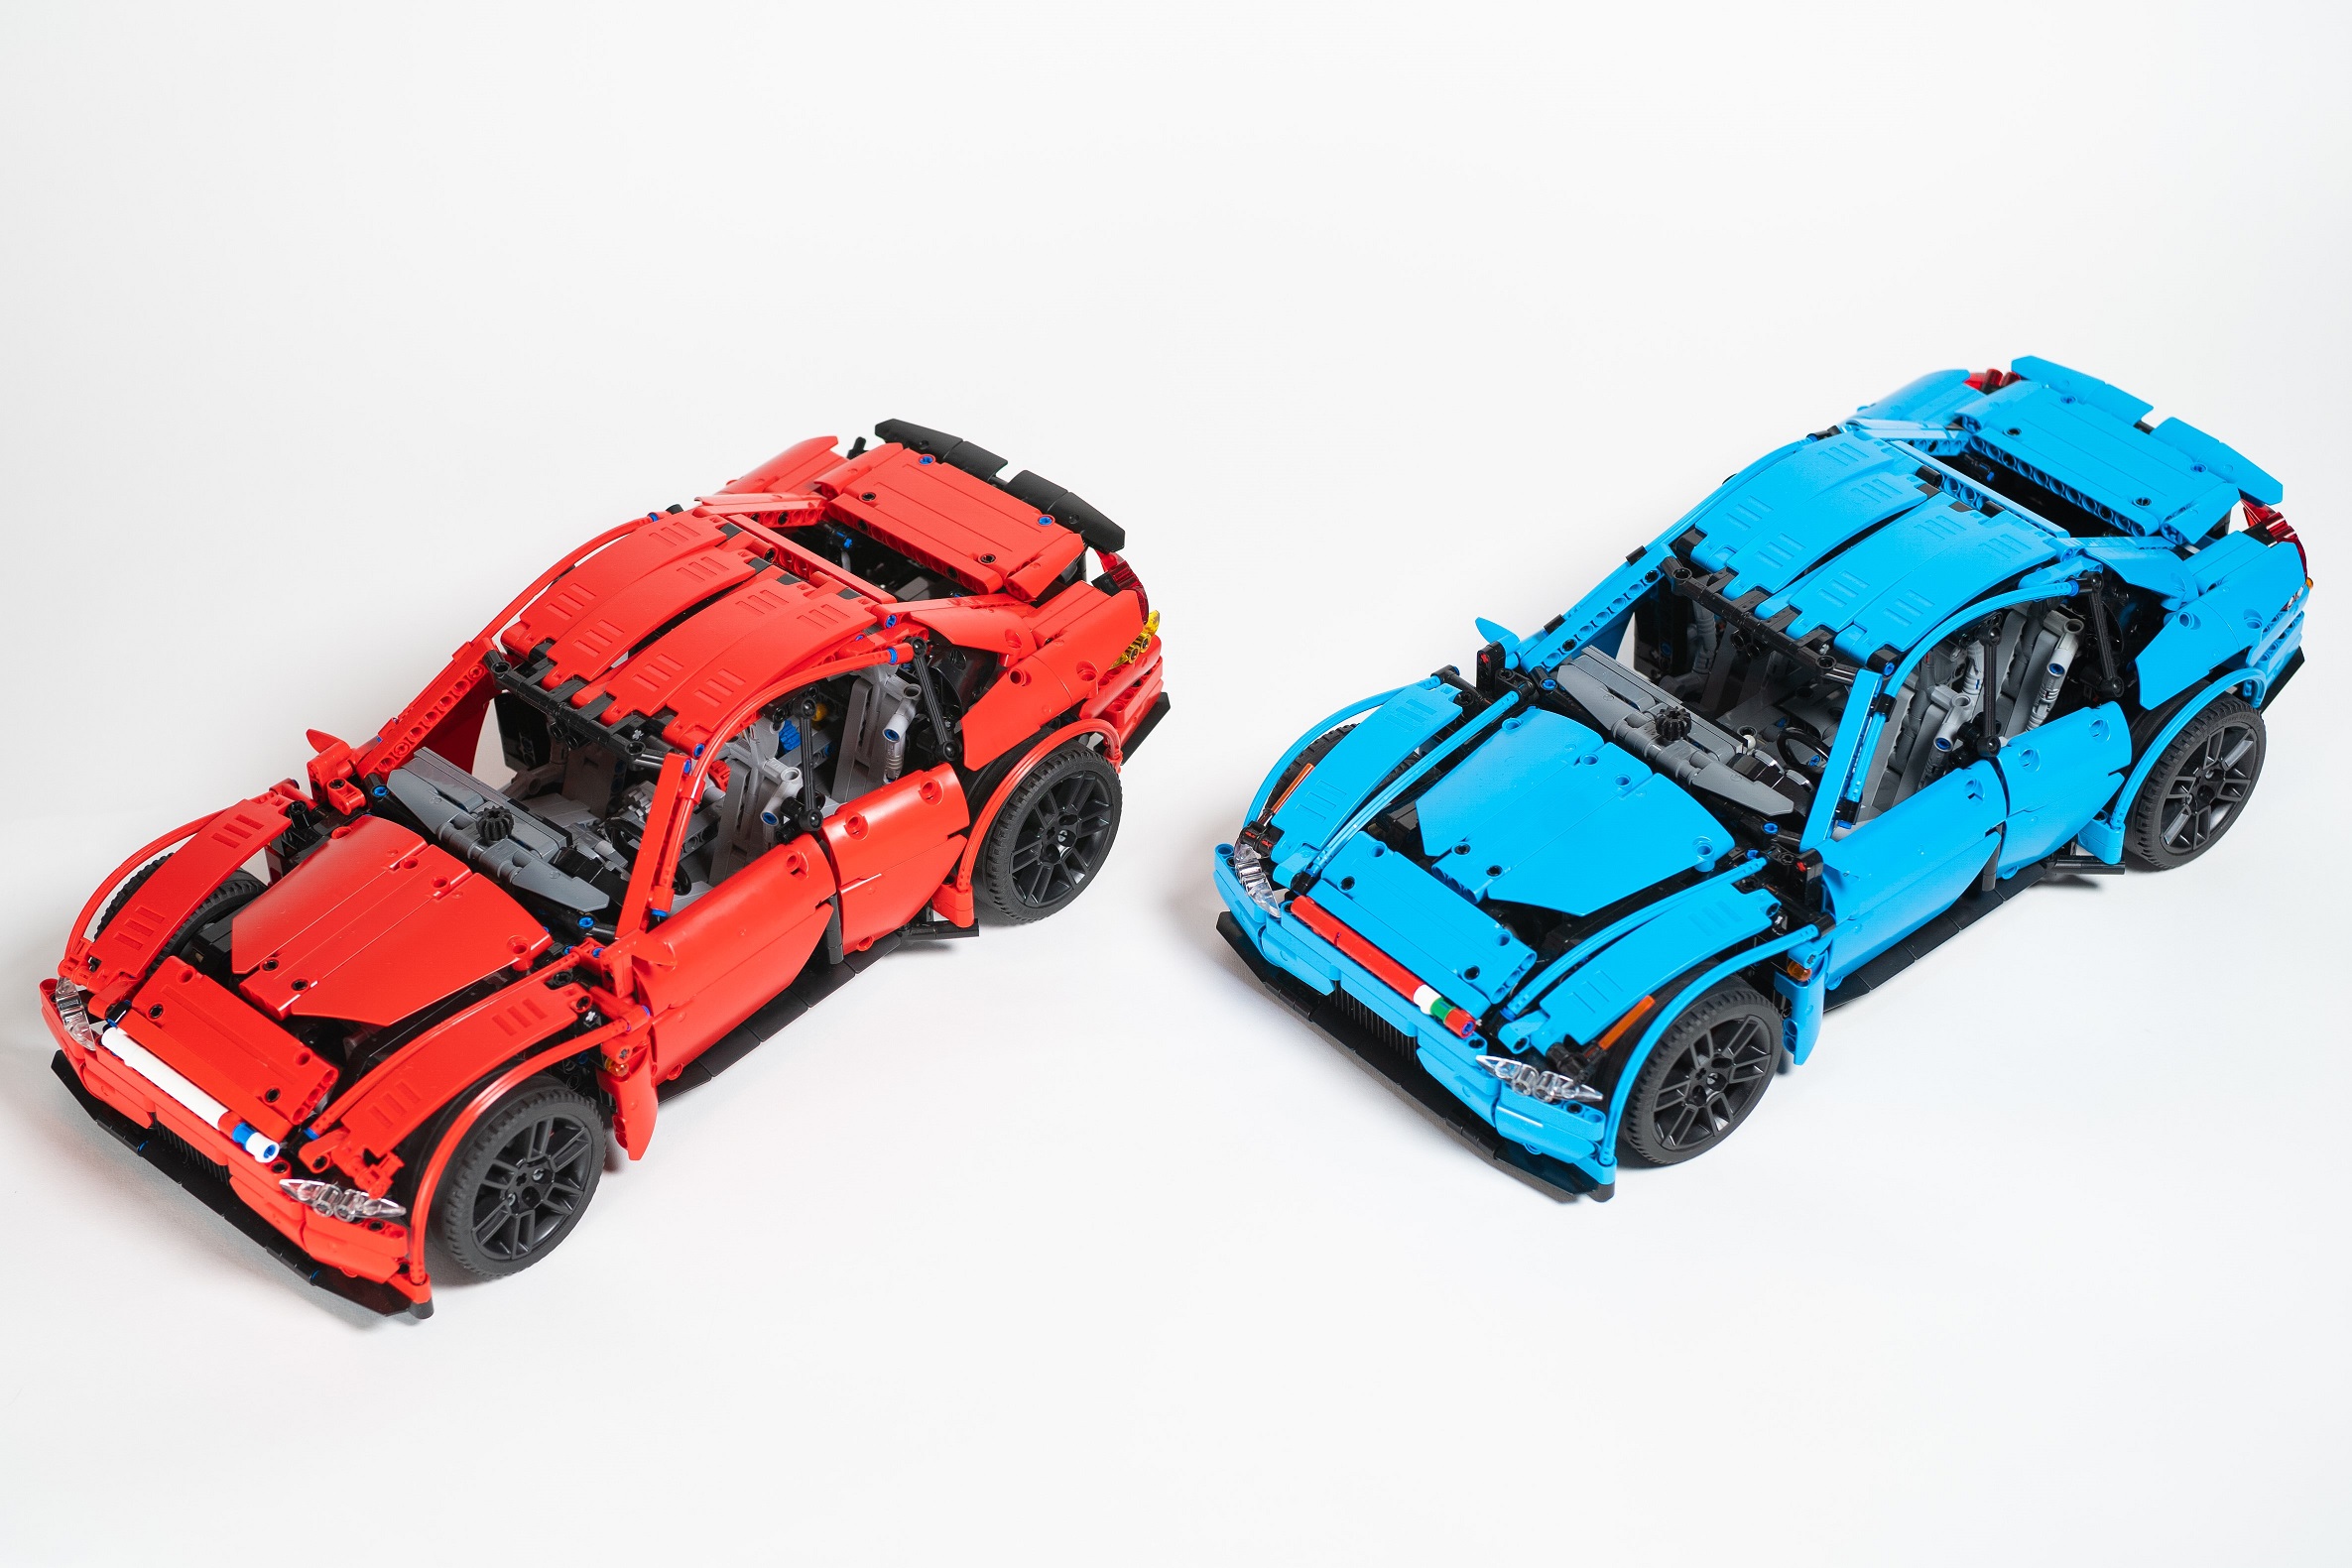
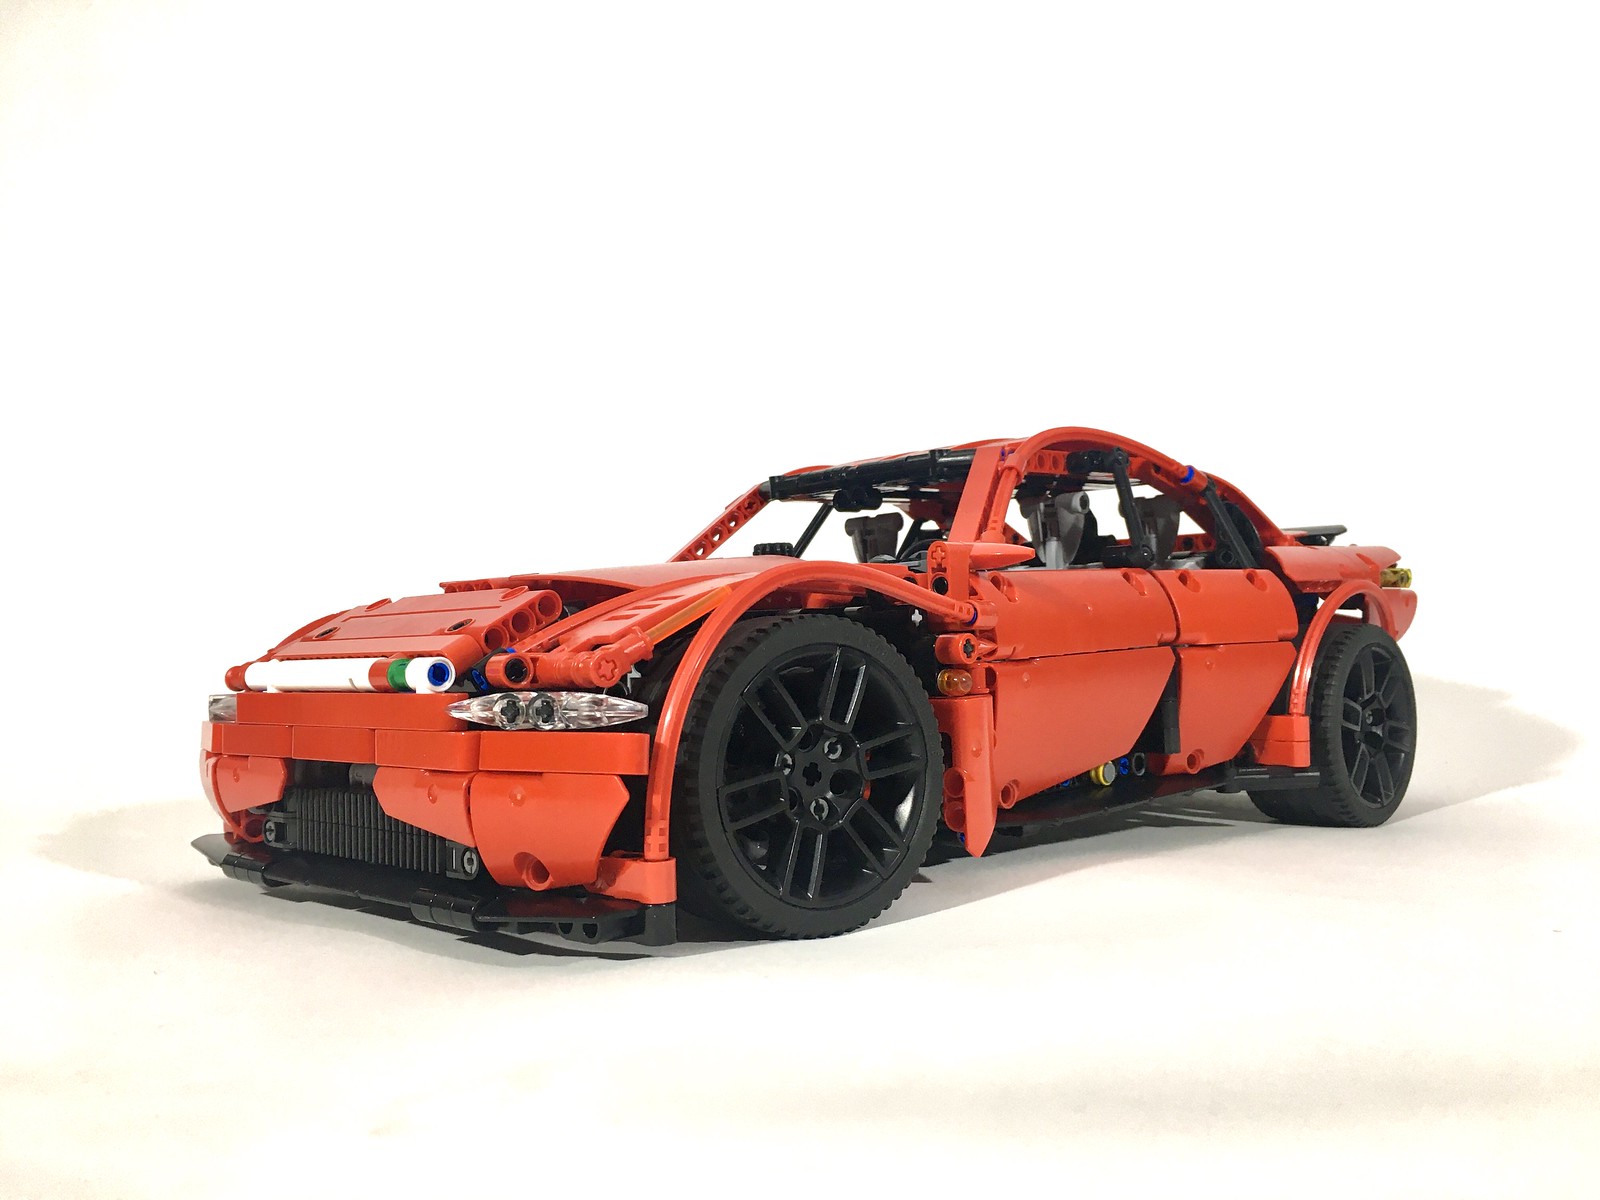
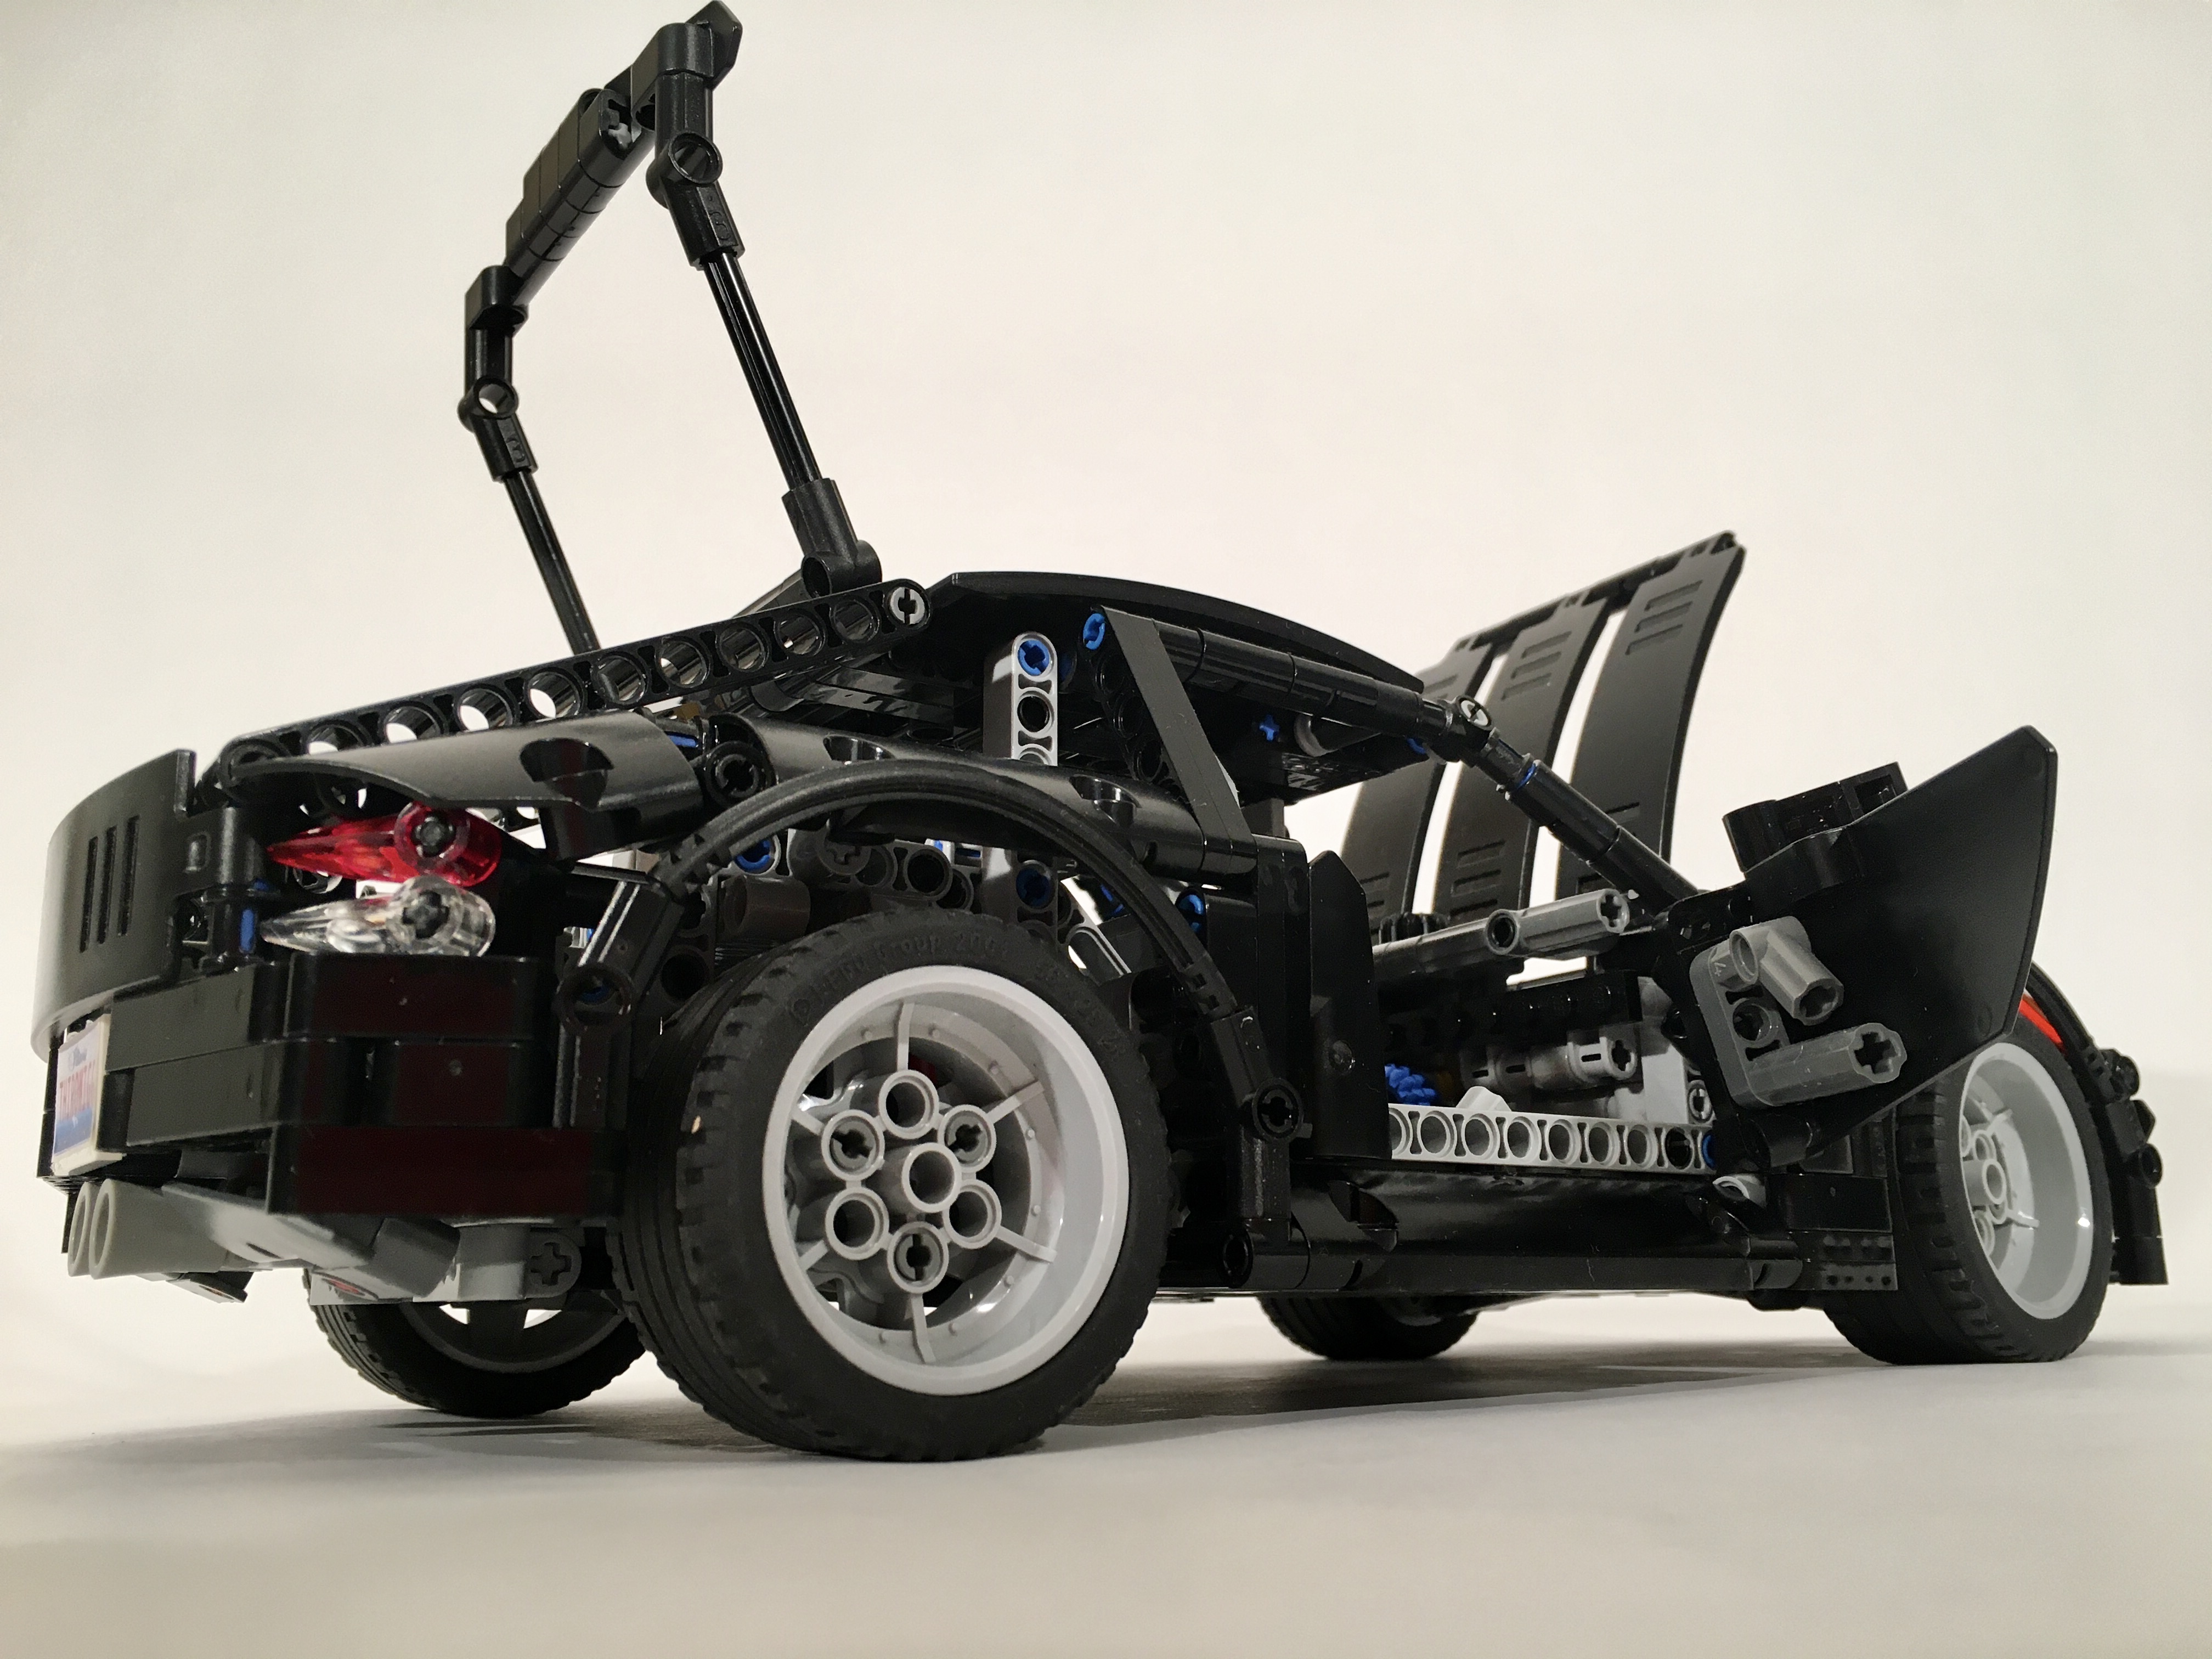
3T Sports Sedan was the inaugural car for startup Thirdwigg Motors, and the market requested another, smaller, sportier offering. The board of directors approved development of the 2C to fill this need.
Full gallery including instructions may be found here.
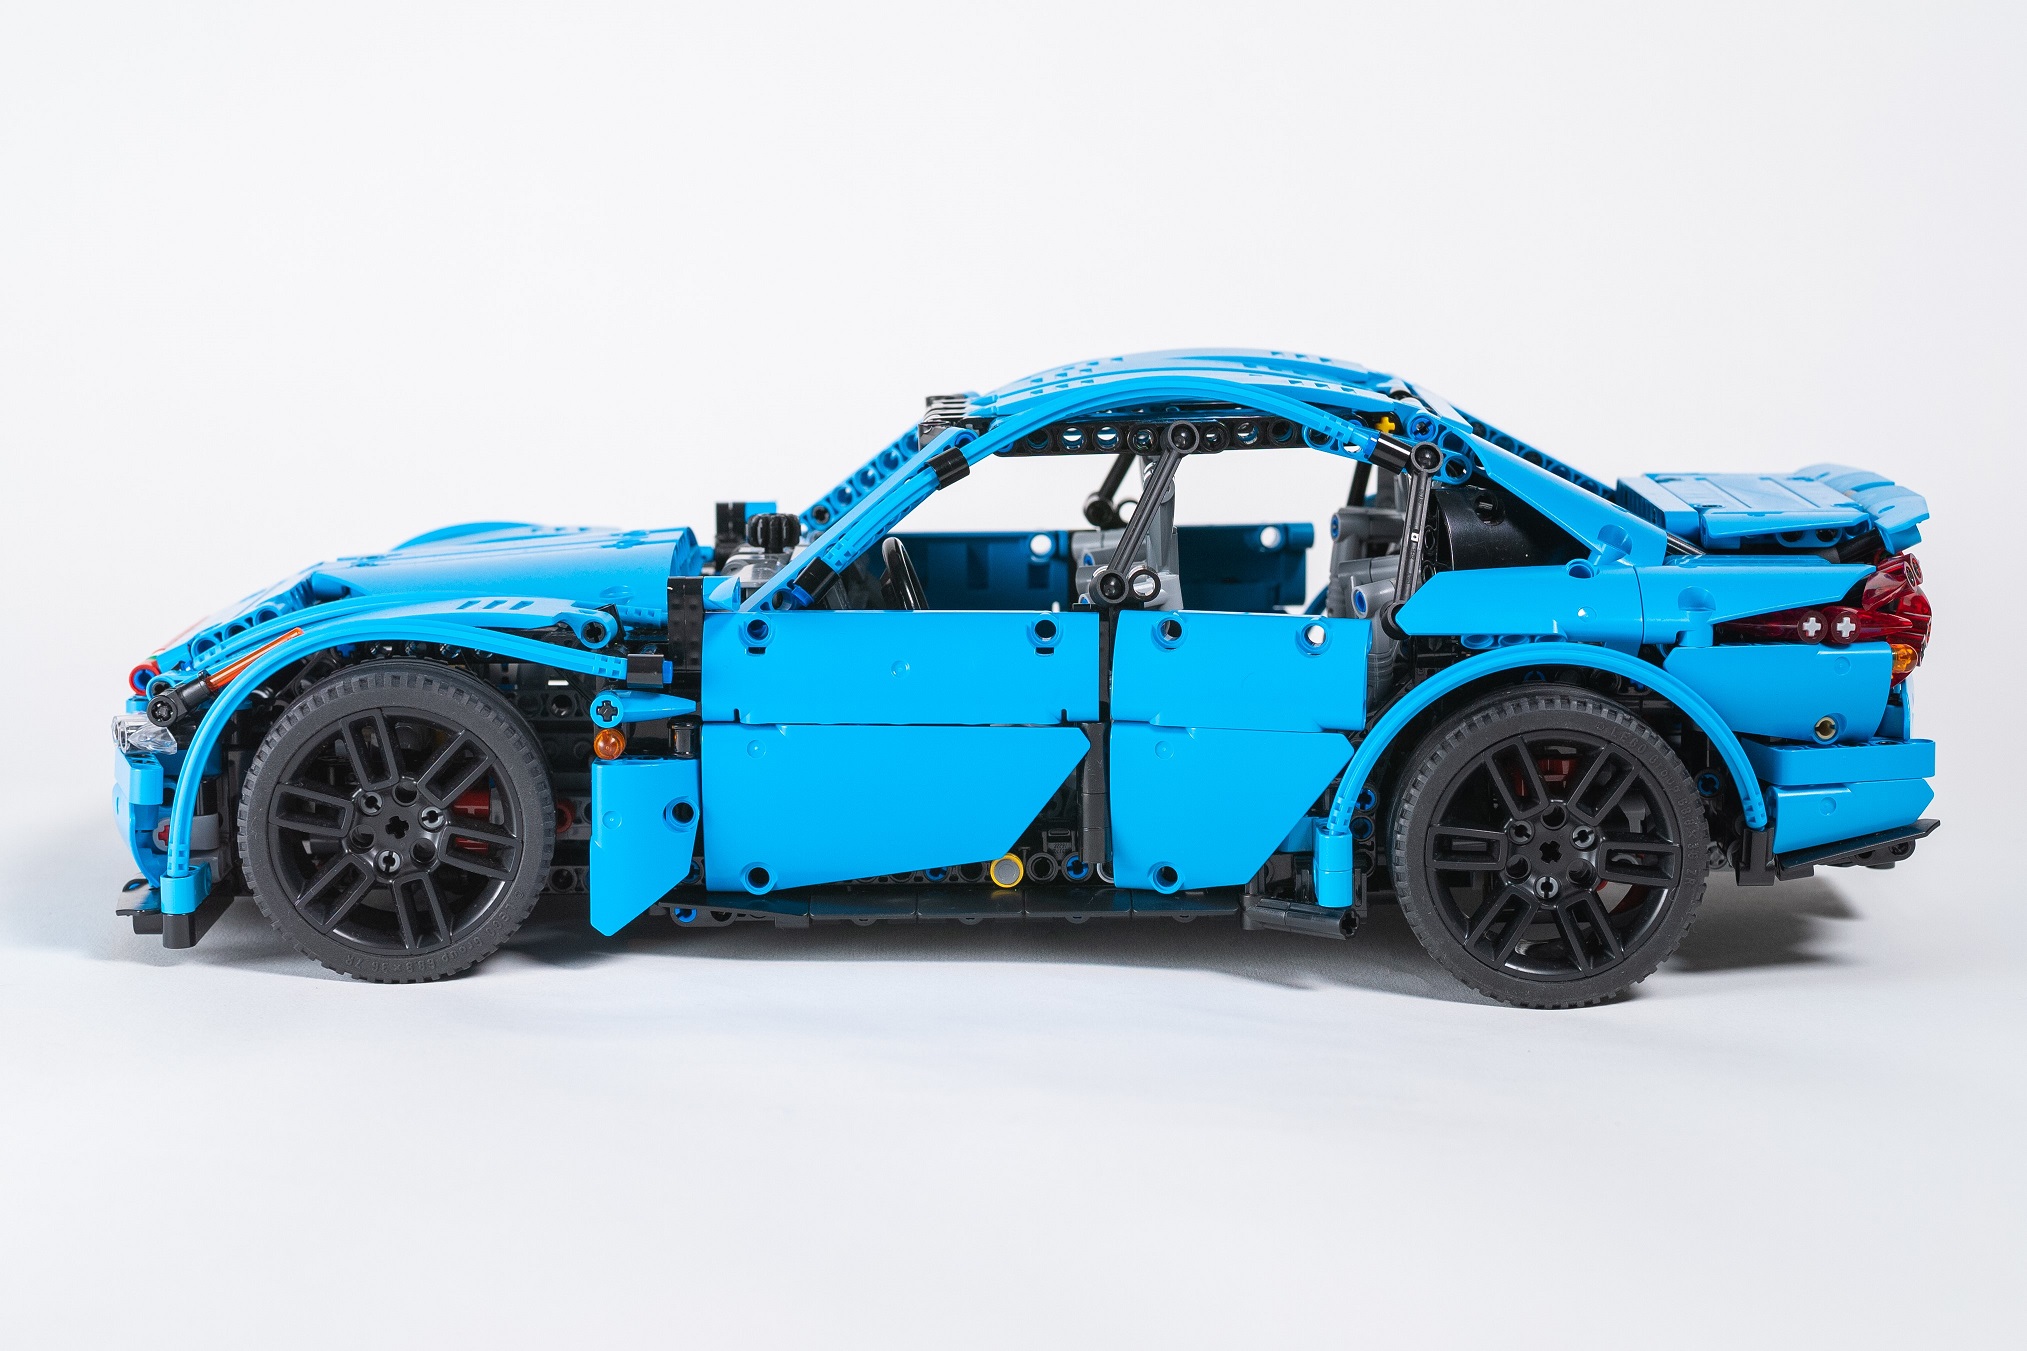
I wanted to keep the scale and keep many of the best parts of the 3T in this design but change the body style and add a couple of features. Very early I decided on a two door with a mid or rear engine. I wanted to get a better transmission, so with this, I set of to work. I scaled the car to the Porsche Cayman, and started fitting in parts. I used the same suspension from the 3T in both the front and rear, which constrained how the driveline would have to be routed.
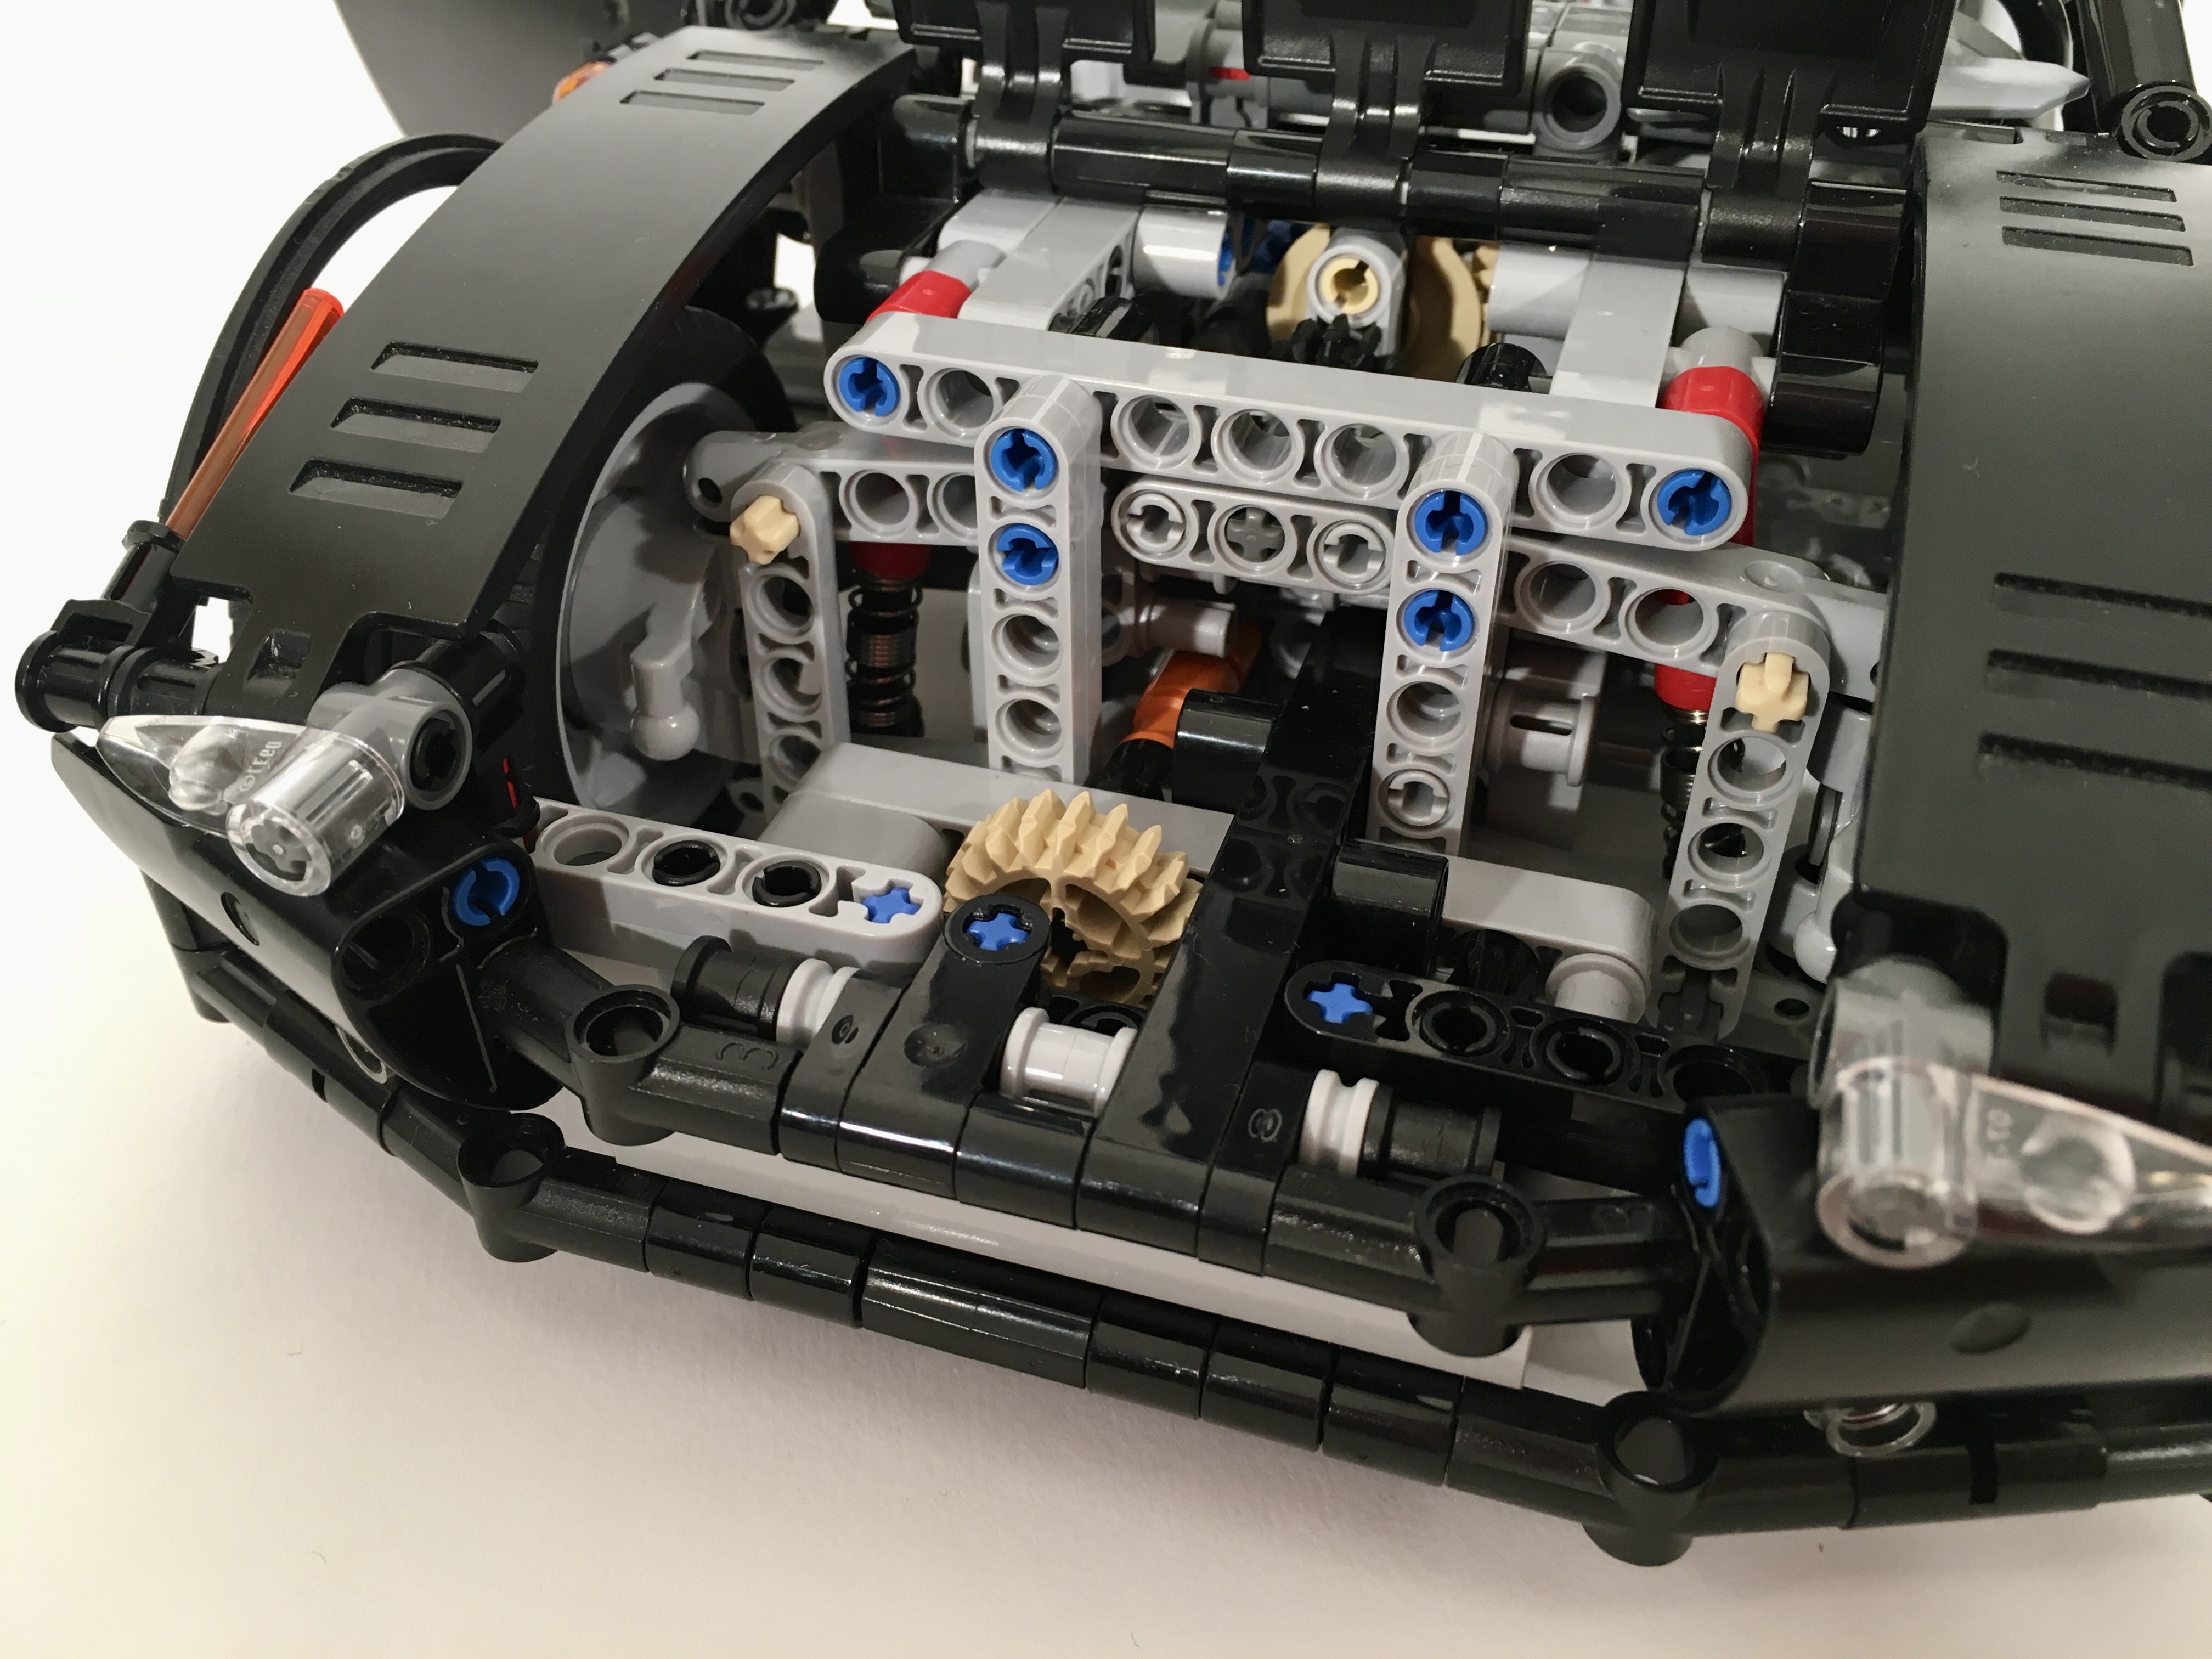
It was at this point that the interior setup got a little complicated. When I started this car, the new Wave Selector was just release which optioned a lot of gearbox options. After seeing this great little transmission, I knew I had what I wanted: a four speed sequential transmission. After playing with some options, I place it in the middle of the car. I toyed with having the engine behind the rear axle, but settled on a mid placement. Nothing larger than a Flat 4 was ever considered. The four speed gearbox worked and a changeover axle ran to the front under the suspension where a simple rotation limiter was placed. The steering HOG and steering wheel had all of their mechanics in front of the transmission, so everything fit.
I had intentions of having a ratcheting gear selector to work with the slick sequential transmission. But I was running out of space. The center of the car was taken up with the transmission, suspension at each end, and placing one in the rear did not give a way to connect to the transmission. So the only place left was under the front hood. There were a number of great change over options that work well. I tried each. Some fit, some worked great, but each had the same problem: there was not good way to seamlessly integrate the “button” into the bodywork. I had visions of pushing on a grill to actuate the mechanism, but the grill was not very big, and required even more space than I was already using. In the end I decided to scrap the idea of a changeover, and use a simple rotary selector. It is not fancy, but it works well, and keeps the bodywork clean.
Through out this process I was toying with ideas for the body work. Generally, I add parts as I like them, and when everything is placed, I rebuild the whole car with structures in place for all the final placements of critical internal and external parts. But this car had a large transmission in the middle which meant there was no frame running from the front to the rear. I added a structural frame under each door, and tried to build up the frame under the transmission as best as I could. It works, but there is still a little car flex under heavy center load.
First, the bodywork on this car works better for my eyes than the 3T, even though I tend to like sedans a little better. Second, the gearbox worked flawlessly. It was smooth, and even though I had the open the hood the change gears, the smoothness was worth it. Finally, the suspension worked great as it had proved itself in the 3T. It now adorns the desk at my work. Hopefully you enjoy it too.
Don’t worry, Thirdwigg Motors is already hard at work on the next car.
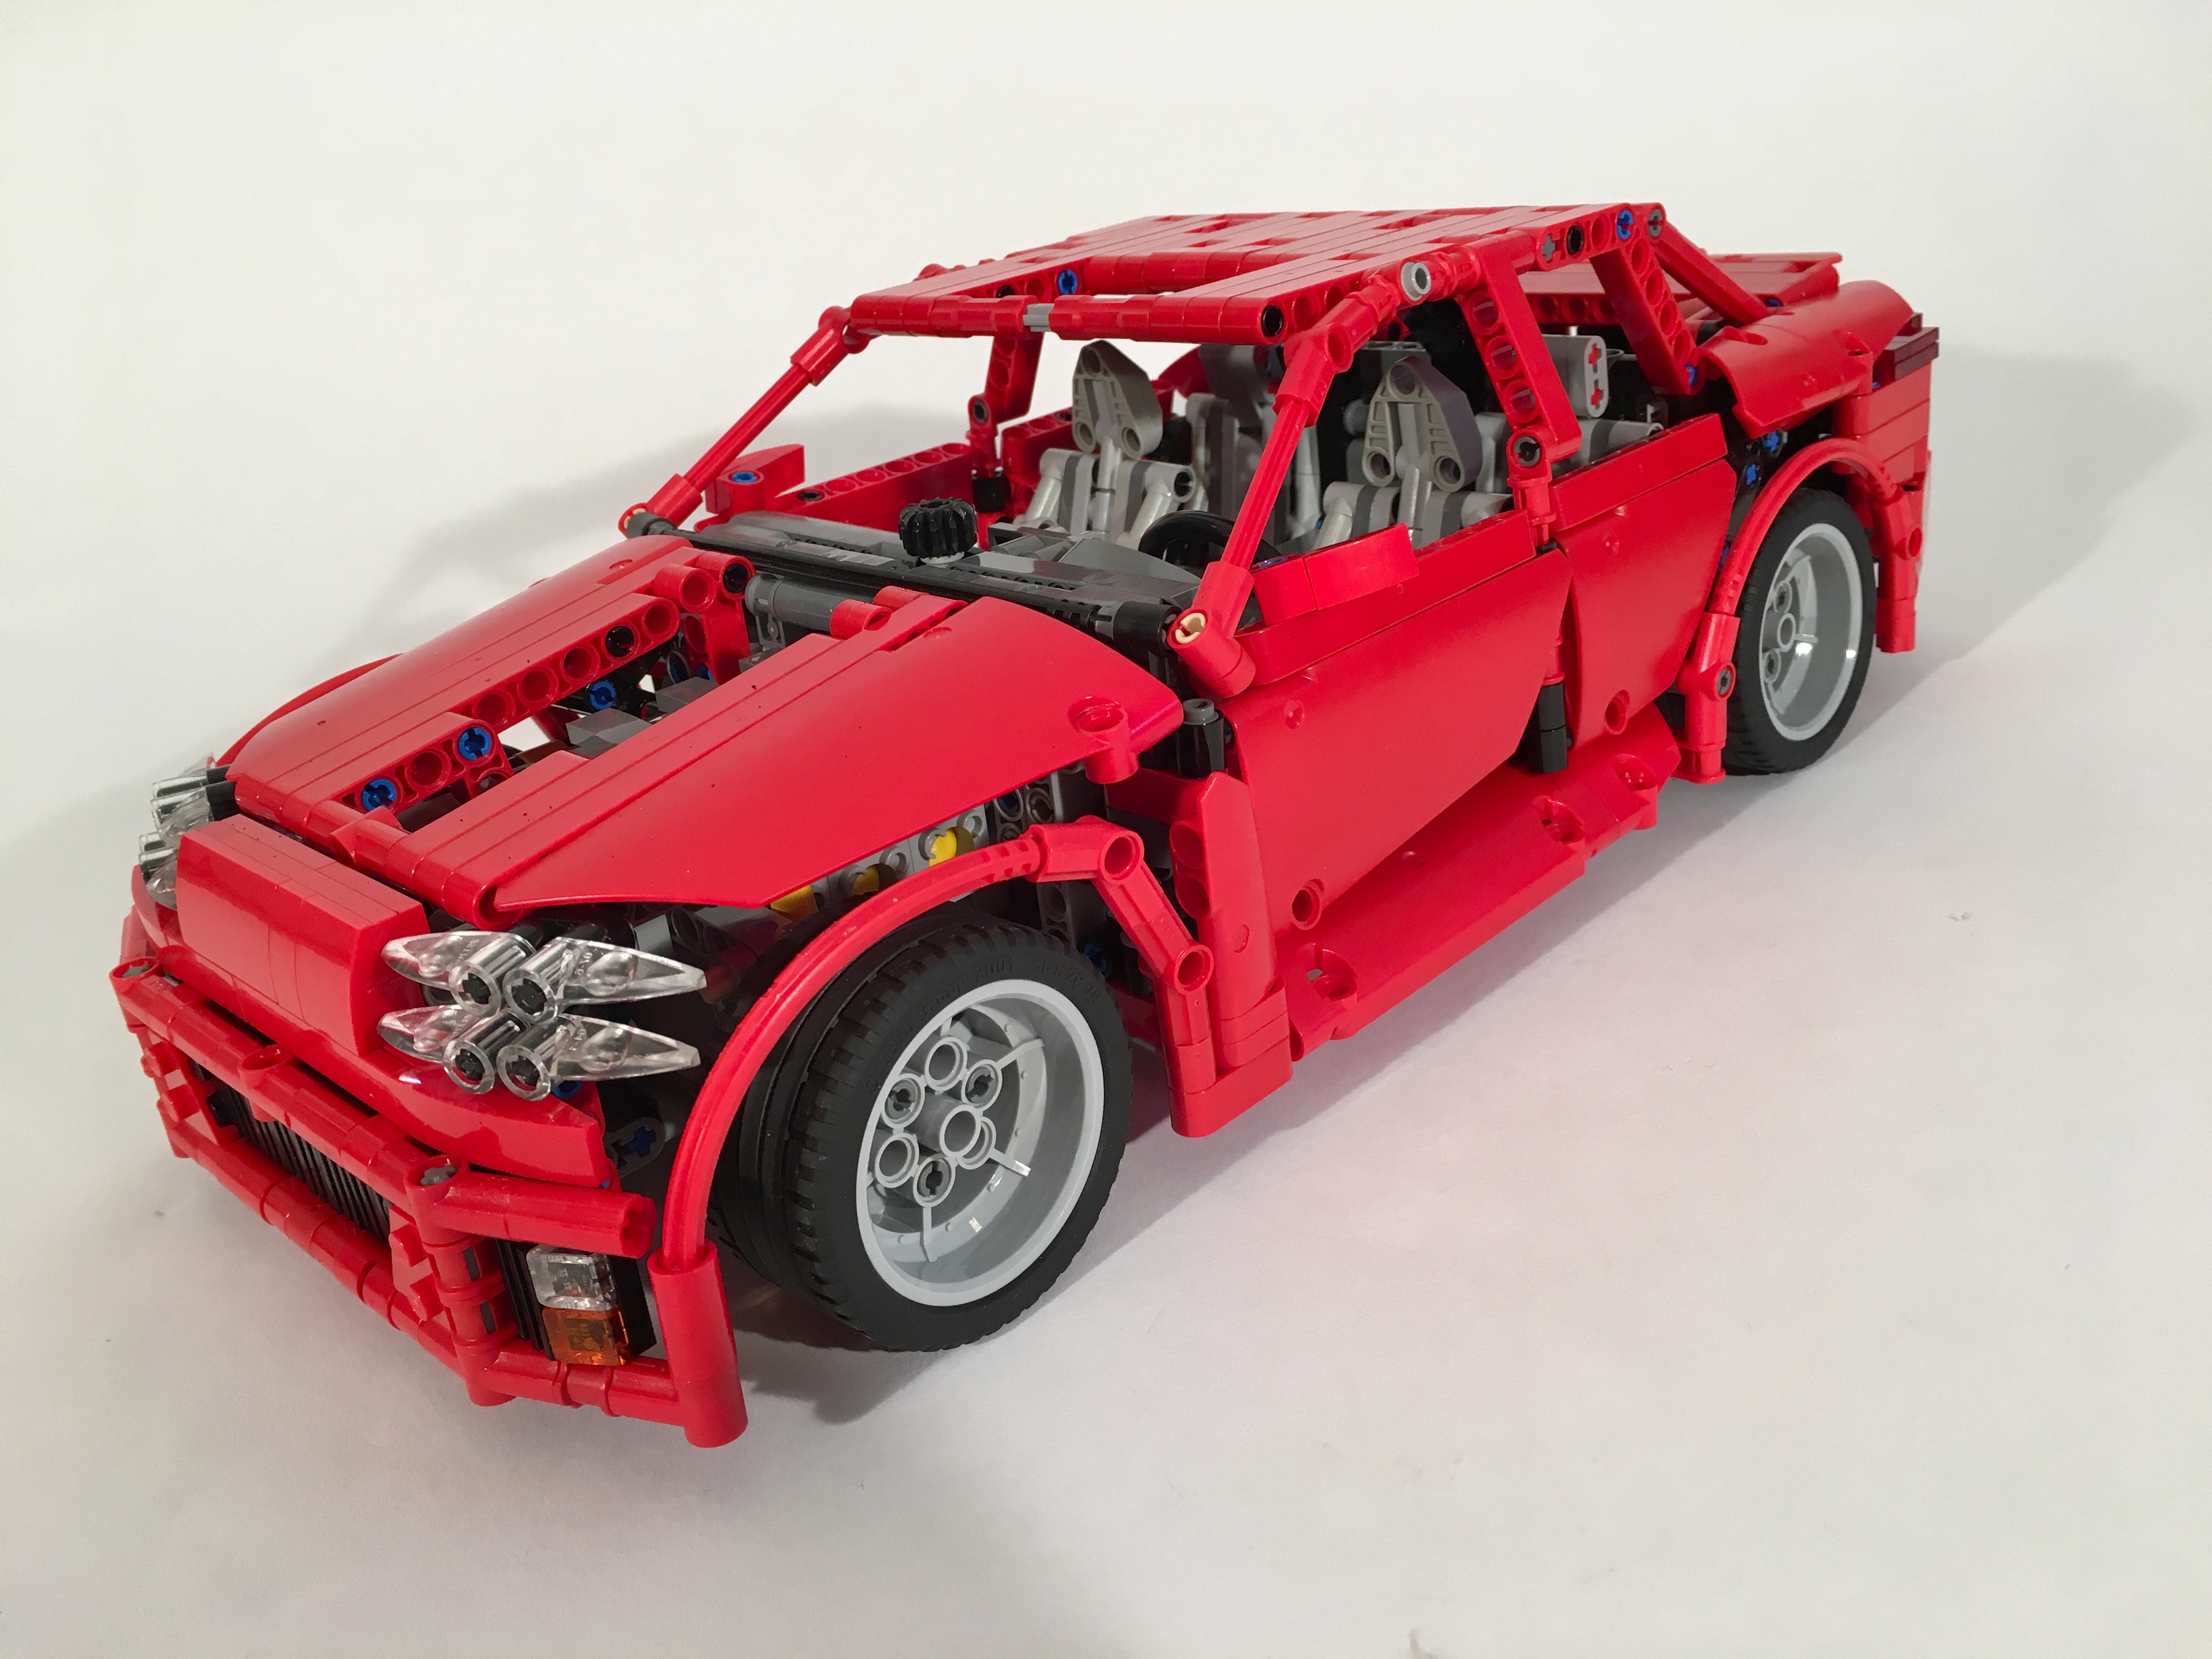
The sport sedan is my favorite kind of car. You can have your McLaren, if I can have four doors and a long hood. One with the proportions of a C-class, the suspension of the ATS, the engine of a Mazda 6, the suede interior of the M3, and the value of the G70. Don’t worry about me, I’ll be set. But there are few good sedans in LEGO, and even fewer smaller ones. Let’s change that.
When I set out to make a sedan, I wanted it to be smaller. What were the features I could add in a smaller LEGO car? It had to have some style, suspension, a gutsy engine, steering, and a transmission. Finally, it had to be strong. So I got to work. The scale was set on a 3 Series that was a little wide, so I set the hardpoints and set off to work.
I first set the two axles and suspension. I have built a couple cars with a floating rear differential, and this setup has worked well in the past, so it would work well for this car. Each side had a dual arm independent setup with two shock absorbers. The front suspension used a dual A-arm setup and a wheel hub with only one hard shock absorber. Before adding the steering, the driveline would need to be finalized.
I played around with a number of transmissions, but settled on a simple two speed design for a number of reasons. First, it was smallest as something else would take a lot of space from the interior. Second, something better would take away from the rigidity of the model. Sedans need a lot of support through the transmission tunnel as you lose a lot of rigidity near the doors. Finally, anything more complicated than 2 speeds would be tricky to manually operate (play with) in this scale. About half way through my work on this project, some fun new gears came out which improved the design.
Next, I moved on to the bodywork. This is the part that causes me the most problems in my car builds, and this car was no exception. I set the doors first as I wanted to use two panels for each side. Then I worked on the front and rear bumpers. The rear came together quickly, but the front took a little more time. I wanted something that was sporty, and with a simple grill. I think it worked out well. Finally was the roof and the rear quarter panels. This part took a long time, as I wanted something strong and stylish. The result is strong and has the C pillar split into a D pillar. It is not perfect, but it is stronger than all the panel ideas I tried.
After the bodywork was set I did something I have never done before, I rebuilt a second whole car. This time, I knew all the final features, and where all the body work would attach so I could focus on creating a strong frame that would best support the whole design. I am happy I did this, as it cleaned up the inside, found some new solutions, and made the whole car stronger. Building this way also helped me think through how clear instructions could be made.
In the end, I was pleased with the final design. It accomplished all the goals I wanted, and it is an accessible design for others to recreate. I love building in this scale, and cars are a lot of fun, so I will need to do another small car design again.
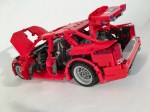
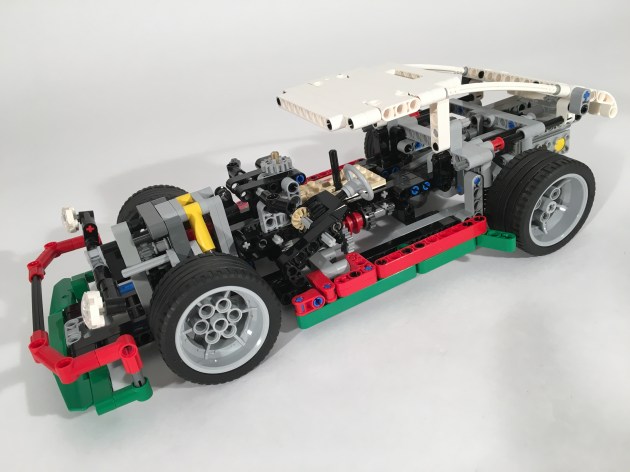
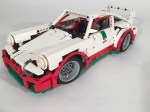
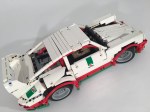
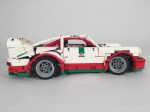
In a moment of online immaturity, I requested a topic for the 100th LUGNuts Challenge. I was tasked to build “any year Porsche 911, or a 2015 Jaguar F-Type.” It was to be completed during February 2016. I, of course, mistook the challenge as a requirement, and worked frantically to complete the MOC in 13 days.
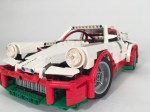
Being the year of the Technic Porsche, I figured it was a good idea to try my hand at the 911. The 911 is an iconic car and it’s shaping is instantly identifiable. It seemed like a bad idea to try and recreate it. I spent the first week of the month planning the style, scale, and the features. I decided to model 935, 964, or 991 GT3. Each were rear wheel drive, and had a wide rear track with prominent rear fenders. I decided on a four speed transmission, steering, and full suspension all around. Throughout the build, I settled on a cup racing version of Model 964, in OCTAN colors of course.
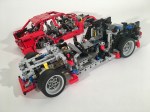
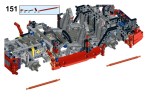
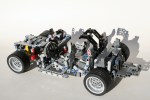
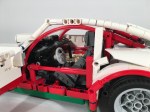
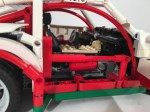
I started building on Feb. 10th, and completed the placement of all the major components. By Feb. 15 I had a final chassis. I used a “dynalive” suspension on the rear connecting to a short/long arm suspension design. The differential is not fixed to the chassis, but move in a dynamic way between each side of the suspension. I have used this set up before, and it works well. Immedialty in front of the suspension is the transmission. Rather than having the common four speed tranmissions found in 8880 and many other MOC, this transmission has all the gears in a single plane. This add a couple of gears, but it allows for a lower car, which works great at this scale. The output shaft exits the transmission on the non-driver side, and goes up and over the rear suspension where it connects to the boxer 6 at the rear of the car. Finally, I added a simple double A-arm suspension on the front.
By the 16, I had an introduction to the body work, and the steering had been finalized. I added a drivers seat and worked on the roof , and a draft of the front hood was done on the 17th. On the 18th, I submitted for feedback to the internet a couple of designs for the front hood. I finalized the hood and the rear quarterpanels on the 19th. By the 20th the exterior details were done, and I stopped posting work in progress pictures. After a week of solid building, I took a couple days off and made a 12 part Bricklink order to cover the few white parts that were needed.
I then spent the next couple of days finalizing the interior details, including the dashboard, a full roll cage, and the engine details. The MOC was done by the 25th, which means I completed it in 15 days, faster than anything I have ever built.
The MOC worked well. The suspension was taught, and functioned well. The steering lock was a little limited, but it worked smoothly. The transmission was a little gummy in gear one, but two through four worked great. But did it look like a Porsche? Yes, but some parts bothered my eyes a little, such as the spoiler, fenders, and hood. Basically the shape is there; you can tell what car it is, but from some angles, you cannot tell it has flared fenders. The hood does not look as curvaceous as it should, and the spoiler looks like an add on. The colors looks good, but a little more great would be great. Overall, I was pleased with what I did in 15 days, but next time I will be a little more particular.