International FTTS
July 30, 2012 1 Comment
It has been a little quiet in Thirdwiggville for the last month. I have been working on a project that is taking a lot of time and resources, so my posts have slowed, even though my building has not. But just wait, it’s going to be awesome.
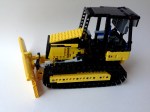
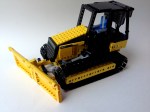
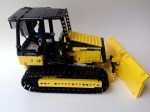
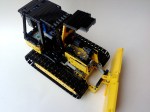
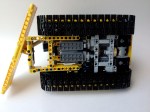
Last summer I wanted to do another Trial Truck that would utilized some features I have never used before. I wanted something complicated to see how it would work. I wanted a model that would use four wheels steering, independent suspension, and have a simple two speed gearbox while being low to the ground. After spending some time at the Chicago Autoshow, I saw a FTTS concept, so I thought this would be a great vehicle to model for this next truck.

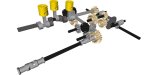
This model would be built around an independent suspension. After seeing it used so effectively in a truck by ATRX, I wanted to give it a try. Each of the four wheels would use a simple double a-arm set-up with a wheel mount attached at the outside. The wheel mount would house the portal axle and connect the steering linkage. After a couple of different designs, I also decided the wheel mount would also connect the the shock absorbers. This was a little unorthodox, as most independent designs mount the shock absorbers directly from the frame to the a-arms. I did this for two reasons. First, the model would be heavy, and I could not get the support I needed when the shocks were connected to the a-arms. Second, and most importantly, I noticed too much suspension flex when the shocks were mounted to the a-arms. The force applied to the wheel would go up the wheel, to the wheel mount, through the pivot, halfway down the lower a-arm to the shock. LEGO is relatively stiff, but all these steps complied too much flex. I would not have it. I mounted the shocks on the wheel mount, and created a simple MacPherson strut set-up. This worked well, as it allowed for full steering movement, long suspension travel, and adequate support of the truck.
The front and rear suspension axles both had a PF-M motor driving the steering. Each were on independent PF channels connected to a single 8878 Battery Box to allow for individual steering, crab steering, and to solve steering drift commonly problematic with four wheels steering vehicles. Both axles were connected with dual drive shafts running the length of the truck. One drive shaft would then connect through a simple two speed gearbox to the PF-XL motor. The final gearing was 1:6.2 and 1:10 for the truck. This gave the truck sufficient top speed, with an effective crawler gear. The Battery Box used for the drive motor and the gear shift motor was placed directly behind the front suspension, and in front of the drive motor. This placement was perfect for stability. It helped give great traction to the front wheels, kept the center of mass low and to the center with a slight forward bias.
I then finalized the model with a simple removable body built on a Technic frame. While the hood was little high, and the rear body a little too short, it looked pretty close to the rear FTTS. Fans seems to like the look, as it is still one of my more popular model. See the full gallery here and the Work in Progress gallery here.
The model was a lot of fun to drive, and due to its squat design, it was very well planted. The truck did not want to role over. I think it could have used a little more suspension travel, and having four wheel steering was crucial to give it some maneuverability that was lost due to the suspension design. The gearbox was flawless. The truck did have some trouble skipping gears at the portal axle. It seemed to happen when a single wheel was over-stressed as the driveshaft could have used stronger bracing in each suspension unit. This placed a lot of strain on the particular wheel. So would I do the independent suspension again. Maybe, but it would need some strengthening and redesign. Maybe it’s time for another truck like this.
Thanks for reading. Something big is coming.


