LEGO 42126 SVT8/10


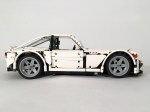
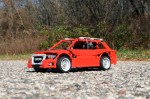
I loved LEGO set 8081 because it gave me a lot of modification ideas, and LEGO 42126 is similar.

Instructions may be found at Rebrickable for the SVT10 and the SVT8.

LEGO 42126 SVT10 Front

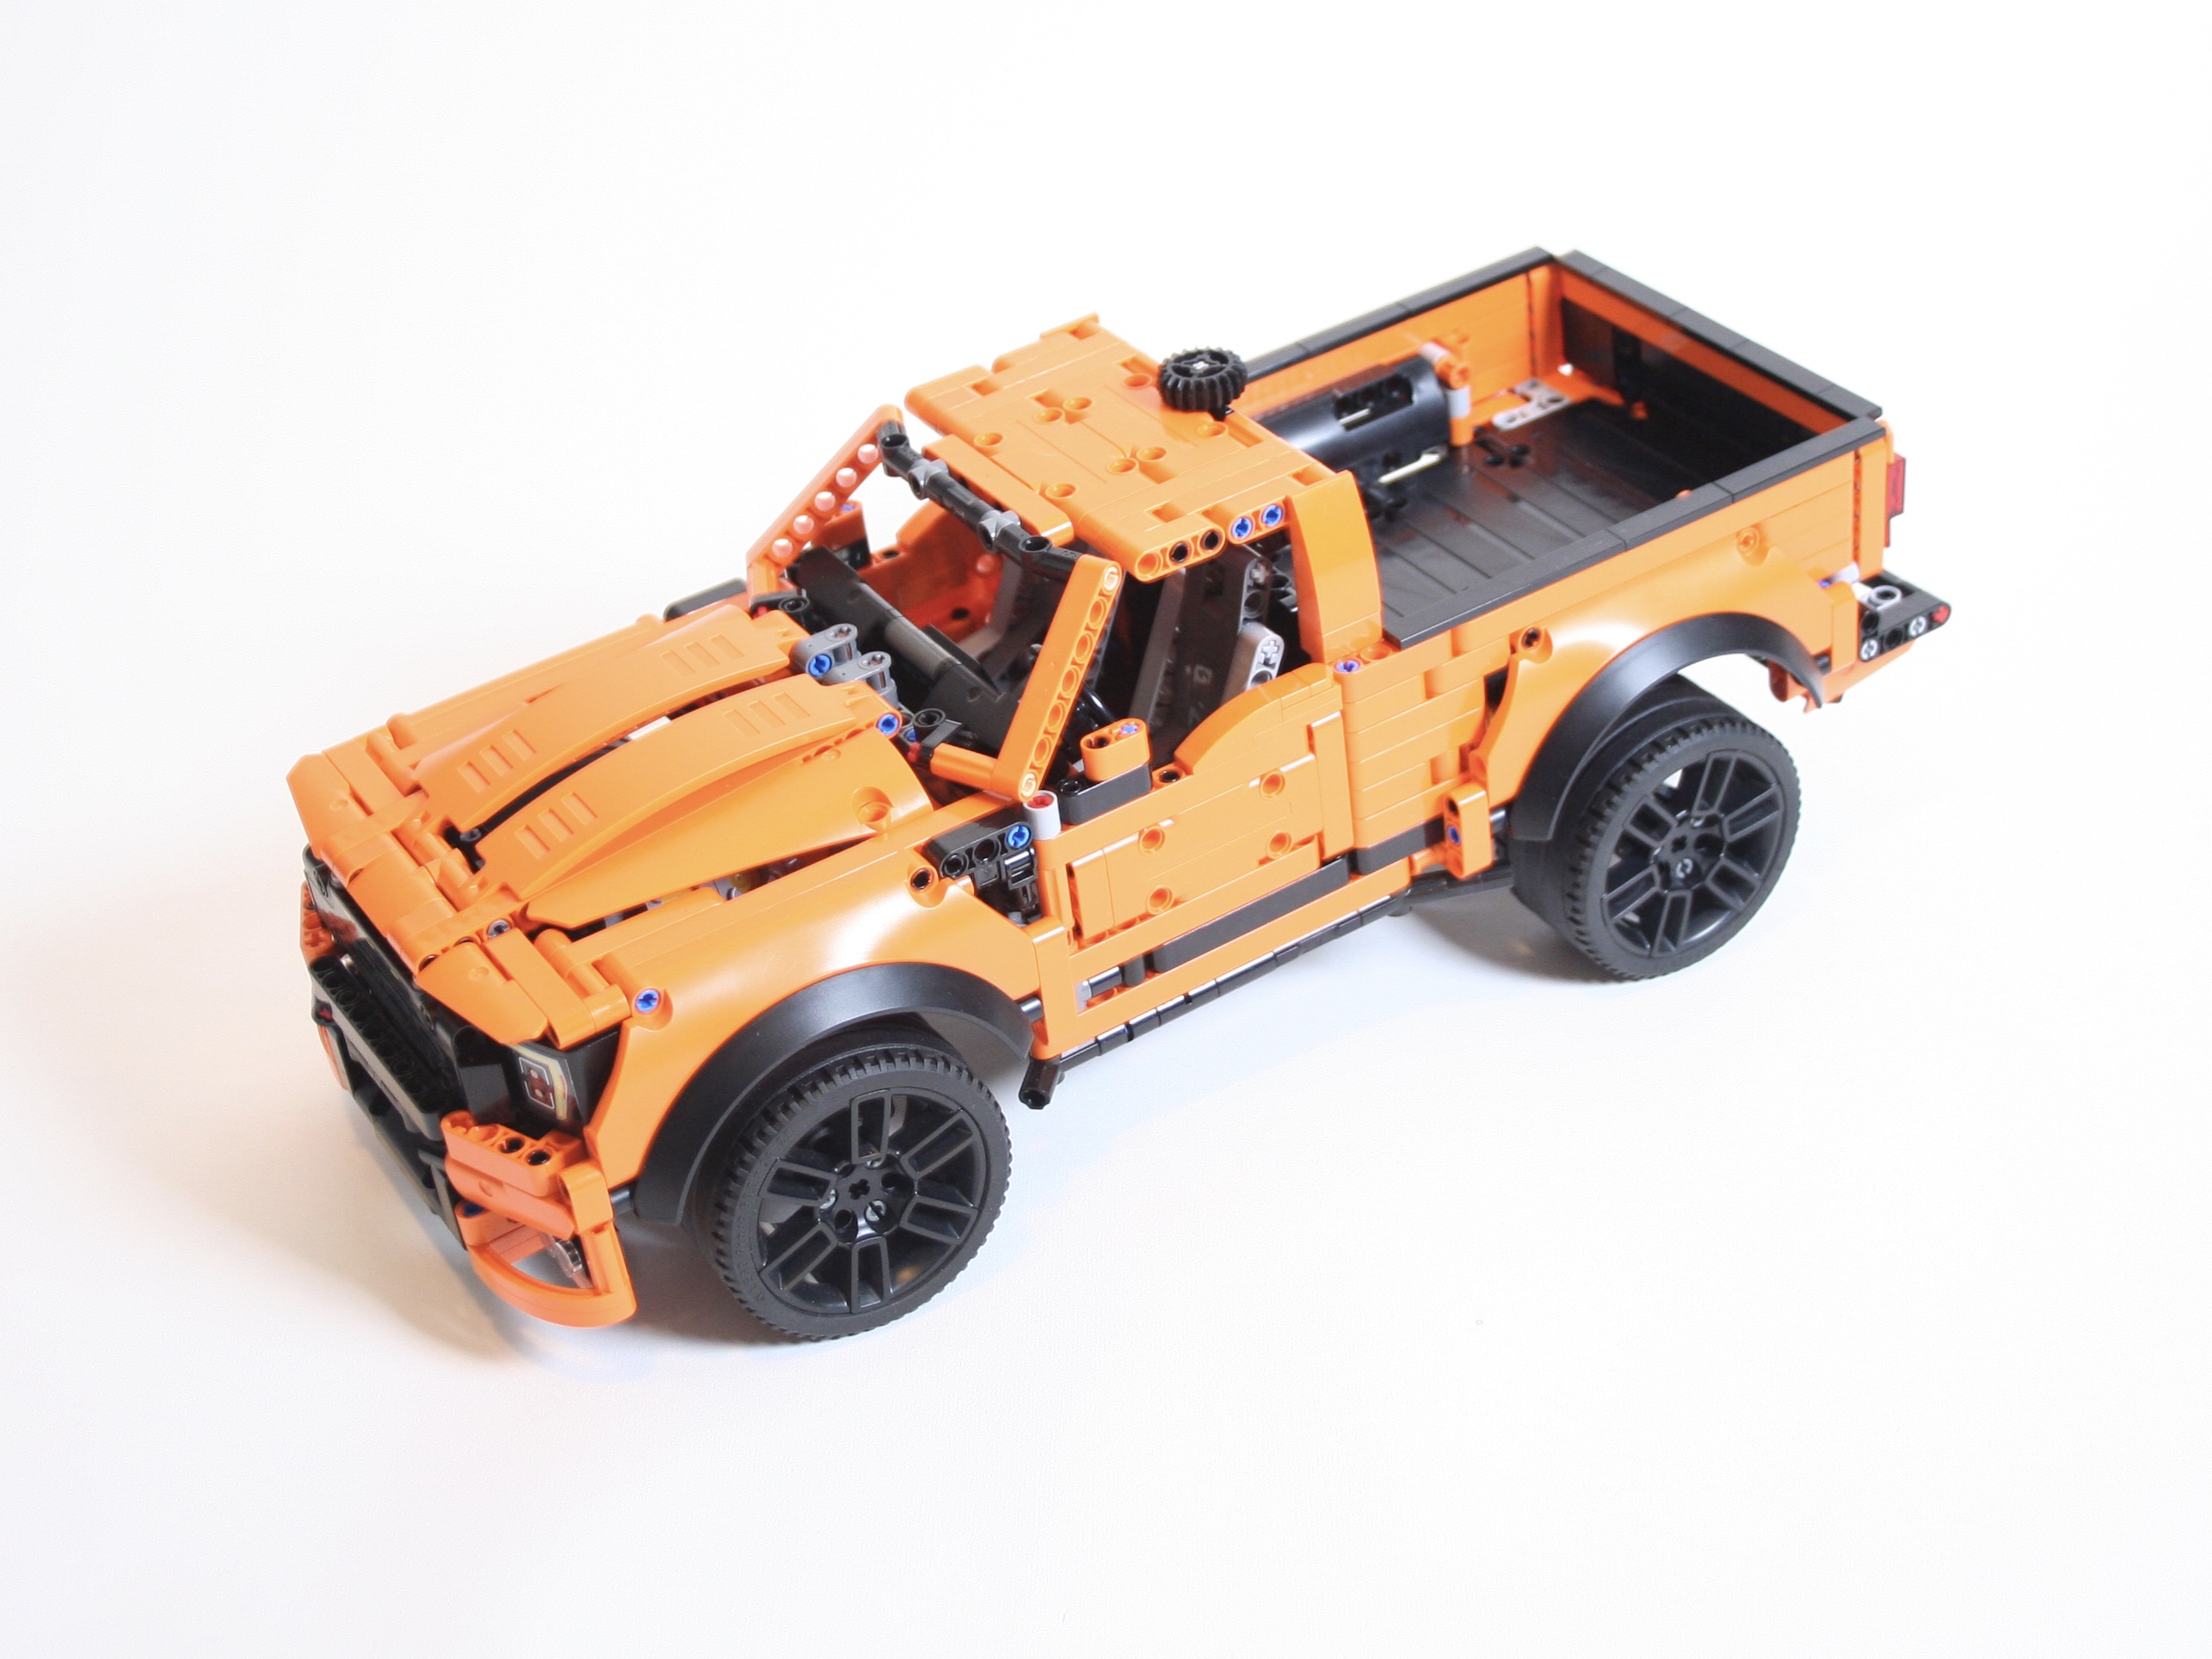
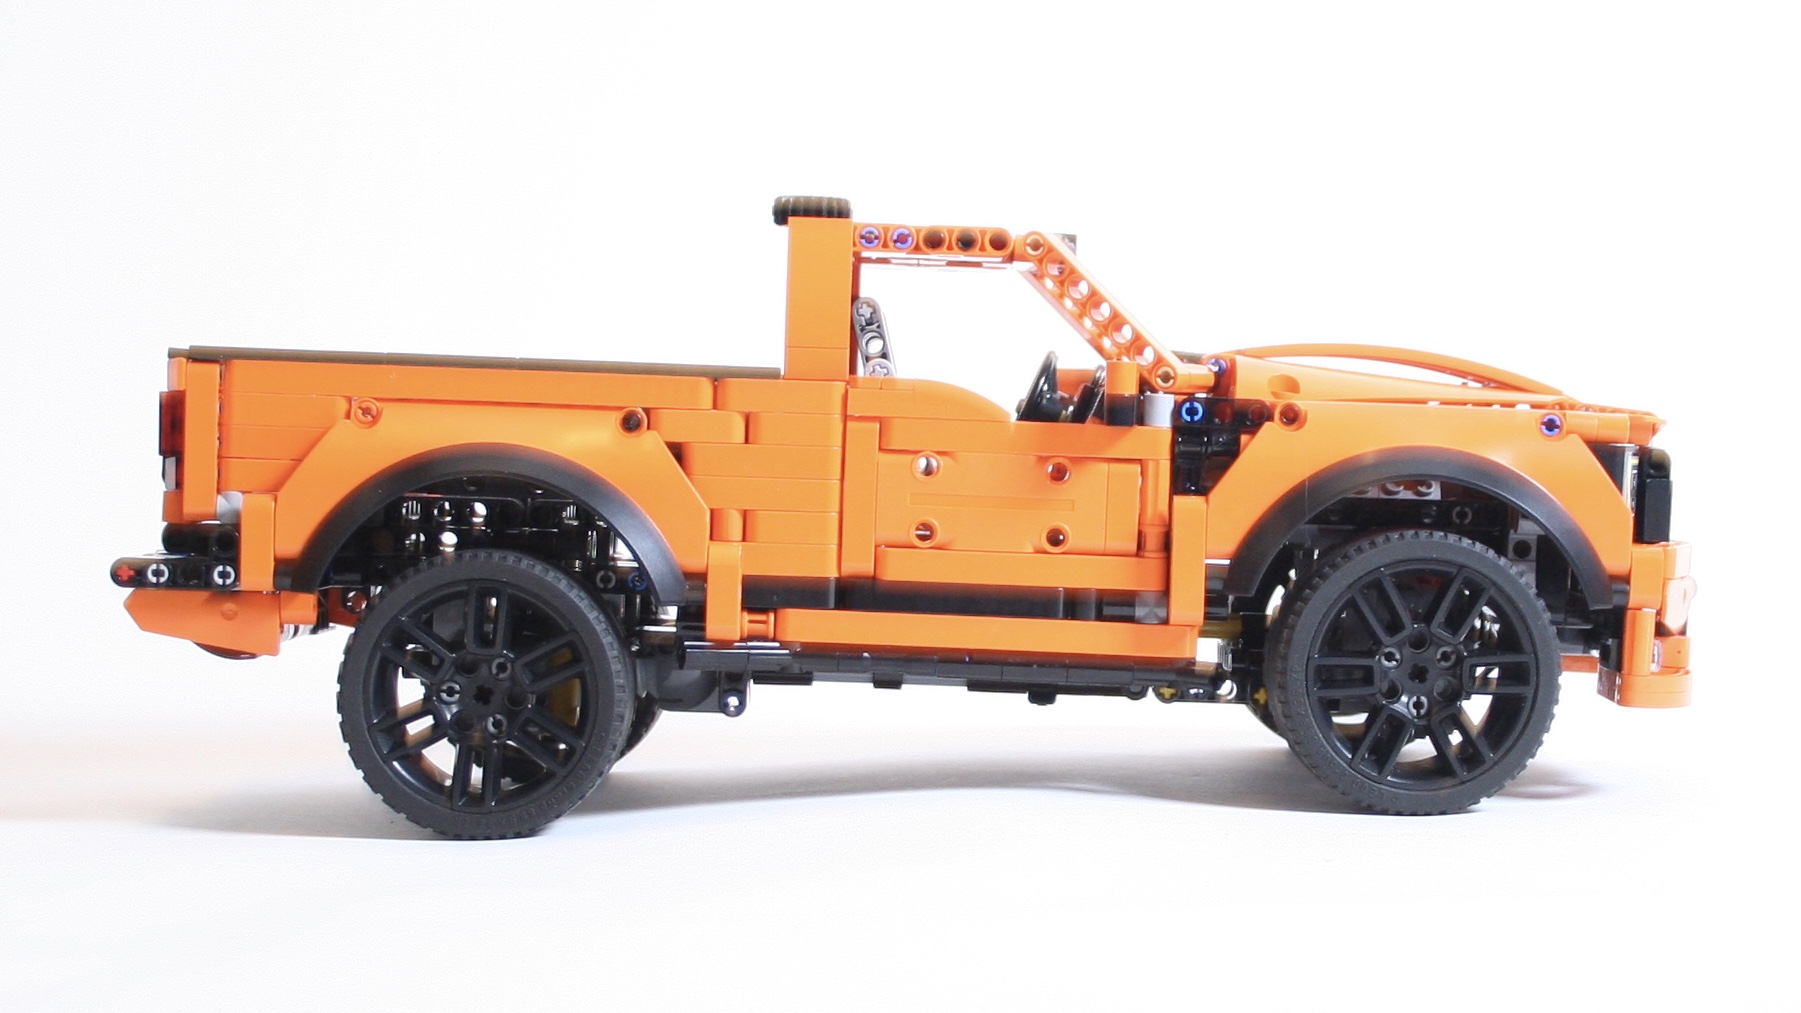
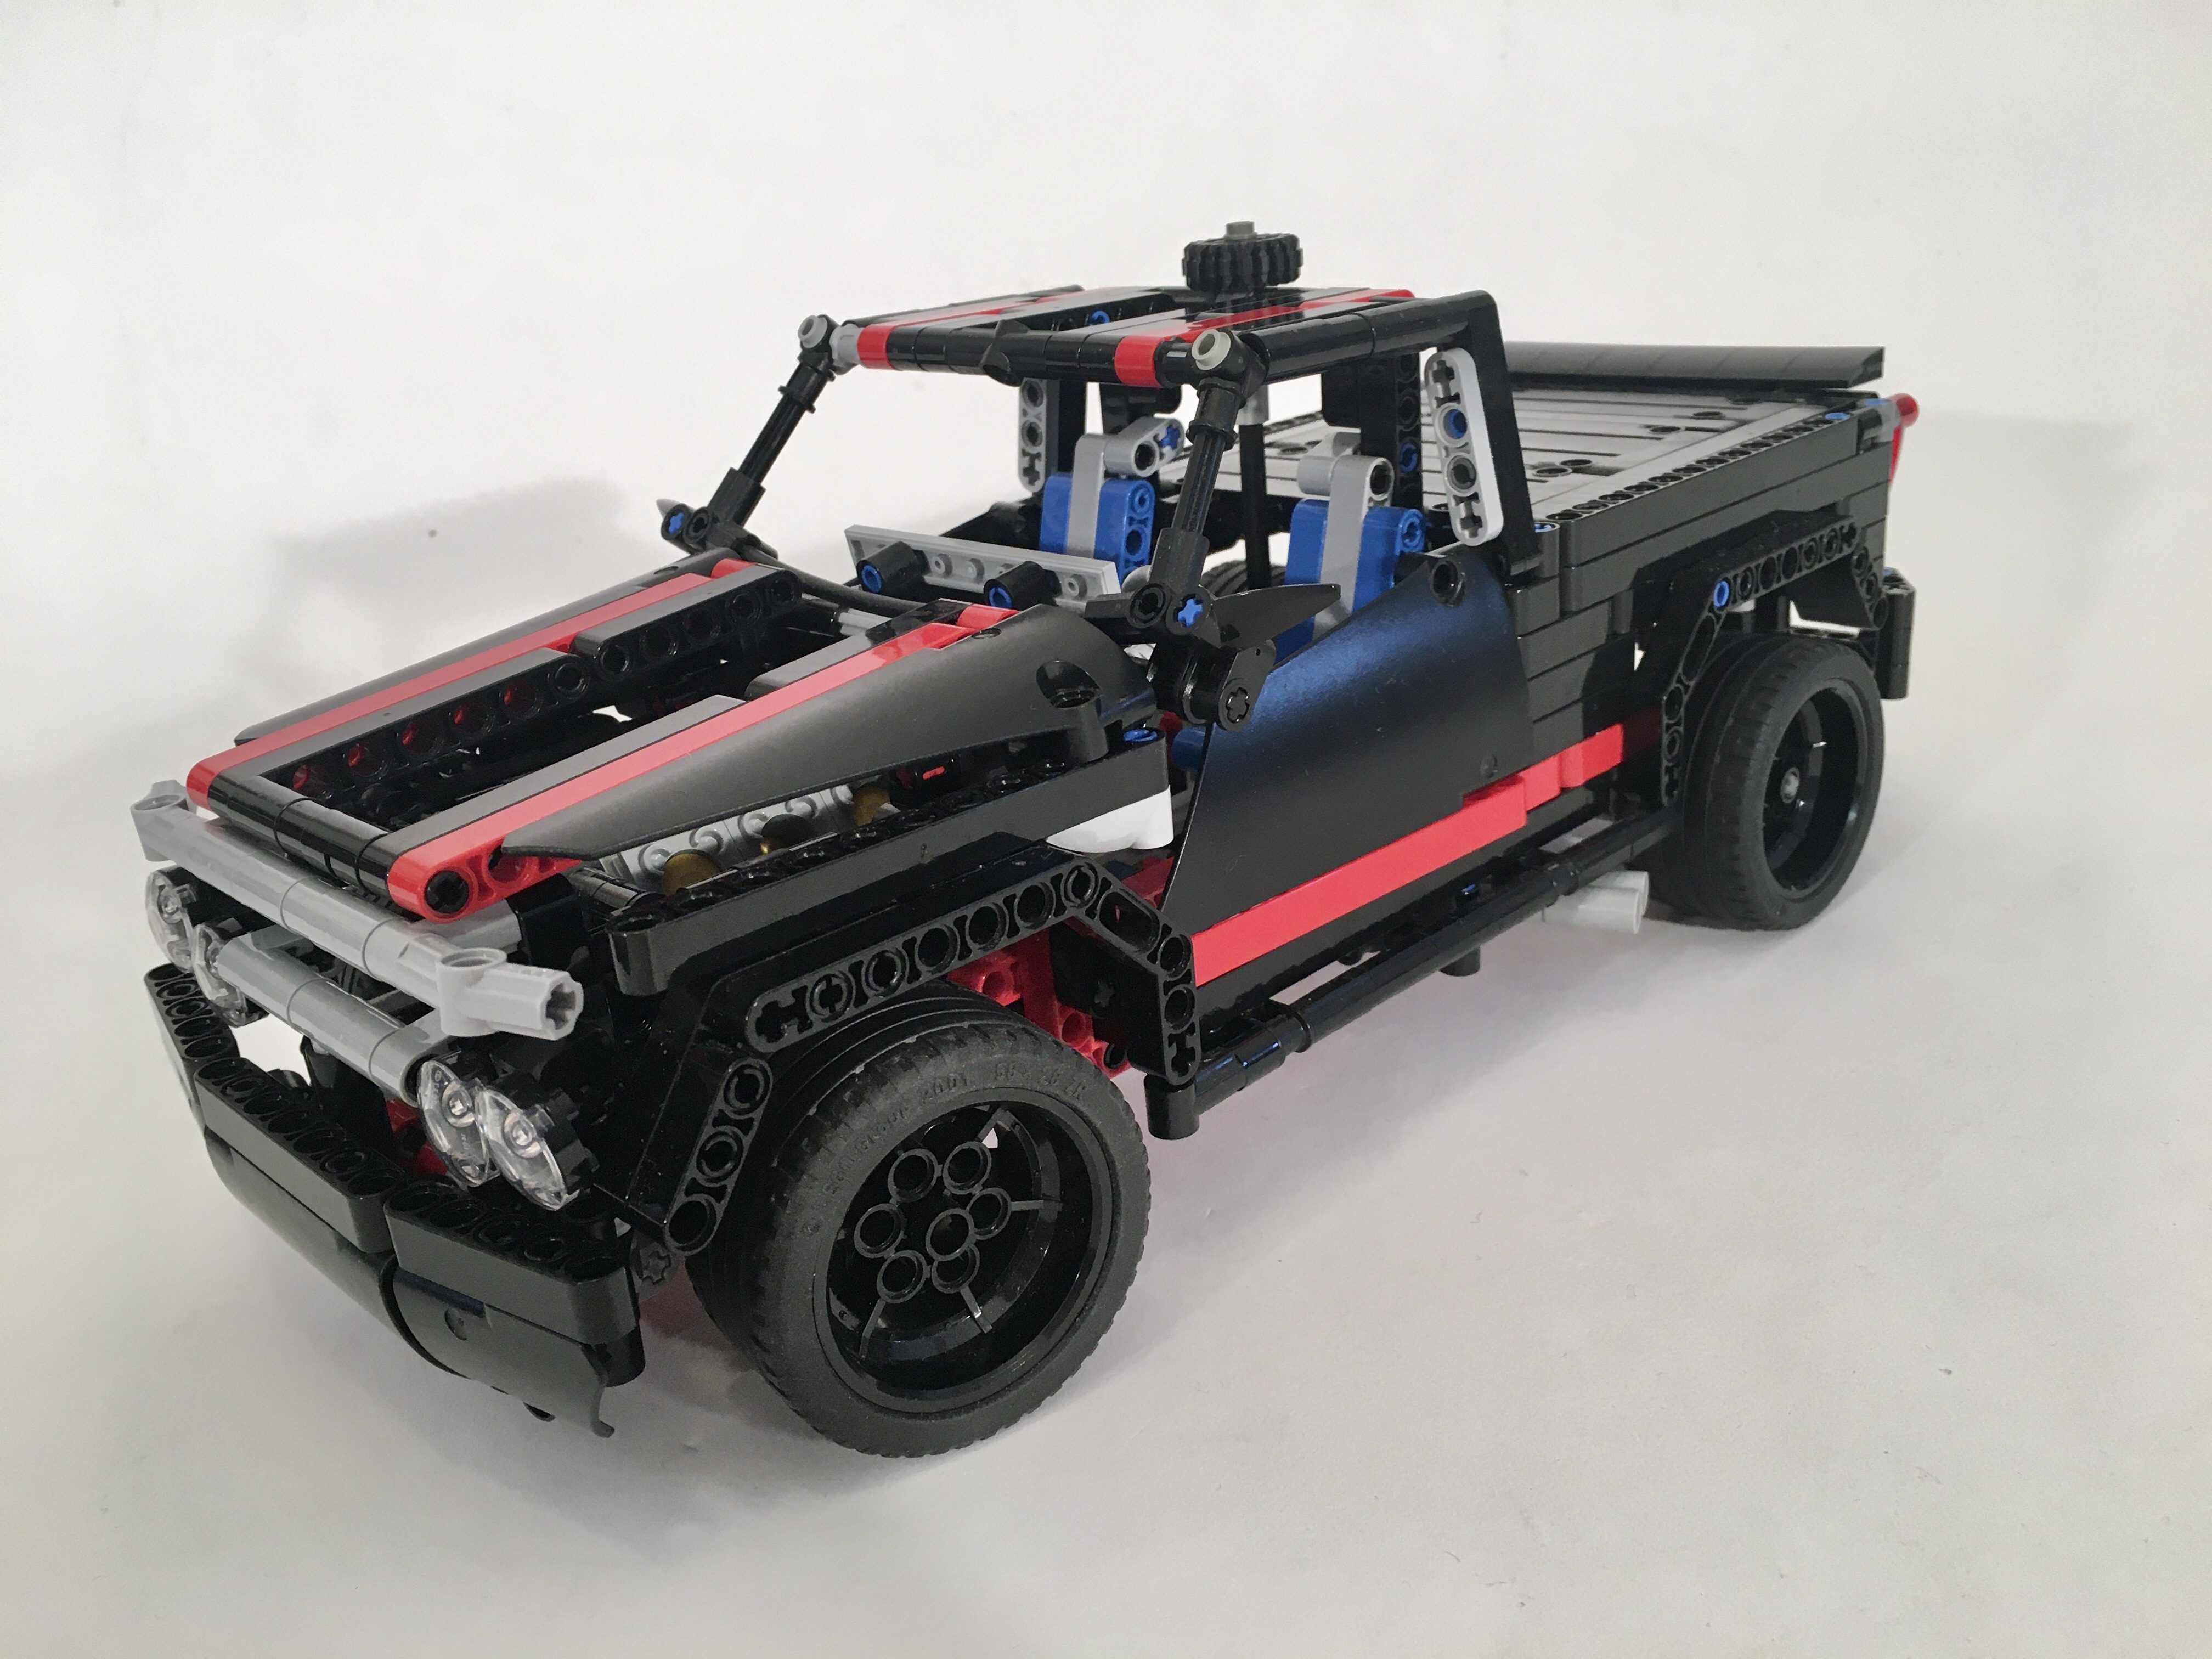
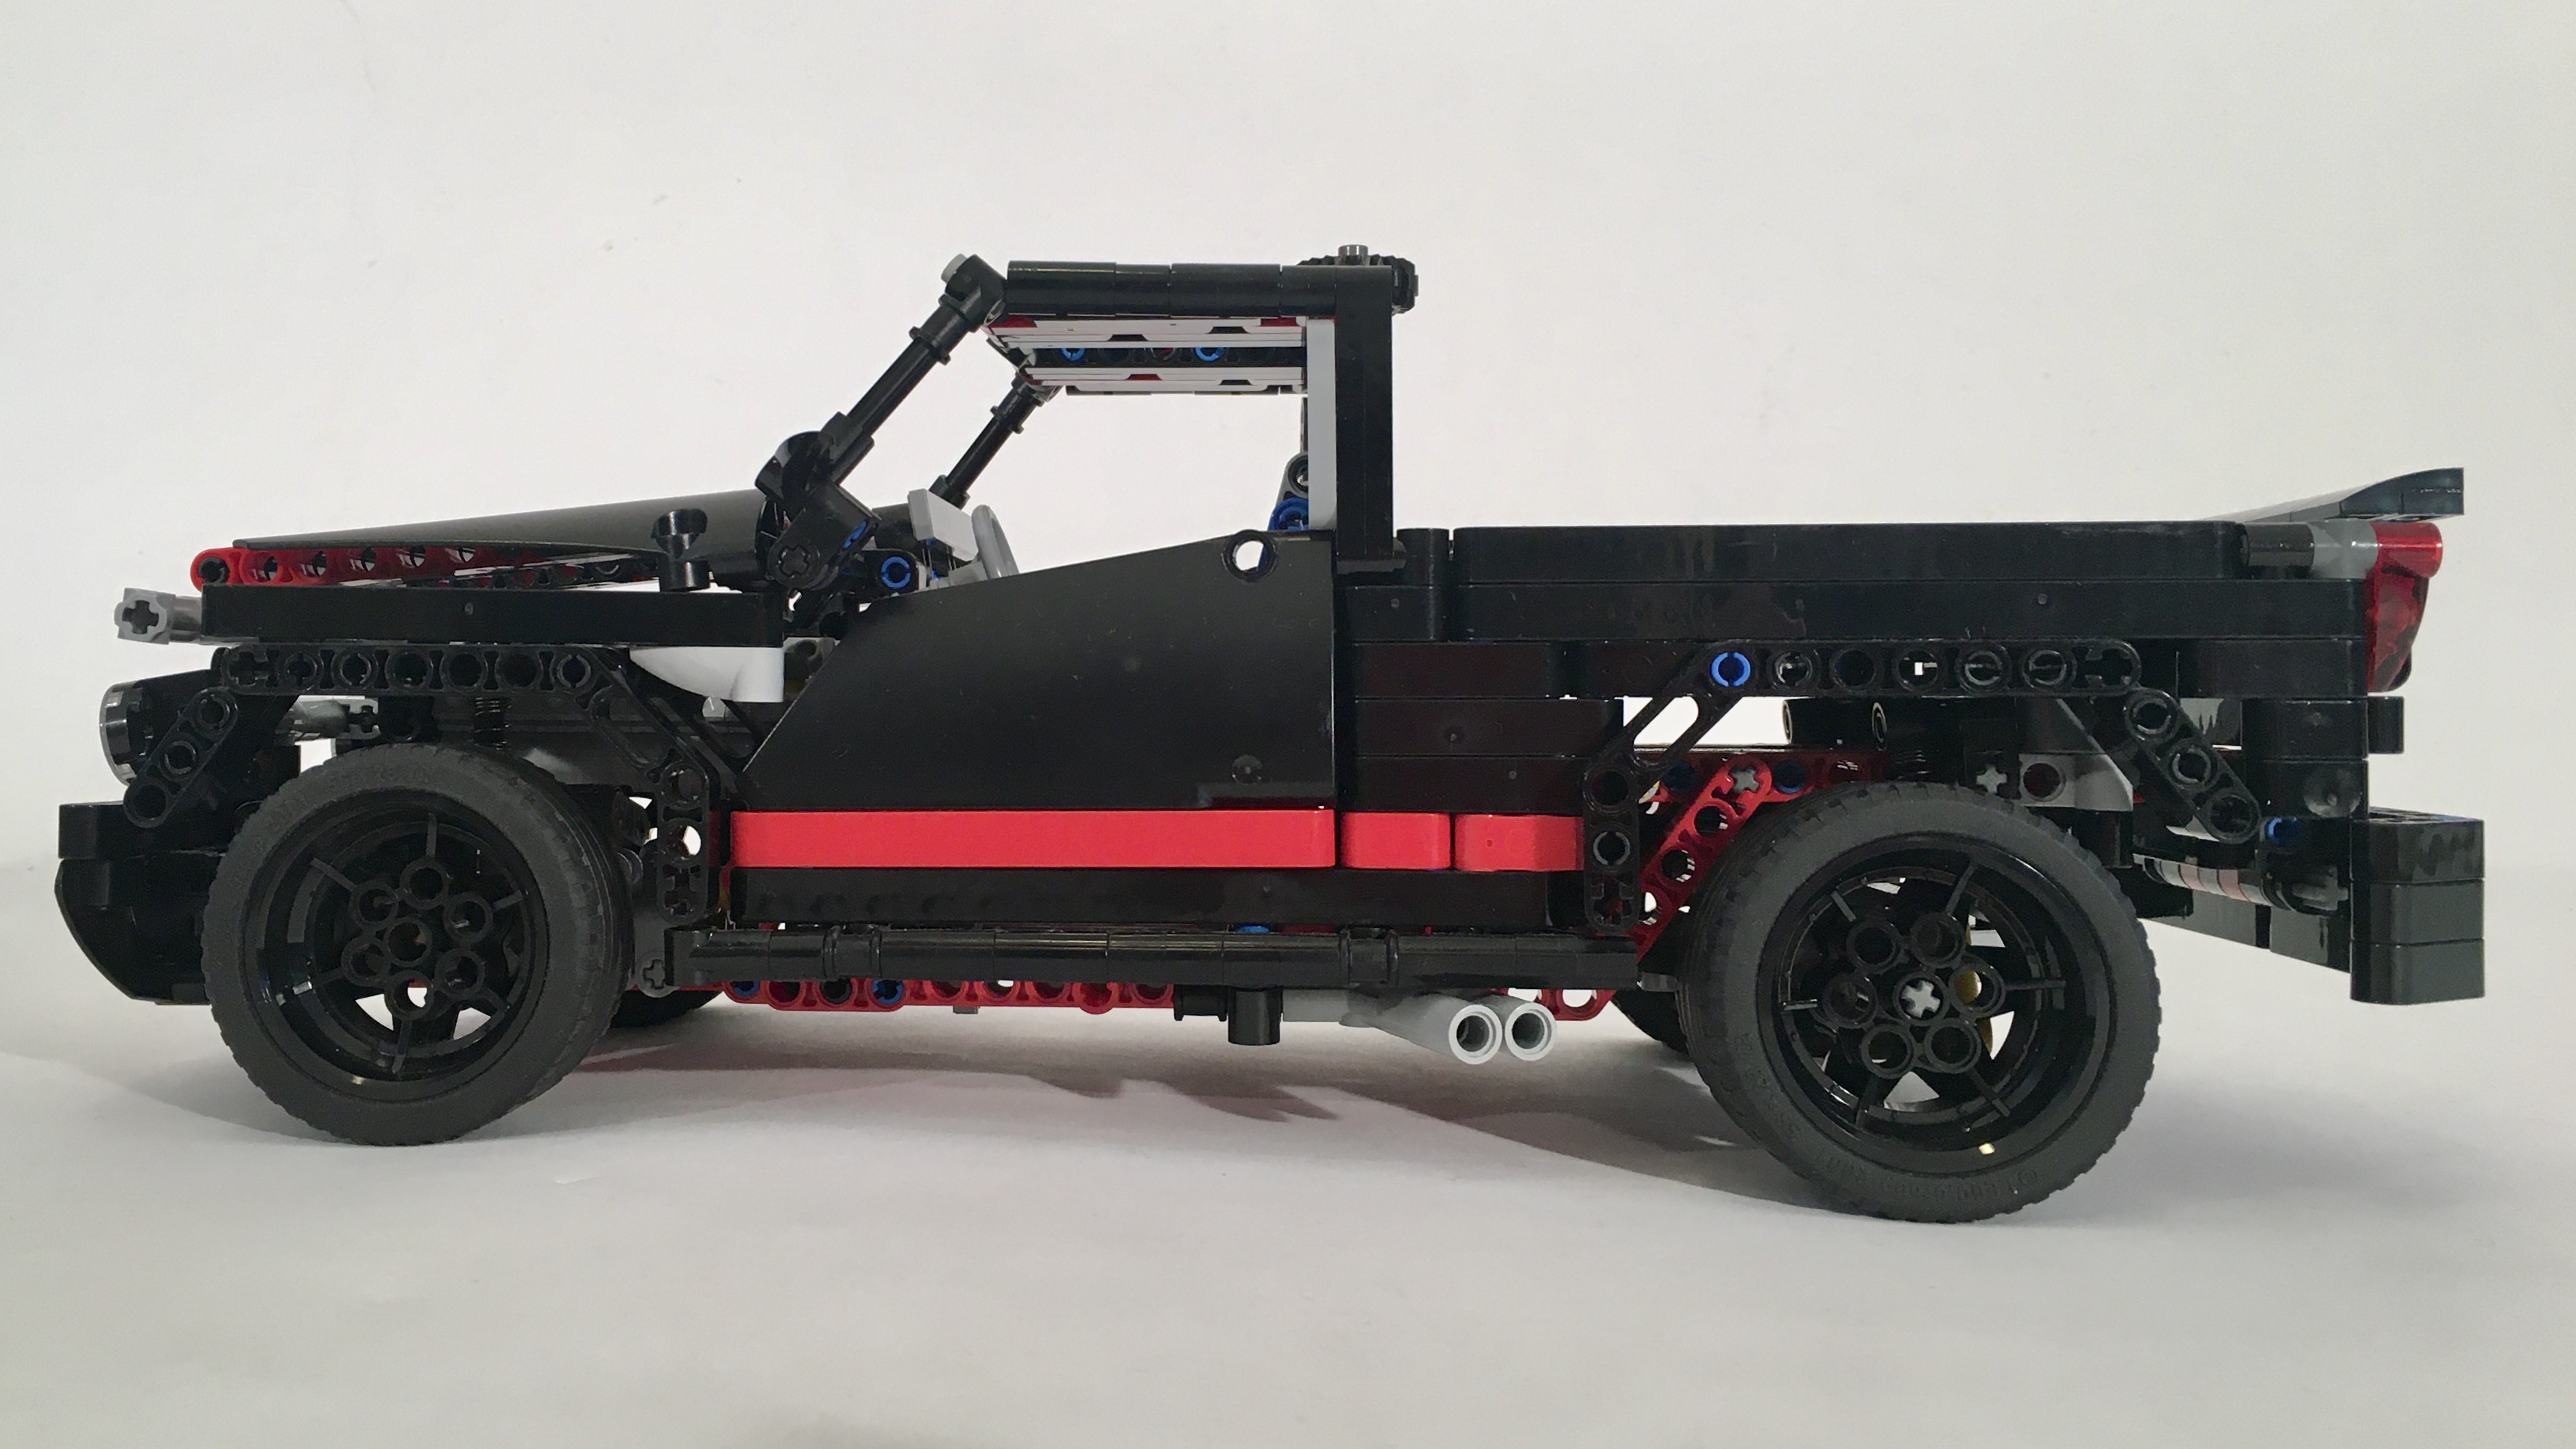
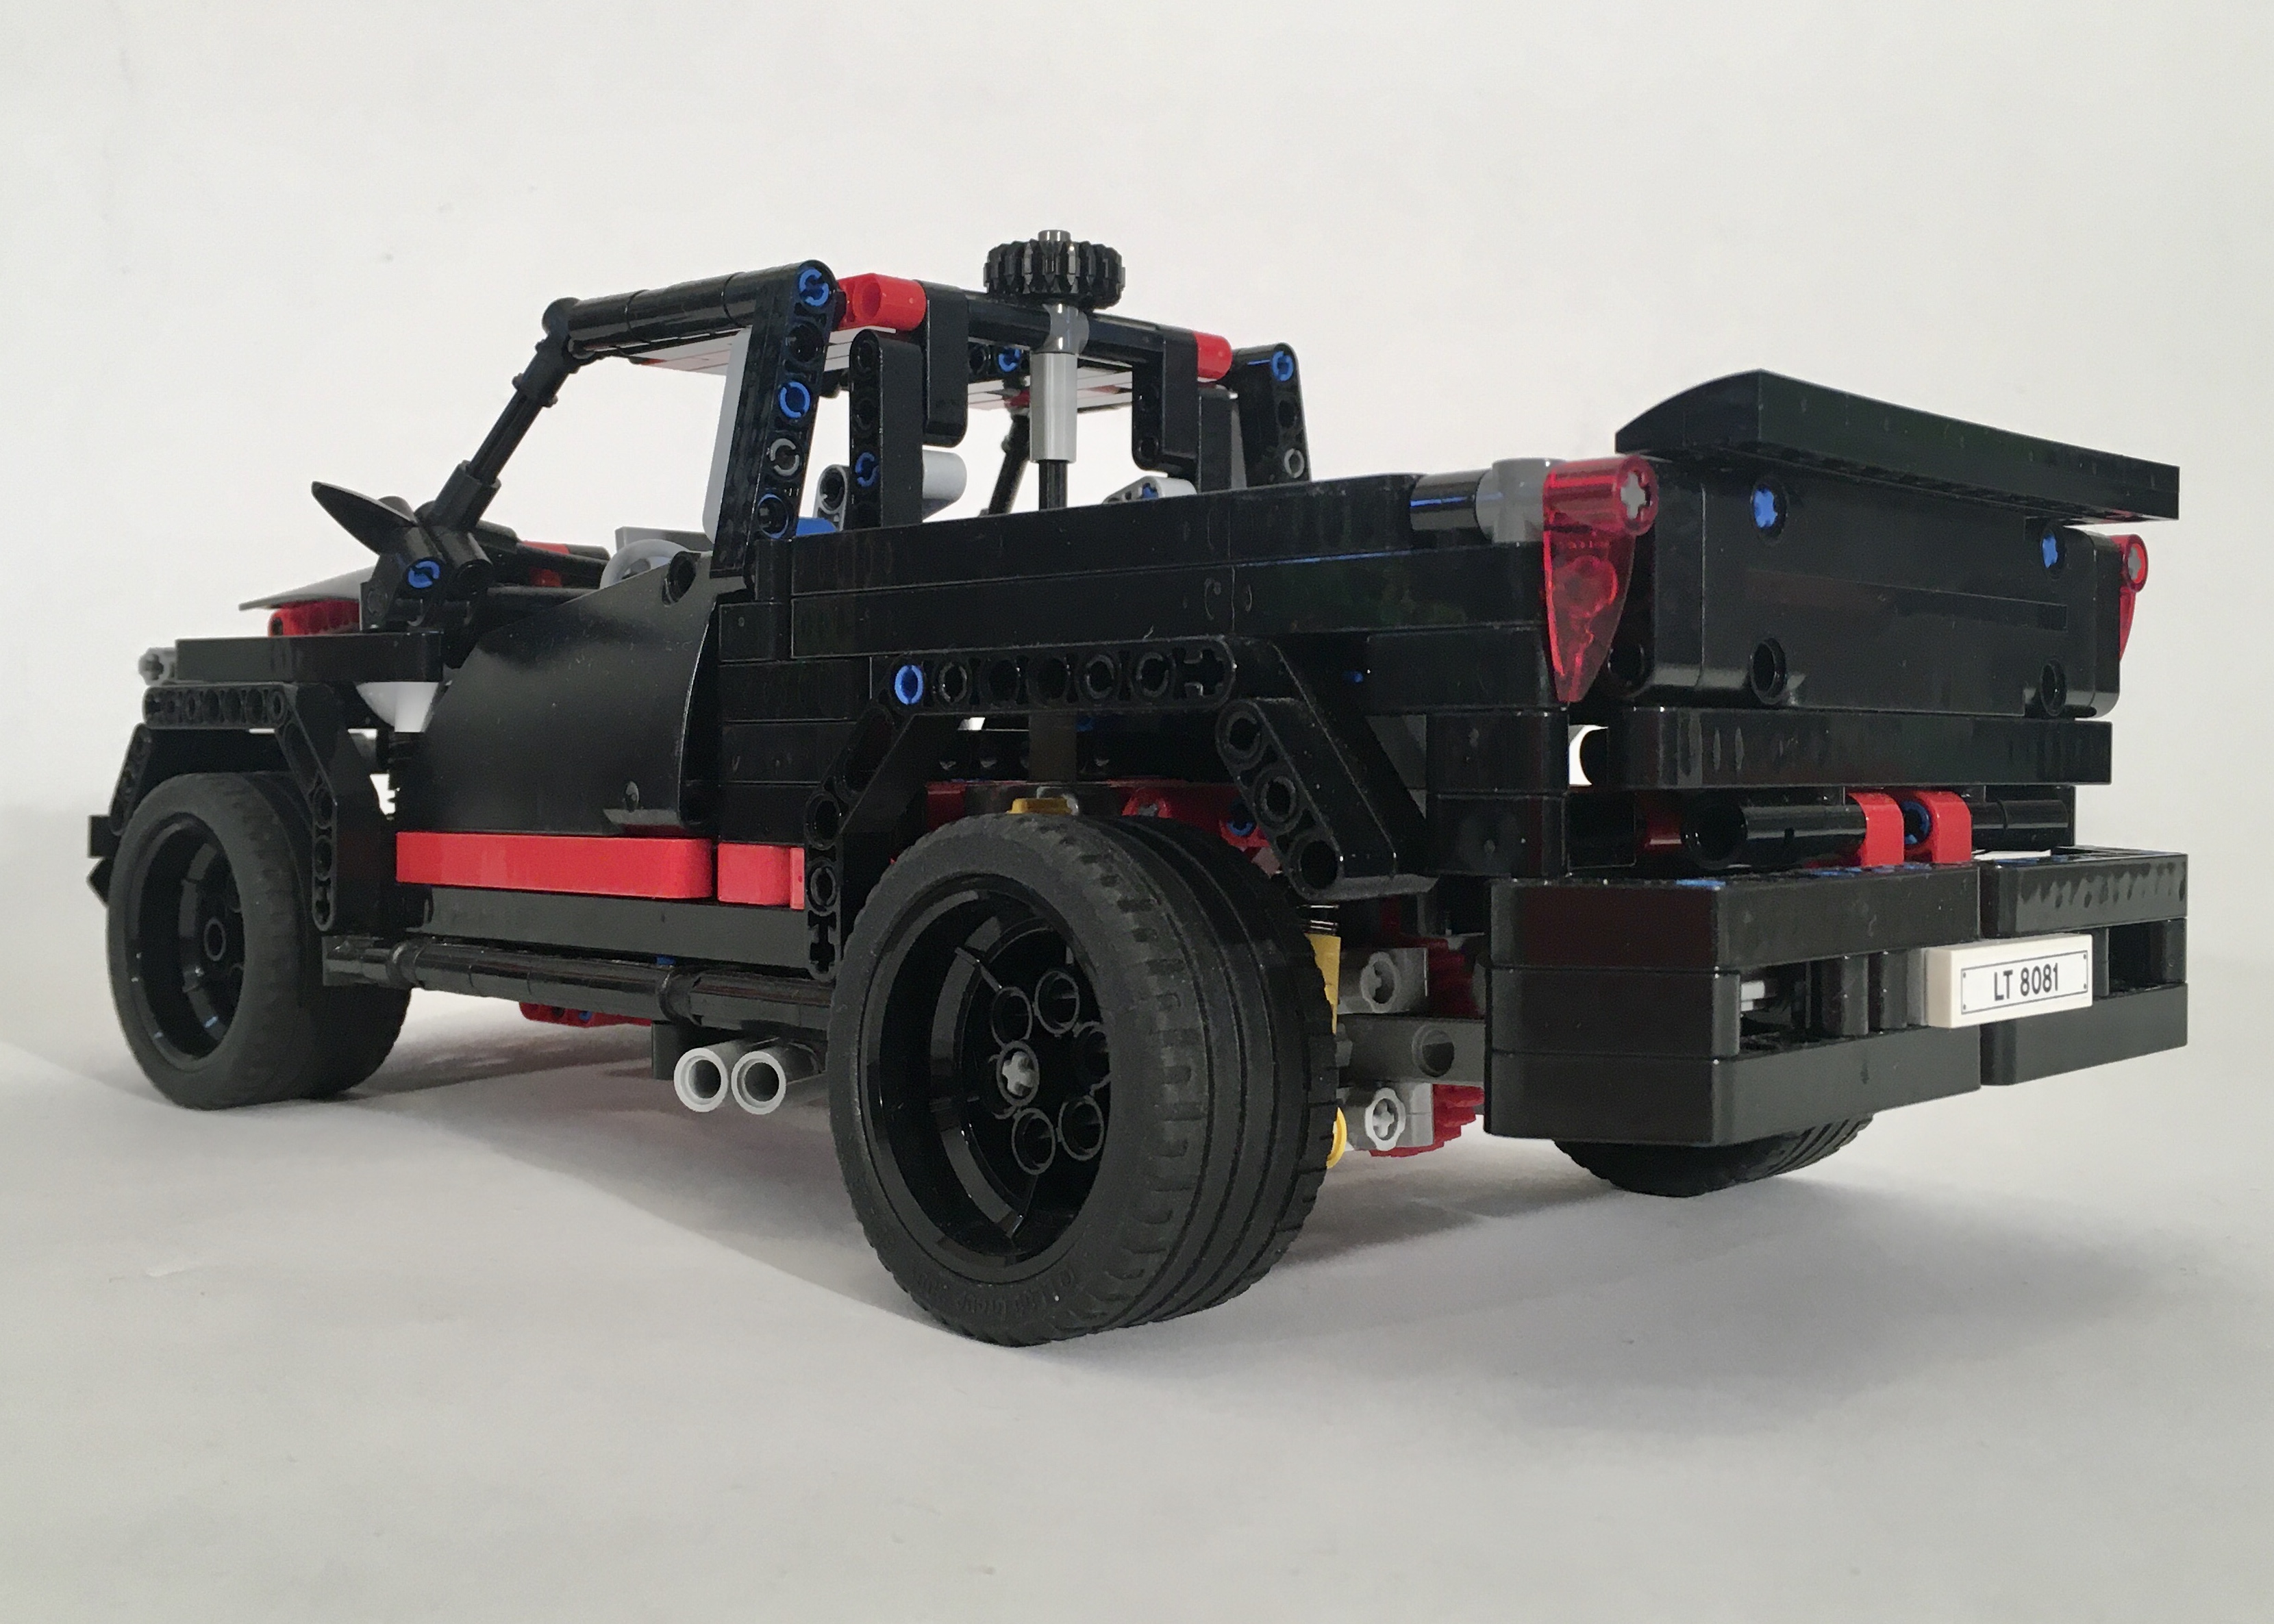
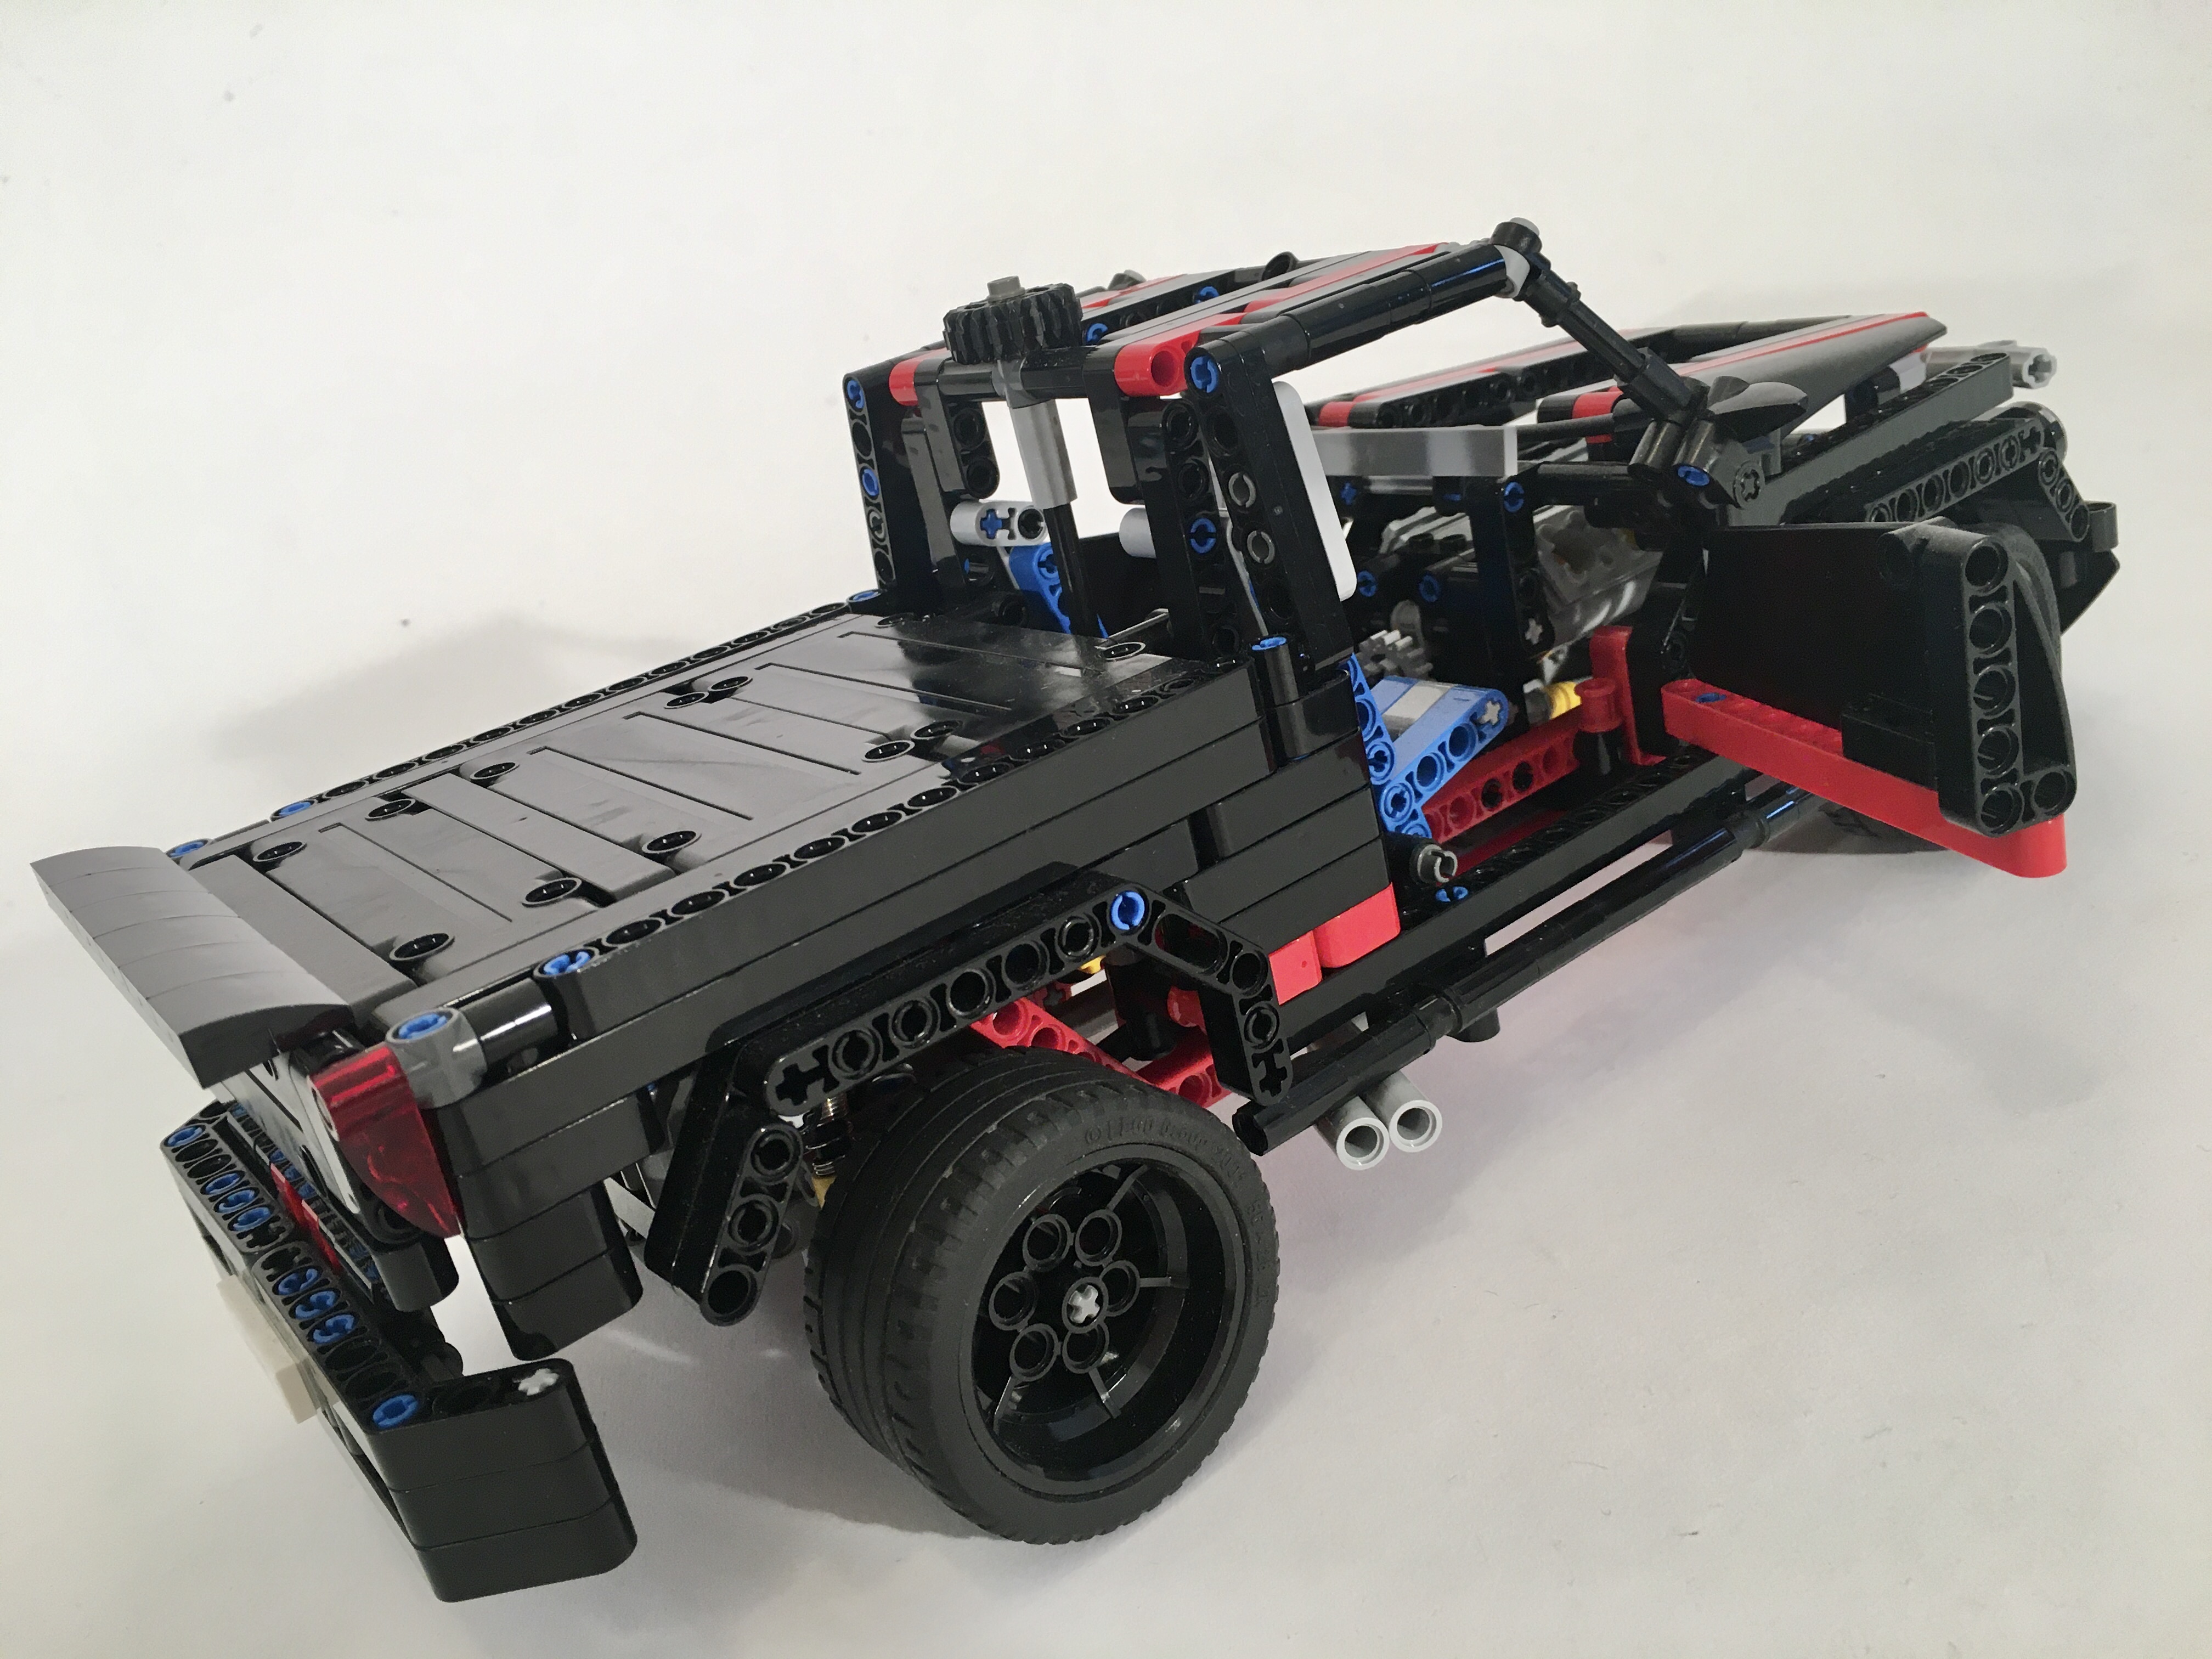
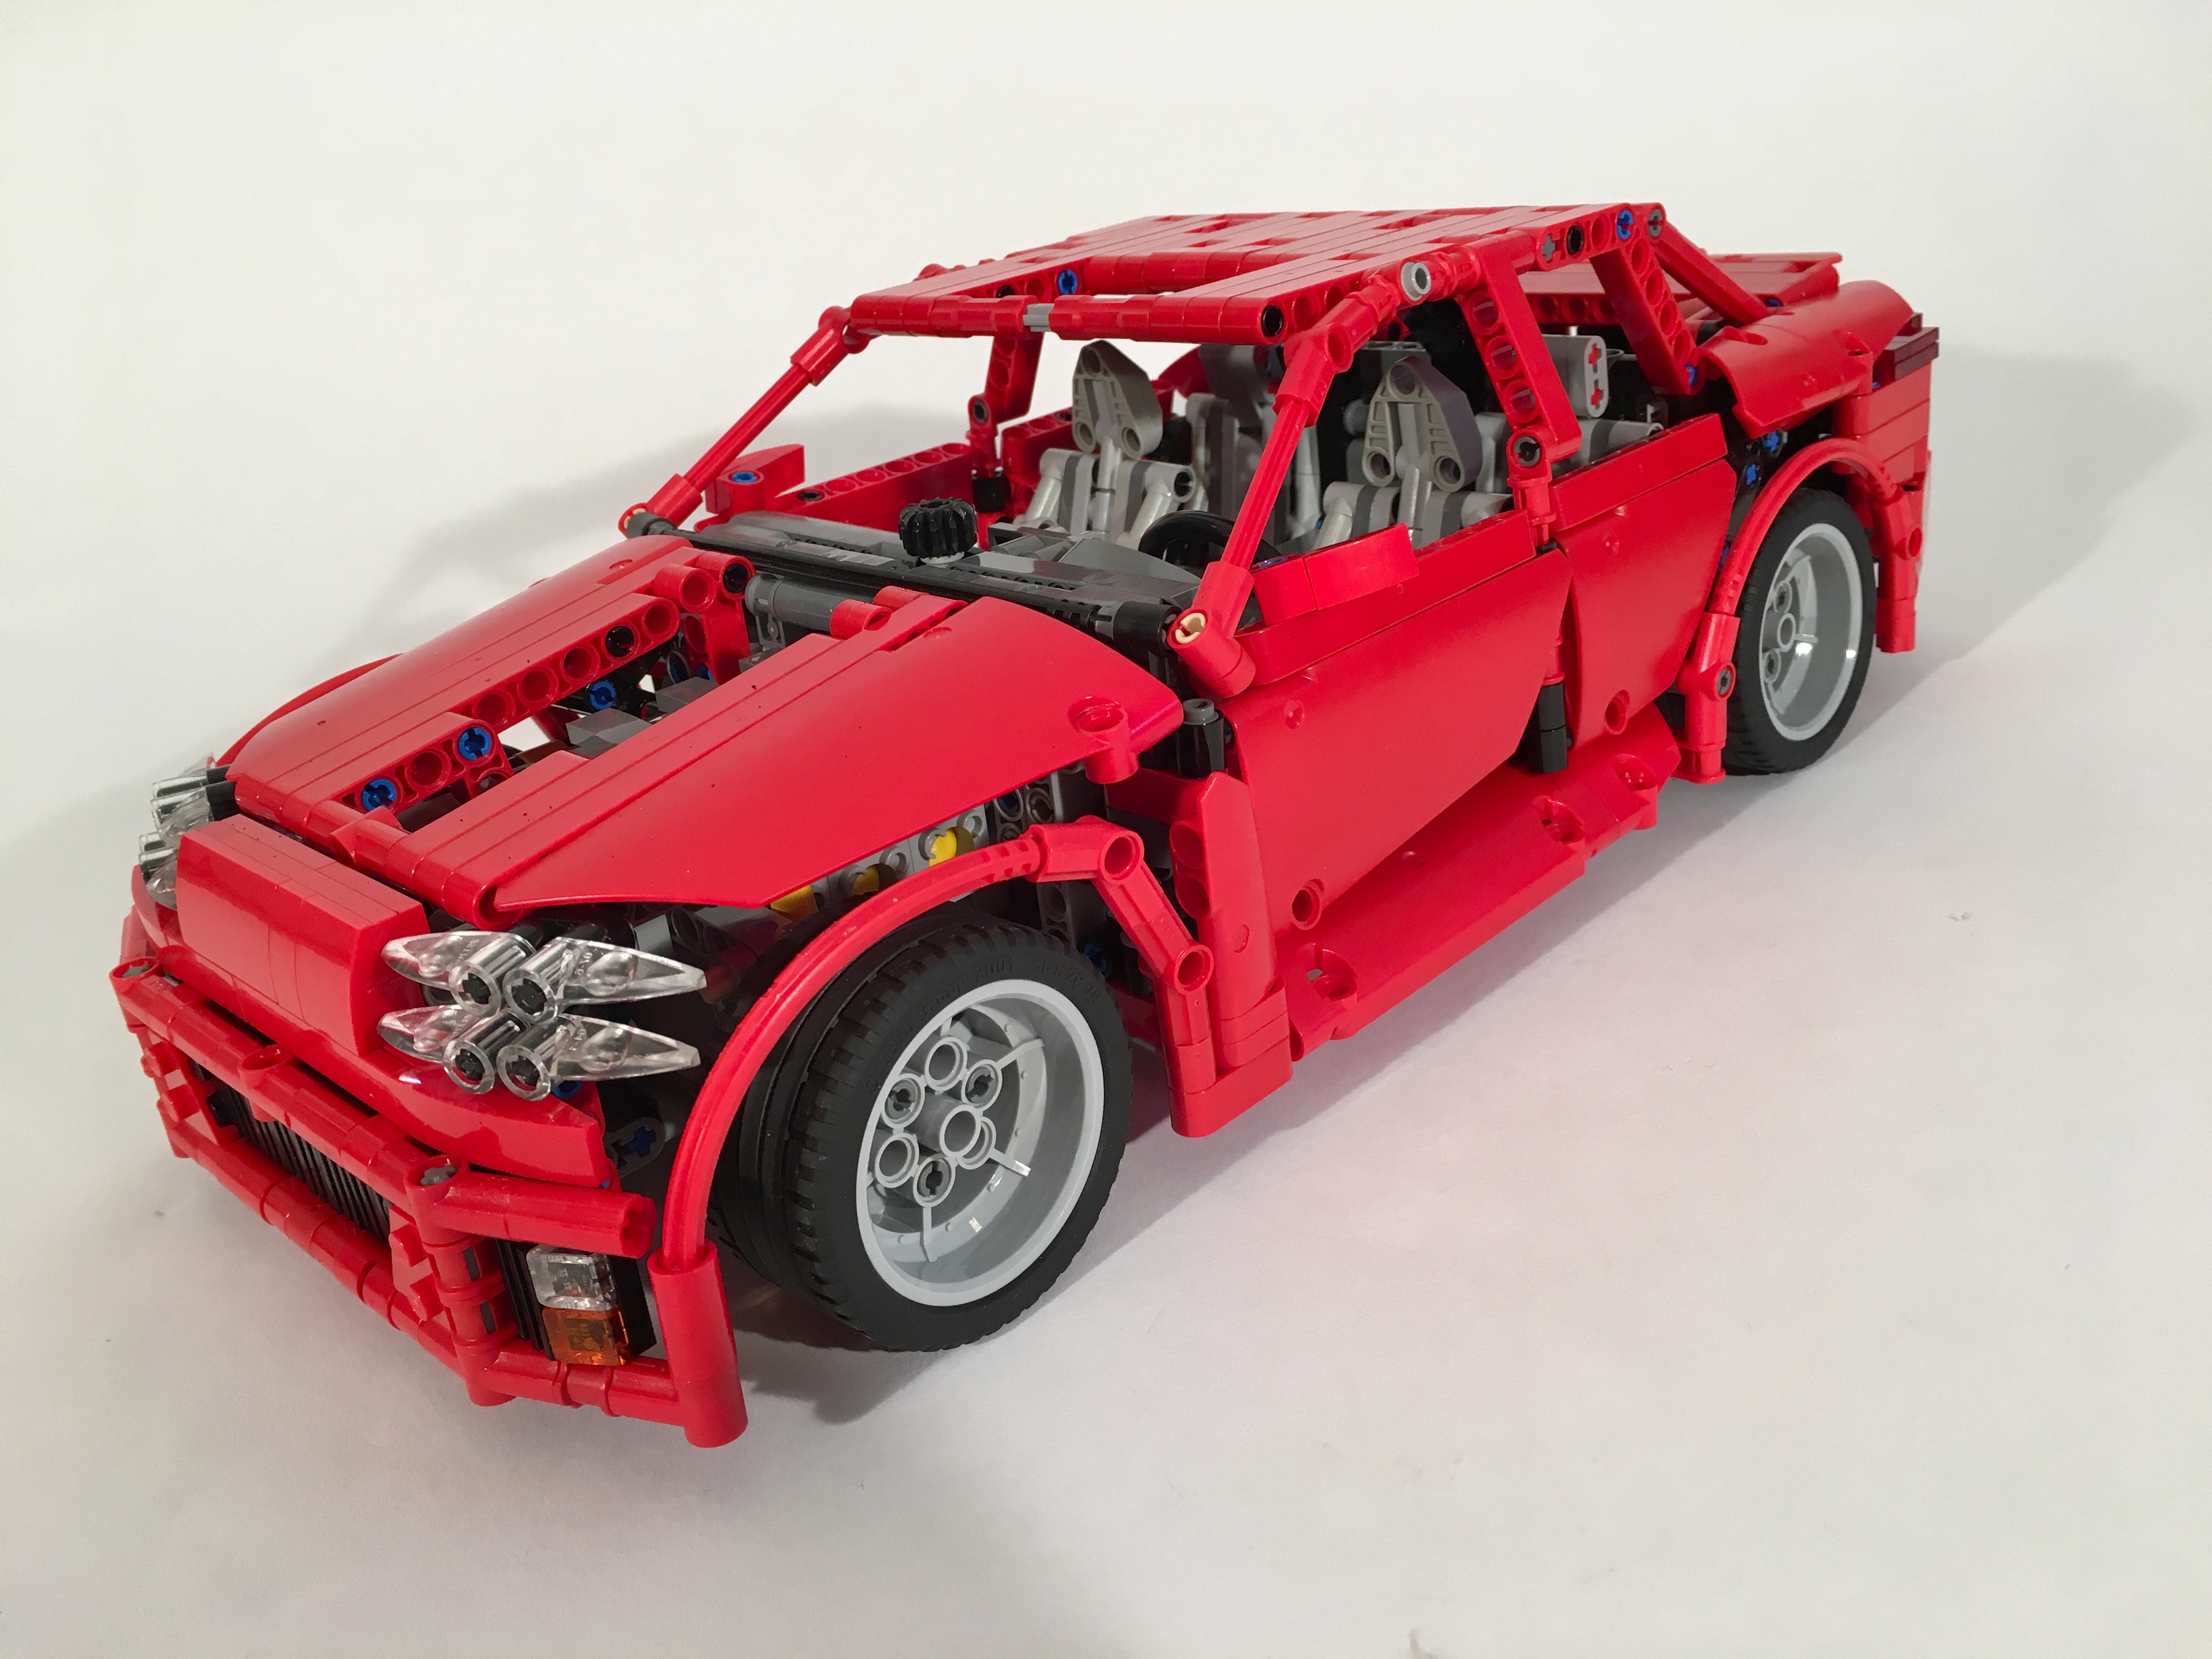
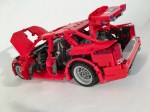
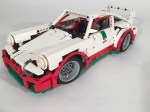
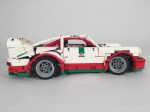
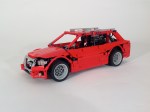
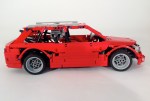
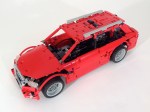
In addition to the 4×4 version of 42126, I was immediately interested to making a sport version of the pickup. The sport pickup is one of those silly American contributions to the automotive landscape, so naturally I had to turn the most American of vehicles, the F-150, into a sport truck.

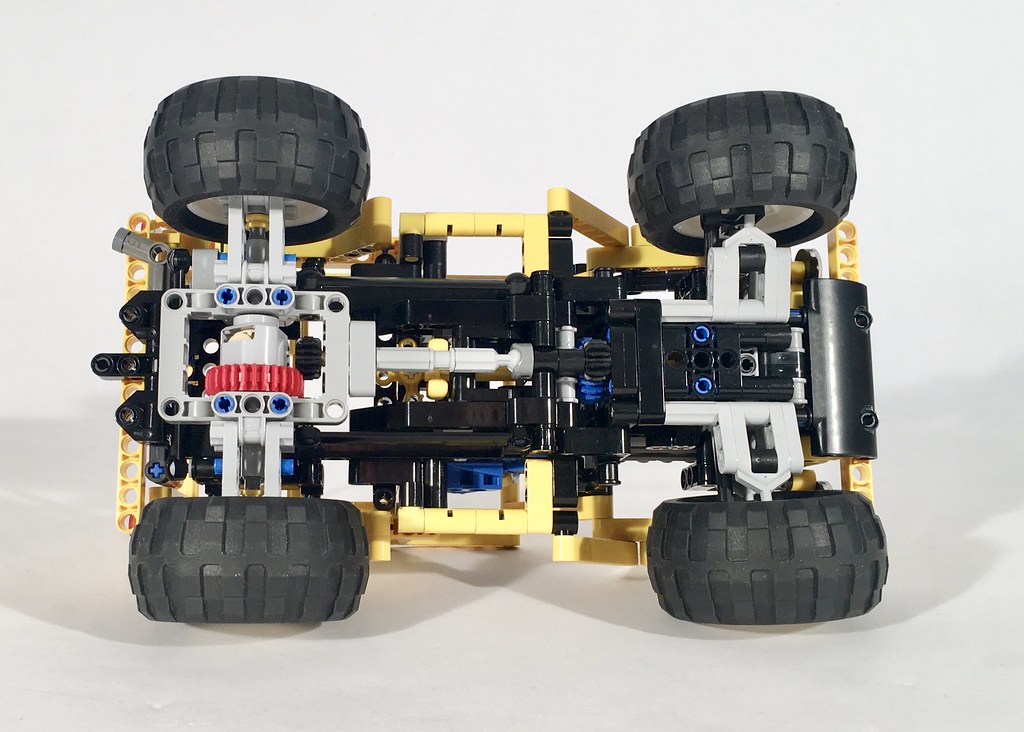
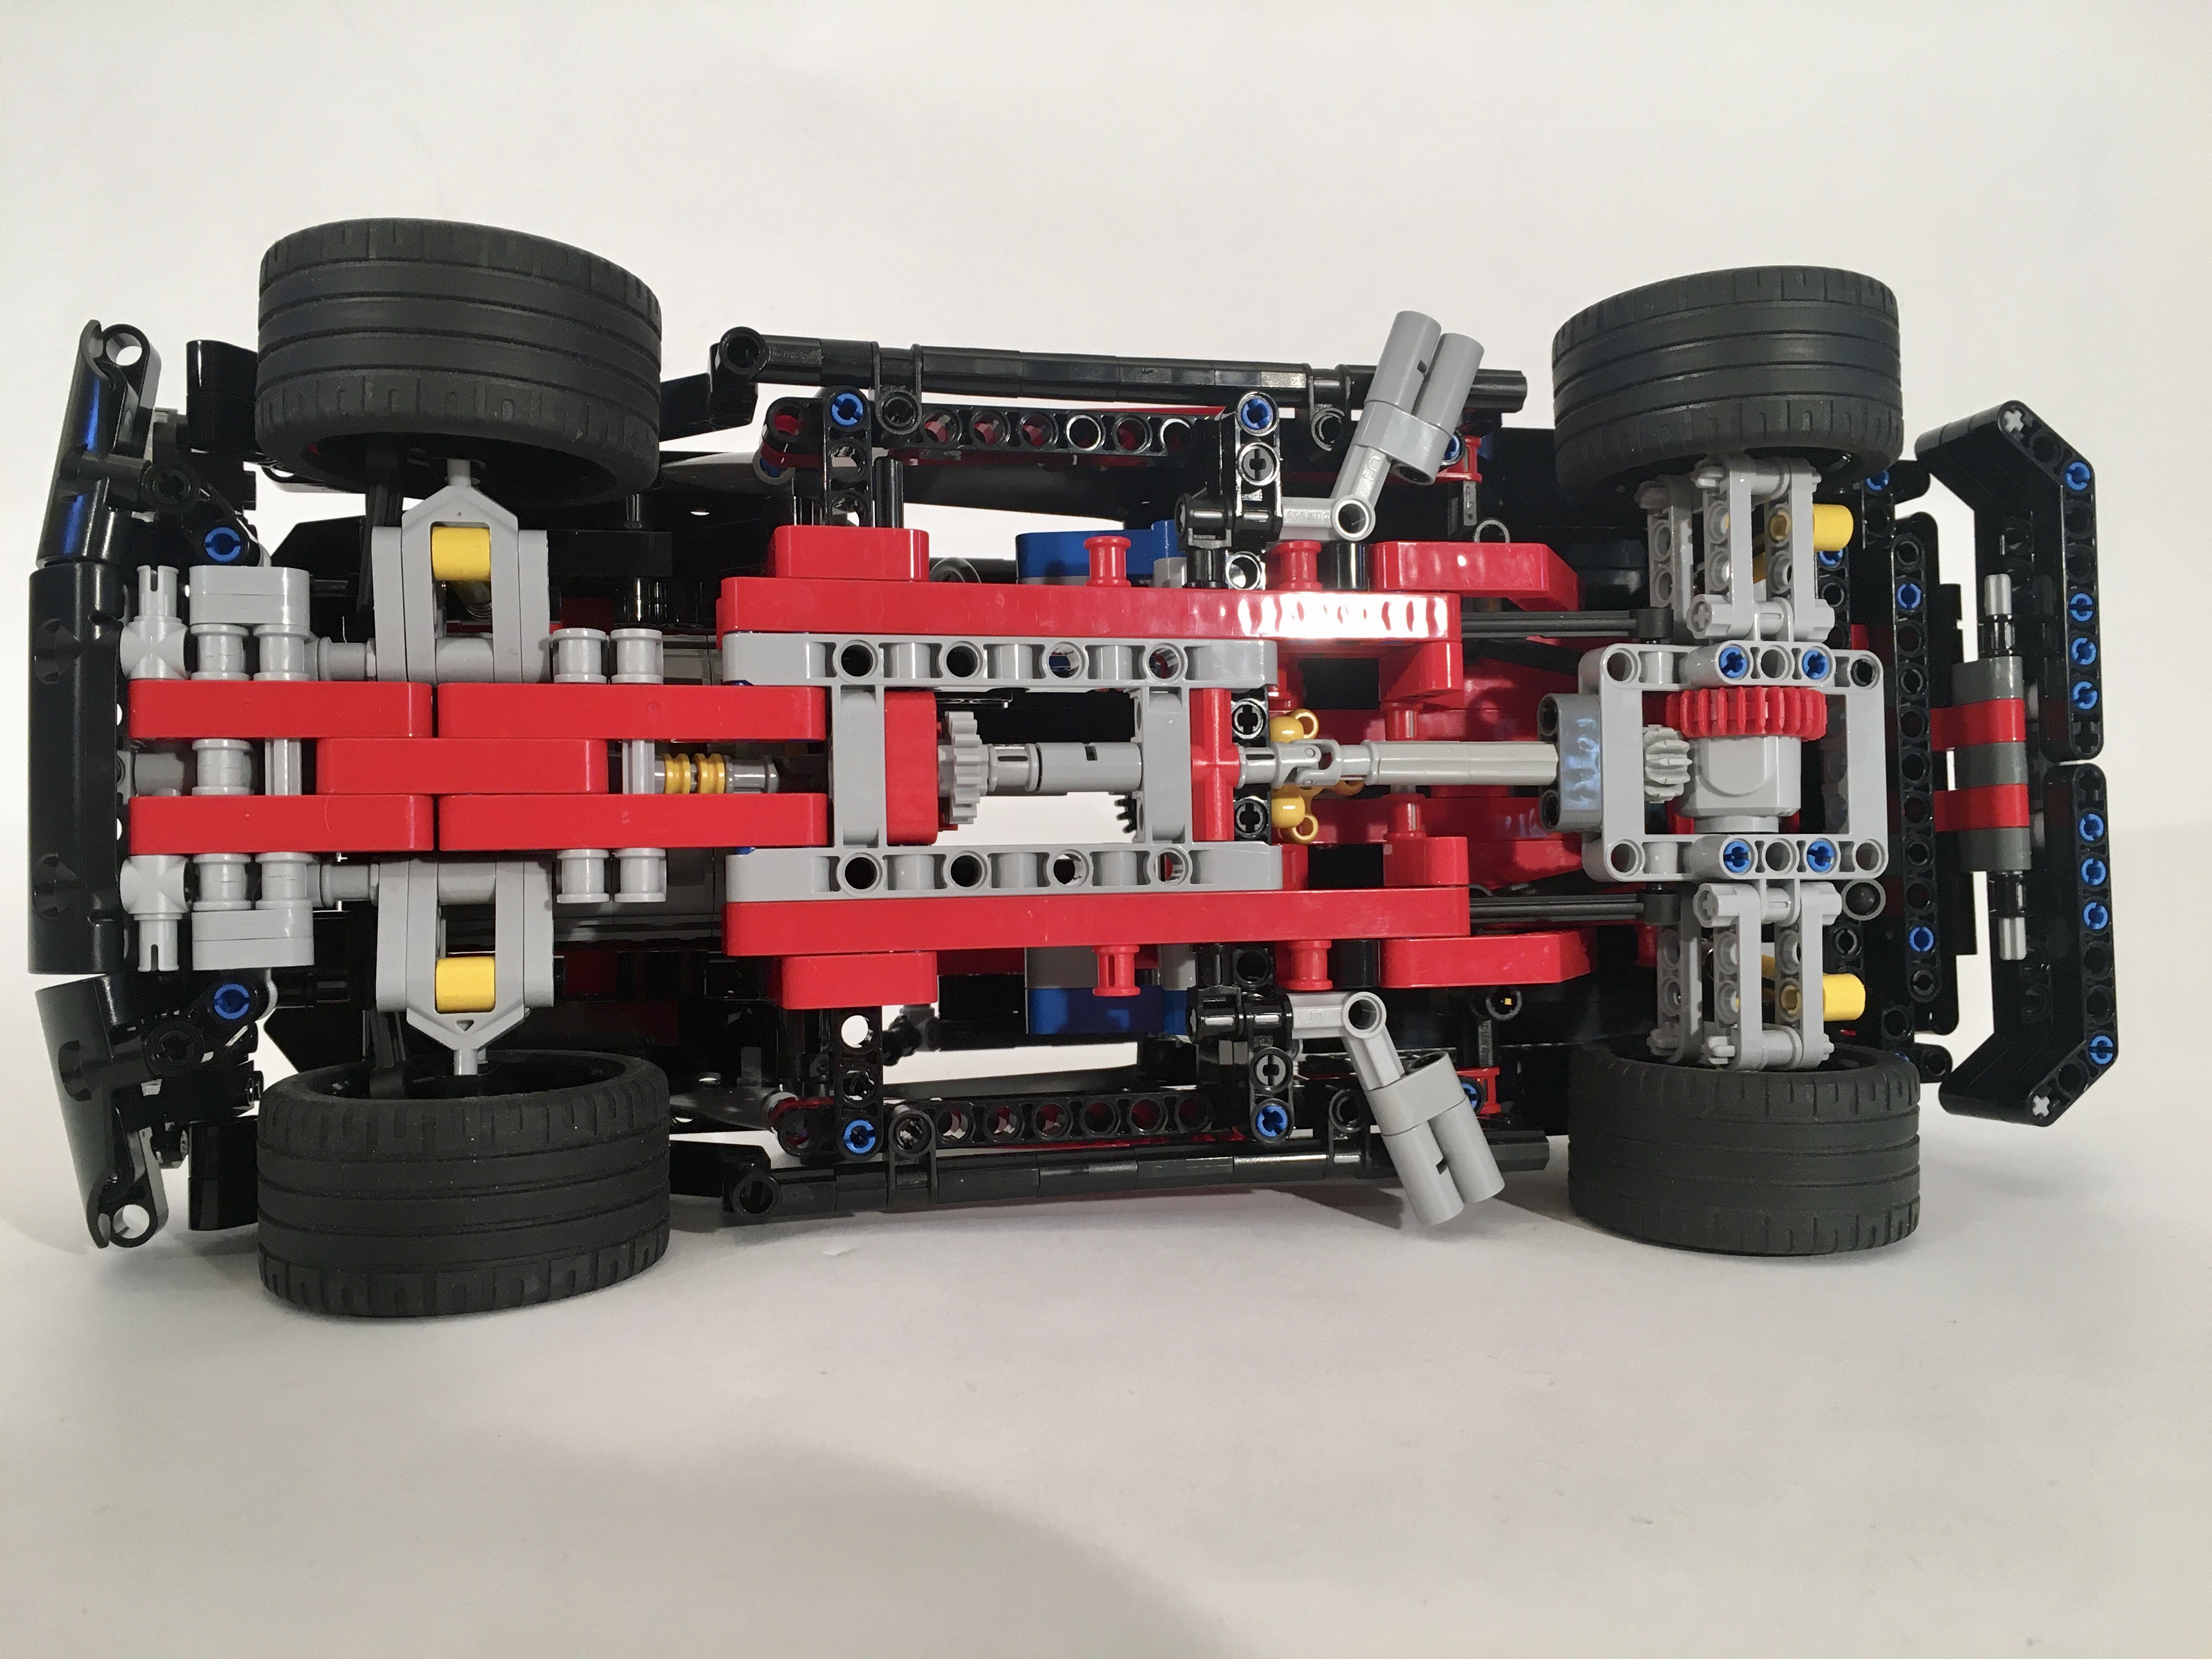
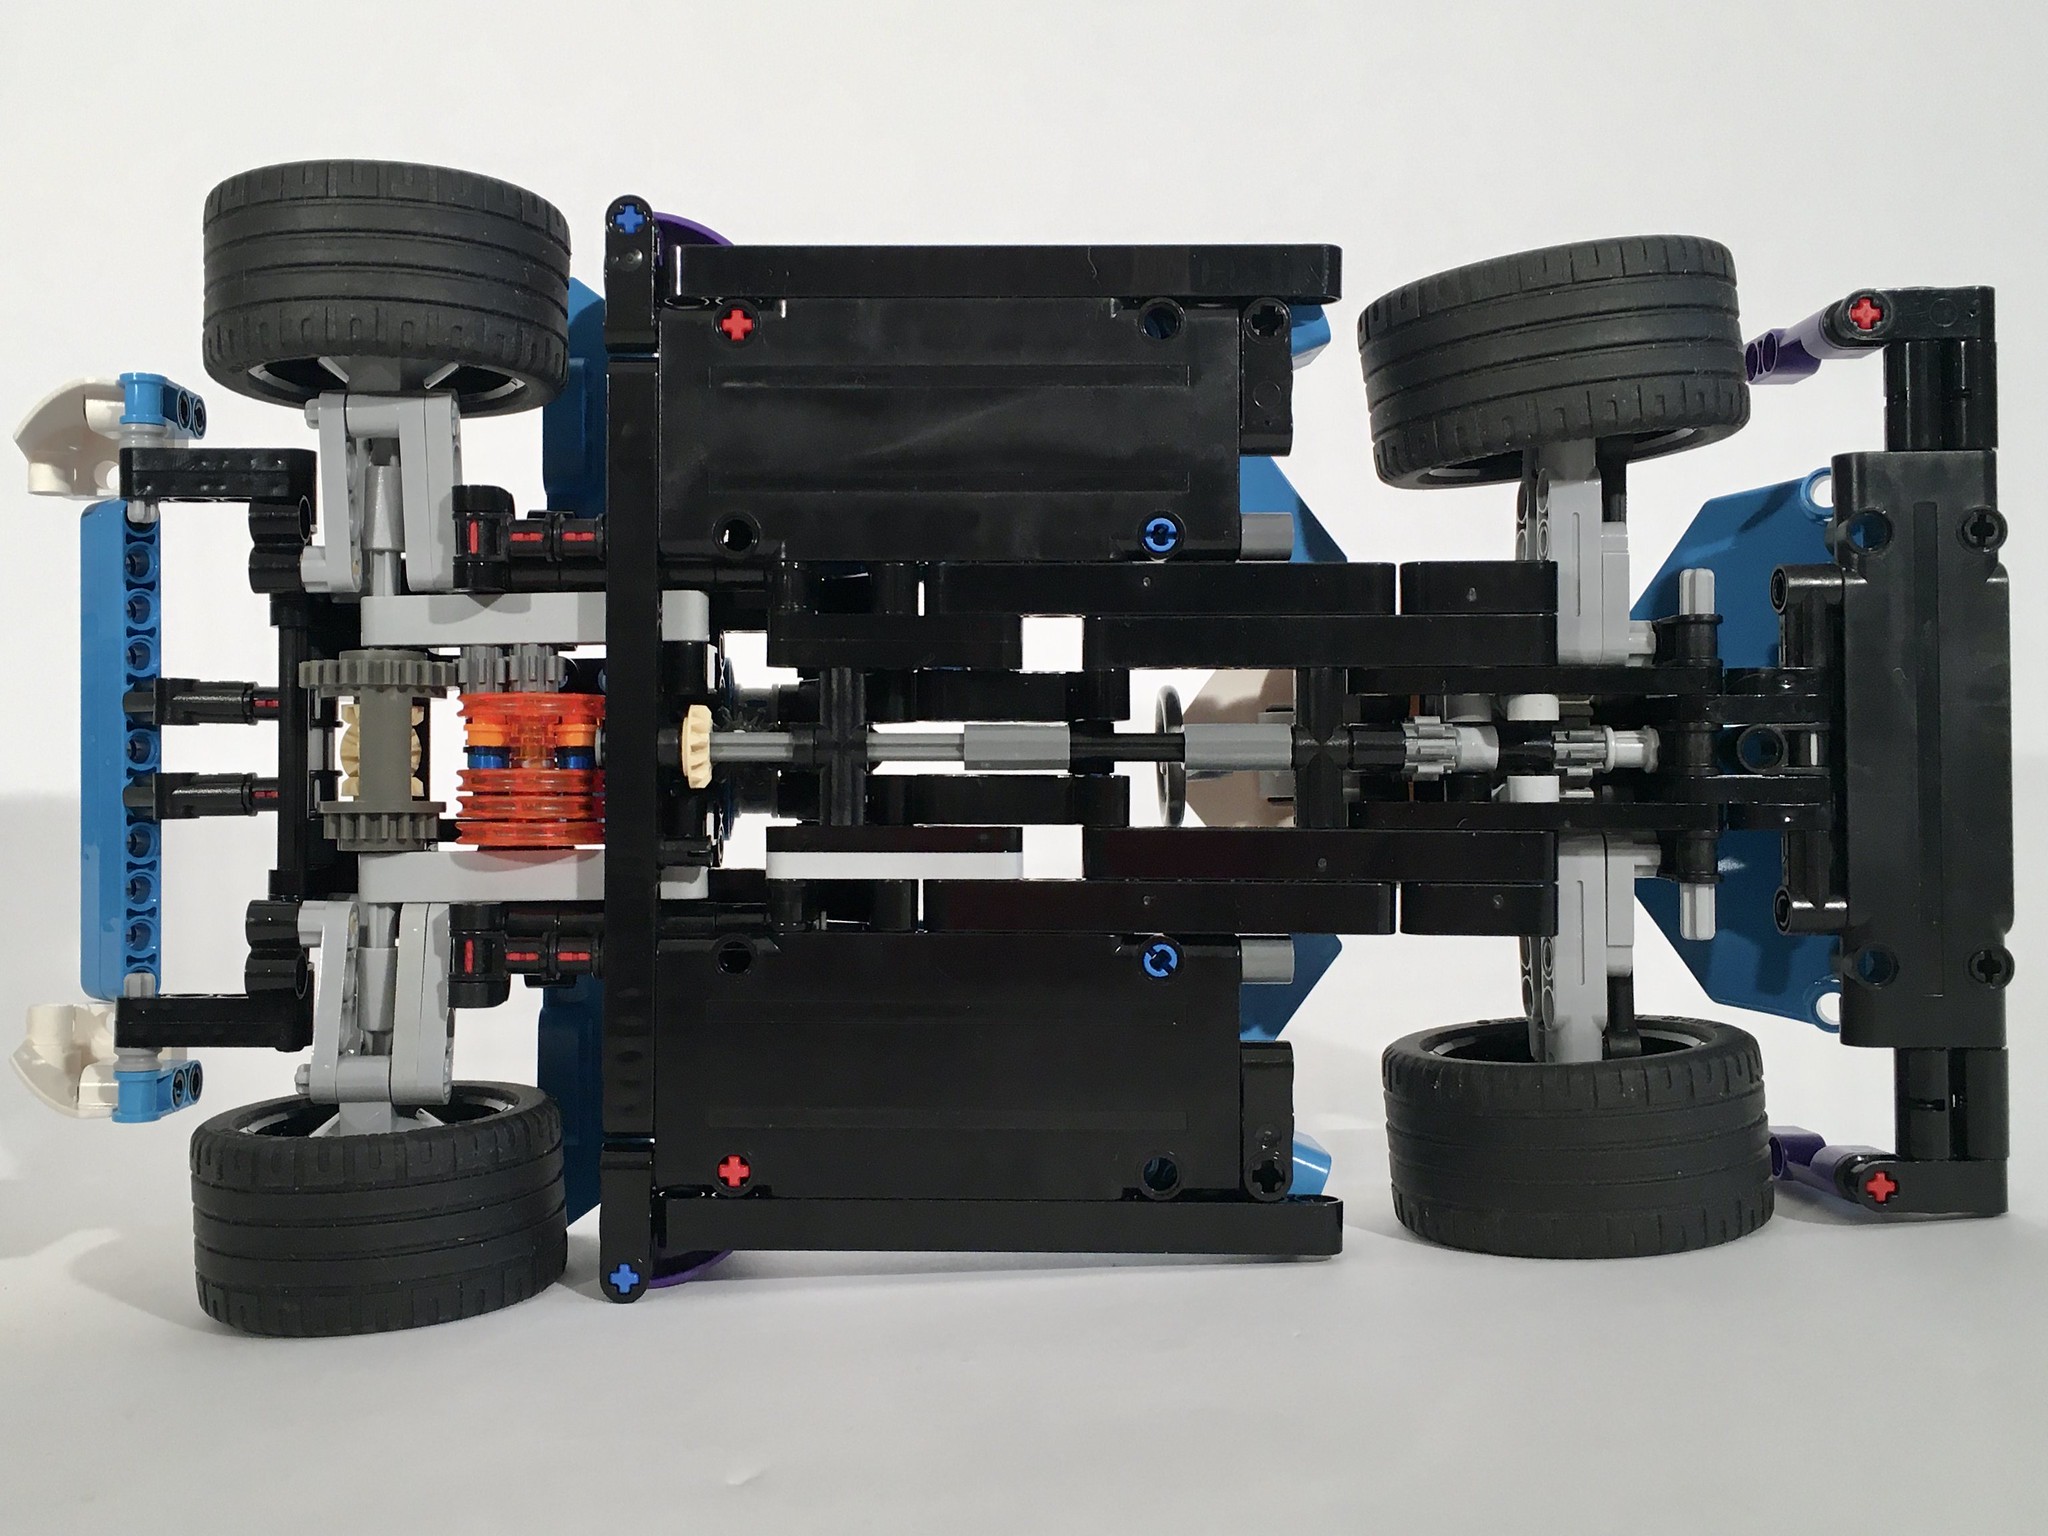
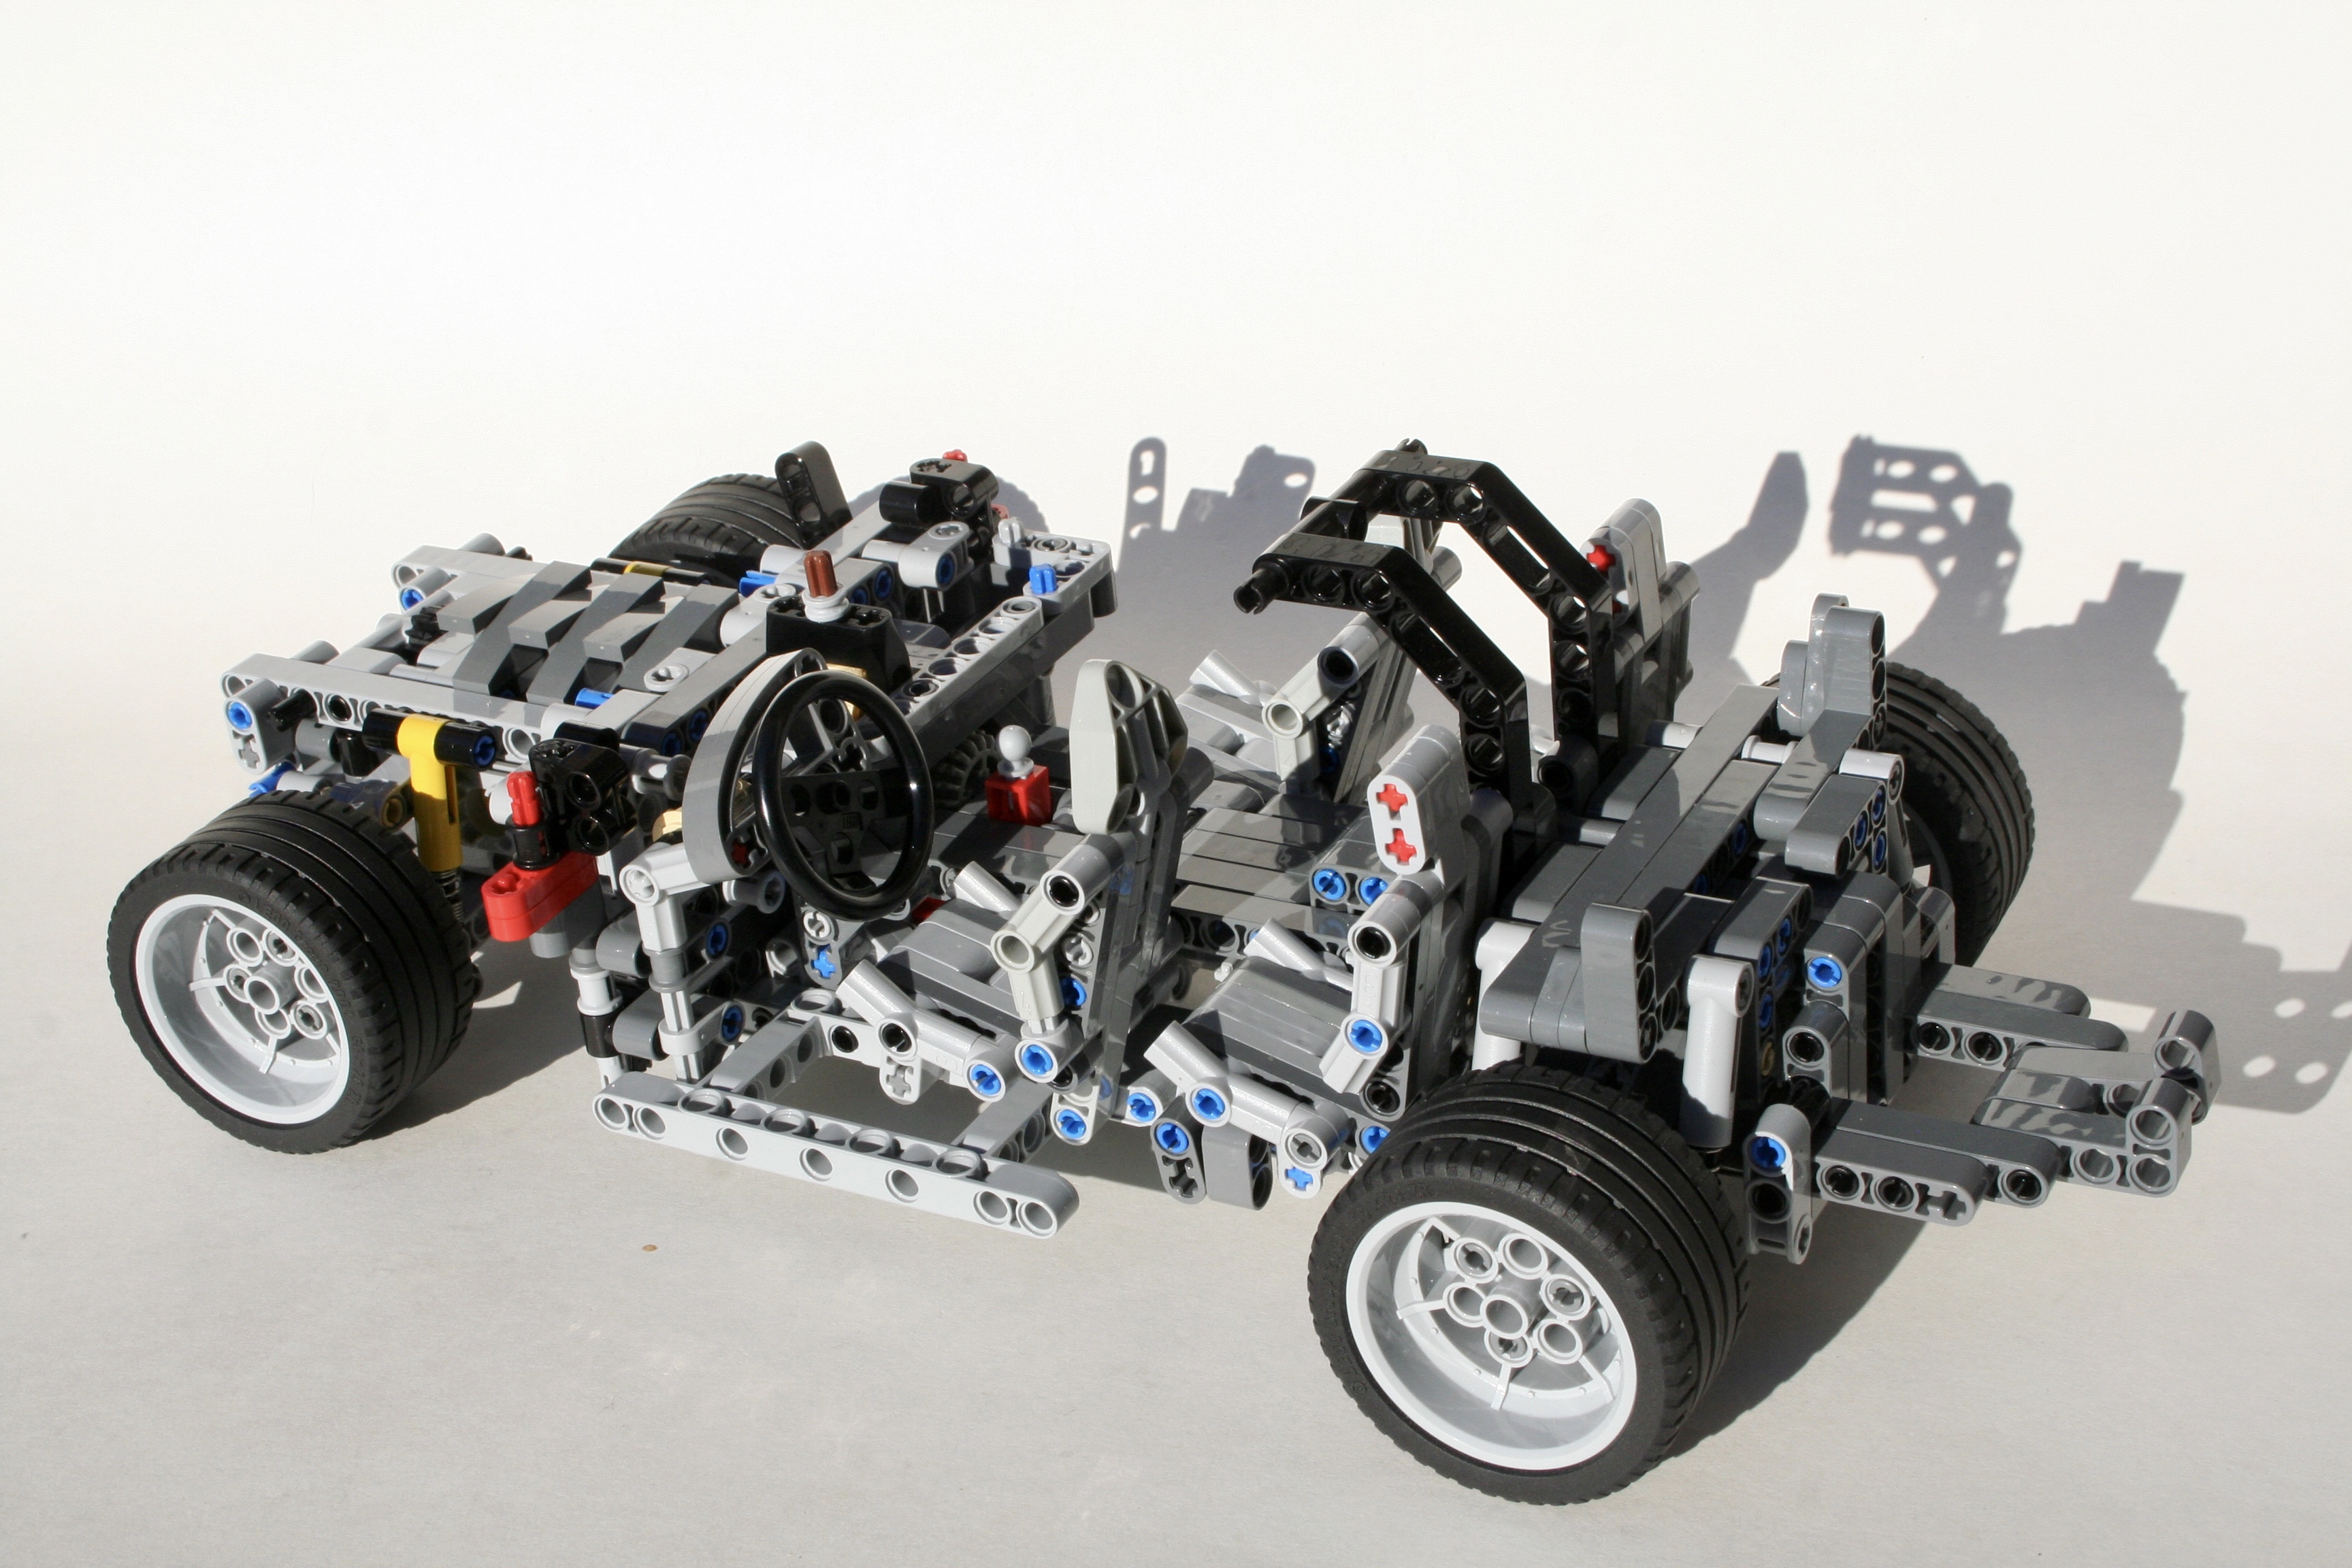
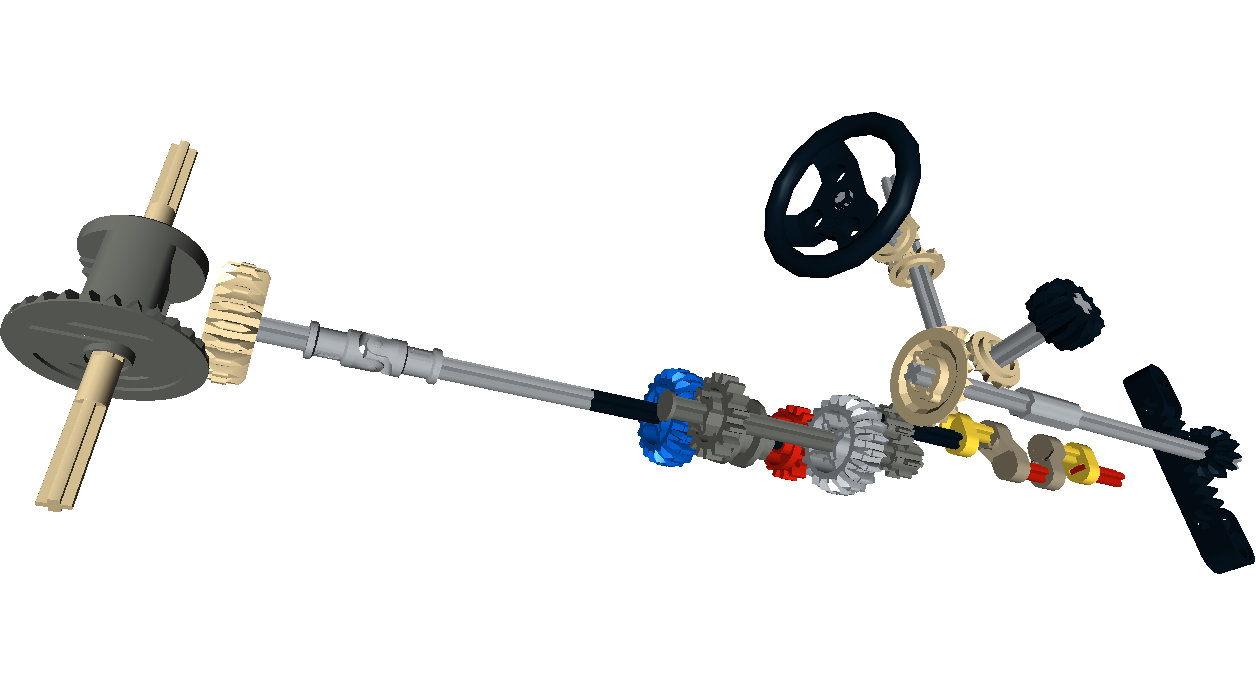
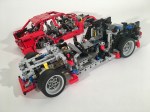
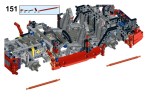
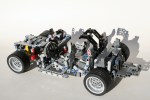
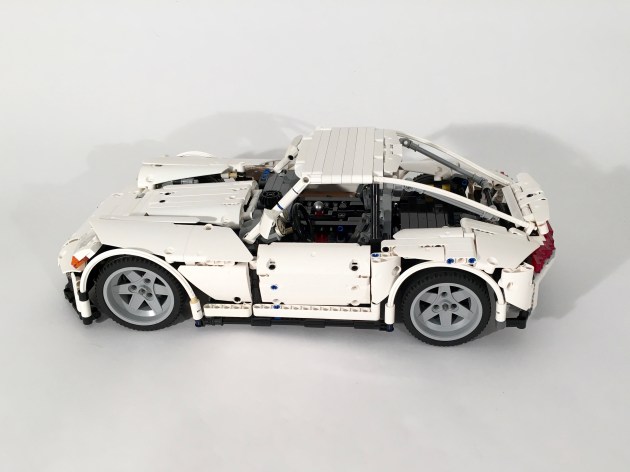
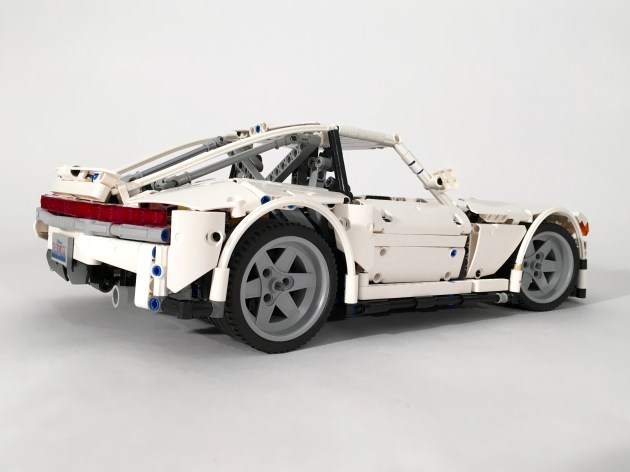
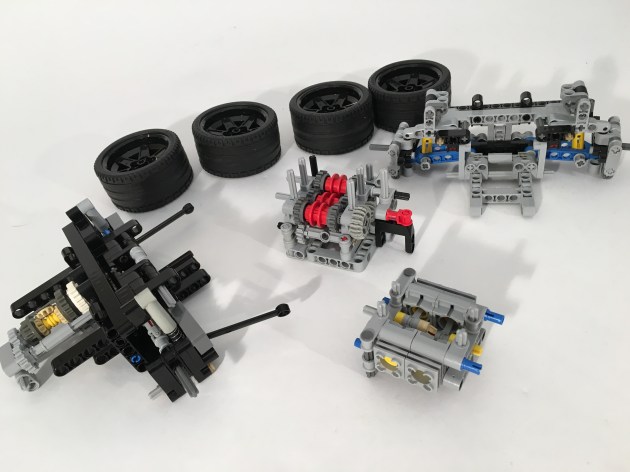
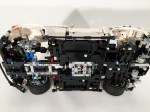
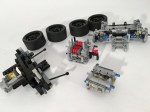
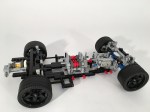
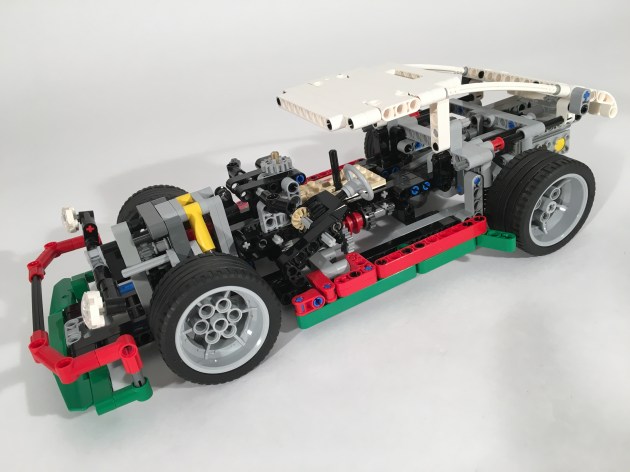
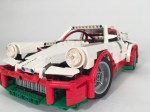
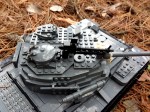
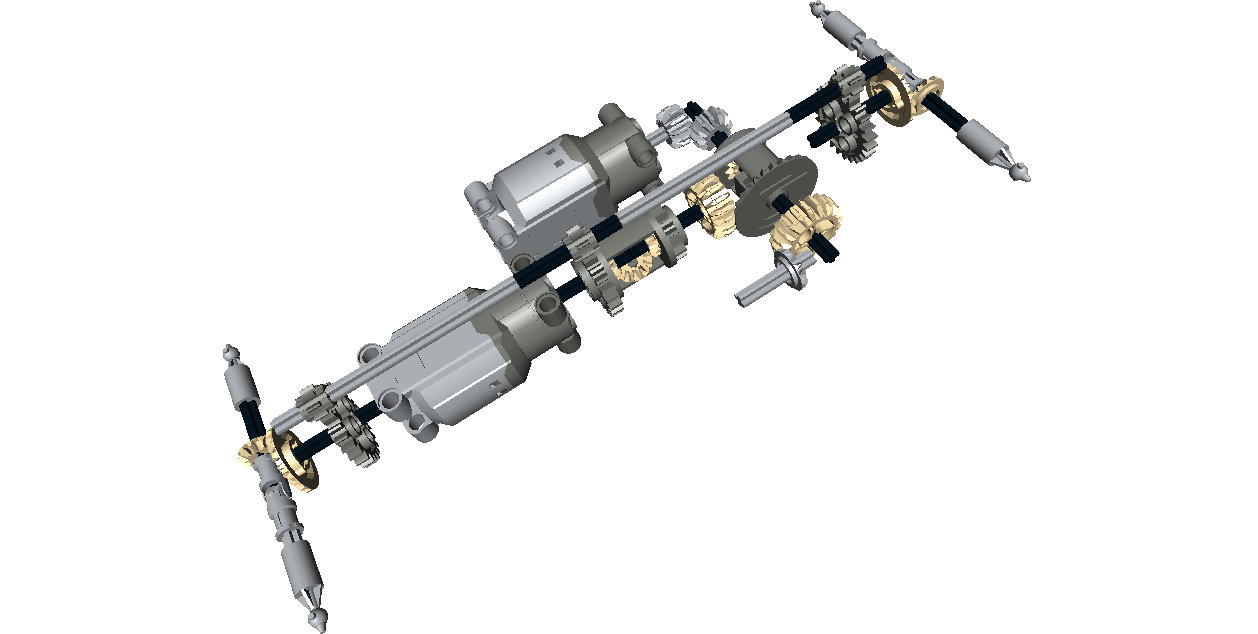
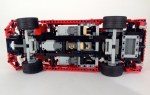
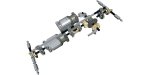
First, I had to figure out how to set the ride height. I decided on the wheels for the truck right away, so it was clear the truck had to come down a little bit. It was clear this would be a significant modification. Since I was already changing the whole frame for the ride height drop, I decided early that i would change the rear suspension to an independent design.

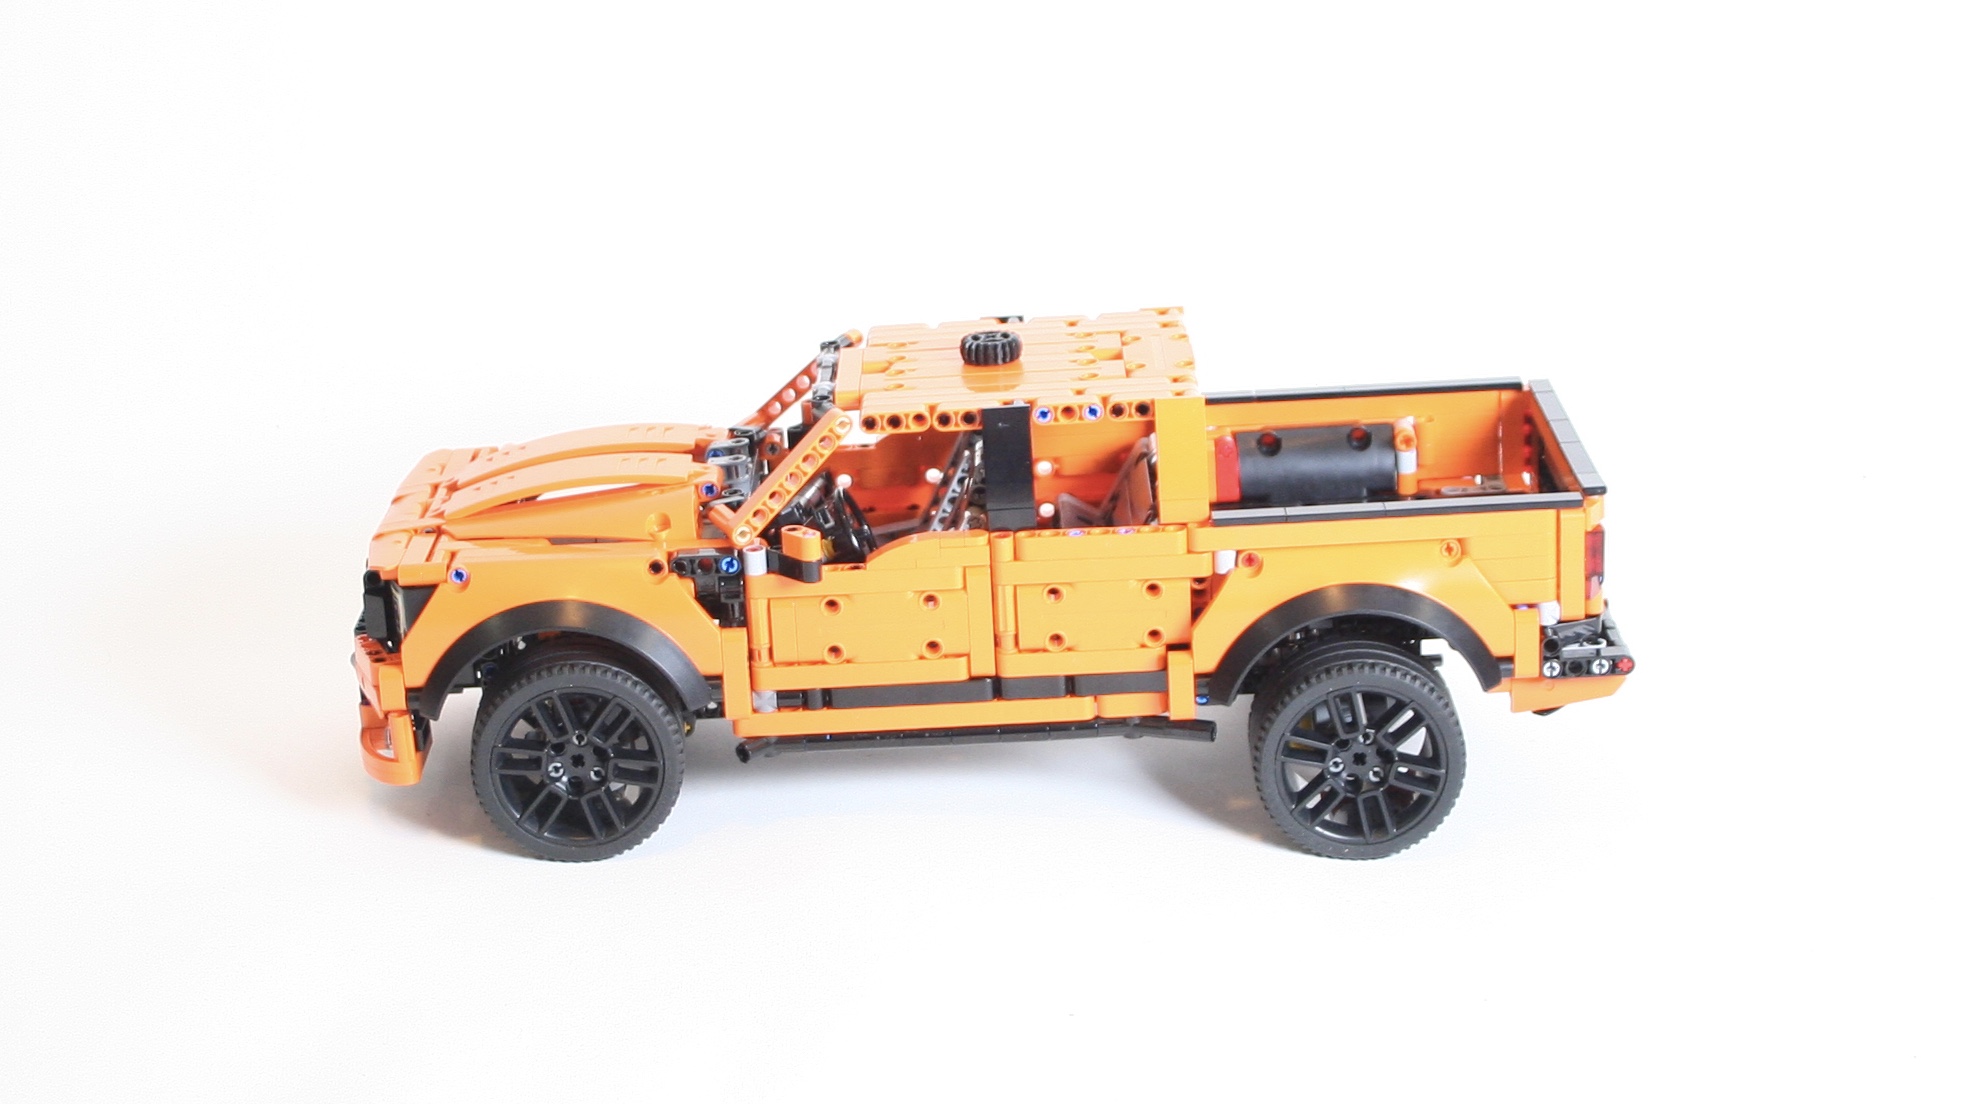
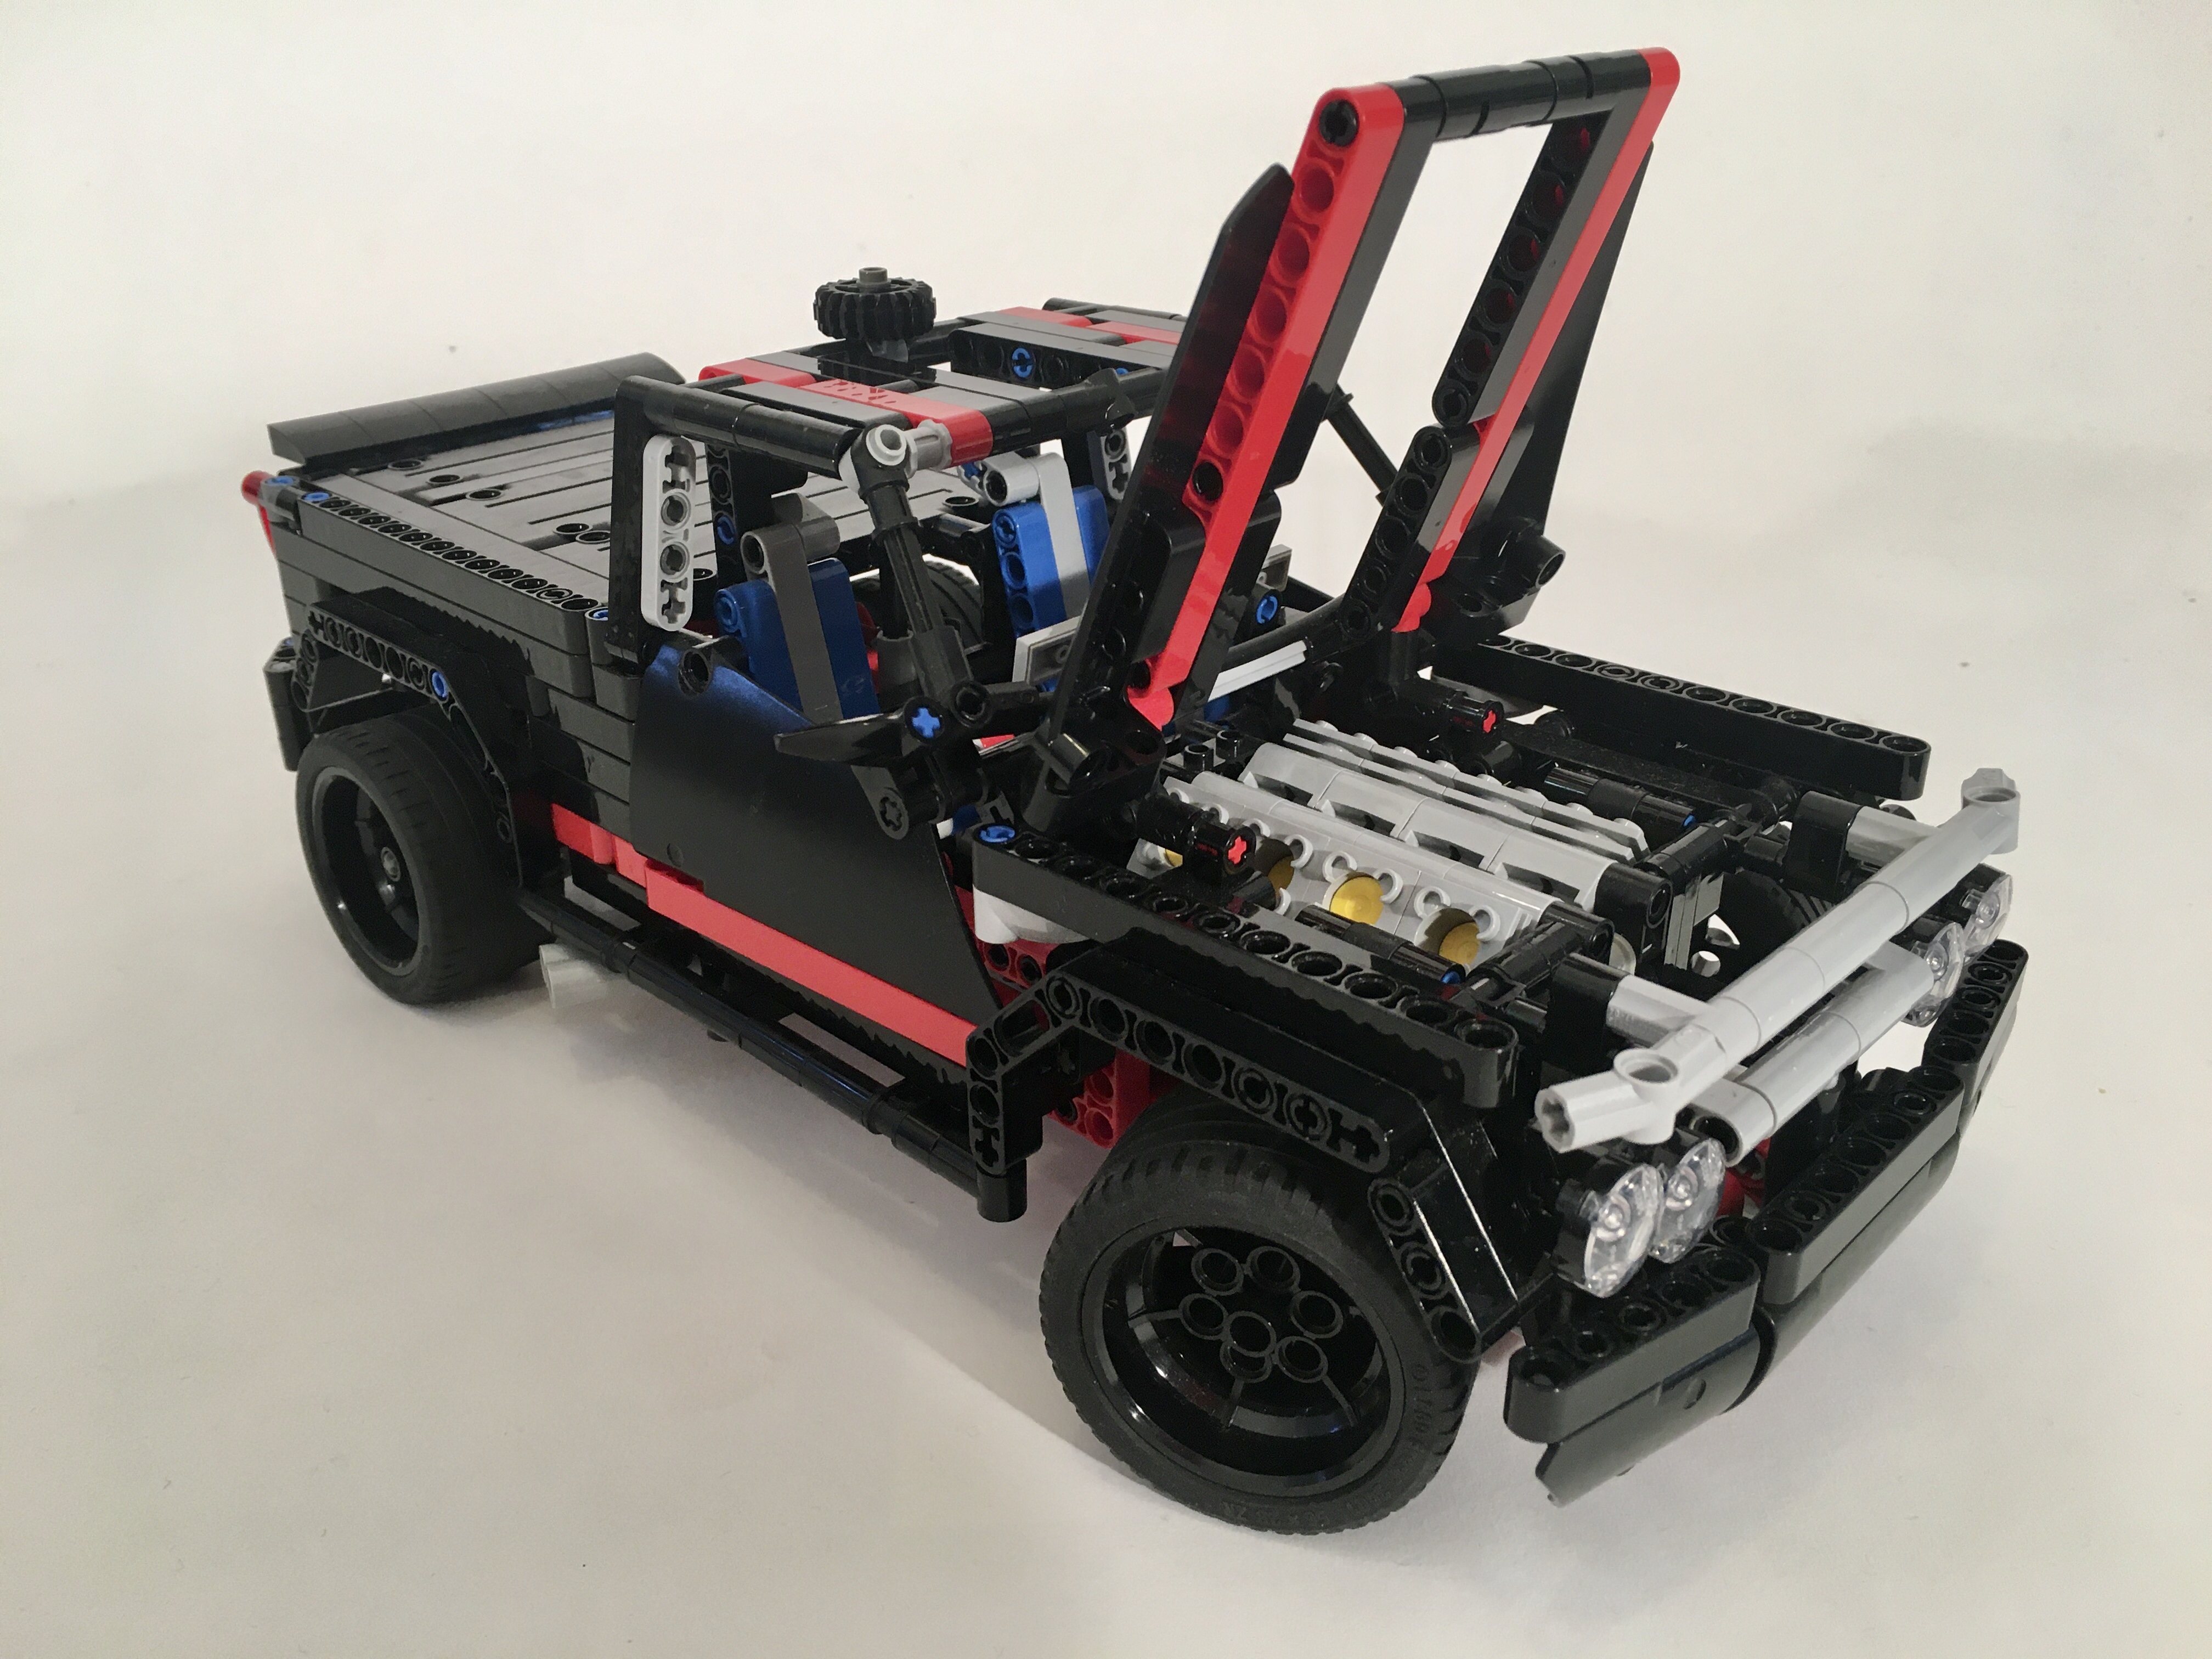
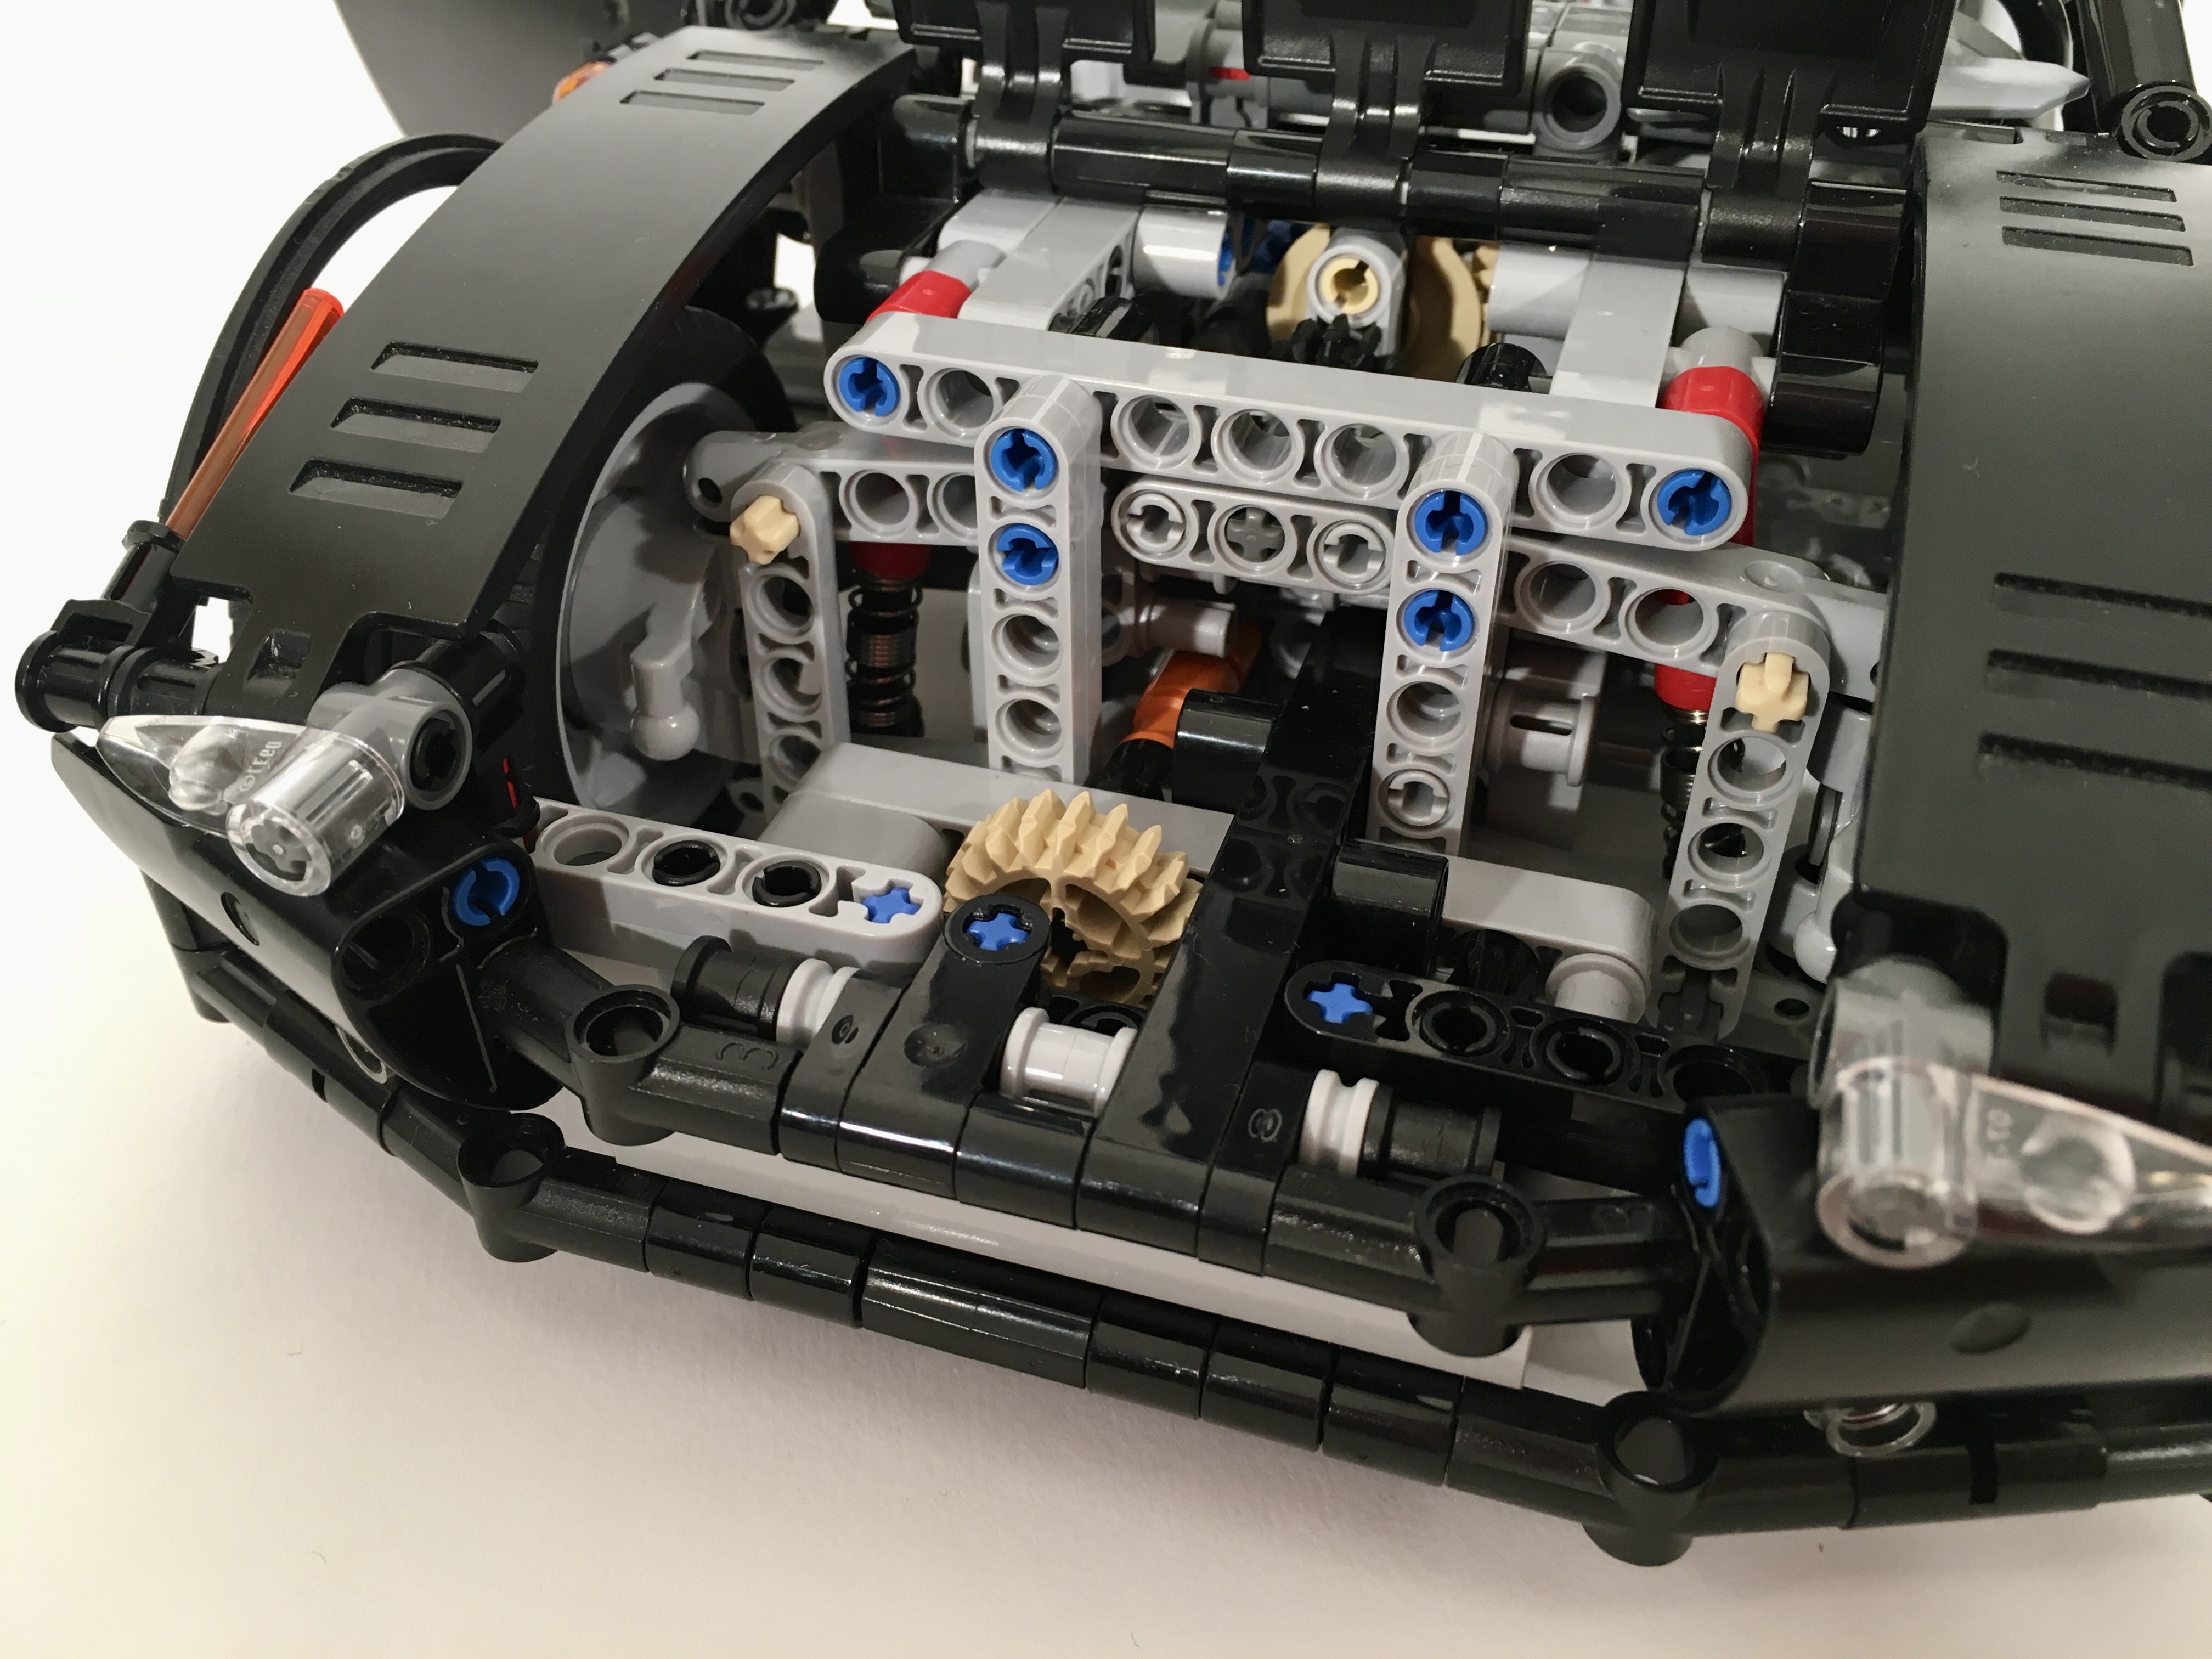
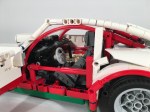
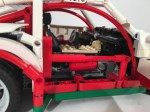
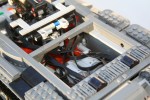
Second, I had to decide on what engine I would use. It was clear at this point, I would have a two door and four door version so I decided a V8 for one, and a V10 for the other. 42126 has a lot of space under the hood, so both would fit without a lot of changes. I added a chain driven supercharger for the V8 to give it a little different look.

LEGO 42126 SVT8 Open

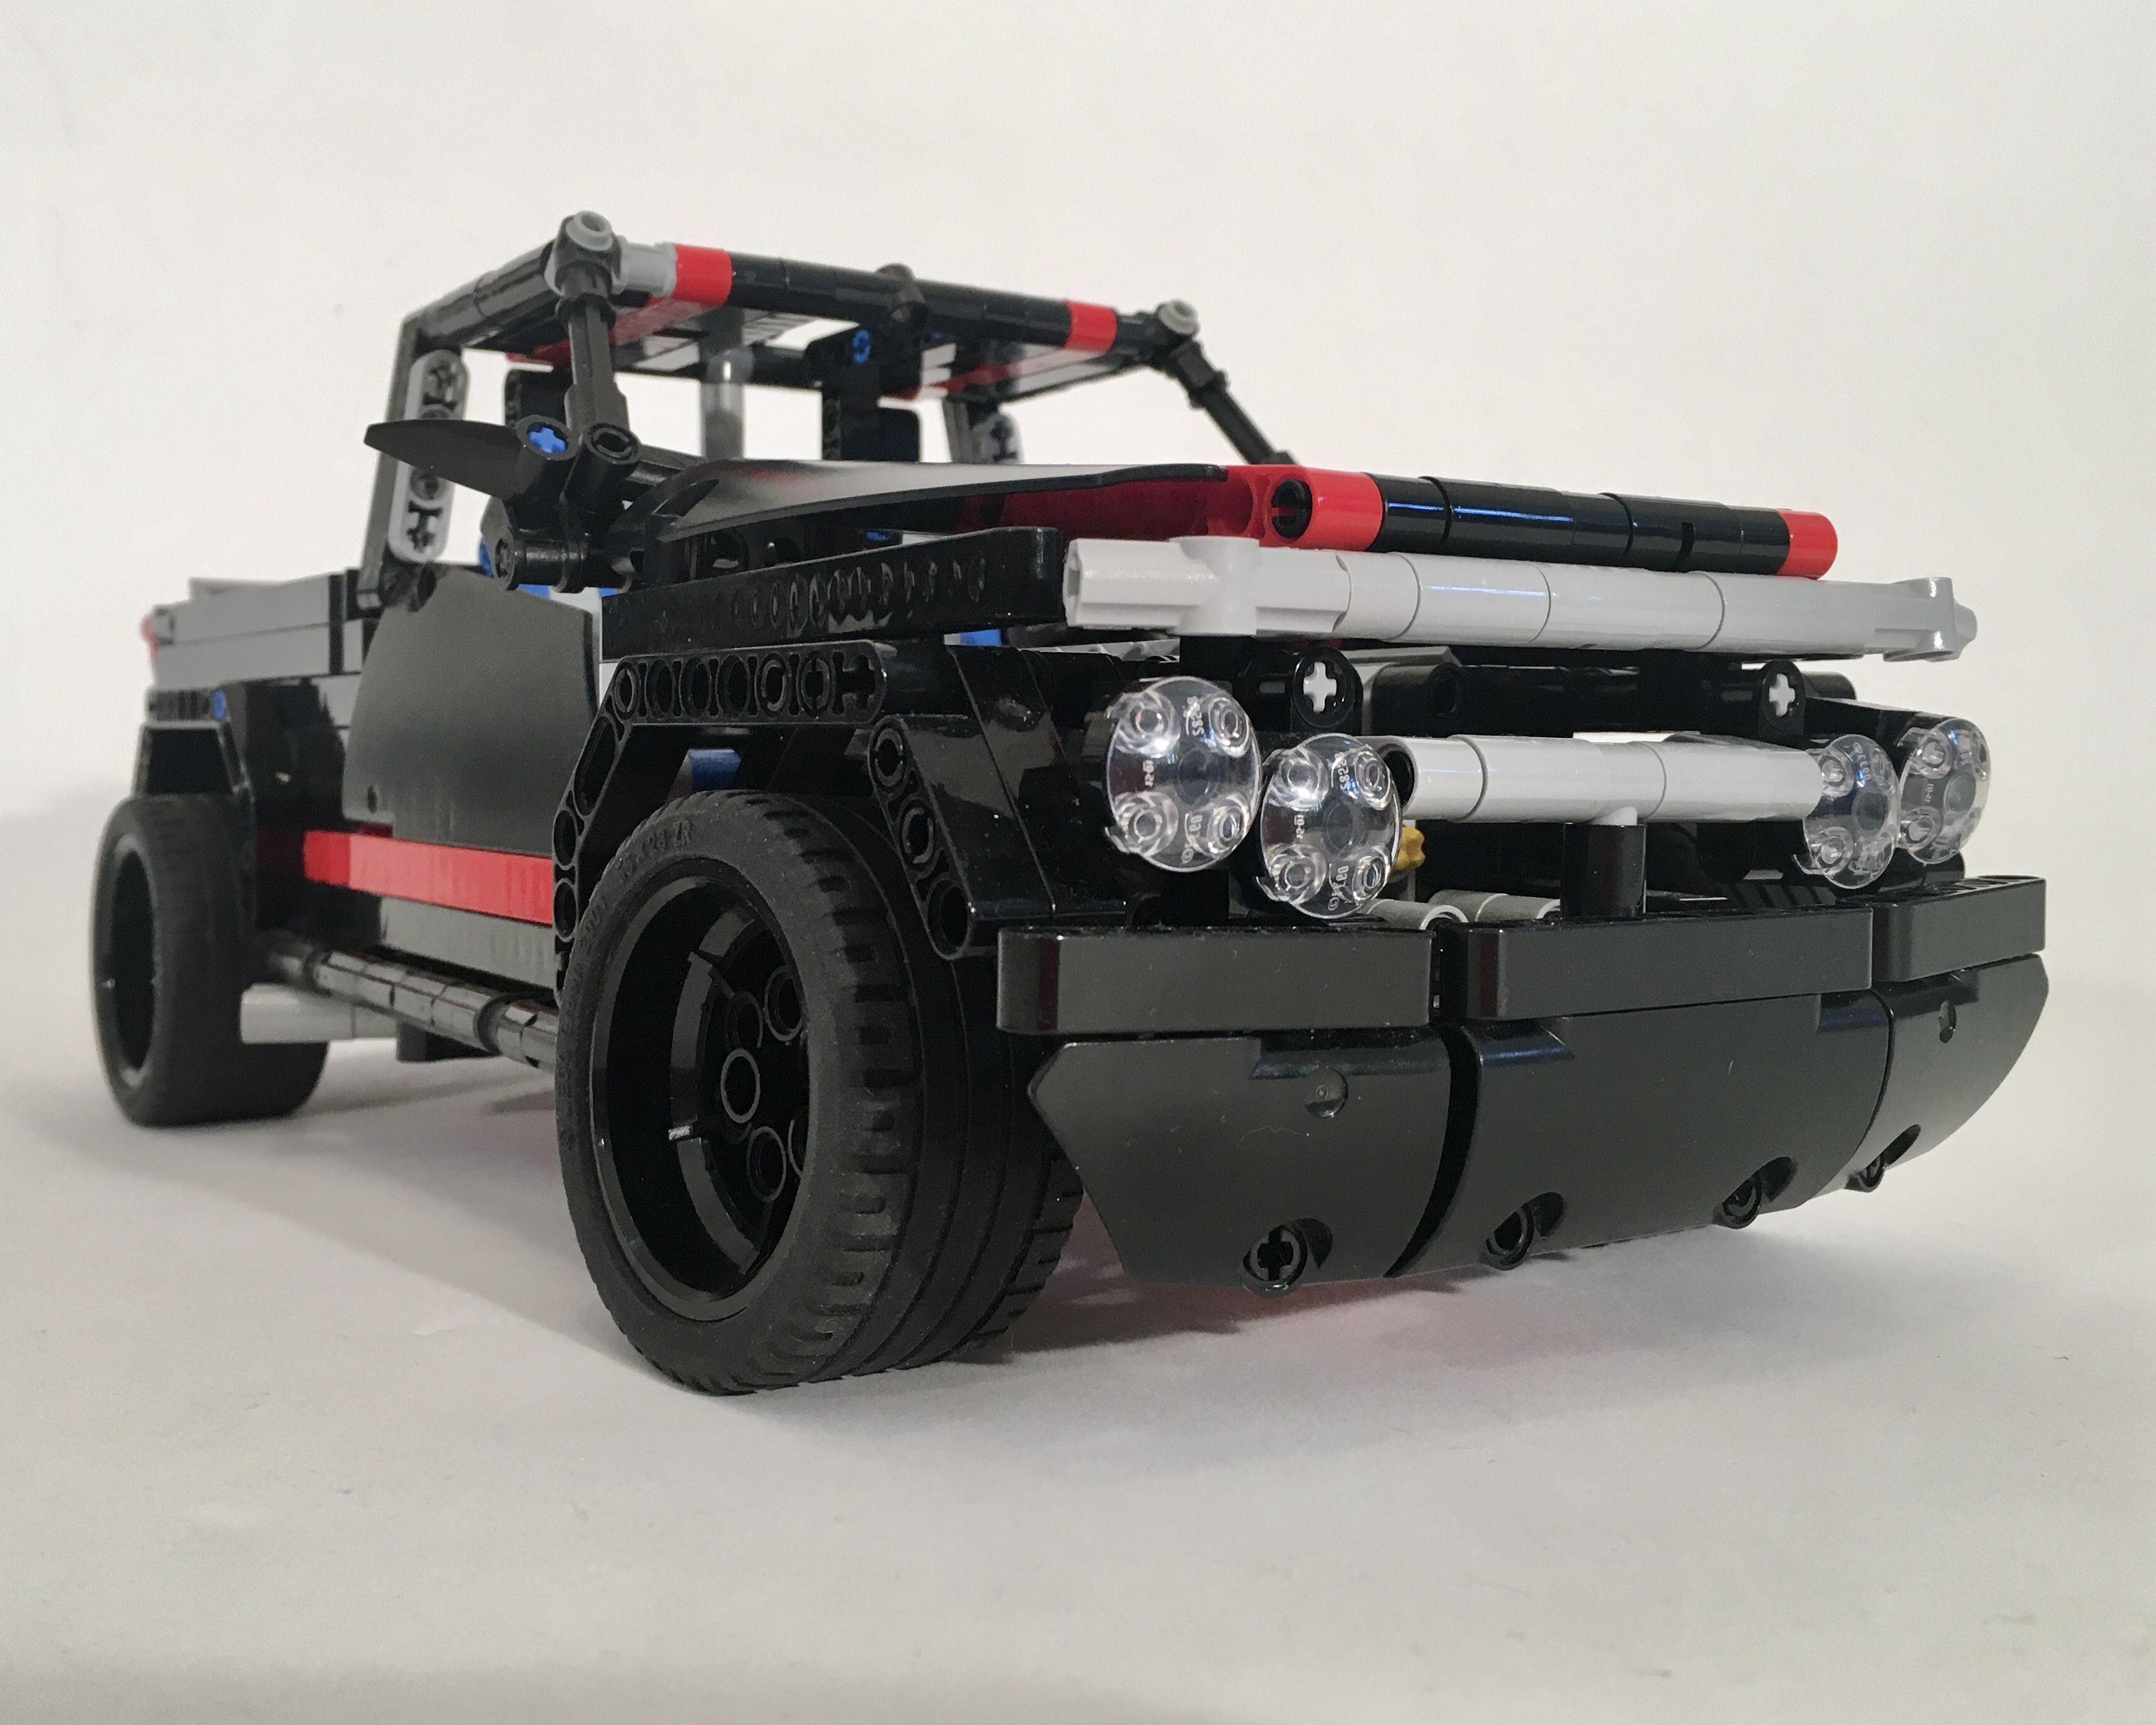
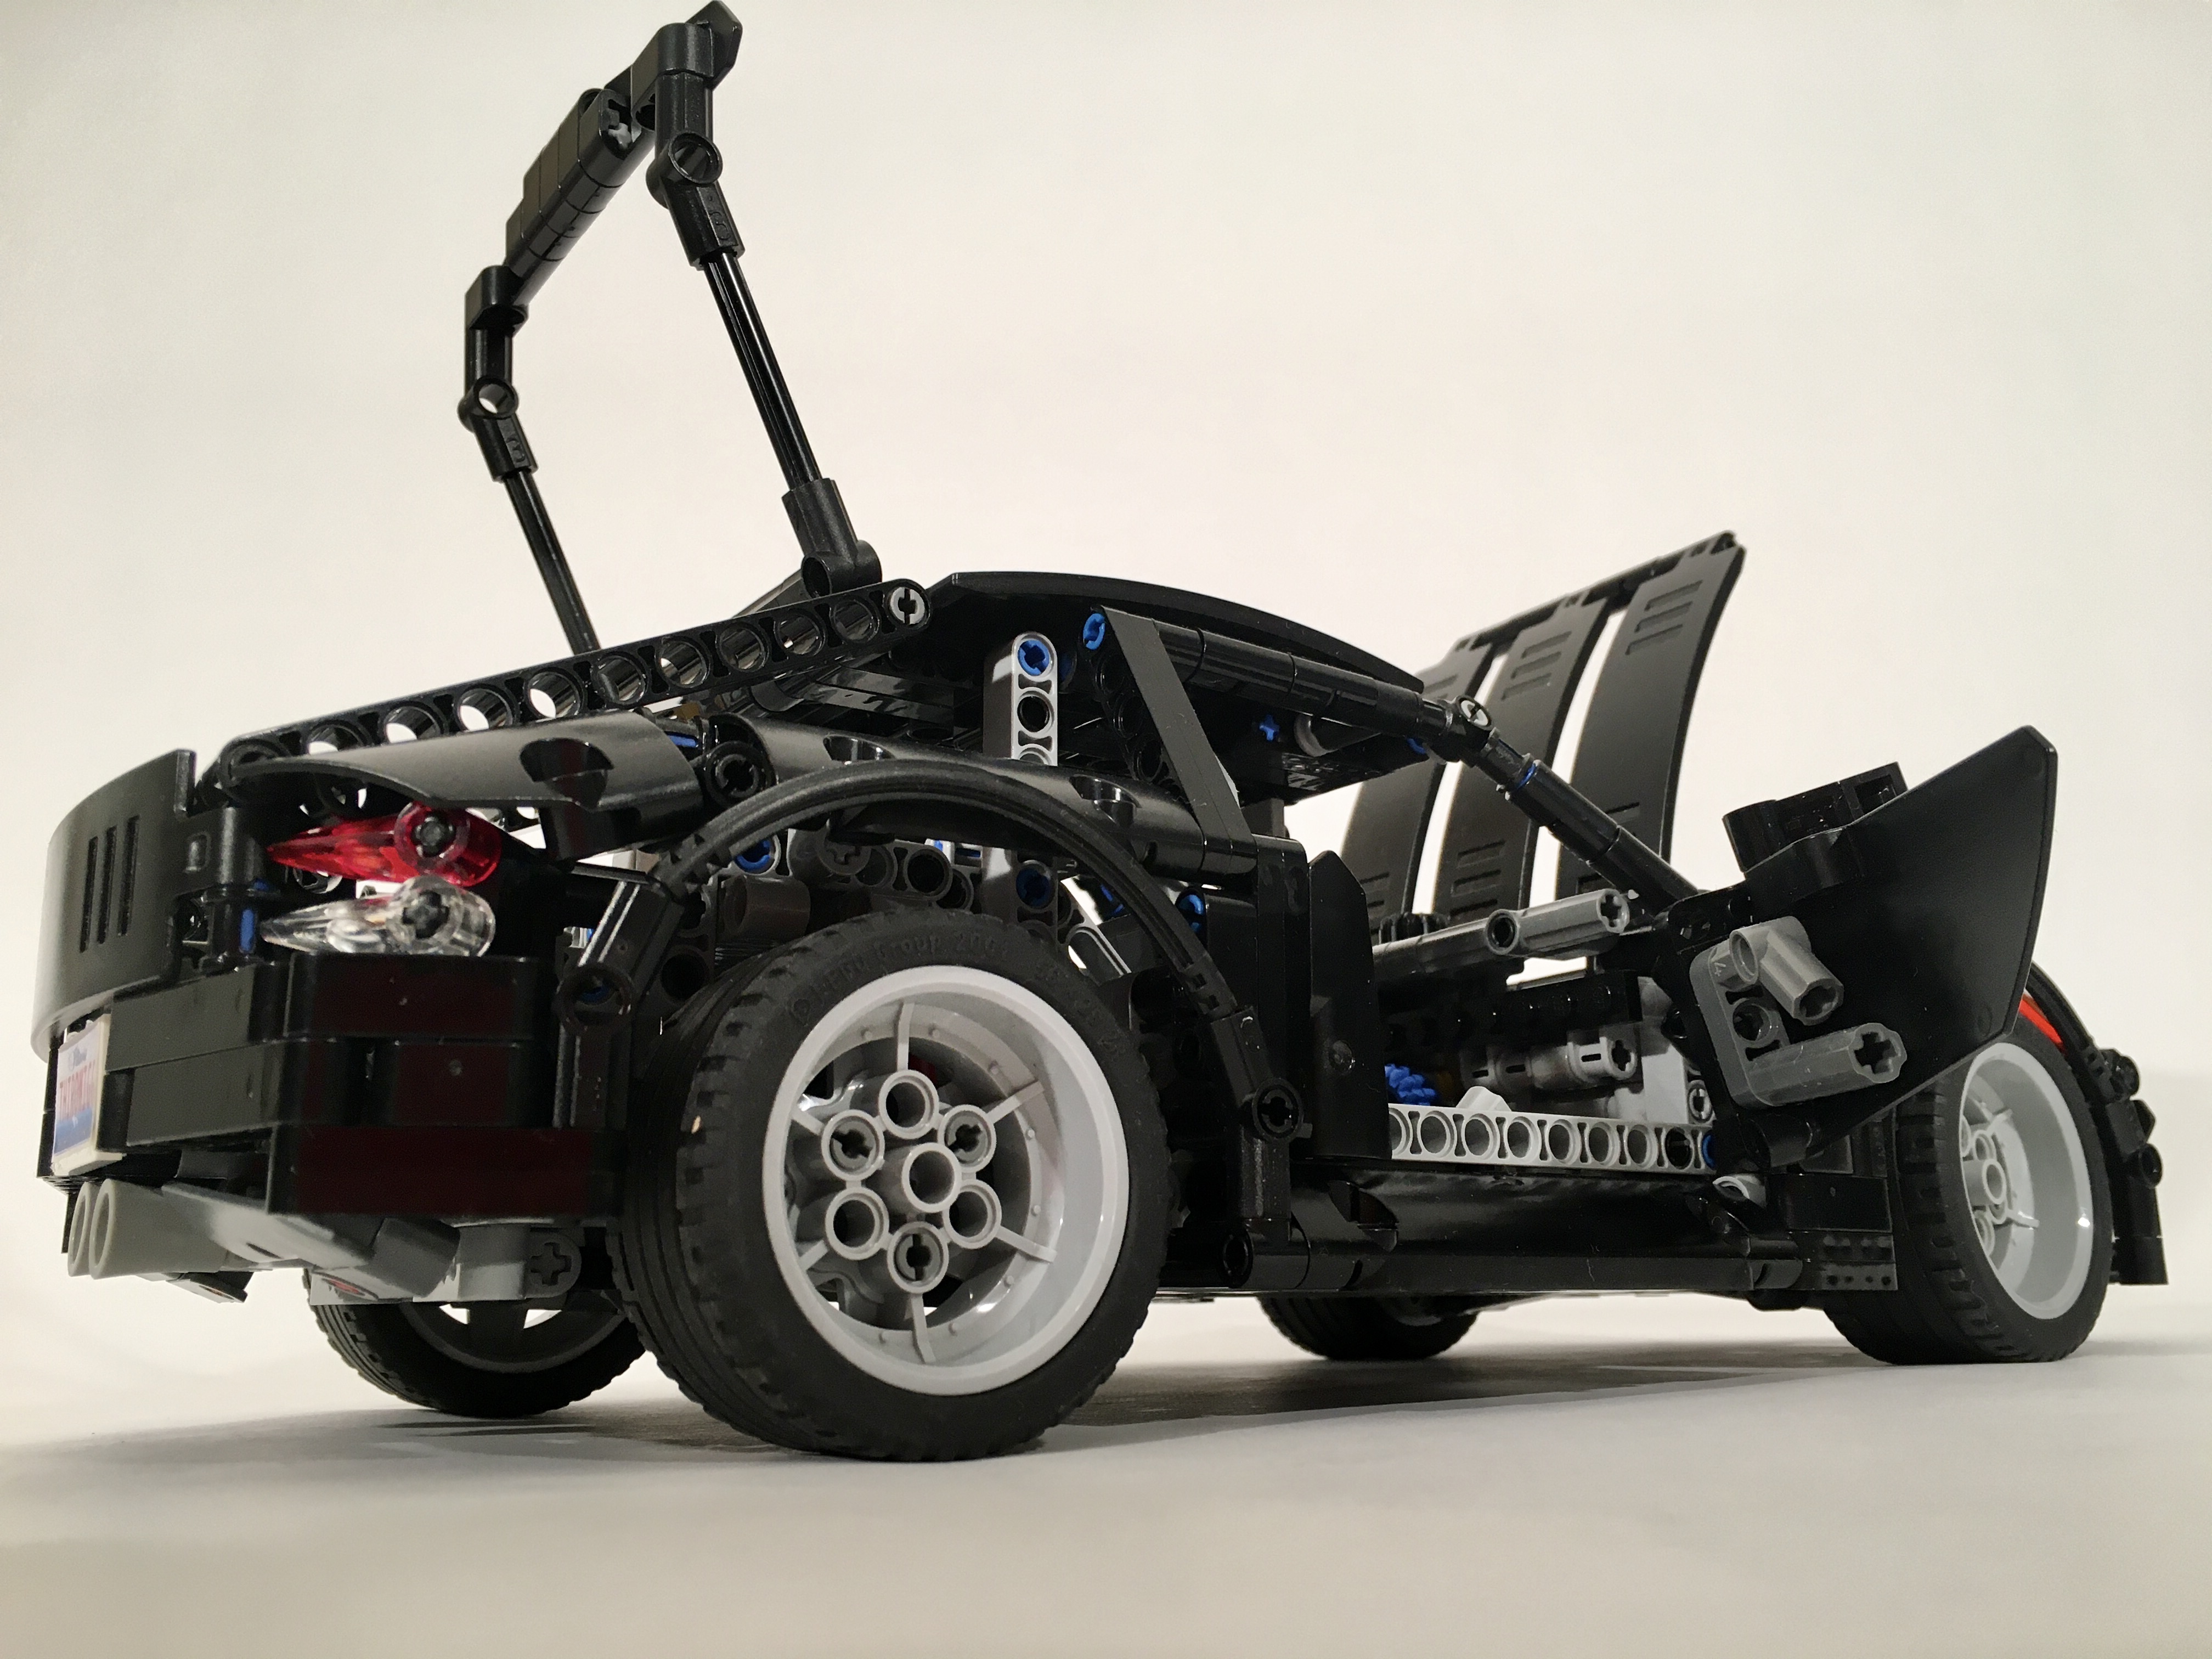
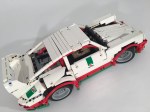
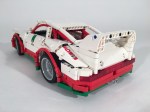
Finally, I wanted to keep the bodywork similar to 42126, but with a sporty look. I designed a new front bumper that is lower, and looks less rugged. I removed the side steps from 42126, and replaced with some simple panels. A new hood was also designed.

Video for the SVT10.

Video for the SVT8.

Functionally, the truck worked better than the Raptor. The suspension worked very well, thought the rear ride height was a little high. The steering worked well, and the front wheels tracked better than on 42126. I liked the look a little better as well, as the wheels and tires make 42126 look out of scale with itself. I pleased with how the updates turned out, so we’ll see if I come up with another MOD to do at some point.

Until then, happy building!

LEGO 8850 Update


After updating 8640, I wanted to update another set with a Technic Fig. There was only one option, 8850 Rally Support Truck.

Free instructions are available at Rebrickable.com.

8850 Update Side

Every once and a while I return to an old LEGO set, and try to modify and improve what was offered by The Lego Group when the set was released. I like to harken back to some of these influential sets because it helps me take stock of all the improvements that have happened in parts and design in LEGO Technic. 8850 was one of the first sets to use the, then new, cylinder and piston parts that have been used ever since. The set also had a driver, steering, and a robust design. When I set to work on this MOD, I placed the following constraints: keep the size, keep the engine, keep the steering, add suspension, update the bodywork, and keep the driver. Make it yellow.

8850 Rally Support Truck Update

The chassis came together quickly, as it is not too complicated, and utilized features I have used before. The rear live axle is simple, and linked forward by two links, and laterally by a Panhard rod. I used the new differential to increase the final engine speed. The front suspension is another simple design; double A-arms with a rear steering link. The steering mechanism travels under the engine, through an idler gear, and moves upward towards the HOG gear on the top of the truck.

8850 Update Chassis

The body work was quick as well, though I needed to slow down to be conscientious to the original design. Liftarms replaced Technic bricks, and the lines were kept. I added some engine detail including a intake, and gave a new grill design. I removed the headlights on top of the A-pillar, because they look silly to my eyes. I played with some ideas for the front bumper including a bull-bar, and other colors, but this simple design ended up being the one I like the most. I gave a little tailgate on the rear with some color, and a little exhaust pipe. Finally, I gave a little OCTAN coloring to highlight the race focus of the truck.

In my effort to improve access to my builds, I have created this MOD in Bricklink Studio, and have made instructions that are a little more clear than the photo sequence instructions I have done in the past. You may find a partlist and download the instructions PDF at rebricklable.com. Send me a photo if you enjoy the build.

Sample of the Instructions

8850 is a tricky set to update, because it has some defining features that I find unattractive, such as the front bumper, the rear, and the upper A pillar headlights. With this in mind, I think I carried the themes through to this build well. The OCTAN livery while keeping the main yellow with white highlights worked very well for my eyes. Functionally, keeping what 8850 had, and adding suspension was a fun project. I am already thinking about how to convert this build into an overland version with 4×4 and more bodywork. Stay tuned…

Until then, Happy building.

8081 SRT Tremor


Lego set 8081 is one of my favorites. It’s a cute little set, that has some mechanical diffenciencies, so I have made a number of MODs of the set. Here’s another one.

The full gallery may be found here.

It’s becoming a bit of a bad habit for me to start a new project while I am currently building something else. While I was building the 8081 110, I founds myself making another draft of a little pickup. I moved pretty quickly on the 8081 110, but this project stalled. The chassis came together quickly. The live axle rear suspension is a simple design with five links to keep non-vertical movement at bay. The front is a simple independent wishbone design just like the original 8081. Finally, I placed a V-8 right over the front suspension, and geared it to the rear wheels. I used the new differential in the rear axle, which drives the V-8 a little faster than in my previous designs.

The sport pickup is a silly I idea that was all the rage in the United States in the late ’90s and early ’00s. Pickups like the SVT Lightning, the Ram STR-10, and my personal favorite the Dodge Dakota RT, were prevalent. This MOC slowed while I was trying to get the styling in the vein of these notable pickups. I liked what I designed for the front and rear bumper, and the rear bed was sufficient. But all the designs I came up with for the hood and the front grill looked dull and basic. Each of the above pickups had bold grills, and a hood line that communicated more power than anyone would need.

At some point, I realized I was not making any changes to the design, and I was running out of creativity. So it was time to be done.

While this is not my favorite MOD of 8081, it is another one to add to my long lists of MODs. The MOD worked well in that each of the simple features functioned without any problems. But I do feel like I did not do justice to 8081 with this MOD, nor did I represent any of those sport pickups well with this MOD. Maybe I’ll need to build a replacement soon….

Happy building.

1E.R Track Car


Thirdwigg Motors is not immune to the regulatory requirements of automotive manufacturing. As such, electrification has arrived!

Full gallery may be found on Flickr.com.

01

After the introduction of the 3T Sports Sedan and the 2C Sports Car, Thirdwigg Motors was ready to start exploring the electrification of vehicles. Since the previous vehicles all had internal combustion, in order to more into electrification, some testing was required. The car features a single electric motor just forward of the rear axle. Geared up 3:1, the motor provides sufficient acceleration and top speed.

10

Since this is track car suspension and bodywork are crucial for performance. The flat bottom of the car contributes to downforce, as does the rear wing and aerodynamic bodywork. The front and rear suspension is independent with torsen bars at each corner. There is very little wheel travel, appropriate for a track car. Steering is handed with the steering wheel, and the HOG just above the driver’s head.

The car was a good exercise to test a different drive mode in a LEGO car. Another electric car will soon be coming from Thirdwigg Motors, so this test vehicle was a good first step. The suspension was a little soft; it worked OK which was my experience with the Octan F1 as well. Frankly, the torsen system only works great for tanks in my experience, but maybe with a little work, it can have an application in future cars.

Until next time, happy building.

2C Sports Car


3T Sports Sedan was the inaugural car for startup Thirdwigg Motors, and the market requested another, smaller, sportier offering. The board of directors approved development of the 2C to fill this need.

Full gallery including instructions may be found here.

fullsizeoutput_193b

I wanted to keep the scale and keep many of the best parts of the 3T in this design but change the body style and add a couple of features. Very early I decided on a two door with a mid or rear engine. I wanted to get a better transmission, so with this, I set of to work. I scaled the car to the Porsche Cayman, and started fitting in parts. I used the same suspension from the 3T in both the front and rear, which constrained how the driveline would have to be routed.

fullsizeoutput_1945

It was at this point that the interior setup got a little complicated. When I started this car, the new Wave Selector was just release which optioned a lot of gearbox options. After seeing this great little transmission, I knew I had what I wanted: a four speed sequential transmission. After playing with some options, I place it in the middle of the car. I toyed with having the engine behind the rear axle, but settled on a mid placement. Nothing larger than a Flat 4 was ever considered. The four speed gearbox worked and a changeover axle ran to the front under the suspension where a simple rotation limiter was placed. The steering HOG and steering wheel had all of their mechanics in front of the transmission, so everything fit.

fullsizeoutput_1943

I had intentions of having a ratcheting gear selector to work with the slick sequential  transmission. But I was running out of space. The center of the car was taken up with the transmission, suspension at each end, and placing one in the rear did not give a way to connect to the transmission. So the only place left was under the front hood. There were a number of great change over options that work well. I tried each. Some fit, some worked great, but each had the same problem: there was not good way to seamlessly integrate the “button” into the bodywork. I had visions of pushing on a grill to actuate the mechanism, but the grill was not very big, and required even more space than I was already using. In the end I decided to scrap the idea of a changeover, and use a simple rotary selector. It is not fancy, but it works well, and keeps the bodywork clean.

fullsizeoutput_193c

Through out this process I was toying with ideas for the body work. Generally, I add parts as I like them, and when everything is placed, I rebuild the whole car with structures in place for all the final placements of critical internal and external parts. But this car had a large transmission in the middle which meant there was no frame running from the front to the rear. I added a structural frame under each door, and tried to build up the frame under the transmission as best as I could. It works, but there is still a little car flex under heavy center load.

First, the bodywork on this car works better for my eyes than the 3T, even though I tend to like sedans a little better. Second, the gearbox worked flawlessly. It was smooth, and even though I had the open the hood the change gears, the smoothness was worth it. Finally, the suspension worked great as it had proved itself in the 3T. It now adorns the desk at my work. Hopefully you enjoy it too.

Don’t worry, Thirdwigg Motors is already hard at work on the next car.

Happy Building.

3T Sports Sedan


The sport sedan is my favorite kind of car. You can have your McLaren, if I can have four doors and a long hood. One with the proportions of a C-class, the suspension of the ATS, the engine of a Mazda 6, the suede interior of the M3, and the value of the G70. Don’t worry about me, I’ll be set. But there are few good sedans in LEGO, and even fewer smaller ones. Let’s change that.

Instructions may be downloaded here.

fullsizeoutput_126b

When I set out to make a sedan, I wanted it to be smaller. What were the features I could add in a smaller LEGO car? It had to have some style, suspension, a gutsy engine, steering, and a transmission. Finally, it had to be strong. So I got to work. The scale was set on a 3 Series that was a little wide, so I set the hardpoints and set off to work.

I first set the two axles and suspension. I have built a couple cars with a floating rear differential, and this setup has worked well in the past, so it would work well for this car. Each side had a dual arm independent setup with two shock absorbers. The front suspension used a dual A-arm setup and a wheel hub with only one hard shock absorber.  Before adding the steering, the driveline would need to be finalized.

fullsizeoutput_127d

I played around with a number of transmissions, but settled on a simple two speed design for a number of reasons. First, it was smallest as something else would take a lot of space from the interior. Second, something better would take away from the rigidity of the model. Sedans need a lot of support through the transmission tunnel as you lose a lot of rigidity near the doors. Finally, anything more complicated than 2 speeds would be tricky to manually operate (play with) in this scale. About half way through my work on this project, some fun new gears came out which improved the design.

28980312697_2bcbee2062_o

Next, I moved on to the bodywork. This is the part that causes me the most problems in my car builds, and this car was no exception. I set the doors first as I wanted to use two panels for each side. Then I worked on the front and rear bumpers. The rear came together quickly, but the front took a little more time. I wanted something that was sporty, and with a simple grill. I think it worked out well. Finally was the roof and the rear quarter panels. This part took a long time, as I wanted something strong and stylish. The result is strong and has the C pillar split into a D pillar. It is not perfect, but it is stronger than all the panel ideas I tried.

After the bodywork was set I did something I have never done before, I rebuilt a second whole car. This time, I knew all the final features, and where all the body work would attach so I could focus on creating a strong frame that would best support the whole design. I am happy I did this, as it cleaned up the inside, found some new solutions, and made the whole car stronger. Building this way also helped me think through how clear instructions could be made.

fullsizeoutput_112a

In the end, I was pleased with the final design. It accomplished all the goals I wanted, and it is an accessible design for others to recreate. I love building in this scale, and cars are a lot of fun, so I will need to do another small car design again.

Until the next time, happy building.

Porsche 714


My Entry for the LEGO Rebrick Porsche Contest.

This year, it seems like everything about LEGO Technic is about Porsche. LEGO created a 911, and started a contest for creating your own Porsche. Porsche is all everyone is building and talking about.

714

So I made one too. The Rebrick team posted a contest to design your dream Porsche, and thinking of the words of Mr. Porsche, “I couldn’t find the car I dreamt of, so I decided to build one myself,” I set to work. My dream Porsche lives in the spirit of the 914 and the 924: A compact, lightweight, mass-market, rear-wheel-drive sports car. It has a long hood, short overhangs, and a roofline that alludes to Porsches of today and yesterday.

714 Rear

I had six weeks to design a car. In a week I had the front and rear axle, and the transmission. The transmission is a similar unit to the one I had in the ATS. Six speed manual, with a single point shift lever. It keeps the gear changes quick with short throws. The rear axle is an independent suspension design, with short upper swingarms, and long lower swingarms. This changes the camber of the wheels as they move through the suspension travel, to keep a consistent contact patch around a corner. The limited slip differential is mounted longitudinally behind the axle. The front suspension is also independent with short upper and long lower swingers. The are mounted to a steering uckle that gives both Ackerman and caster geometry.

714 WIP1

Because it was my dream car, I wanted a car that would be inexpensive, and teach me how to drive fast. A front engine, rear wheel drive is a less expensive car to design and build. Additionally, my car would have a Boxer 4 for lower cost, and an option for Boxer 6 for more performance. Since I can use some training to be a better fast driver, I though a roll cage would be necessary.

714 WIP2

The remaining five weeks were spent working on the bodywork and the interior, which always takes more time than you think. I fit the cabin in around all the mechanical bits, and was able to add a glovebox and a manually adjustable tilt steering wheel. The seats are simple, but match the car interior well. I wanted to keep a couple of features that were iconic in my mind with Porsche cars: Round headlights, a full width thin taillight, a curvaceous roof, hunches over the rear wheels, and a taller greenhouse. After many drafts, I was able to get a design I was pleased with.

The car turned out how I wanted, and I felt it was a good contribution to the contest. The front of the car did not turn out how I envisioned it in my mind. The rear did not look as clean as I wanted. Mechanically the car works great. The suspension works perfectly, and the steering works flawlessly without hitting the wheel fenders. The transmission is great, and the limited slip differential continues to do the trick.

After all this talk about Porsches, I’ll take some off and build something different.

Happy Building.

Porsche 911 Cup Car


In a moment of online immaturity, I requested a topic for the 100th LUGNuts Challenge. I was tasked to build “any year Porsche 911, or a 2015 Jaguar F-Type.” It was to be completed during February 2016. I, of course, mistook the challenge as a requirement, and worked frantically to complete the MOC in 13 days.

The full gallery may be found on Flickr or Brickshelf.

Porsche 911 (964)

Being the year of the Technic Porsche, I figured it was a good idea to try my hand at the 911. The 911 is an iconic car and it’s shaping is instantly identifiable. It seemed like a bad idea to try and recreate it. I spent the first week of the month planning the style, scale, and the features. I decided to model 935, 964, or 991 GT3. Each were rear wheel drive, and had a wide rear track with prominent rear fenders. I decided on a four speed transmission, steering, and full suspension all around. Throughout the build, I settled on a cup racing version of Model 964, in OCTAN colors of course.

911 WIP 2

I started building on Feb. 10th, and completed the placement of all the major components. By Feb. 15 I had a final chassis. I used a “dynalive” suspension on the rear connecting to a short/long arm suspension design. The differential is not fixed to the chassis, but move in a dynamic way between each side of the suspension. I have used this set up before, and it works well. Immedialty in front of the suspension is the transmission. Rather than having the common four speed tranmissions found in 8880 and many other MOC, this transmission has all the gears in a single plane. This add a couple of gears, but it allows for a lower car, which works great at this scale. The output shaft exits the transmission on the non-driver side, and goes up and over the rear suspension where it connects to the boxer 6 at the rear of the car. Finally, I added a simple double A-arm suspension on the front.

911 WIP 2

By the 16, I had an introduction to the body work, and the steering had been finalized. I added a drivers seat and worked on the roof , and a draft of the front hood was done on the 17th. On the 18th, I submitted for feedback to the internet a couple of designs for the front hood. I finalized the hood and the rear quarterpanels on the 19th. By the 20th the exterior details were done, and I stopped posting work in progress pictures. After a week of solid building, I took a couple days off and made a 12 part Bricklink order to cover the few white parts that were needed.

WIP 6

I then spent the next couple of days finalizing the interior details, including the dashboard, a full roll cage, and the engine details. The MOC was done by the 25th, which means I completed it in 15 days, faster than anything I have ever built.

911 Side

The MOC worked well. The suspension was taught, and functioned well. The steering lock was a little limited, but it worked smoothly. The transmission was a little gummy in gear one, but two through four worked great. But did it look like a Porsche? Yes, but some parts bothered my eyes a little, such as the spoiler, fenders, and hood. Basically the shape is there; you can tell what car it is, but from some angles, you cannot tell it has flared fenders. The hood does not look as curvaceous as it should, and the spoiler looks like an add on. The colors looks good, but a little more great would be great. Overall, I was pleased with what I did in 15 days, but next time I will be a little more particular.

Until next time, happy building.


T-55A


The T-72 that a made a couple of years ago is still the most popular MOC I have made; at least in terms of internet analytics. This year, I committed to making another tank, so I figured keeping in line with old Soviet armor would be rather apropos.

The main gallery may be found on Brickshelf or at Flickr. Instructions may be found here.

T-55

The T-54/T-55 line of tanks have been produced in greater numbers than any other tank. The MOC represented here is a T-55A, representing types that were assembled starting in 1970. This series included an updated NBC and antiradiation system, an upgraded engine, and also added back in the 12.7mm anti-aircraft DShK on the loader’s hatch that was part of the original T-54 spec.

As with most of my MOCs, I starting scaling the tank before any building took place. I knew I wanted to use the newer, larger track links, and I knew I wanted to use the old mid-sized wheels. This set my scale, so I got to work. Starting with the chassis and the hull I worked first on the driveline and suspension. I used simple 2×4 liftarms to connect the road wheels to a suspension axle which activated a shock absorber inside the hull. Each road wheel has its own shock absorber. Fitting them all in took some creativity, but they are all mounted inside on the left and right sides of the hull. In the end, each wheel has about 3 studs of vertical travel.

T-55 Chassis

In between each suspension bank are the remaining mechanics.  After the suspension was set, I worked on the turret functions. Right from the beginning, I knew the tank would have a rotating turret and an elevating gun. It was clear having the elevation mechanics for the gun in the turret would be tight, so I decided instead to have the functions placed in the hull rather than in the turret. Using a vertically mounted mLA, connected directly to the breach of the gun, I was able to develop a method that would elevate the gun throughout the full turret rotation. The turret rotation was driven by a 8z gear connected to the turntable, and reduced by a worm gear. Both motors for the elevation and rotation are placed directly in front of the turret.

T-55 MechBehind the turret are two PF L motors mounted transversely side by side. They drive a 1:1 gearbox which connect directly to each rear drive sprocket. The IR receivers are placed above the gearbox. For those keeping score at home, the internals are (f to r) the battery box, the turret motors, the turret mechanics, the drive motors, and finally the IR receivers.

Working on the exterior of the MOC is what took the most time. The hull came together pretty quickly, with the exception of the details over each track. Most of the finishing time came with the turret exterior. Most Soviet tanks have the distinctive mushroom turret, which considering LEGO’s cube orientation presented some challenges. The turret of the T-55 also has a slight triangle orientation when viewed from the top. Like the T-72, I designed the turret with four side orientations (left, right, front, and rear), and one top orientation. Starting from the rear, I added a basic curved structure. The sides each had a couple levels of slopes, each tapering in toward the gun. The front was a little more complex. There are two “slope blocks” made of 4 curved slope bricks, and a supporting structure. One slope block is mounted on each side of the gun. The support structure is a mess of bricks with a stud on one side, headlight bricks, and plates. The top of the turret is plates on the front, and two sloped plate sections under each hatch. The two hatches are mounted to the turret support under the sloped plate sections. The AA machine gun is placed on the top, and various external mountings are placed in various ways around the turret.

T-55 Turret Detail

After making a lot of non-powered MOCs, it was nice to get back into Power Functions. I was pleased that everything worked flawlessly. The drive had adequate traction and power. The suspension worked well, and provided good floatation and travel. The turret rotation was smooth and allowed for precise directions changes. The gun elevation worked great, though I had to limit turret rotations to under four before the clutch on the mLA would snap. After a number of smaller builds, and frustratingly long builds, I was nice to finish something that worked well, provided constant entertainment throughout the build, and turned out quite nice.

Happy building.

Audi allroad


There are not many projects I start that I do not finish. I can count a couple. But, sometimes there are projects that take a long time to complete. I either loose motivation, lack parts (read budget), or find something else to do. If I were wise, I would toss the project, and move on to something better. But there is value to trudging through the slog and completing something difficult. The Spitfire is a great example of this. The Audi Allroad has been on The Queue for about 16 months, and it’s finally done.

The full gallery may be seen on Brickshelf or on Flickr.

Audi allroad

After completing the OCTAN F1, I thought I could use the suspension for an all-wheel drive car. I was sure I could make the front suspension with steering work at this scale.

allroad Suspension

I wanted it to have another fun feature, so using a bunch of differentials, I developed a simple three speed transmission. Three power functions motors are connected via two differentials which connect to the drive axles. Each differential acts as a subtractor between each motor. When one motor is running, the power moves through two differentials, and the car moves slowly. When two motors are running, the power moves through one differential, and it’s a little faster, and when all three motors are running the car is running the fastest as no differentials are splitting the power. I got it to work, and within a day, I had a working chassis.

allroad Driveline

Once this was done, the MOC sat on my desk for a long time. This past fall, Thirdwiggville welcomed another citizen to the village, and this gave me lots of time late at night to get back to working on this project. I spent a couple of weeks working on the body work with the perspective of “finish this.” So the body work could use a little more polishing; doors, mirrors, better lines, maybe an interior. But I was happy to finally get this done.

The MOC worked well. The suspension functions quite well at this scale, and the transmission was simple and effective. It could be a little quicker, but I was not going to make a substantial gearing change after the MOC was built.

Two final thoughts. I need to stop building supercars because they take a lot of time and effort for me, and I find little motivation for the body work; I do not think the body work looks good, and I lack motivation to work on it. Second, I needed to test the driveline earlier in the build process. I spend too much time fiddling with gear ratios after everything was build. But this project is done, and I am happy it is.

Happy building.