Ionos Sport Sedan


Sometimes I cannot make a decision. This is the LEGO result of that problem.

You may find free instructions for the AWD and the RWD (my favorite).

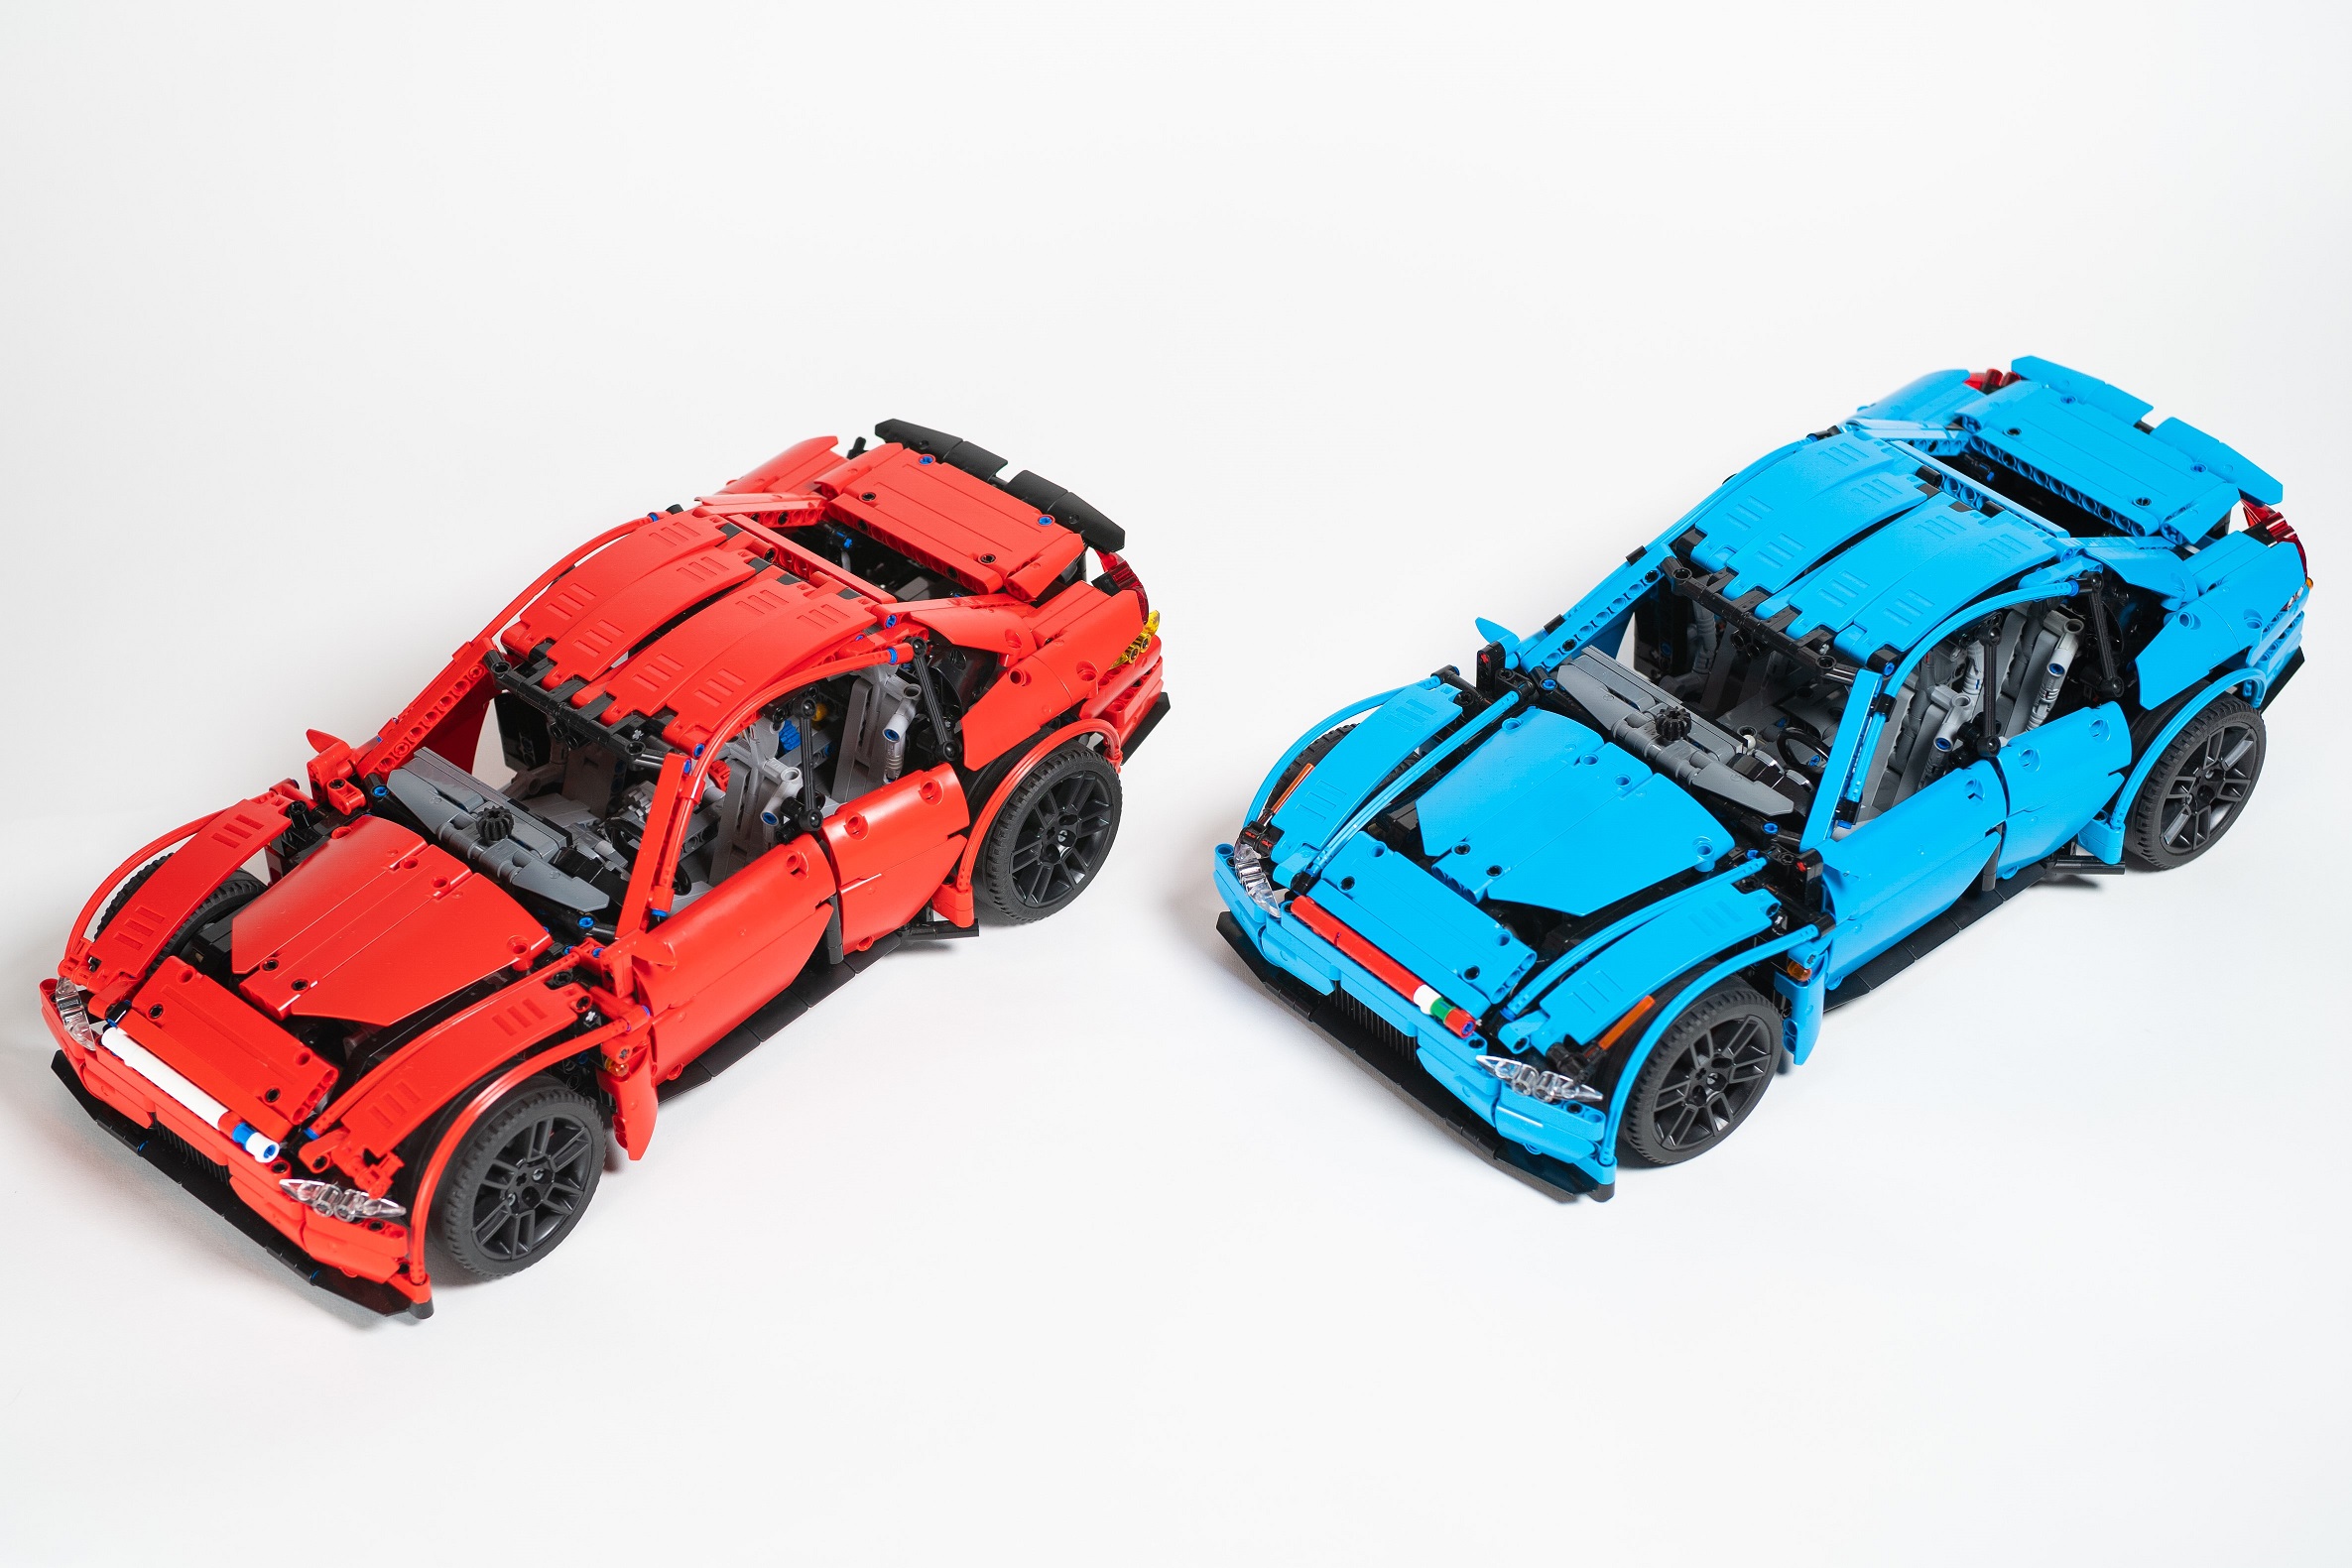
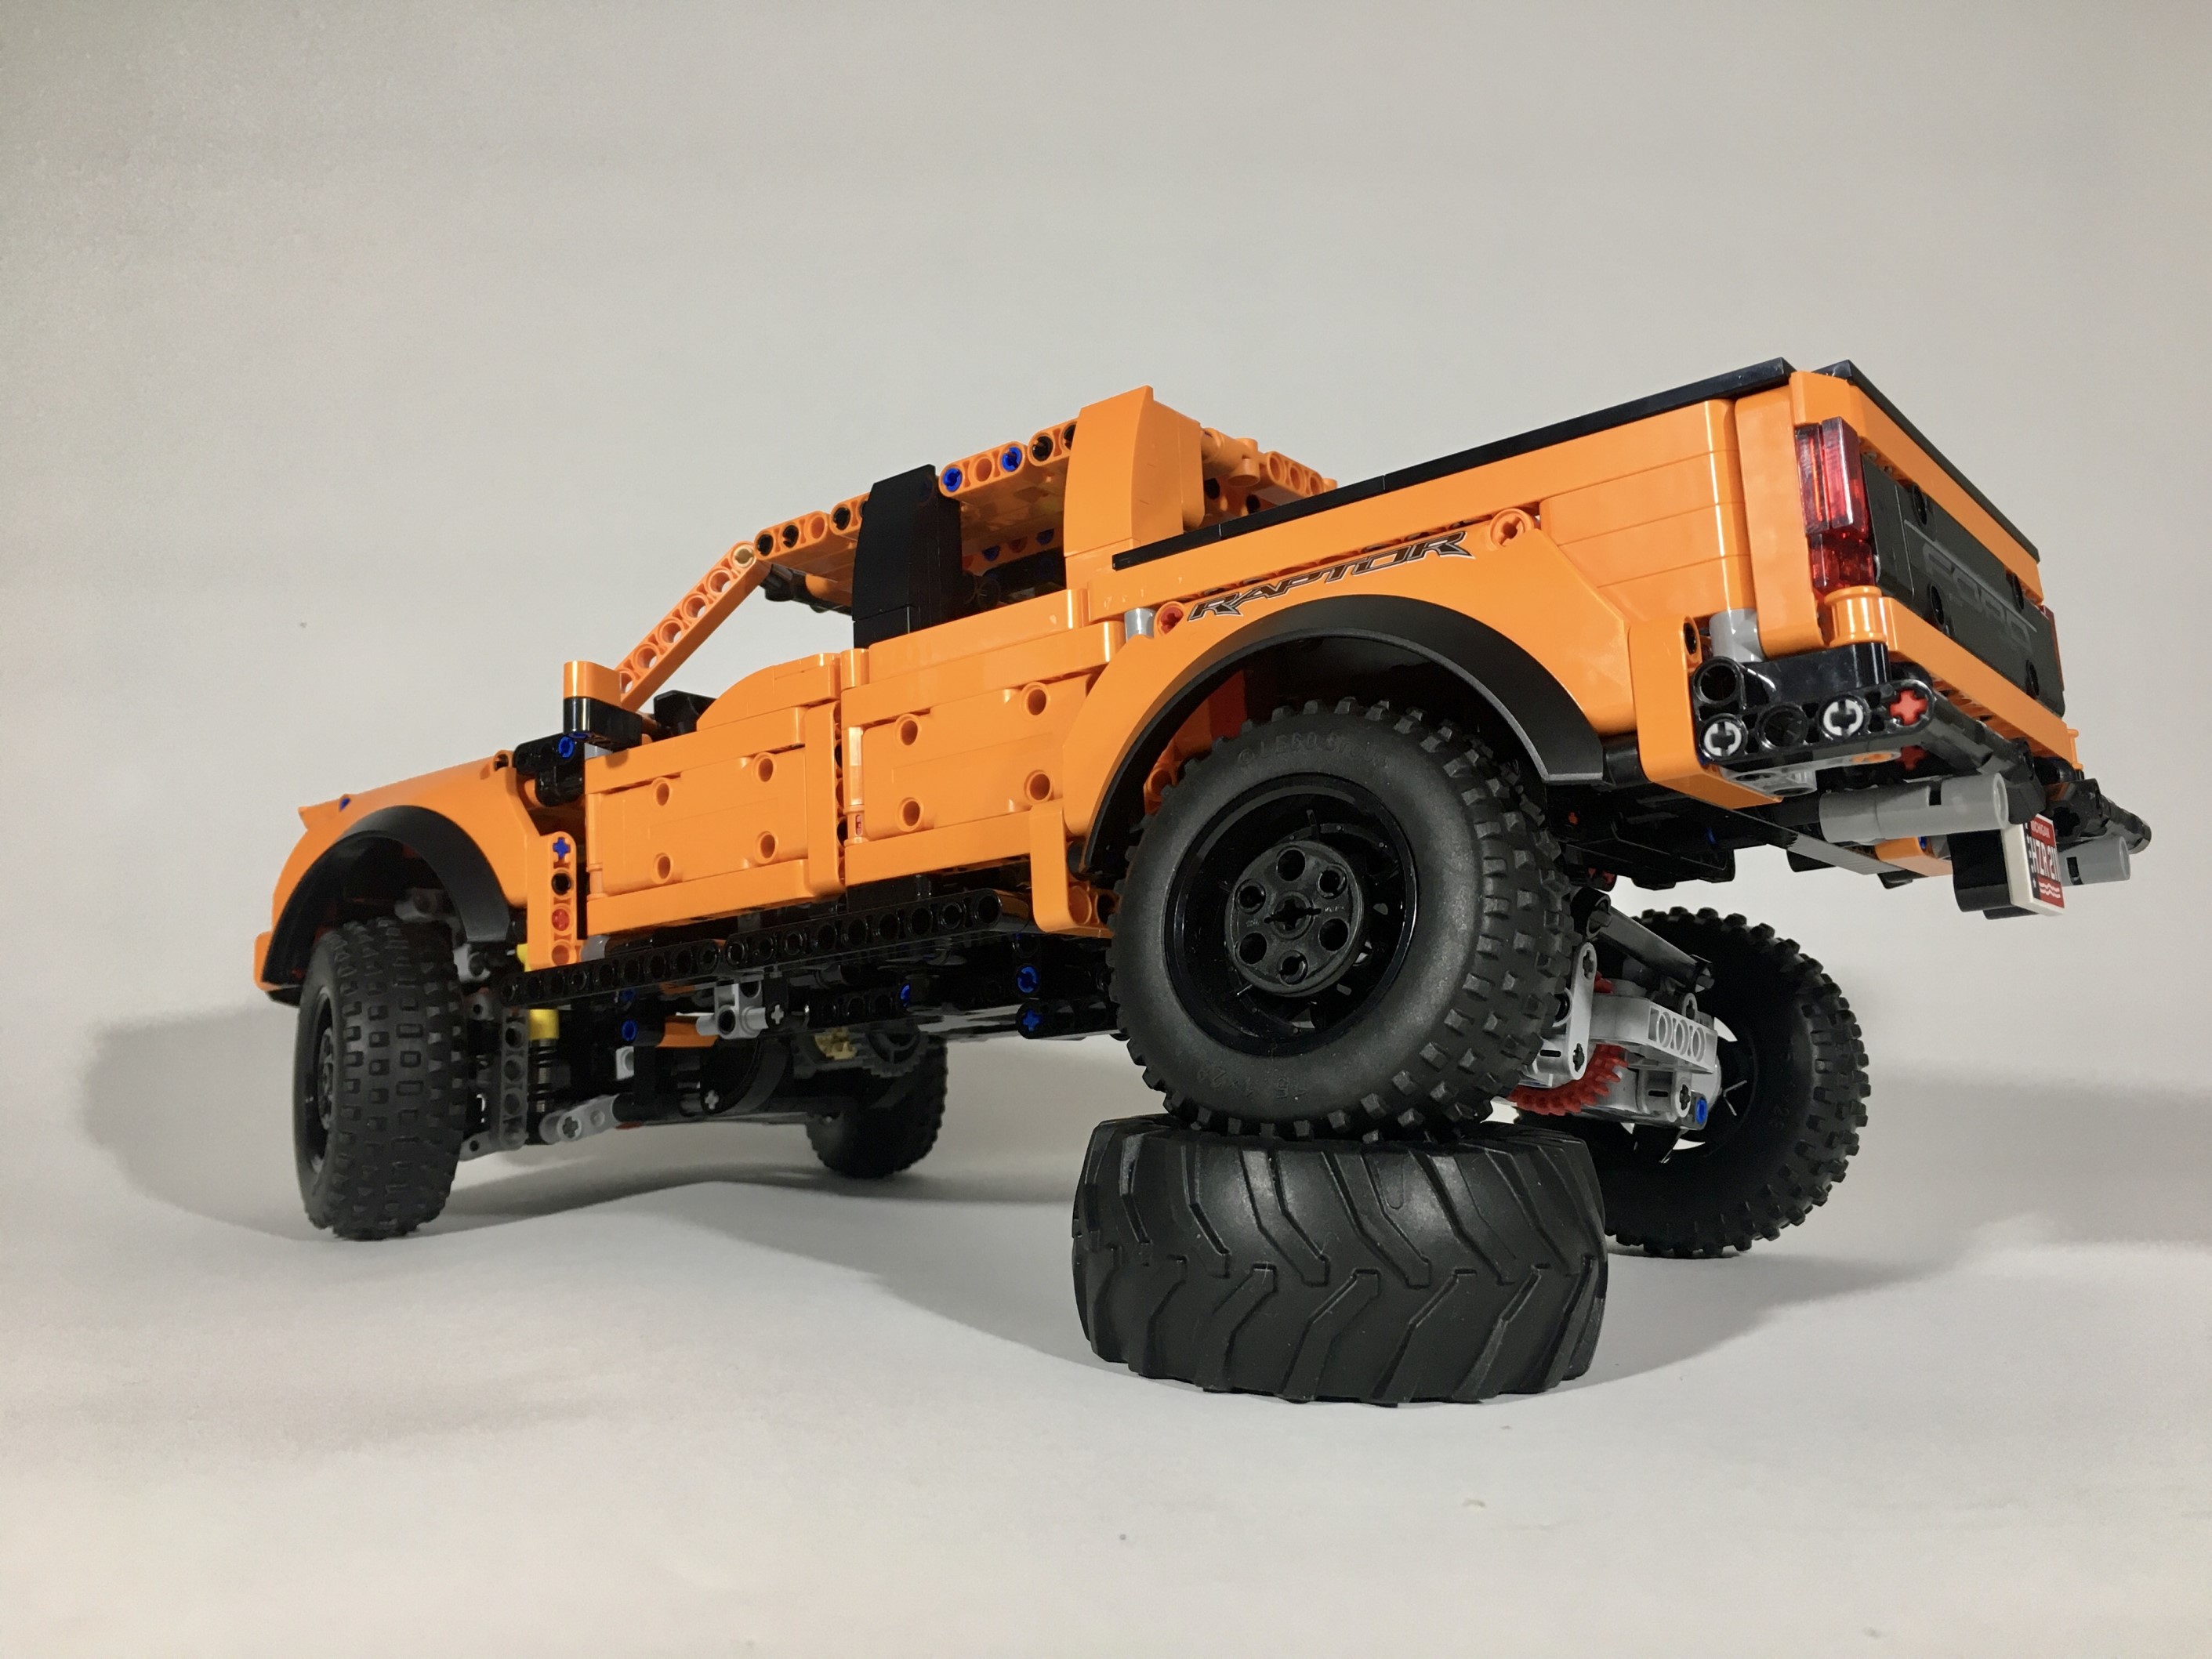
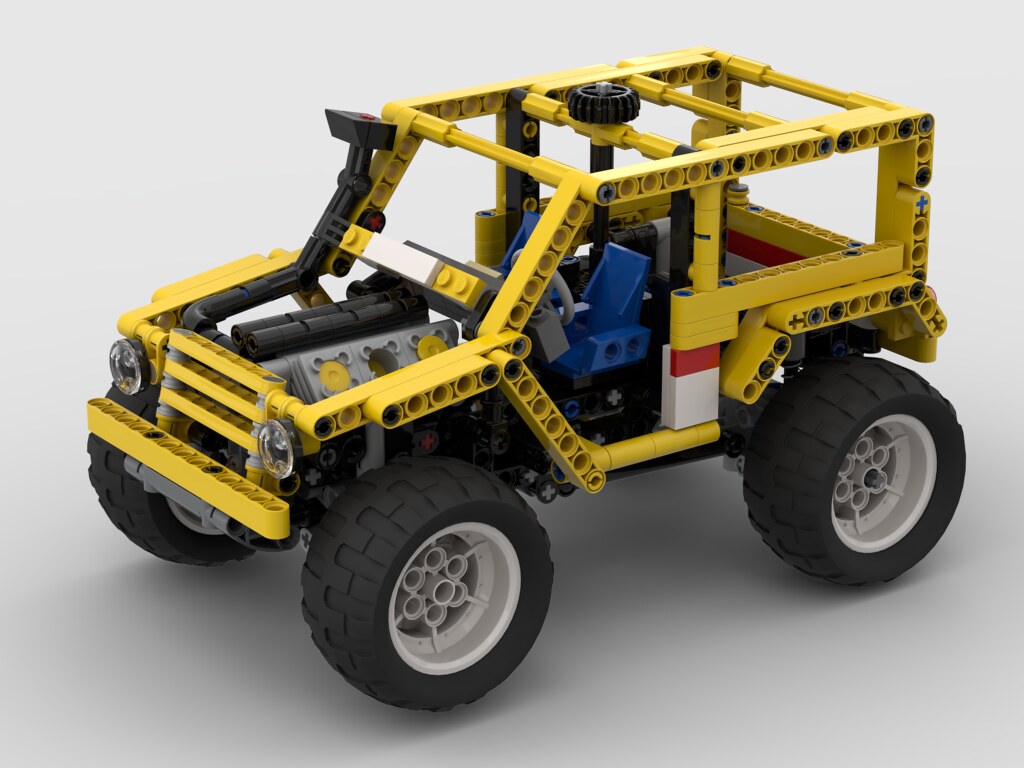
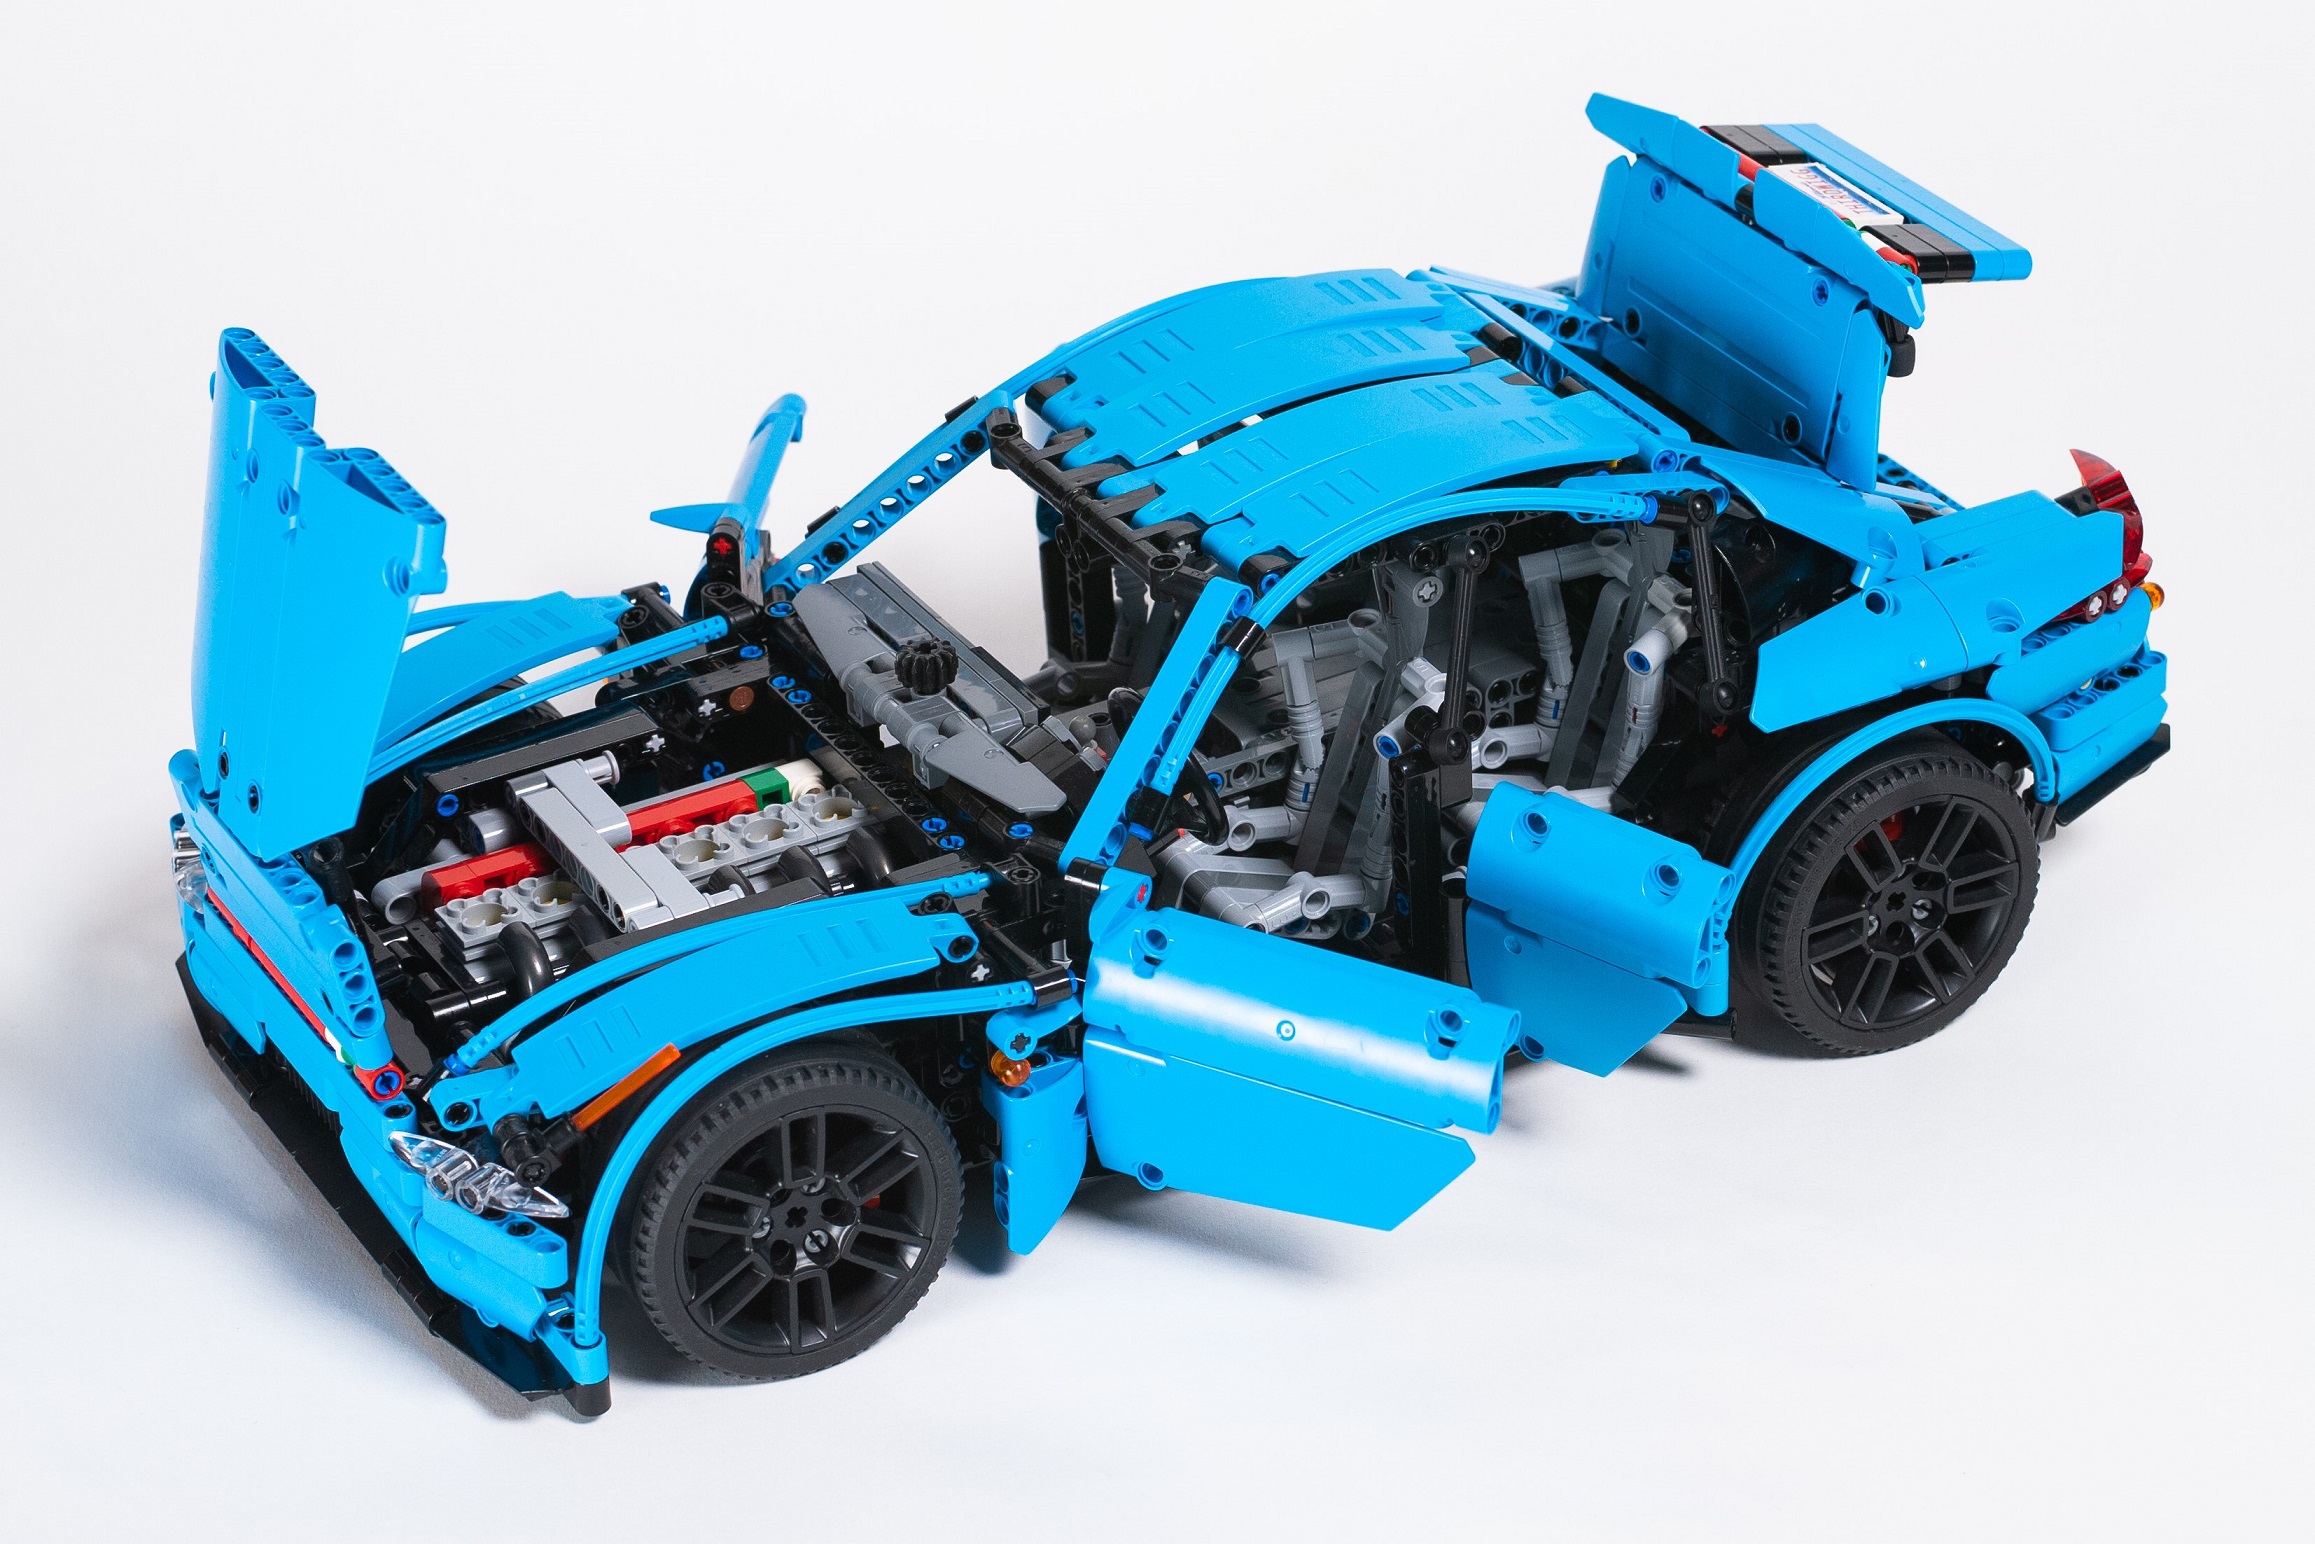
At the end of 2020, I decided to make a sport sedan. I find the sport sedan to be my favorite kind of car (see here and here), and it was time to do another one. I acquired a couple of the Defender wheels, which look more sporty than the other 56mm wheels. These would be the center of the build. The car would be long hood, short deck, with faired fenders. Then more questions happened, and I could not make up my mind.

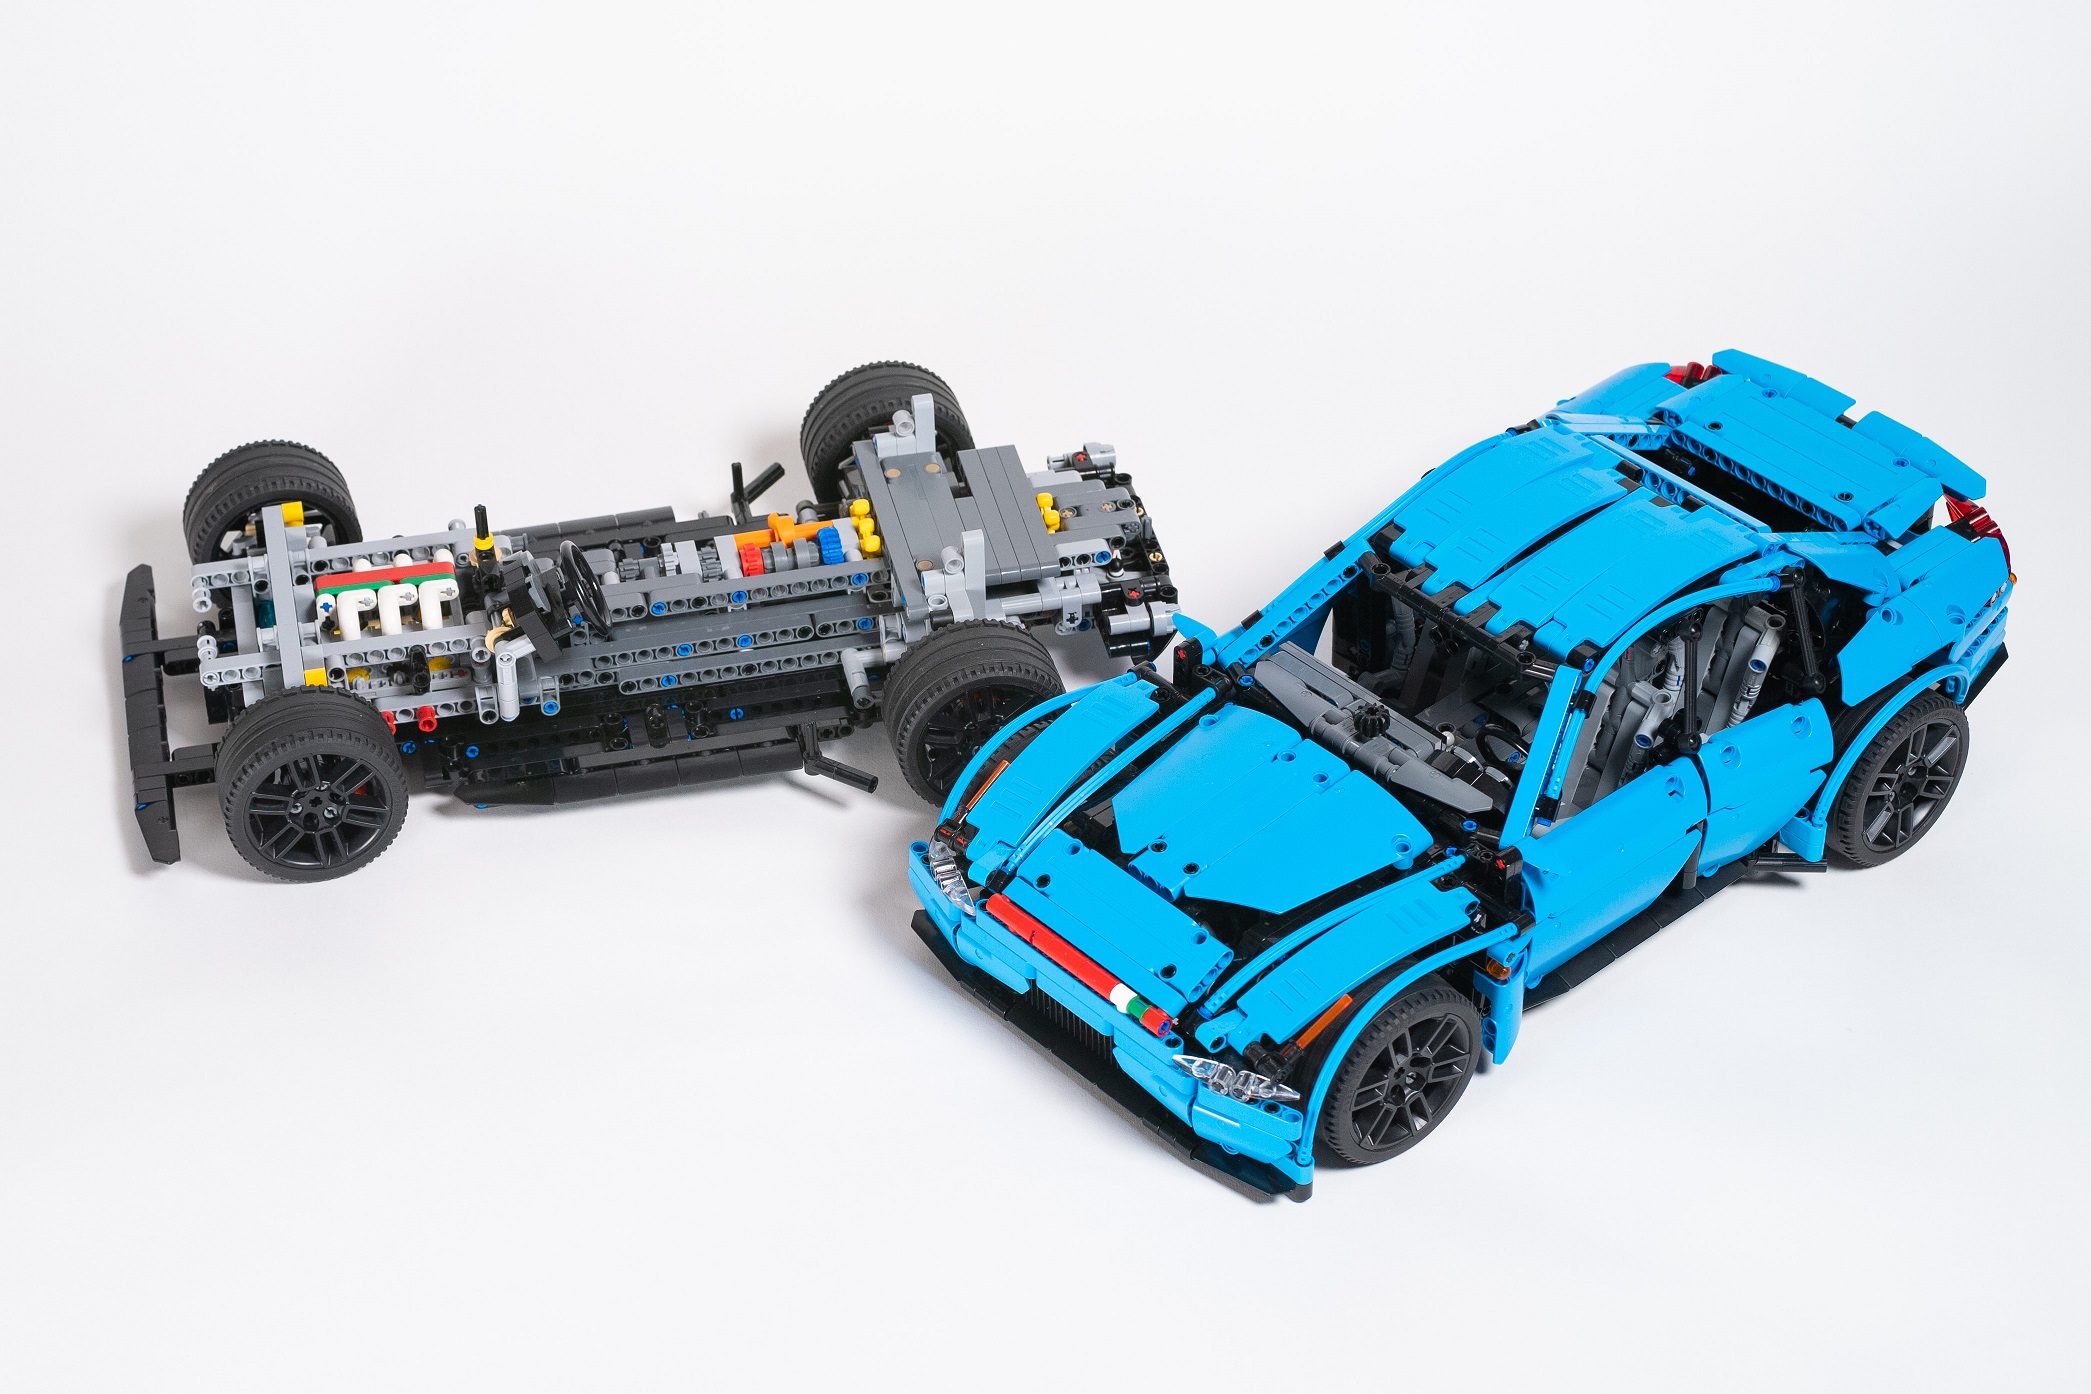
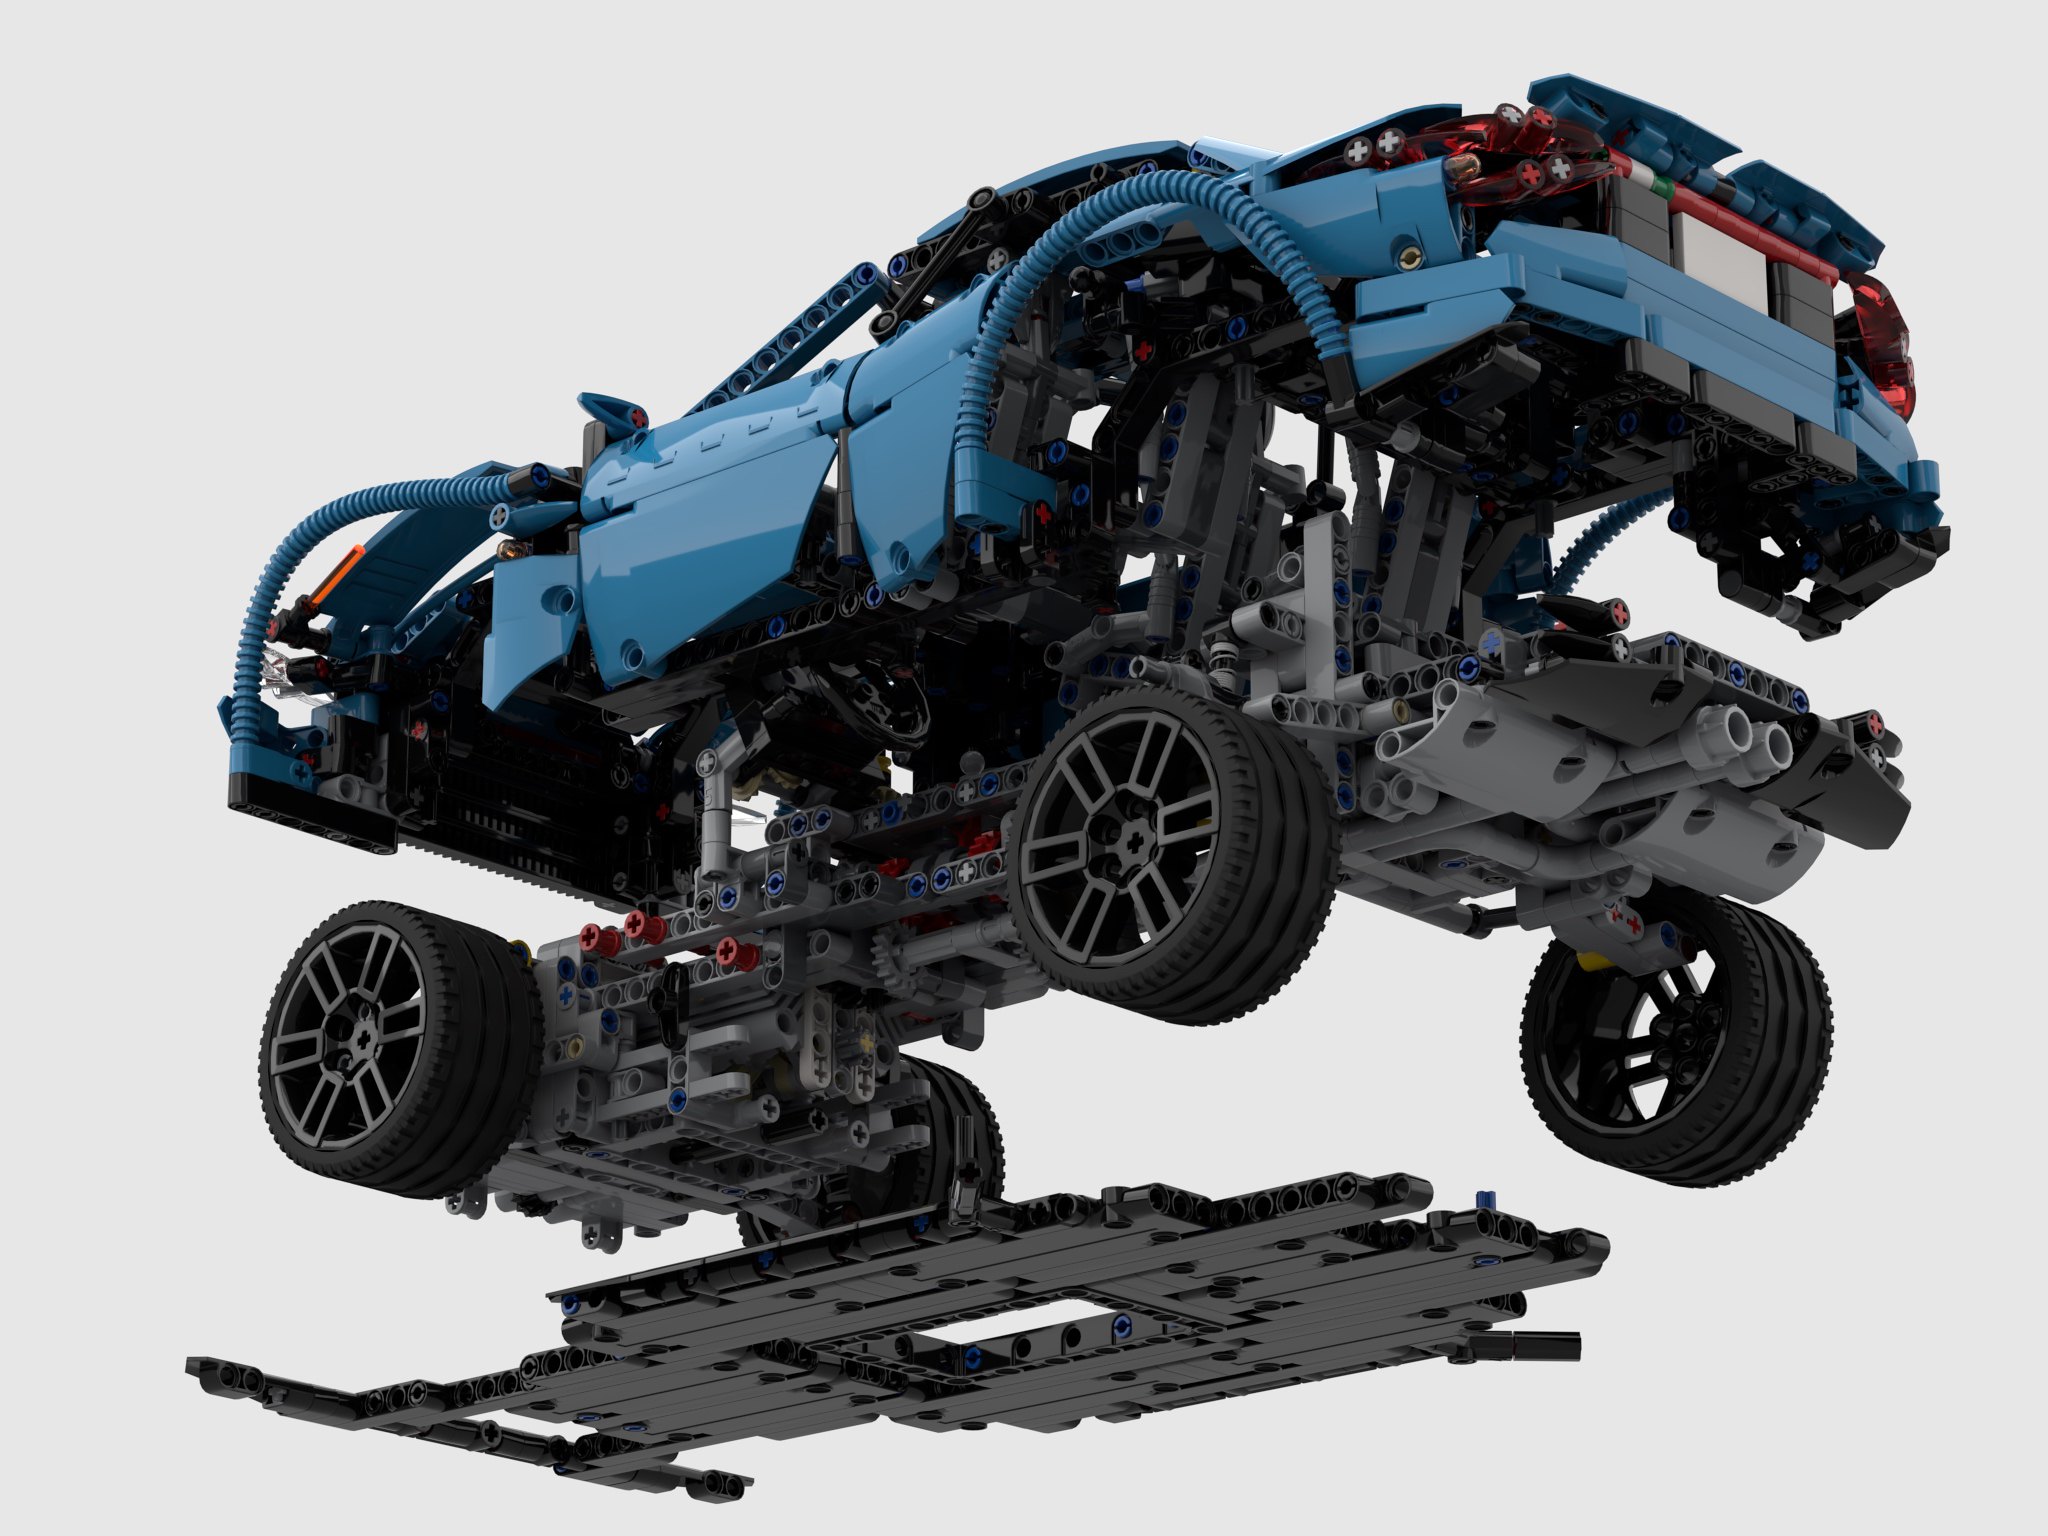
What transmission did I want? What engine would be best? Could I fit all wheel drive? Was that appropriate? As I found myself asking these questions, I began answering “well why not that too?” It was here, the project took a dramatic turn. The car would be fully modular and interchangeable. After playing around with some dimensions and simple structures, I decided on the following setup: Two different transmission and rear suspension modules, one floorplan, one body (in two colors), two engine tubs for all wheel drive and rear wheel drive, and three engines. Demensions were set with a width of 27 studs at the rear tires, and 25 studs at the front tires, and a wheelbase of 33 studs.

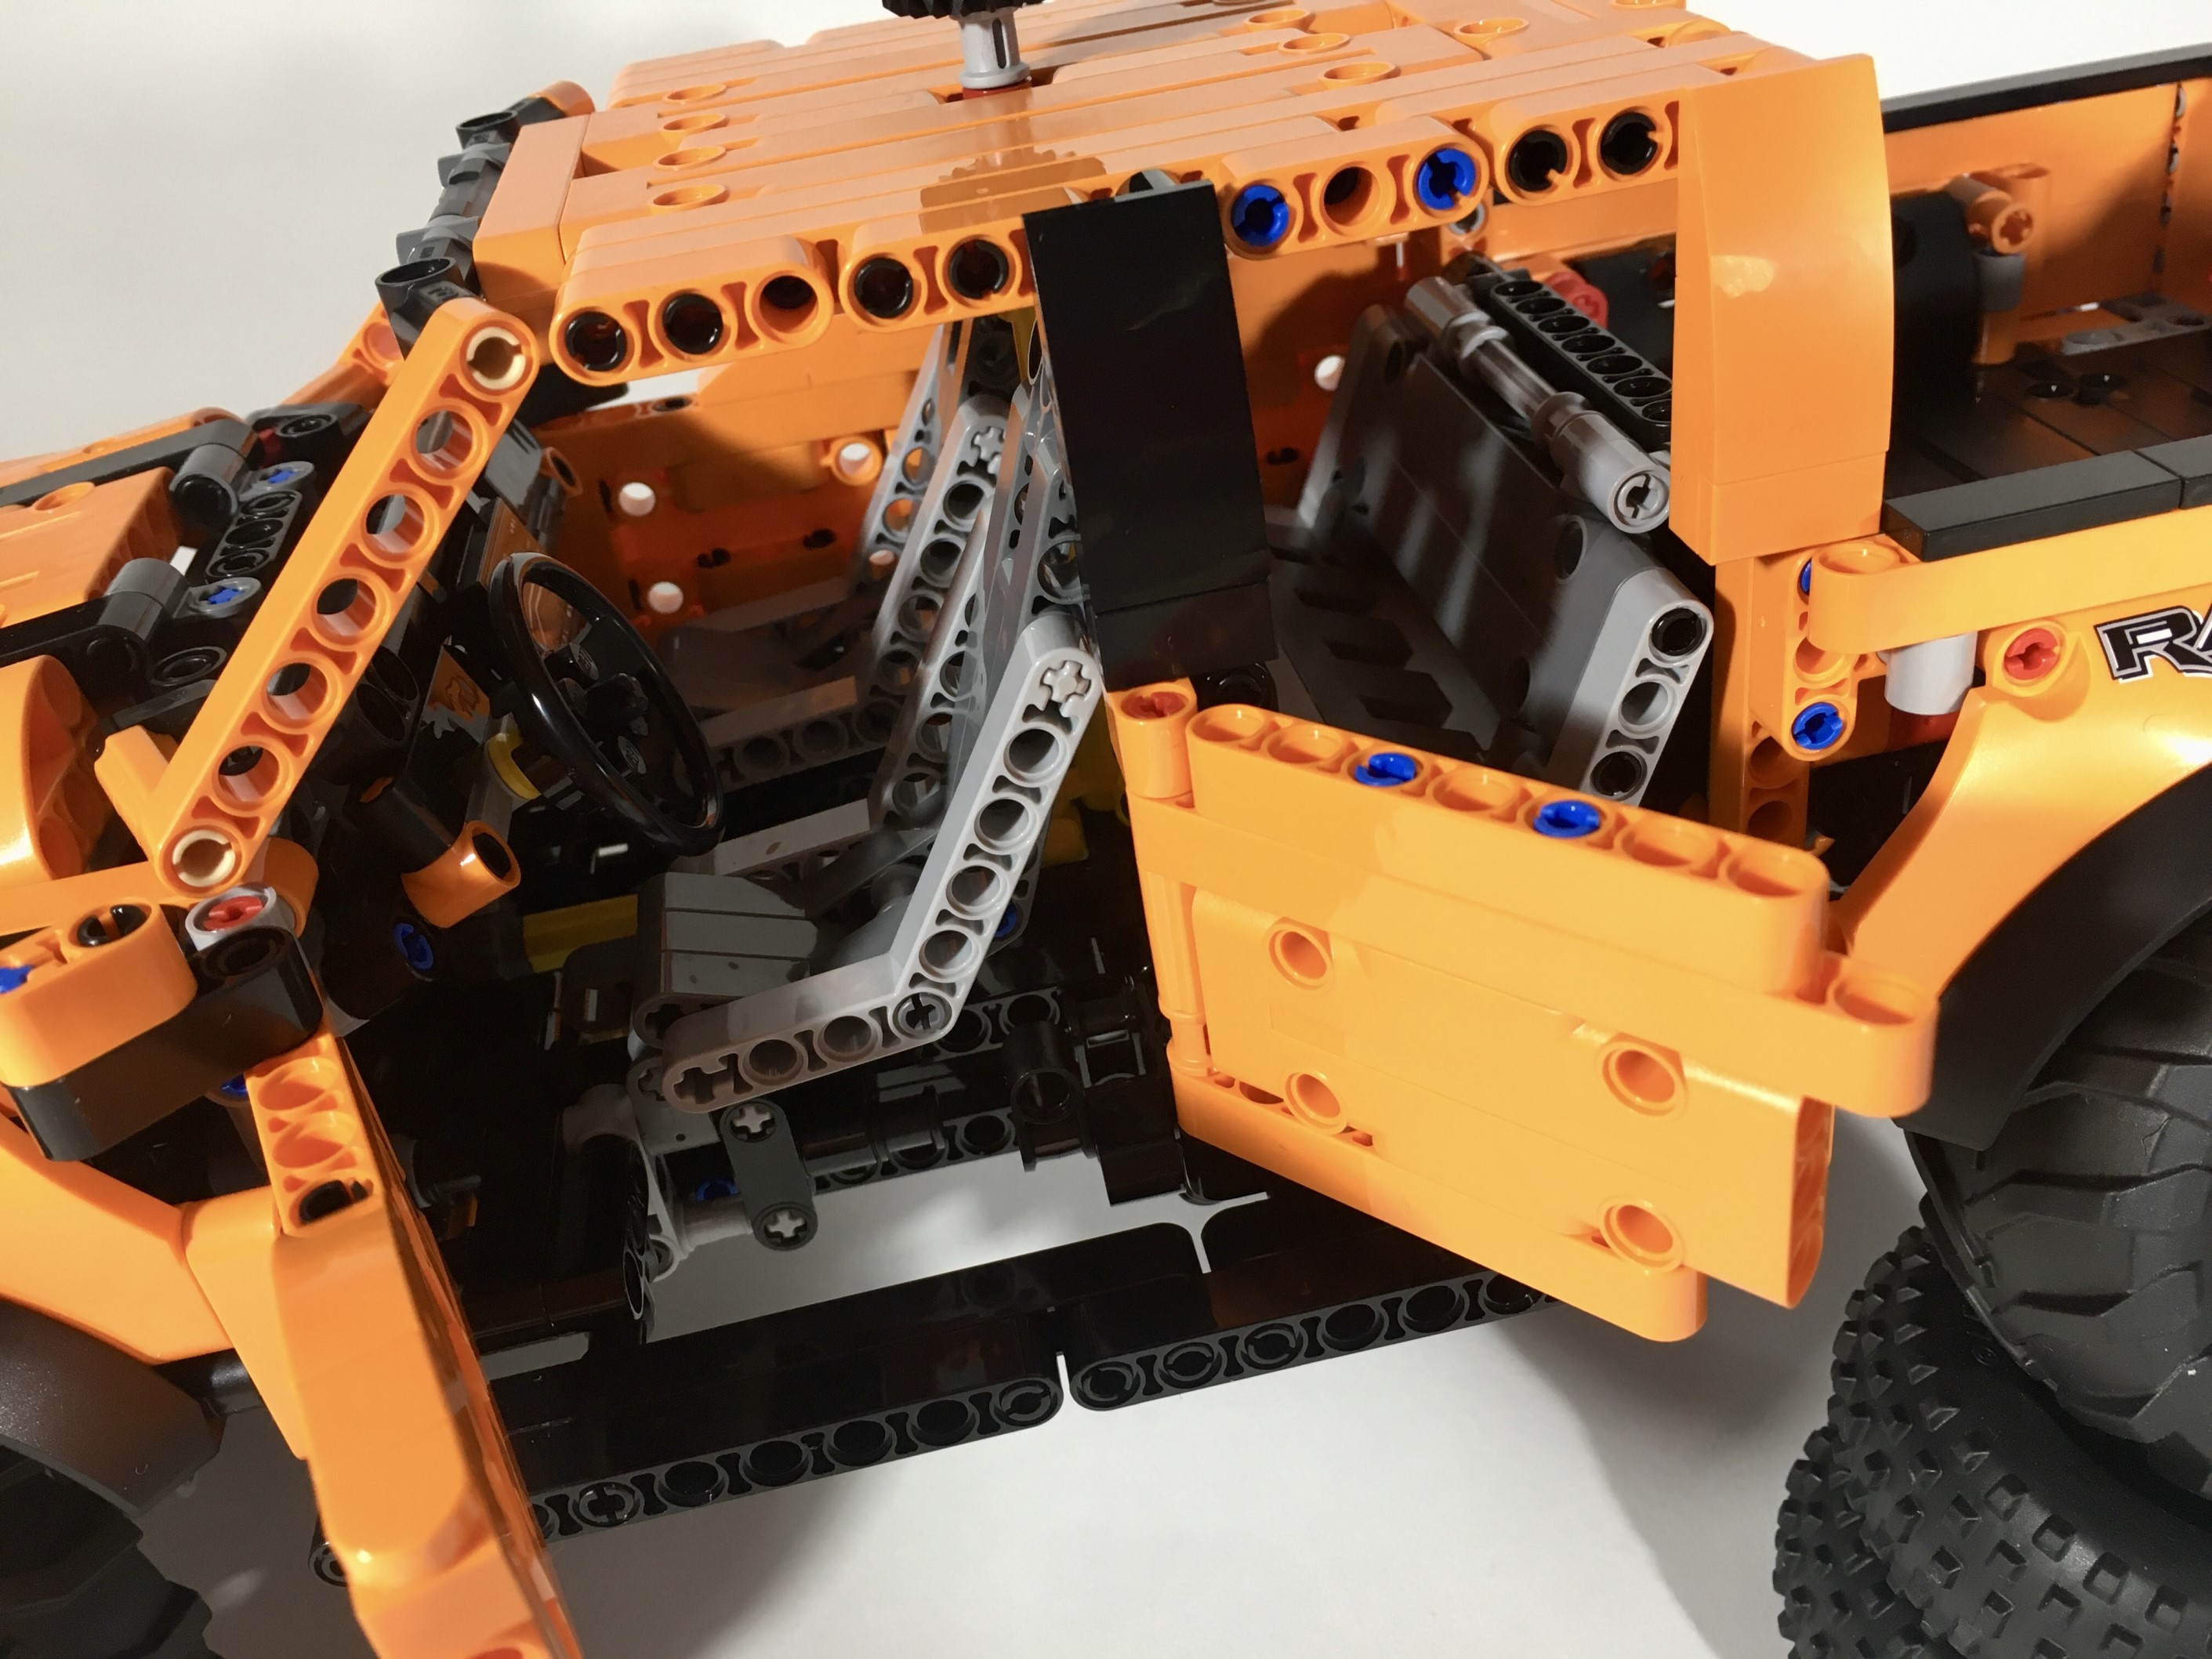
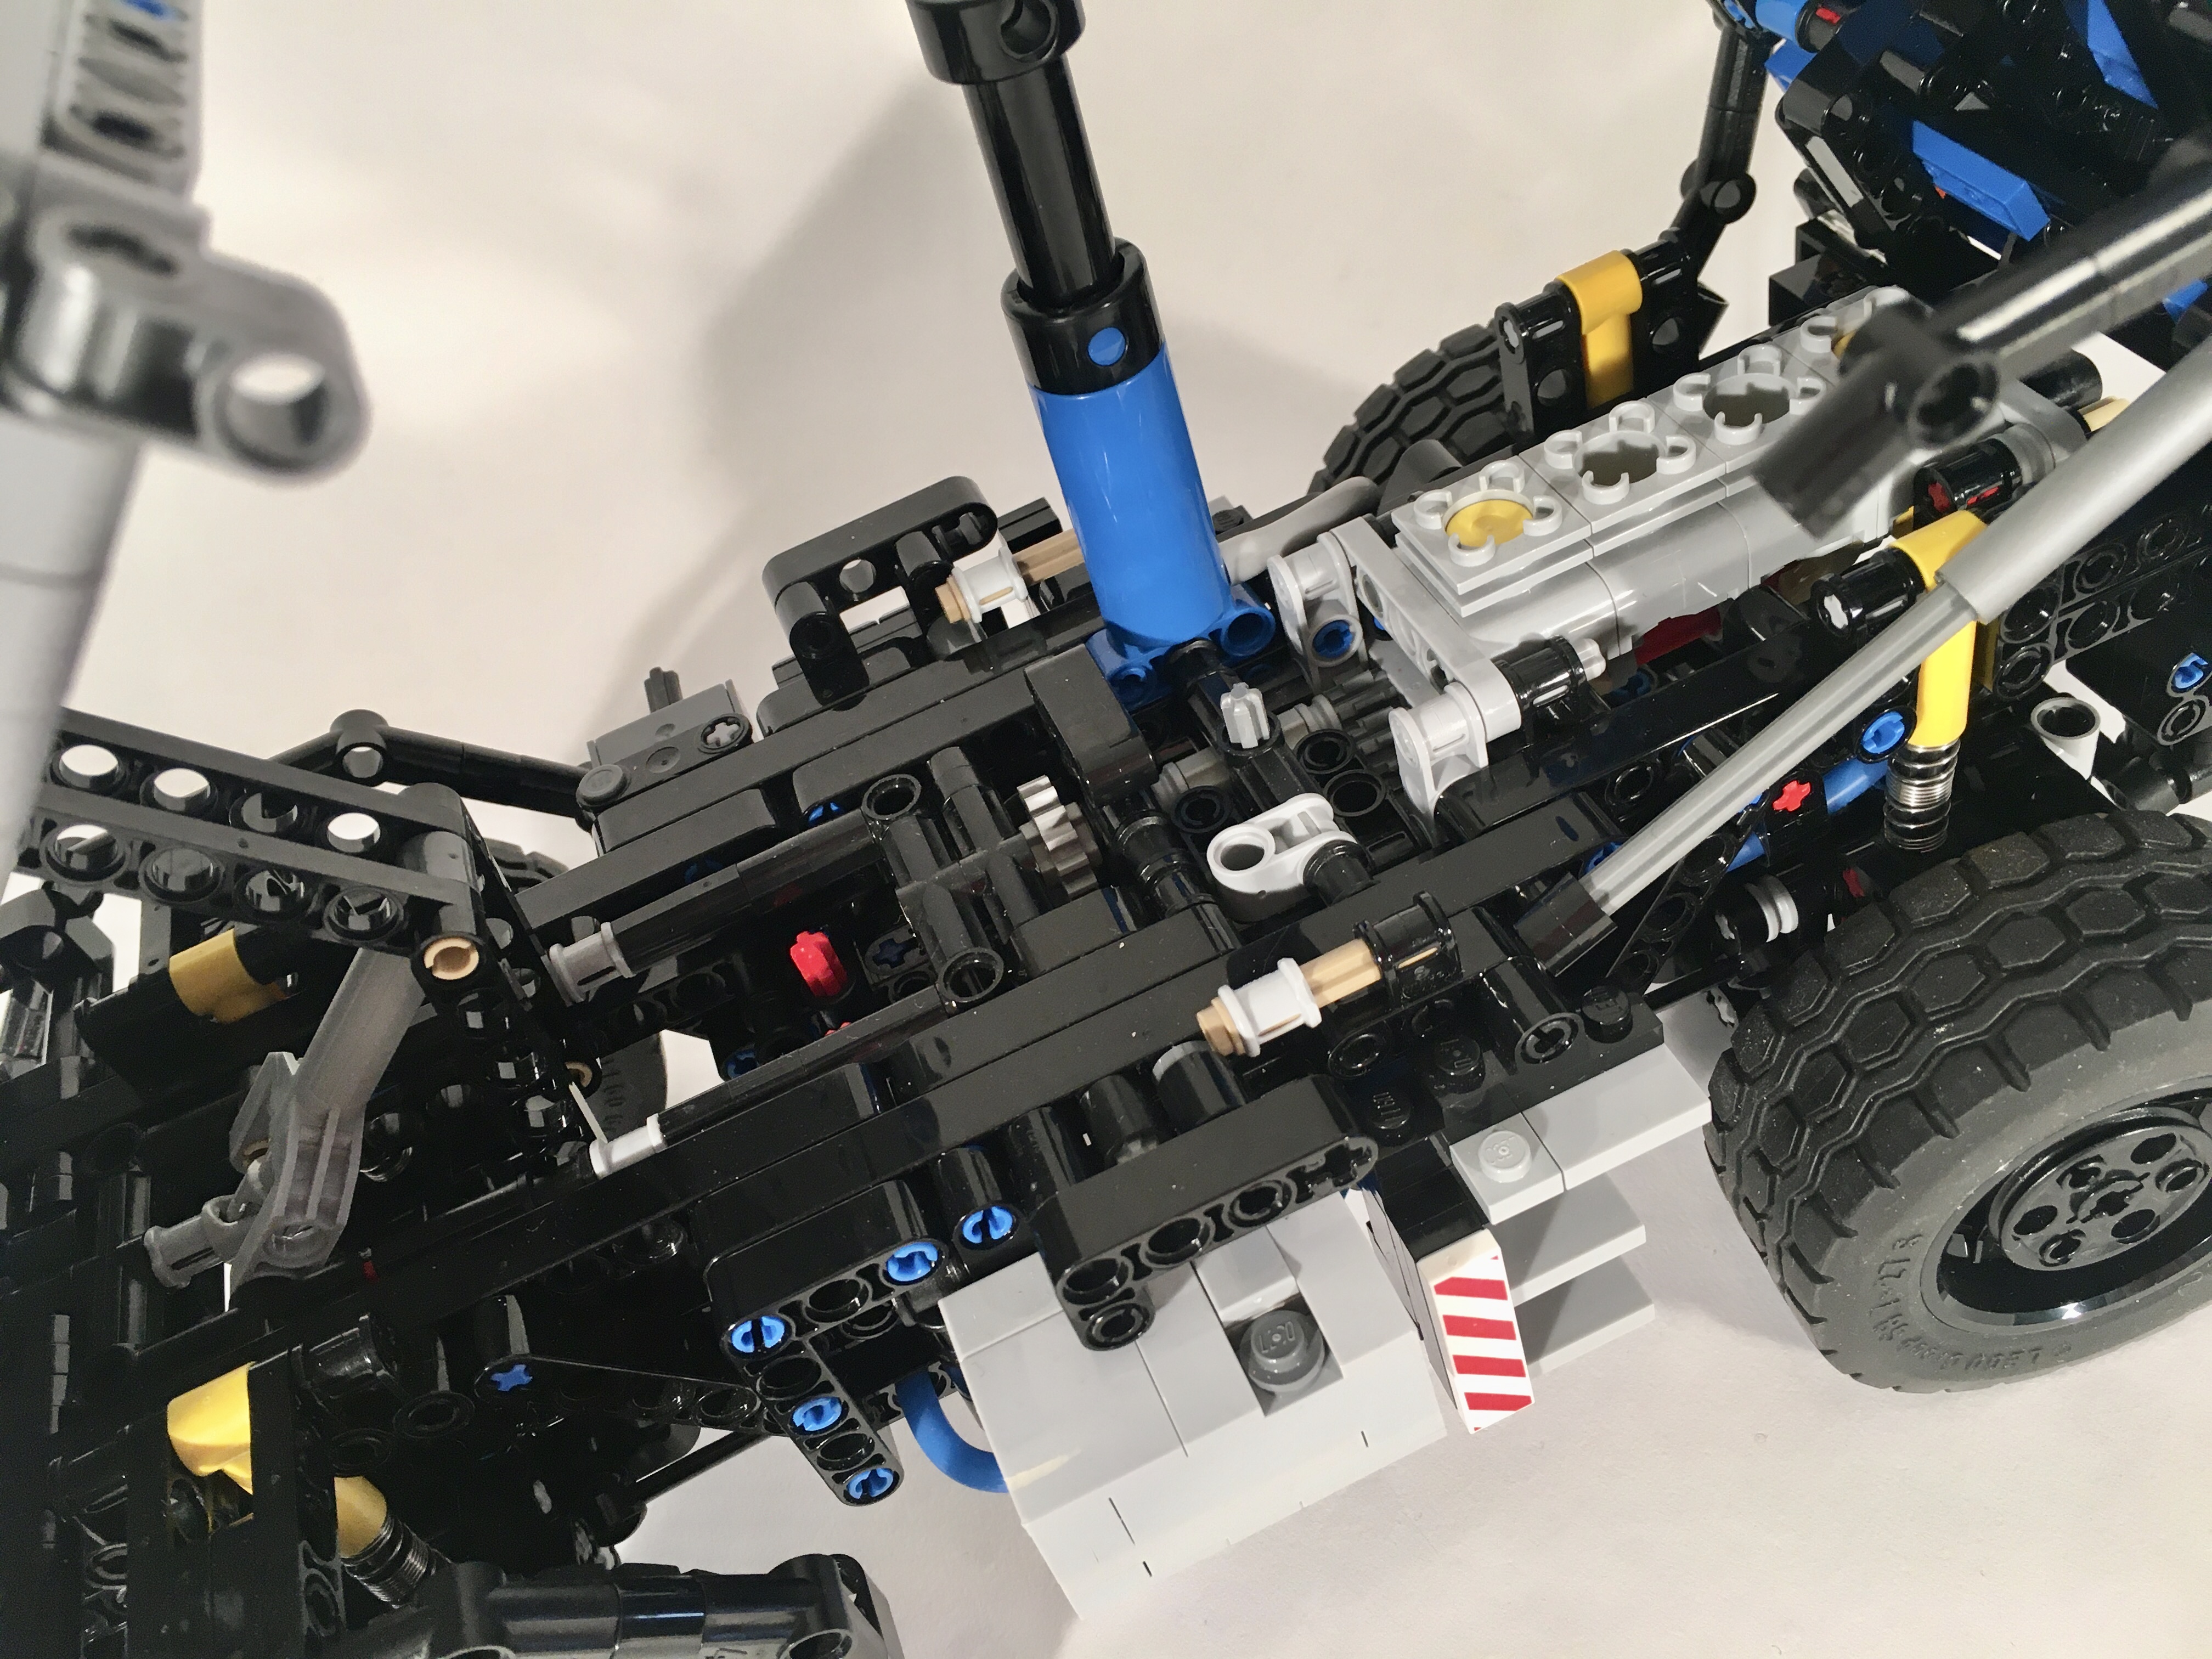
Each of the 9 modules were build in constant flux with each other as I managed attachment points, size, and interchangeability. I settled on a 4 speed manual transmission module, and a 4 speed sequential transmission module. The manual is shifted in the cabin, and the sequential has a shift lever on the rear bumper. While four speeds is basic for a LEGO car these days, it kept space inside for four seats. Once the transmission modules were basically set, I was off to another module.

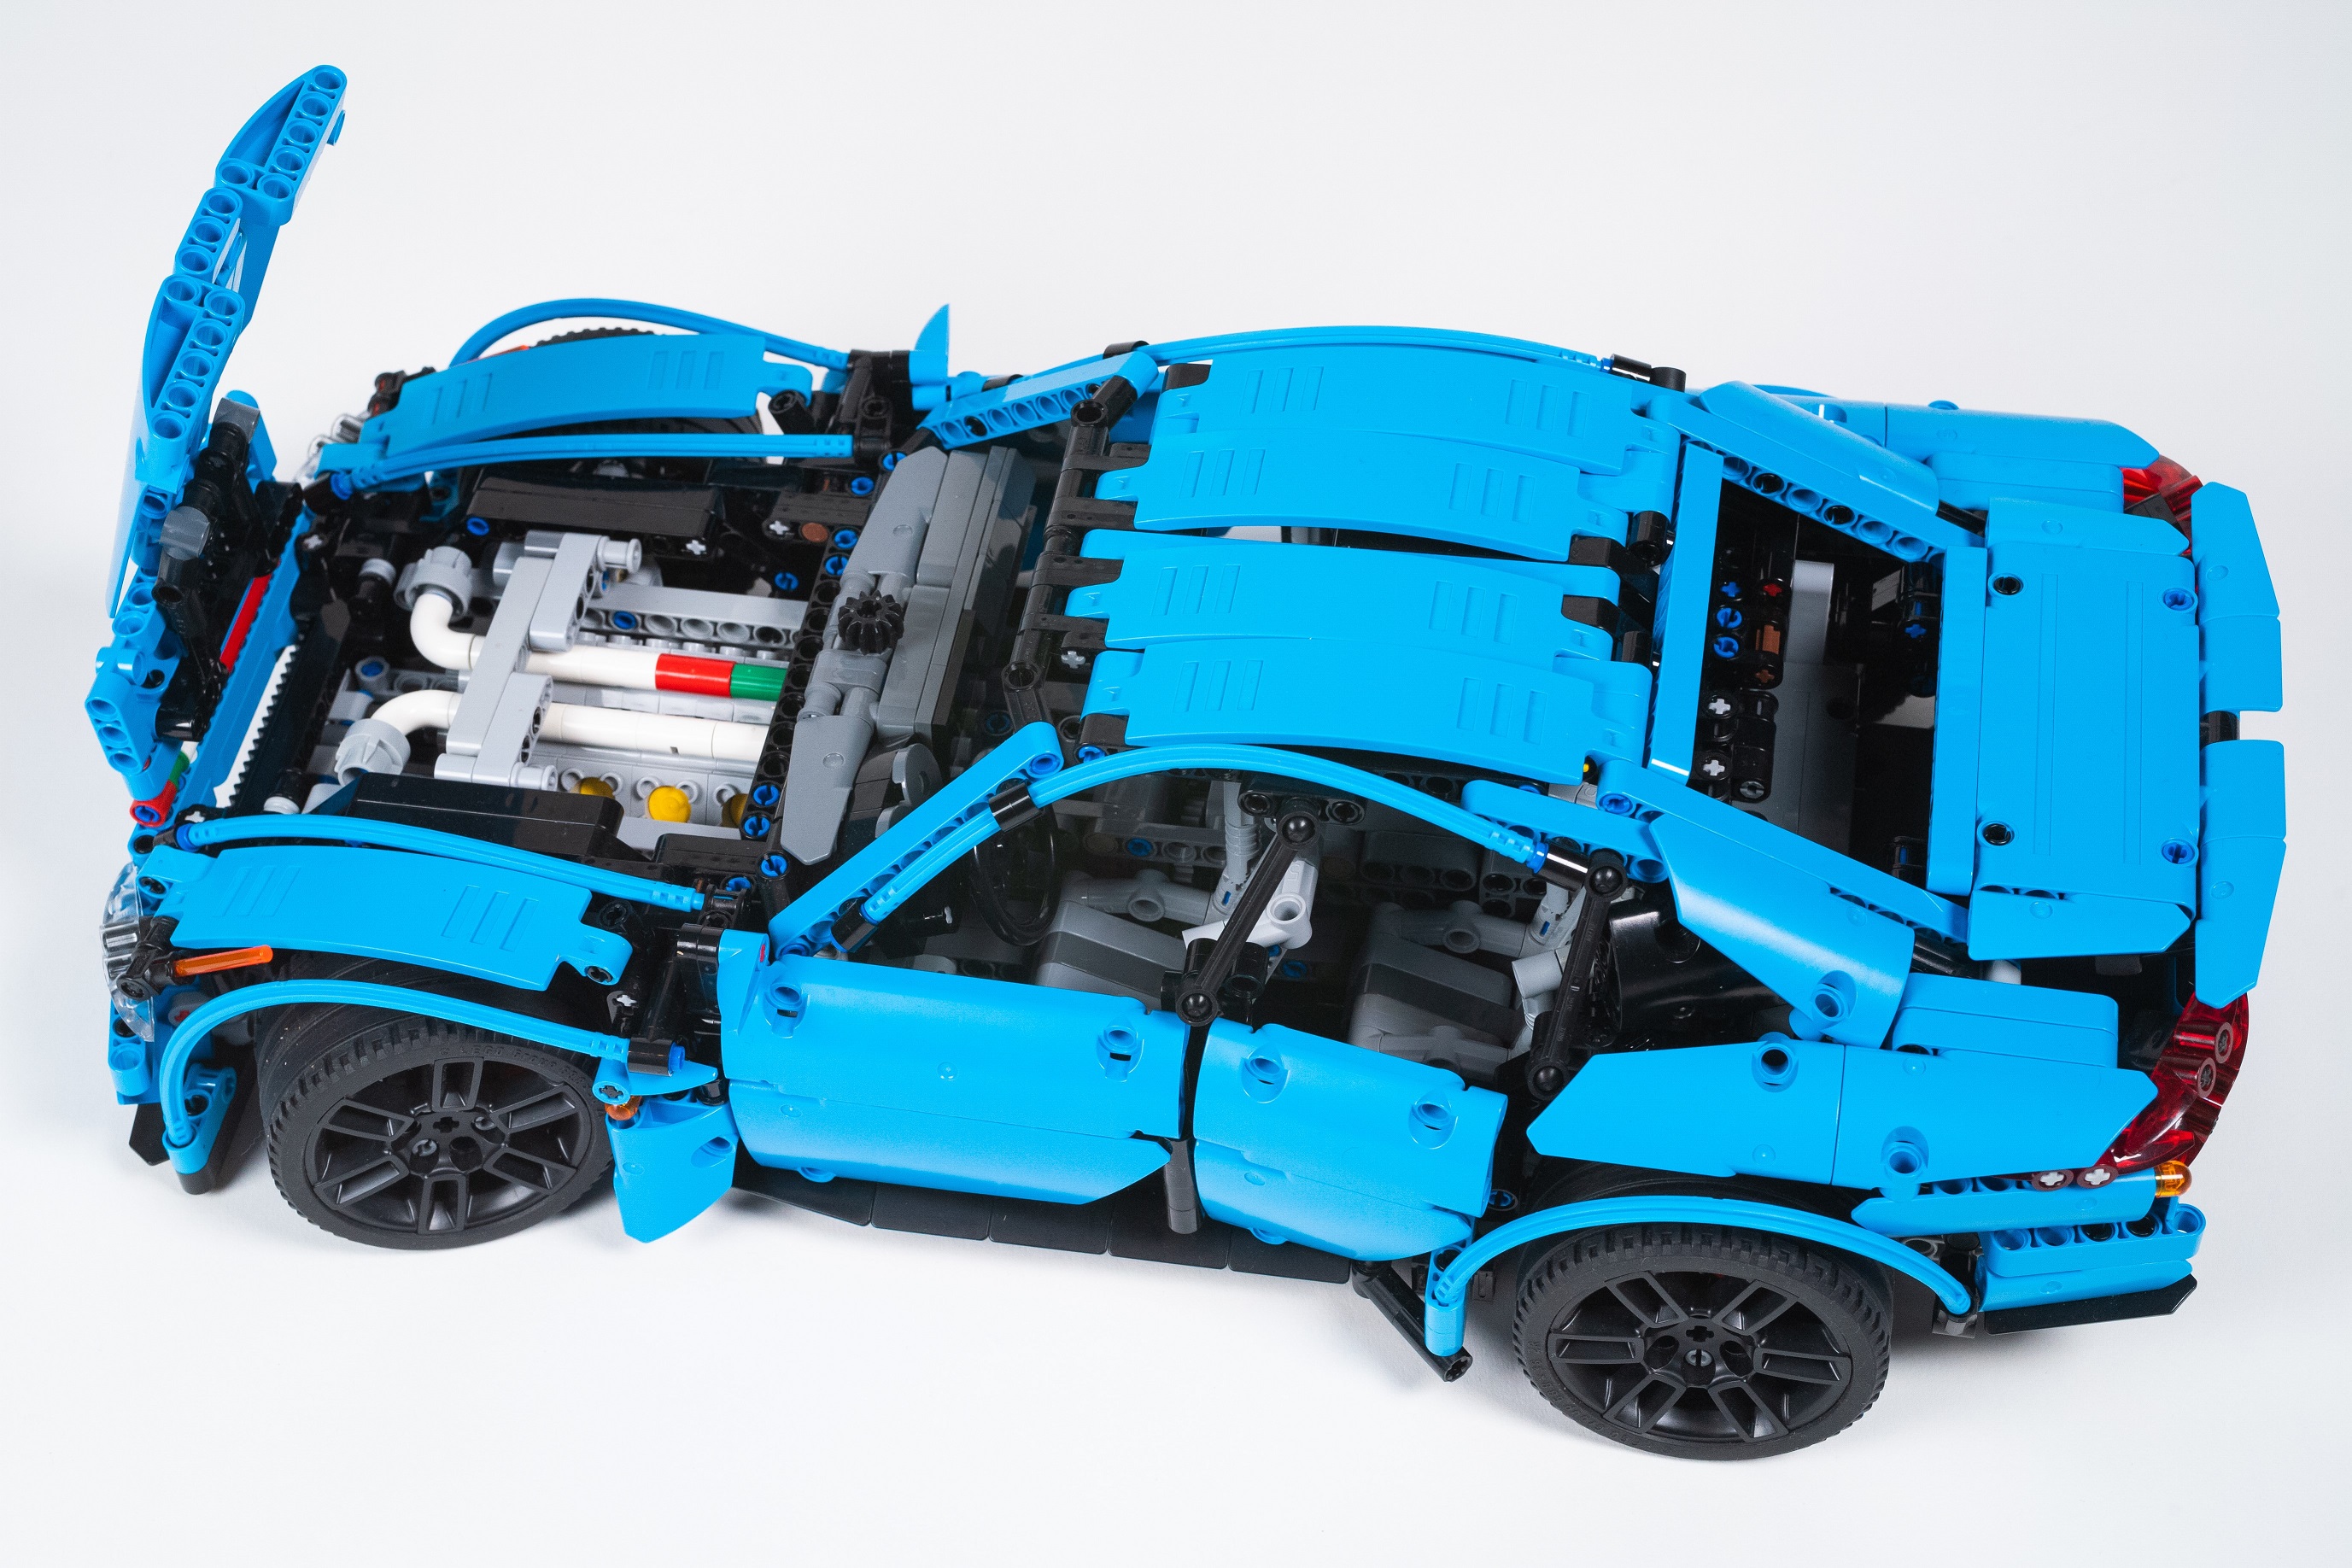
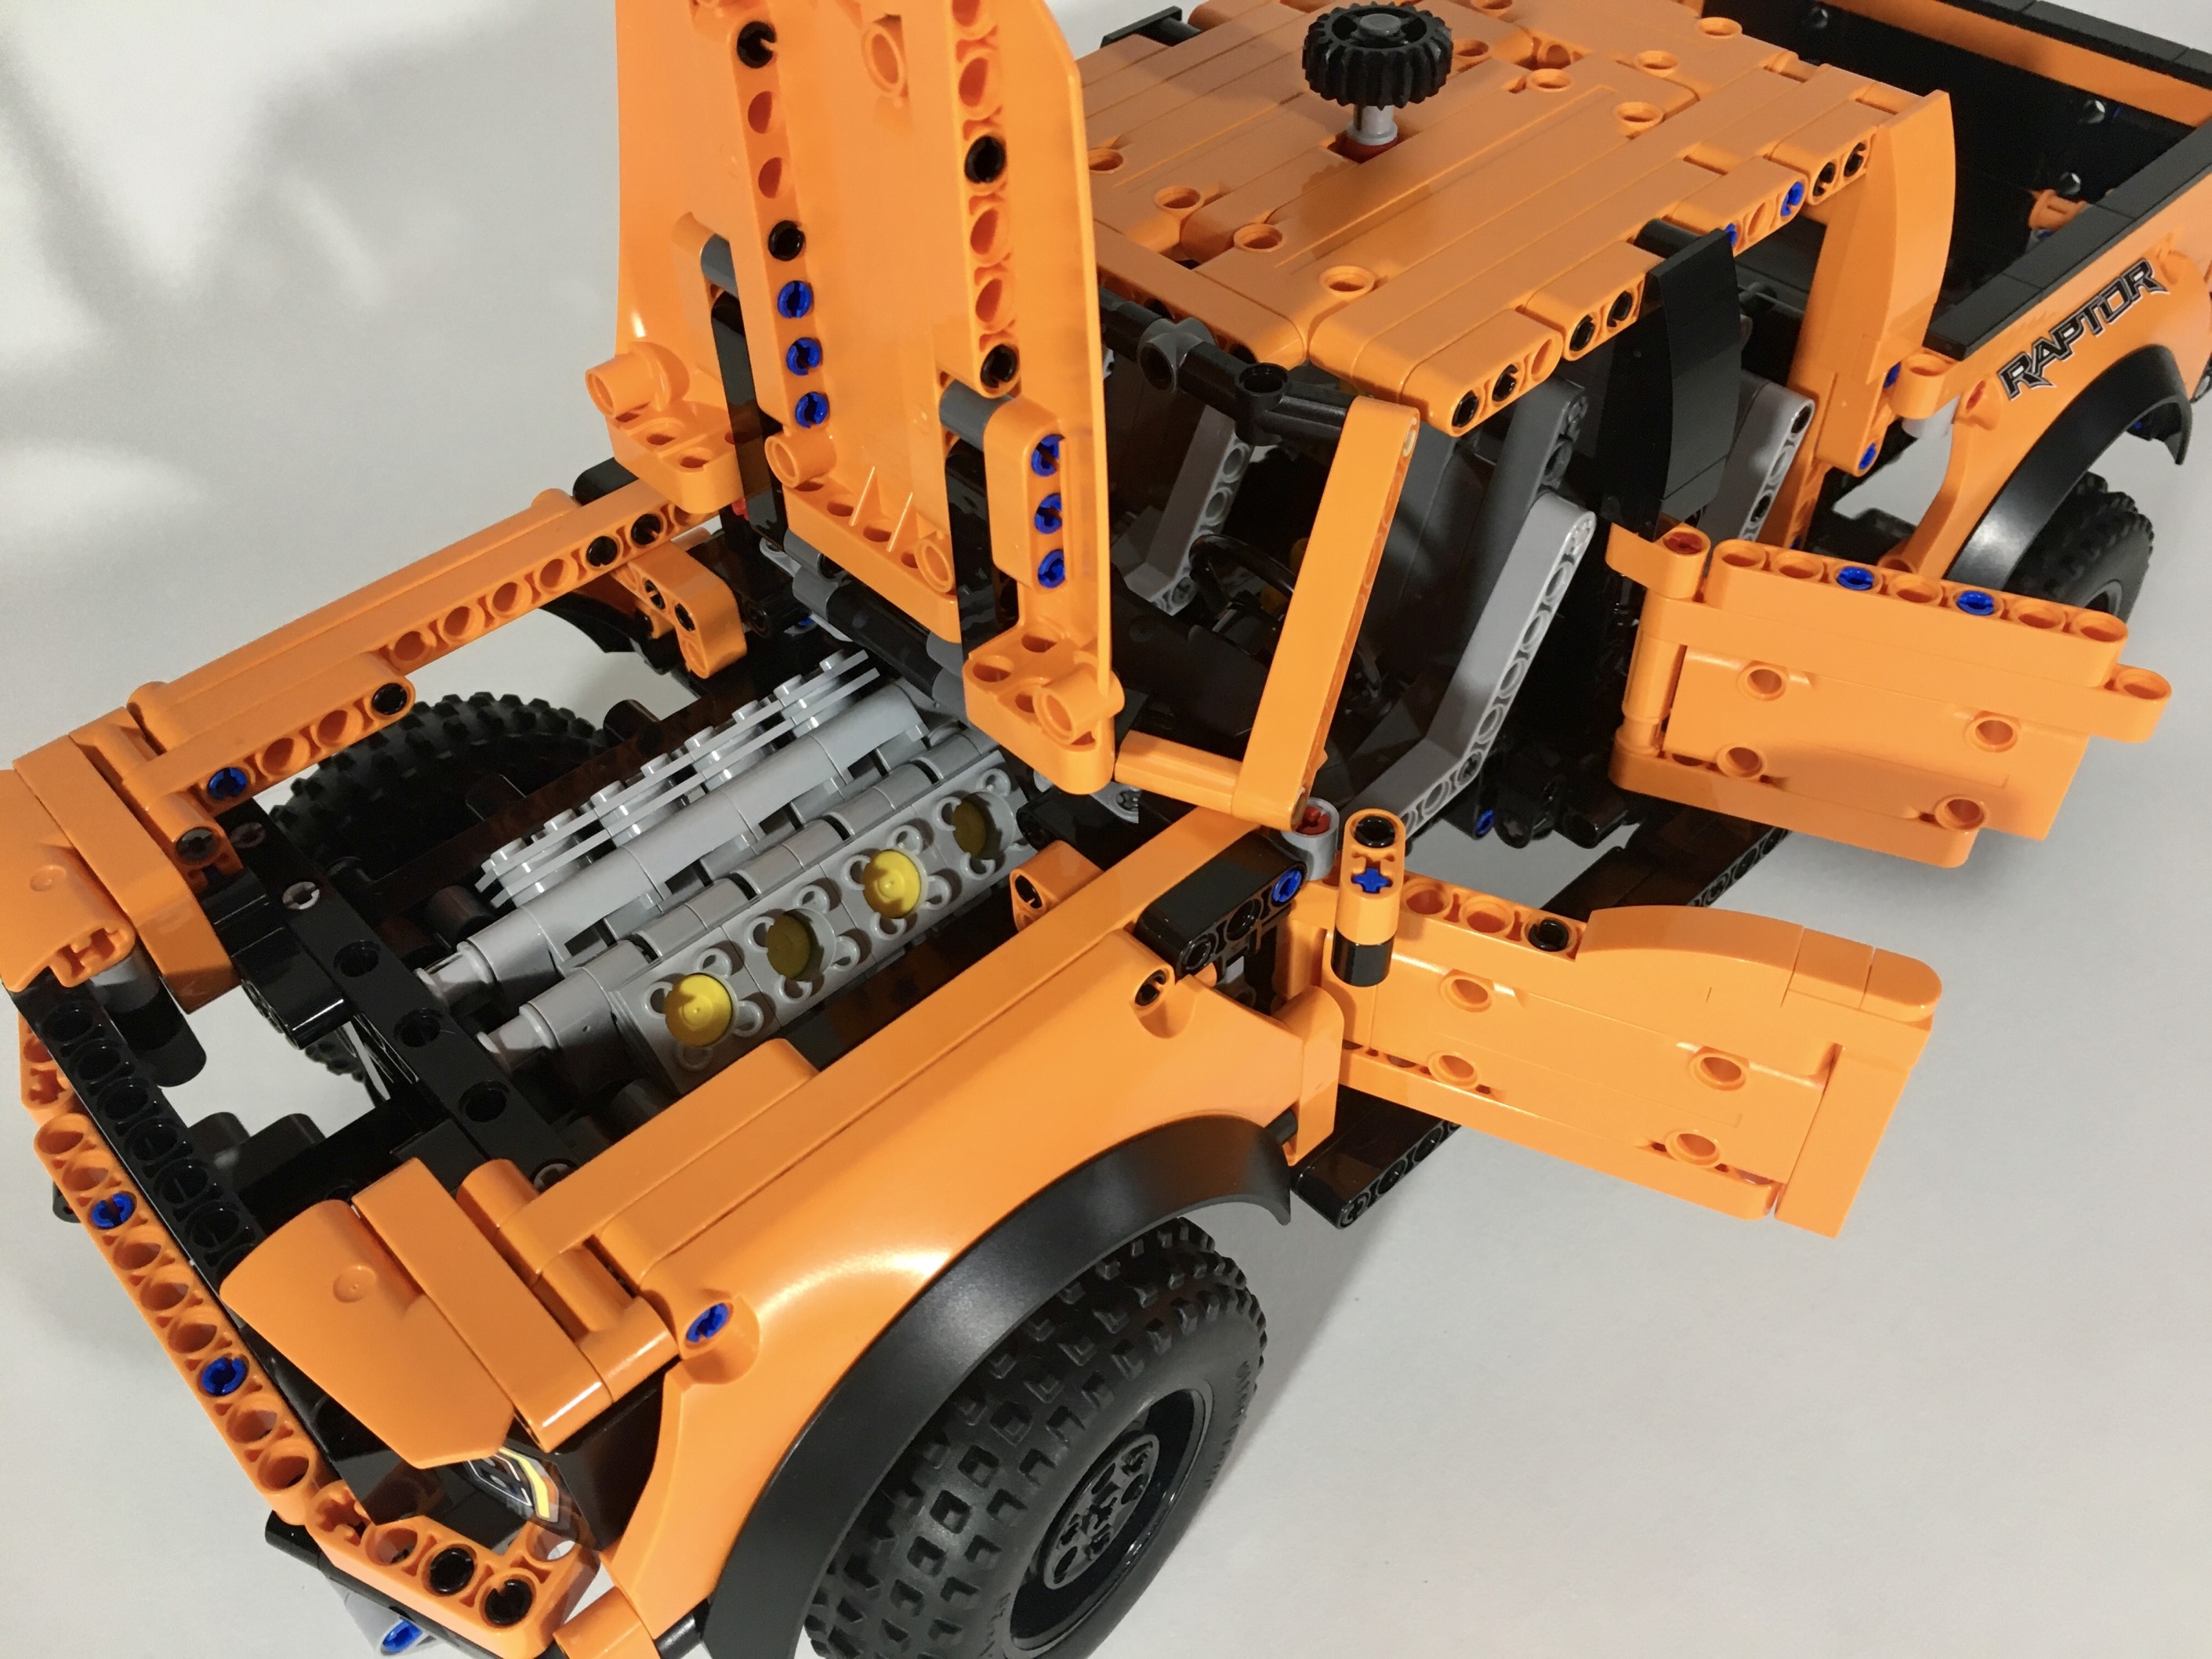
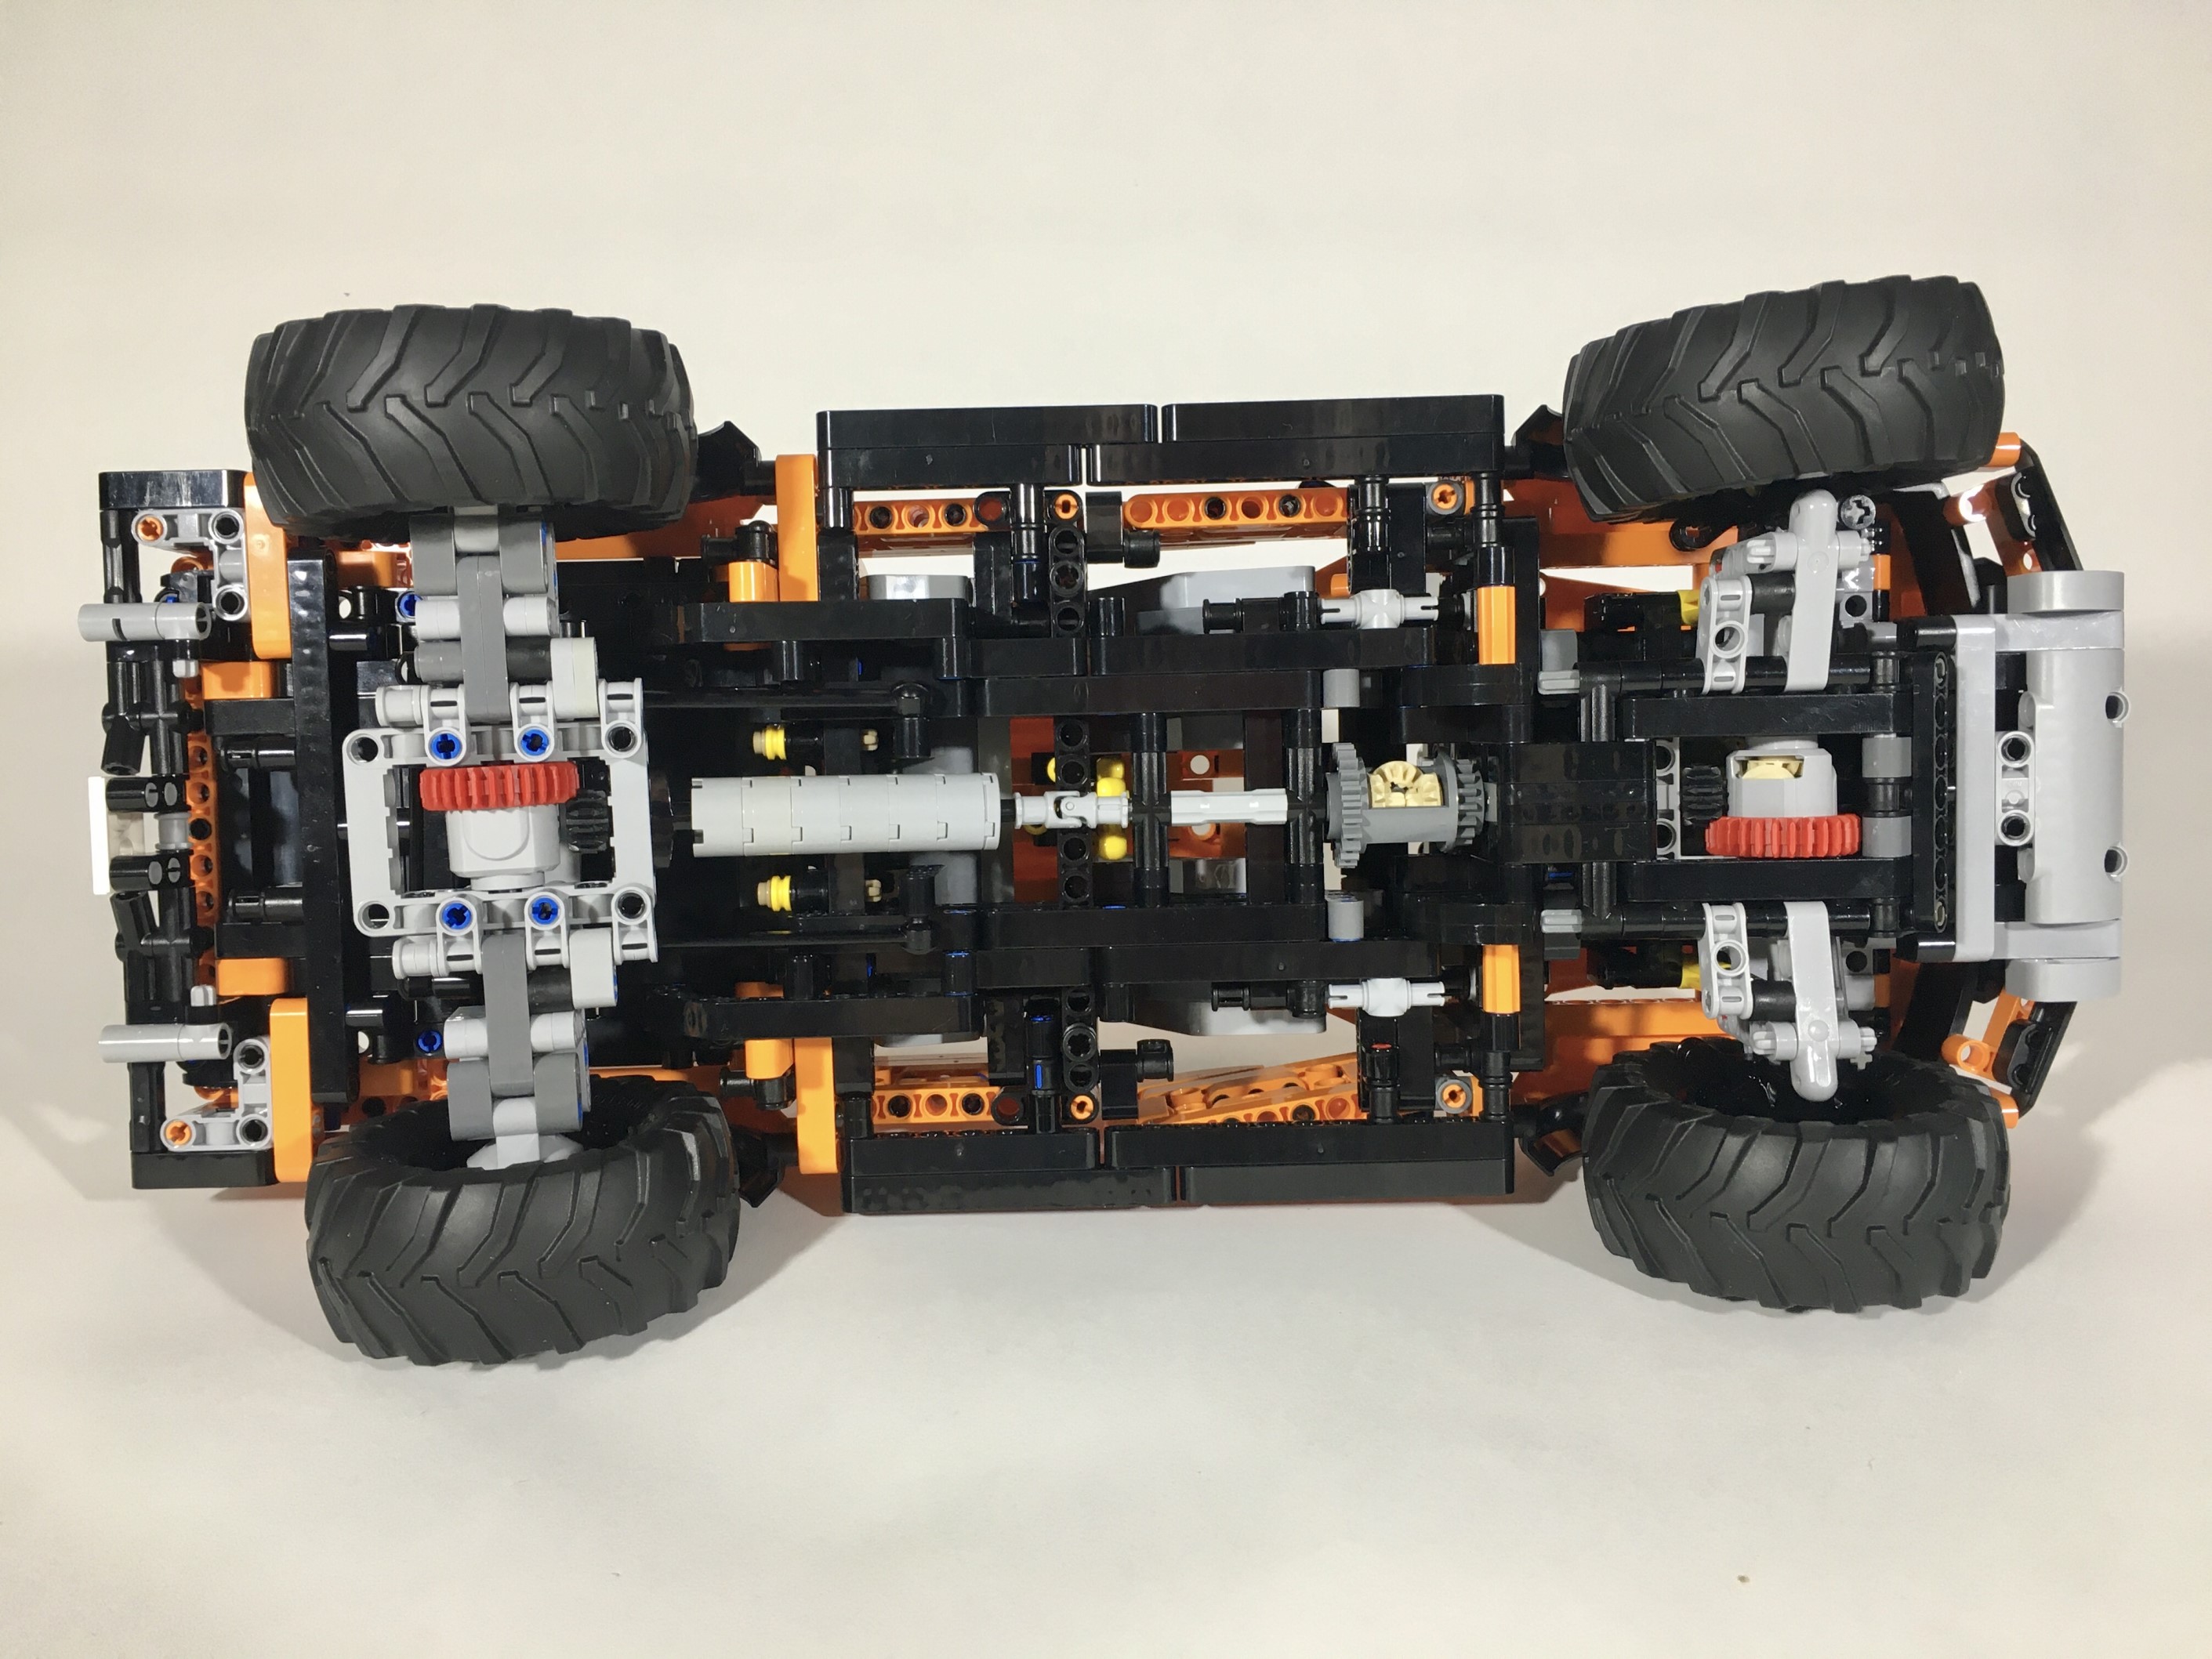
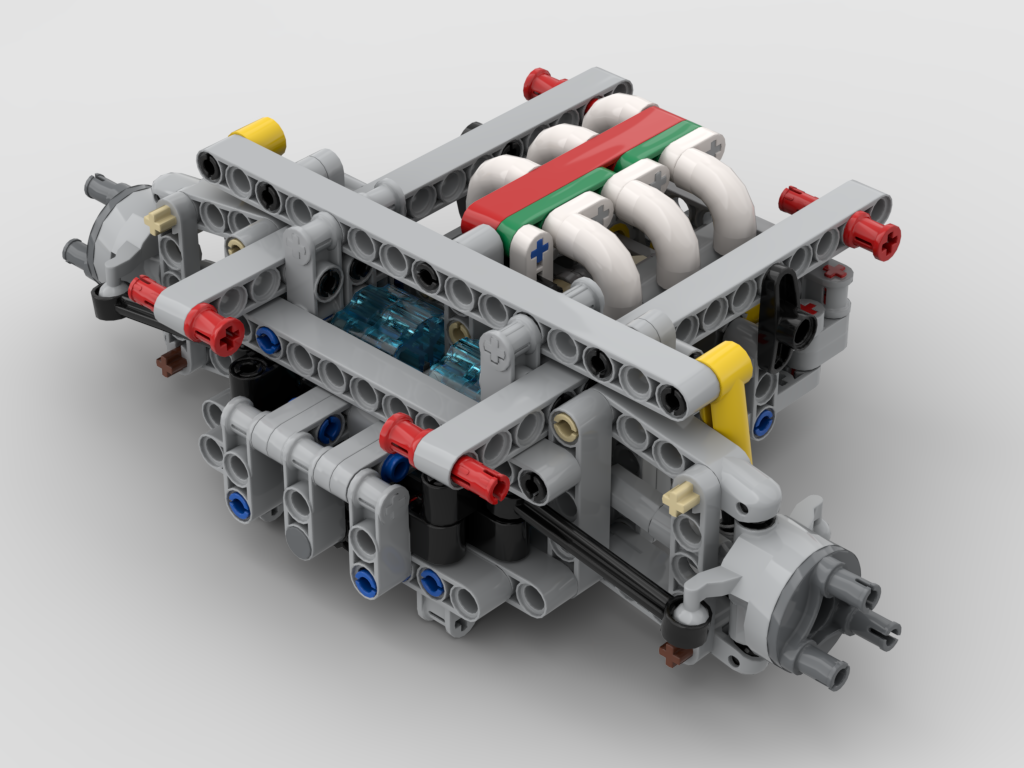
The engine tubs were a lot of fun and took less time than I thought they would. There are two tubs. The first, is built to support the front independent suspension and two different engine designs. The Straight Six is my favorite engine, so I wanted to make this options possible. The steering race for this module is placed far forward to allow for the I-6 to fit. In fact, the front of the engine is two studs from the front of the car. The V-8 fits well, and is placed behind the front axle centerline. The second engine tub features a fixed Flat 6 engine, and two fake electric motors; one for each side of the front axle. This unit is the hybrid and All Wheel Drive engine tub. Each tub attaches to either transmission module with six pins and one axle for steering. Drive connects by a 8 tooth gear off the engine.

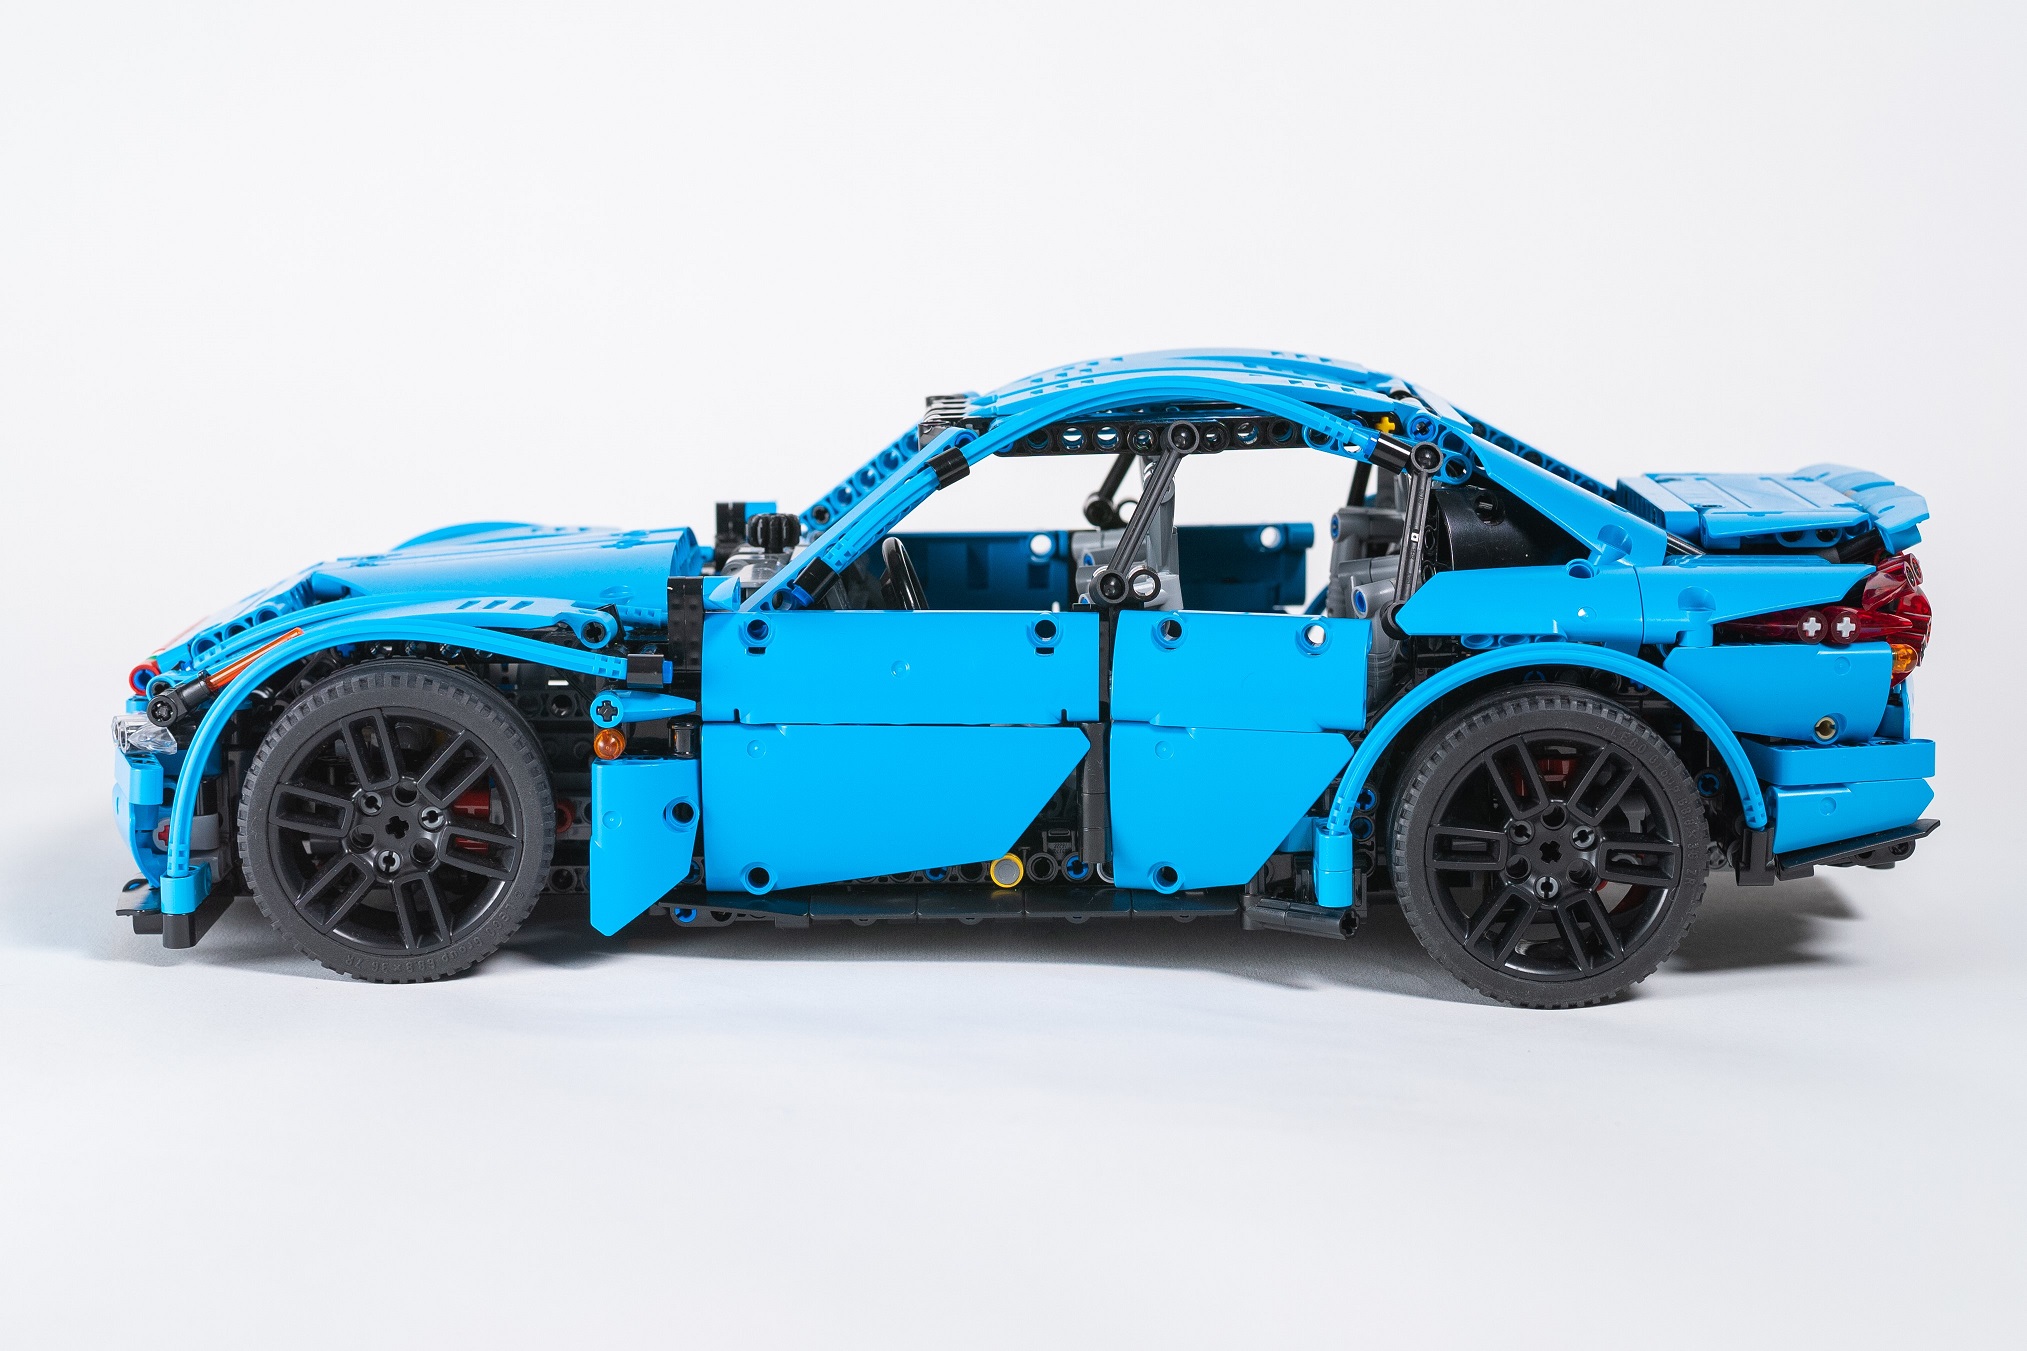
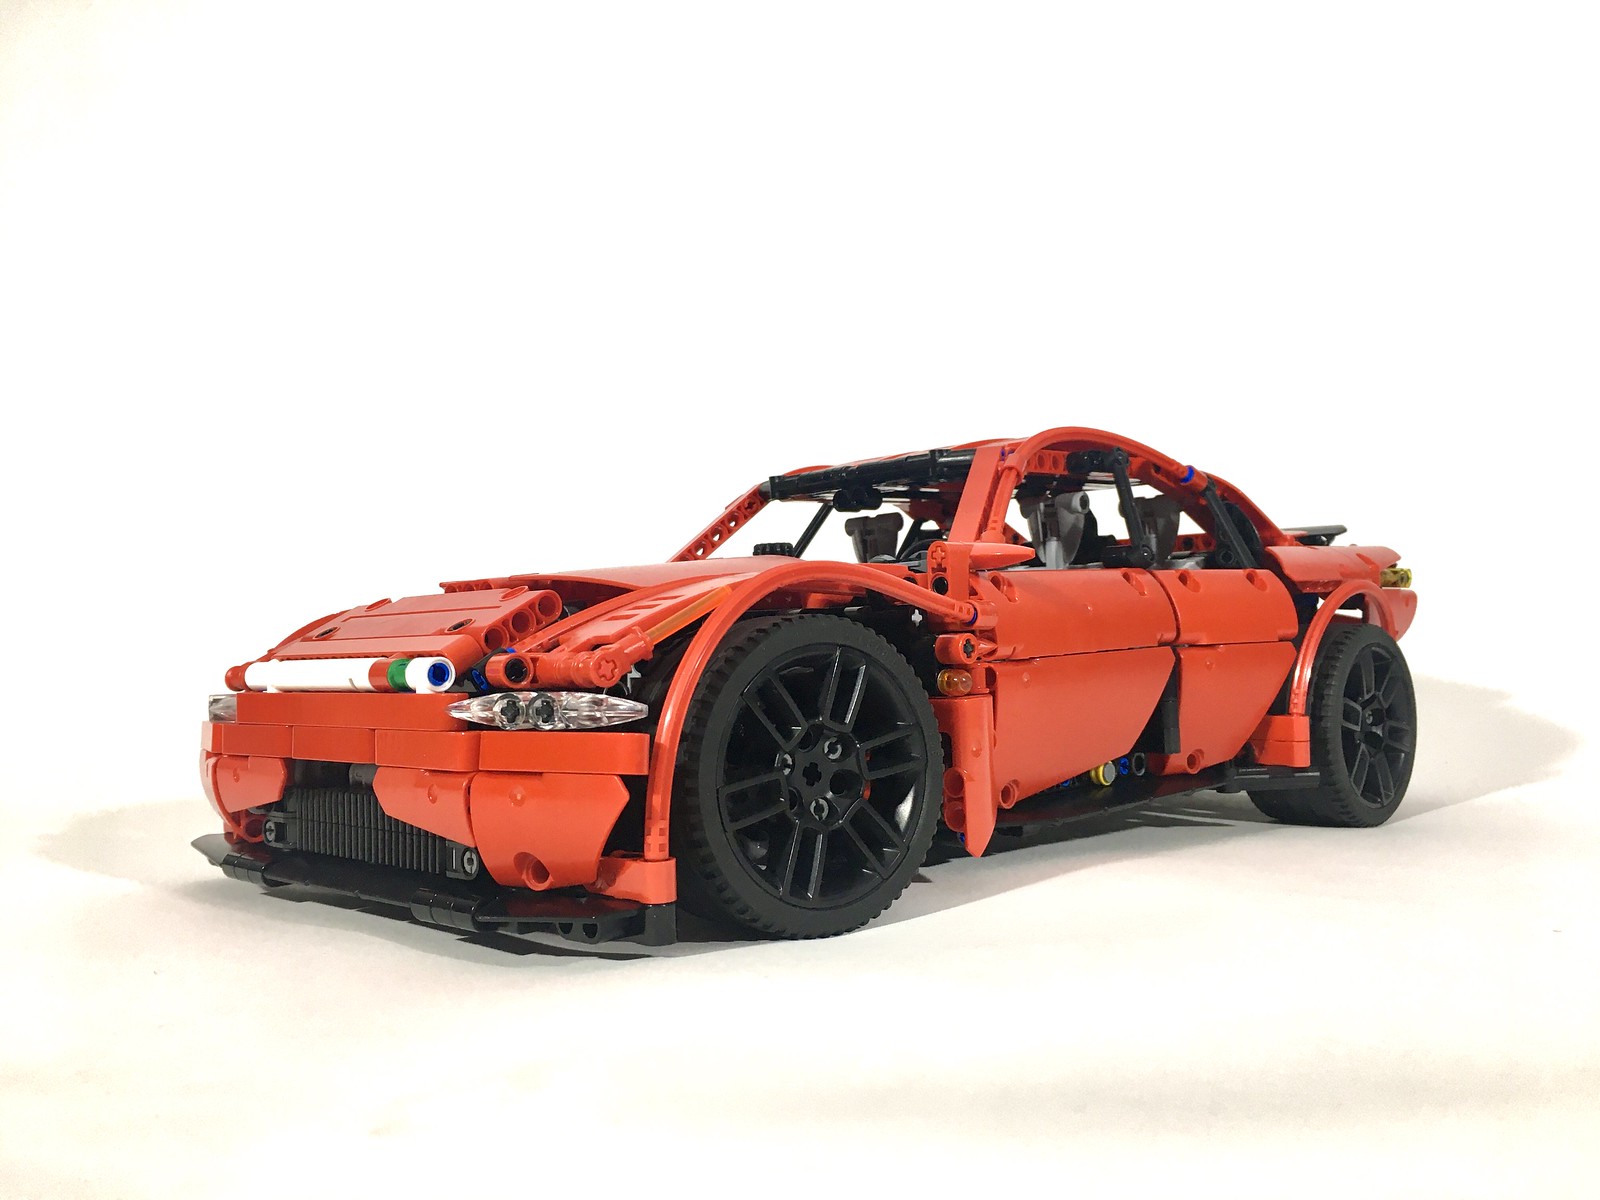
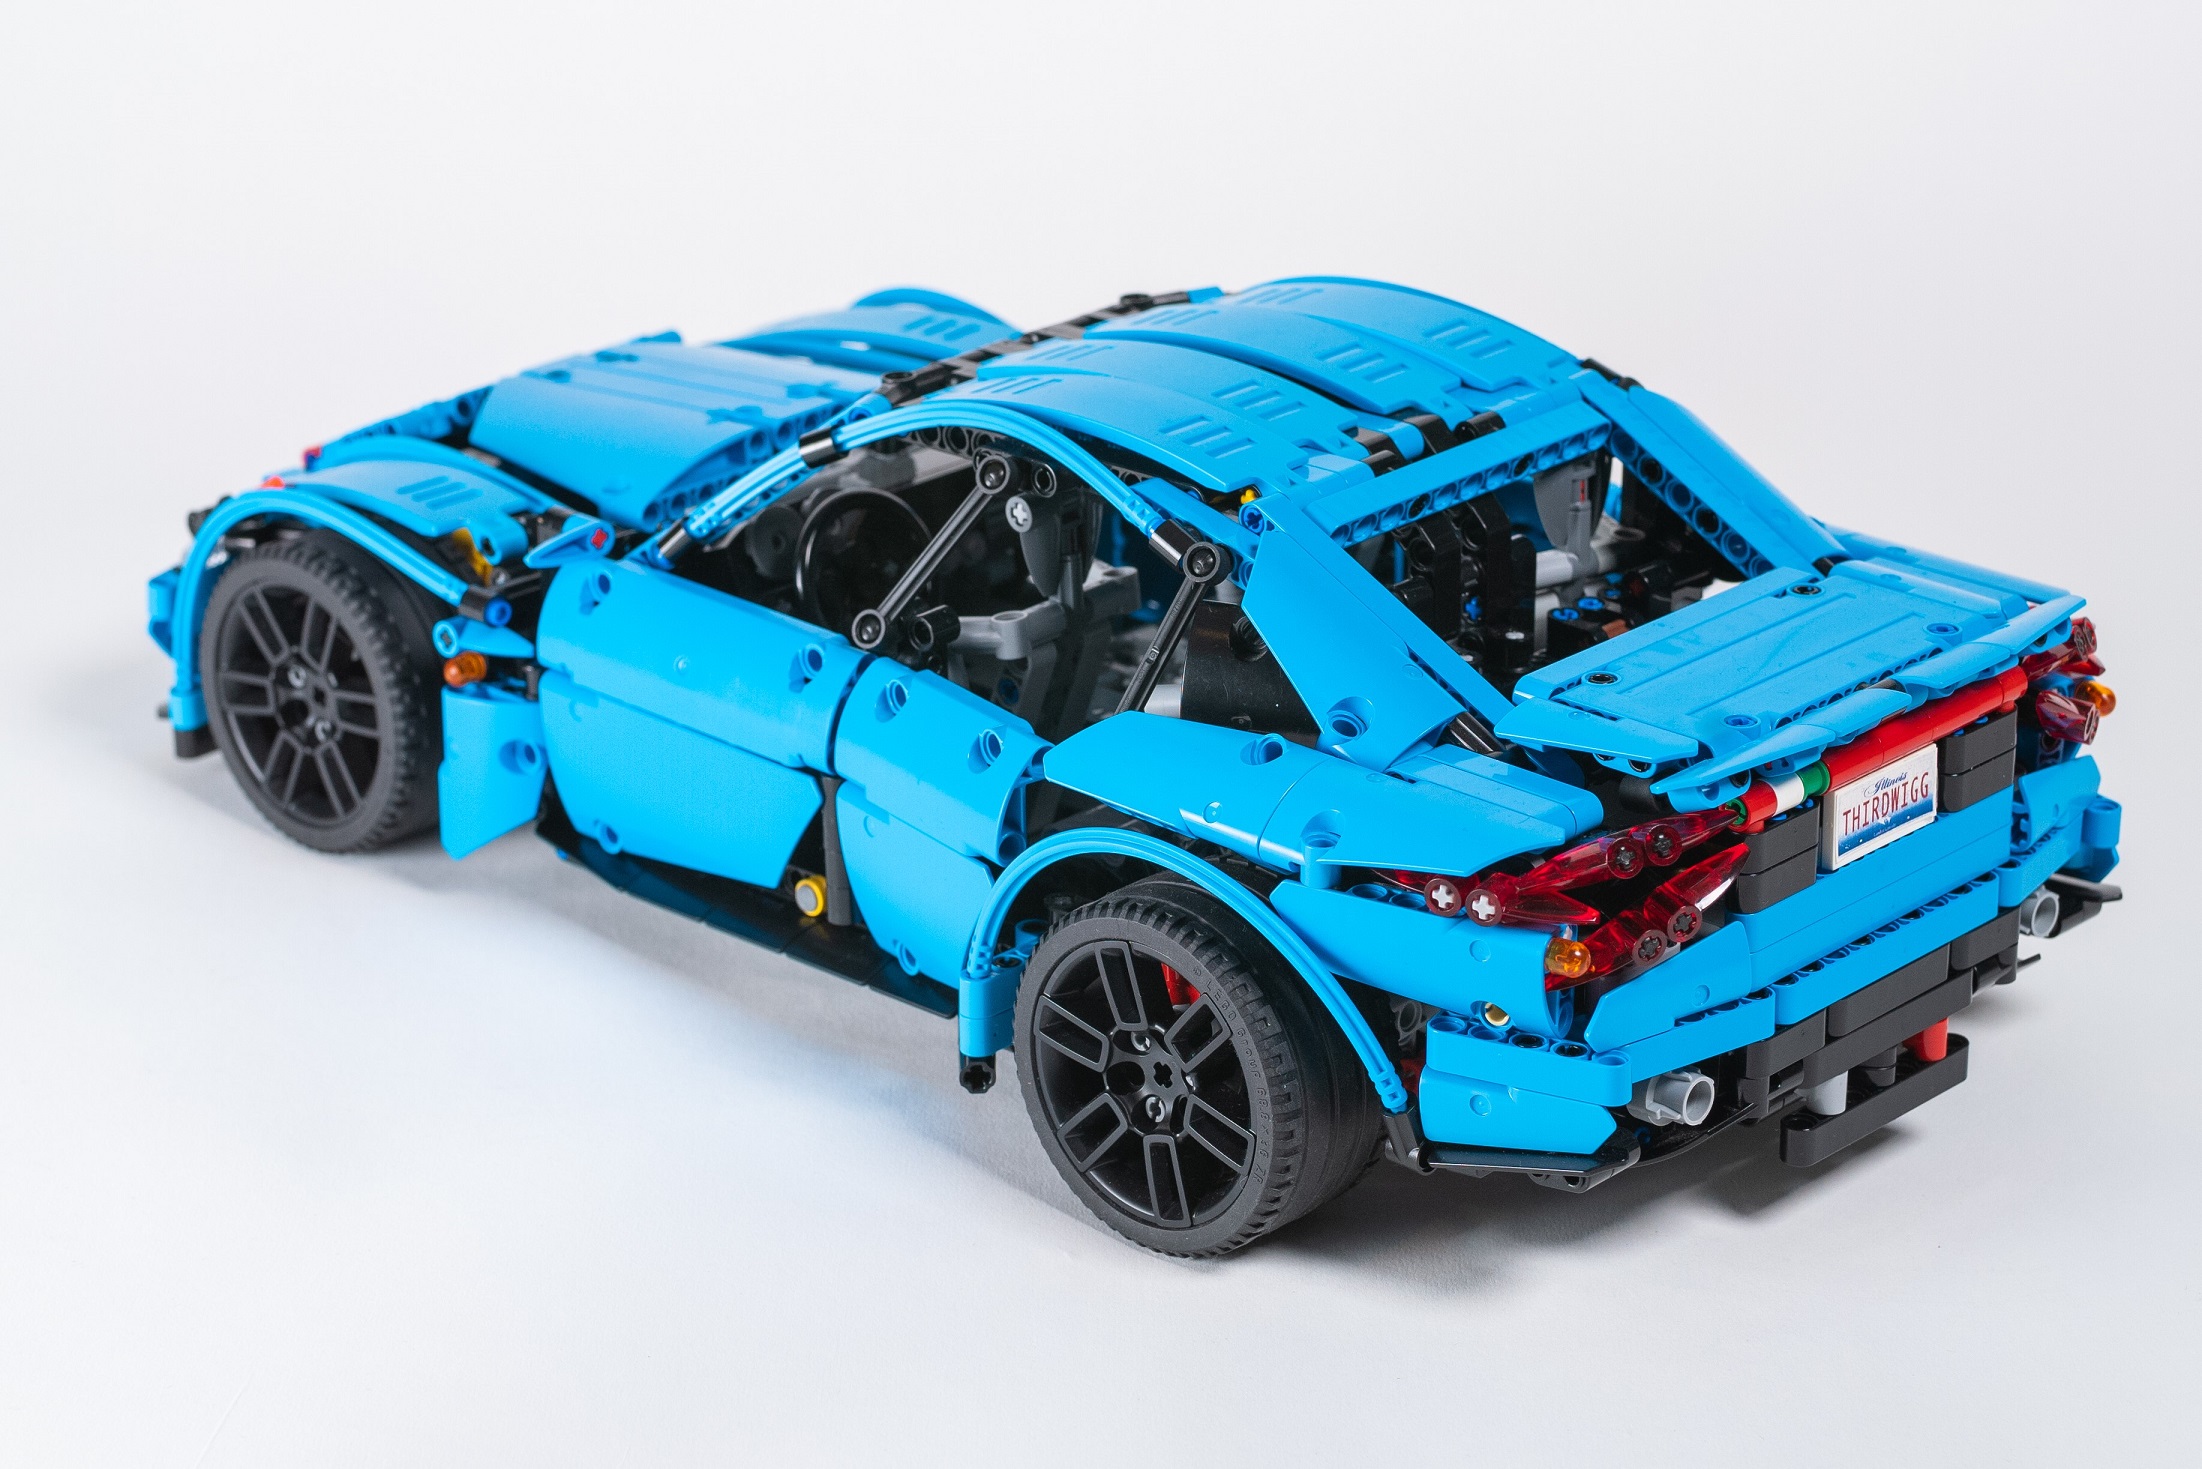
Then I built the floorpan. This simple build provides the floor to both the cabin and the underside of the car. It is connected at six points, four to the chassis, and two to the center of the body. These points stiffen the car, and connect it all together. The body took the most time as this is what most people would see. Early, I committed to the sides panels including the doors and the part just behind the front wheels, and the roofline. Otherwise everything else was fair game. The front bumper took some time in order of the two studs of space, but I was pleased with the design. Next I managed to get the A, B, and C pillars to look the way I wanted. The C pillar took some trial and error but finally got a shape that was fast looking without the coupelike lines that seems to be permitting sedan design these days.

The rear took the longest. It was at this point where my focus on the MOC was starting to wain. Over months I tinkered with different trunks, different lights, and different rear bumpers. Eventually, I got to where I am now which could be improved, but I was pleased enough to call it complete. I added a little spoiler, and the body was done.

Ionos Sequential Rear

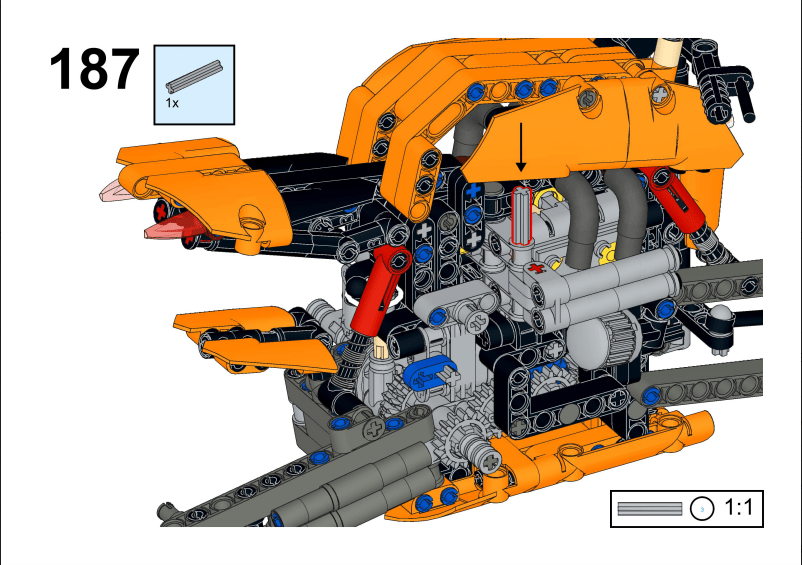
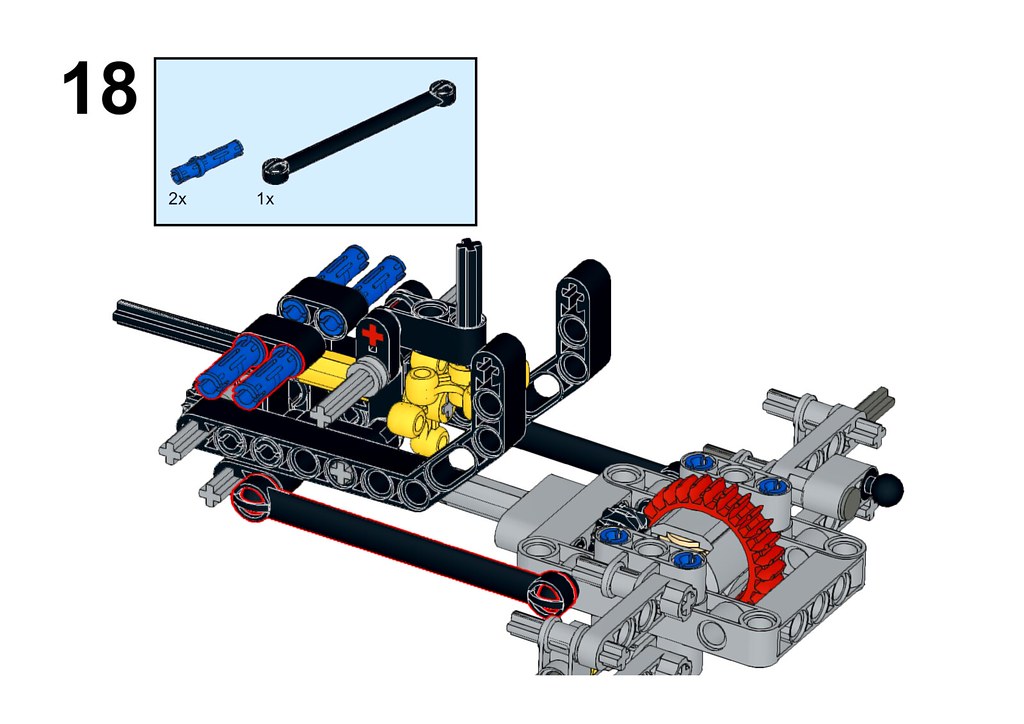
After everthing was built set, I rebuilt the whole car. As I did, I checked fit and built a Bricklink Studio file. With each step I found improvements along the way, and learned how to make better instructions. The result was a car system that fit together well, and gave for an interesting build. Again, if you are interested in the detail, or building your own you may find the instructions here and here.

This was my most favorite build in a long time. If you are interested, the Dark Azure, Manual, AWD version is my preference. The integration of all the parts was fun to do, and the build, test, rebuild process that went through every stage was a case study in continuous improvement. Both transmission work flawlessly. The suspension is stiff and functions as they should for a car of roughly 2500 parts. The varied engines were a fun inclusion. The design of the car is sporty and keeps the lines and proportions of a traditional Rear Wheel Drive Executive Sedan: long hood, short deck, short front overhang. I hope you enjoyed the car, and if you build it, I hope you enjoy the build. I definitely did, and will do something similar in the future.

Until then, happy building.

2021


Another year comes to a close there is Thirdwiggville, and wowzer, was it a big one. As a review, here is what I made for the year: Ionos Sports Sedan, Unimog U400, Unimog U430, LEGO 42126 V-8 4×4, 8854 Update, Compact Telehandler, Kickboxer Diesel, LEGO 8850 Update, Compact Loader, Unimog U500.

I accomplished a good deal of last years goals:

  • A motorcycle (completed)
  • A sports sedan (completed)
  • Another midsized car (EV) (Nope, but I count the Ionos)
  • Something yellow (completed x2)
  • 7 completed builds (completed)

This year I was able to build more than I have in the past couple of years. Some of this is due to some smaller builds this year, and the Unimogs were similar enough to each other that I was able to double up the work on them. Additionally, I built two contest MOCs, which are time sensitive, so that sped up those builds. Also, the 8854 Update won the Eurobricks TC20 contest, which was incredible!

Two other notes: First, the Unimogs and the Ionos car(s) are two of my favorite builds in quite a while. The Ionos was a fantastic build, and I’m proud of the work that went in the car and all its versions. Likewise the Unimogs were beautiful, and will adorn my house and office for a while.

Second, this year I taught myself how to use Bricklink Studio, and now I’ll never look back. I am now able to make instructions that are clear and easy to read in a way that the Photo Instructions I have done in the past never were. For the time being, I have committed to making a Studio file and Instructions for each MOC going forward as this seems to bring a lot of value to the LEGO community, and I’ll slowly update the old photo instructions for MOCs in the past. I am conflicted on if I should charge money for these instructions. I have a lot of builders who taught me a lot over the years, and this was due to freely available information. I would like to pay this forward for other builders coming behind me, so I hope to keep a lot of these instructions free. As always, feel free to find my instructions at Rebrickable.com.

For 2022, here are my goals.

  • A Combine to match the Atmos Tractor
  • Another 42126 MOD
  • An attachment for the Unimogs
  • A Garbage Truck
  • A small truck
  • A system airplane
  • A remake of 8440

We’ll see if I can make all this work. As always, I try to be flexible to where my current interests are and other considerations such as contests and home life. Feel free to watch The Queue to see what is coming up. Happy Building and on to 2022!

Unimog U400/U430


I frequently build another Unimog after it has been a couple of months since the last one, so here is another TWO!

You may find building instructions for both the U400 and the U430.

I generally find myself building a Unimog about every year, and this year, I built three. Kindof. Early in 2021, I built a Short Wheelbase U500 in blue, and I loved it. So, I wanted to see if I could take the build a little further. I’m partial to the U500, but the U400 seems to be a little more popular, and the current U430 was another challenge I wanted to try.

Instructions available for both.

The chassis for both is a modification of the U500. The wheelbase is 2 studs shorter, so I removed the winch and the PTO on/off switch, and modified the bed tipping mechanism. The rest is the same, including the front and rear PTO, the four wheel drive, and the I4 engine. Both the U400 and the U430 have a manual pneumatic pump with a front/rear switch for attachments.

The tipping bed is the same for both, and can tip in three directions. The three sides drop as well. And the cab for both is generally the same, with a slight change to the front to address the styling differences for both. You can see the similarities between both in the videos below.

I’m pleased with these MOCs, and how they worked. The U400 is the most beautiful MOC I have made in a long time. It currently adorns my desk at work, and will continue to do so for some time. While I wish both would have portal axles, the stability of the drivetrain, and the flawless reliability is worth tradeoff. The U430 looks great as well, especially with the tires, the orange is my favorite. Hopefully I am able to make some attachments for the front and rear. Stay tuned.

Until then, happy building!

LEGO 42126 V-8 4×4


Sometimes a LEGO set needs just a little more content. 42126 is one of them.

Instructions may be found on Rebrickable.com.

LEGO 42126 was introduced in the Summer of 2021, and I was immediately drawn to the pickup as it included some features I like, such as steering, suspension, a decent (at least in the USA) price, and it’s Orange! But there were serious features lacking such as four wheel drive, a V-8 (I know, I know, a Raptor, and many of Ford’s F-150s use a turbo V-6), and the rear suspension geometry was weird. I agree with others, that some parts of the design like the rear taillights and the front headlights are a little off. But, like 8081, I saw some potential here, and I ordered the set.

In fact, before I even received my copy of 42126, I was designing and a building a new chassis. The V-8 was easy enough to add, as the space under the hood is extensive. Adding in a front drive axle was a little more complicated. To keep the width, steering geometry, and suspension travel the same as 42126, adding a front drive axle would take a little work. I used a floating differential design, which allows the differential to move freely as the suspension travels through its movement. The steering link was flipped upside down, and relocated in front of the drive axle. The suspension swingarm and shock absorber mounds did not change.

42126 V-8 4×4 Chassis

Immediately behind the engine firewall a differential that connects to the V-8, and the rear axle. The rear axle is changed to replicate a better movement of the rear Raptor. LEGO noted how the half module offset of 42126 was a feature they had to work on to get the placement of the axle correct. However, this feature was only needed as the pivot point of the rear axle was so to the rear of the pickup. By moving the pivot point of the rear axle farther forward, the travel pivots less, and creates a better axle movement of more up and down. This also helps place the axle better when one side is up, and the other down.

While I made no changes to the exterior, I made minor changes to the interor. The colors of the seats have been changed so they match one another a little better. Finally, with a little bit of cross frame bracing, the pickup was done. When 42126 finally arrived, I removed the bed, the doors, the hood, and the roof from 42126, and my F-150 was done.

I like making modifications of sets more than I like making B or C models of them. As such, this project was an enjoyable one for me. I worked fast, and I liked the improvements I was able to make to the original. I like the look of 42126, so keeping this consistent was fine for me, and the additions of the V-8 and the four wheel drive was a fun challenge to pursue. Now to see if I can do a Sport Truck version of 42126. Stay tuned….

Happy building!

8854 Update


Winner, Winner, Chicken dinner is what we say in my house!

Free instructions are available at Rebrickable.com.

LEGO 8854 Update

I often participate in online LEGO contests, and most of them are on Eurobricks.com. In the summer of 2021, Eurobricks announced TC20, Technic Studless Recreation. I participate in many, but not all, of the contests that Eurobricks offers. The requirement was to pick an old studded set, and recreated it in studless Technic. I couldn’t sit this contest out, as it checked all the right boxes for me. Entries would be smaller to stay in scale, the builds would be feature packed, and it they would have a deep nostalgic connection. I was in.

Choosing a set to recreate took some time. I started with a list of 32 sets, and started to whittle it down from there. Quickly I removed some of the sets for various reasons: interest, size, not right now, too sacred (8880). I ended with a top three of 6357, 8855, and 8854. 6357 would be interesting to me, but after doing 8640 a couple months back it could wait. 8855 had some opportunity. It is a classic set, and instantly identifiable. I built a little mock-up, and let it sit for a couple of days. I didn’t come back to it.

I am not sure why I did not settle on 8854 right away. I love building Unimogs, and when I do updates I like to add some features. 8854 was missing suspension and an engine, so everything was right for me to recreate this iconic set. I had made my decision and I started posting my progress. First, I had to decide the scale. I made the decision to use the newish Batmobile tires in the build, which make the tires a little larger than the original 8854. I added a stud to the wheelbase to compensate, but otherwise the scale would remain the same.

Next, I had to figure out how to add all the features I would want, while keeping all the original features. HOG for the steering would remain on the top right side of the cab, naturally as a beacon. I then added a control gear for the outriggers on the top left side of the cab. The rotation of the crane would be on the right of the truck driven by a worm gear, and all other crane controls would be on the crane itself.

Fitting in the suspension and engine was a little tricky. Adding the engine was simple enough. There is a differential on the rear axle with portal axle. The driveshaft goes forward to drive a I4 mini engine. Suspension is a dual pendular axle setup: both axles pivot side to side. The front and rear axles are linked together so that when one axle pivots right, the other axle pivots left. It is a simple design that functions well.

LEGO 8854 Engine

Designing the crane was the easiest part. Panels form the base of the arm, and a simple extending boom as created using studded technic beams and some rack gears. A worm gear extends the boom.

The cab is where I had some trouble. 8854 has a funny shaped cab to my eyes. First, it is very narrow. Second, the hood slopes very steeply. Third, the windshield is not very steep, more car shaped than truck shaped. I rebuilt 8854 in Bricklink Studio to help me compare the two designs over each other. I found this to be a helpful step, and allowed for some good feedback from other Eurobrick members. I ended up making the hood a little more flat and slightly shorter. The roof was made a little longer, which made the windshield a little more steep. Then added the fenders that wrap around the wheels a little better, and headlights and a grill that referenced the original grill. I was pleased with the final design. Oh, and I added seats, opening doors, and a dashboard.

Being able to compare the two versions side by side helped me feel comfortable with how the build was going. Most of the time I use Studio when the build is complete, as do not like to tinker in Studio. However, being able to see changes in real time, was immensely helpful. I could ask was the new version staying true to the original? If not, what was the specific part that was making it feel/look off? Being able to overlay both versions on top of each other was helpful, and a step I will do again in the future.

Cab Comparison Overlay

It turns out the design was good enough for a first place! I was thrilled that through both a voting and jury stage, this update was picked over 46 other designs. In addition to that affirmation, I was pleased with how the MOC turned out as well. The functions all worked well, and the control of each was simple and effective. I only wish the suspension was little more stable, but this was only noticeable when the crane was fully extended. I’ll use the suspension again in other MOC soon. If you love 8854 as much as I do, I hope you will give this update a build as well.

Happy Building.

Compact Telehandler


Sometimes I plan out a build, and other times, a build just kind of happens. This was the latter.

You may find free instructions for this MOC at Rebrickable.com.

After building the Atmos Tractor, and then a gazillon implements, attachments, and trailers, I started branching out to other machines that could be used at the Thirdwigg Farm. The Compact Loader was a result of this. I was playing with the new LEGO 42122 tires, and quickly came up with a little four wheel steering idea. I added a fork boom, and decided to see where the project would go.

I am quite fond of LEGO 8283, and the rest of the design was influenced by this little set. I tried a couple of boom extension designs, but each looked a little too “overweight” for the little tractor. So I came back to the extension design that was used on 8283. A mini linear actuator is used to lift the boom. Both functions are controlled by two separate gears on the back of the telehandler.

The cab came together pretty quickly, though I had to make sure the new tires had a clear range of motion. I added some lights, and front fenders which brought a little visual weight to the front. I had a tricky time finding rear fenders that I liked, but I eventually found a solution I liked. In my move towards increasing the readability of my instructions, I have published a PDF with step-by-step instructions that list required parts for each step. I hope they are clear for you, and they bring value to your own build.

The Compact Telehandler worked just as I hoped. The steering is great; it’s fun to drive this little tractor around on a small desk. The boom lift works well, and has a great range of motion. The extension works smoothly, though since it is driven by a worm gear, if the extension is in the wrong position while trying to lift the boom, the boom will bind. The fork tilt mechanism is smooth, and is easily accessible in all boom positions. We will see what next build come from just playing with a couple of parts.

Happy building.

Kickboxer Diesel


I have done a lot of difficult LEGO projects over the years, but this project was the hardest in a while.

You may find free instructions for this MOC at Rebrickable.com.

I often participate in Eurobricks Technic contests, and this last winter, I chose to participate in TC19 Technic Motorbike Contest as I enjoy Motorcycles, and I have built only one. This was an oportunity for me to develop some skills in a MOC that I have not done in the past. I had no idea, how much it would stretch me. From the start I committed to the following features: steering , suspension, an engine, and a transmission.

I quickly picked a motorcycle to replicate, the fantastic Kickboxer, and got to work. First I set the scale and did a rough draft of the suspension. I built a little flat 4 engine.

Then I started on the transmission. The transmission is a four speed sequential transmission that is shifted on the left of the motorcycle. I took a while to get the design to work, and then took a lot of time to get it to fit into the motorcycle. Finally, I was able to get the final solution to work. It’s dense and complicated. I encourage you to take a look at the instructions to explore it a little more.

The suspension worked until I finished much of the bike. Then it sagged, and required a complete rebuild. I was able to retain much of what I wanted even after the redesign.

The motorcycle was a build I was very happy to finish. I was frustrated multiple times in this build, so I had a high sense of accomplishment when it was done. The transmission works flawlessly. The suspension is sufficient, and the steering is a little gummy. But all in all, it’s a build I am proud of. I hope you enjoy it too.

Happy building.

LEGO 8850 Update


After updating 8640, I wanted to update another set with a Technic Fig. There was only one option, 8850 Rally Support Truck.

Free instructions are available at Rebrickable.com.

8850 Update Side

Every once and a while I return to an old LEGO set, and try to modify and improve what was offered by The Lego Group when the set was released. I like to harken back to some of these influential sets because it helps me take stock of all the improvements that have happened in parts and design in LEGO Technic. 8850 was one of the first sets to use the, then new, cylinder and piston parts that have been used ever since. The set also had a driver, steering, and a robust design. When I set to work on this MOD, I placed the following constraints: keep the size, keep the engine, keep the steering, add suspension, update the bodywork, and keep the driver. Make it yellow.

8850 Rally Support Truck Update

The chassis came together quickly, as it is not too complicated, and utilized features I have used before. The rear live axle is simple, and linked forward by two links, and laterally by a Panhard rod. I used the new differential to increase the final engine speed. The front suspension is another simple design; double A-arms with a rear steering link. The steering mechanism travels under the engine, through an idler gear, and moves upward towards the HOG gear on the top of the truck.

8850 Update Chassis

The body work was quick as well, though I needed to slow down to be conscientious to the original design. Liftarms replaced Technic bricks, and the lines were kept. I added some engine detail including a intake, and gave a new grill design. I removed the headlights on top of the A-pillar, because they look silly to my eyes. I played with some ideas for the front bumper including a bull-bar, and other colors, but this simple design ended up being the one I like the most. I gave a little tailgate on the rear with some color, and a little exhaust pipe. Finally, I gave a little OCTAN coloring to highlight the race focus of the truck.

In my effort to improve access to my builds, I have created this MOD in Bricklink Studio, and have made instructions that are a little more clear than the photo sequence instructions I have done in the past. You may find a partlist and download the instructions PDF at rebricklable.com. Send me a photo if you enjoy the build.

Sample of the Instructions

8850 is a tricky set to update, because it has some defining features that I find unattractive, such as the front bumper, the rear, and the upper A pillar headlights. With this in mind, I think I carried the themes through to this build well. The OCTAN livery while keeping the main yellow with white highlights worked very well for my eyes. Functionally, keeping what 8850 had, and adding suspension was a fun project. I am already thinking about how to convert this build into an overland version with 4×4 and more bodywork. Stay tuned…

Until then, Happy building.

Compact Loader


It was time for me to learn how to do Bricklink Studio, and my Atmos Tractor needed a friend to load all of the trailers.

Free instructions can be found at Rebrickable.com.

This small loader came together rather quickly. I decided to use rear wheel steering rather than articulation as this would keep the mechanics of the bucket/fork simple. Additionally, I wanted to use the new tires from LEGO 42122, and they take up a little more room while turning. Finally, I wanted to allow the tractor to switch easily from forks and a bucket, so this simple feature was the second part to figure out.

The next part of the build required a little more trial and error. End Loaders are tricky in that they have a wide range of motion, and have to fit within a little given space due to the front wheels, cab, and ground. It become clear that at this scale, a mini linear actuator was not going to work. So I used a worm gear and 24z gear with a small linkage to the boom. This gave a wide range of motion, including a very high lift height. The motion was controlled by a 20z gear at the rear of the loader.

The bucket/fork tilt was a little more tricky. A 8z gear and worm gear control the movement. I add this mechanism in many of my builds because it works well for many needs; and it is small. In this build, I needed to redesign the frame for this mechanism as the standard build would not allow for the bucket and fork to fully tilt at ground level. But with a little modification, I was able to get it to work. At the high end, the bucket tilt can bind, which is not great. The tilt stays consistent as the boom lifts, which was a requirement for me as the fork was going to be a center part of the build. Control for the tilt is at the rear of the tractor. Pulling two axles allows for quick change between the bucket and the forks.

Finally, I built this MOC with the singular focus of developing my skills with Bricklink Studio; with the goal of improving the instructions that I make available. I have made photo sequencing instructions for years, but with the 800 pound gorilla that is Rebrickable.com, more and more people are contacting me directly saying some form of “I am confused when I try to build ______.” So, after trying a couple of 100-200 part builds, I launched into this Compact Loader, and built the file in Studio. Studio takes a little time to get used to, but it is slick. And the instructions that are generated are very slick.

But it does take time. Many of my instructions have been free, and I continue to value this for many reasons, but I’ll be reevaluating this the deeper I get into this transition. Either way, enjoy the many MOCs of mine that you can build for free.

I am pleased with how this MOC turned out, and what it taught me about building in Bricklink Studio has been valuable. The model fits my design language, and functions as I expect my models to function. And now, you can clearly figure out how to build it as well. I hope you will enjoy the build as well.

Happy building!

Unimog U500 (405.201)


Every couple of years I build another Unimog; they tend to be a favorite subject.

Instructions may be found here.

Unimog U500 (405.201)

Right after the LEGO Batmobile 76139 was released, I saw the front tires, and immediately planned this Unimog. The tires were perfect for a U500. I stared working on a draft before I had acquired the tires. I wanted the build to be in the theme of my Unimog 437 in that it was about 1:18 in scale, and had modular cabins and bed options. But I wanted to take this idea to the next level so that front and rear attachments could be added, as well as trailers. Many of my builds as of late are more system focused, in that a main build supports lots of other attachments, trailers, and versions of the same build. With this one, standard attachment points on the front, rear, bed, cab, and hitches allow for a variety of versions and attachments to be added quickly. I’ll make more of these soon.

Rear Hitch, Attachment point, PTO, and PPTO

I quickly set up a front and rear suspension using what was learned on the 437. The MOC has front and rear live axle suspension, four wheel drive, and front steering. A I4 engine is placed under the cab, over the front axle. Unlike the 437, I added a front and rear PTO. The rear PTO has an on/off switch. A center PTO is present as well for attachments that go in place of the rear bed. Finally, I added a Pneumatic pump behind the cabin to run pneumatics on the front or rear of the truck. A value determines if the preasure goes to the front or rear.

U500 Chassis

I added a three way tipper bed on the rear of the chassis, and created a way for the cab to be tilted. Both can be released by pulling a couple of axles out to allow for the tipping. The cab has seating for three, and both doors open. Finally, I added a front winch that is released and wound up using the fake air tanks on the left of the truck.

In the coming months I will make some attachments and trailers for this truck and for a U400/430 version that use the chassis of the U500 with some adjustments.

2016 Unimog U430

The truck turned out how I wanted it too, and had the features work the way as intended. The suspension is a little hard, but that supports various attachments well. This tipper bed and winch are a little addictive to play with. I did not spend much time making attachments for this truck, but I hope to do so soon. Until the next build or Unimog, Happy Building.