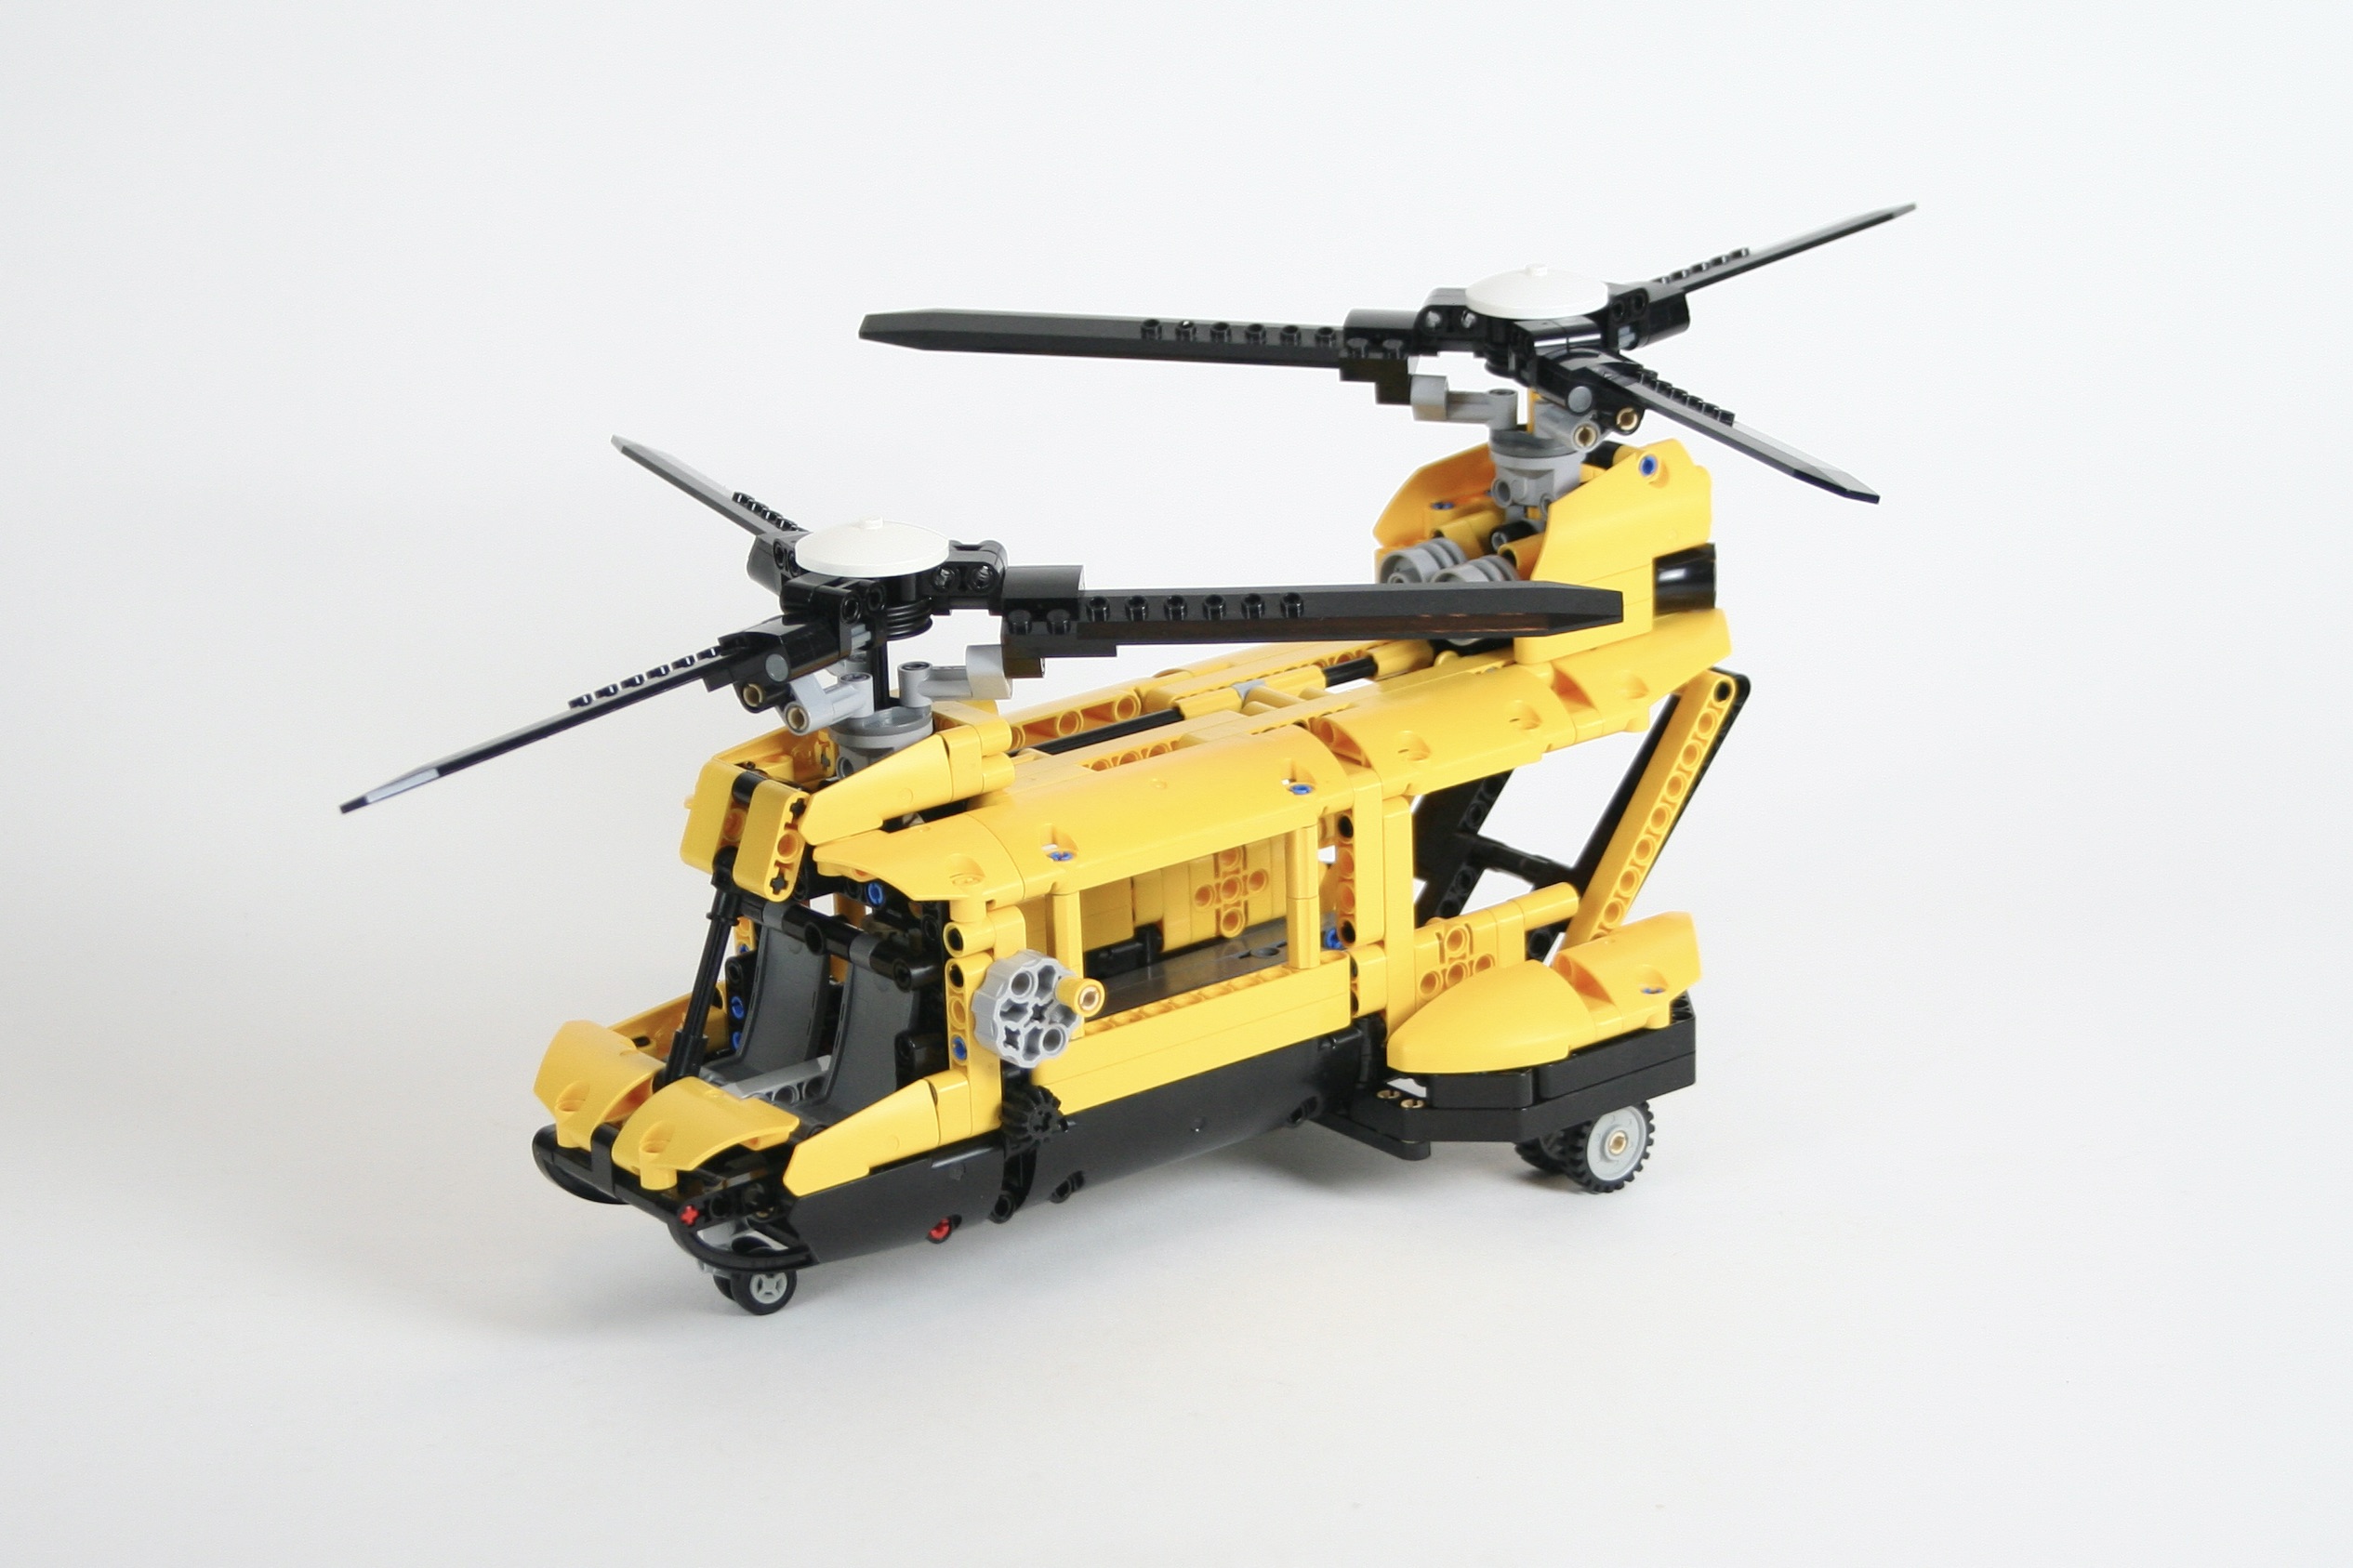
Like so many other people, I am have a nostalgic pull to LEGO sets that were released during my childhood. I, however, make the sometimes poor decision to try and update them using newer parts and building techniques. Set 8062 from 1994 was a unique little set in that it came with instructions for multiple builds and a carrying case. I never had the set, but the helicopter and grabber truck always caught my attention.
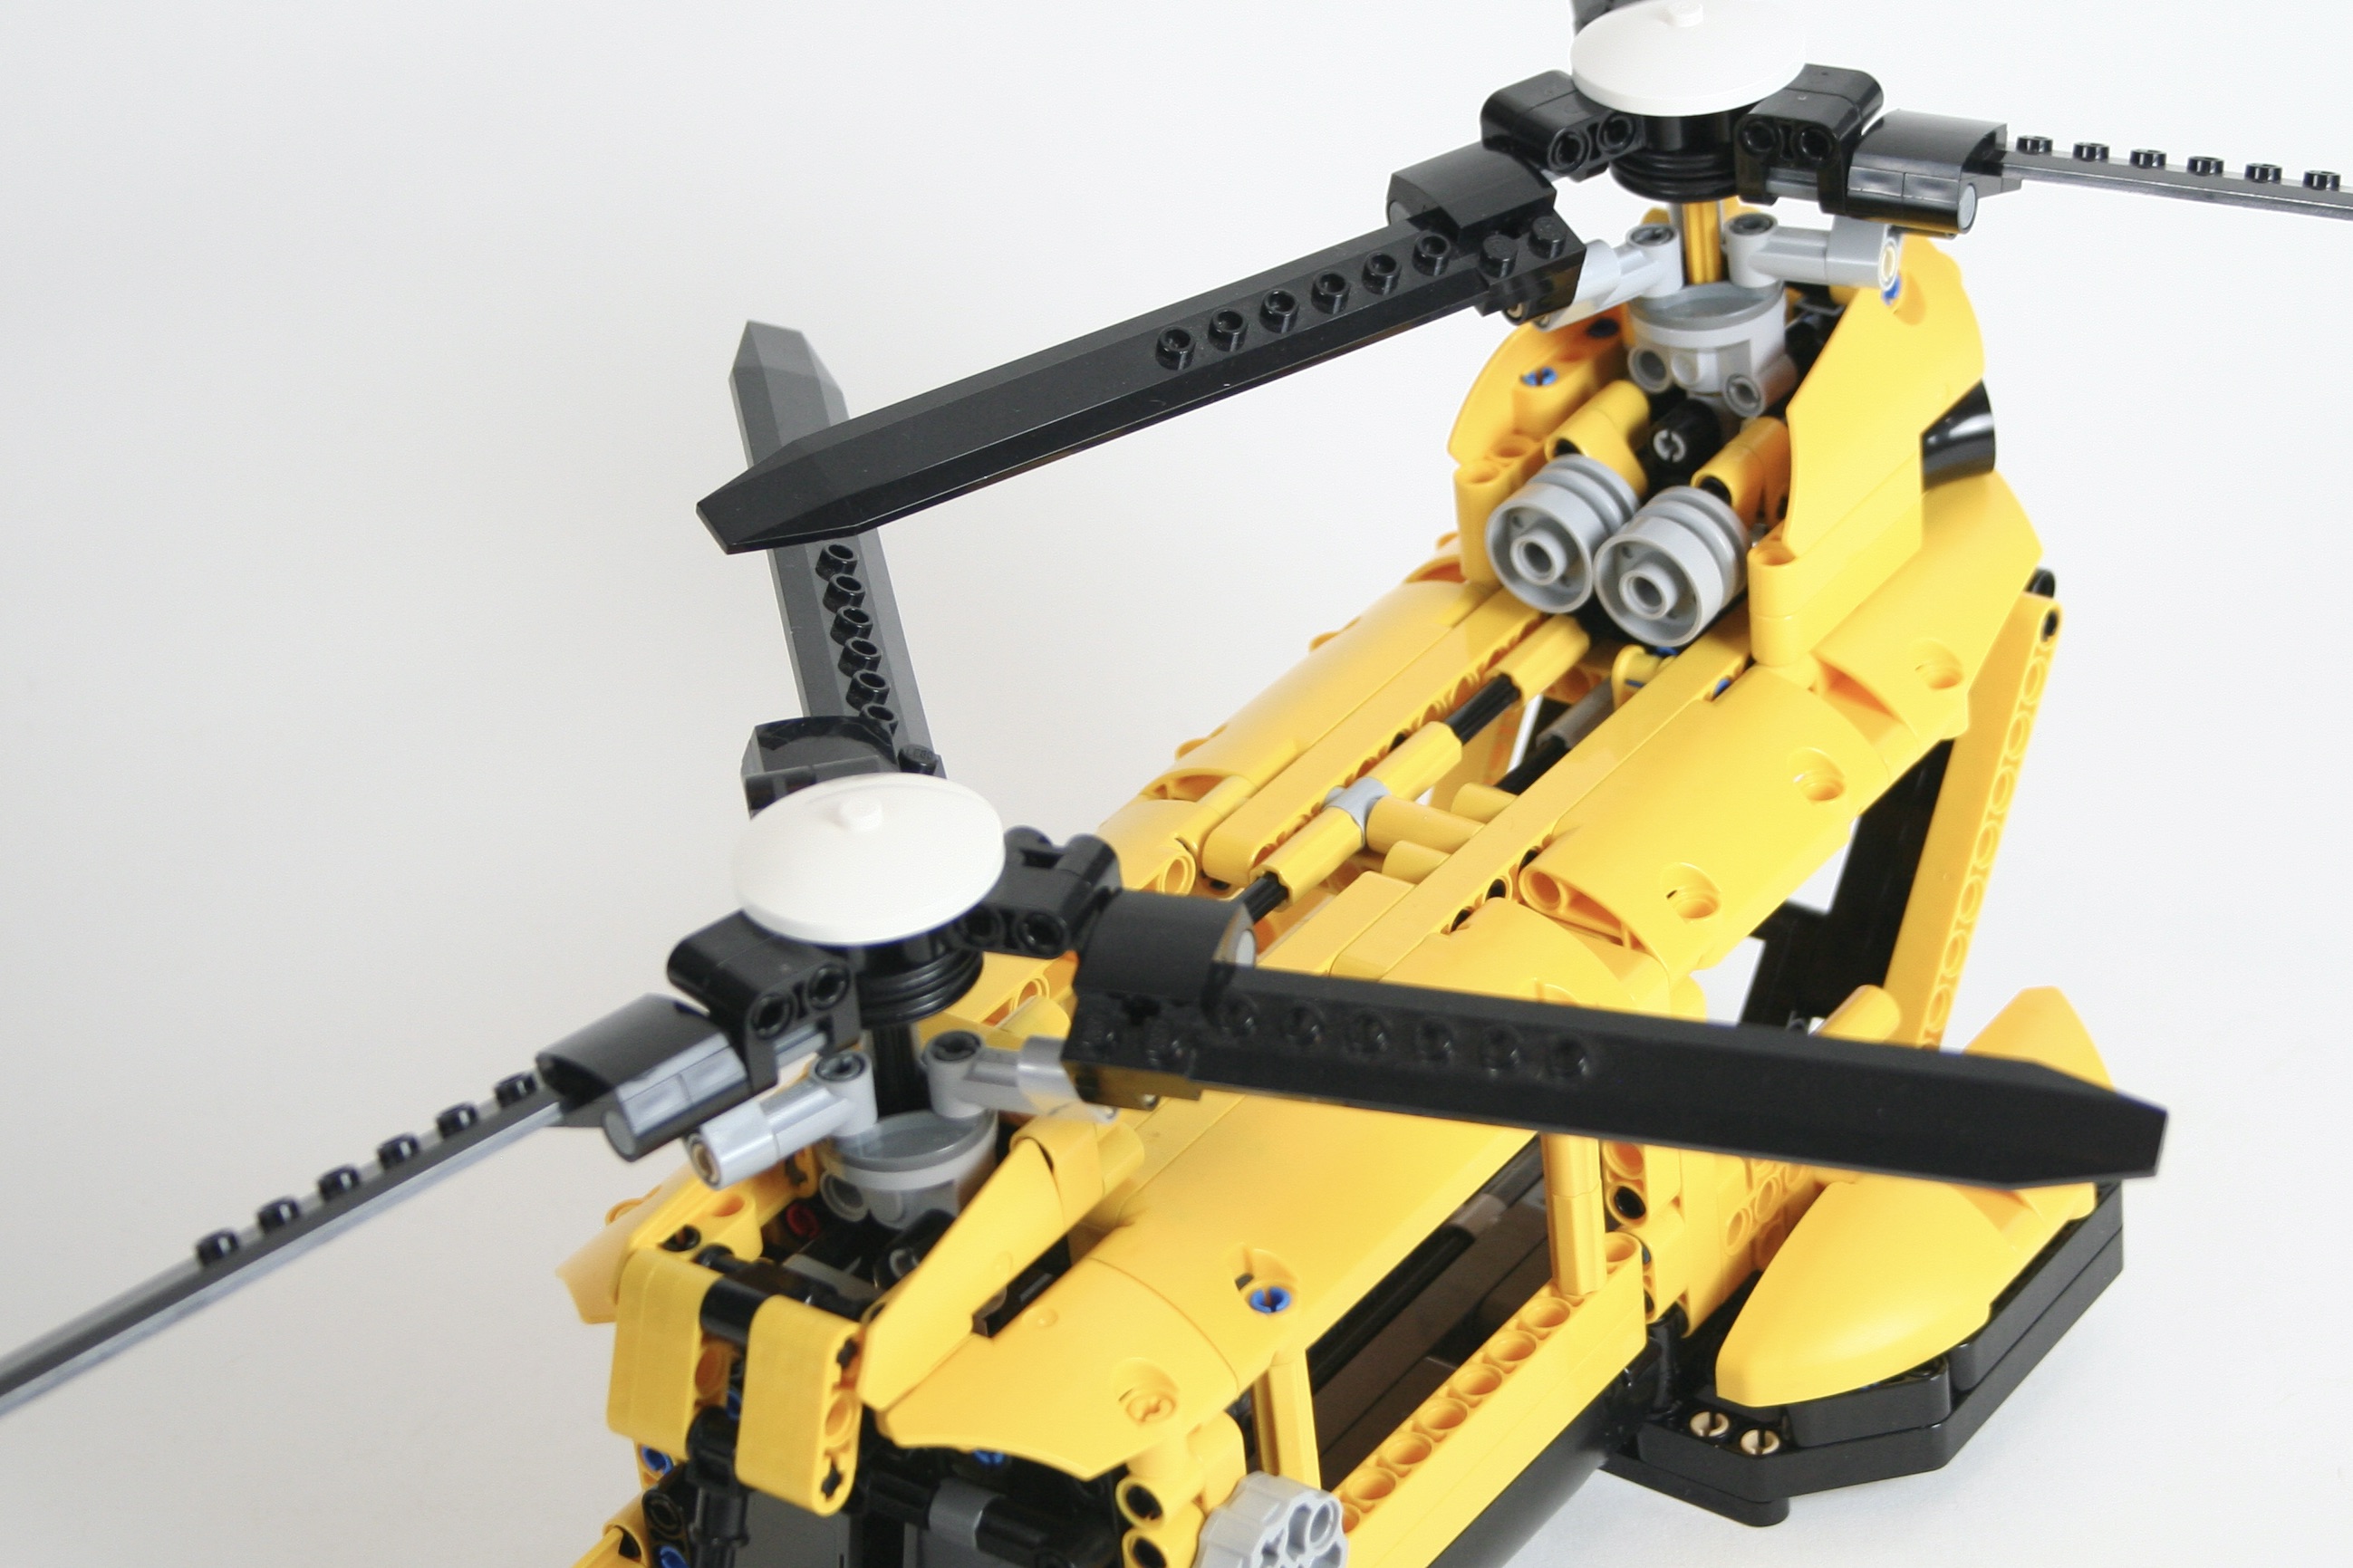
As I try to add features to an updated set, I used the main rotor design I have used before. This simple design allows for collective movement of three rotor blades. It’s a simple design, but was a little tricker for two rotors while trying to keep the cabin free of interruptions. A HOG is placed on the left of the helicopter to spin the blades.
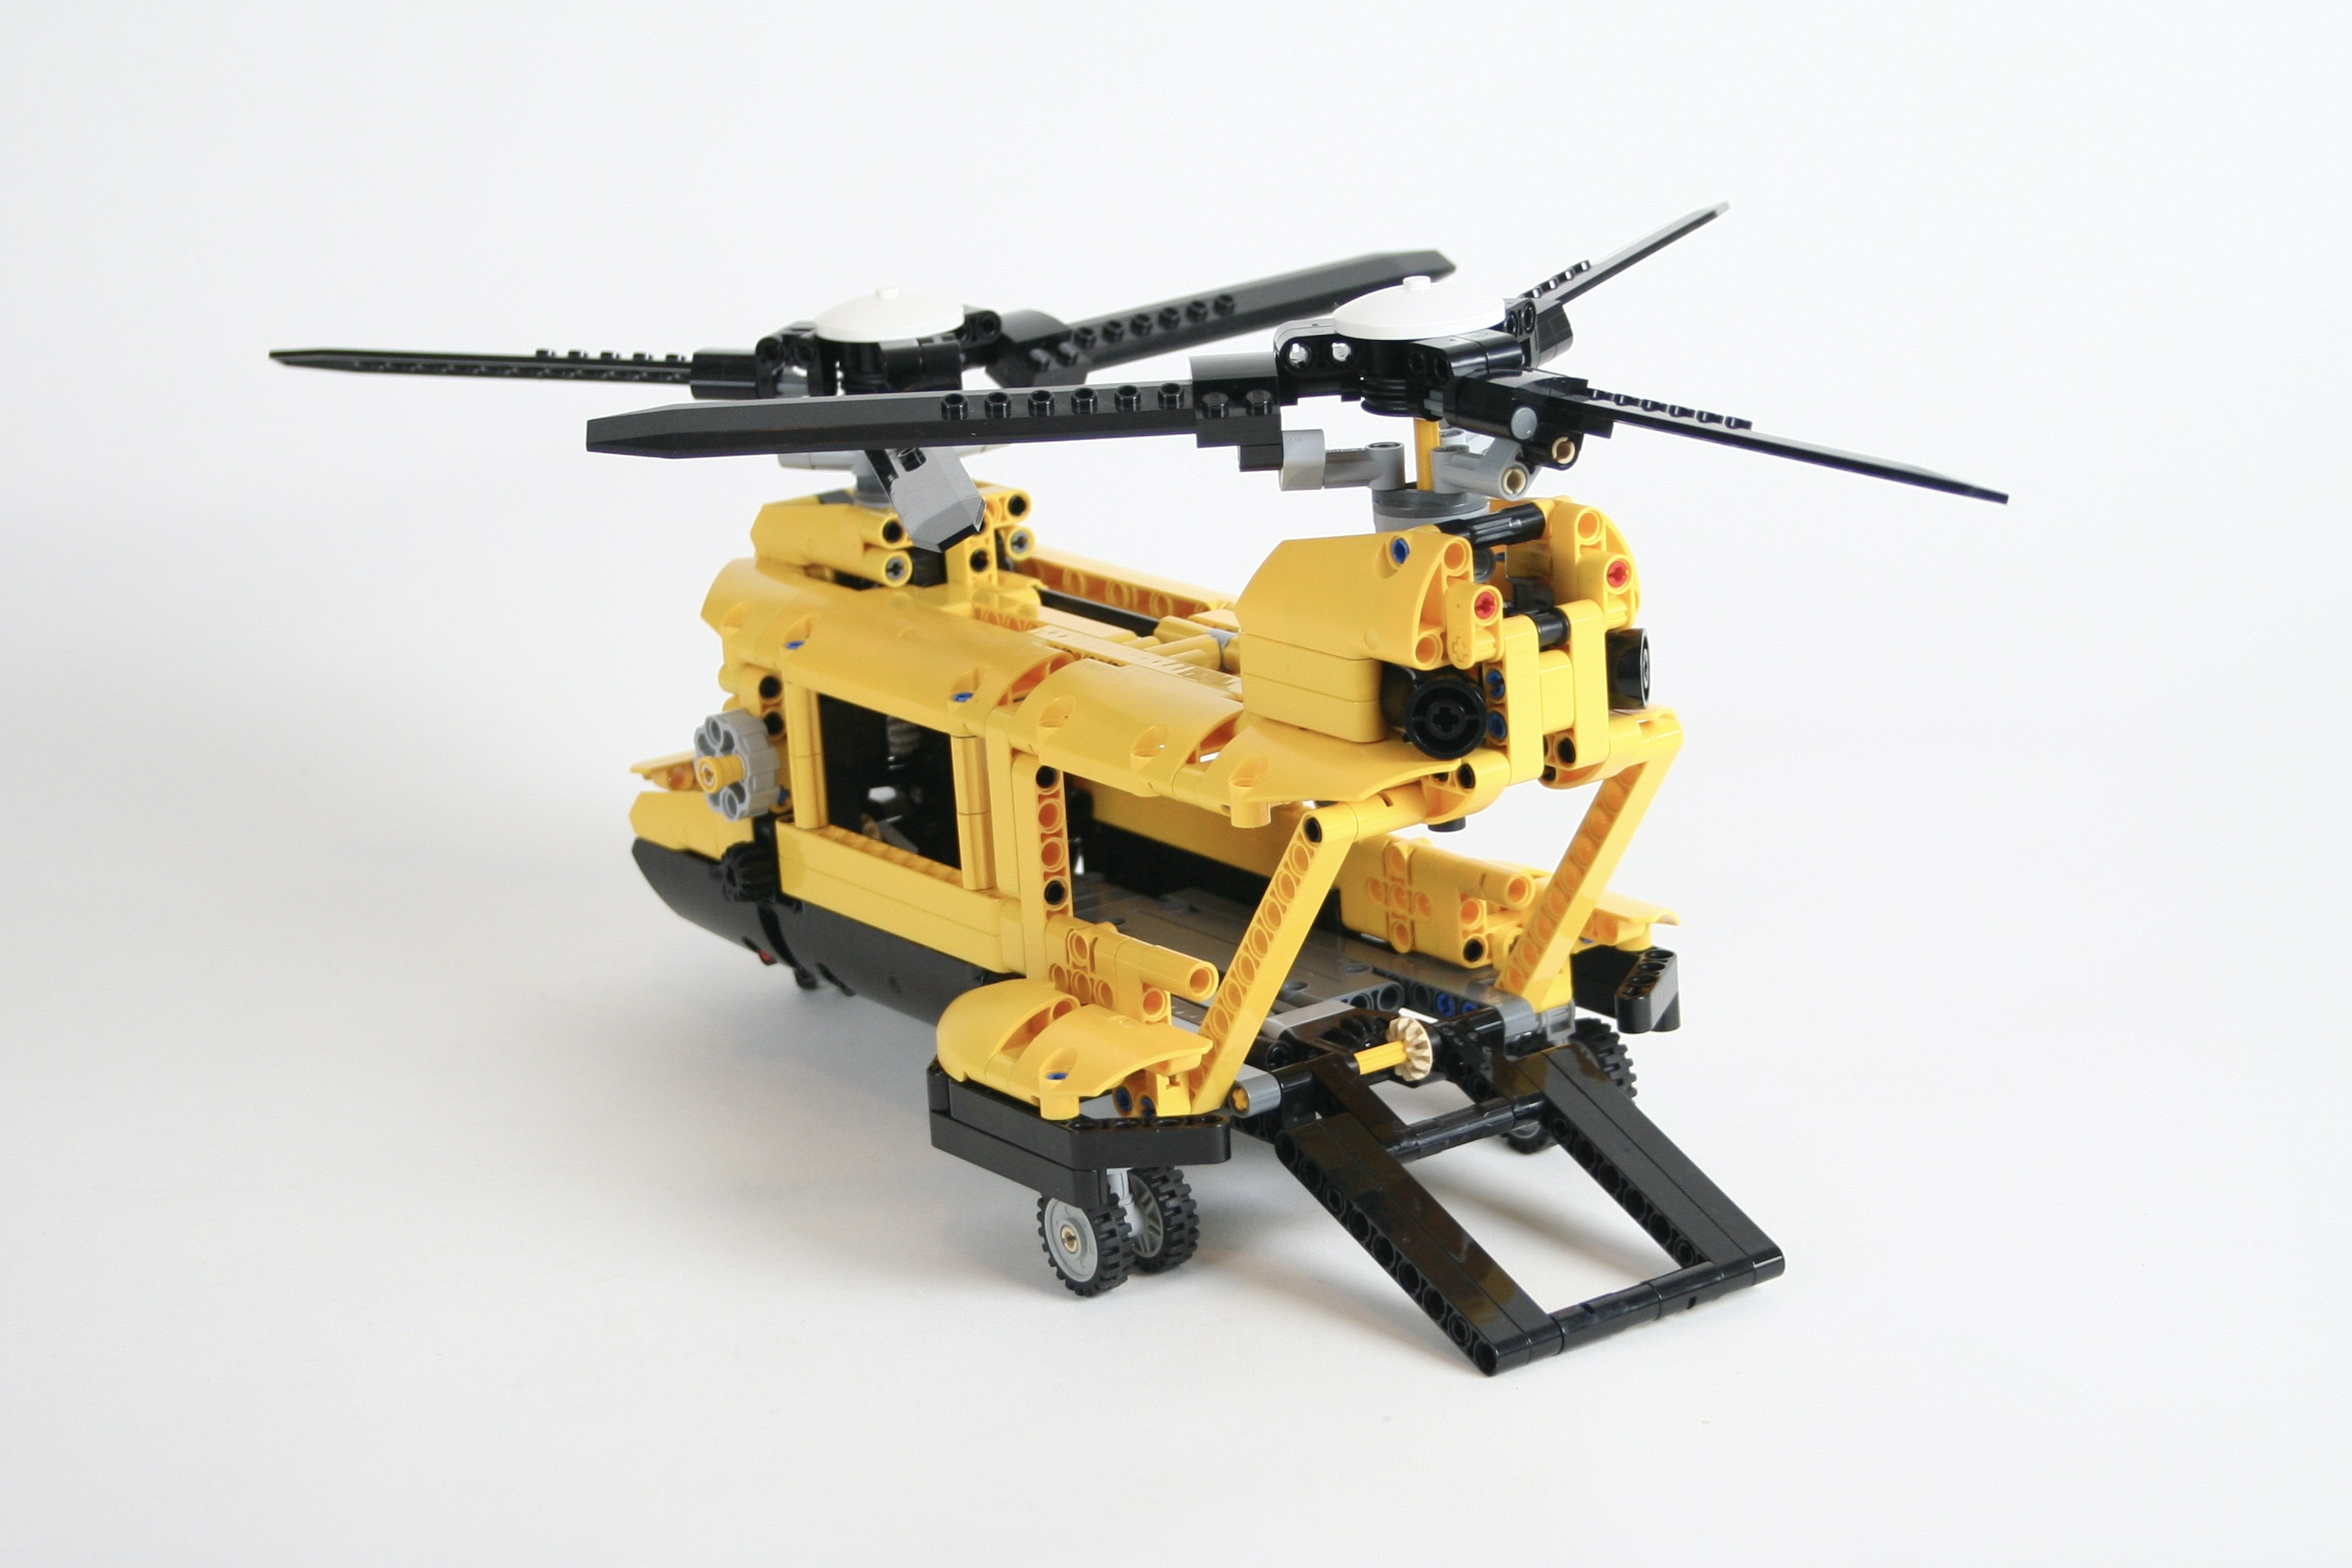
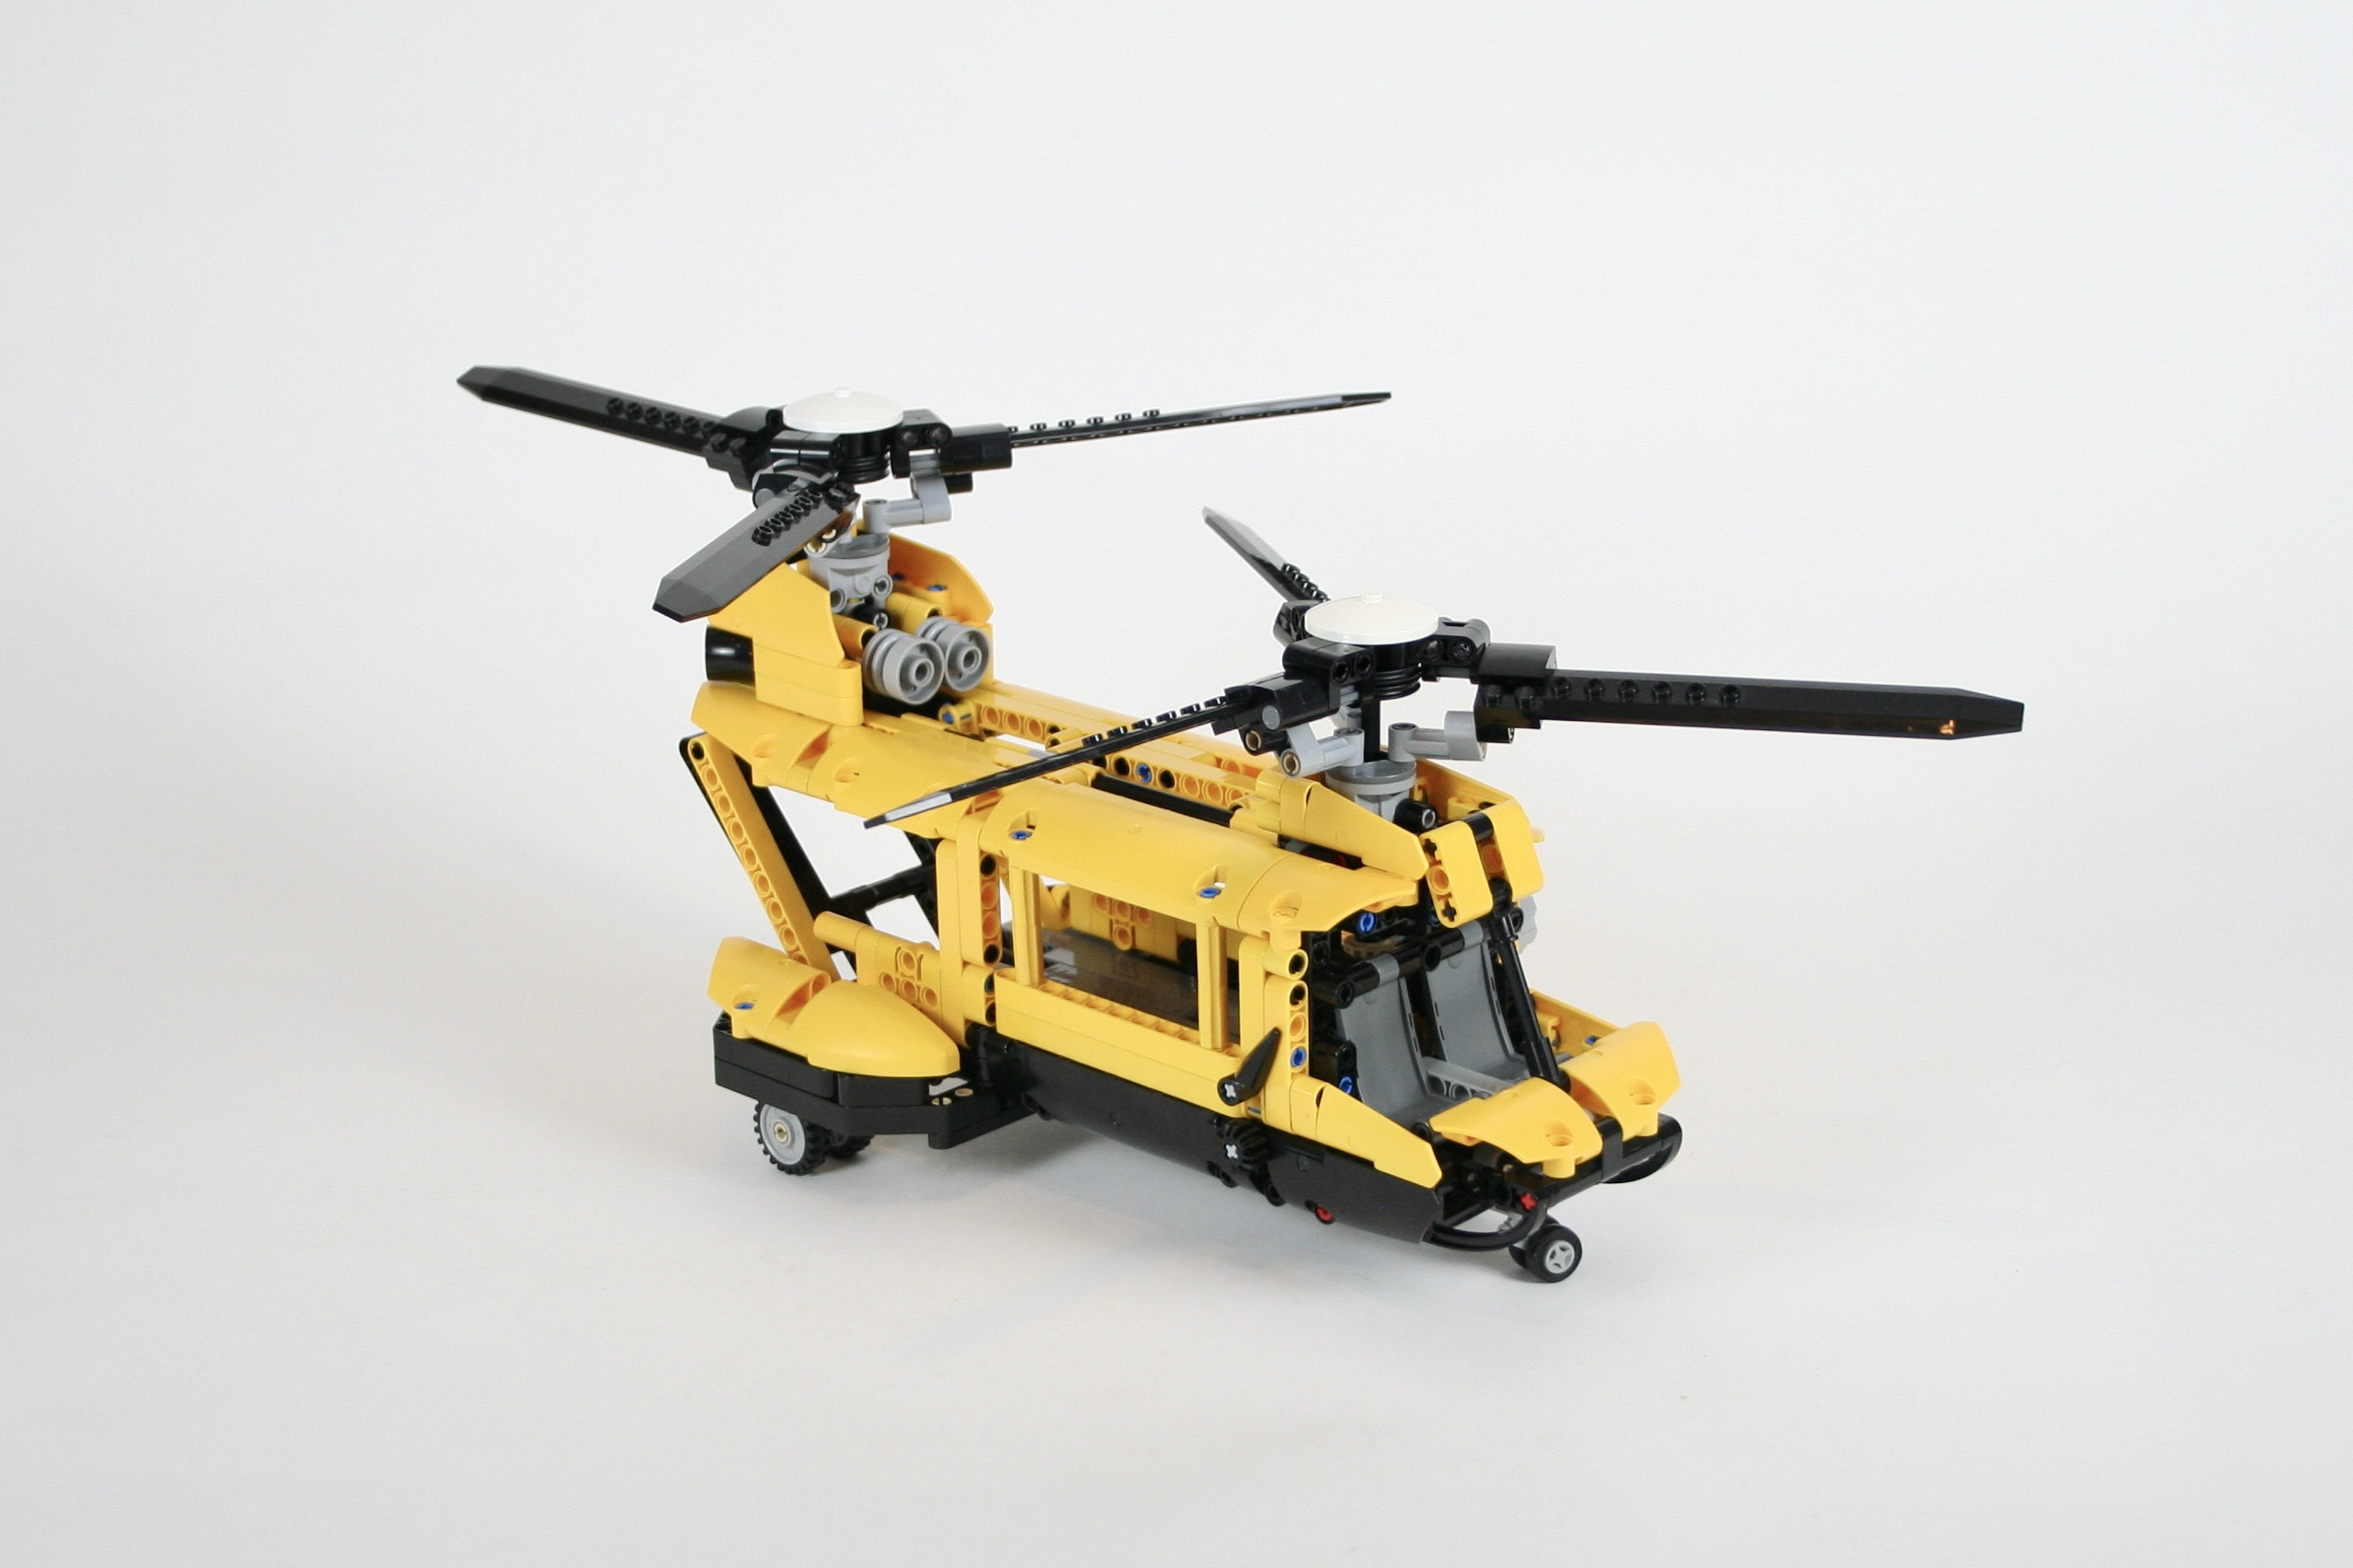
Like the original, a rear ramp is controlled by the HOG of the right of the helicopter. I also added a landing gear that retracts, which is controlled on the left. The front wheel is on a caster, and the rear wheels are fixed. I used many of the panel parts that have been released since 1994 for the body work, and kept the black and yellow livery.
This was simple and relatively quick build, but in the end, it seemed to be missing the look of the original. I think much of it comes down to the shape of the nose. To get the front rotor to fit with the rear rotor, I had to push it forward in such a way that the front windscreen needed to be a little more steep than 8062 was. But all the functions worked well which is always gratifying. I hope you enjoy.
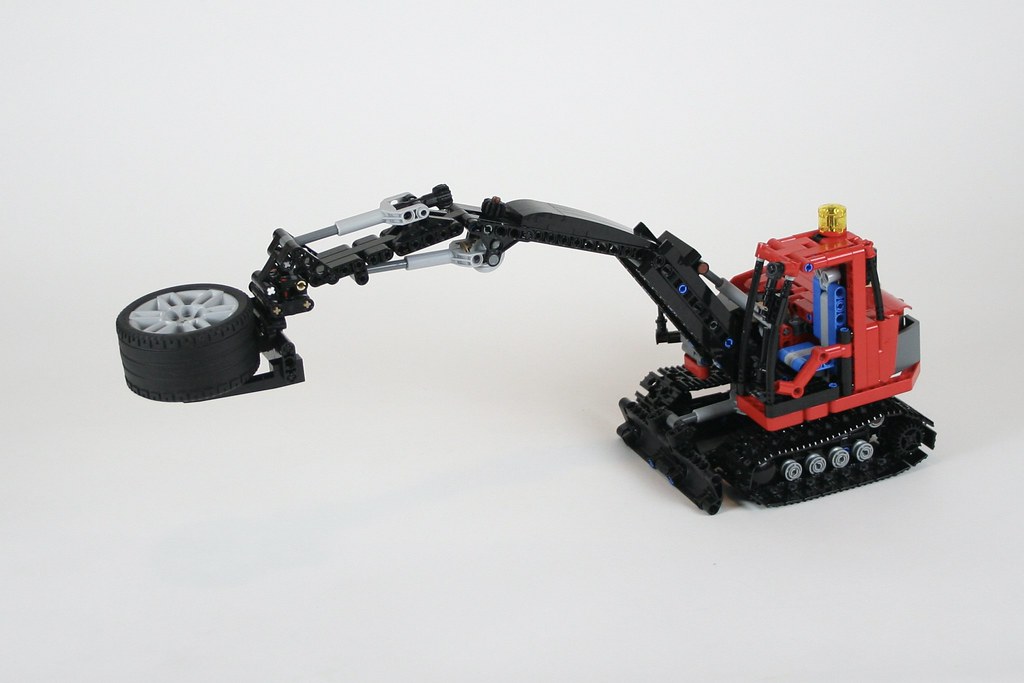
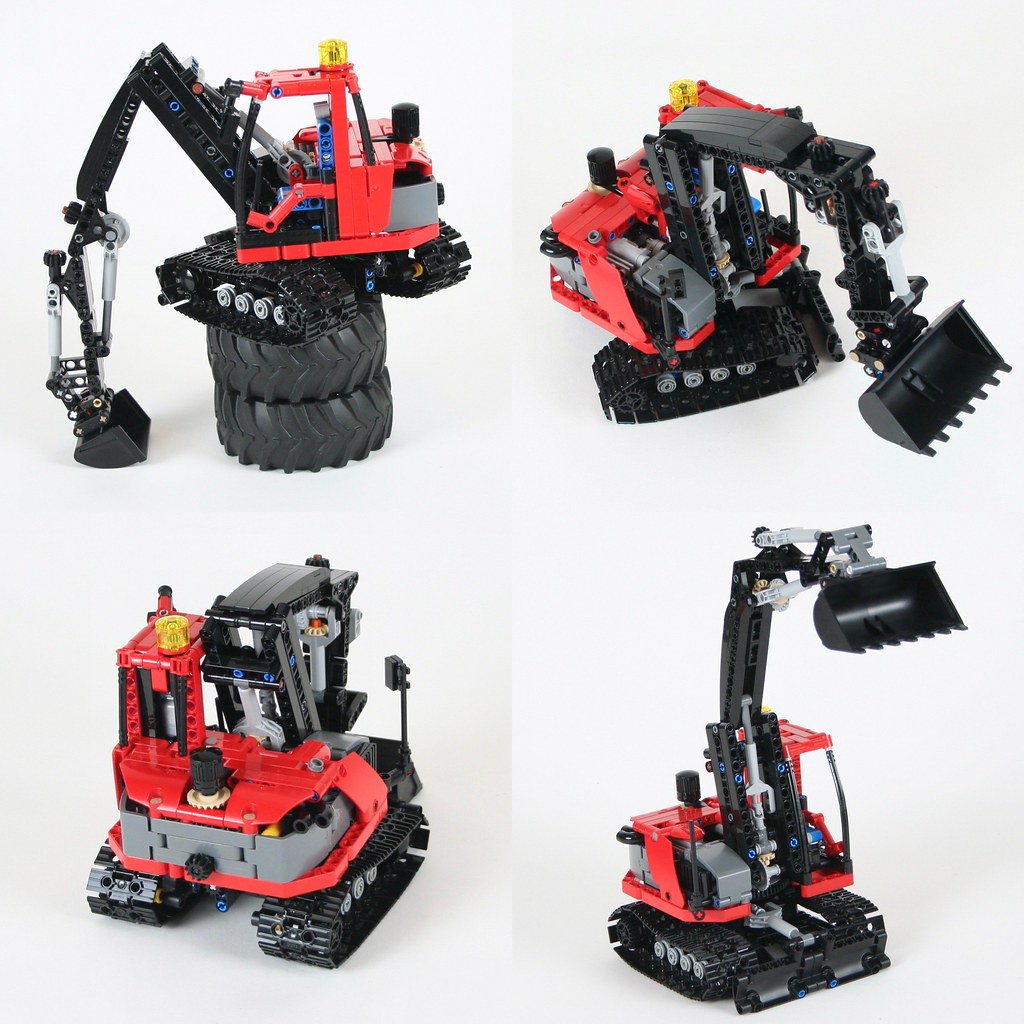
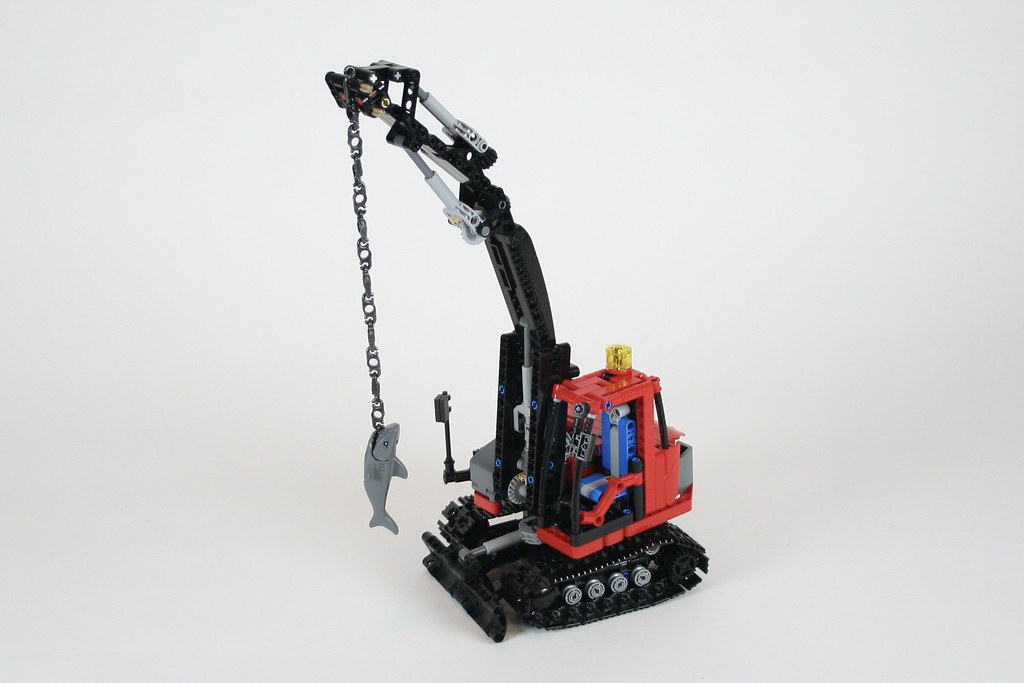
For the Eurobricks TC22 contest, Steph77 designed a little excavator that I loved. With their permission I asked if I could expand on the build, and turn it into my own creation. What attracted me to the design the simplicity of the digging arm, and of course the size. I also liked the inclusion of the fake engine on the superstructure. I rebuilt the arm, and started paying around with it.
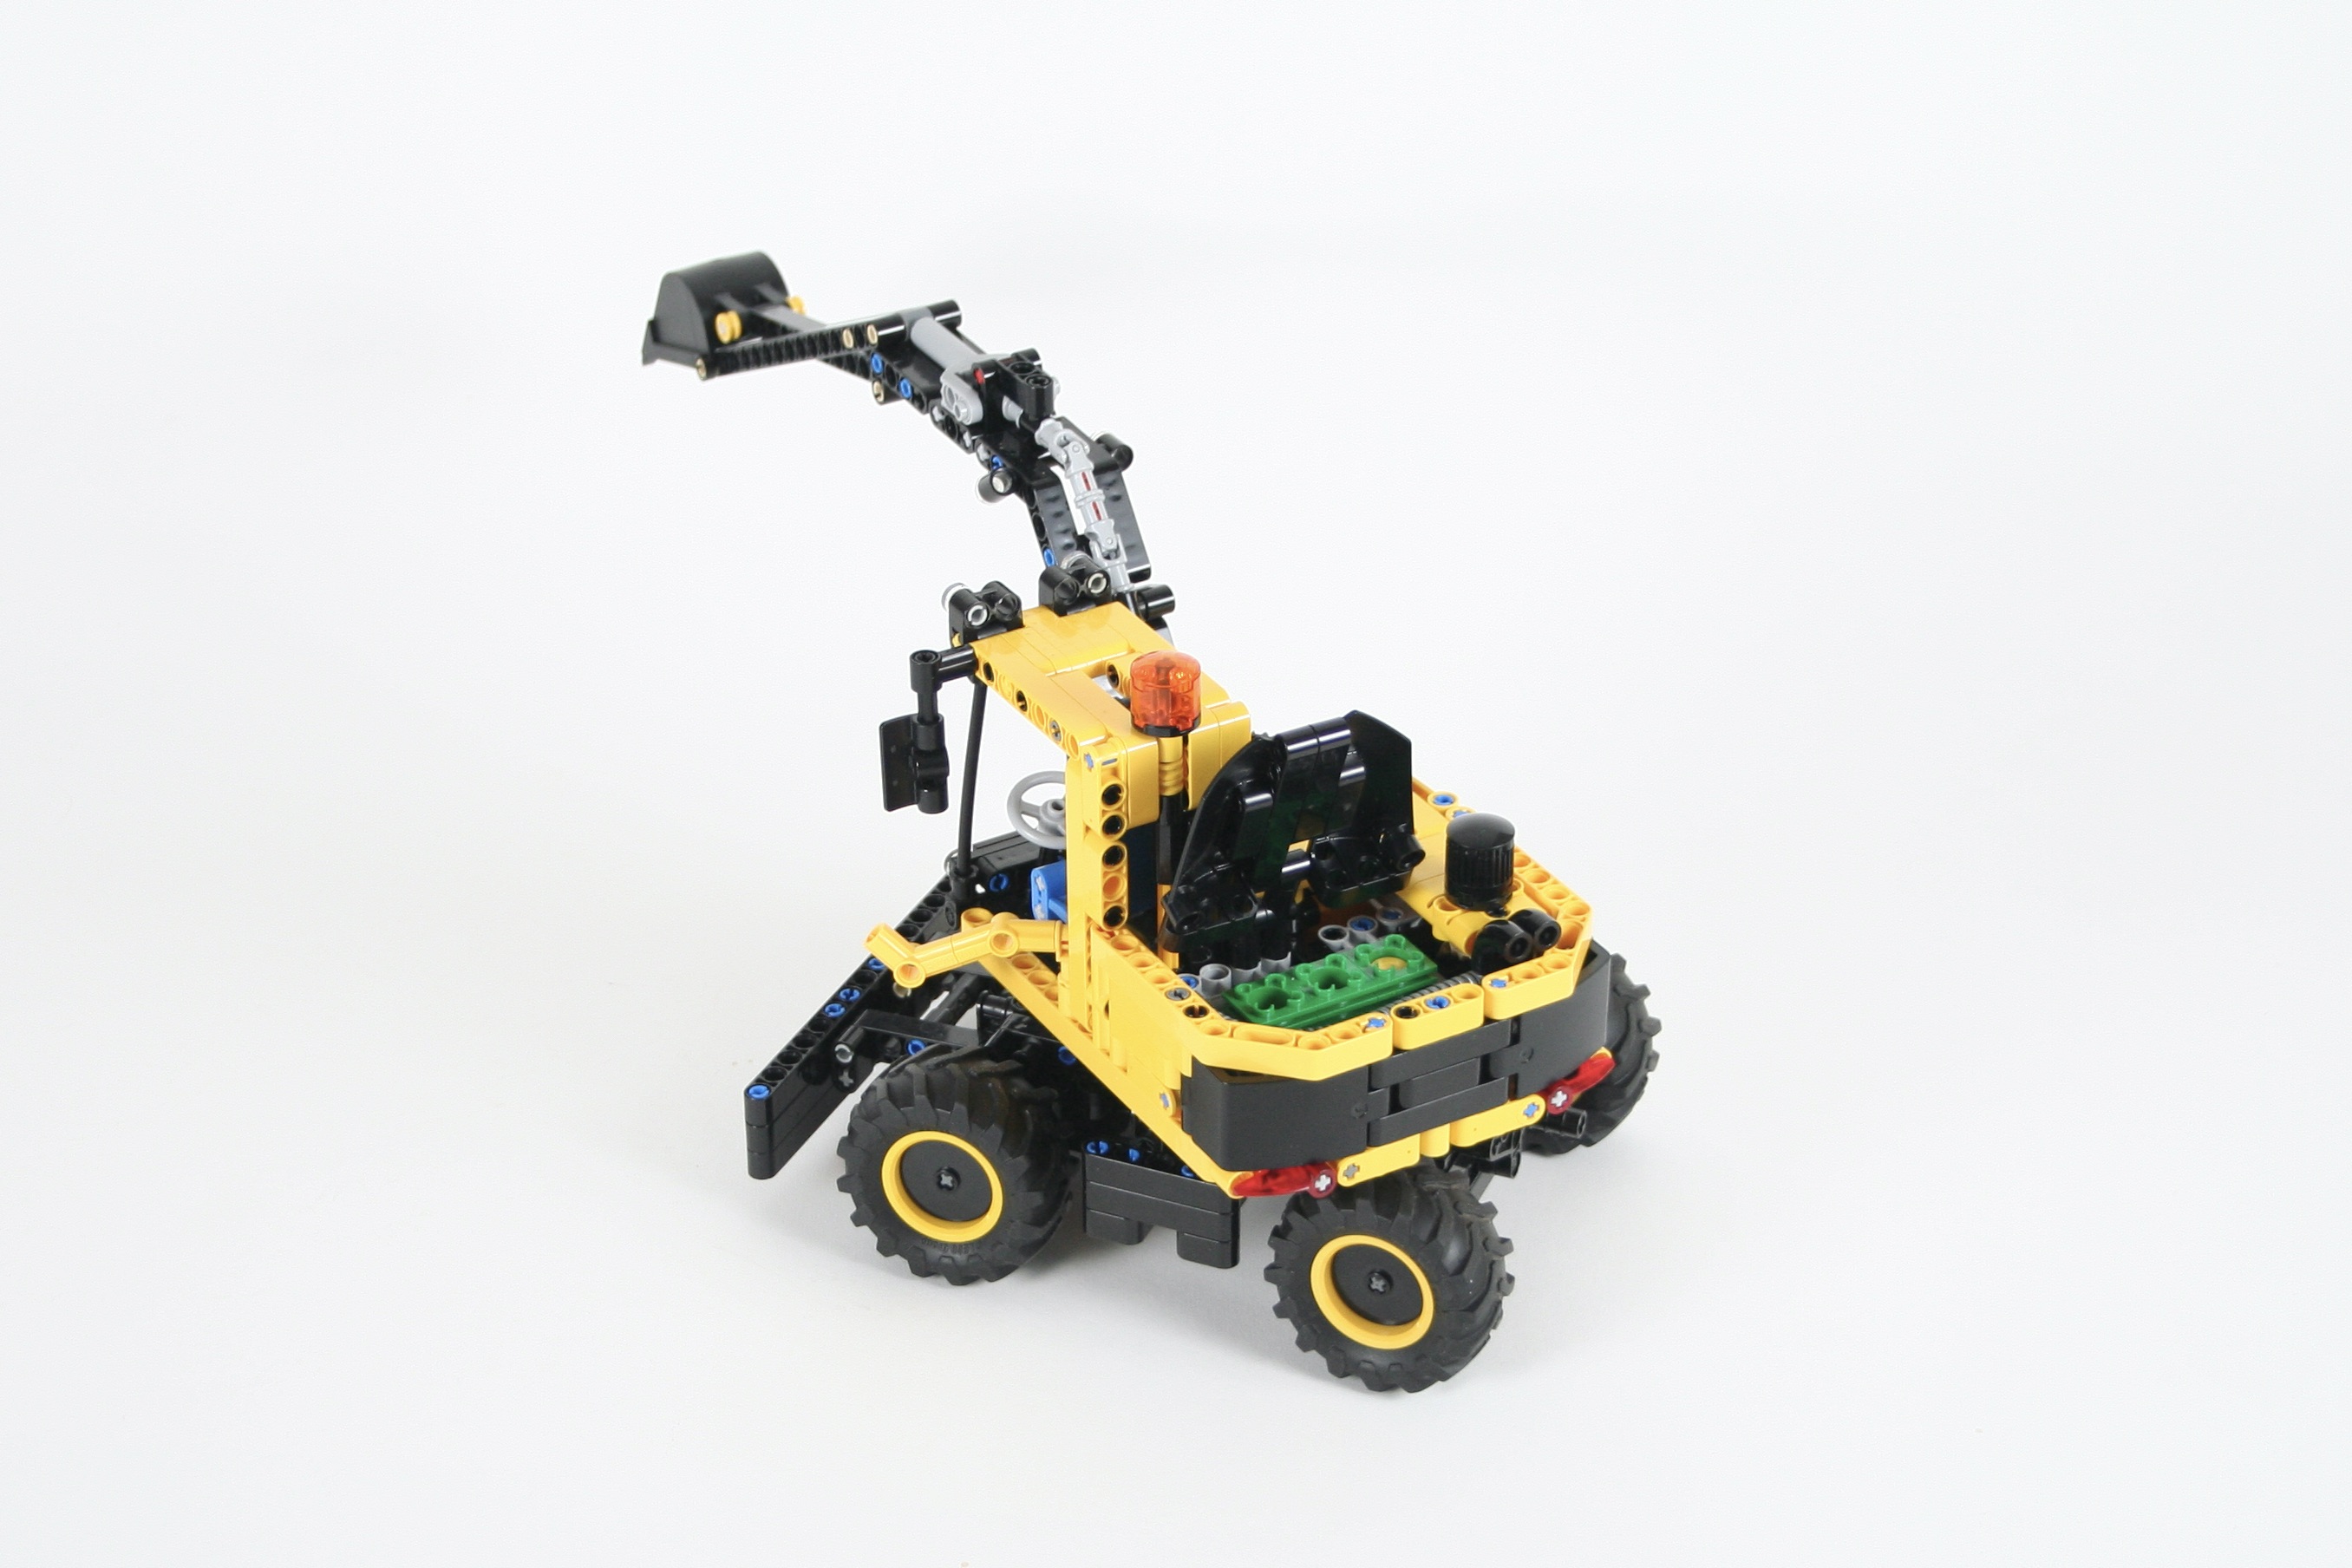
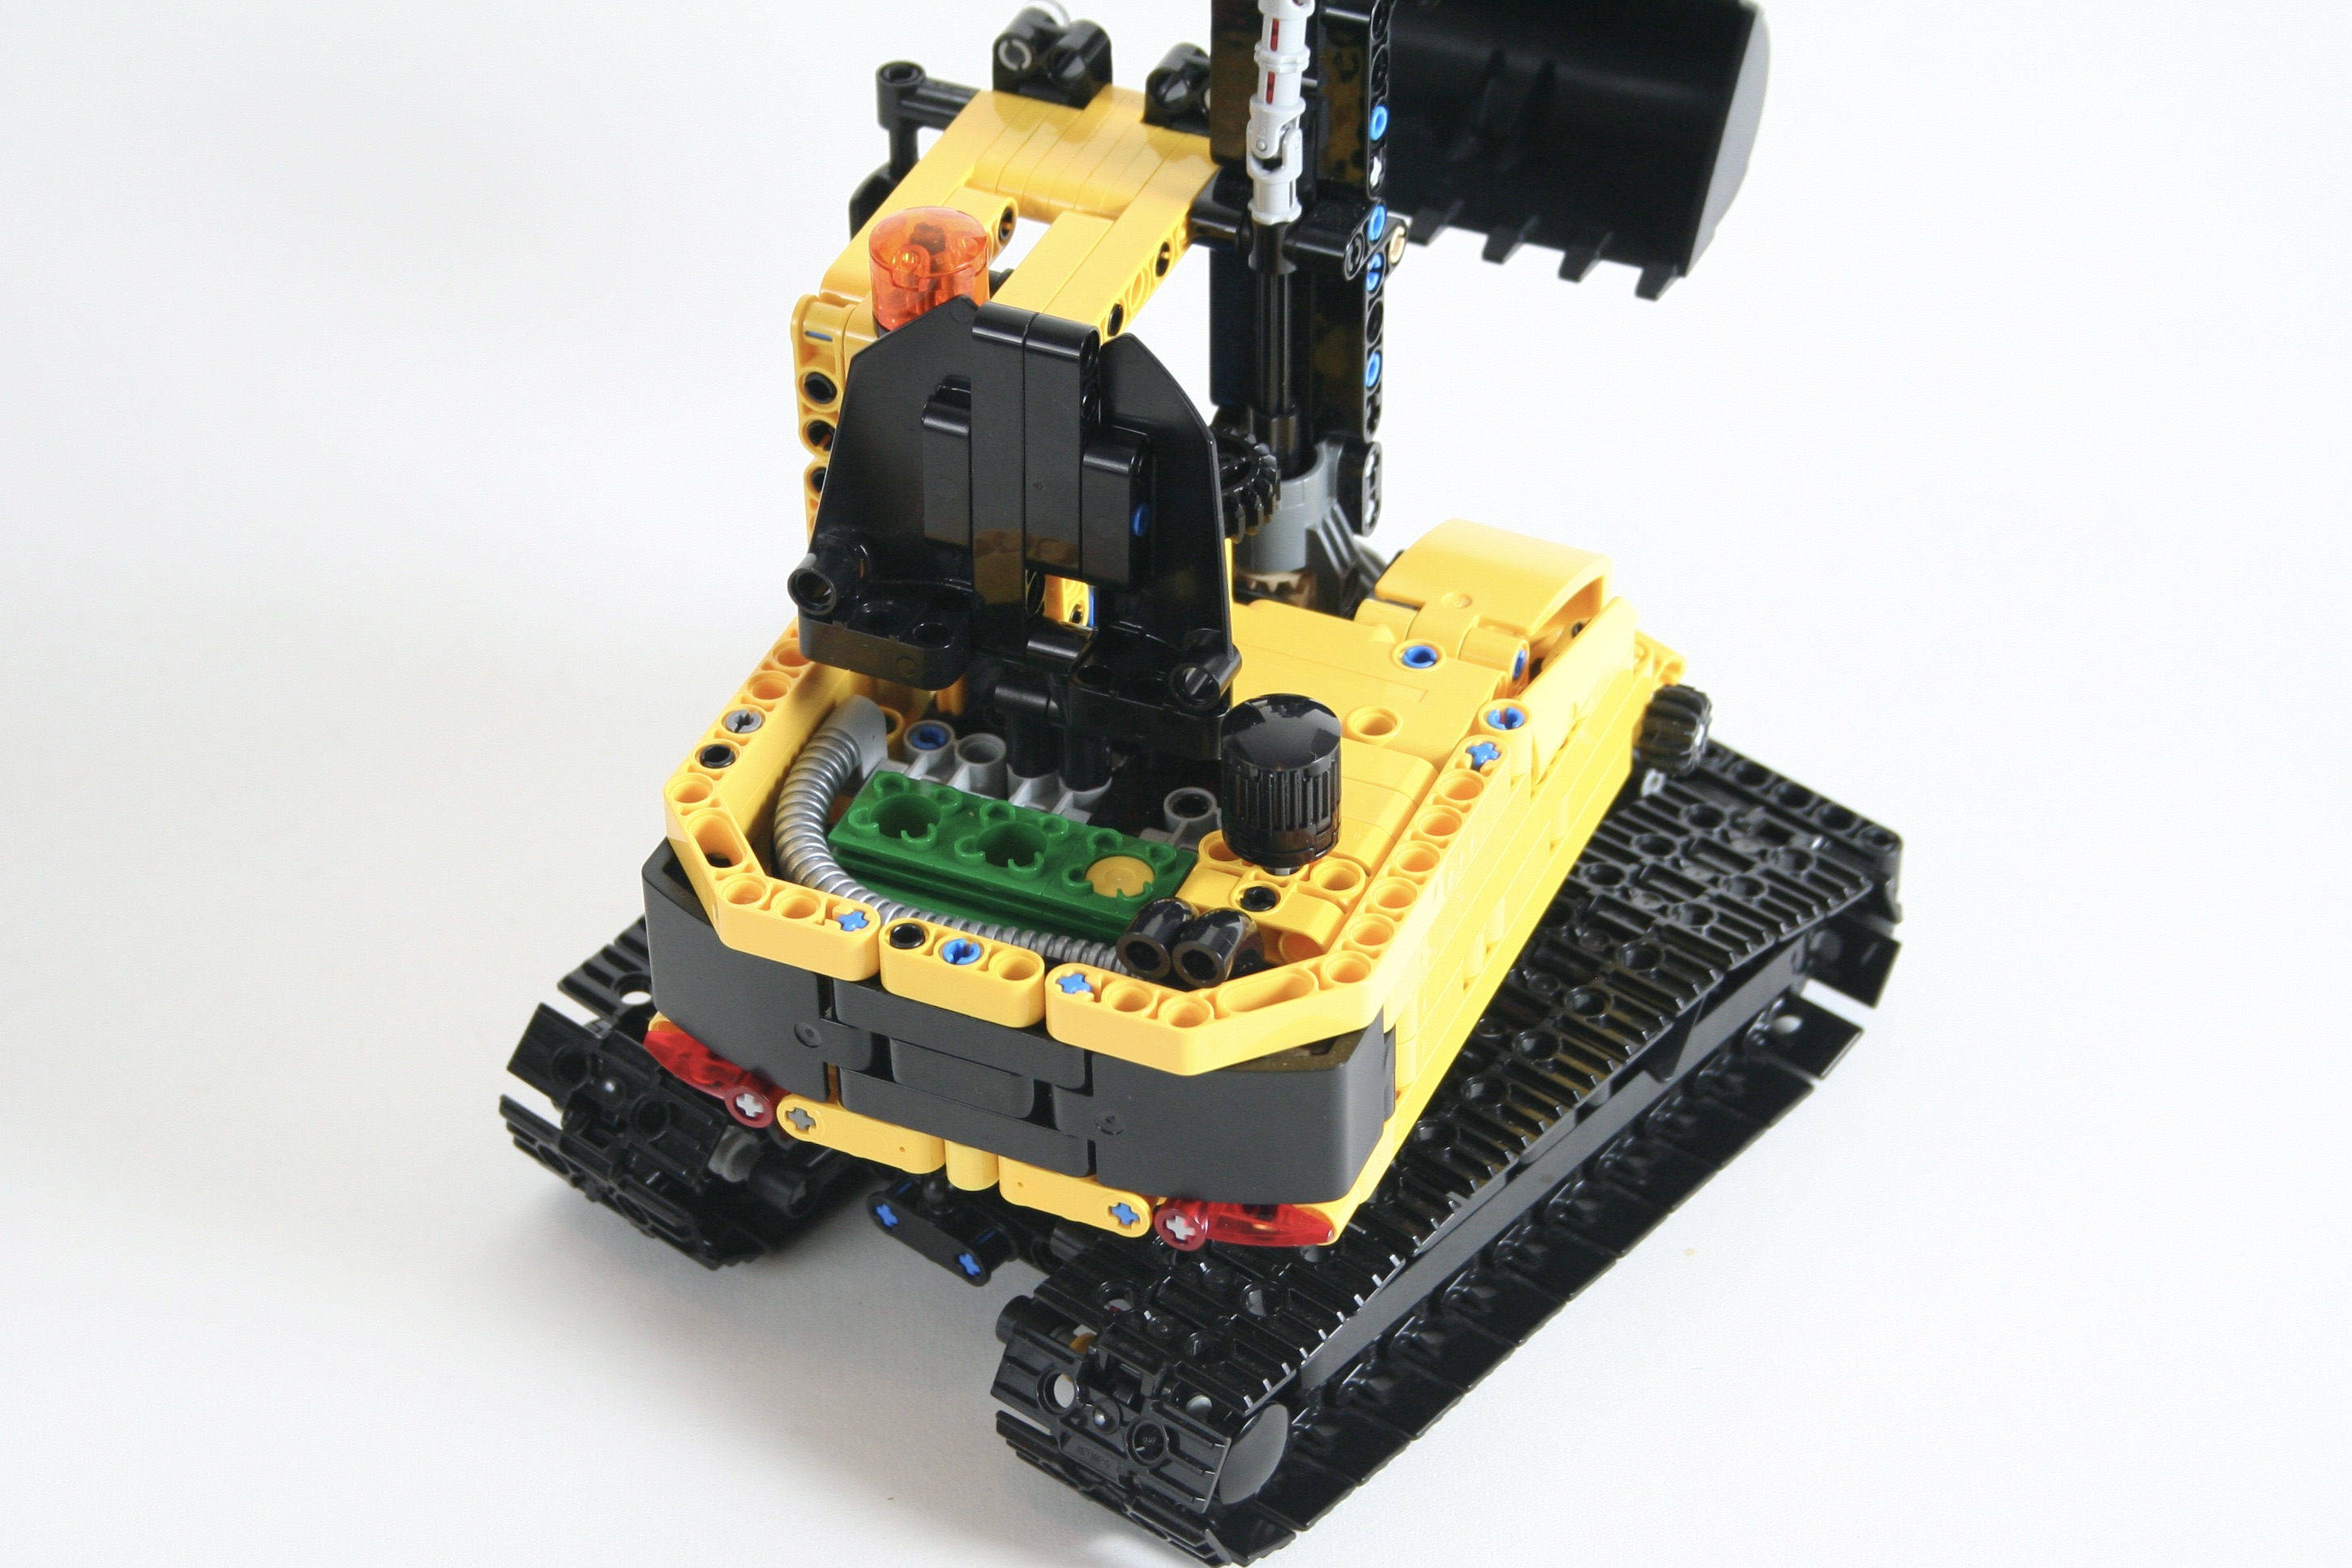
I had just completed the Skid Excavator, so I was interested in building an excavator with similar features. The arm was already designed by Steph77, so I needed to decide where I wanted the HOG knobs to be. I decided on the main boom to be controlled on the side, and the secondary boom to be controlled by a fake air intake on the superstructure. This HOG would also power the fake I3 engine located on the rear of the superstructure. A light at the top of the cabin controls the slewing.
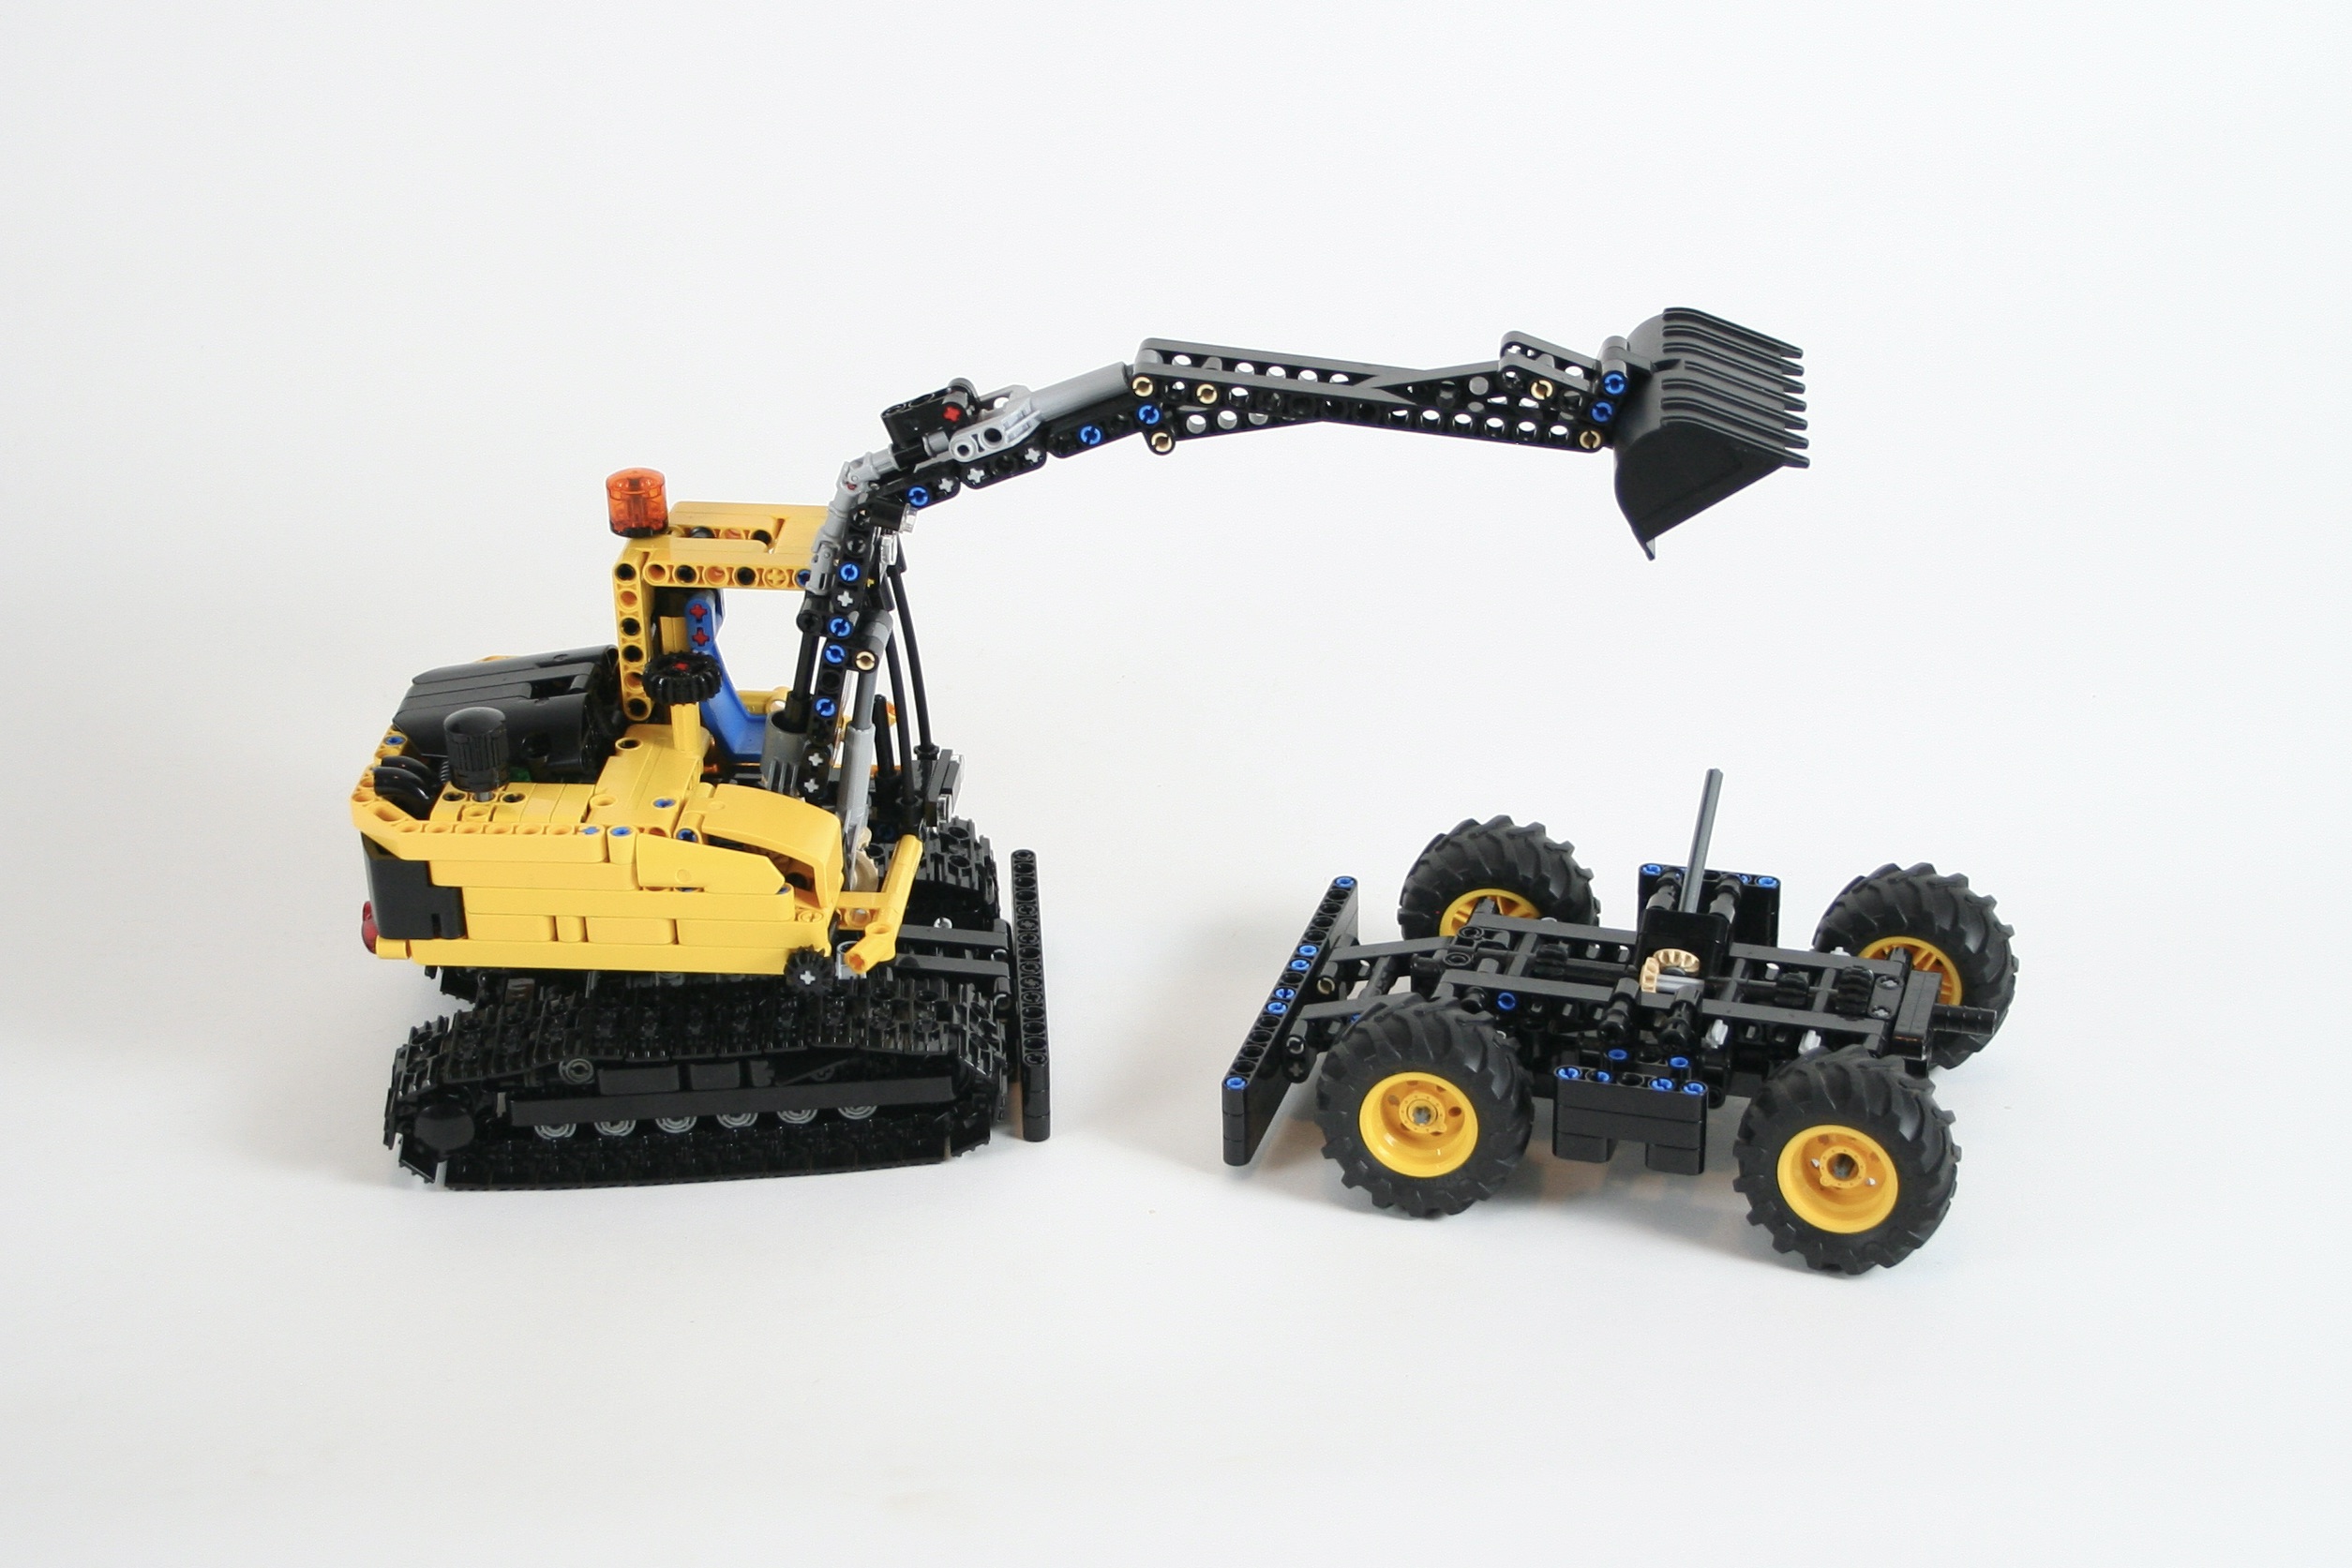
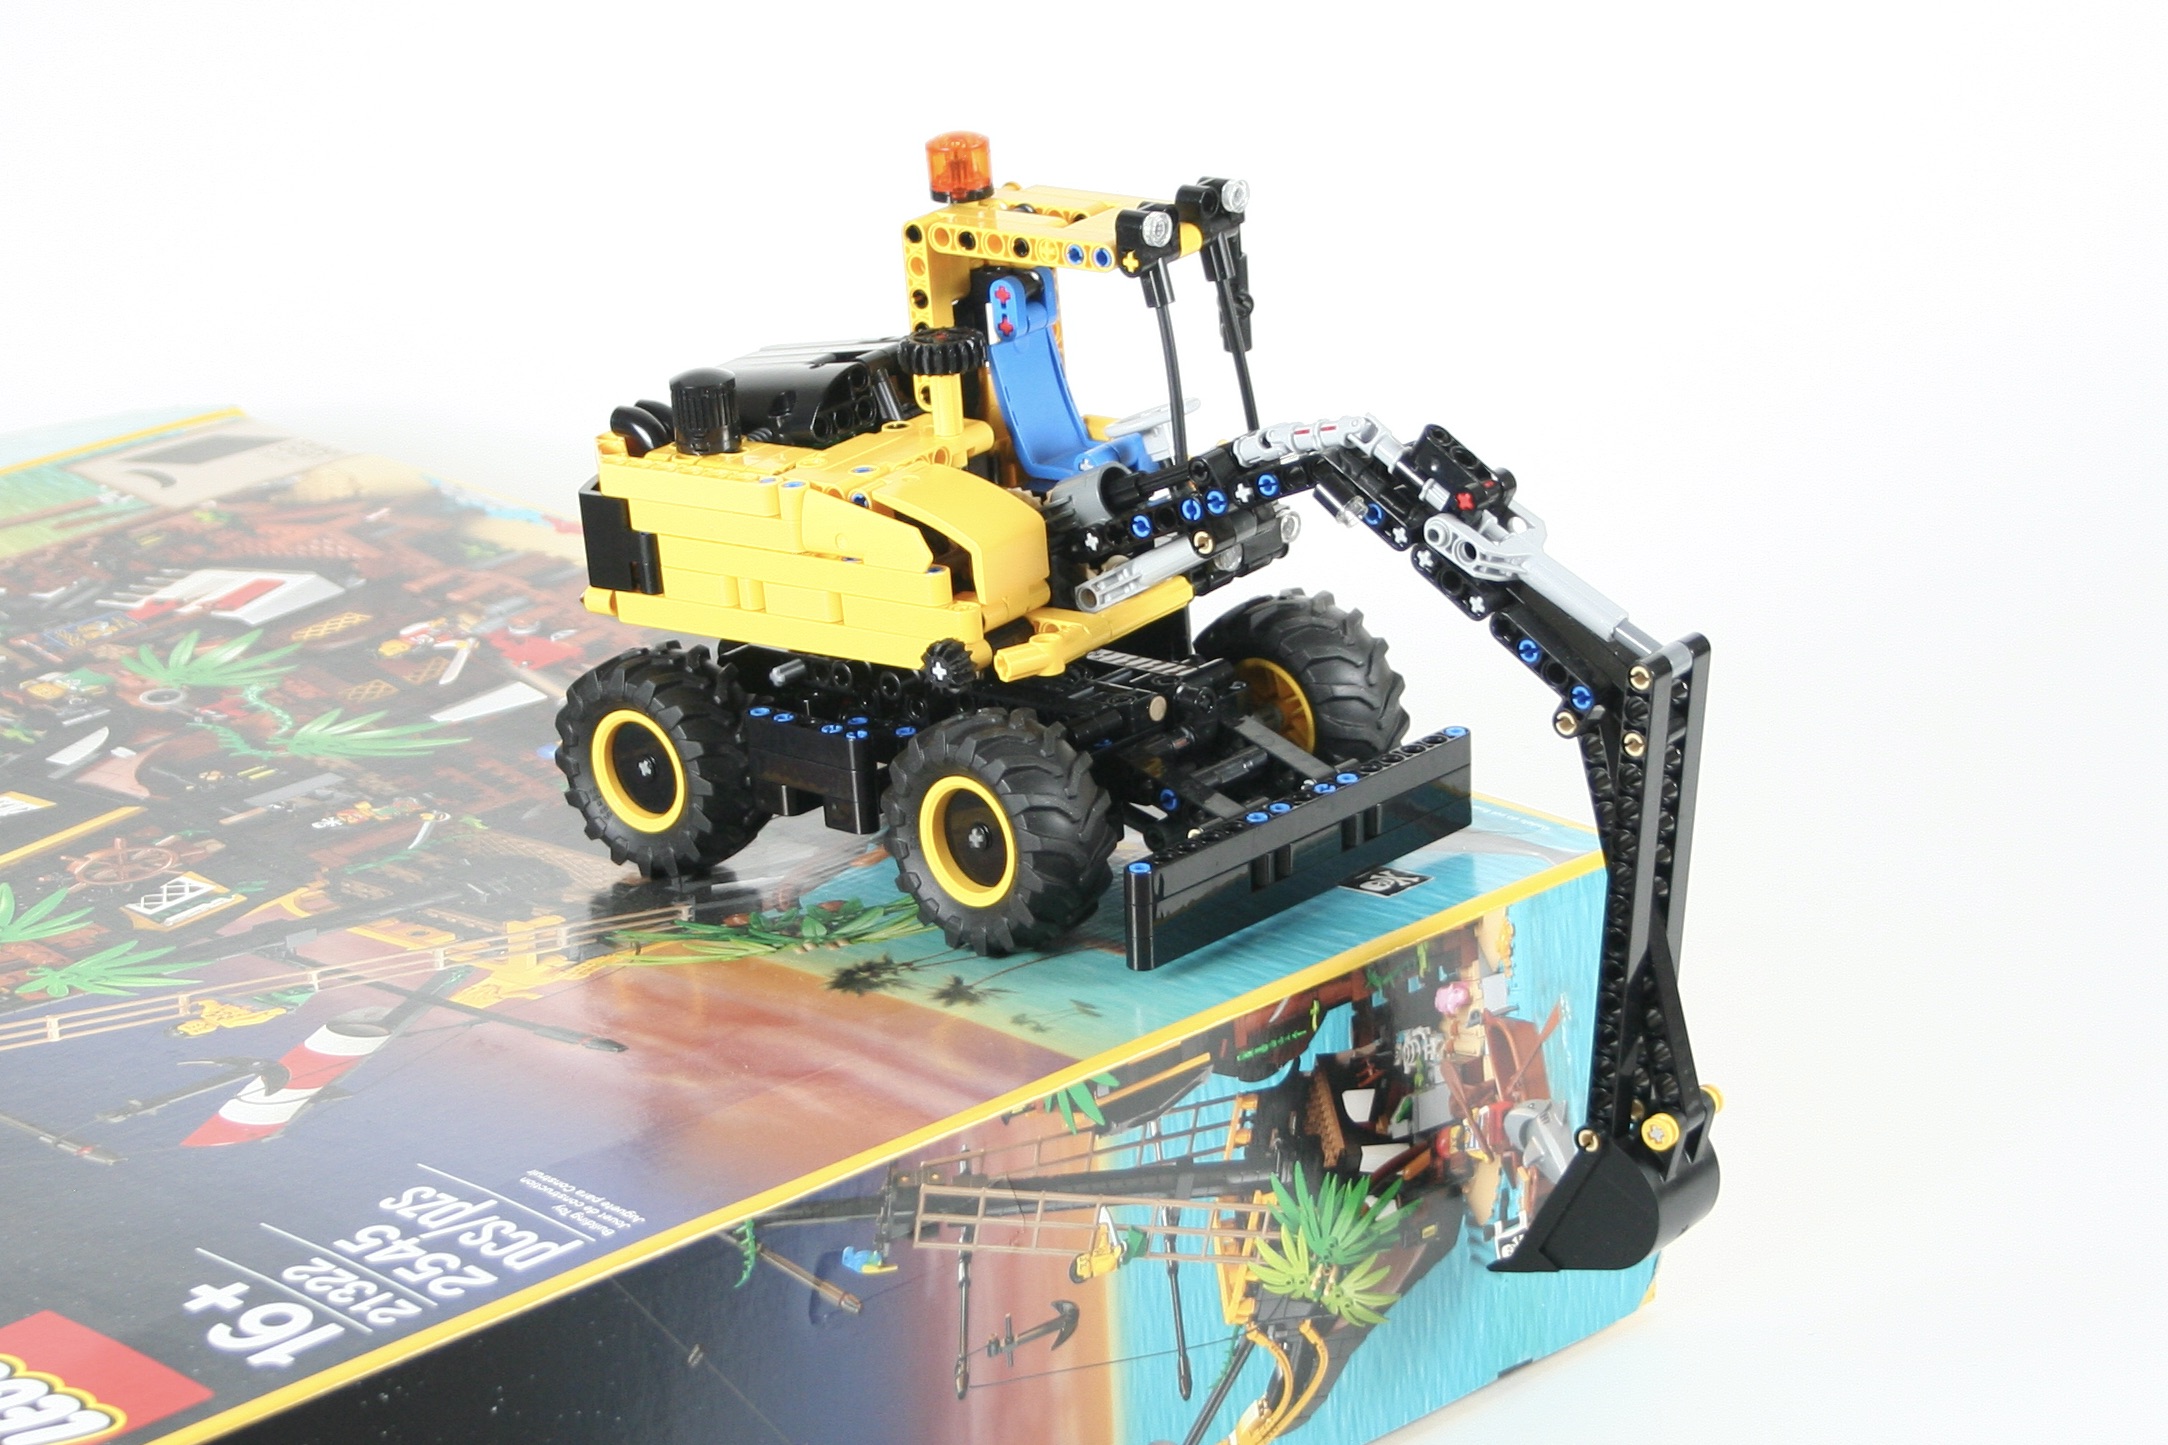
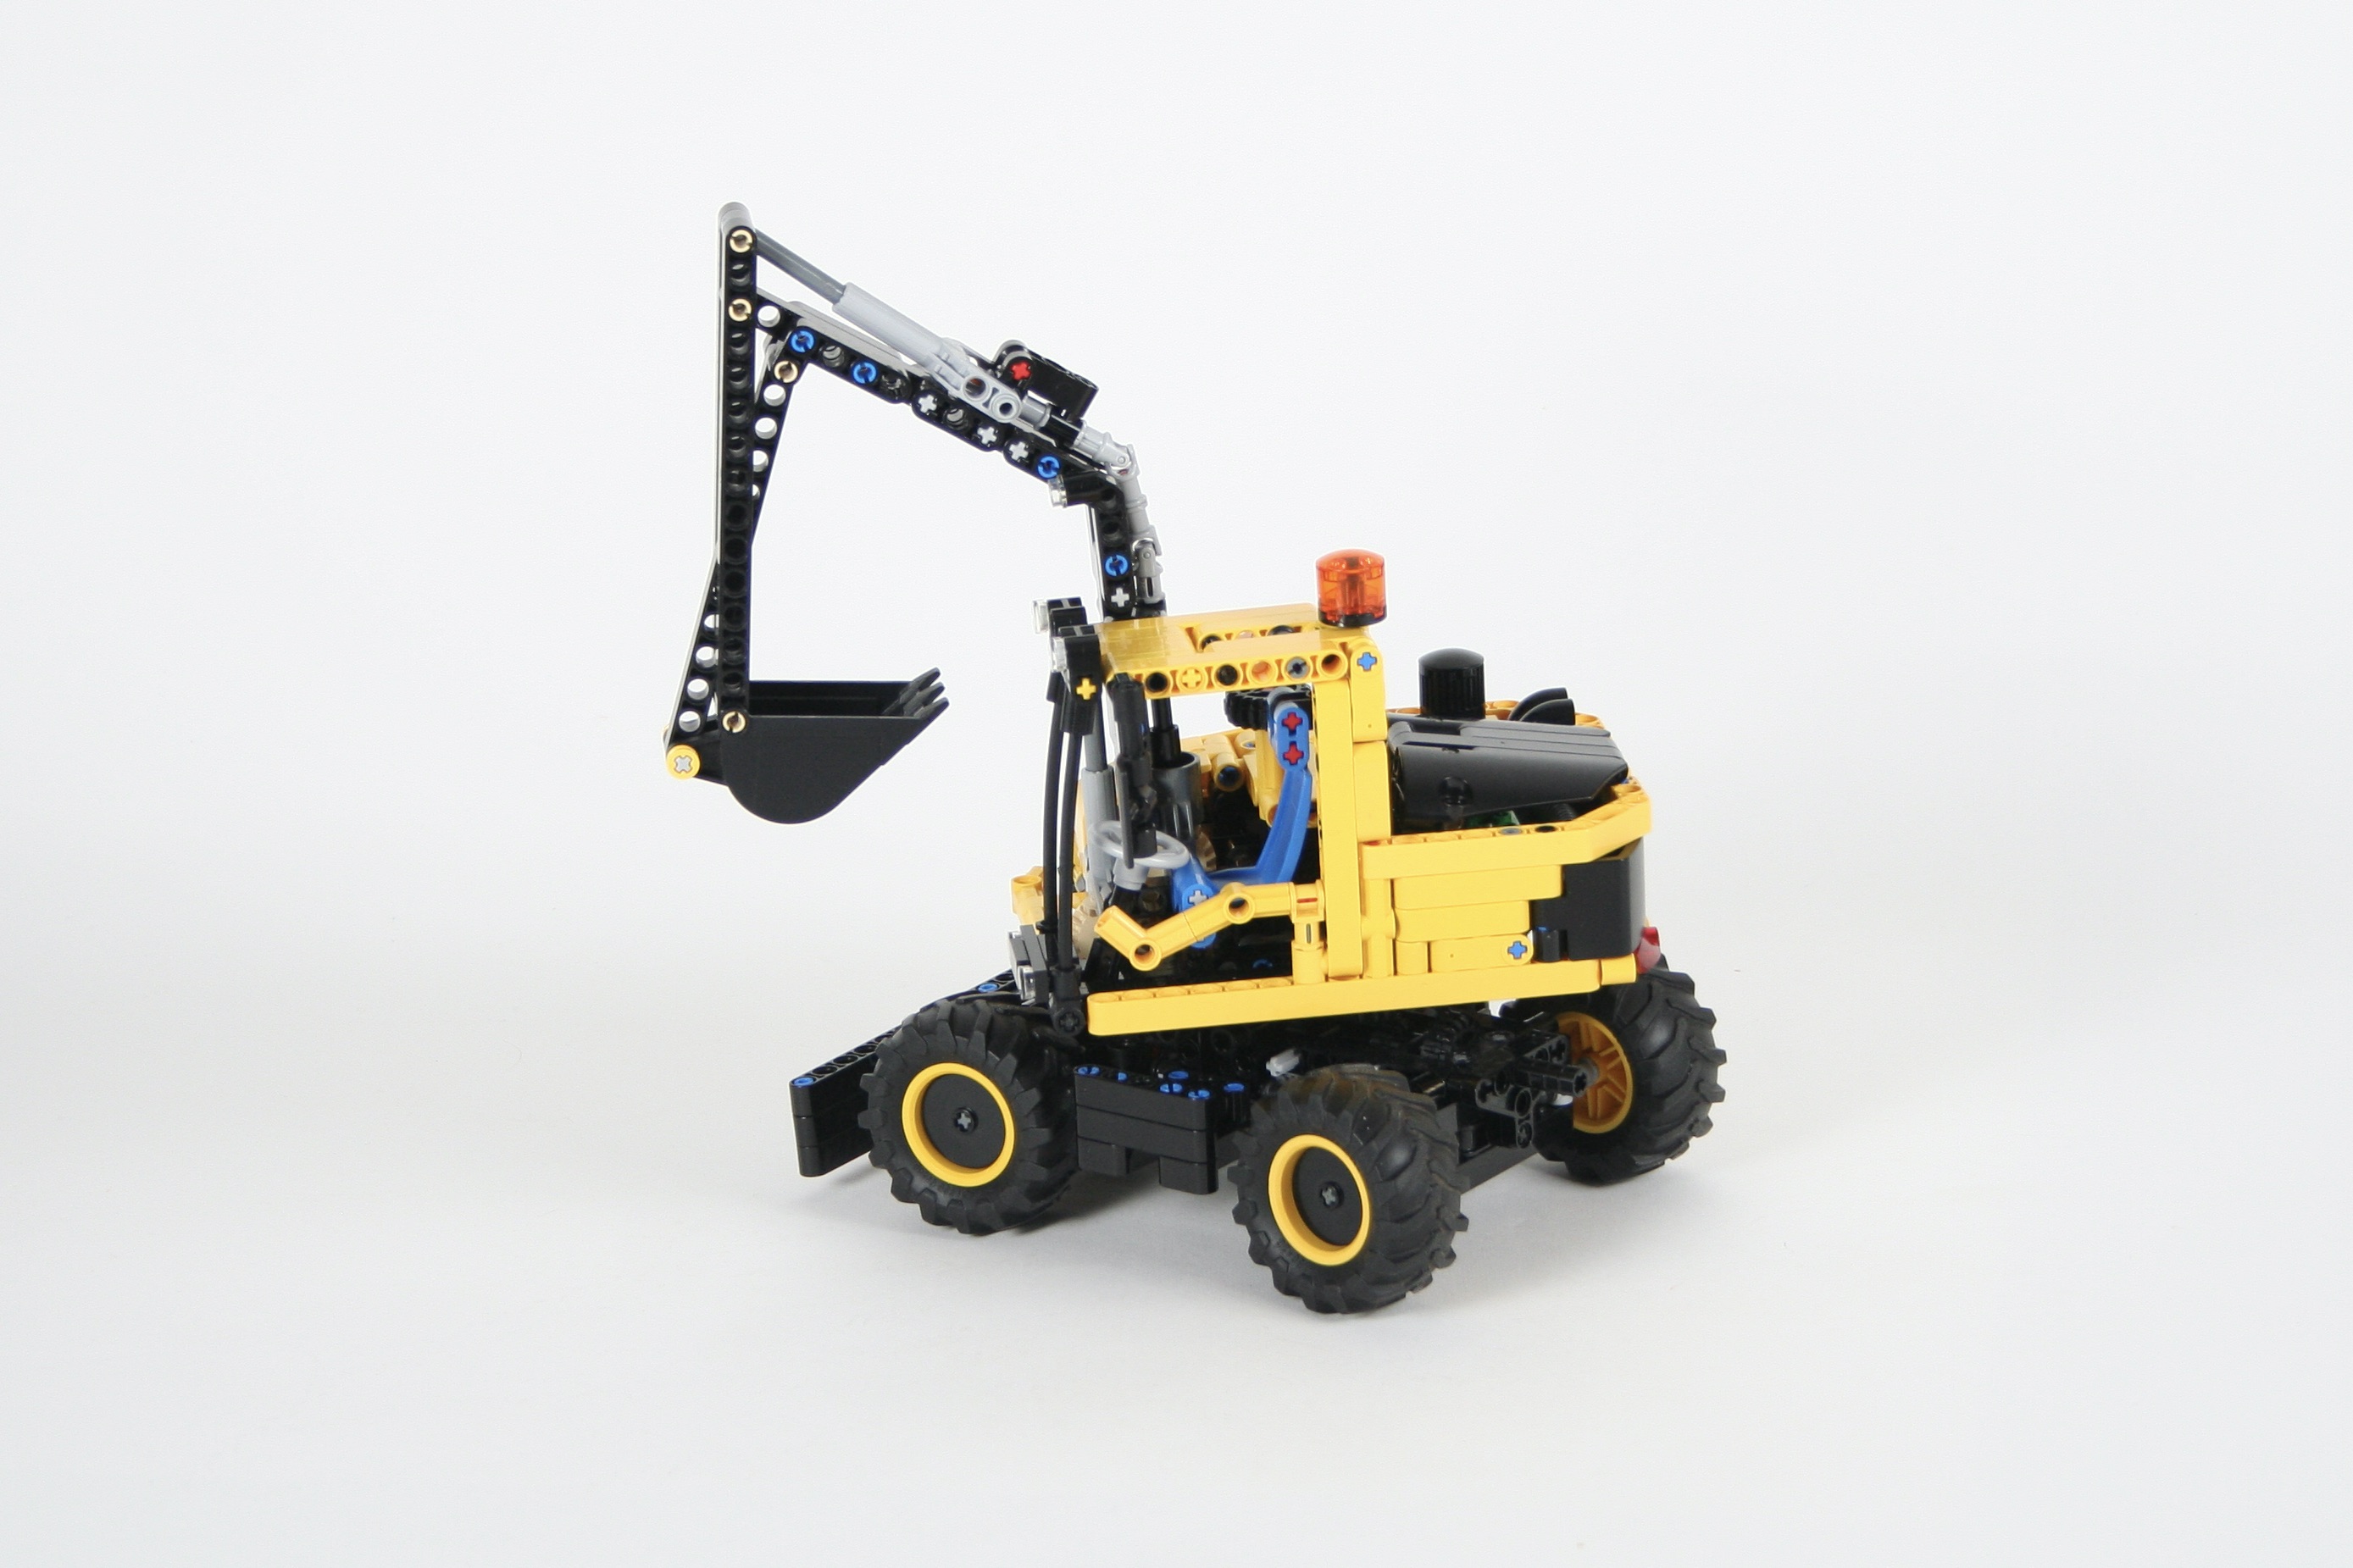
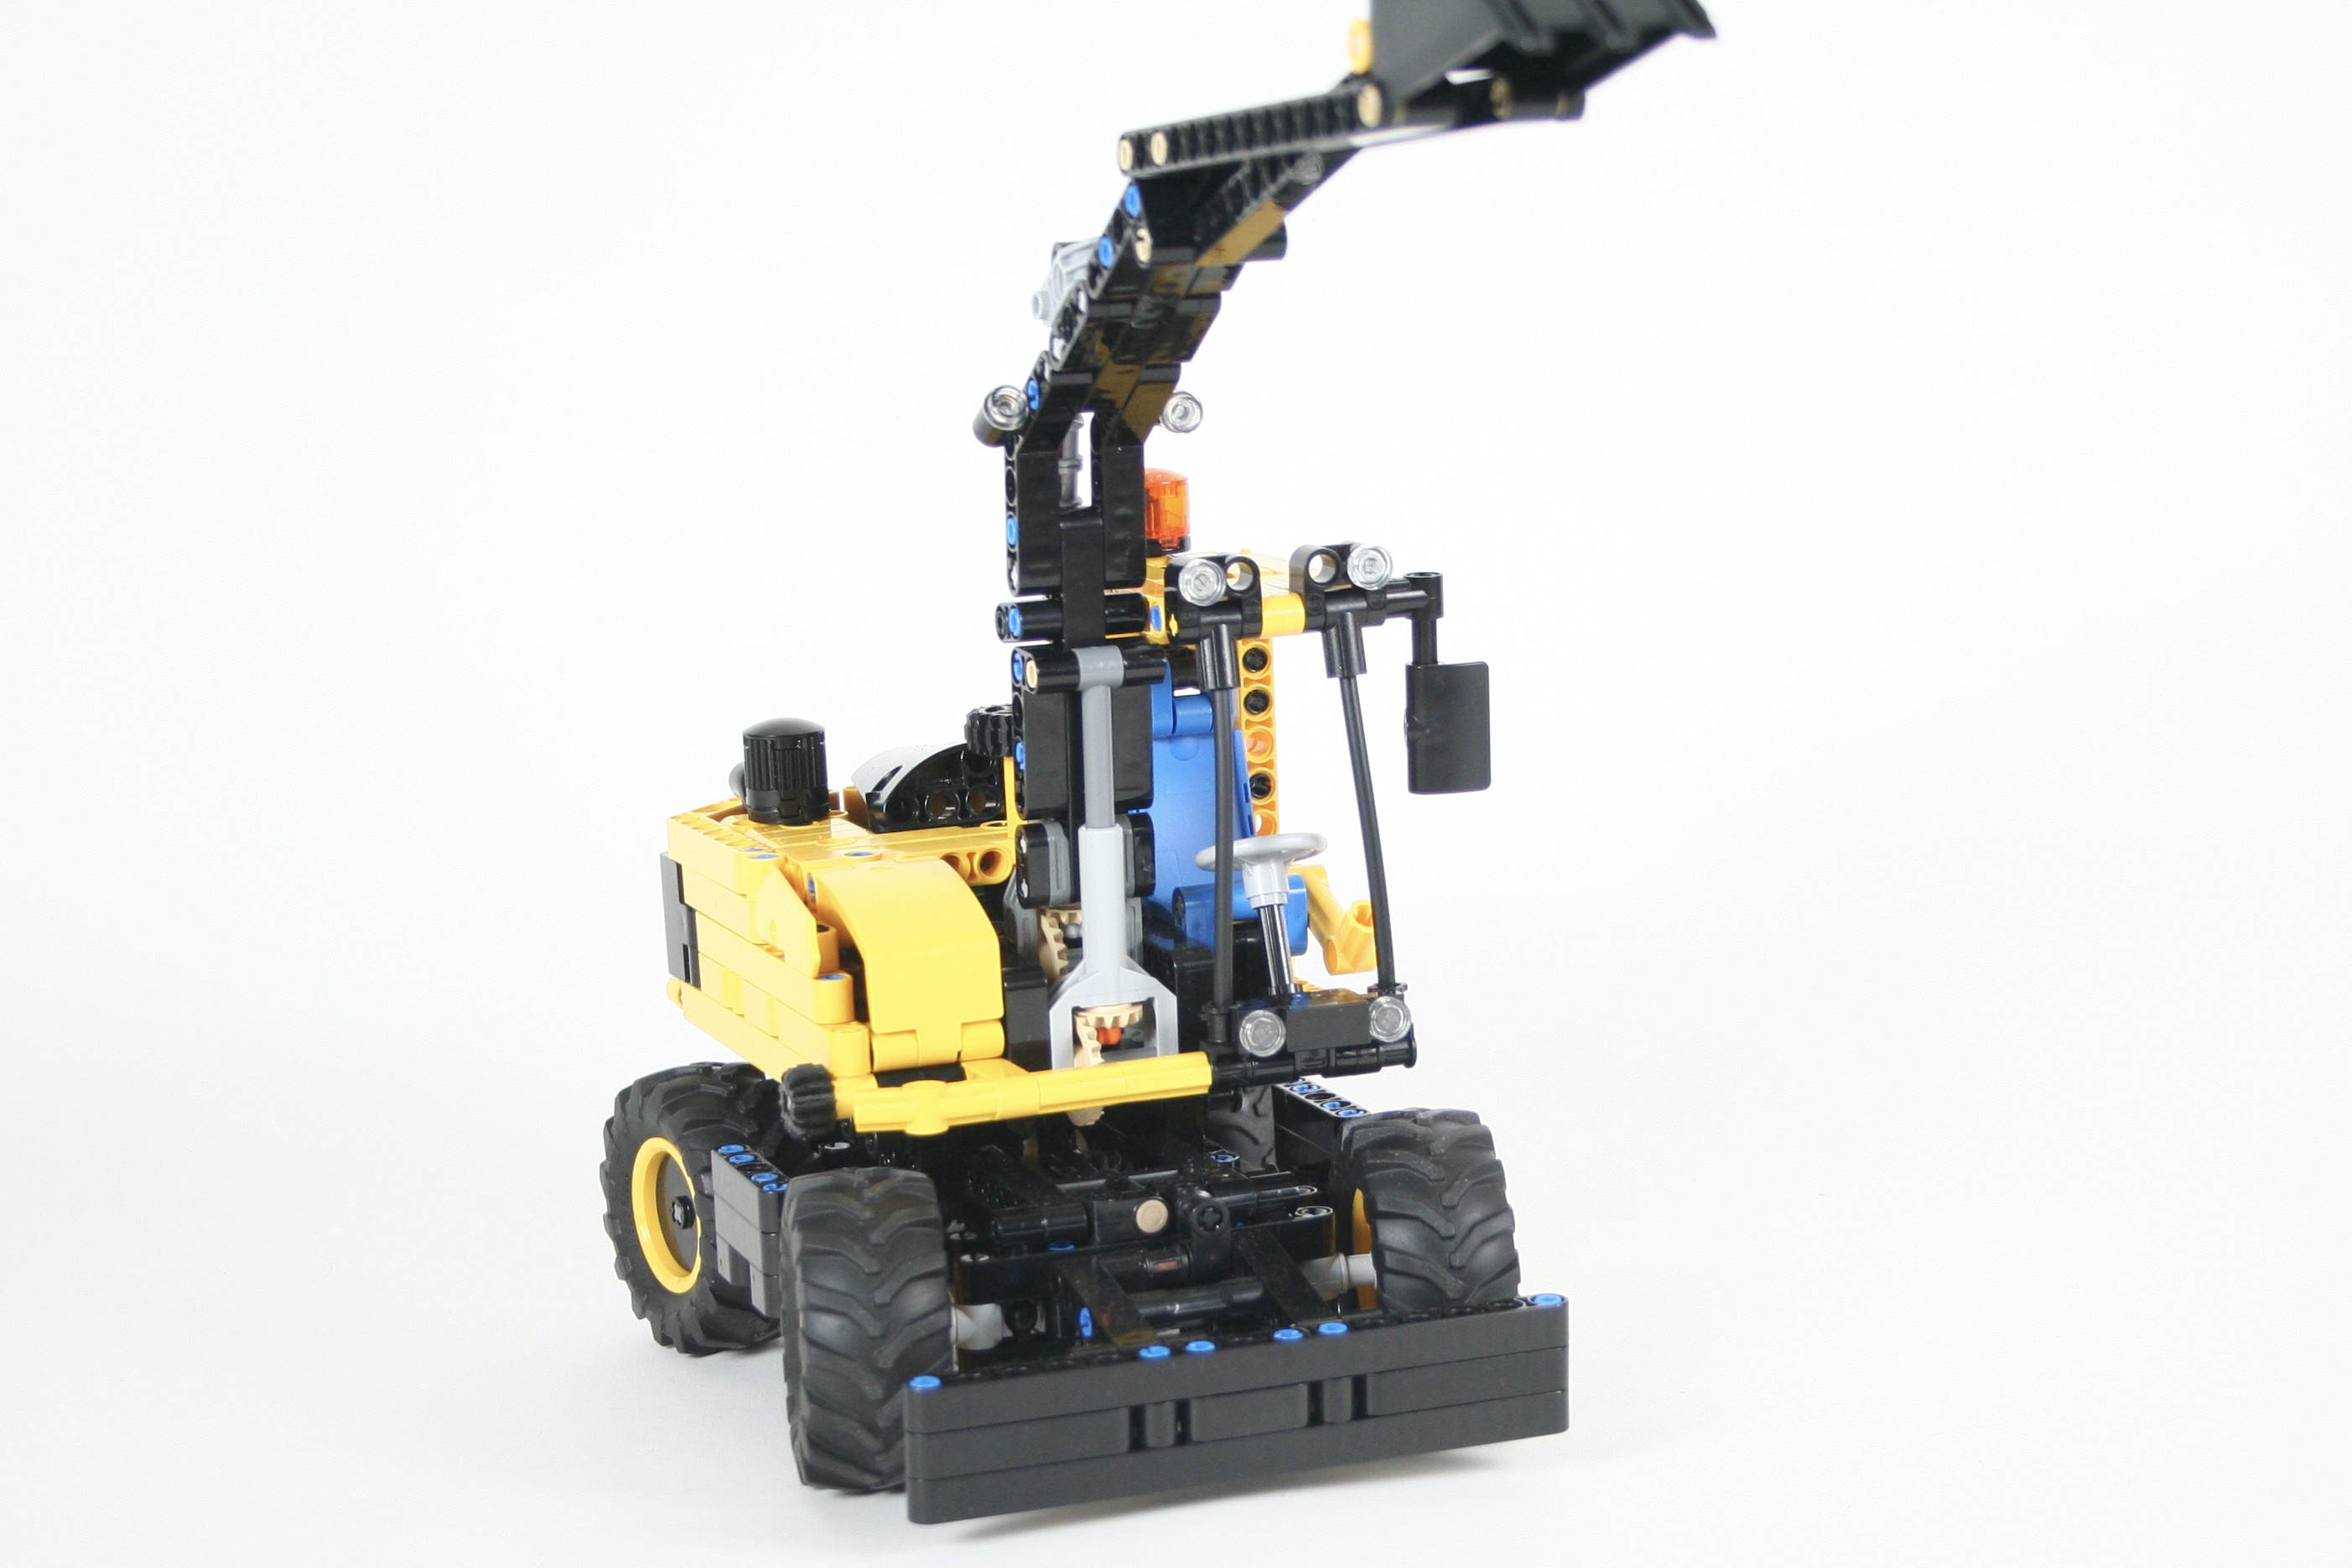
Then I built the chassis. A HOG gear is placed in the center of the superstructure, which controls the steering of all four wheels. Finally, a plow is added to the front of the chassis with a HOG on the back to control the up and down movement.
As I was getting ready to take the wheeled excavator apart, I thought “I could make another MOC easily by creating a tracked chassis.”
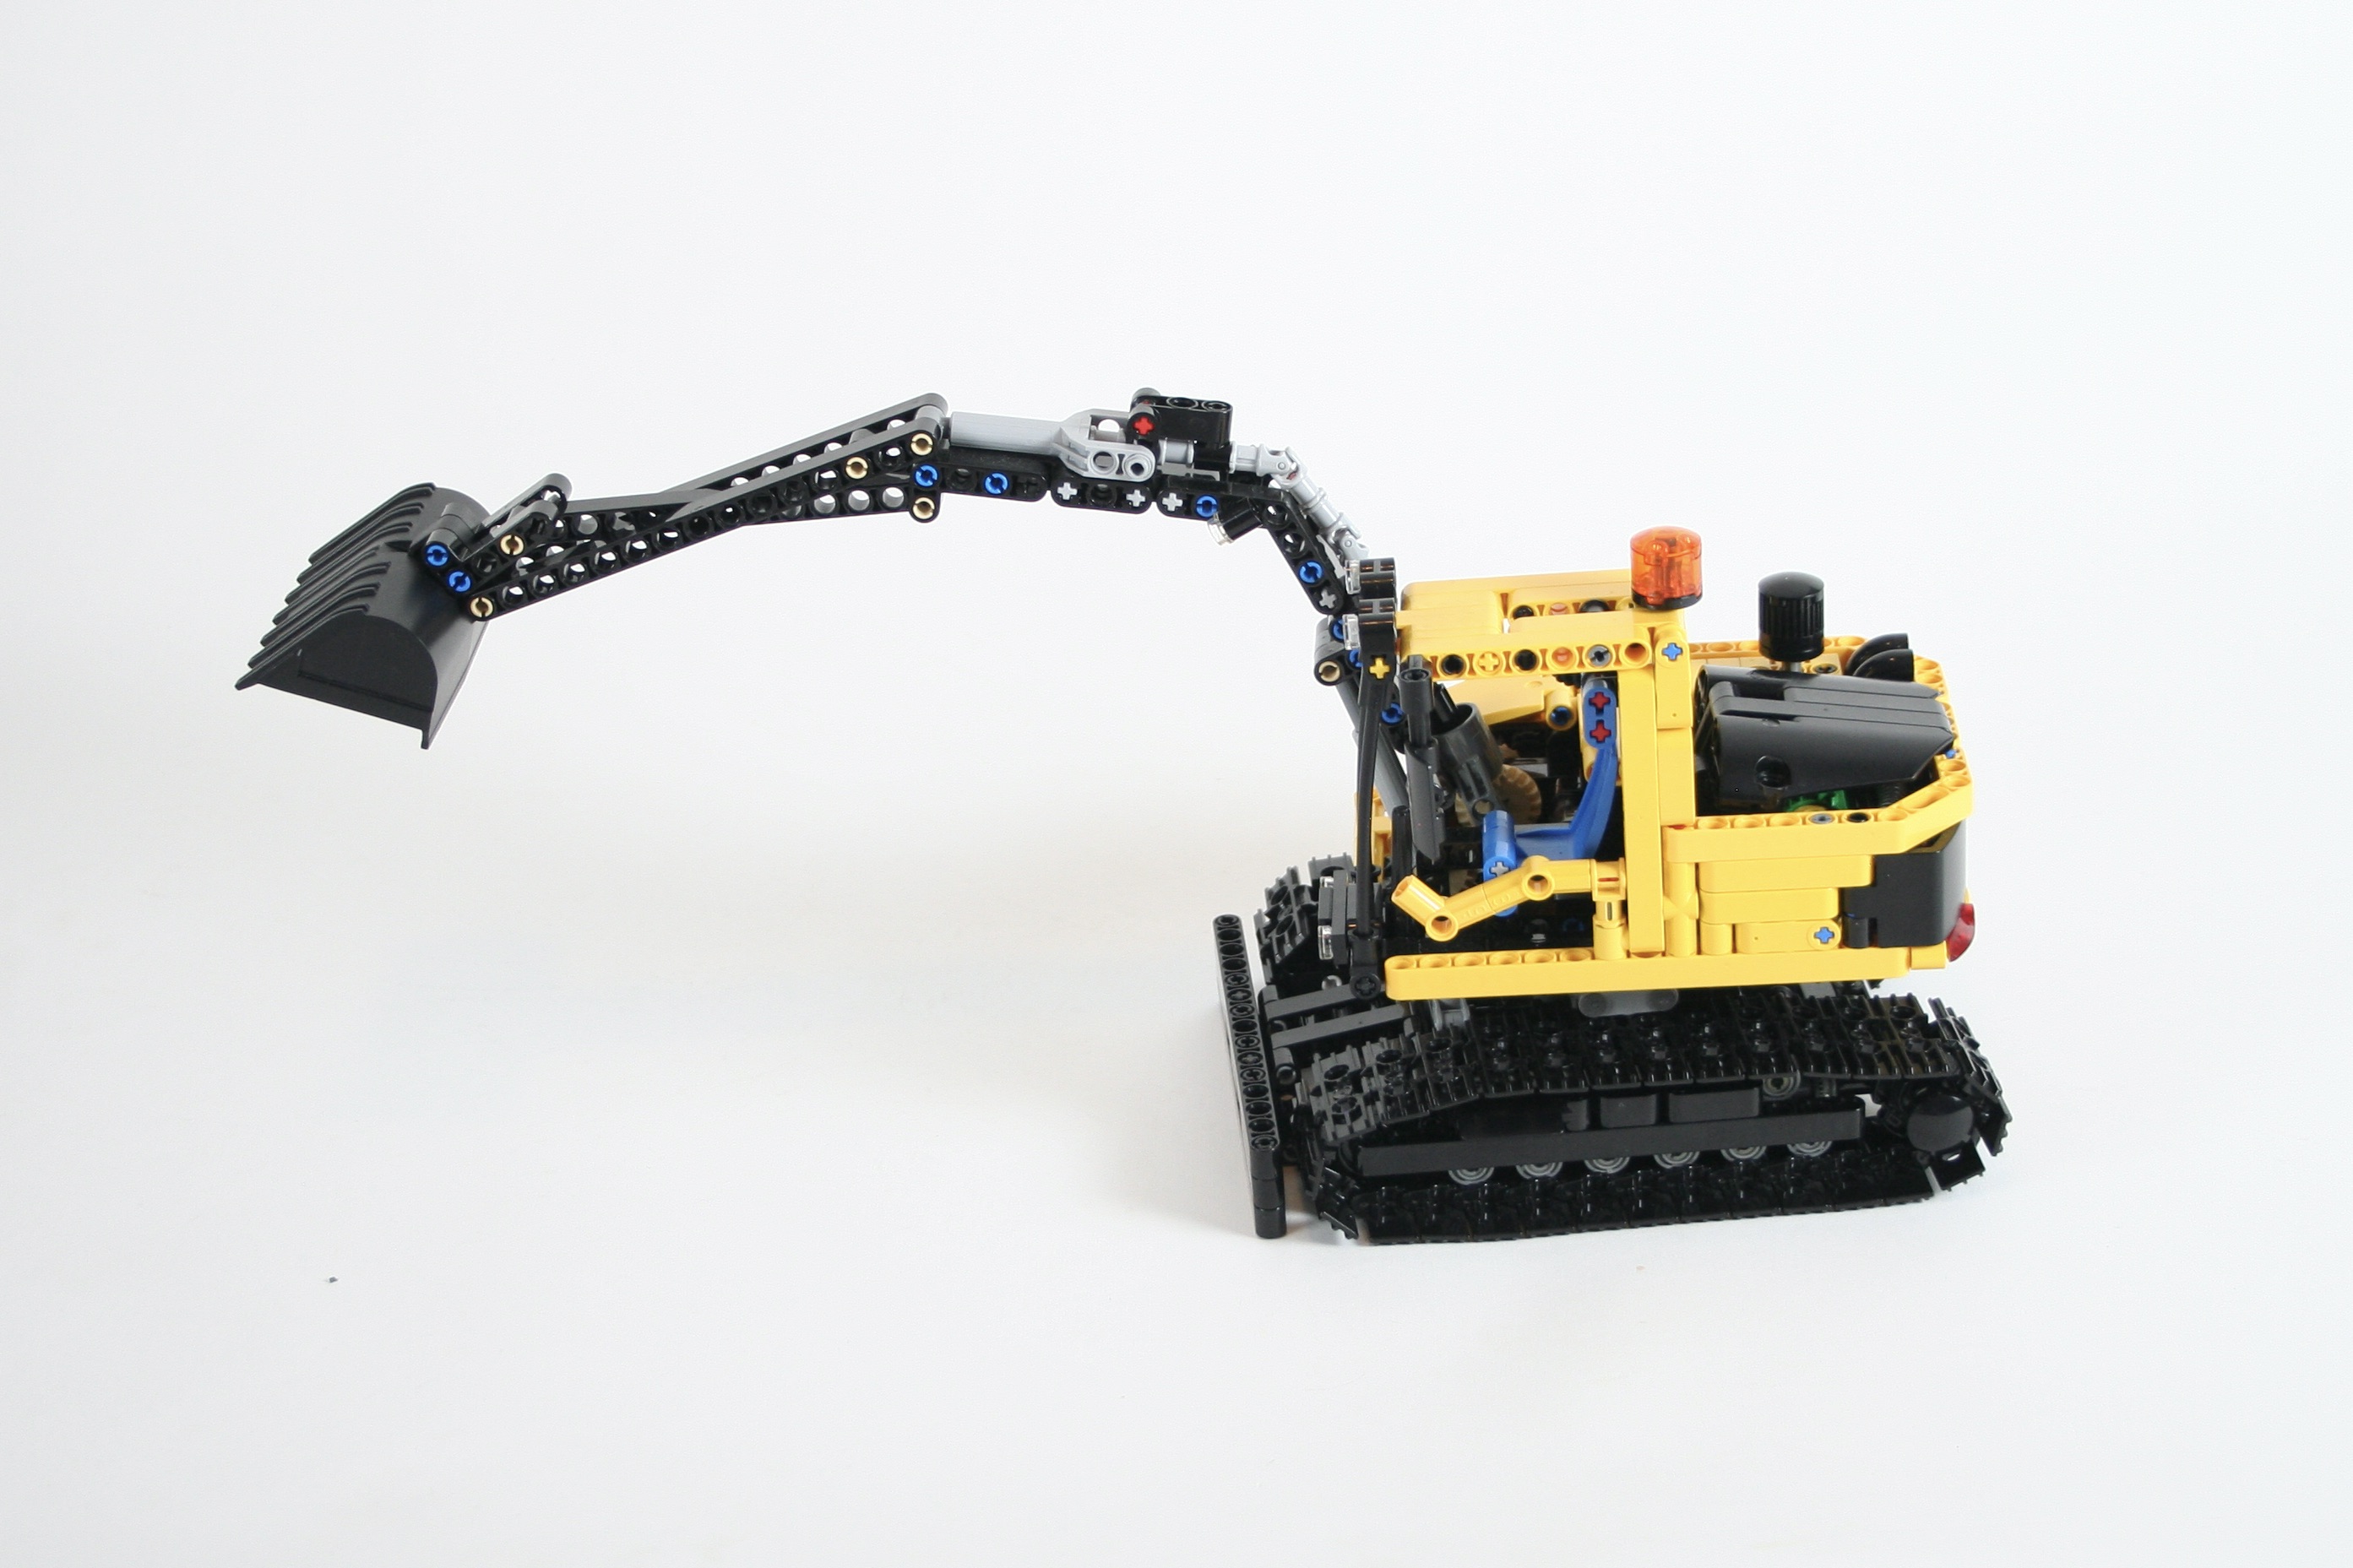
So a couple of hours later, and I built another little chassis. The superstructure is unchanged. Since no steering is needed on the tracked chassis, I used the same HOG placement that was used for the steering of the wheeled chassis to control the plow movement.
I loved this build. I love interchangeable MOCs, and a yellow construction machine is always enjoyable to build and play with. I think I like the look of the tracked excavator better, but driving the wheeled excavator around is a lot more fun. I hope you enjoyed.
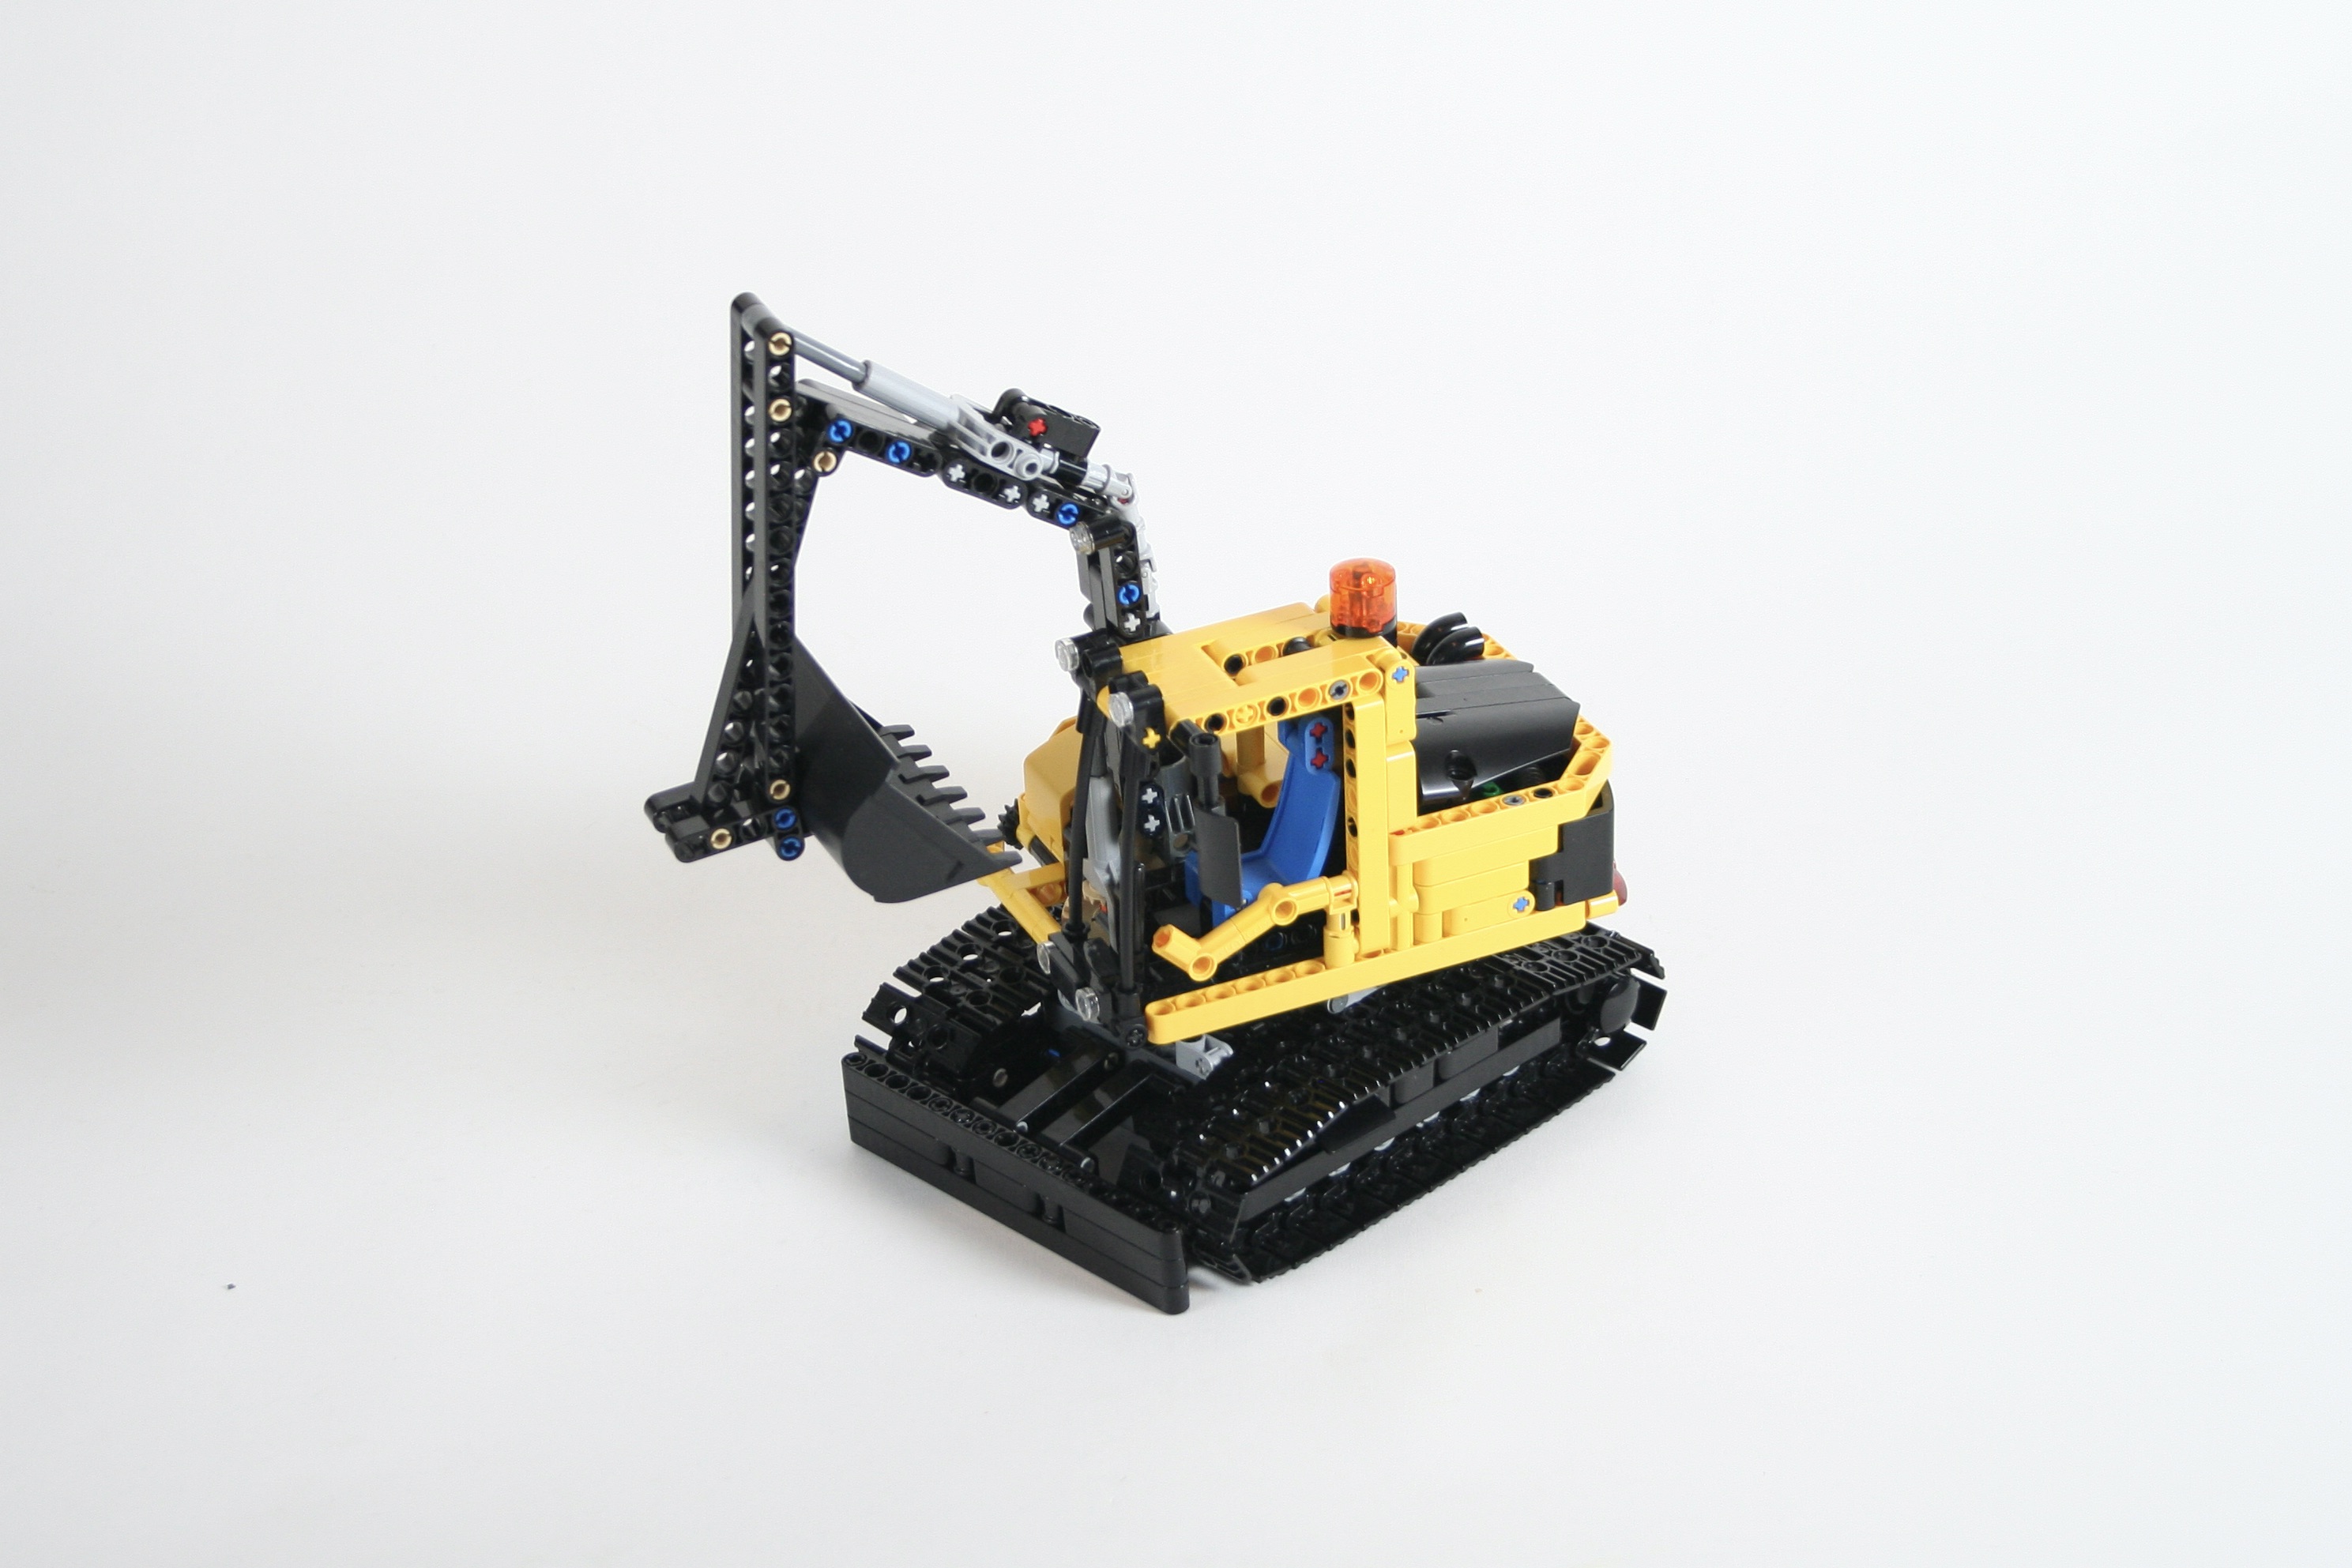
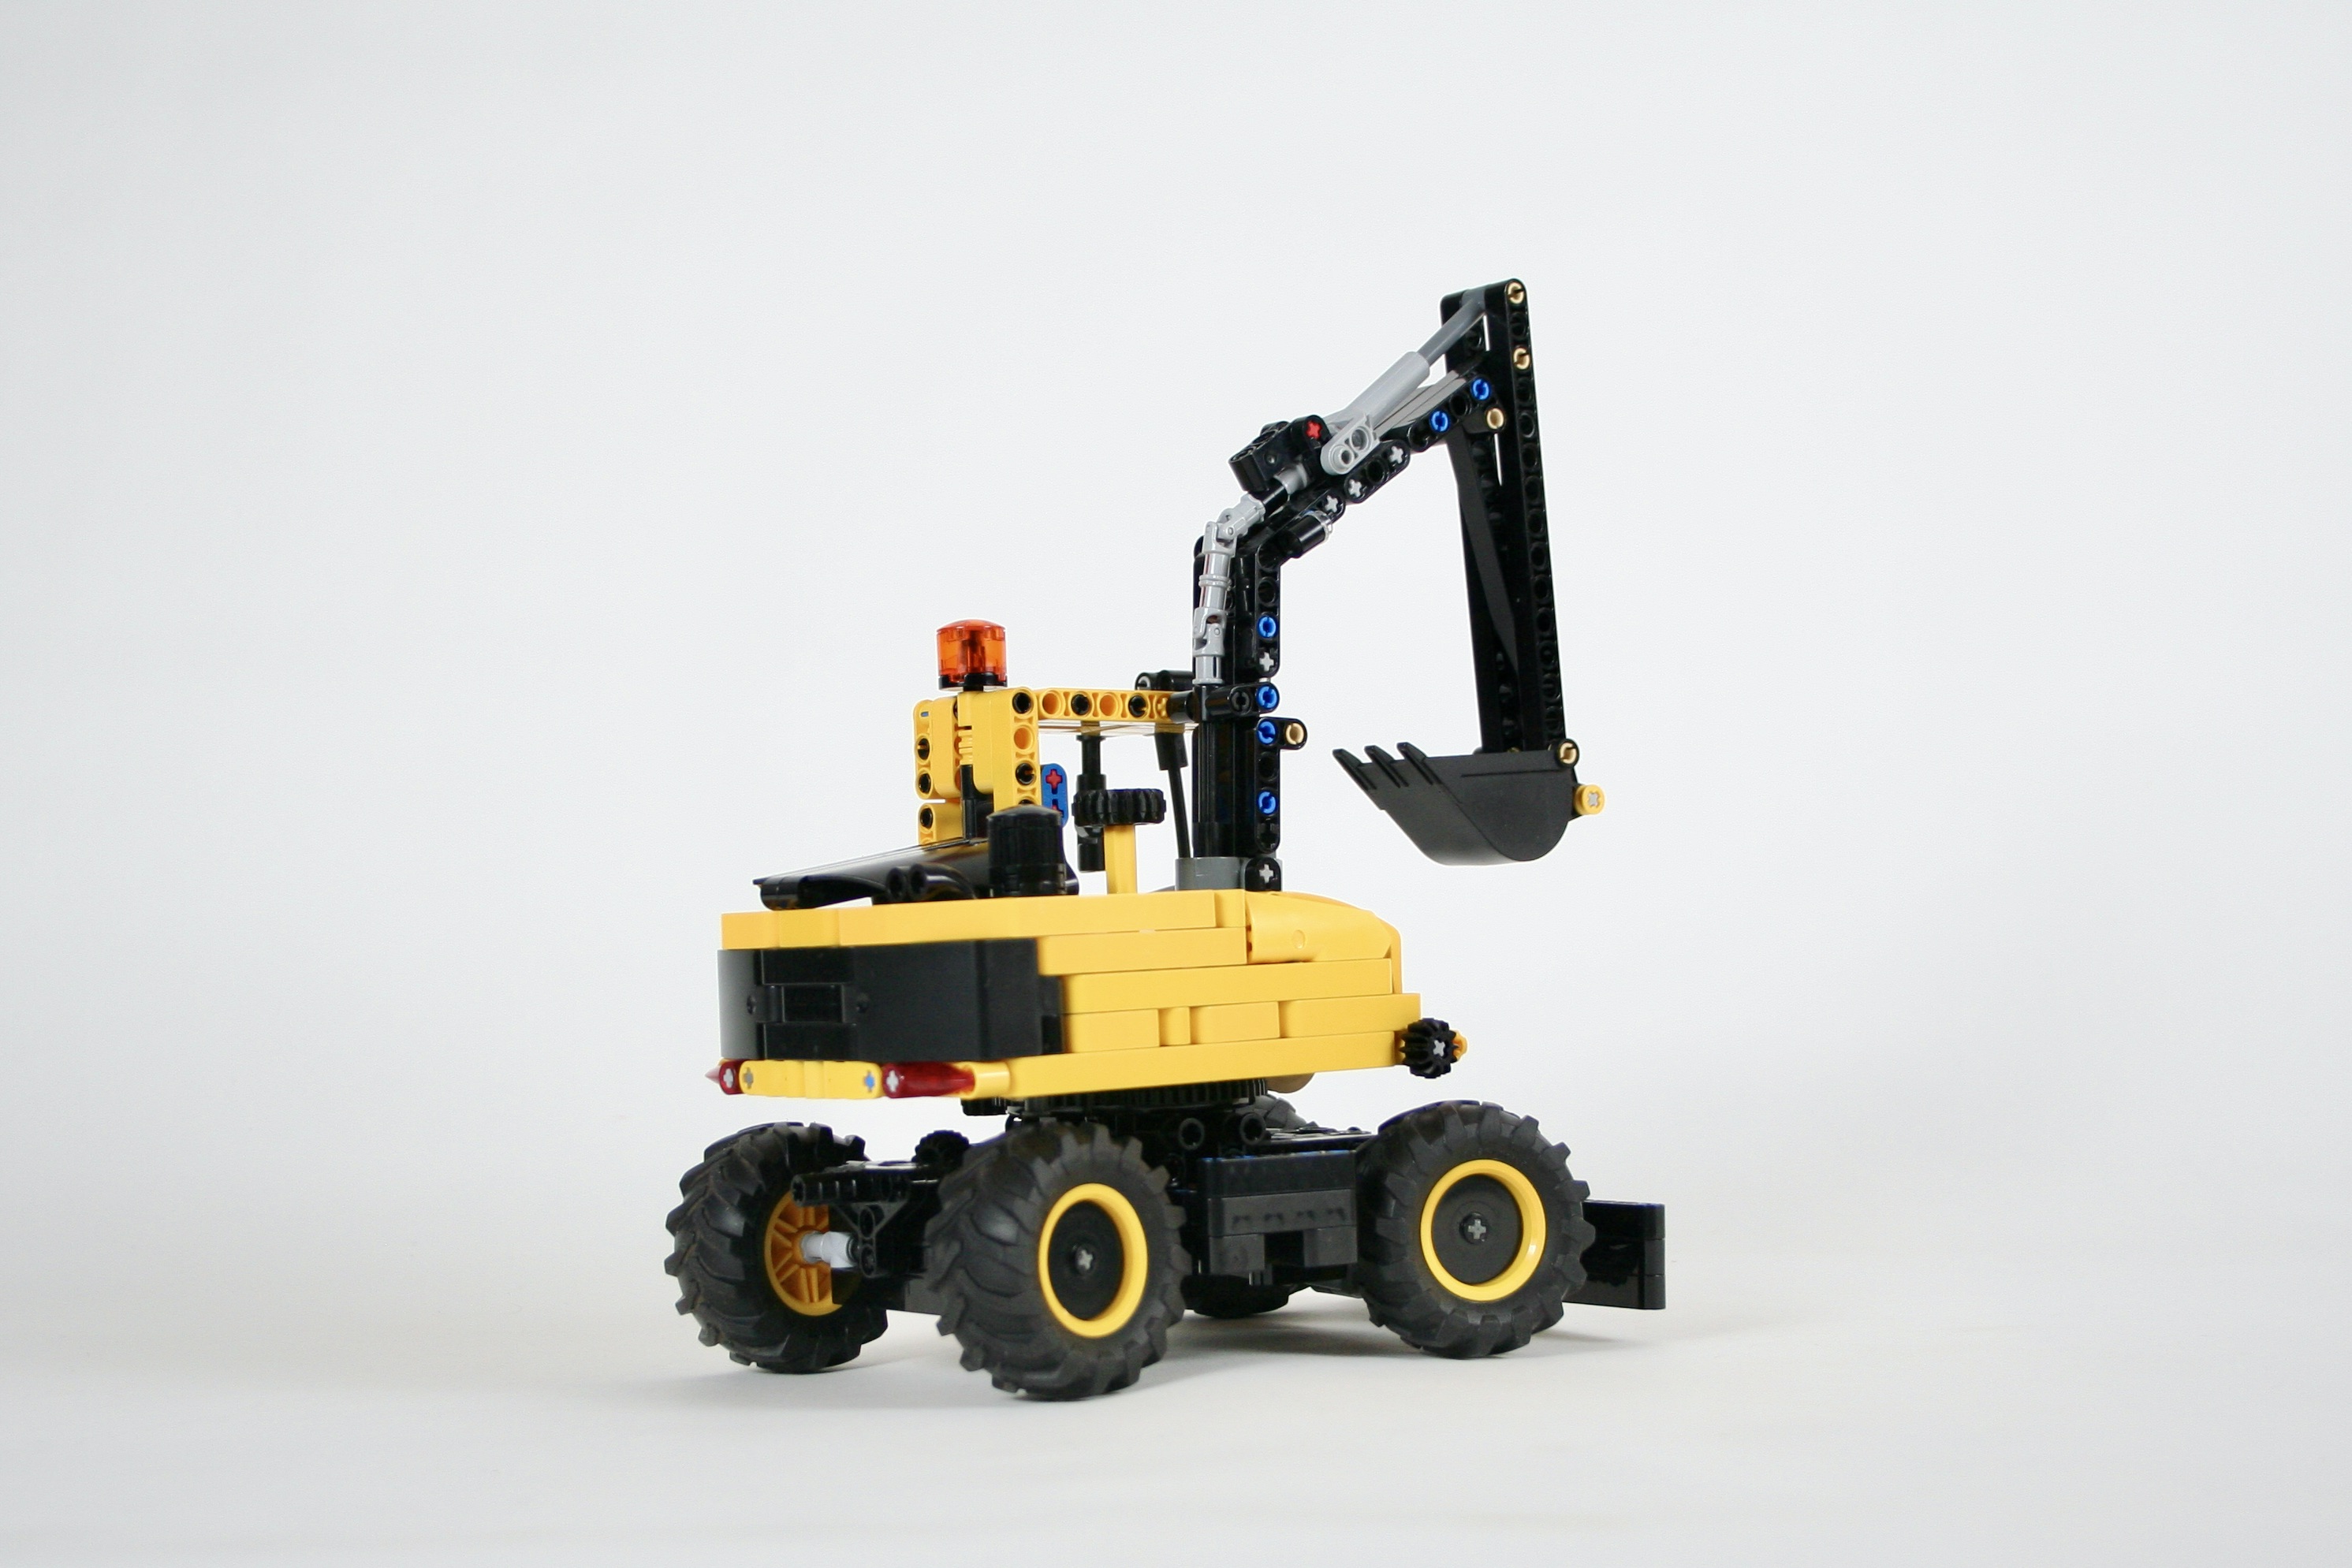
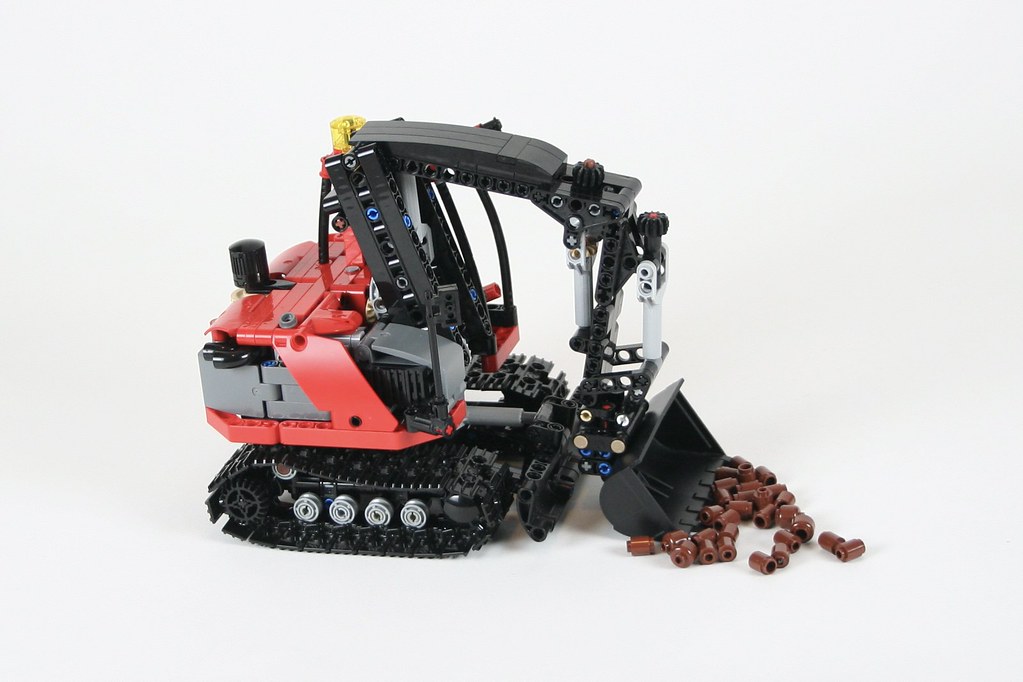
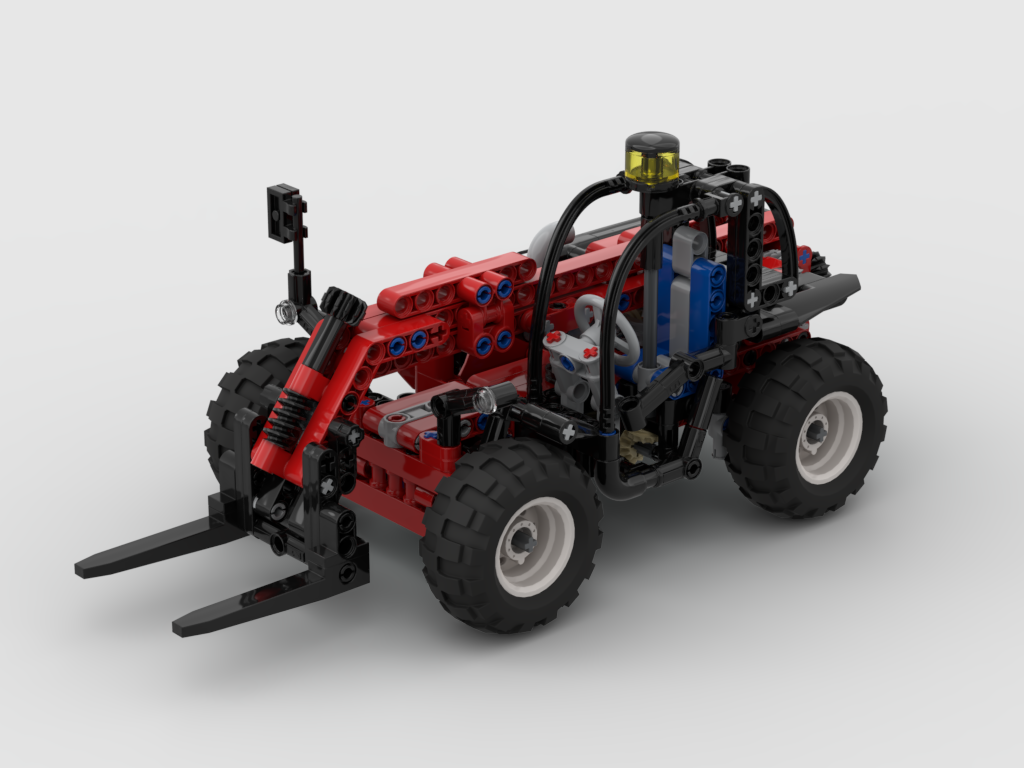
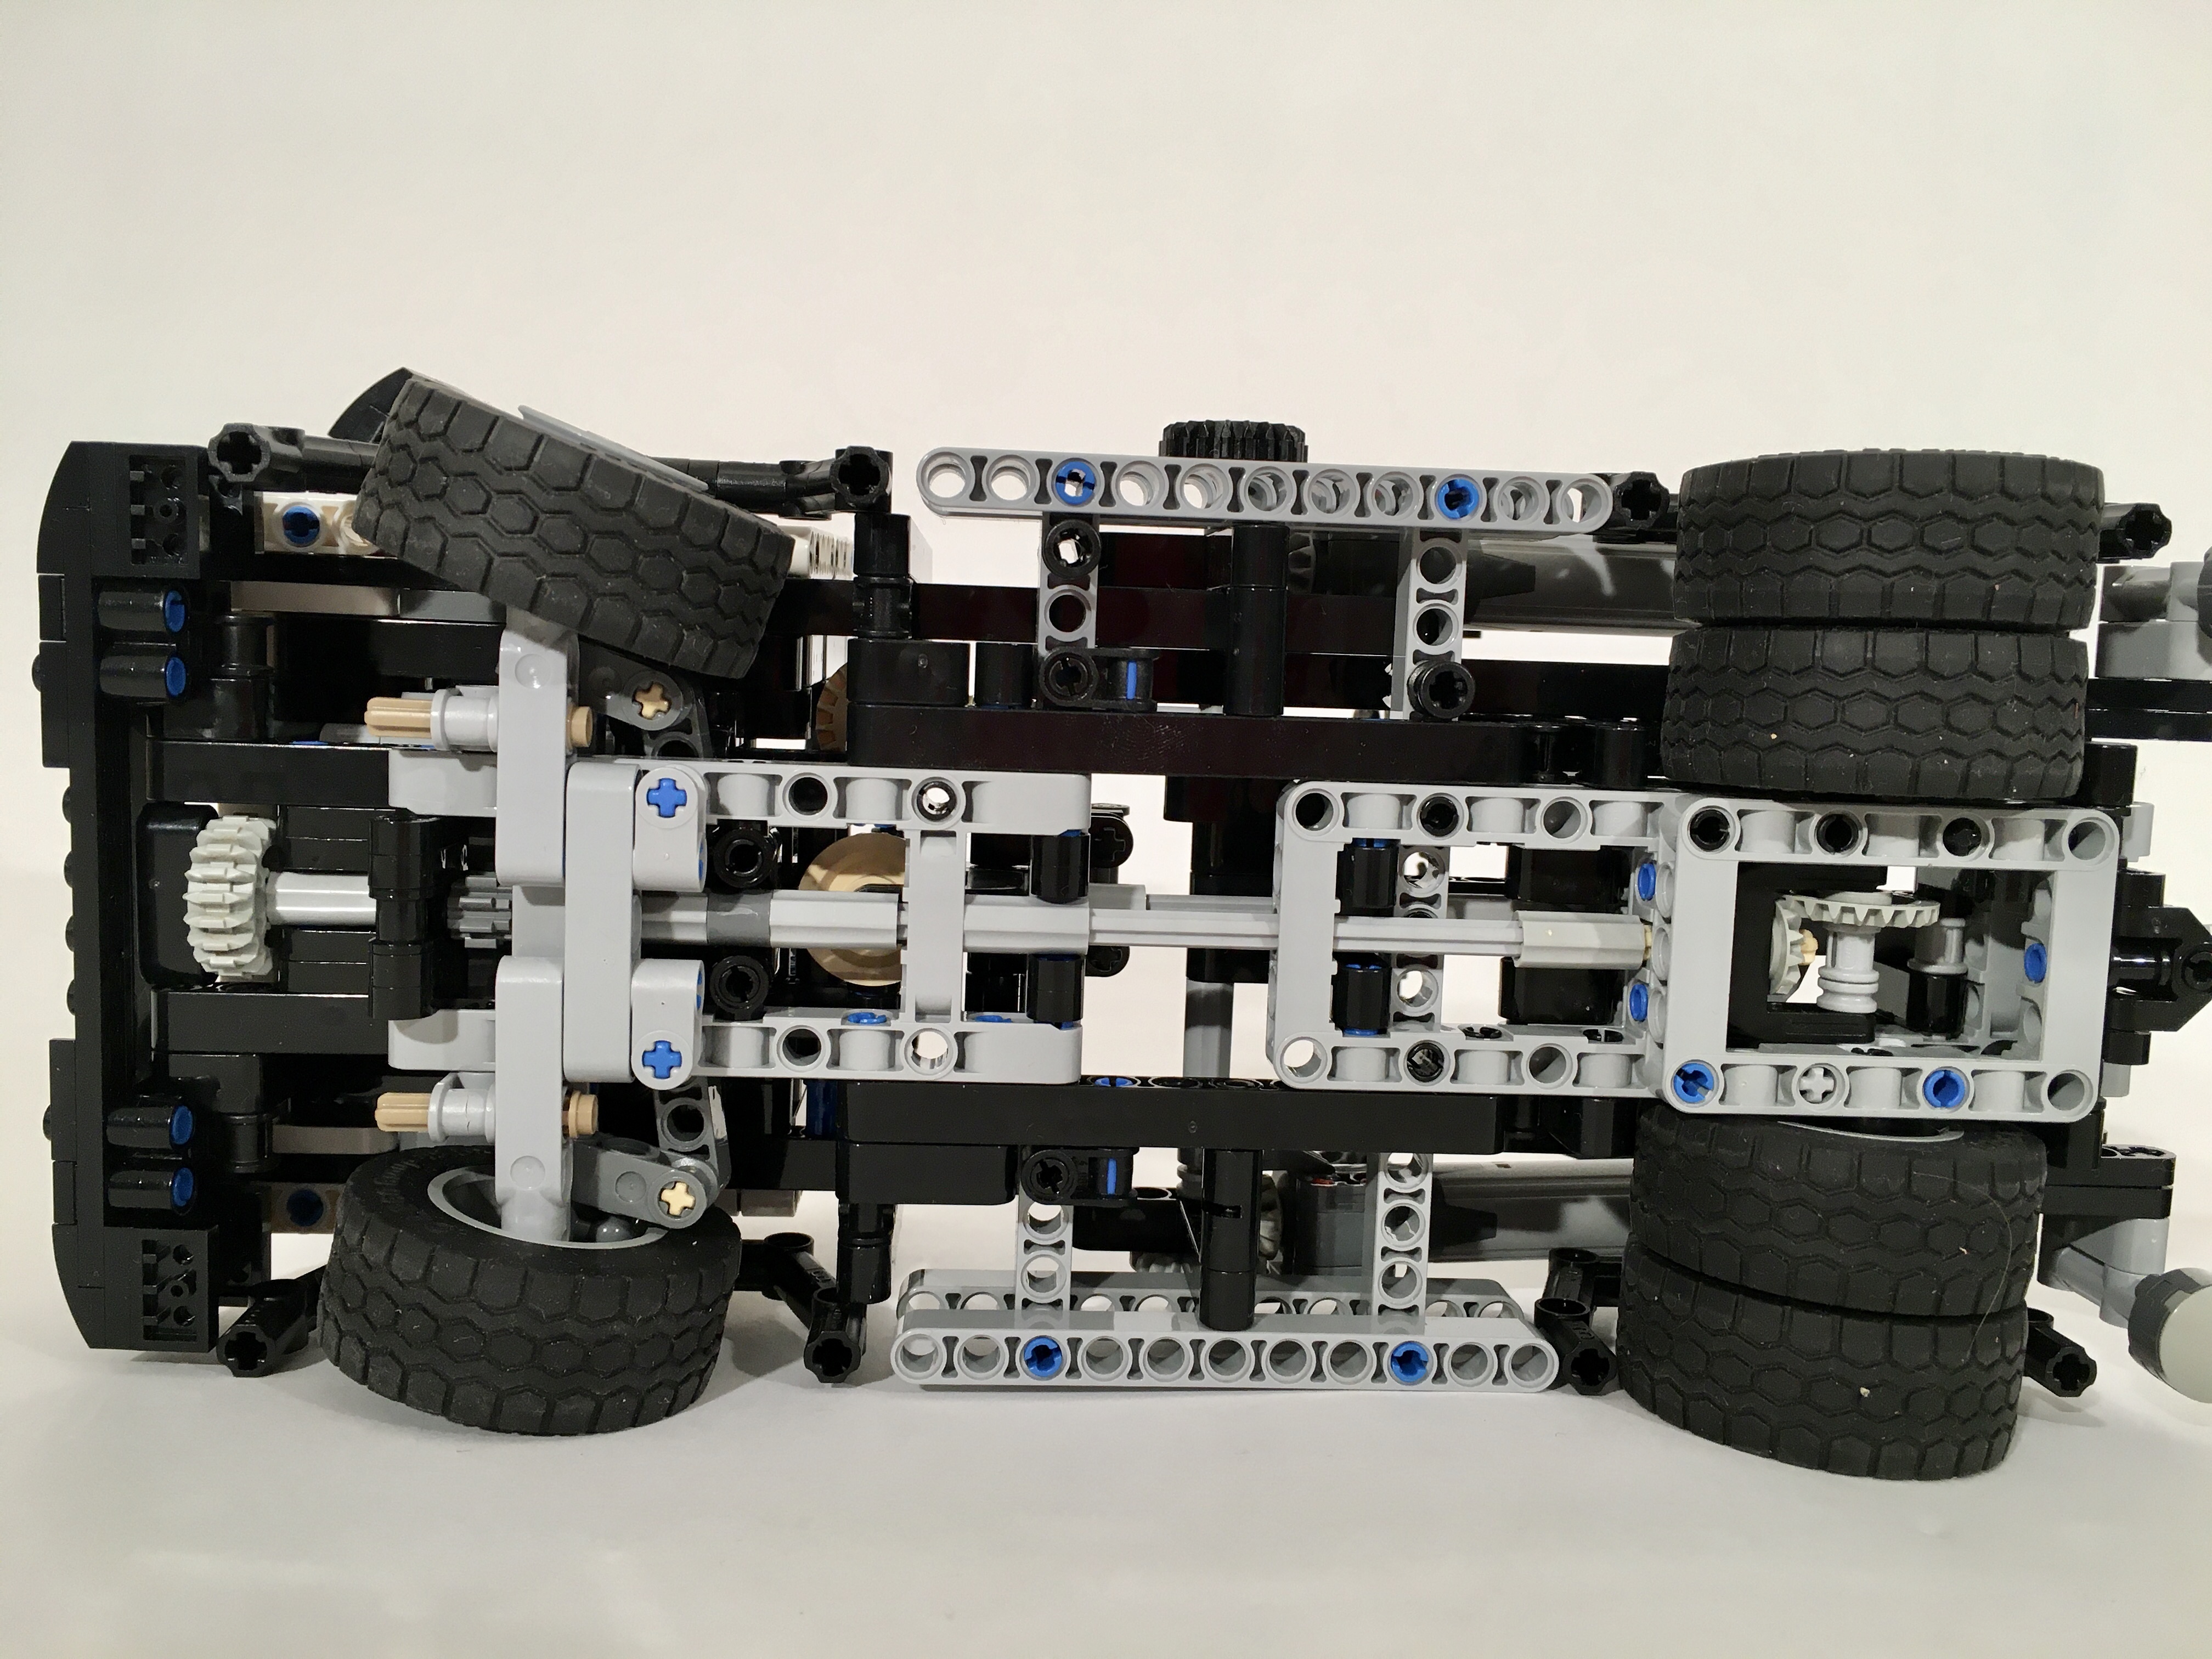
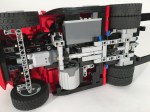
I participate in a number of LEGO Technic contests, and Eurobricks hosts a number of them. The requirements for the TC22 Contest was to build a Technic construction vehicle that could fit in a 10,000 stud bounding box. It had been a while since I built an excavator, and they allow for a lot of functions in a little bit of space. I have always been intrigued with the machines built by the French company Mecalac, and after looking at their cute little Skid Steer Excavators, I had my subject. Setting the scale was important as I only had so much space. I decided on the large tracks as I think they look a little better. Setting the width with the tracks at 17 studs, would give the stability needed, and would give me some working space. Calculating the rest of the excavator would allow for 28 studs in length, and 21 studs in height for a total of 9,996 total cubic studs.
I stared with the boom, which is a little complicated. The boom is a 3 section design, and should reach far, and tuck in close to the front plow, and be able to dig deep. I planned the movements with mini linear actuators, and wanted to keep the controls easily accessible. This resulted in a design where two actuators had controls on the boom, and two actuators had controls on the back of the superstructure.
I thought I had the hardest part done one the arm was finalized, but I quickly discovered that the rest of the superstructure was going to cause some problems. First, I was not sure on the shape I wanted. It took a couple of drafts to get the rear shape right. Once I did I realized I had some space for a little engine, so I added this, and connected it to one of the boom lifts. Now a little engine turns when the arm moves. Once these features were done, it took another four drafts to make sure the tractor would not fall apart.
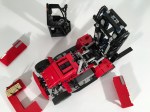
Then off to the cab and the attachments. The can was simple enough, with a simple chair and the HOG mounted to turn the superstructure. I created four different attachments, including two excavator buckets, a skid bucket, and a set of forks. In what is becoming a standard feature of my builds, each can be changed over by pulling a couple of axles on the boom.
I was pleased with how this build turned out, and it was good enough for a third place in the Eurobricks contests. All the attachment options made for a fun, playable model, and the movement of the boom was perfect. Feel free to build one of your own.
Time for another Eurobricks contest! Free Instructions are available at Rebrickable.com.
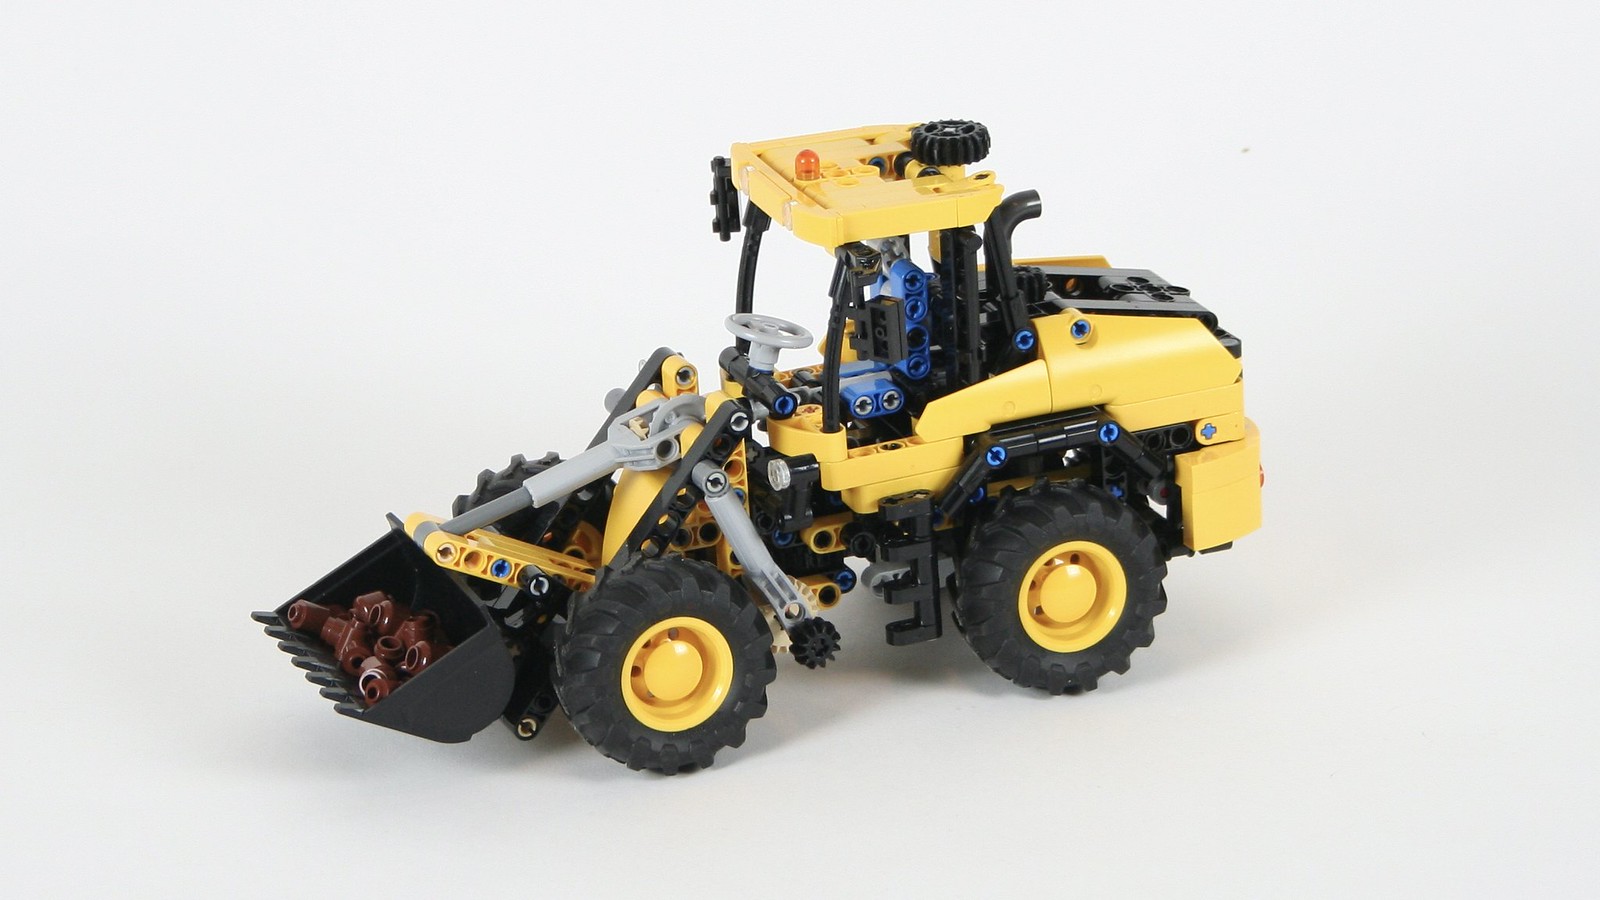
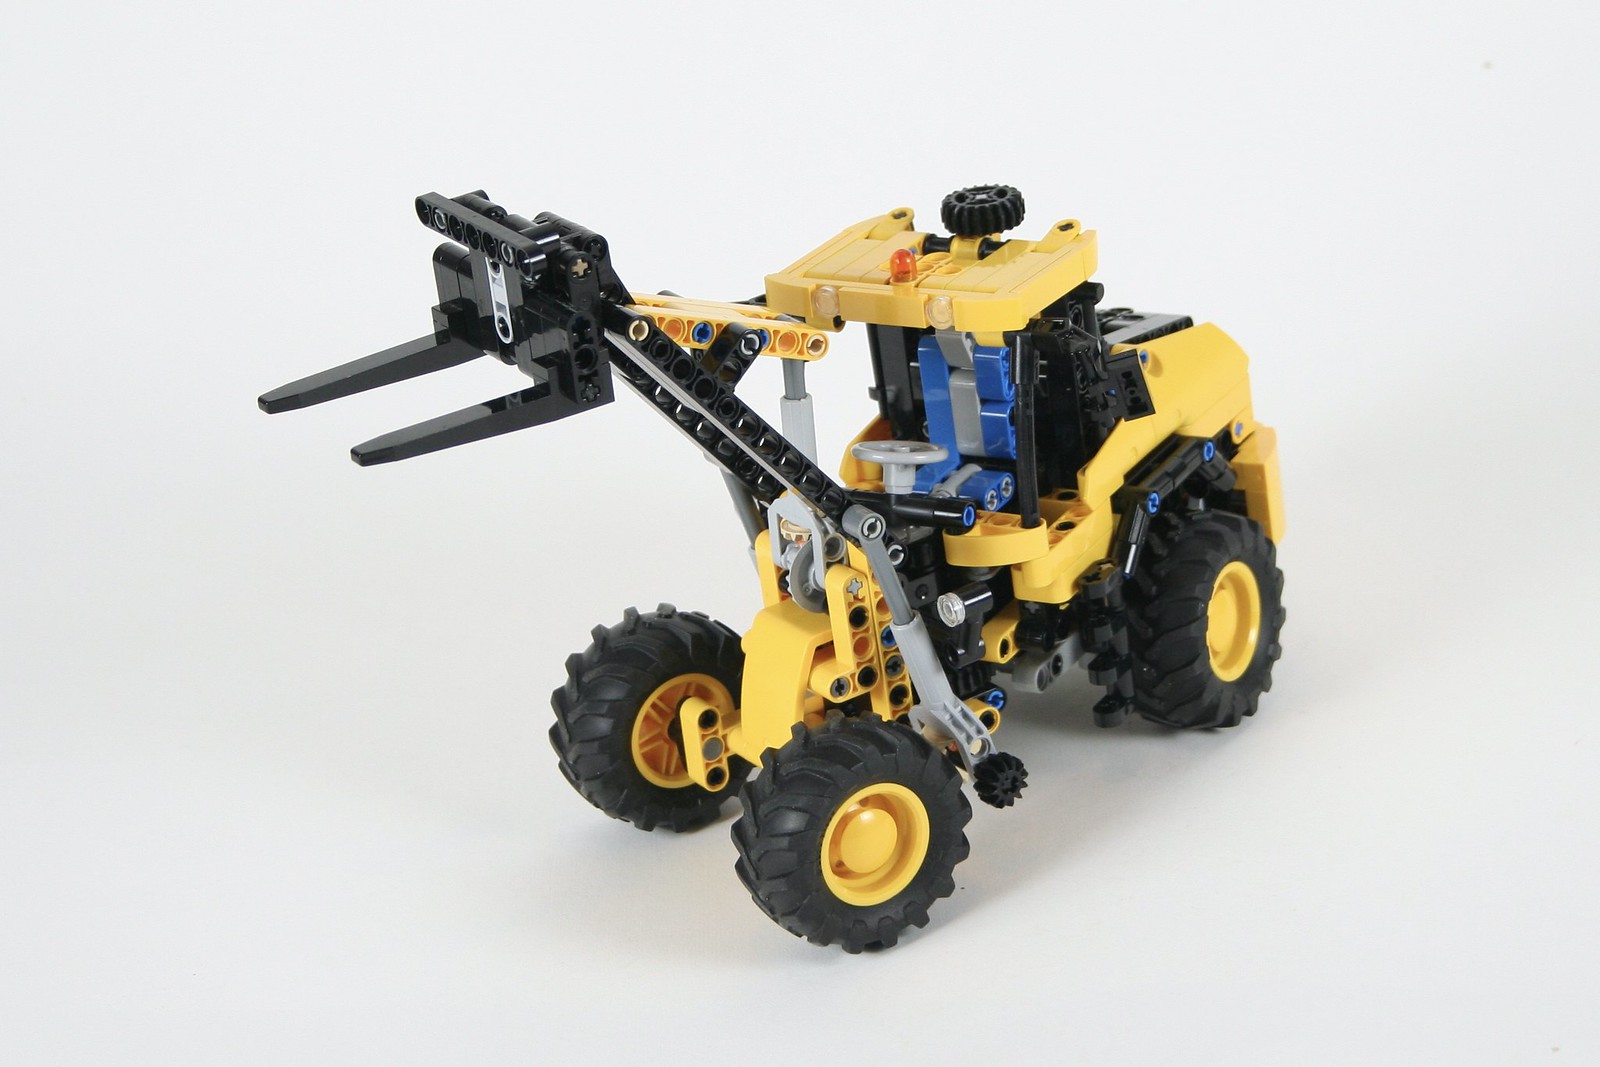
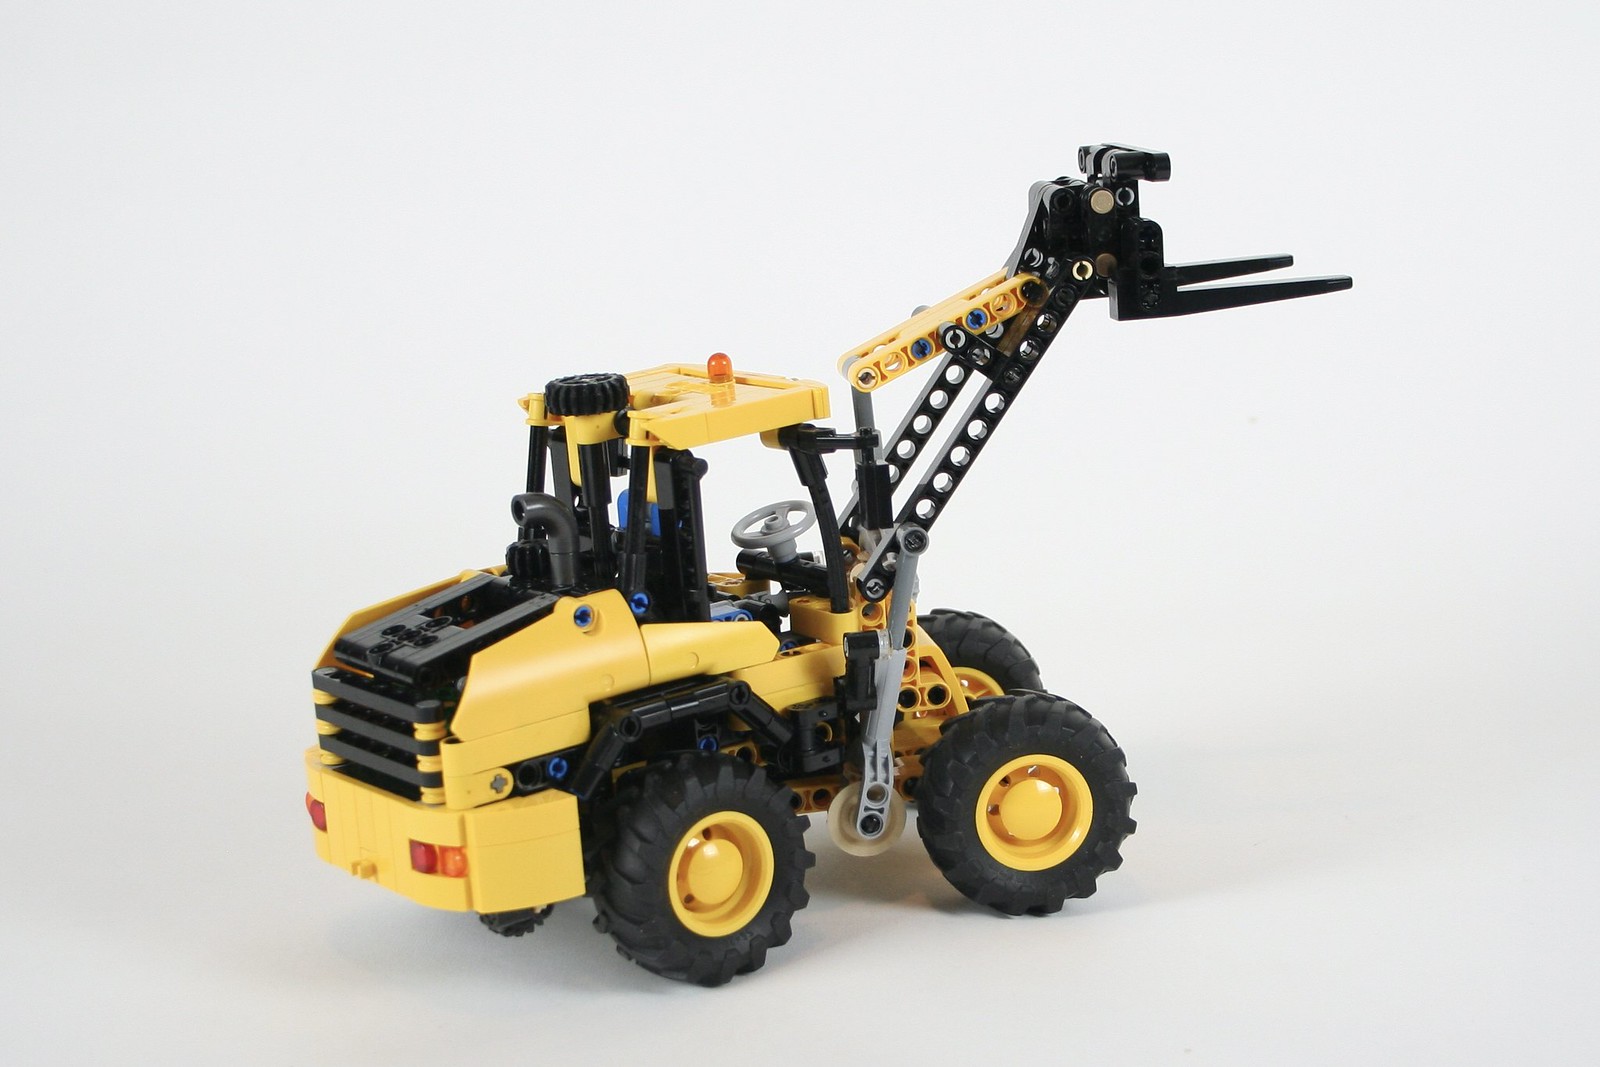
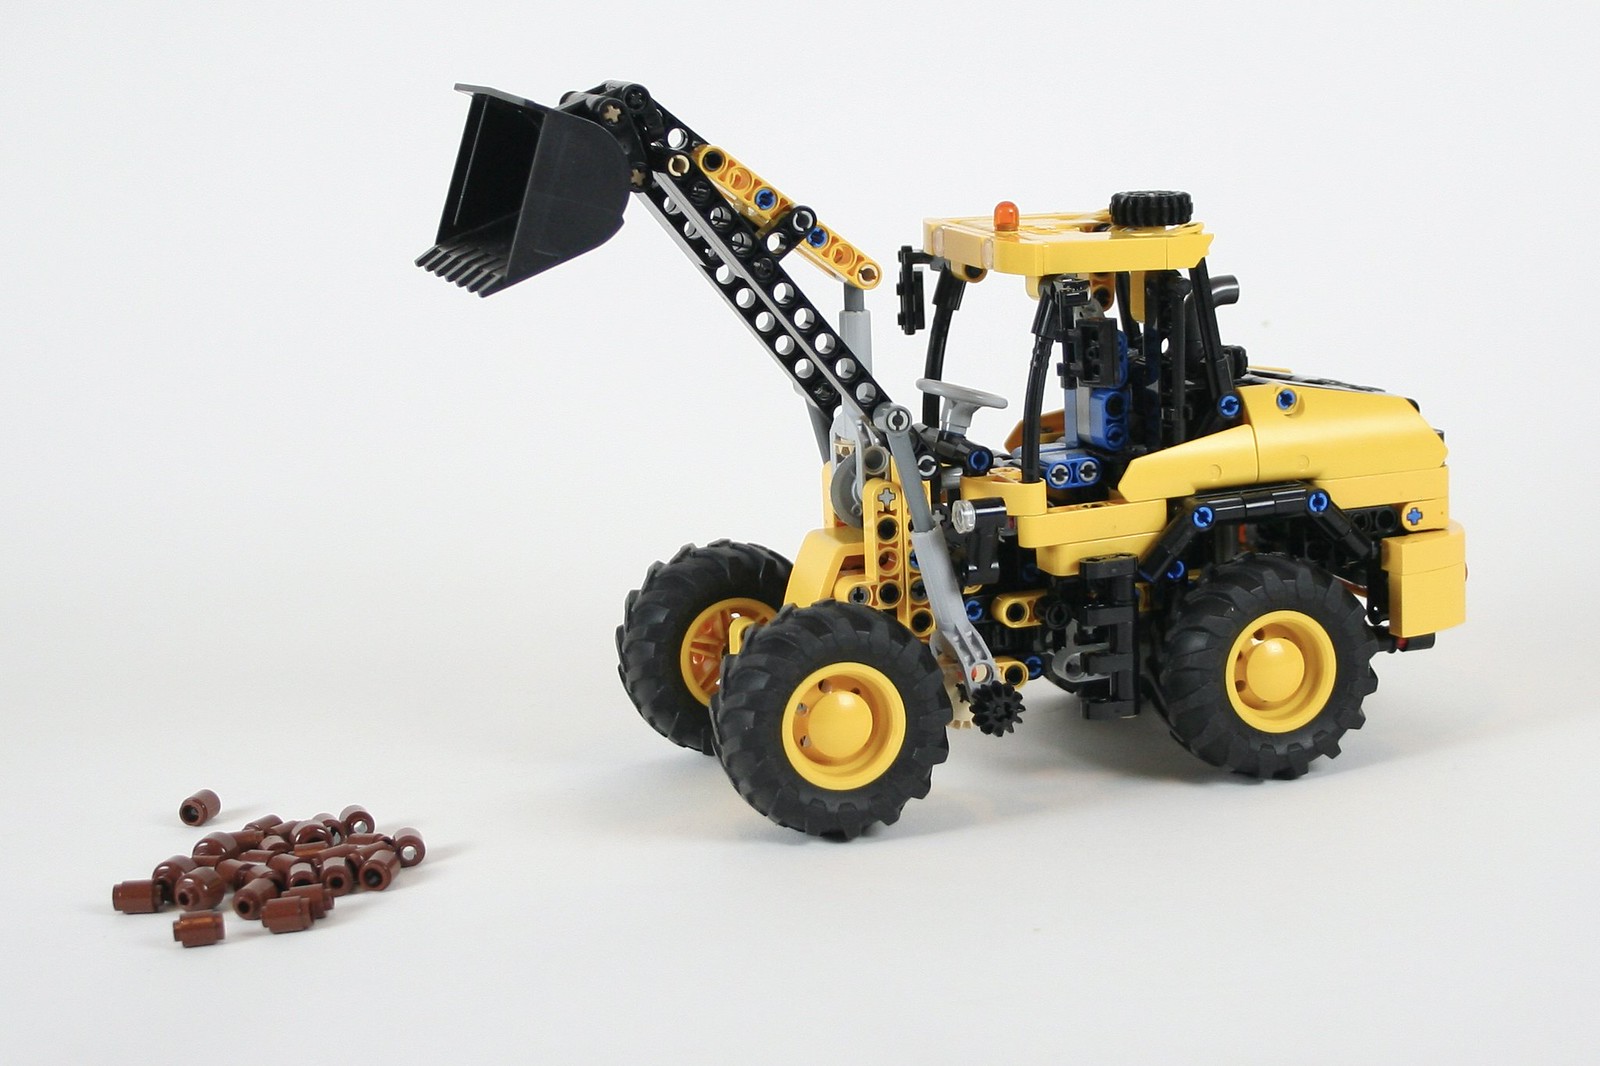
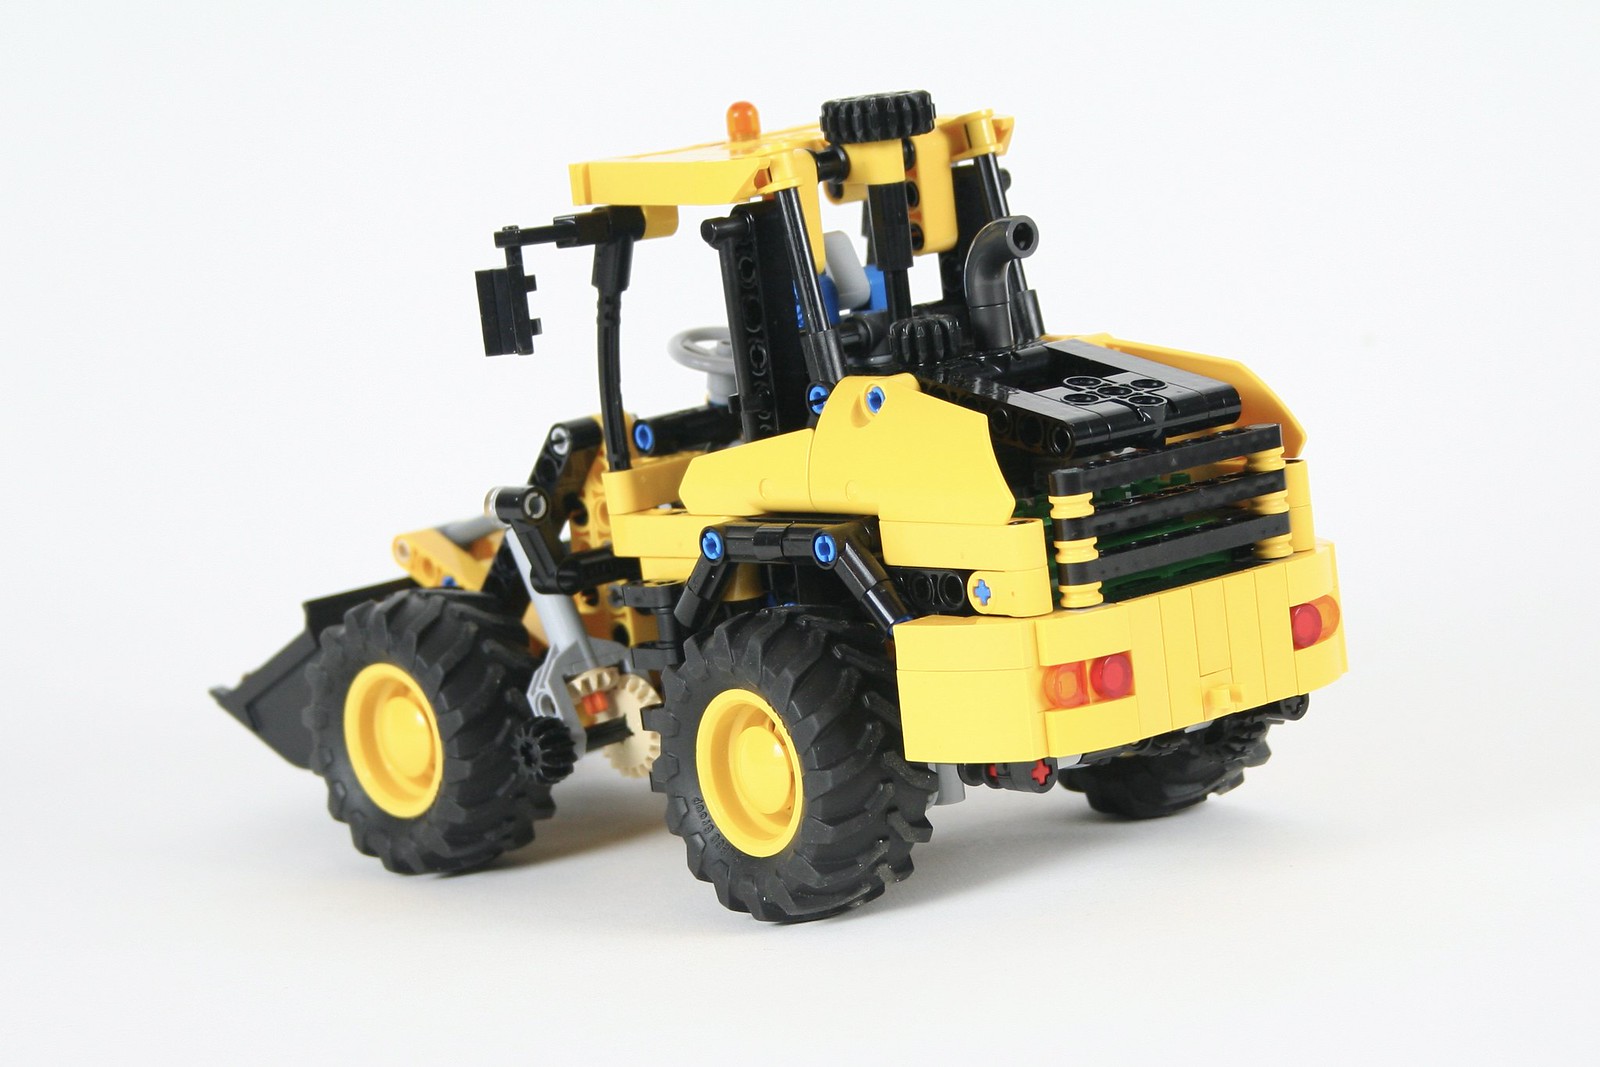
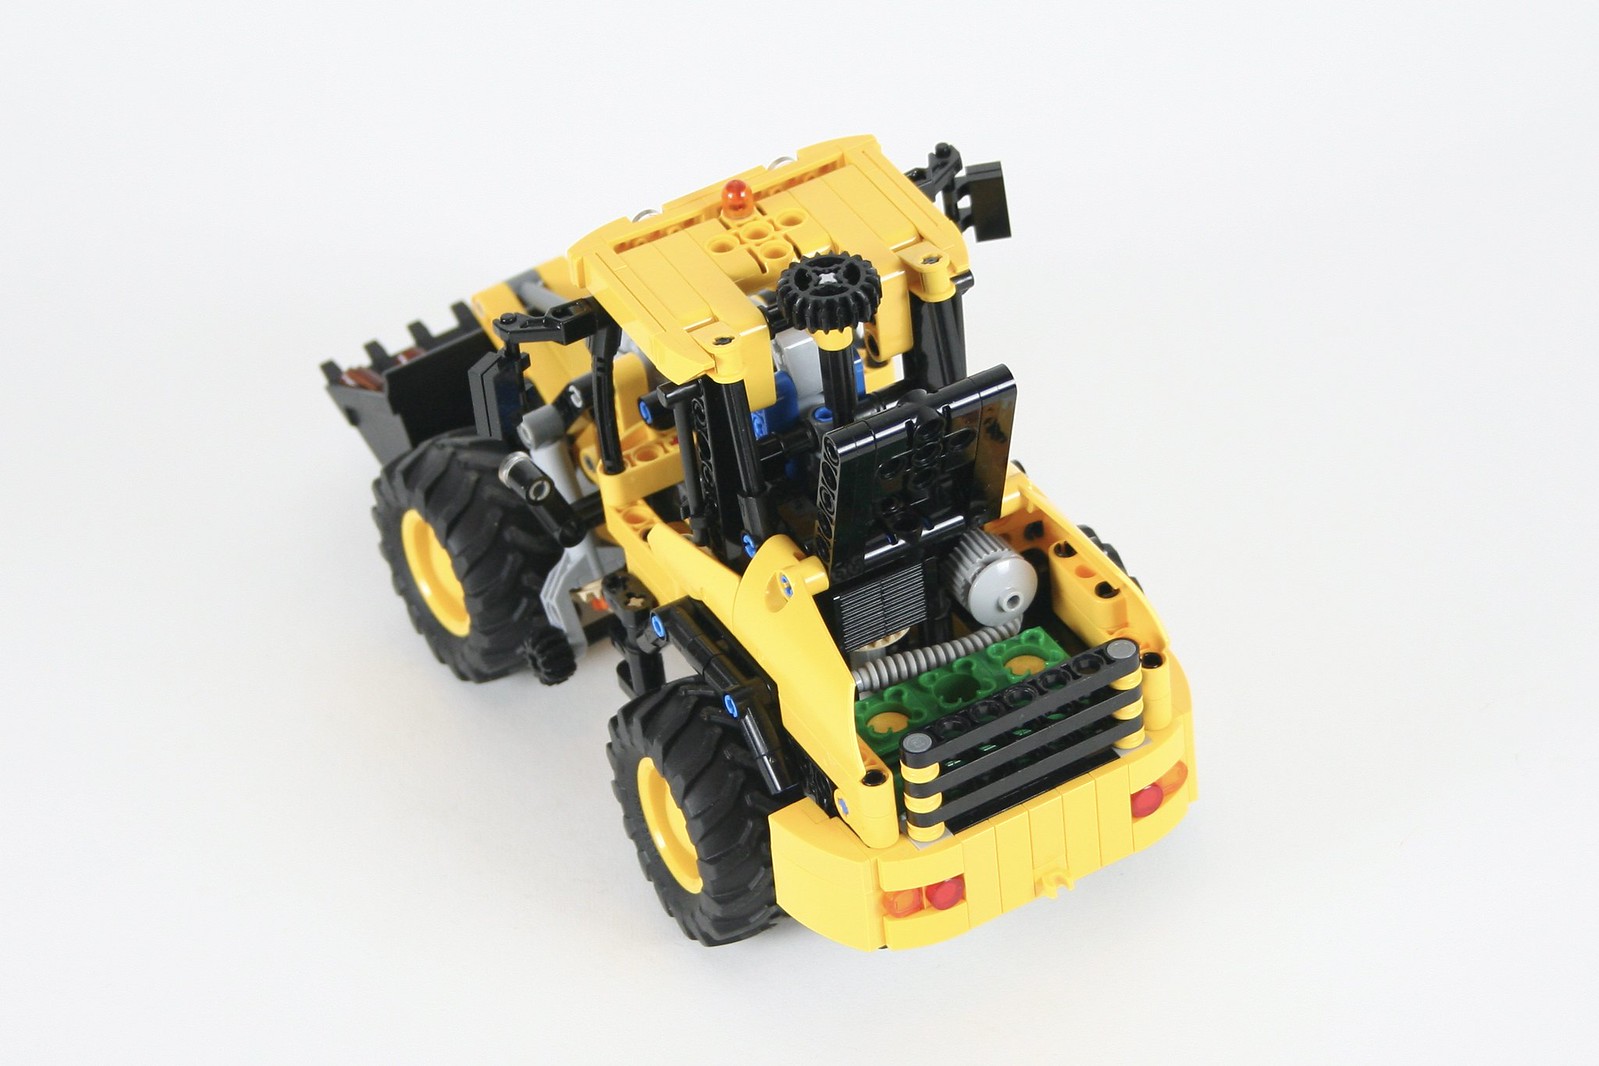
Another Eurobricks contest was made available, and this one was right up my alley. In fact, I was so excited about the contest, I made two MOCs. The contest was to create a small, less than 10,000 cubic stud, construction vehicle. I figured an end loader is perfect for the contest theme, and it was a while since I created one. I build a quick draft of the shape including where the steering, engine, and bucket would go.
At this scale I decided quickly that adding an engine would be a great feature, but four wheel drive would only distract from the look and the function of the bucket. The engine is a little 3 cylinder unit that is mounted transversally behind, and powered by, the rear axle. This placement allowed for steering and bucket tilting to be placed in a HOG placement.
Drive Mech
I next worked on the linkage for the bucket. It took a couple of tries, but I finally got a linkage with full movement. Two mini linear actuators are placed on the side of the loader for bucket lift, and are linked together. The manual control is a small gear on the left side. The bucket tilt uses a Z-linkage design that allows for the bucket to move correctly through the lift movement and not dump any load. This is controlled by a single mini linear actuator, with a controlling gear on the top of the engine cover. The head of the bucket allows for quick change between a bucket and forks. Finally, steering is controlled by the HOG on the top of the cabin, and keep my high standards for steering feel with low slop.
I was pleased with this little creation, but it was not as interesting as the other MOC that I designed. So while everything worked well, and looked great, I submitted the other MOC for the contest. I hope you enjoy the MOC, and feel free to build one of your own.
I frequently build another Unimog after it has been a couple of months since the last one, so here is another TWO!
You may find building instructions for both the U400 and the U430.
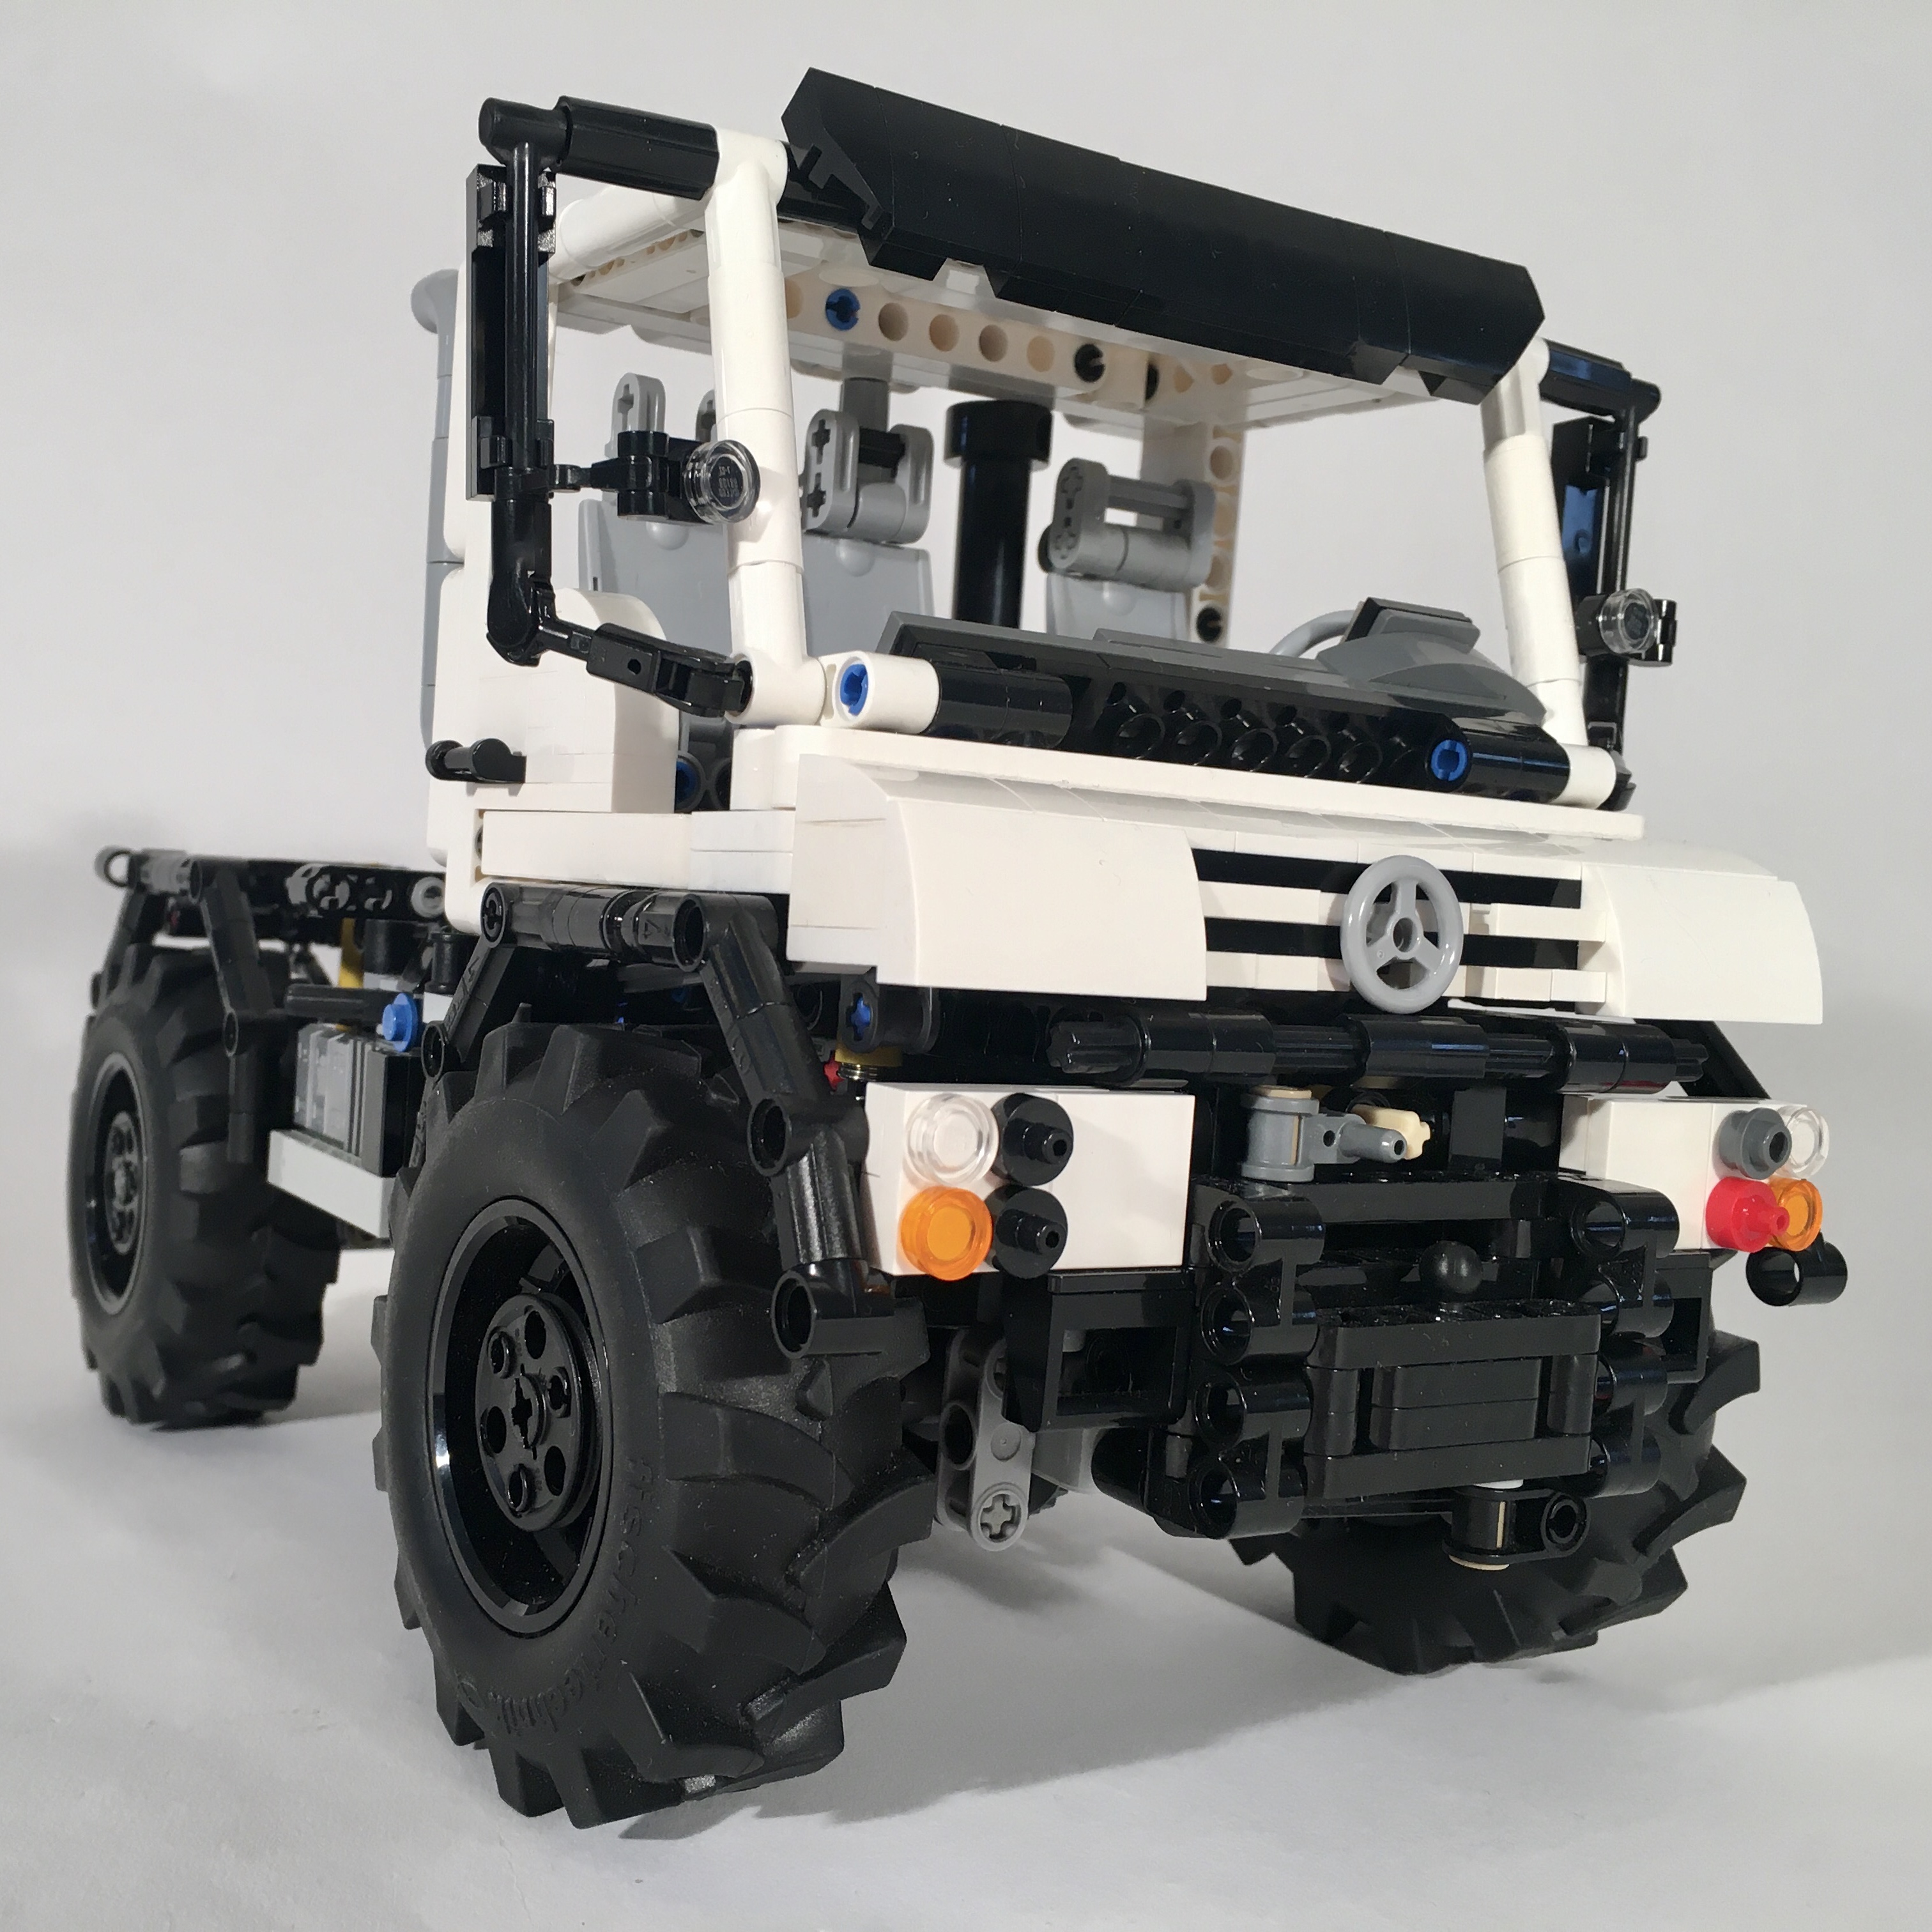
I generally find myself building a Unimog about every year, and this year, I built three. Kindof. Early in 2021, I built a Short Wheelbase U500 in blue, and I loved it. So, I wanted to see if I could take the build a little further. I’m partial to the U500, but the U400 seems to be a little more popular, and the current U430 was another challenge I wanted to try.
Instructions available for both.
The chassis for both is a modification of the U500. The wheelbase is 2 studs shorter, so I removed the winch and the PTO on/off switch, and modified the bed tipping mechanism. The rest is the same, including the front and rear PTO, the four wheel drive, and the I4 engine. Both the U400 and the U430 have a manual pneumatic pump with a front/rear switch for attachments.
The tipping bed is the same for both, and can tip in three directions. The three sides drop as well. And the cab for both is generally the same, with a slight change to the front to address the styling differences for both. You can see the similarities between both in the videos below.
I’m pleased with these MOCs, and how they worked. The U400 is the most beautiful MOC I have made in a long time. It currently adorns my desk at work, and will continue to do so for some time. While I wish both would have portal axles, the stability of the drivetrain, and the flawless reliability is worth tradeoff. The U430 looks great as well, especially with the tires, the orange is my favorite. Hopefully I am able to make some attachments for the front and rear. Stay tuned.
Sometimes I plan out a build, and other times, a build just kind of happens. This was the latter.
You may find free instructions for this MOC at Rebrickable.com.
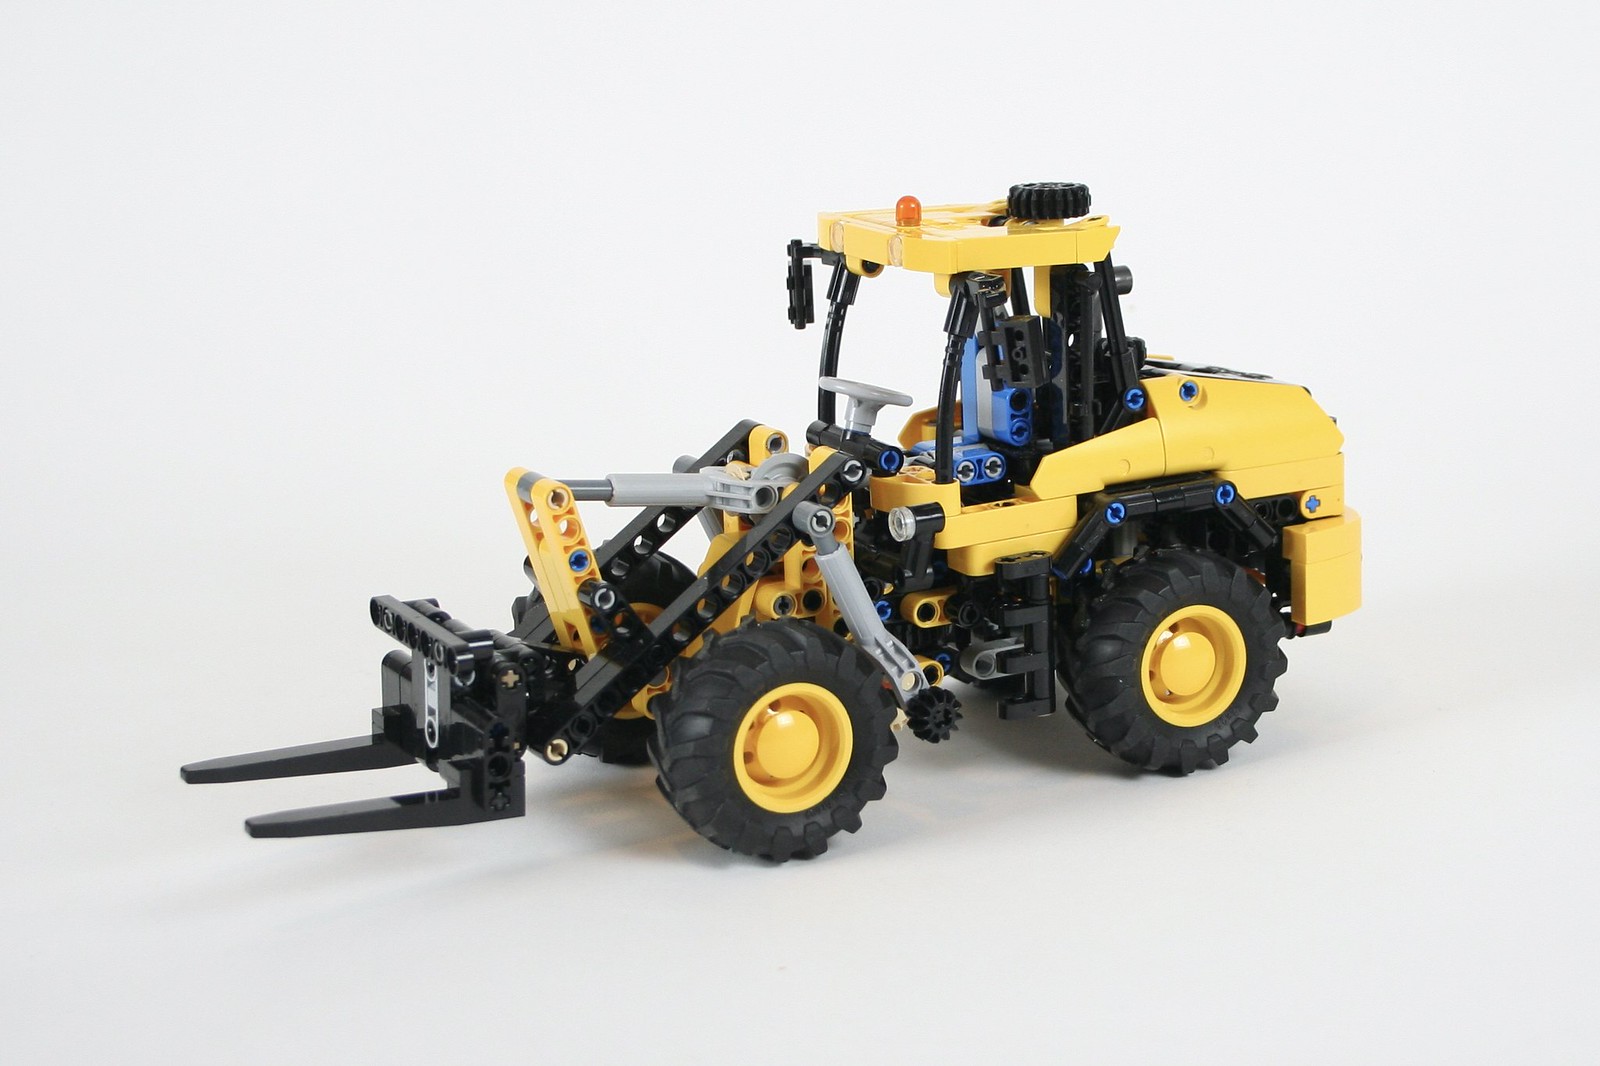
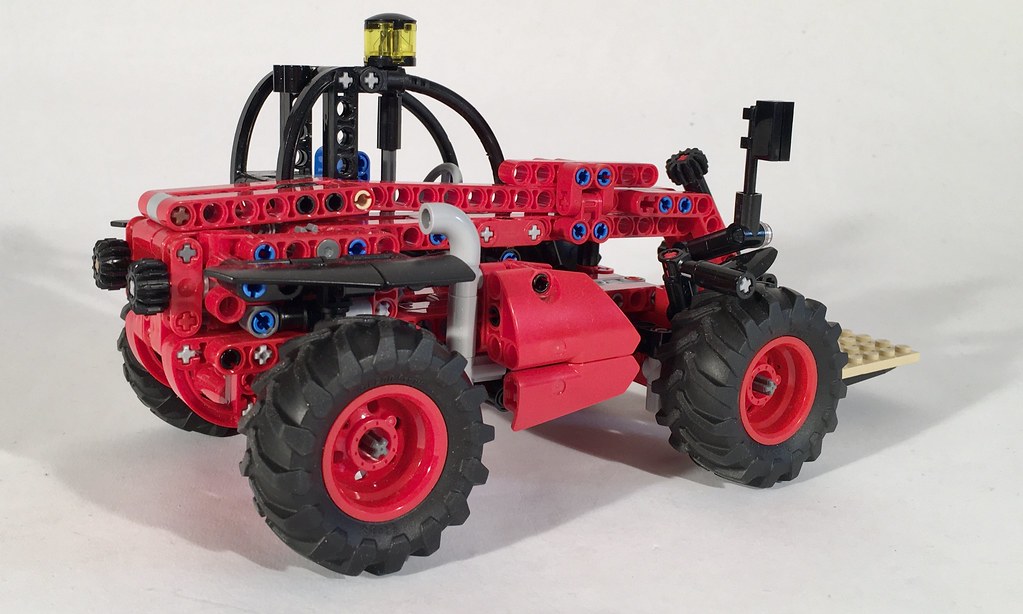
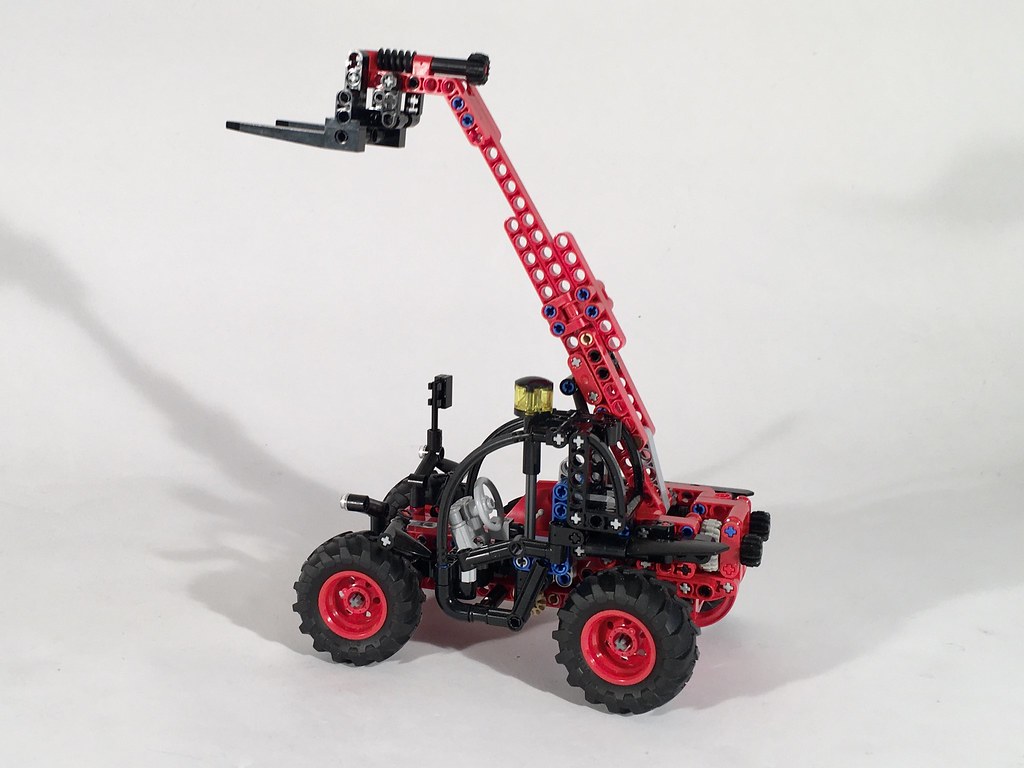
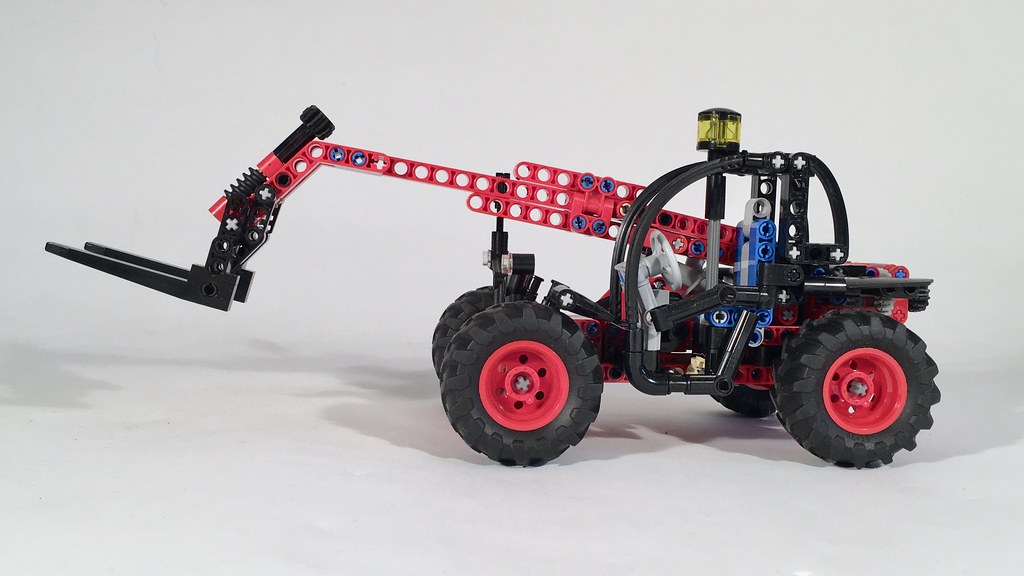
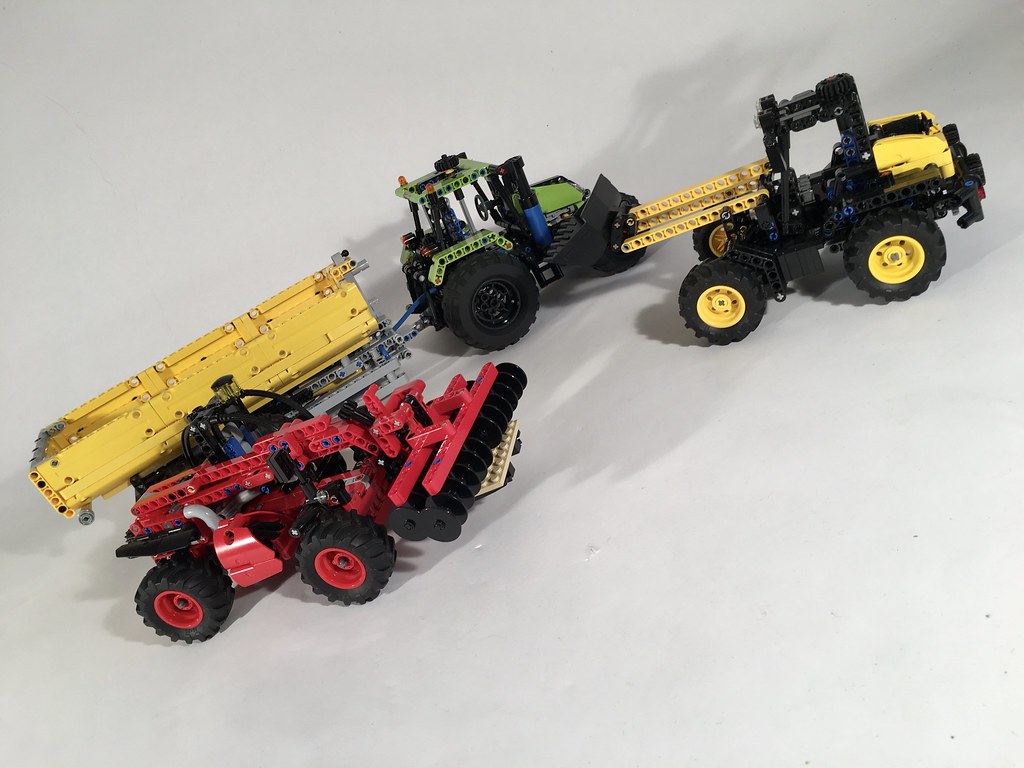
After building the Atmos Tractor, and then a gazillon implements, attachments, and trailers, I started branching out to other machines that could be used at the Thirdwigg Farm. The Compact Loader was a result of this. I was playing with the new LEGO 42122 tires, and quickly came up with a little four wheel steering idea. I added a fork boom, and decided to see where the project would go.
I am quite fond of LEGO 8283, and the rest of the design was influenced by this little set. I tried a couple of boom extension designs, but each looked a little too “overweight” for the little tractor. So I came back to the extension design that was used on 8283. A mini linear actuator is used to lift the boom. Both functions are controlled by two separate gears on the back of the telehandler.
The cab came together pretty quickly, though I had to make sure the new tires had a clear range of motion. I added some lights, and front fenders which brought a little visual weight to the front. I had a tricky time finding rear fenders that I liked, but I eventually found a solution I liked. In my move towards increasing the readability of my instructions, I have published a PDF with step-by-step instructions that list required parts for each step. I hope they are clear for you, and they bring value to your own build.
The Compact Telehandler worked just as I hoped. The steering is great; it’s fun to drive this little tractor around on a small desk. The boom lift works well, and has a great range of motion. The extension works smoothly, though since it is driven by a worm gear, if the extension is in the wrong position while trying to lift the boom, the boom will bind. The fork tilt mechanism is smooth, and is easily accessible in all boom positions. We will see what next build come from just playing with a couple of parts.
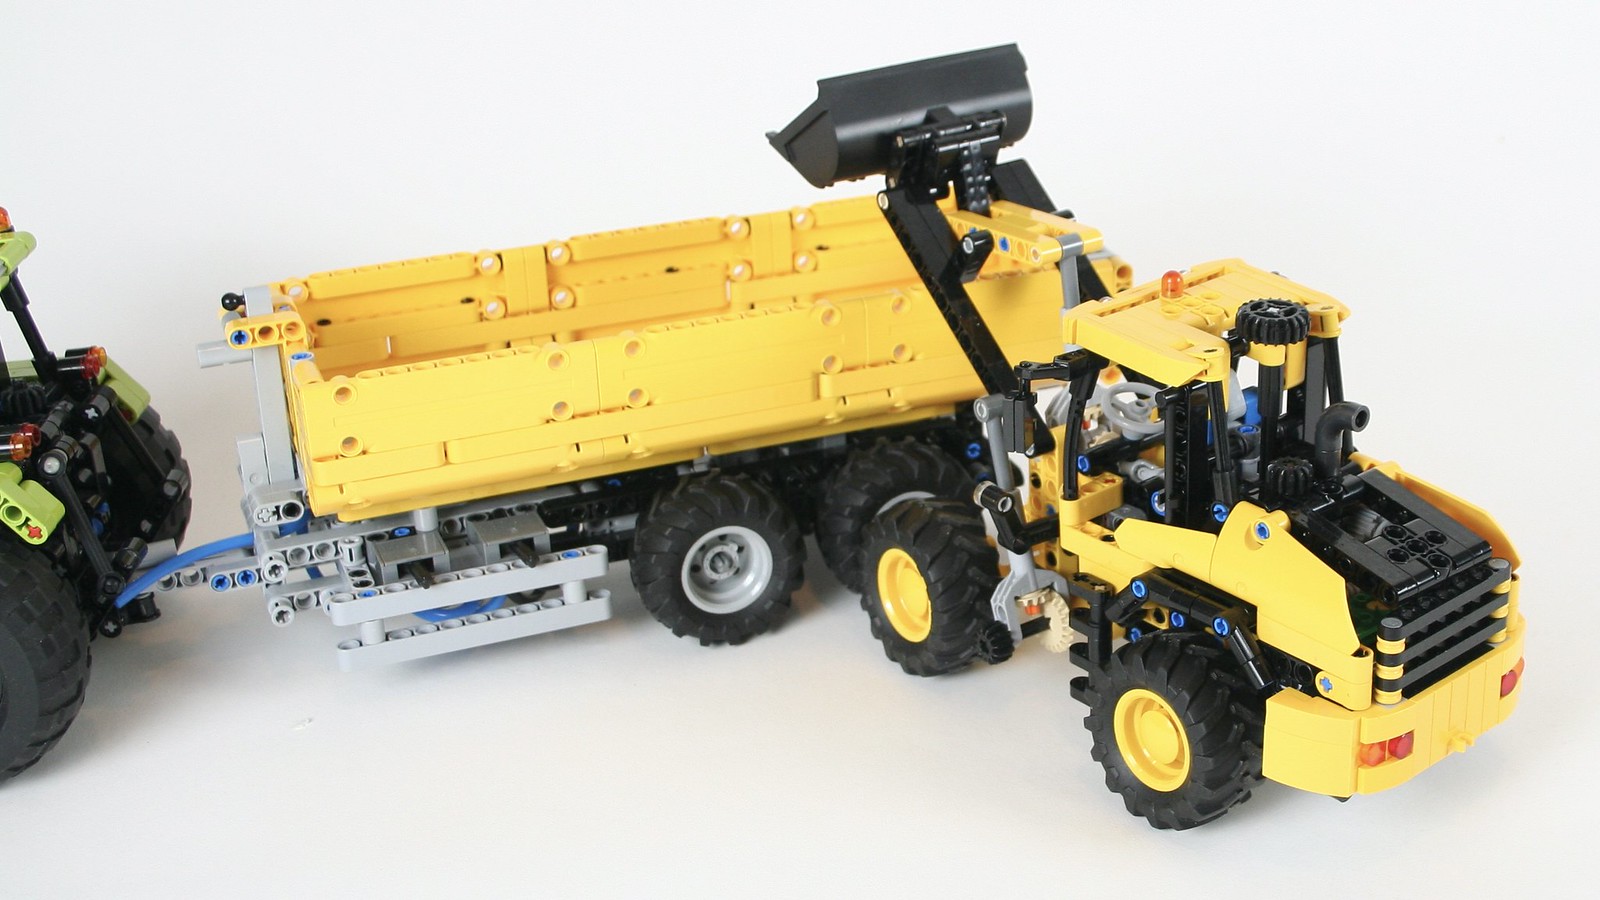
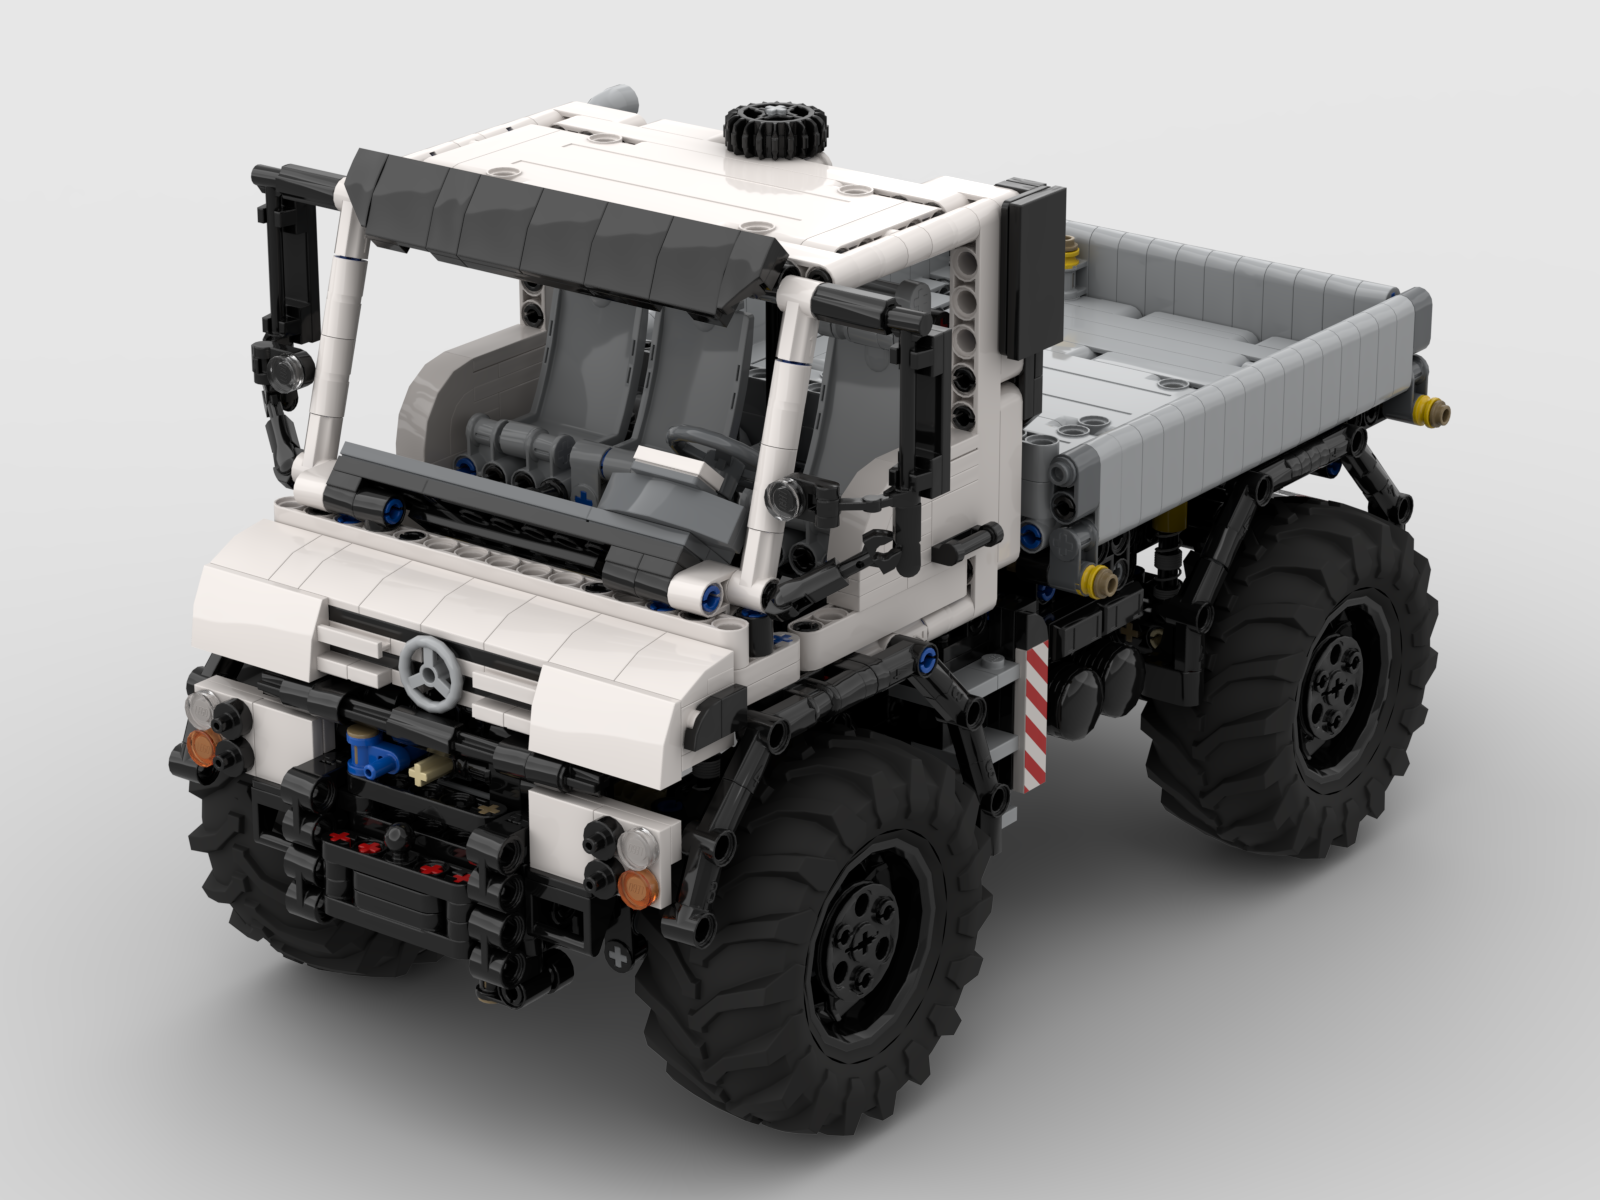
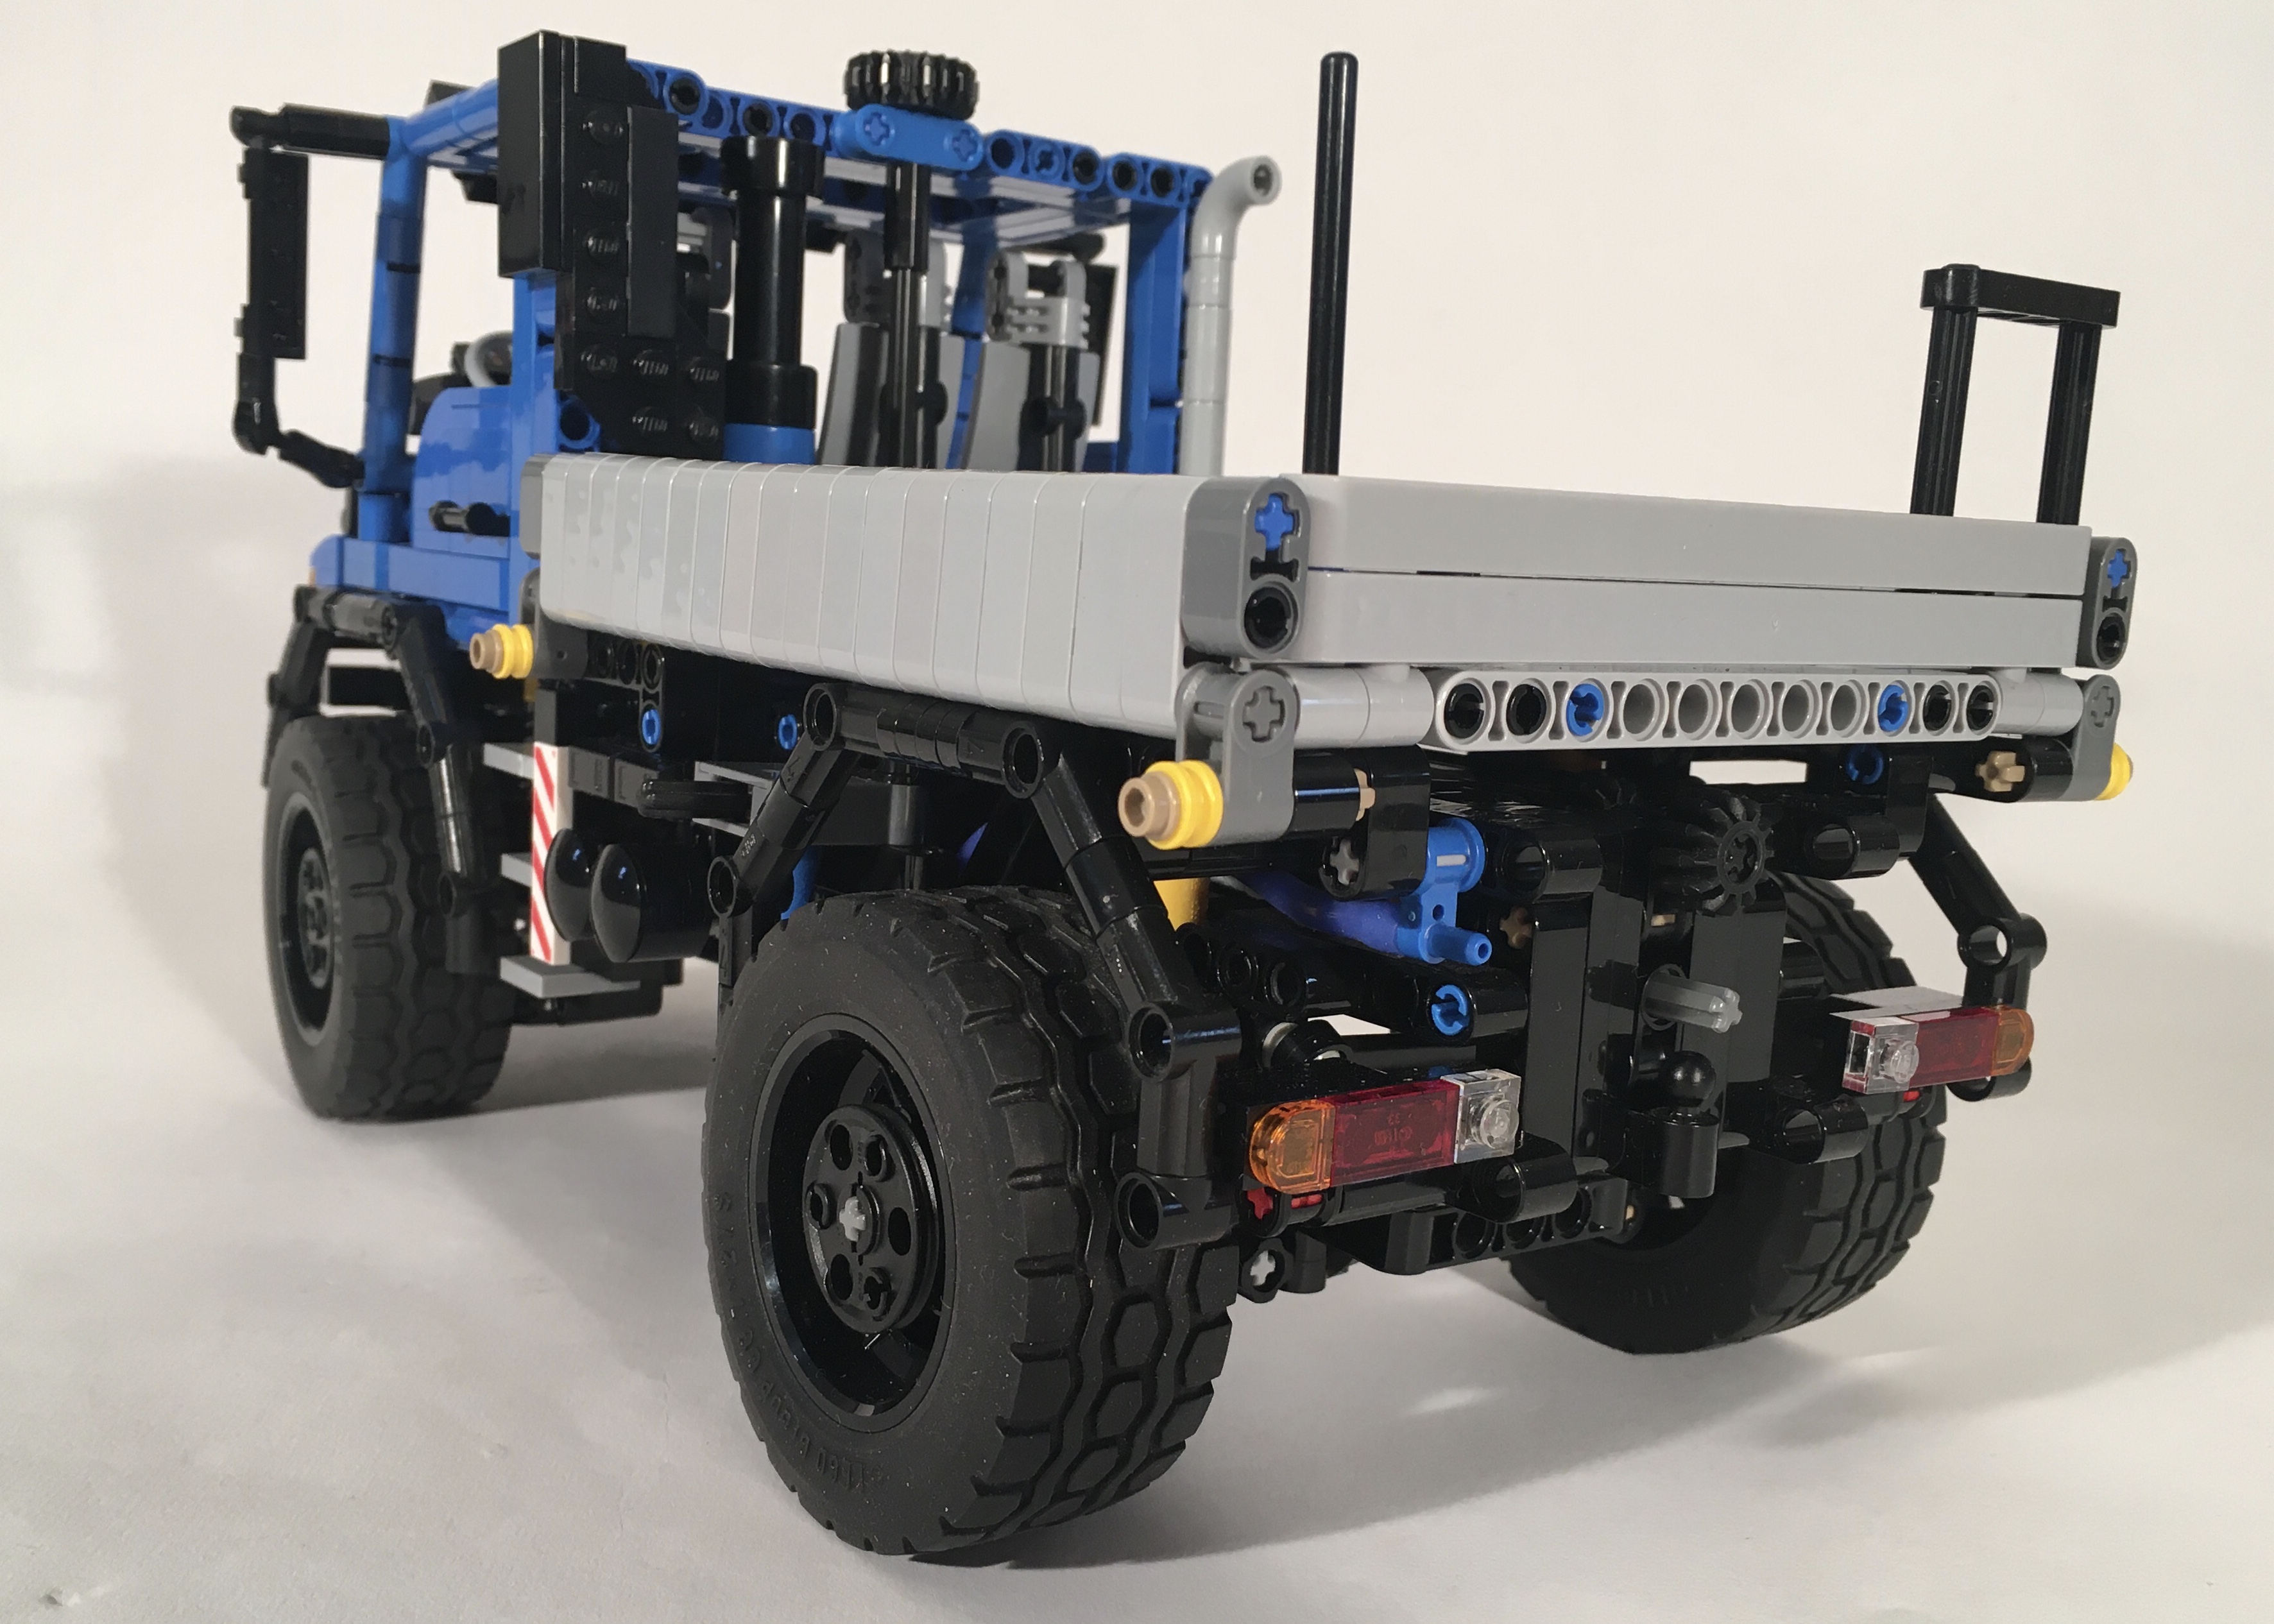
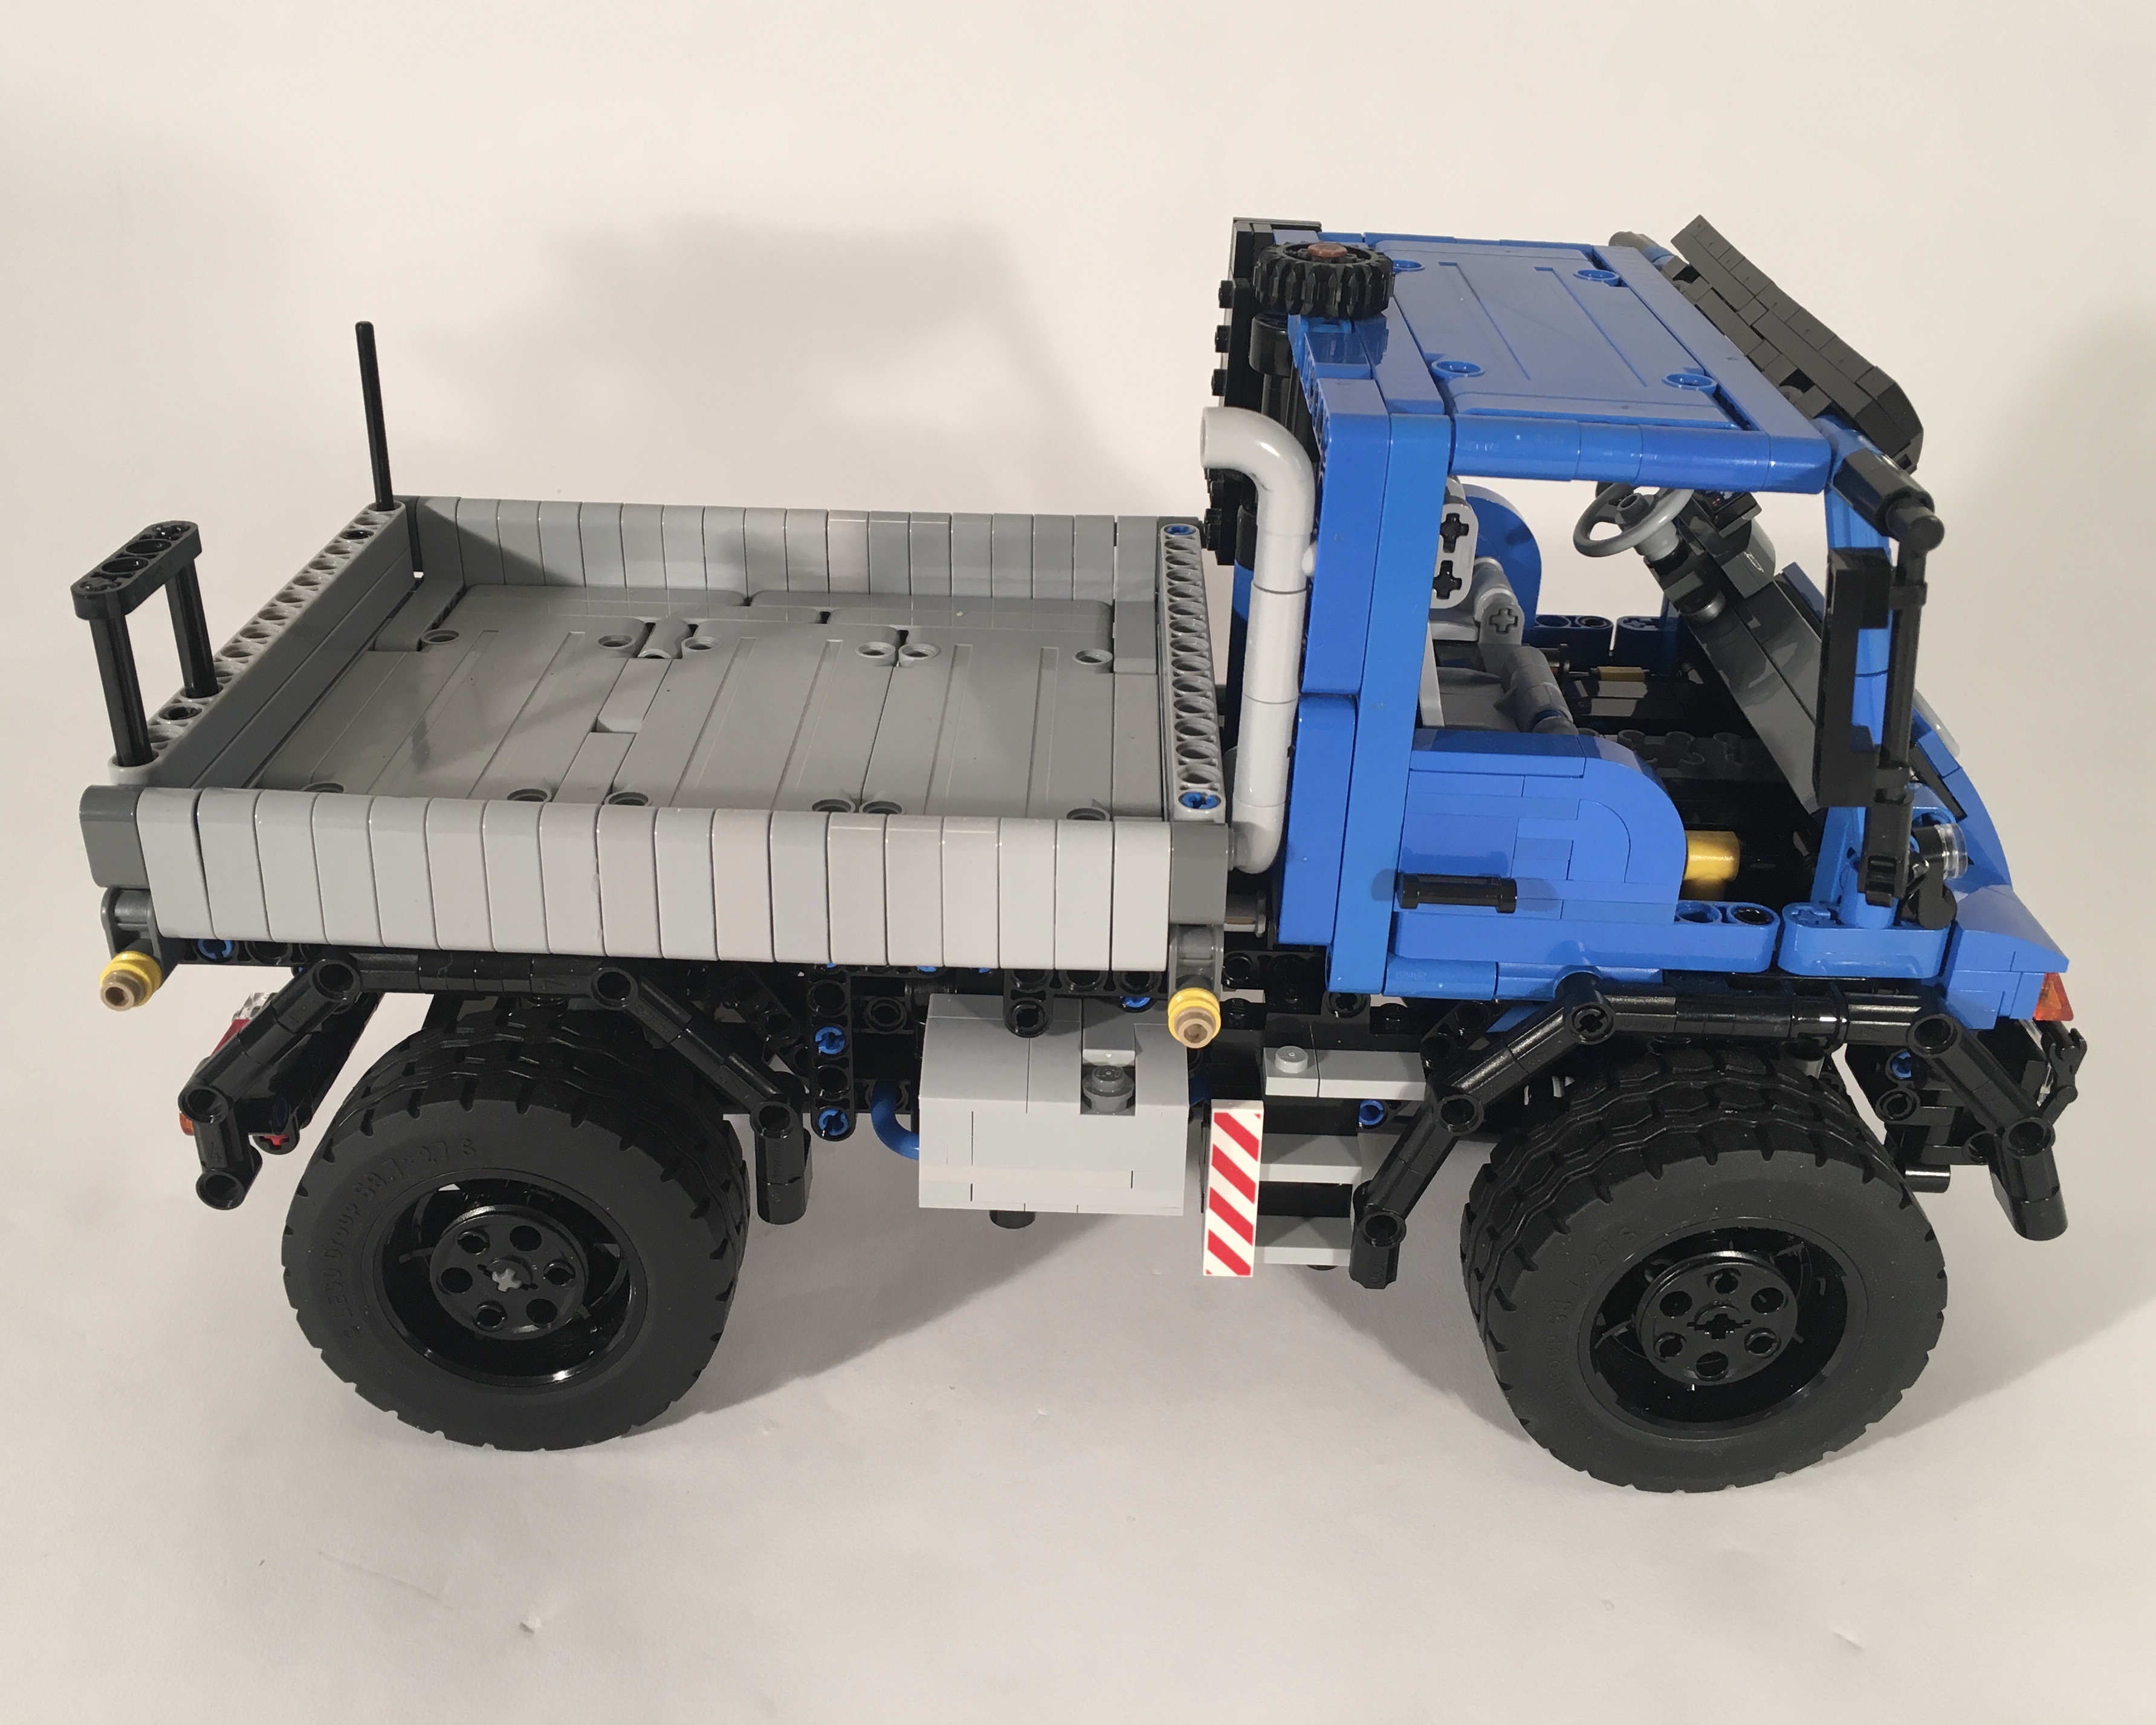
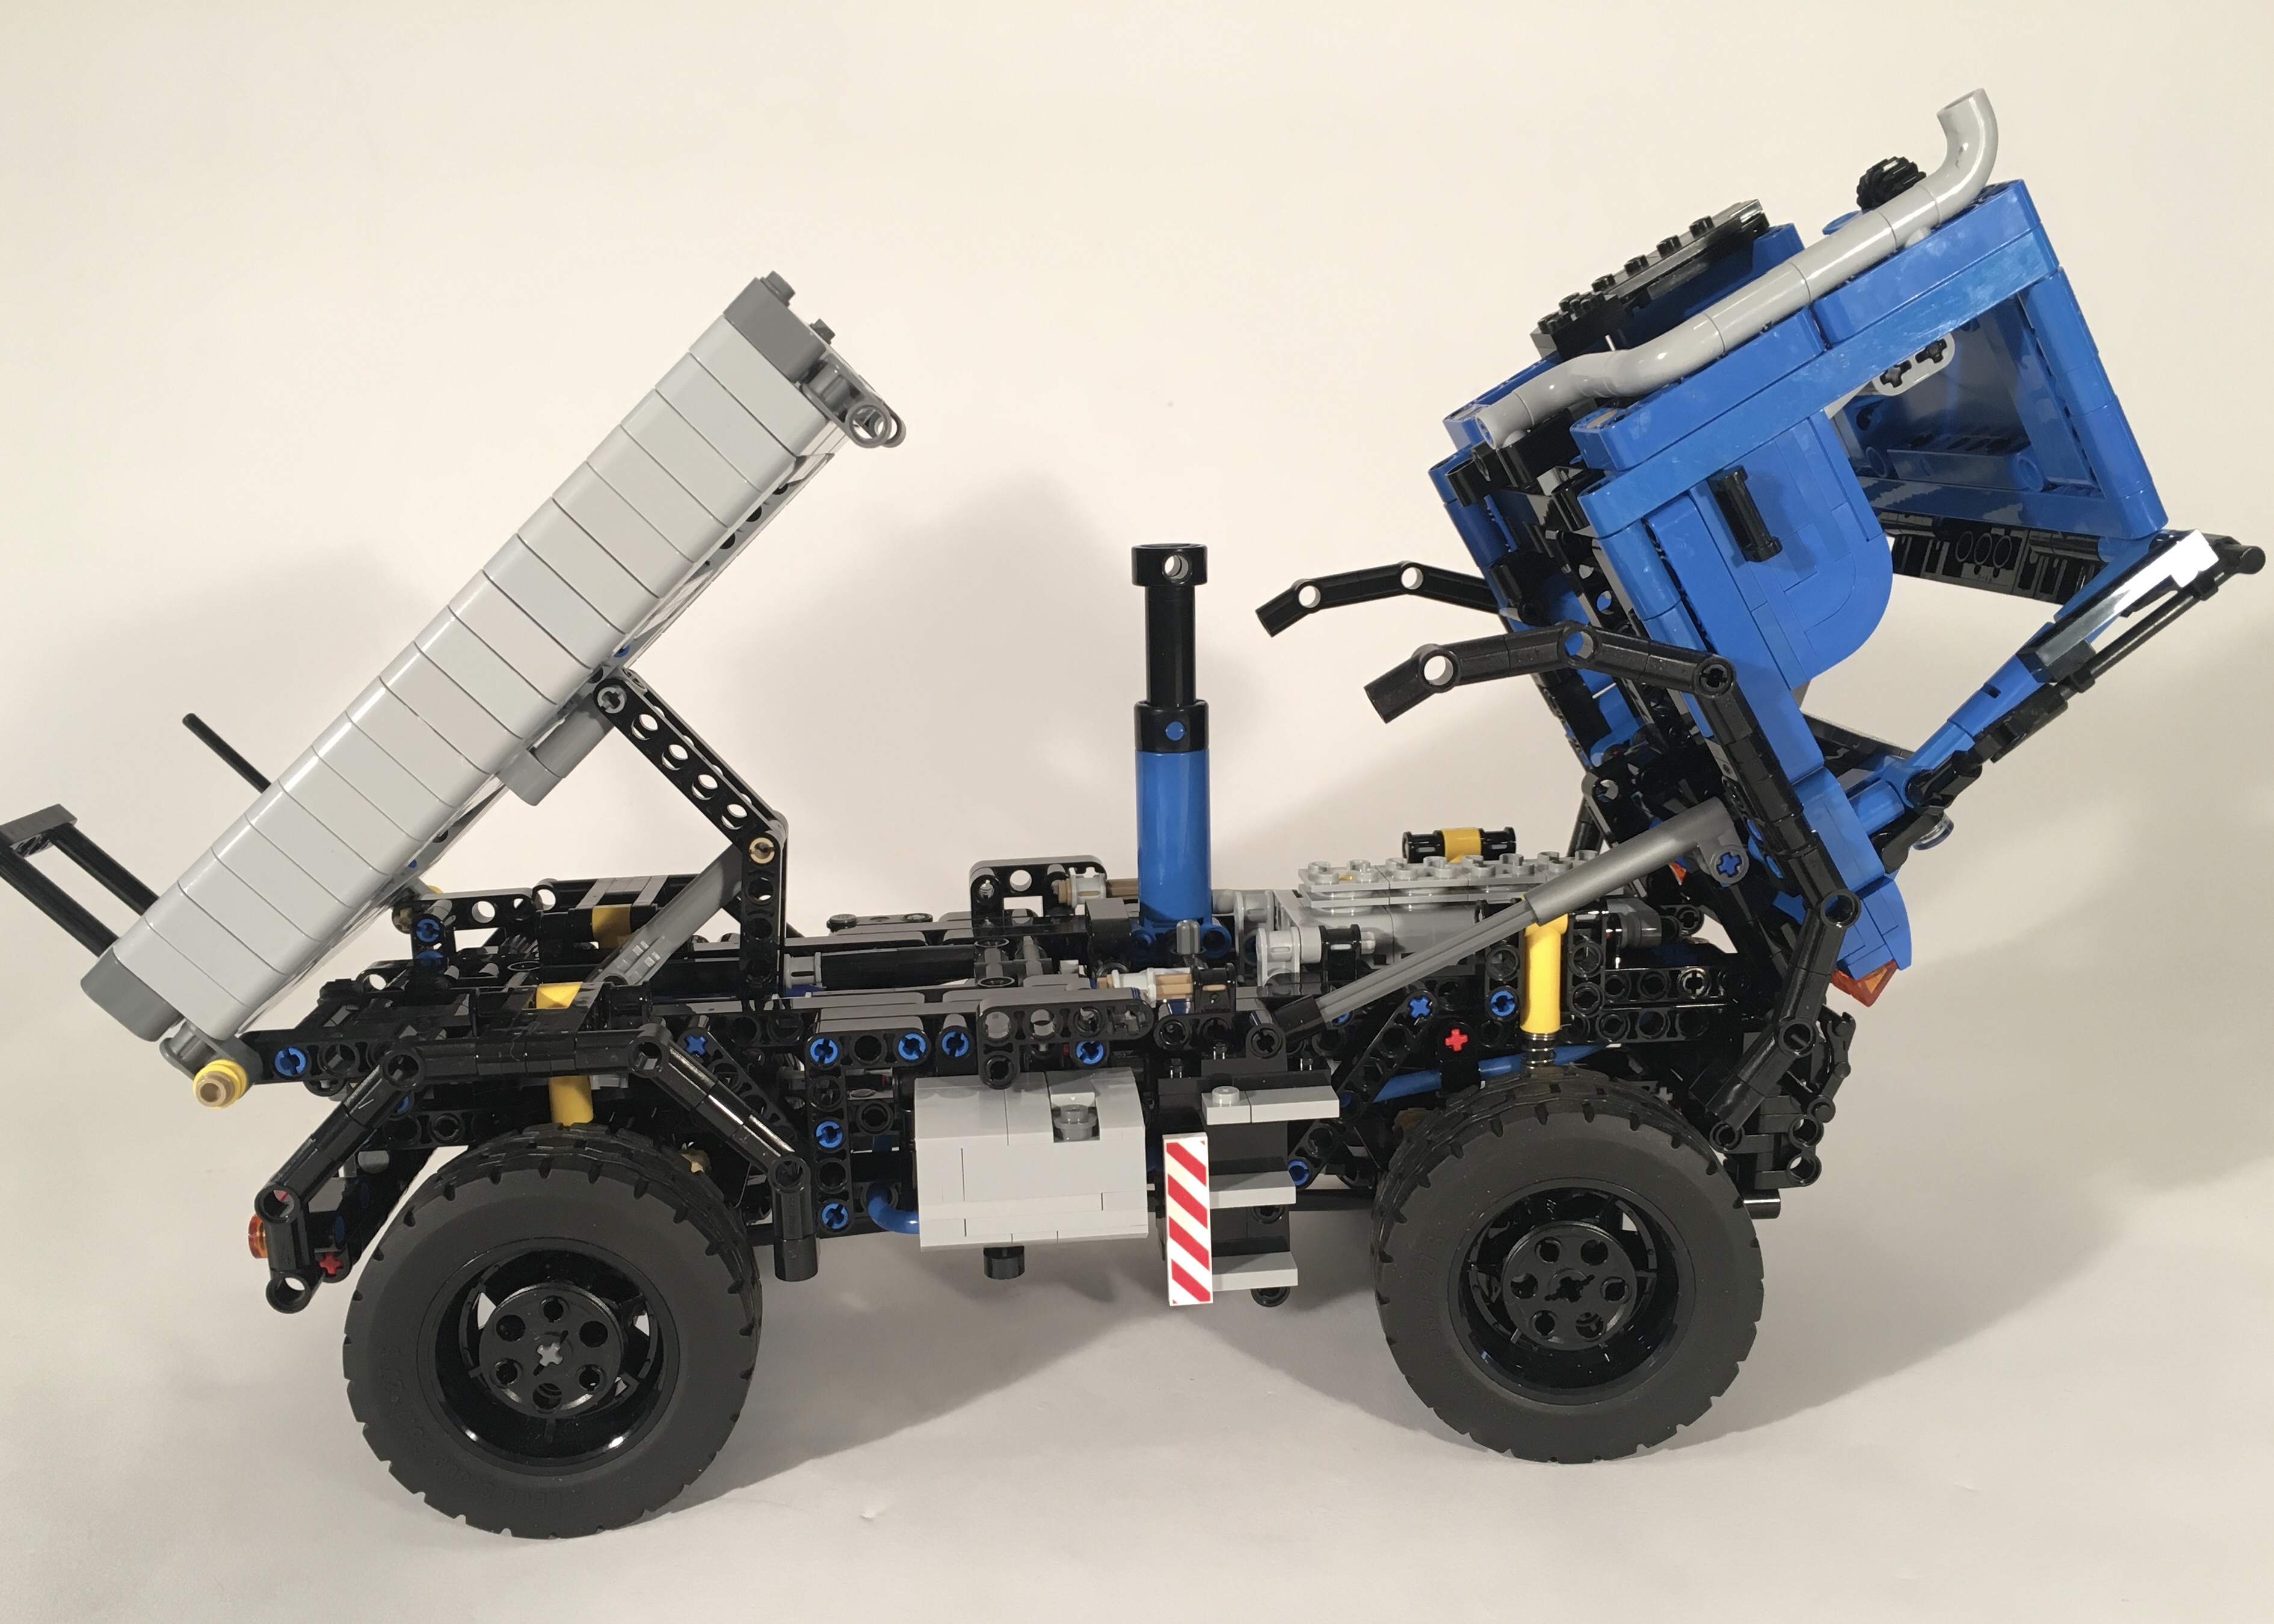
Right after the LEGO Batmobile 76139 was released, I saw the front tires, and immediately planned this Unimog. The tires were perfect for a U500. I stared working on a draft before I had acquired the tires. I wanted the build to be in the theme of my Unimog 437 in that it was about 1:18 in scale, and had modular cabins and bed options. But I wanted to take this idea to the next level so that front and rear attachments could be added, as well as trailers. Many of my builds as of late are more system focused, in that a main build supports lots of other attachments, trailers, and versions of the same build. With this one, standard attachment points on the front, rear, bed, cab, and hitches allow for a variety of versions and attachments to be added quickly. I’ll make more of these soon.
Rear Hitch, Attachment point, PTO, and PPTO
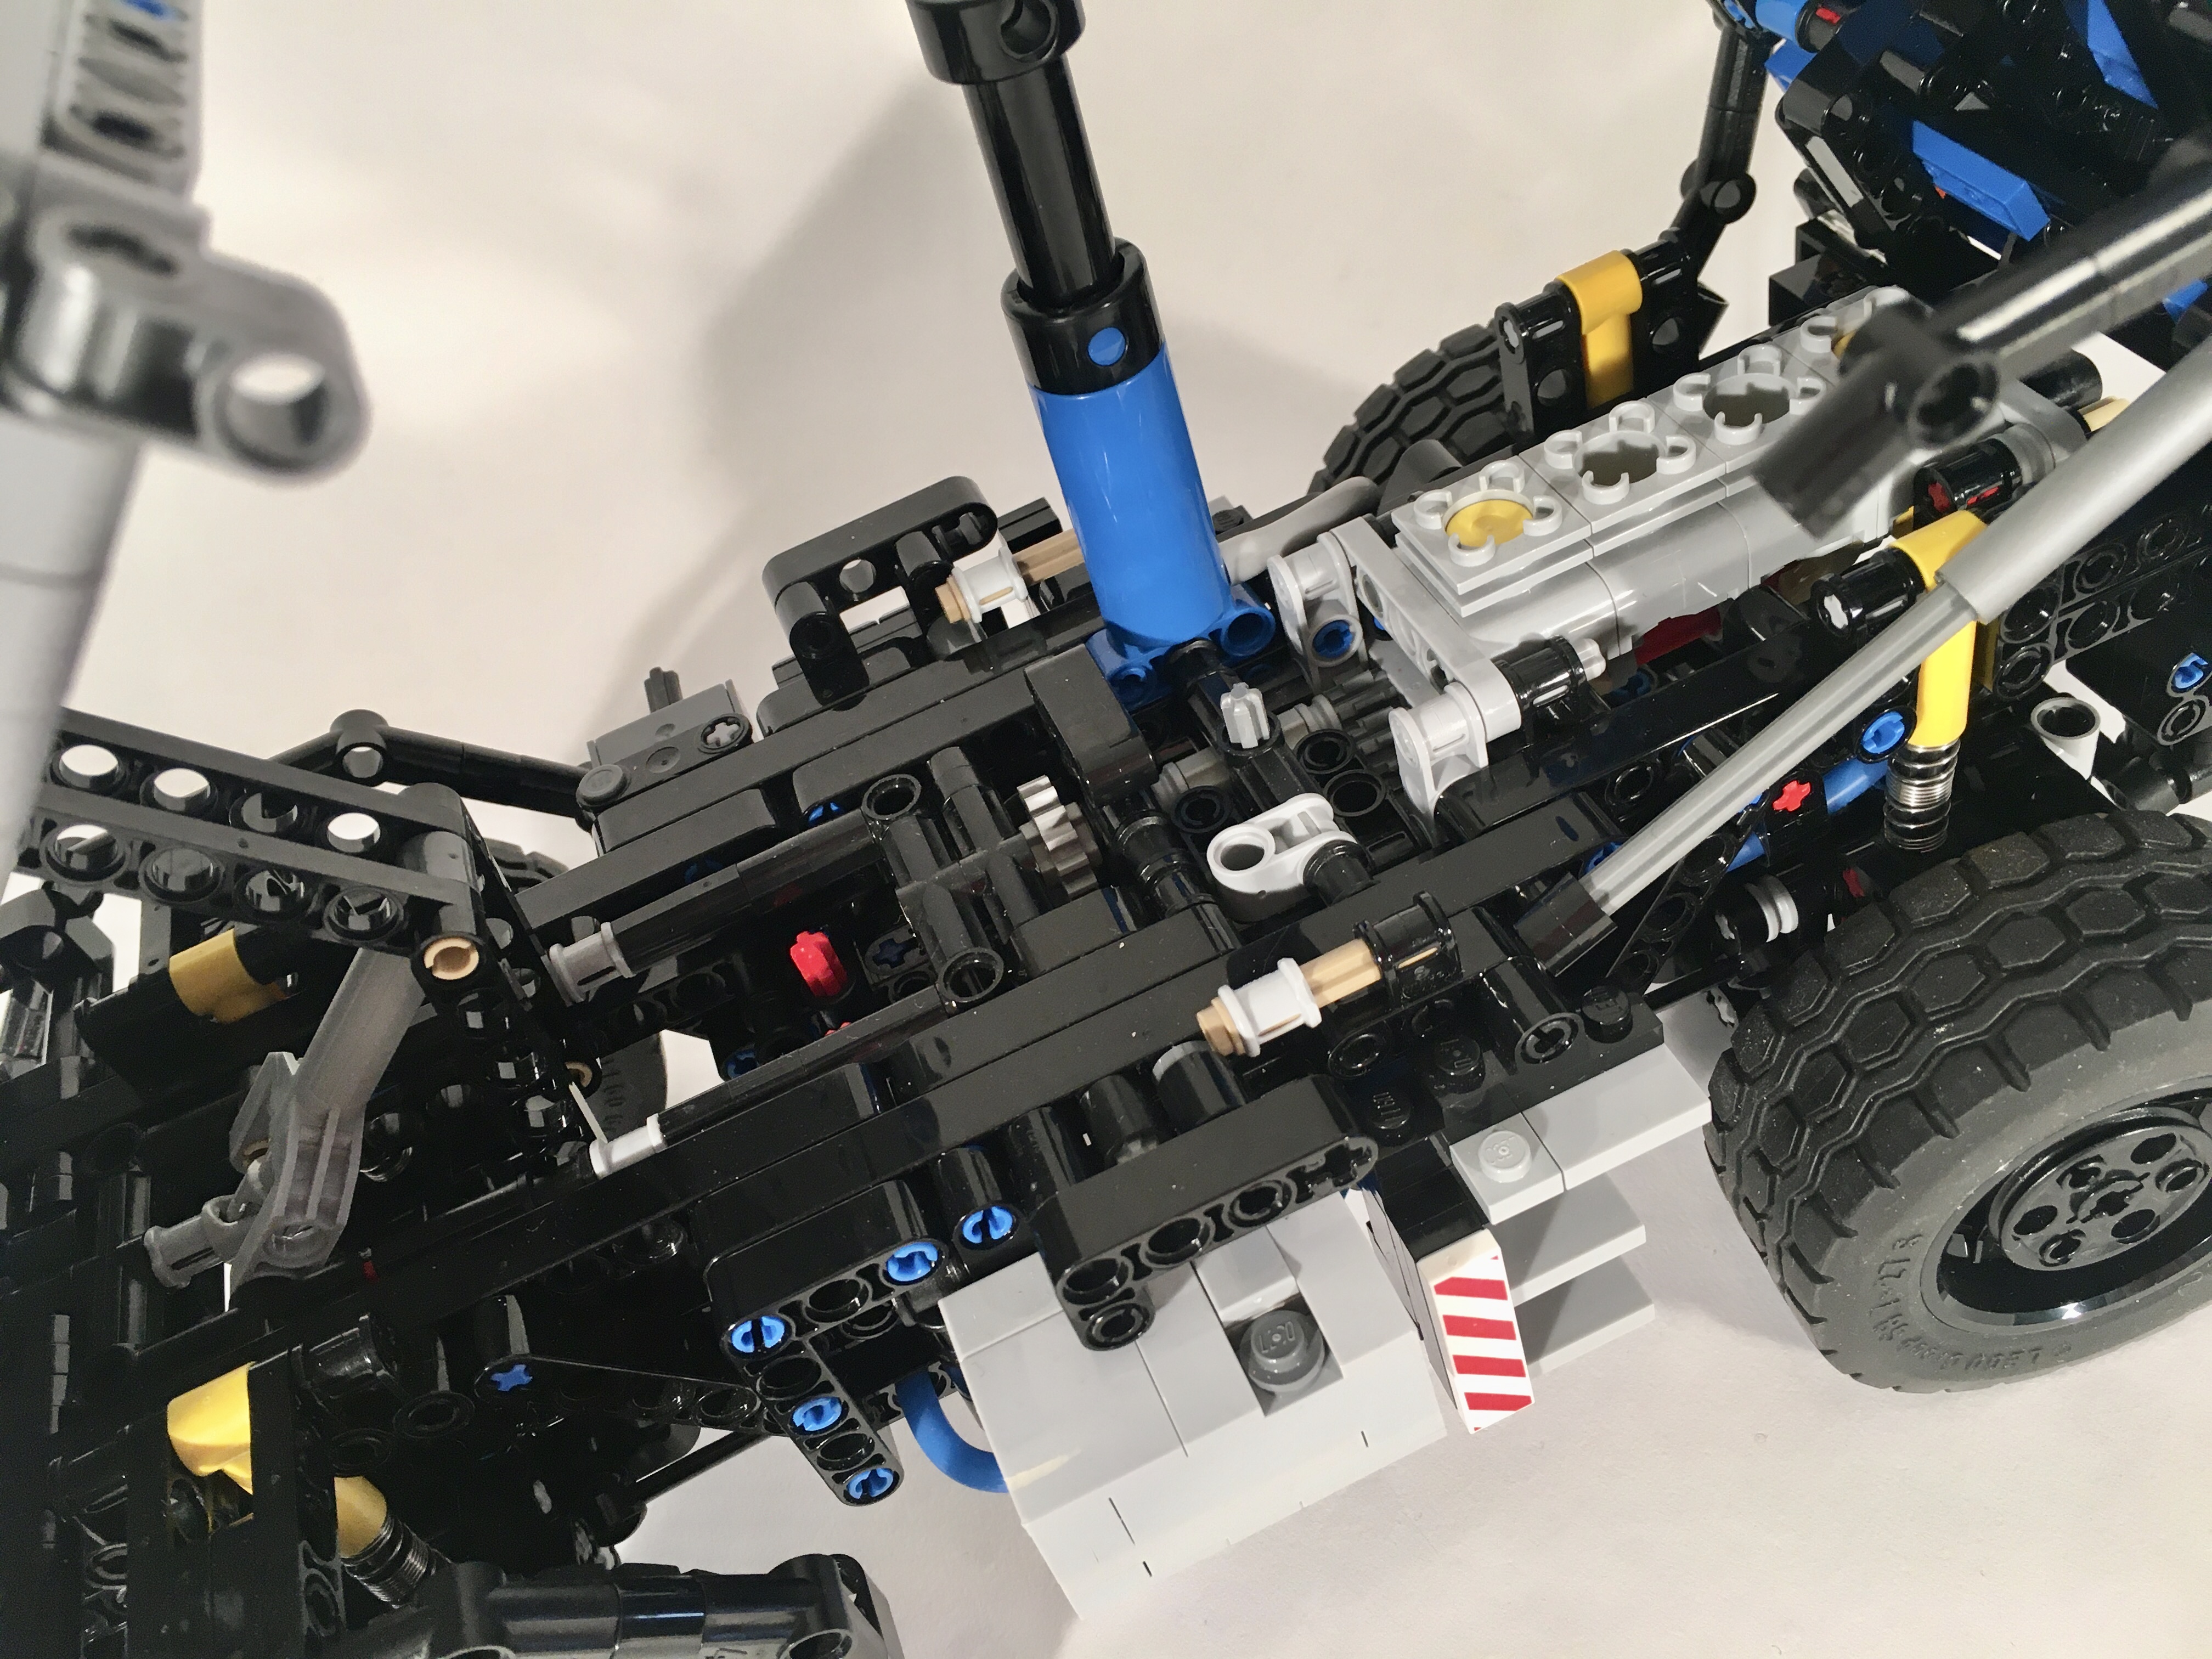
I quickly set up a front and rear suspension using what was learned on the 437. The MOC has front and rear live axle suspension, four wheel drive, and front steering. A I4 engine is placed under the cab, over the front axle. Unlike the 437, I added a front and rear PTO. The rear PTO has an on/off switch. A center PTO is present as well for attachments that go in place of the rear bed. Finally, I added a Pneumatic pump behind the cabin to run pneumatics on the front or rear of the truck. A value determines if the preasure goes to the front or rear.
U500 Chassis
I added a three way tipper bed on the rear of the chassis, and created a way for the cab to be tilted. Both can be released by pulling a couple of axles out to allow for the tipping. The cab has seating for three, and both doors open. Finally, I added a front winch that is released and wound up using the fake air tanks on the left of the truck.
In the coming months I will make some attachments and trailers for this truck and for a U400/430 version that use the chassis of the U500 with some adjustments.
2016 Unimog U430
The truck turned out how I wanted it too, and had the features work the way as intended. The suspension is a little hard, but that supports various attachments well. This tipper bed and winch are a little addictive to play with. I did not spend much time making attachments for this truck, but I hope to do so soon. Until the next build or Unimog, Happy Building.
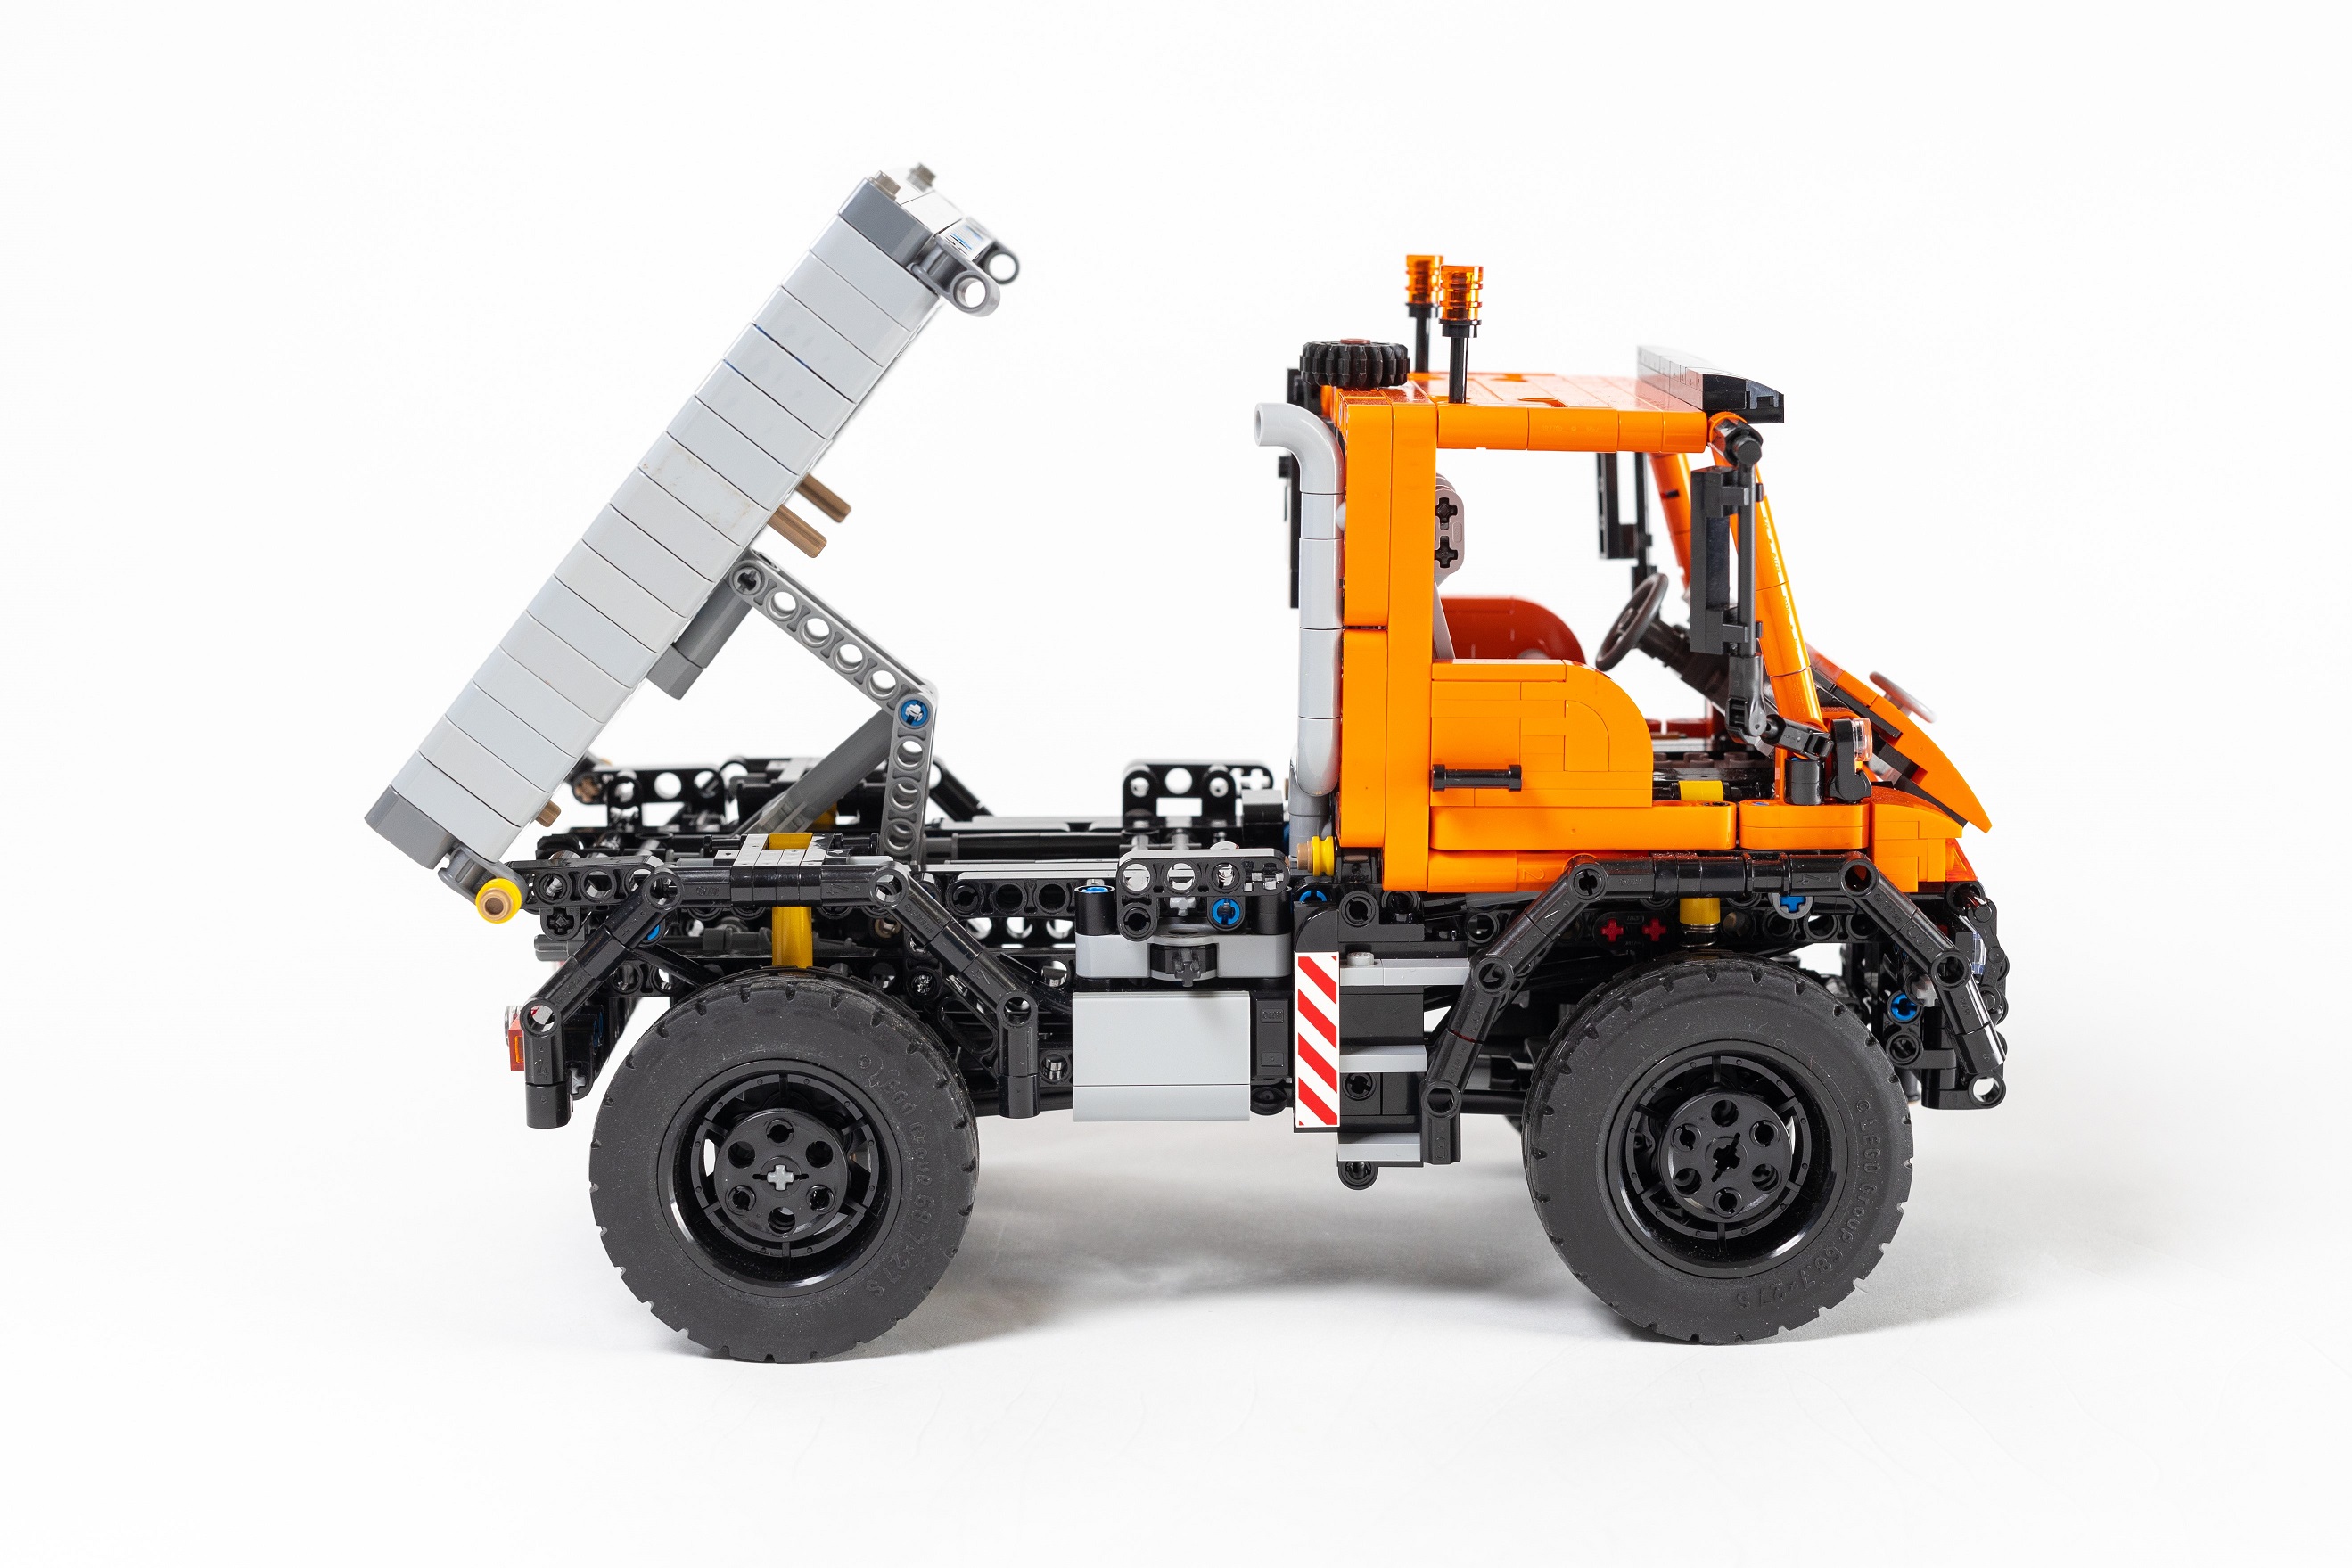
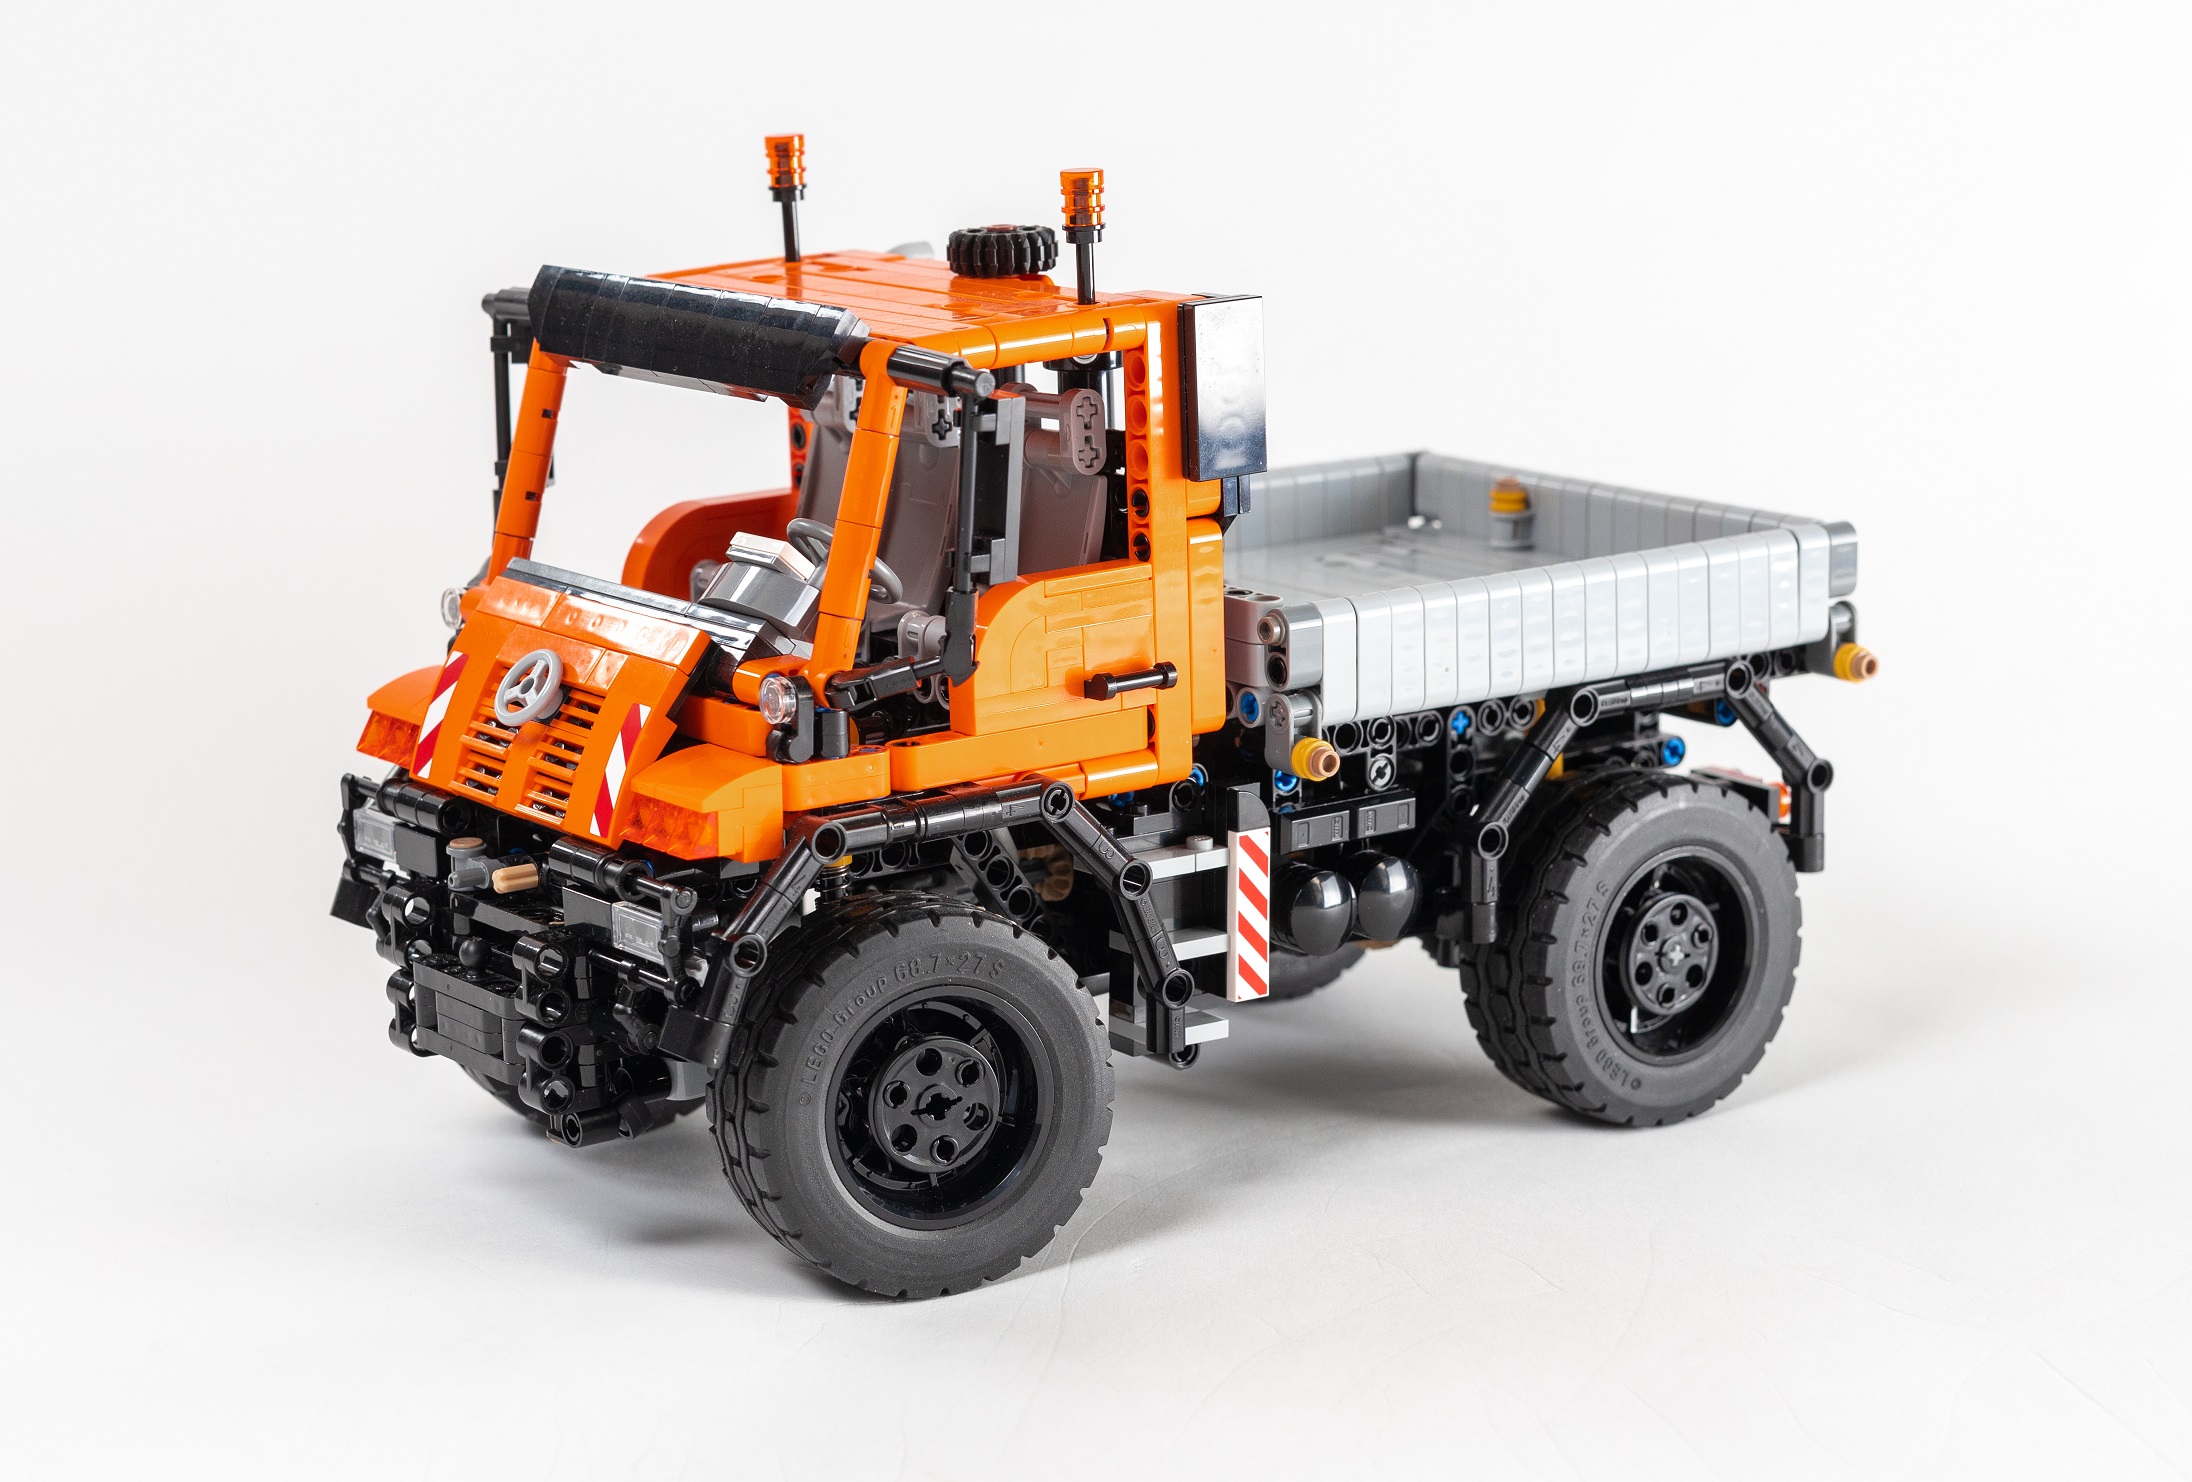
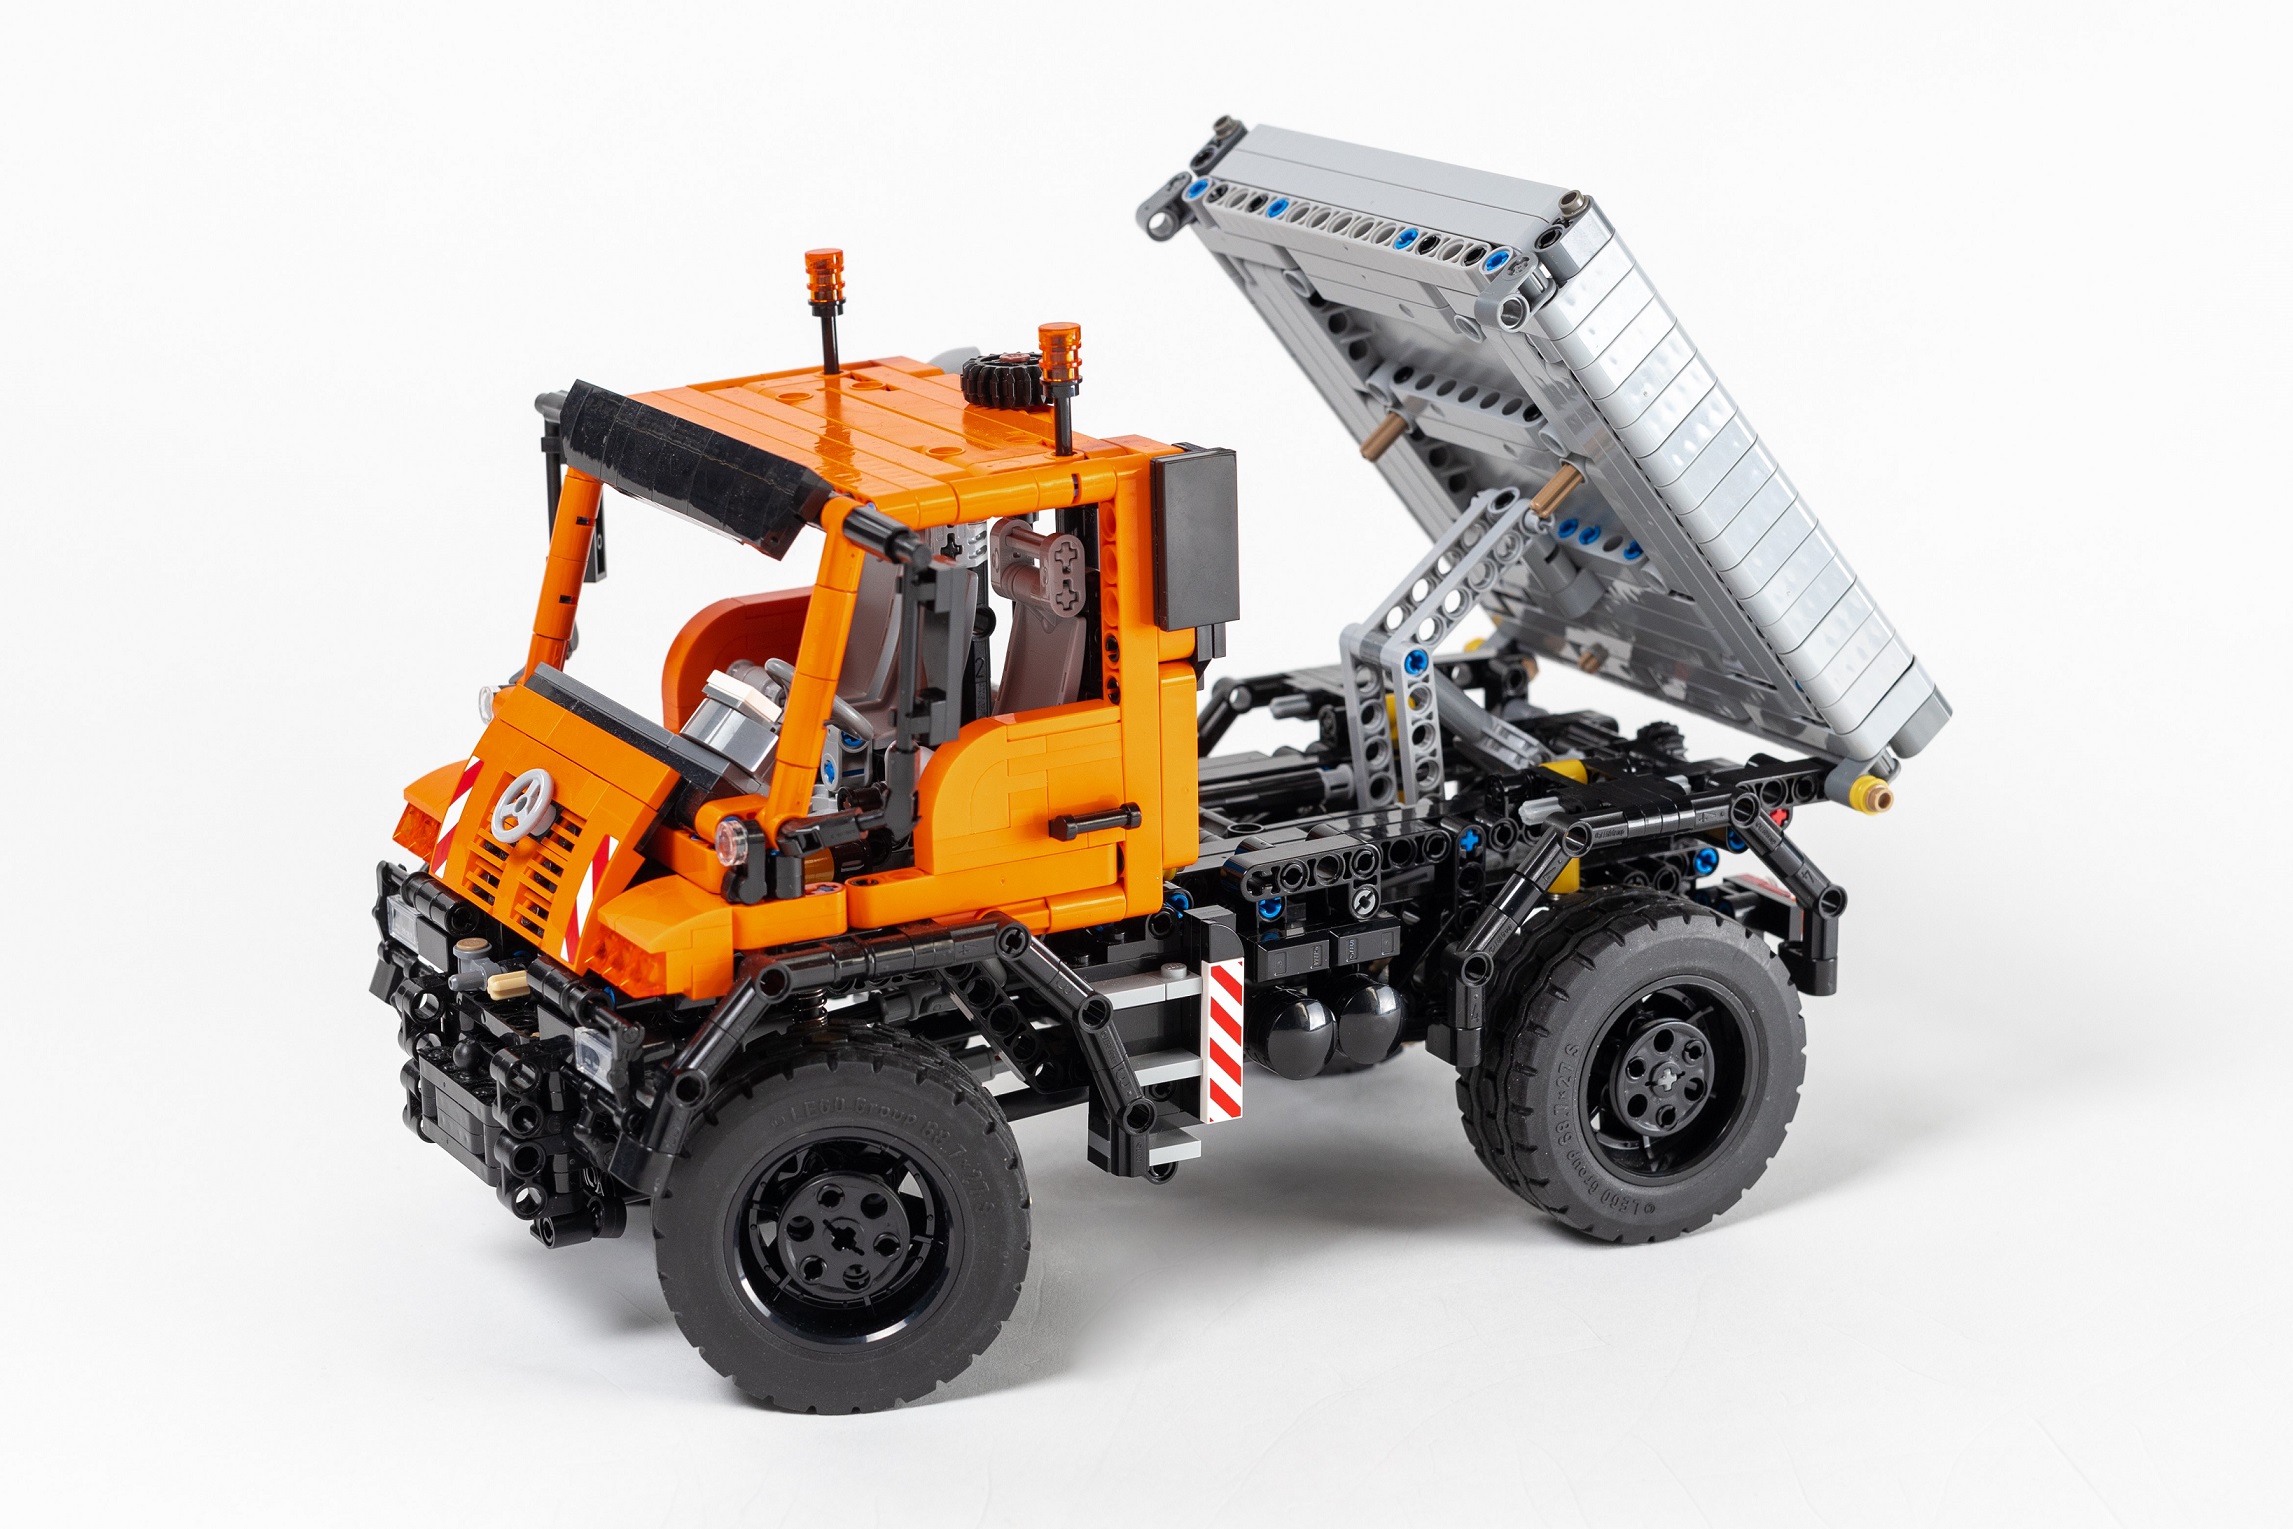
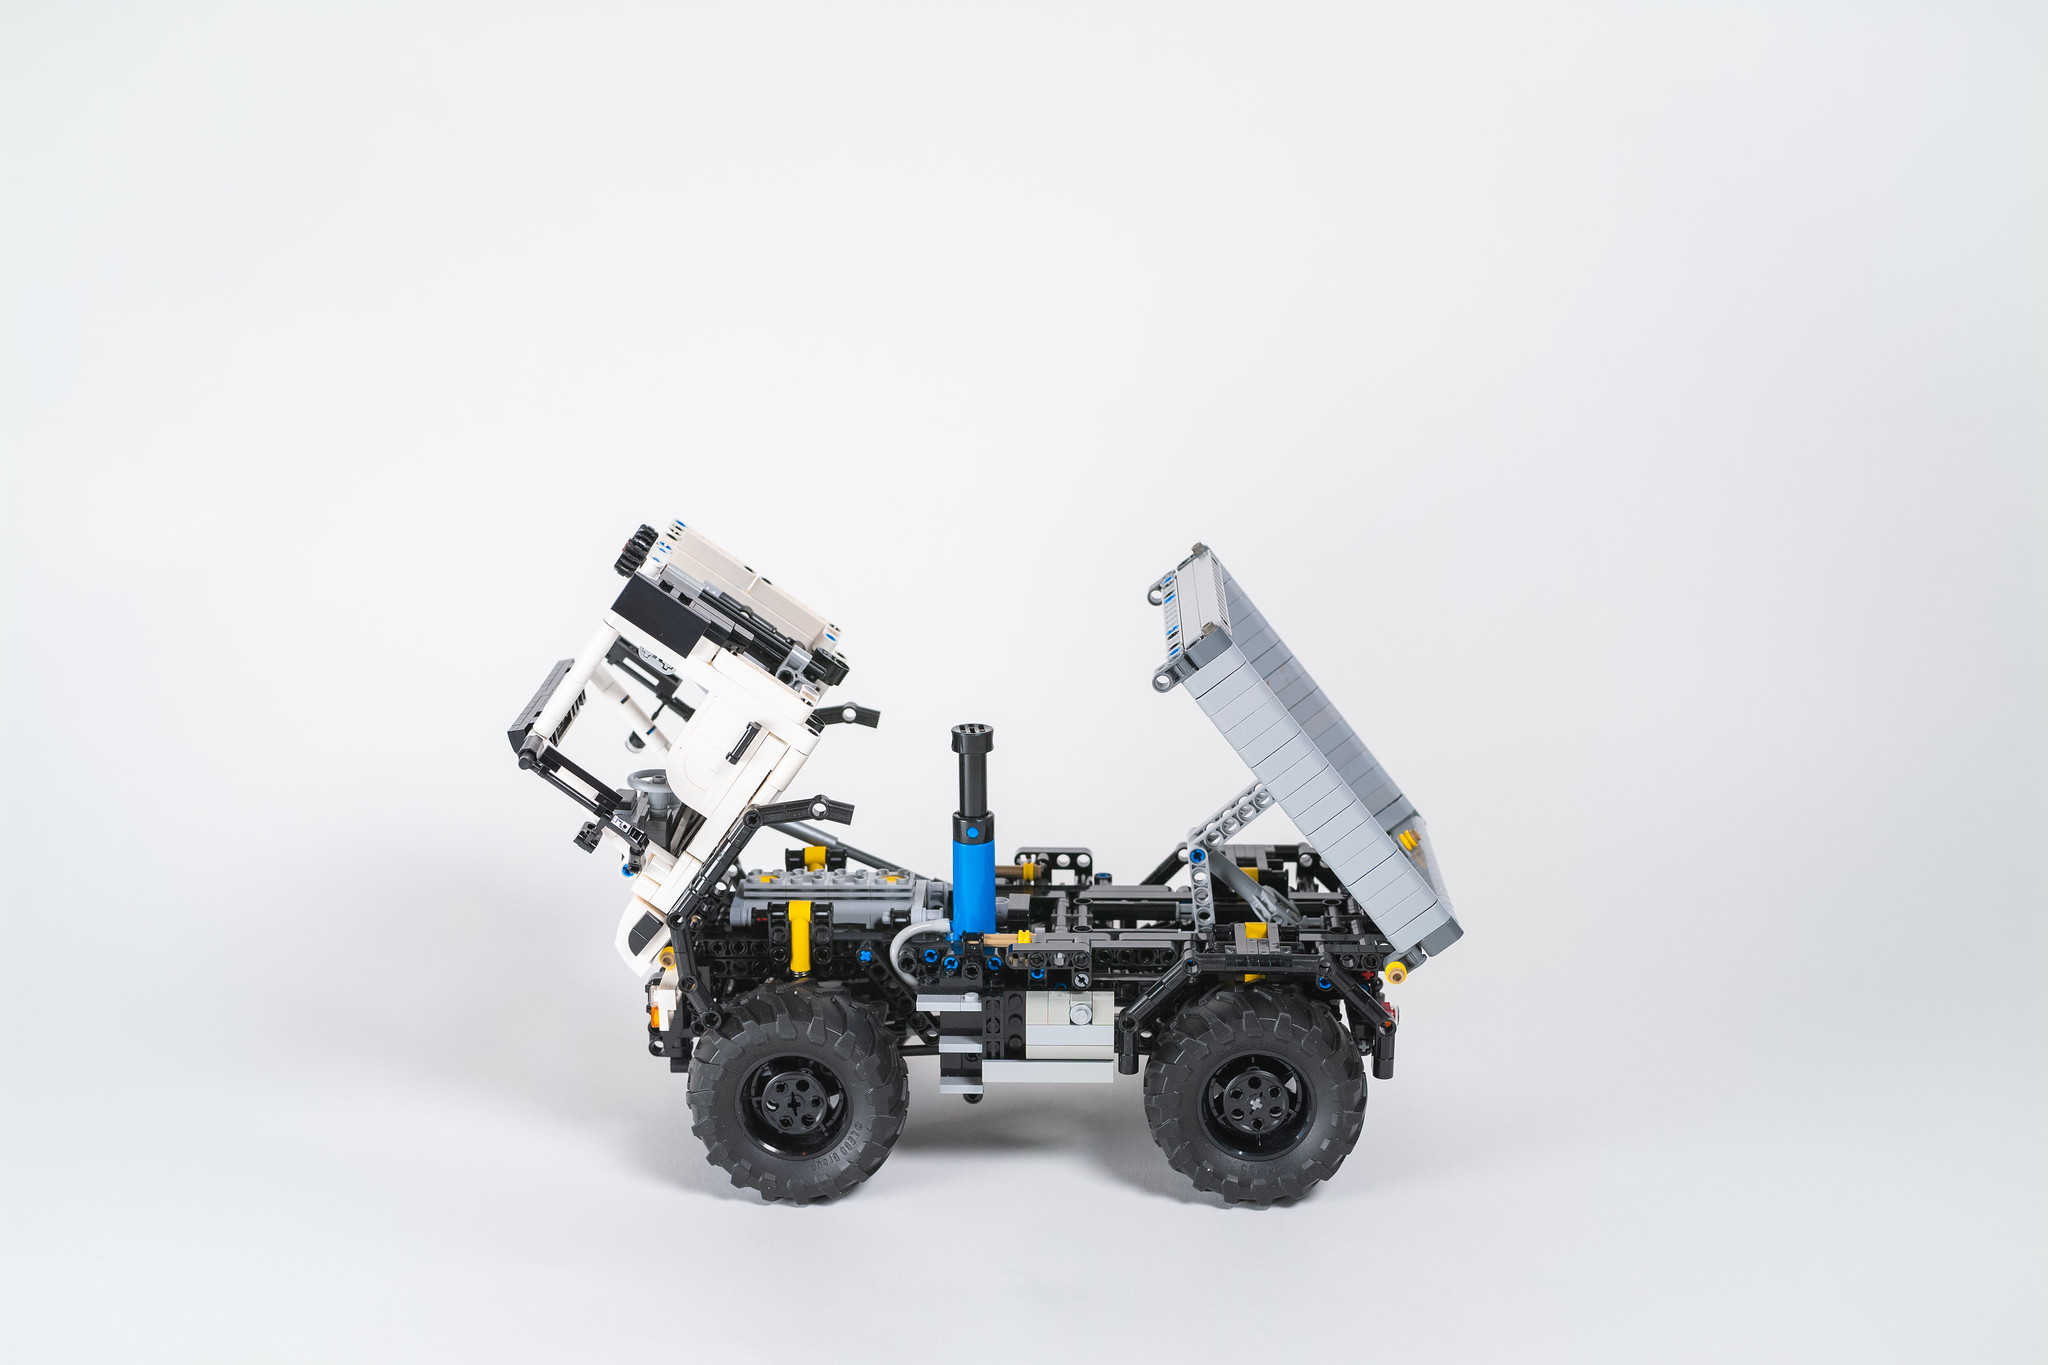
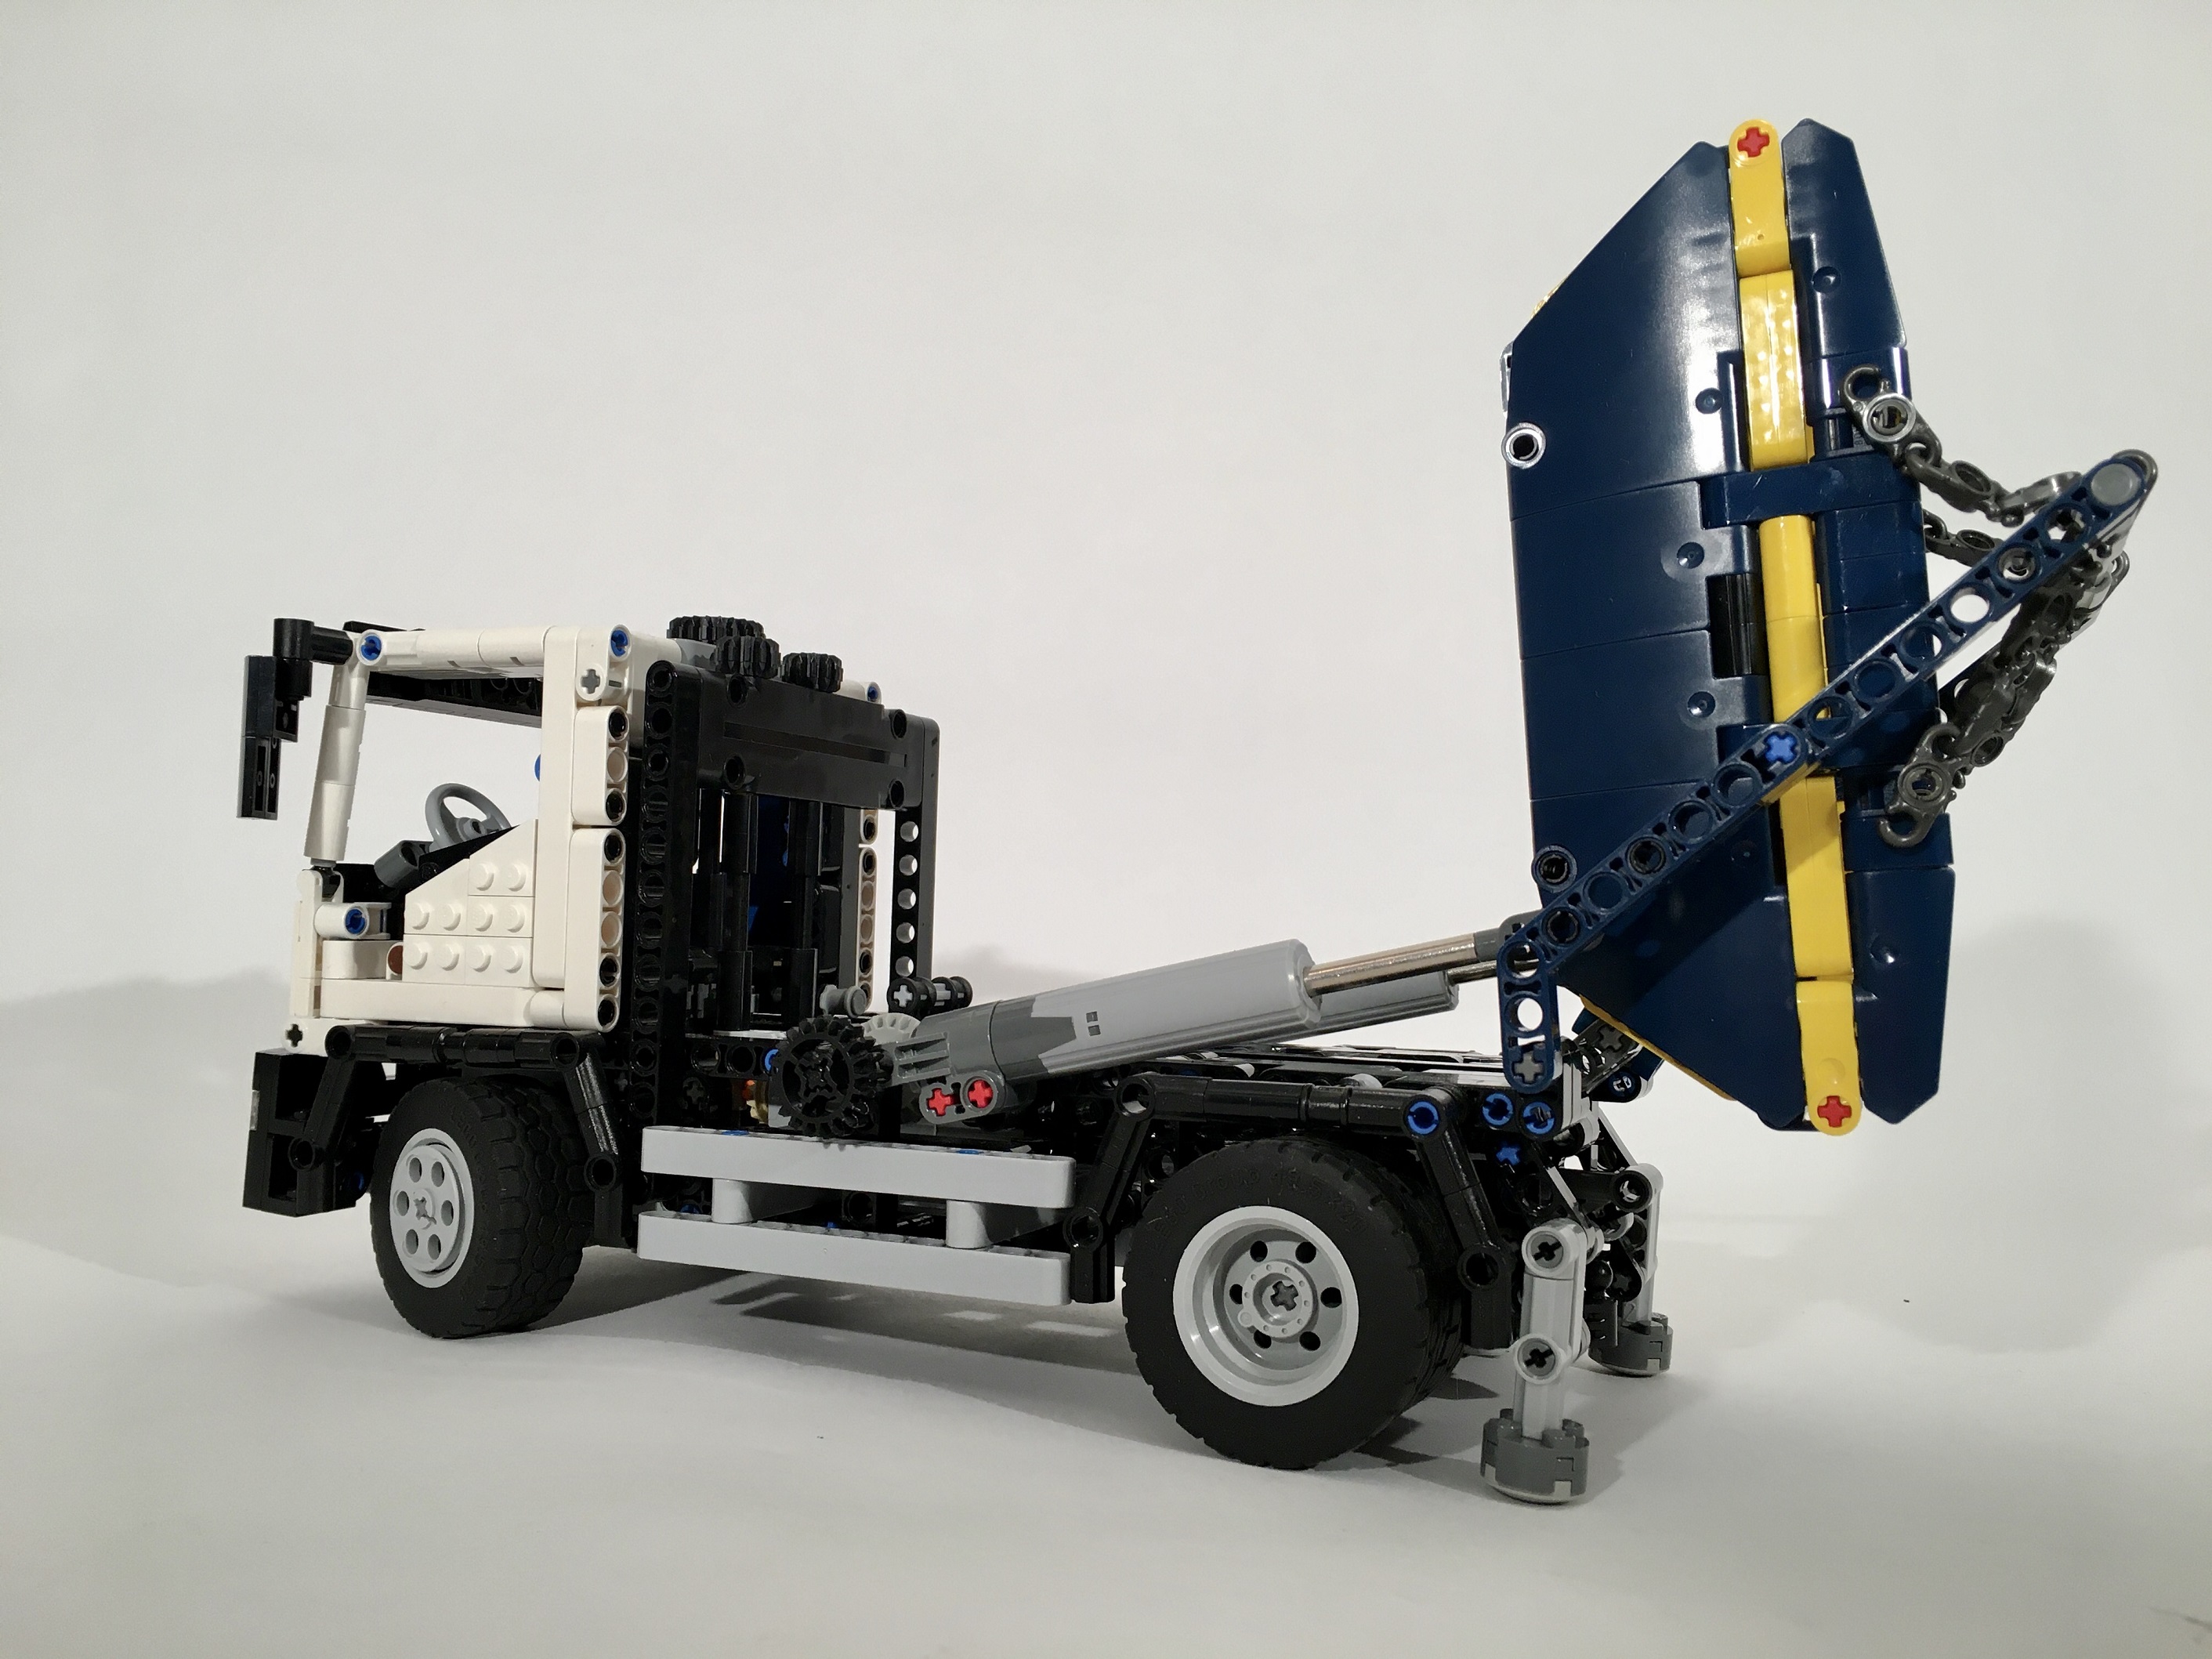
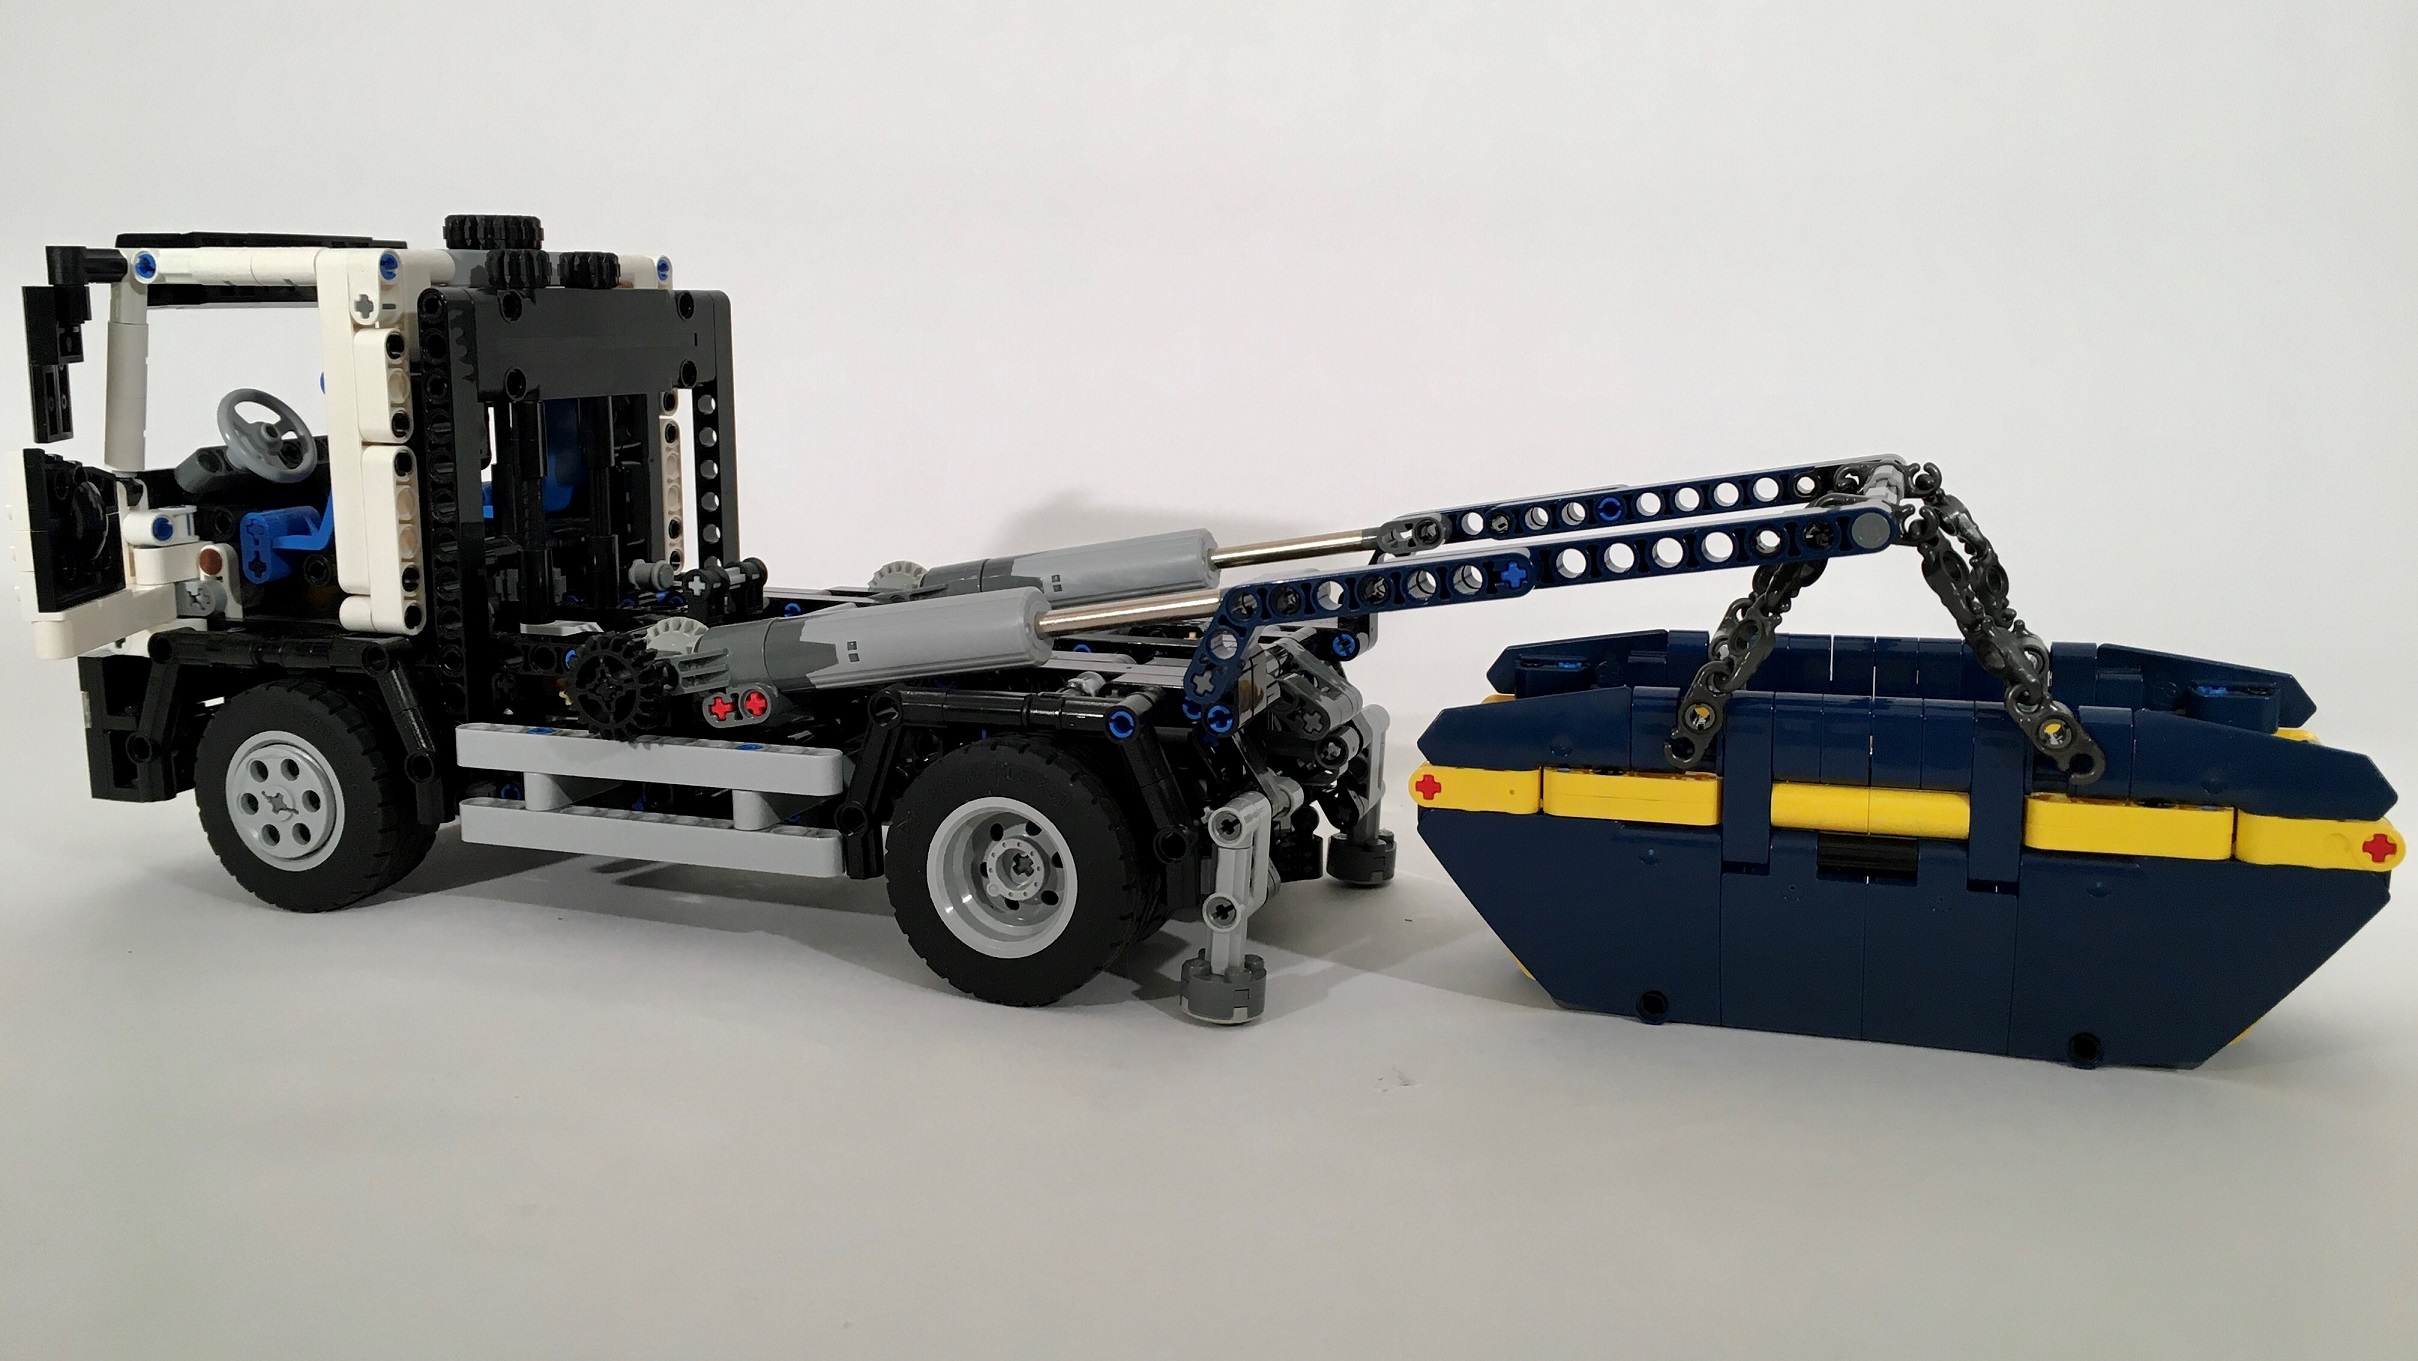
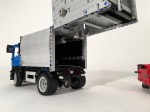
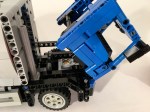
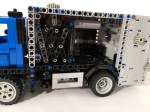
This project stared as a desire to make another small truck. I have used the 43.2mm tire in my trucks a lot, and I have used the 49.5mm tire only once. I was ready for the newer size again, so I found a nice little truck to model, and I was off. I very much like the shape of the 49.5mm tire, but it presents some challenges to scale. I works much better as a 15 stud wide size, and trucks often have a dual tires on the drive axle. This leaves only 5 studs of width to work with for the chassis and driveline. While a differential will fit within this space, keeping the axle connected to the differential does not happen when driving the finished truck. So I have a 8l axle with stop connected to a bevel gear on one side, and a 5l axle with stop. The gear then runs to the front of the truck where it connects to a V-4 engine.
Adding the skip functions were the next challenge. Adding the rear outriggers was not very difficult, but then it was complicated by adding the skip hook. Both are moved by mLA that are mounted far forward in the truck and connected by long liftarms to the back. It took a while to get the geometry of all of this to work together in conjunction with the lifting arms, but in the end it all worked well. The lifting actuators are moved by a gear on the side, and the other two functions are moved by two gears on the top of the cab protector.
Working on the cab came next, and I used a mix of system and technic bricks. I made sure the cab could tilt, and there is a locking mechanism. The steering HOG is on the top of the cabin, and connects when the cab is down.
Finally, I added a little trailer. I added a simple function to lock the skip in place. The trailer can be towed by the truck, and when it is time to add a skip the hitch goes under the truck so it can get close enough to drop the skip.
The truck ended up doing everything I wanted. The tip and lift functions work well, and the trailer was a fun little addition. The colors work well for this truck, and the cab turned out as well. Maybe I will need to do another MOC in this scale.
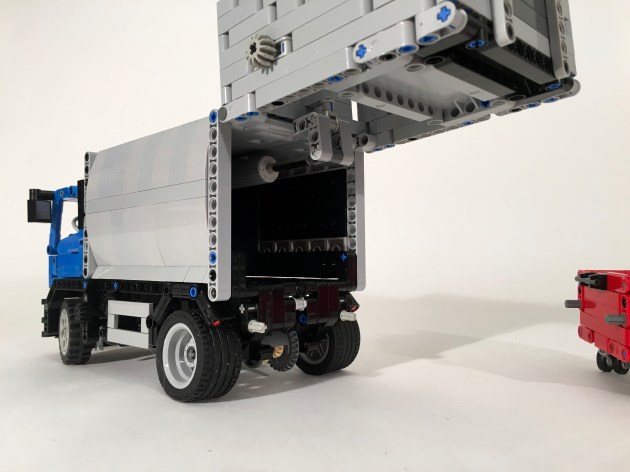
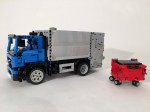
My favorite vehicles to build are garbage trucks (Ok, maybe trial trucks). I enjoy the many functions that I can create. I enjoy the diversity of shapes, sizes and colors, and I enjoy how ubiquitous they are. But I have not built many. So it was time to fix that.
I was originally going to do a large scale truck, but as my temporal limitations are becoming ever more apparent, I decided to do something smaller this time. The 13 stud wide truck is popular in the Technic community, so I decided to go with that. I very much enjoy the Volvo FE, so that was my truck. Since my last truck was one with three axles and Power Functions, this one would have two axles and be manually controlled.
I searched high and low for garbage box that would work well: Gesink-Norba, Heil, McNeilius, EZ-Pak, Dennis-Eagle, Ros Roca. All required a compactor that would need a round base for the trash to collect. Curves are hard to do in LEGO. I had some trouble with refuse compaction cycle working well on the Axor due to the floor curve on the hopper. I wanted a compaction cycle that was more simple and more reliable. So I designed my own.
It’s dead simple.
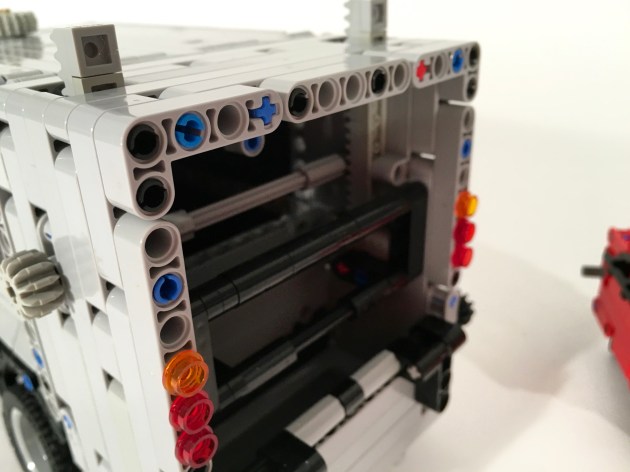
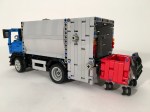
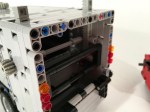
There is a angled elevator in the hopper that goes straight up and down. The center gear on the outside of the hopper that moves the elevator. When refuse is placed on the elevator and lifted, the refuse will fall over an internal wall at the top of the cycle. The refuse falls into the compaction bin, until the rear hopper is opened. Bigger parts sometimes gets stuck on the cross axle.
Inside the compaction bin, is an extraction plate. Turn the gear down near the front left wheel, and you drive a mLA to move the internal extraction plate. Everything works well for small LEGO refuse parts. I built the side of the compaction bin with slopes and tiles. After a number of panel attempts, this one seemed to be the best looking option. I very much enjoy the shape.
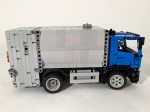
Since I had a little more internal room, I added a driveline to the truck. A rear differential powers a small fake inline 2 cylinder engine under the cab. To check it out, the cab tilts forward. The steering axle serves as a friction connector so the cab does not open unless you intend it to tilt. The doors open, and the bodywork was designed to mirror the Volvo FE 2011 body style. I built a small red refuse bin to show off the functions of the truck.
This may be my favorite build of the year. All the functions work perfectly, and the model looks great. I think I could add a tilting bin function, and add another mLA to give more strength to the extraction plate, but other than that I am not sure I would change anything. I will keep this one built for a while.
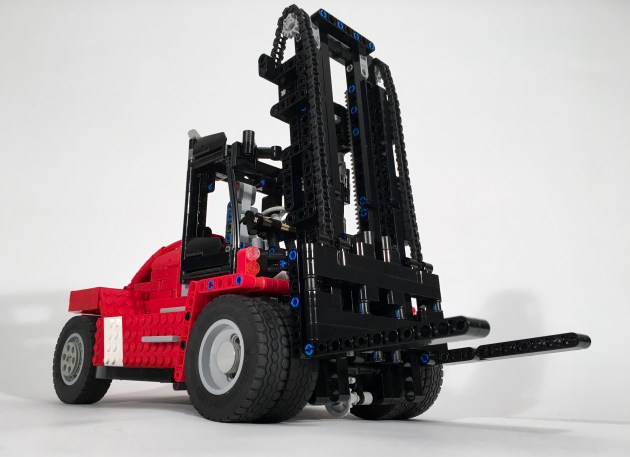
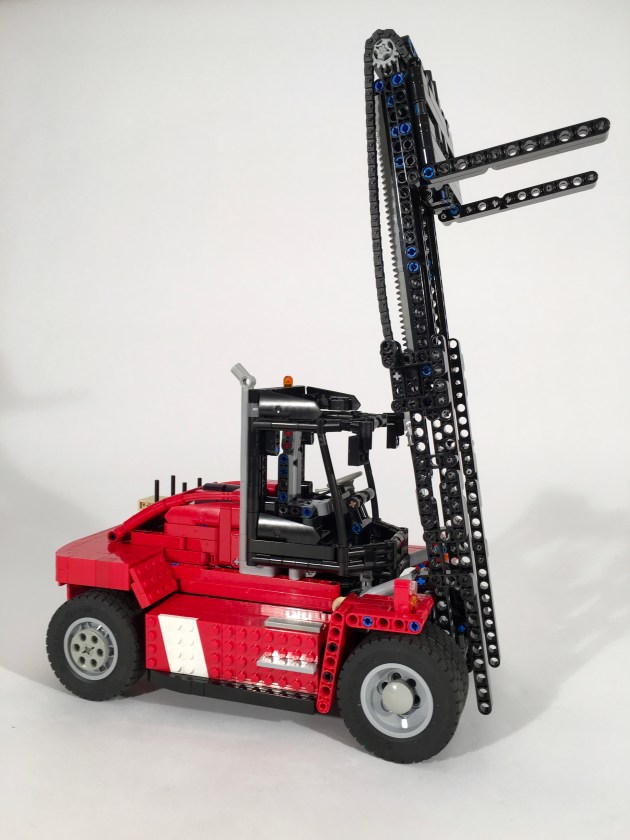
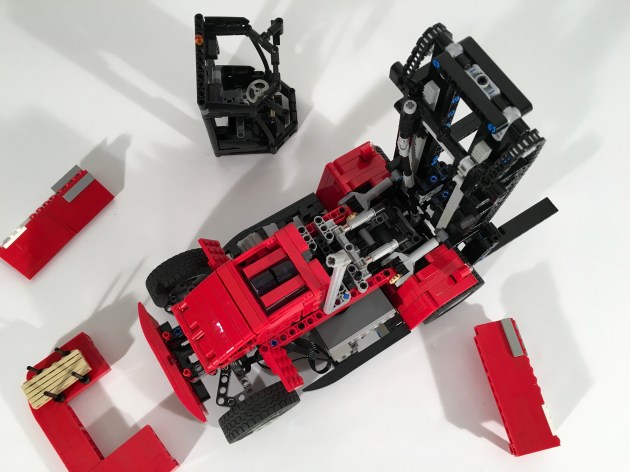
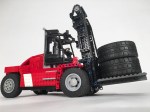
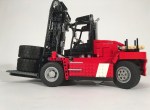
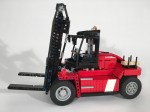
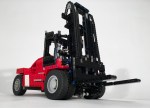
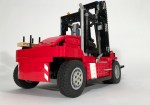
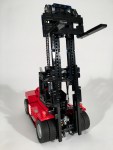
After doing a lot of non powered builds, it was time for me to do something motorized. I very much enjoyed doing a forklift a couple of years ago, so it was time for another one.
The JCB930 that I did a couple of years ago was non-motorized and had some great features. I wanted to build something with all the same features, and since I would need more room for all the electronics, I decided early to model the forklift after the Kalmar mid-sized 180 model. The model would have drive, steering, a two stage lift, and fork tilt. I did not realize how hard this would be. I wanted to keep the boom clear for visibility, and the forks not more than two studs in front of the wheels to keep integrity of scale.
I set the scale and I went to work. After setting the chassis measurements, I went to work on the fork and boom. I knew I wanted to have a two stage boom, and I wanted to keep as much of the boom open as I could. The forks connect through the middle of both the first and second stage booms, and pinch both together. The middle boom is has a gear rack on both sides to lift the forks. This boom has two gears at the top, to route the chain over the top to move the forks. The outer boom is connected to the chassis at the bottom, and two mLA connect to it operate the tilt. After some working, I was able to get the boom to be thin, and just how I wanted.
I decided early that I want to keep the motors out of the boom. So I had to route the lifting function out to the forklift body through the bottom pivot. This required routing the lifting axle under the drive differential. The lifting axle then move rearward, and connected up to a PF L motor. On top of the lifting axle was the drive axle. The PF XL motors was mounted transversally on the right side, and drove and axle forward to connect directly to the differential. To give me some additional space at the front, a portal axle was mounted on its side to move the differential rearward. A PF Servo was mounted in the rear, over the steering axle, and drove the steering function. The steering uses some 2×4 liftarms mounted at an angle to allow for a better steering angle. Finally, a PF M was mounted in front of the Servo, under the cabin to drive the tilt function. None of the mechanics were difficult, but the packaging required a number of drafts.
The final hurdle was the body work. I spend a lot of time early in my MOCs working on packaging placement, so I do not have many body work problems later in the build. Still, some simple SNOT work was needed on the side sills to fit about the battery box, and the XL motor. Oh, and the wires. The cab was pretty straightforward, but still took a little bit of time. Finally, I had some trouble with the rear engine cover and counterweight. In the end it was a simple design that I settled on, but I tried many designs. Again, this took a lot of time.
It took a long time, but I am pleased with the final product. The functions worked smoothly and consistently. The control that was afforded by the fork functions was great. It could lift three AA battery boxes at a time. The steering was quick, and had a great lock which gave great maneuverability. The XL motor provided adequate power, and moved the forklift well. Finally, the bodywork represented the original Kalmar well. I hope you enjoyed as well.