The Toaster


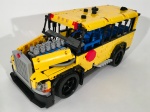
When I was in high school, we had a little bus; we called it “The Toaster.” We had big buses for the large football team and various student “schlepping,” but the Toaster was the perfect size for a cross country or soccer team. But, boy was it hot; the short wheelbase and many windows fused shut allowed for virtually no air movement in travel, and it would spend all day baking in the hot Arizona desert. Hence the name.

When when the Eurobricks Technic Challenge 12-Wacky Racers was announced, I figured this subject would be a good basis for an entry.  Maybe I could visualize my fantasies of the ultimate racing bus. What would it be like to give the bus a stupid big engine, and some sport tires, and make it visually hot?

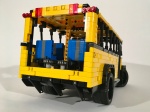
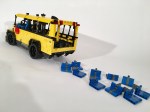
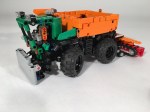
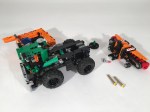
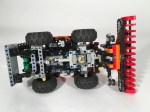
The contest required wheels or tracks and, steering. No problem. It also required a wacky feature to gain an advantage in a race. I’m not very violent, so I immediately thought of a bus that would toss out its seats to make it harder to follow in race. I built a chassis, added a V12 and I was off.

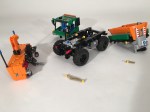
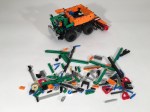
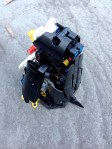
Very early, I had the idea of an attacking sill as well. I gave the bus a lowered look, and this gave a lot of internal space under the drivetrain. I created a side panel that would spring out to attach a racer to the left of the bus. You can see it work here. It was a fun addition to my plans. Then I started working on the seat toss feature. Five seats would be mounted on a 32l axle on both sides of the bus. The seats would slide out the back, driven by two chains with controls on the roof.

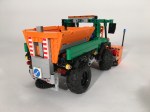
I added some visual excitement such as the exhaust pipes, the engine intakes, a stop sign (I know, I know, I need a sticker), and and internal roll cage. I built a simple working bus door, and closed up the body work. Visually, it could have used a little more excitement, but I liked how it turned out.

All the functions of the bus worked mostly well. Sometimes, some of the seats would get stuck as they were being thrown out the back. The attacking sill worked flawlessly each and everytime. It was a fun feature. I wish the bus has a little more creative styling. Next time.

Until then, happy building.

Advertisement

Snowblower/Tractor


I participate in only some of the contests that are available in the online LEGO community. I generally participate if it meets the following criteria: Is the challenge within my competencies? Does the contest align with other responsibilities/projects to which I have already committed? Can I be competitive? Frankly, it is the last question that often stops me. The preceding two questions determine my limitations, and considering how good many other builders are it is not often I participate. With this in mind, I decided to enter the Eurobricks Technic Challenge 9 (nine already!?).

Edit 2016.02.16 : The contest has completed, and this Model came in second! See the results page here, and all the votes here. Thanks to Eurobricks for the contest.

A full gallery with Instructions can be found here.

Snowblower

Tractor

What interested me in this contest was the constraints, and to a lesser extent the topic. the constraints stipulated that both MOCs had to fit within 10,000 cubic studs. I got out my calulators, and started playing with numbers. I was hooked. Additionally, building one MOC is hard, and building two from the same parts seemed very hard. It was something I had never done, and only a few builders can develop a good B or C model. The planning stage would be critical. Both models would have to be planned together right from the beginning. I toyed with a Combine/Tractor, and a Pipelayer/Crane, and even a Airplane/Boat. With each of these designs, I realized I would be using too much space with a long appendage, such as the Combine’s implement, or the Pipelayer’s arm. The cubic studs required something more…cube shaped. I eventually settled on a Snowblower and a Tractor. Both were a little more square and had similar components (wheels, engines, colors, chain links). I knew I would need to build both together, and multiple renditions would be needed. I was ready to start building.

Snowblower Rear

Pretty early, I settled on 17x17x34 studs for the Snowblower. I challenged myself to include steering, a working blower, and a working salt spreader. I build the basics of the blower implement right away, complete with rotation coming from the truck drive. On the rear, I added an implement lift using a worm gear setup, and a quick link to the truck . Next, I worked on the chassis of the truck. I added portal axles, because I could not get the 5L wheel axles to say connected to the differential. This also helped to clear the front PTO from the steering function, which was linked directly to a HOG gear on top of the cabin. The salt spreader needed a take-off gear for the conveyor belt, and the discharge plate would be driven separately from the rear differential. The mechanics were set. I then worked on the cab. I made sure the cab, the blower, and the spreader could be easily removed by removing up to four pins for each. It’s a fun modular function that allow for other attachments.

Snowblower Modules

I first made a pile of all the parts used for the truck while it was still built, and made a first draft of the tractor. Based on the parts of the Snowblower, the tractor would have four wheels, a 2 cylinder engine, and something with a whole bunch of 3×3 round, red, liftarms. I first modeled it after a John Deere 7R series, but realized this would leave me with too many left over parts. I then tried modeling it after a Claas Saddletrac. This seemed to be a better fit. I then took apart the Snowblower, making instructions as I went. I then used these parts to make the official model B. Over the course of a week, I made many revisions.

Tractor Rear

Both models worked well, as none of the feature are too complicated. I was pleased with the A model as everything functioned as it should, and it looked great. The tractor was simple, and it’s simple functions worked well. I was pleased with how it all turned out. It was great working with a limited number of parts for the B model, but I would prefer to clean up the look of the tractor a little better. This was a great little contest. I loved the restriction of the cubit studs, and I loved having to make a MOC with a defined group of parts. Now let’s see how the voting shakes out.


Thirdwiggville


About a year ago, Mr., Mrs., and Jr. Thirdwigg packed up some boxes and left Chicago for Grand Rapids. Along with many other changes, this relocation provided myself a room devoted to LEGO; well at least until it will be commandeered (shared?) as a family play room.

LEGO Room

It is not too fancy, but it works well. The room is in the attic of the house without heating or cooling; the summers get a little hot, but the winters are fine. I have two little tables on which I do my building, and four organizing shelves that keep many of the high use parts close at hand. Tires, books, and empty bricklink packages are strewn about, at least until I can muster up the gumption to put them away.

LEGO Table

Organization is always a work in progress, and as you can see, some things need to be put away. Careful eyes can see some projects from The Queue that are getting close to completion.

LEGO Shelf

The room has some nice build in shelves on both sides of the room. As you can see, I keep a lot of infrequently used parts in bags off to the sides, and some of the larger Wheels and Tires. I also keep an large box on the floor for when small children want to come over and play in Uncle Thirdwigg’s LEGO room.

Happy building. More MOCs will be finished soon.

Silly Fat Penguin


Sometime procrastination breeds a good outcome. Sometimes. This is the result of waiting too long to come up with an idea for a contest.

The full gallery with Instructions can be found here.

Penguin

A while ago Eurobricks posted a contest. While I was focusing on Brickworld, a new job, and other life events, I decided I should sit this one out. Then things died down. On July 20. It was a little late to produce something excellent. I thought it would be fun to do something other than a truck, plane, or tractor. I saw a little toy penguin on a colleague’s desk, and I thought,that’s it. That would be fun.

The penguin has a wheel on the bottom which runs three gears. The final gear drives a shaft that connects to the wings and the beak, making them move as the penguin wobbled along. Behind the main wheel, there is a little swivel wheel so the penguin can be nimble.  I added some feet, and worked a little while on the belly. I added some fun eyes, and made sure to give the penguin a cute little bow tie. All done. All for 192 parts.

I wish I would have added a wind up motor, or gave the penguin the ability to walk by itself, but I ran out of parts and time. After filming (which is not my best work), I realized the flapping could have been a little quicker. But it was a fun little project, and my first animal creation, so that’s something. I hope you enjoy, and if you can vote, give one for me.

Happy building.