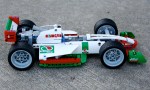
OCTAN F1
September 30, 2014 7 Comments
In a bought of inspiration (or distraction) at work, I noted my old 6546 sitting on my desk. After years of looking at this small car I thought, I could make this bigger, and in Technic. Done.
The full gallery including instructions can be found here.

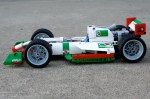
I decided the car should have a simple engine, four wheel suspension, and working steering. Recently, there was a good design that gave me an idea about how to do a smaller scale driveline for the car. I worked on the rear first, and once I had the suspension setup, I added a small flat four engine place directly on the bottom of the car. This would be the basis for the rear of the chassis.
I then started the front suspension design which would utilize the new suspension components from 42021. I first tried adding shock absorbers. Then I added rubber connectors. The first was too big, the second did not work to well. After monkeying with it for a while, I developed a simple torsion bar setup. The torsion axle is a 10l and provides the pivot point to the bottom control arms. They connect to the chassis behind the suspension to a fixed point under the steering wheel. The set up works well. Frankly, it works a little better than the rear as the rear could benefit from stiffer arms and suspension mounts.
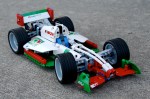
Next came the body work. As I wanted to keep things similar to the 6546, the coloring would have to be white, green, and red. And it would need some stickers. I used the stickers from set 60025, so the car number would have to be changed from the original #4 to #5. The coloring and markings turned out well. I tried to make sure it was not too busy. Easy enough, and everything is easily acquired so you may build your own.
Fitting with my yearly planning I have now completed the two small builds I wanted to complete. It was quick, fun, and a MOC that is accessible for other builders. Feel free to build your own (make some new colors, and we can then have a race).
Happy Building.
-
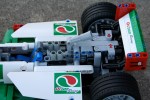
- Flat four on the floor.
-
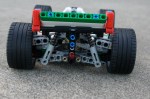
- Simple and effective rear suspension.
-
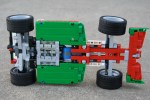
- Aero bottom. #aeroiseverything