I have been working on a number of MOCs for the last couple of weeks, and each of them have been stuck on some part. Sometimes when I get into this situation, it is helpful for me to put each of them aside, and design something small, simple, and quick. It helps me feel like I still have some creative ability, and satisfies the accomplisher in me.
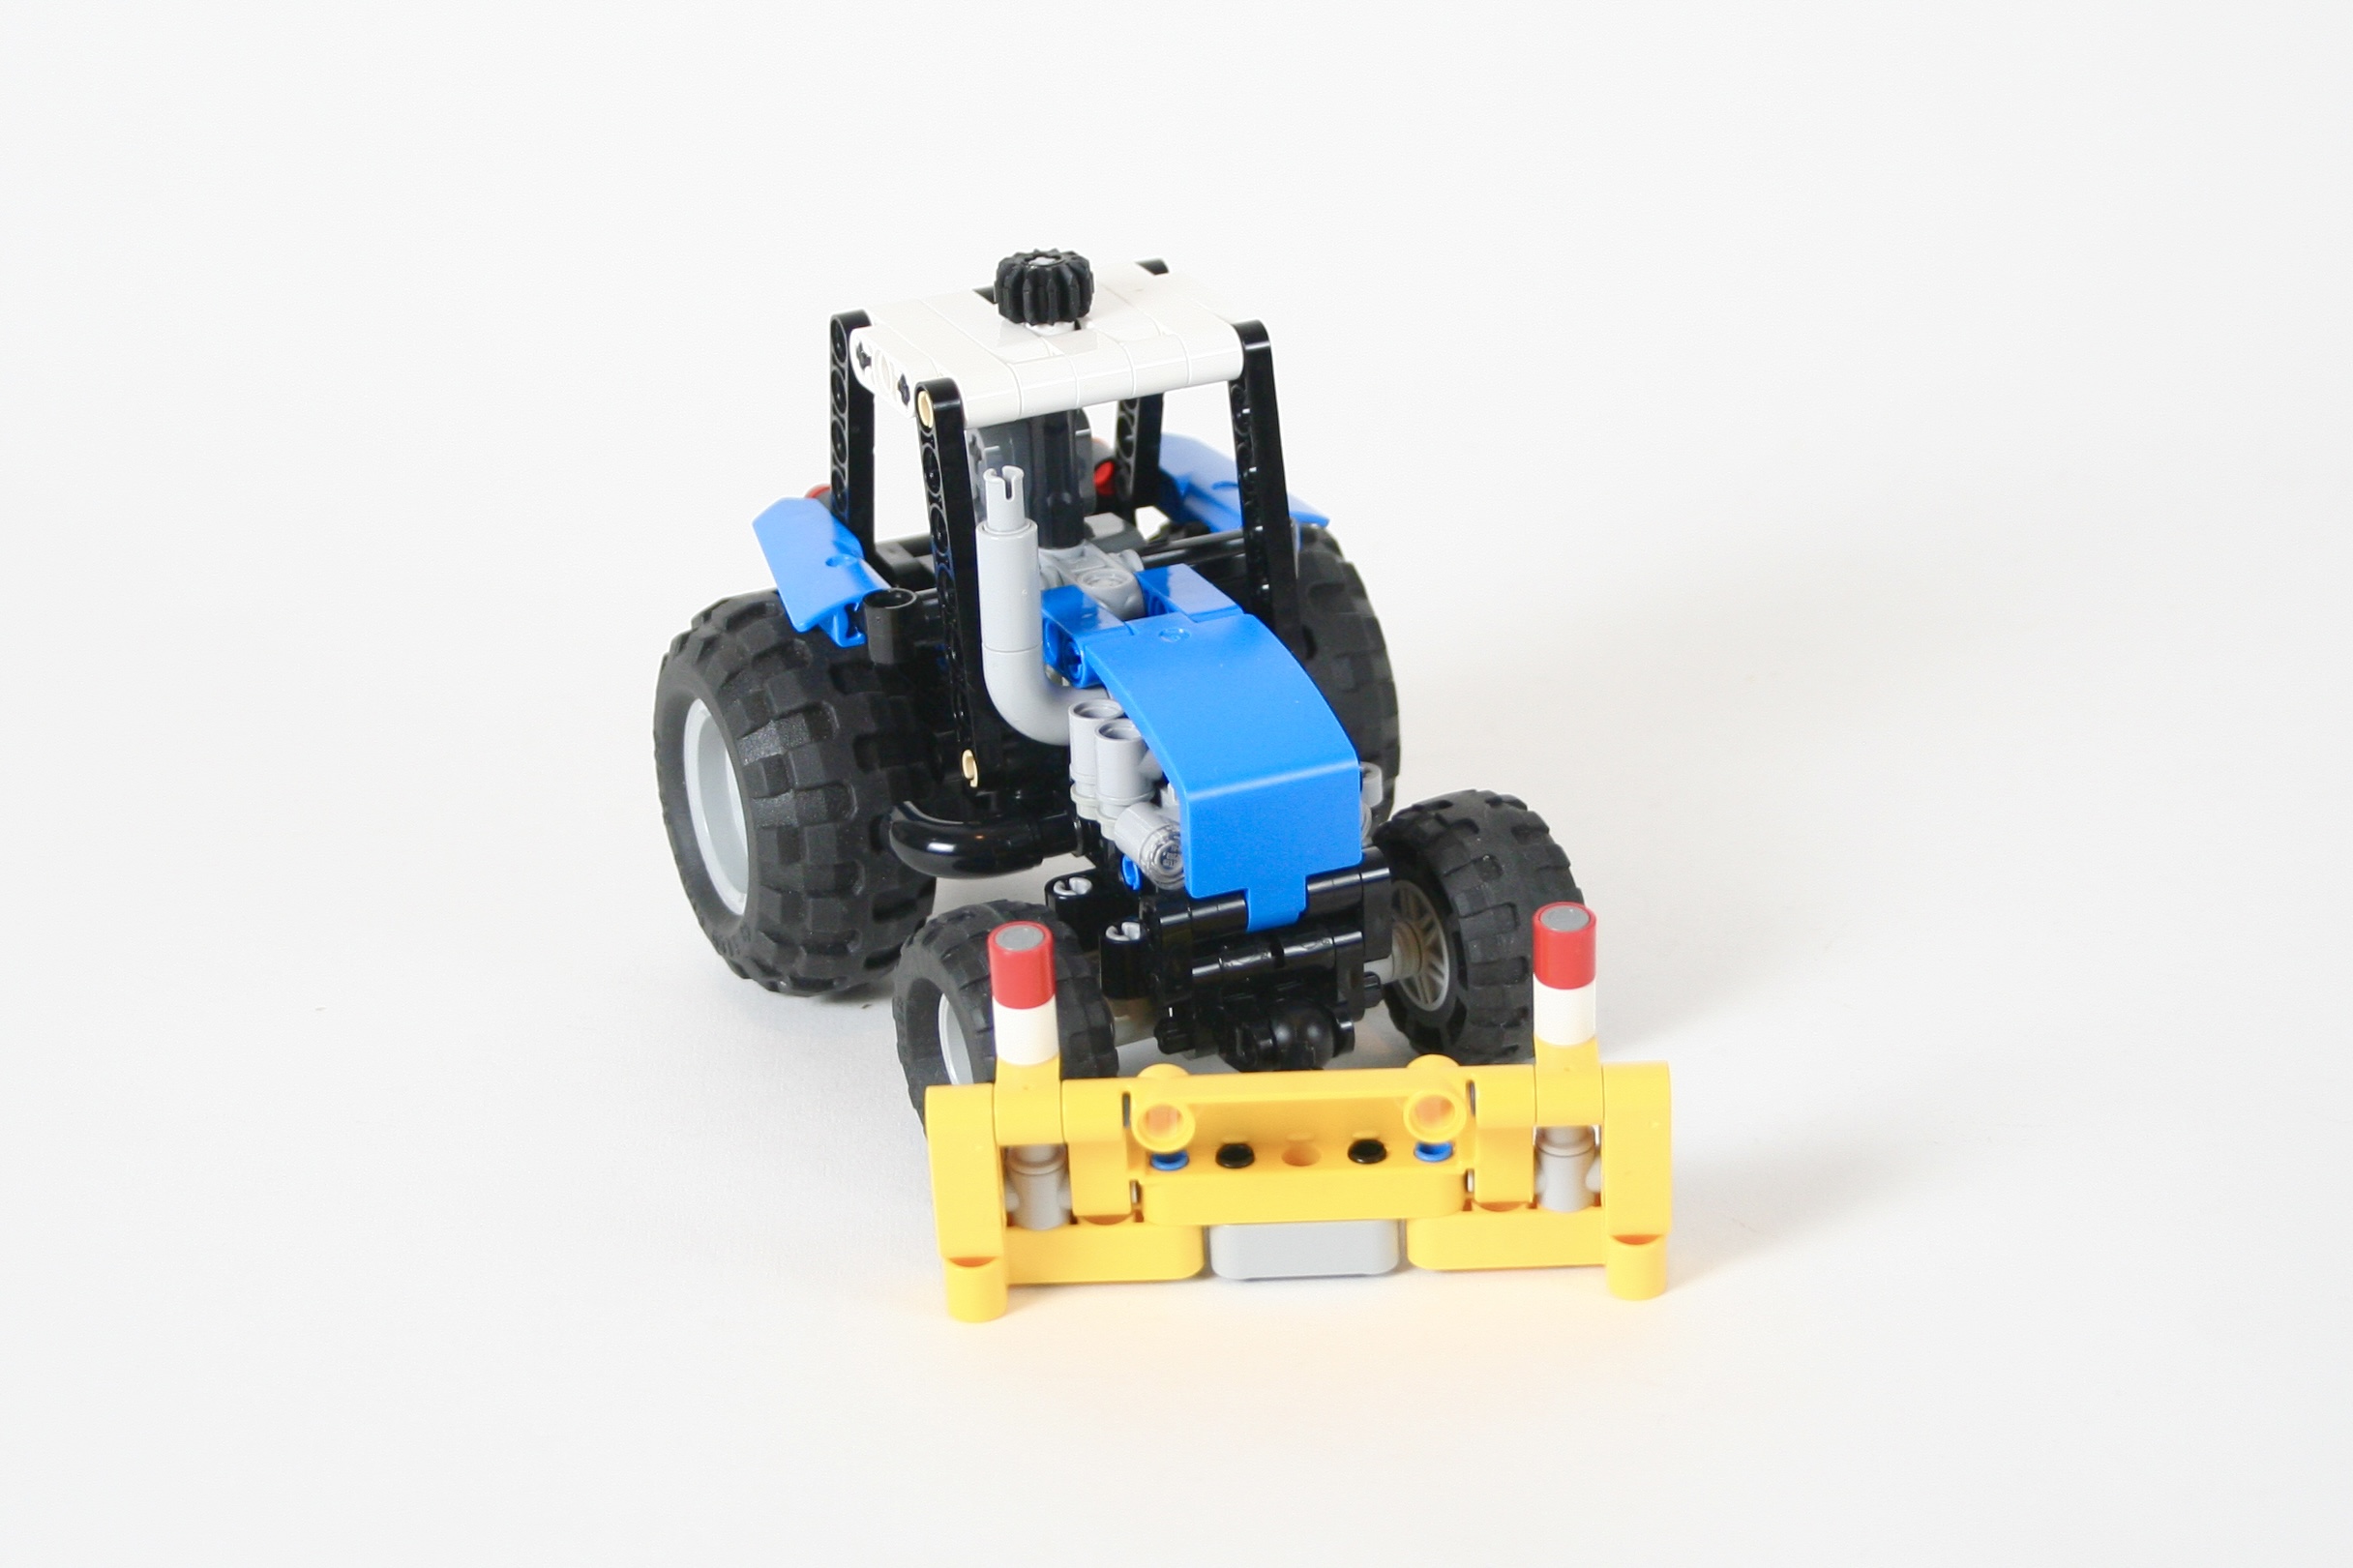
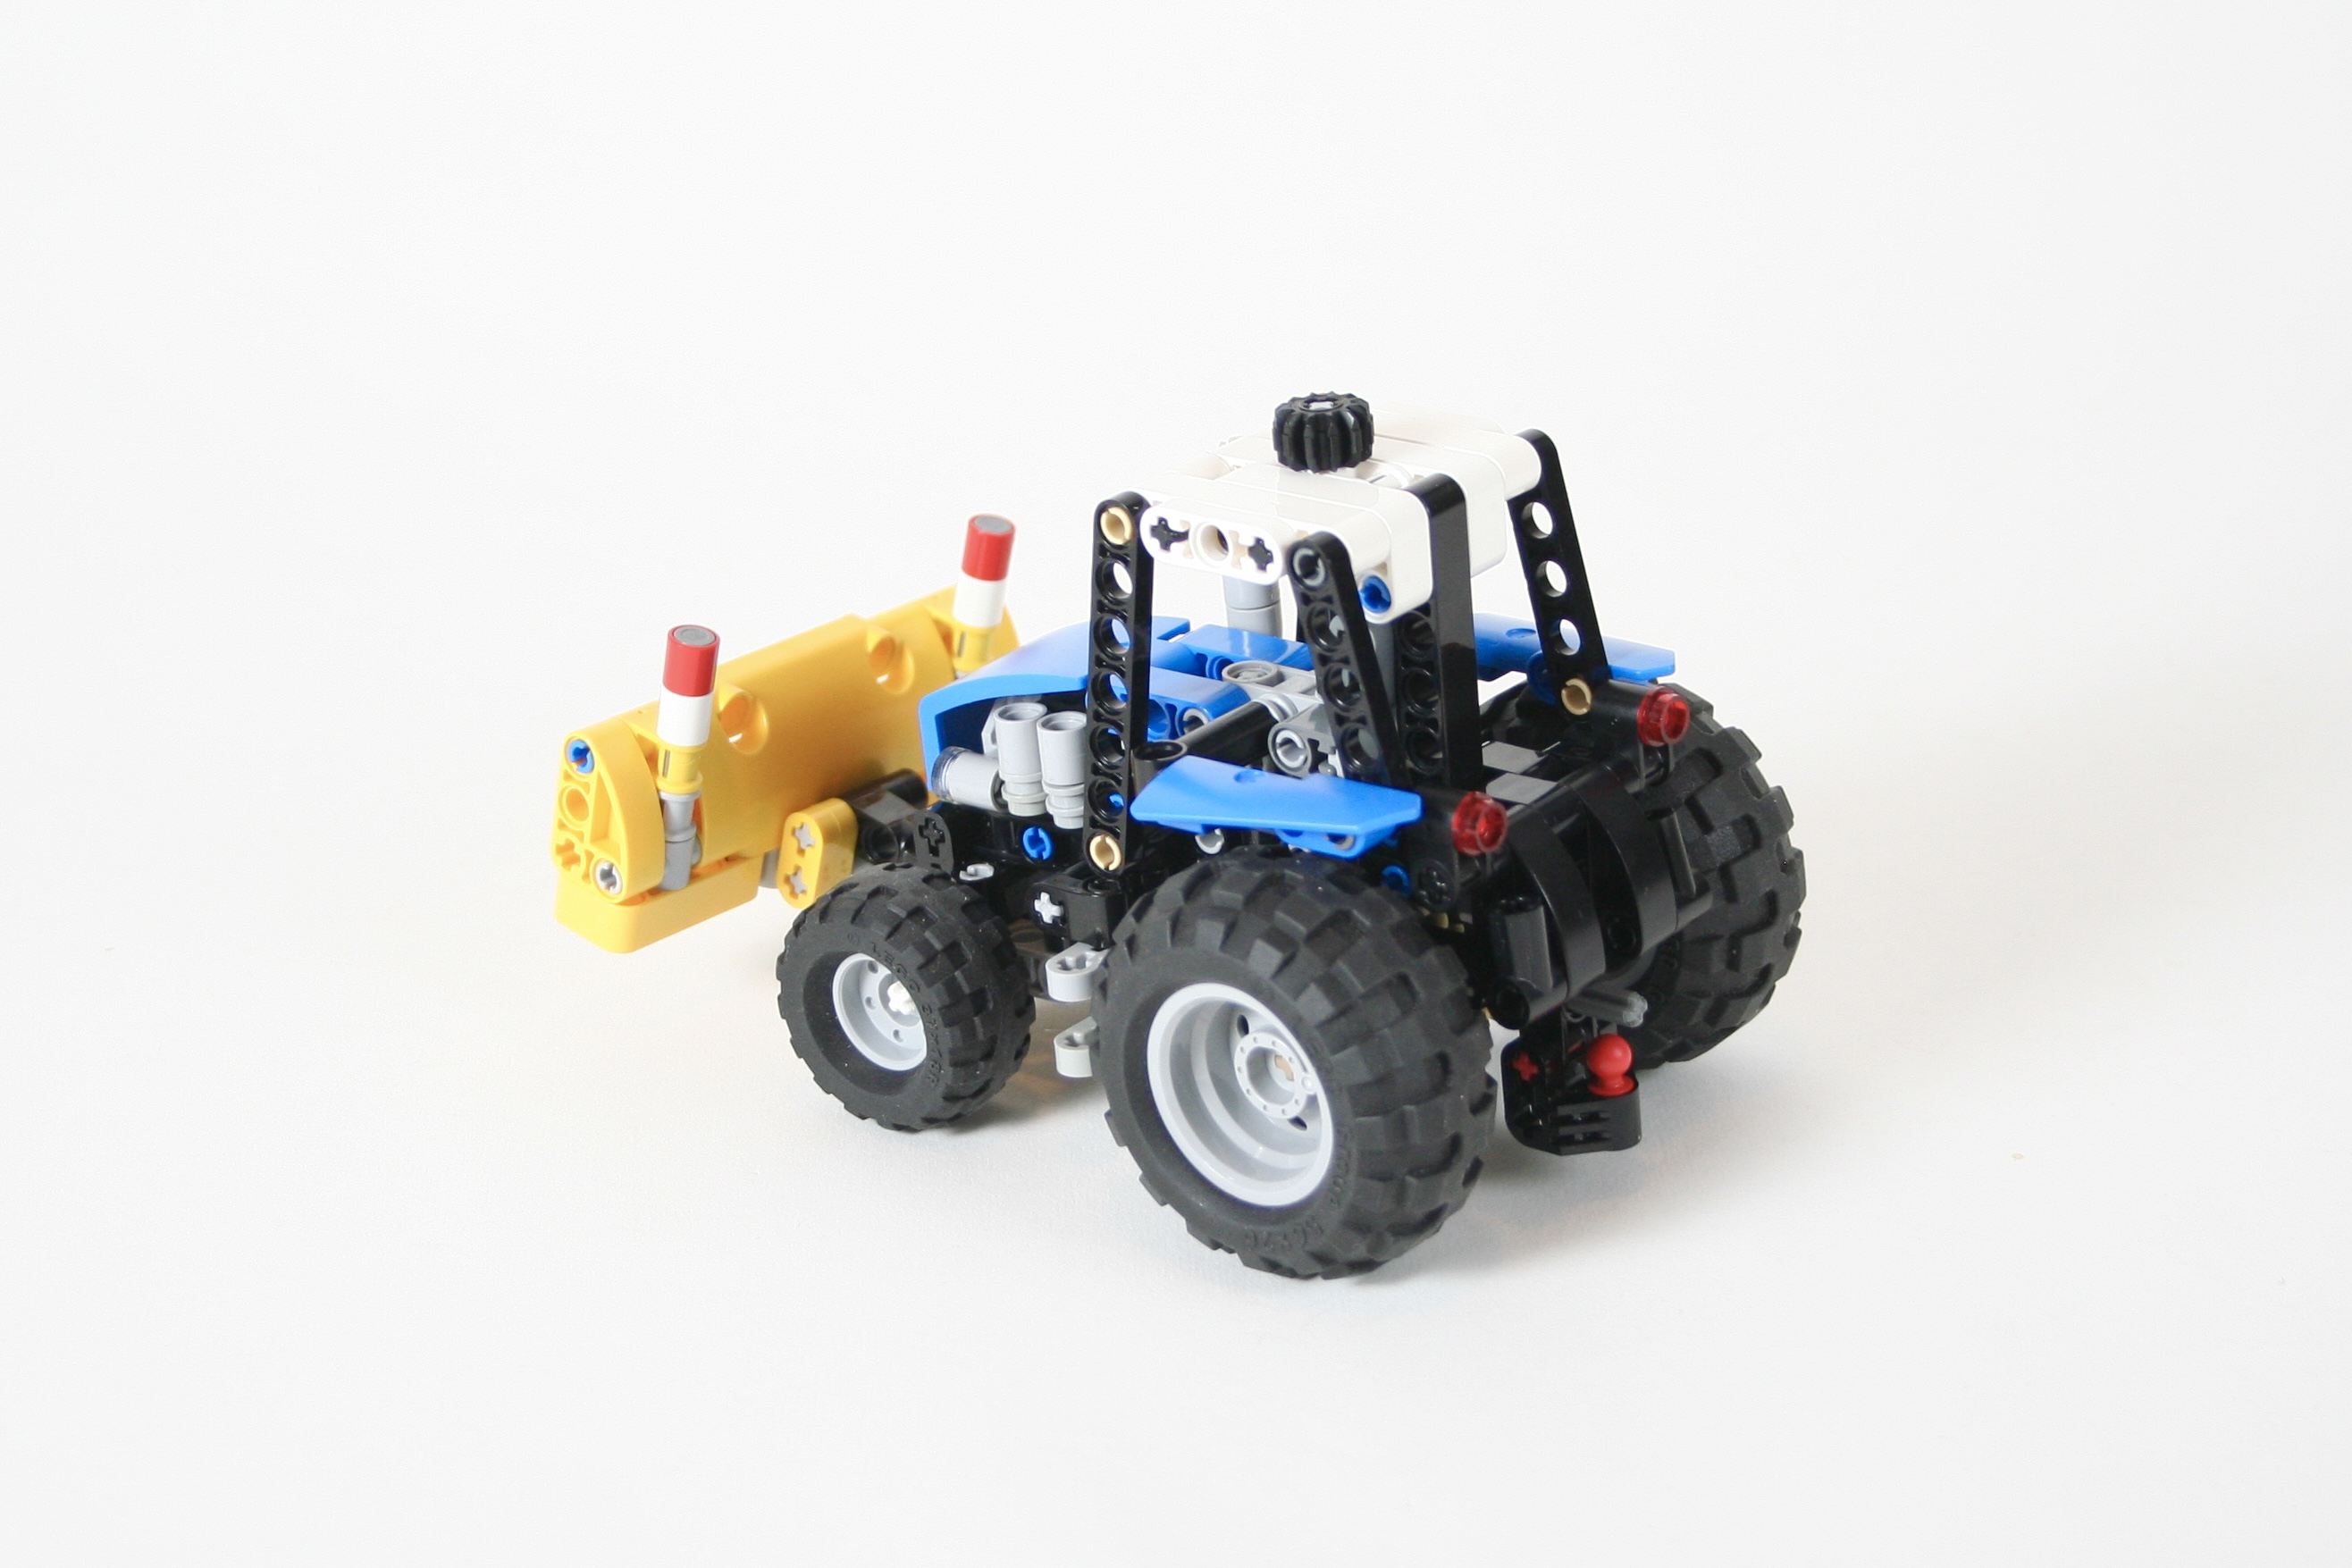
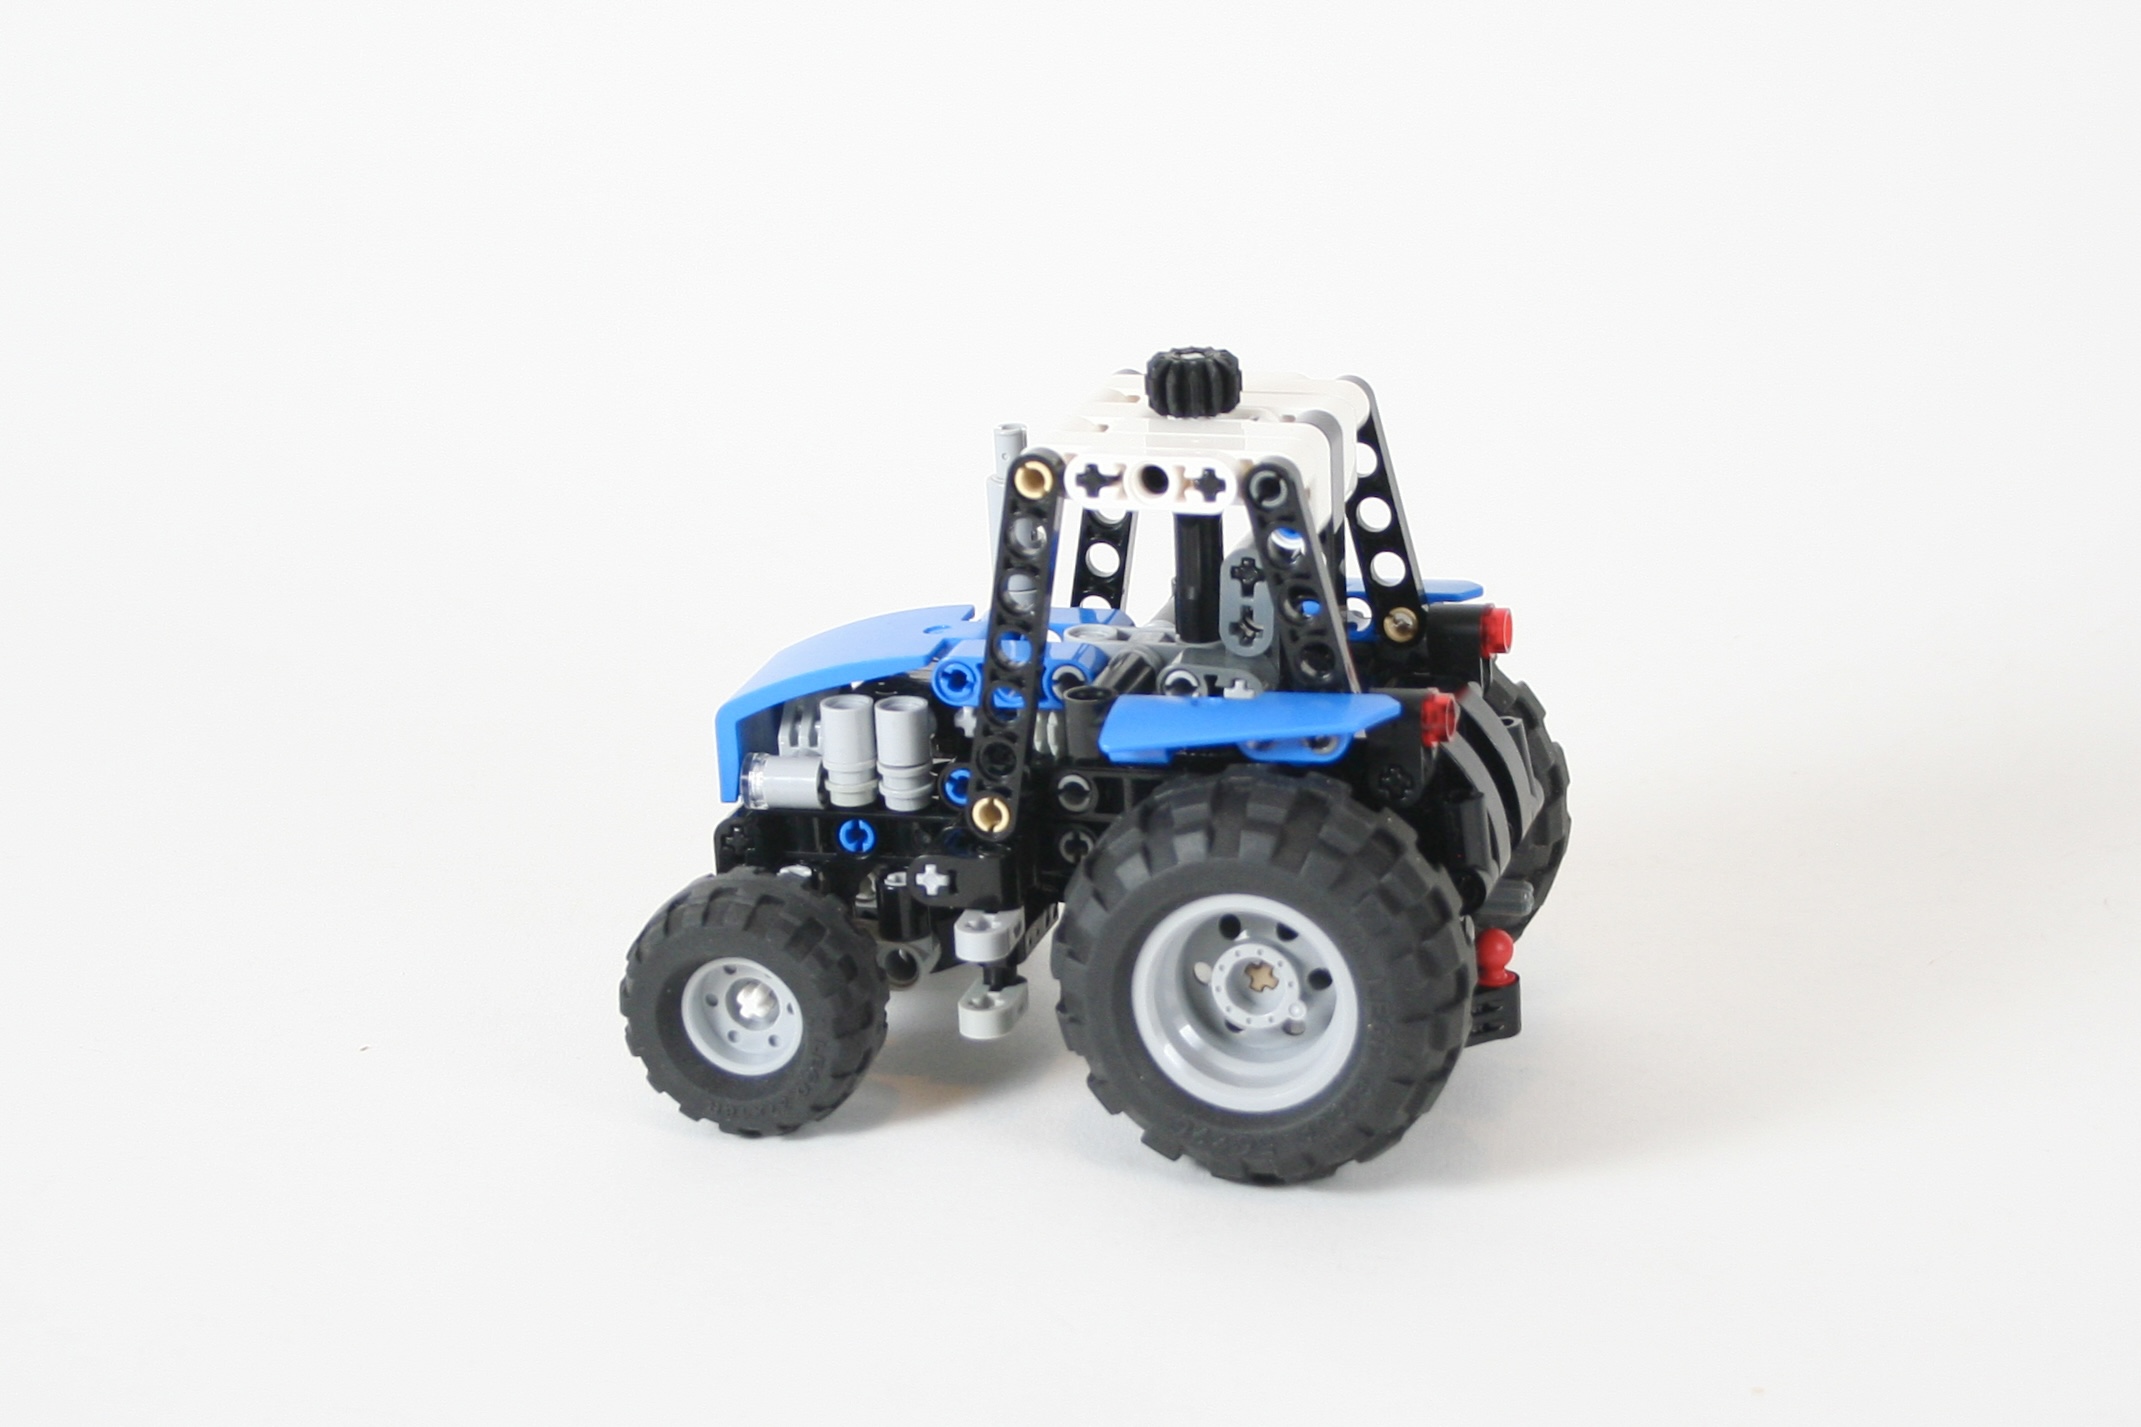
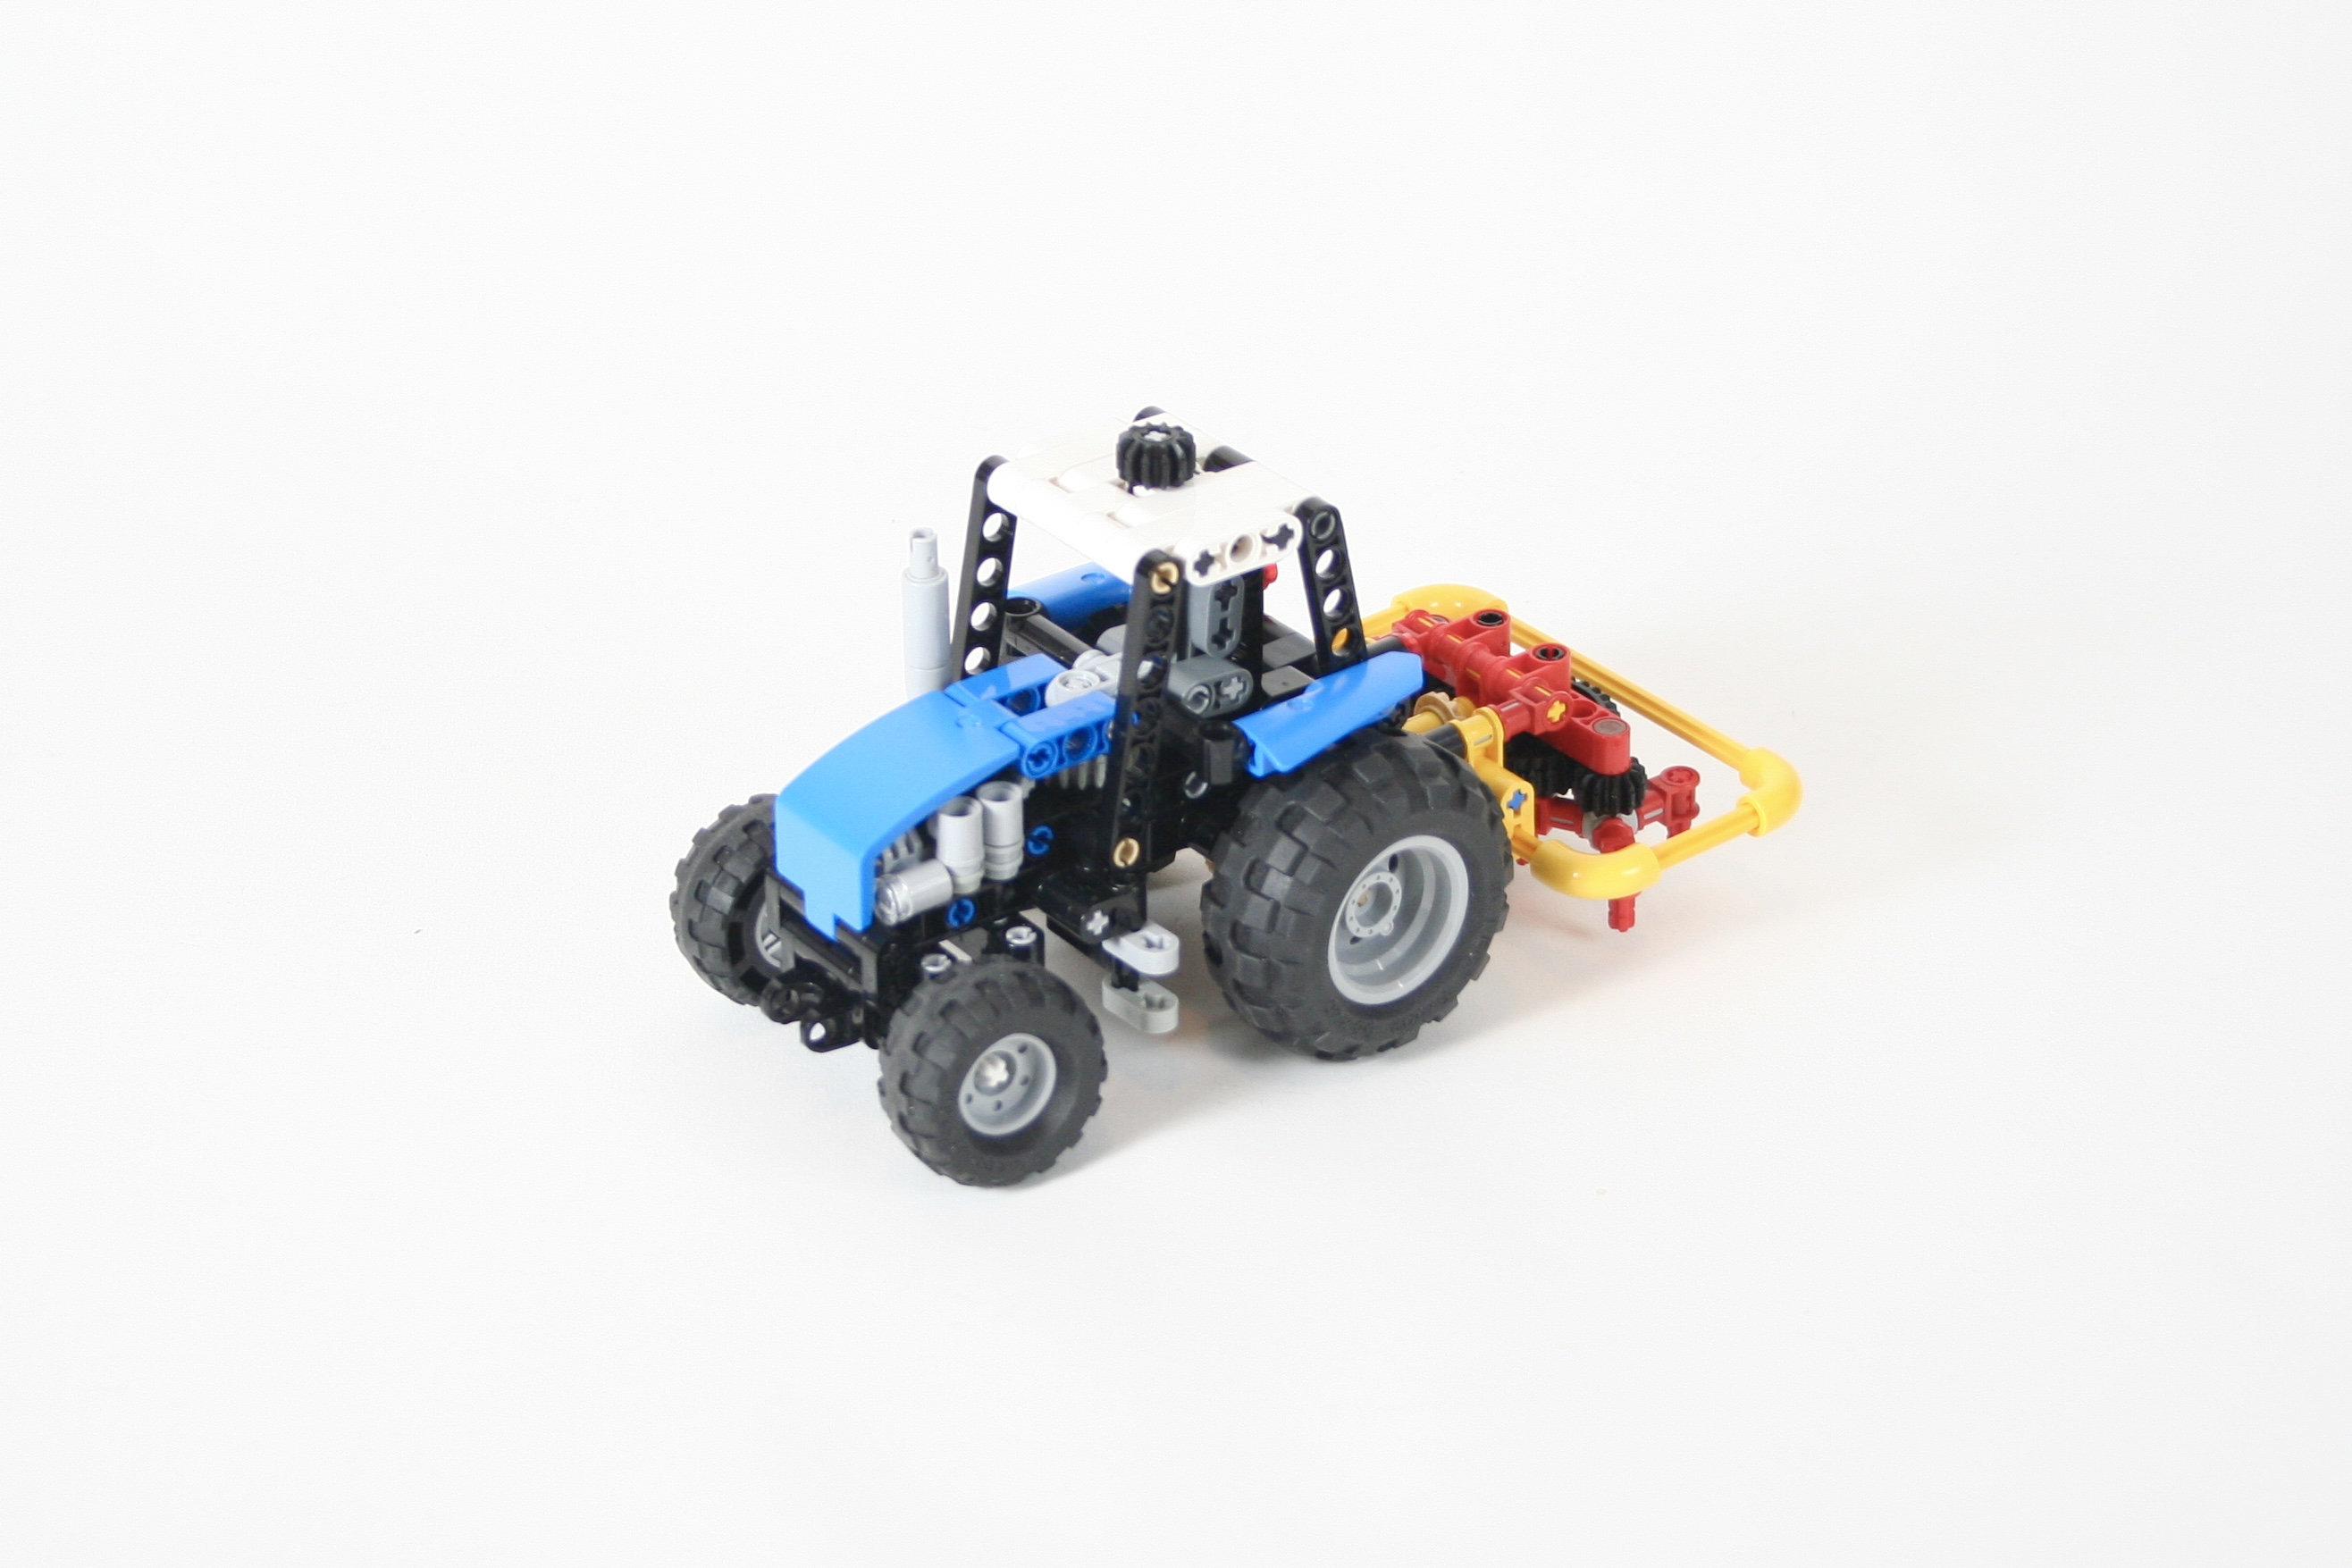
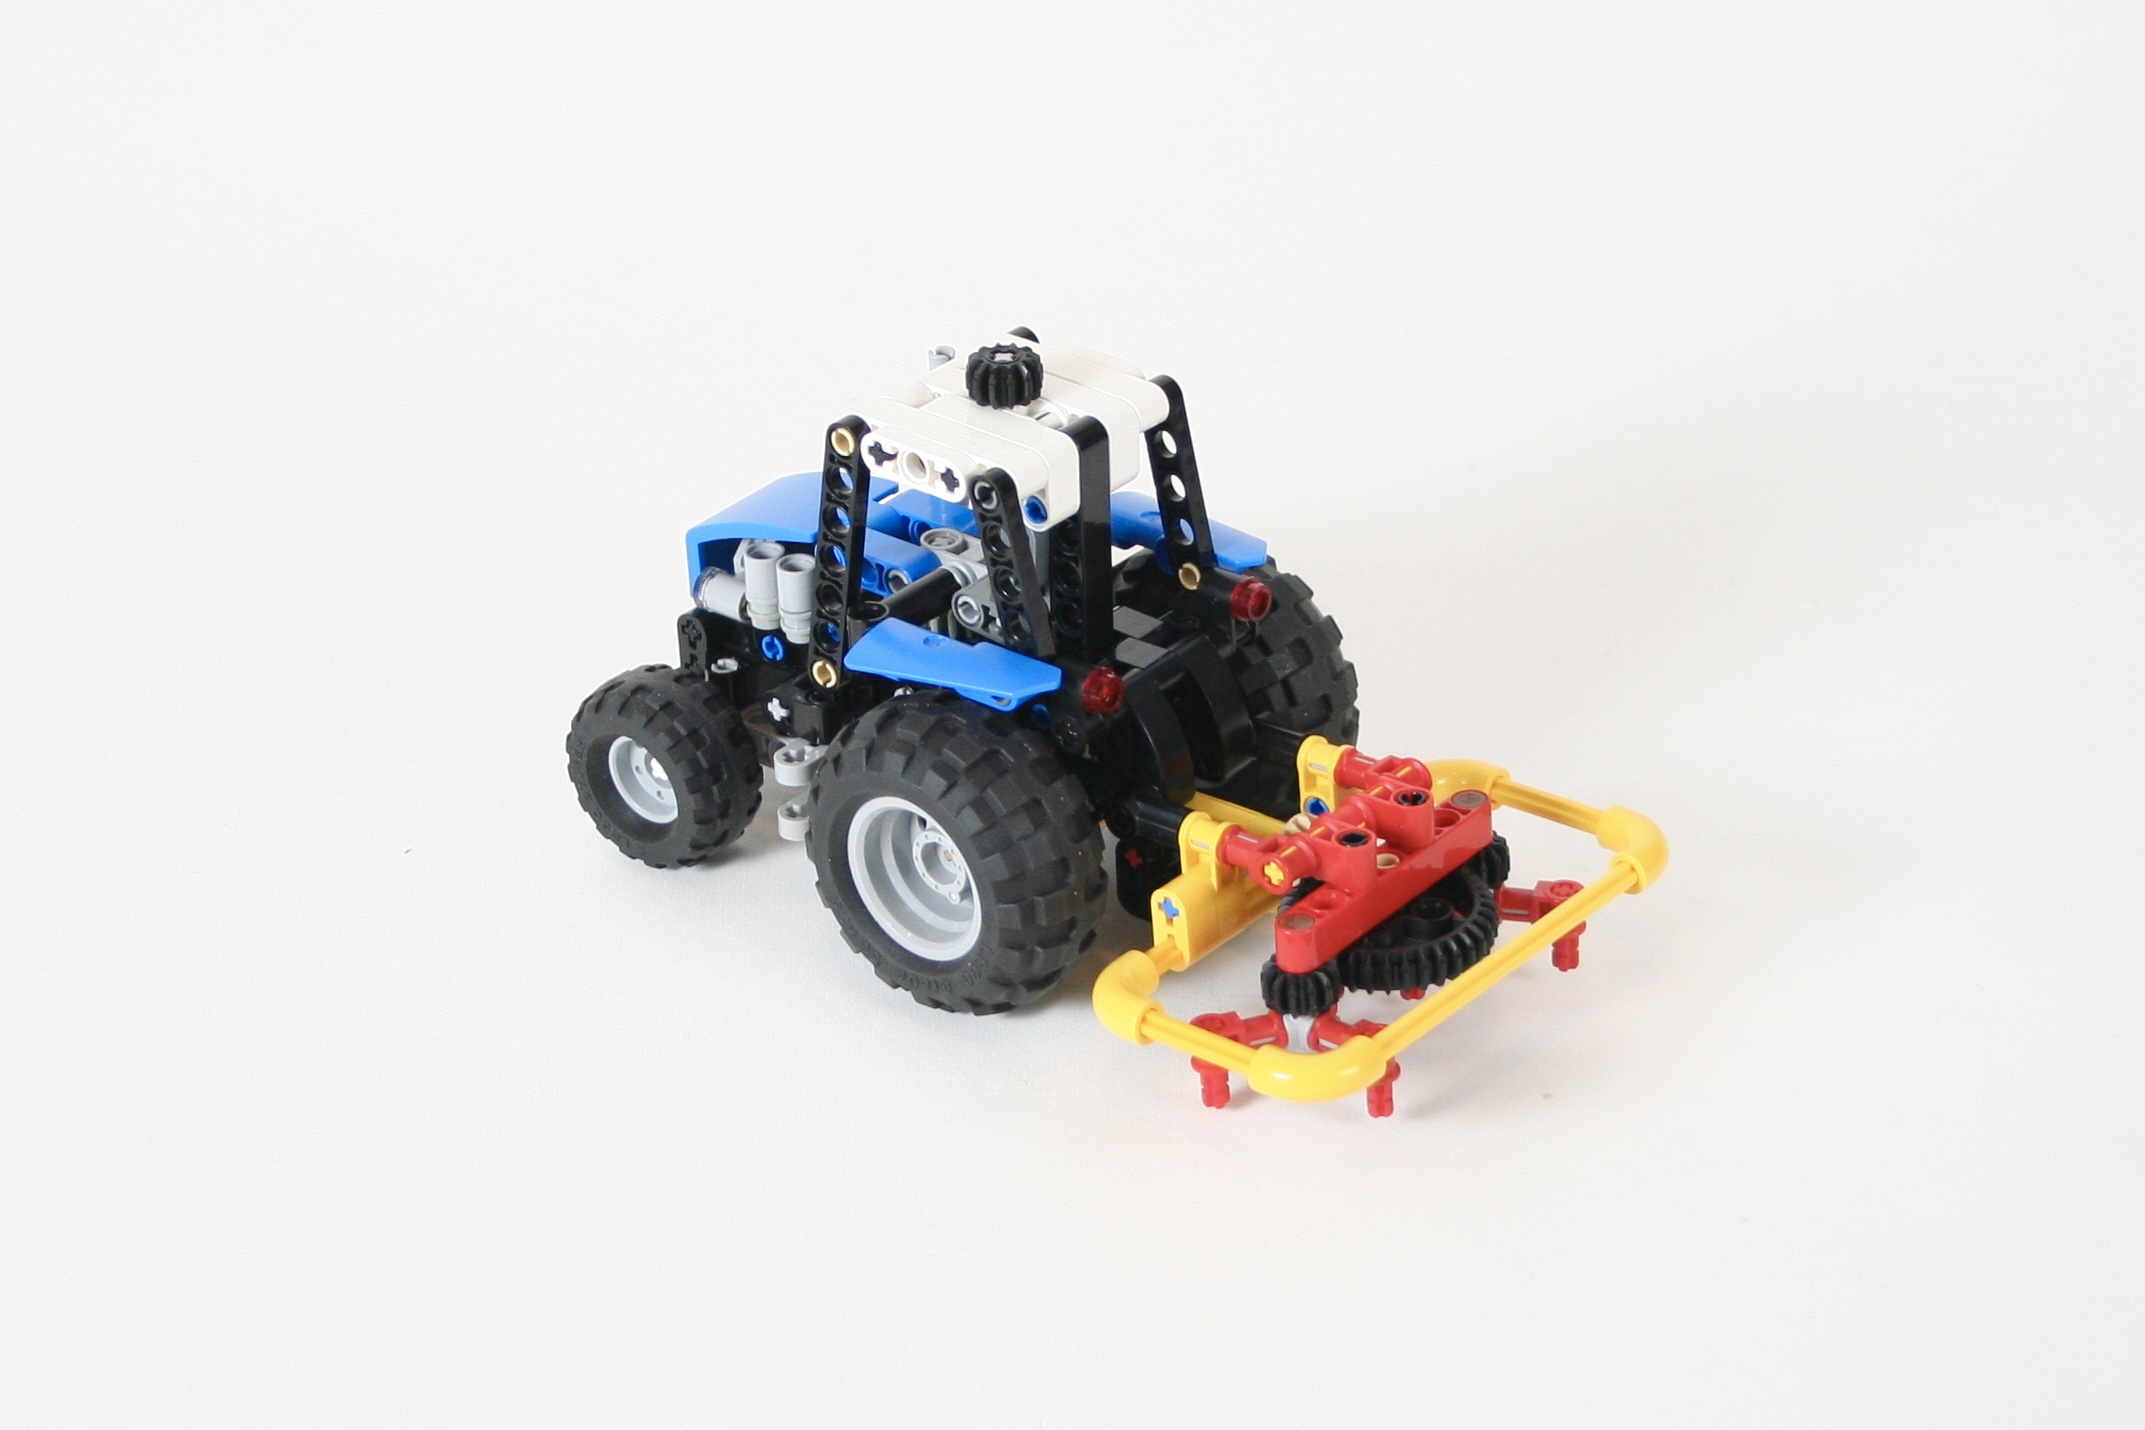
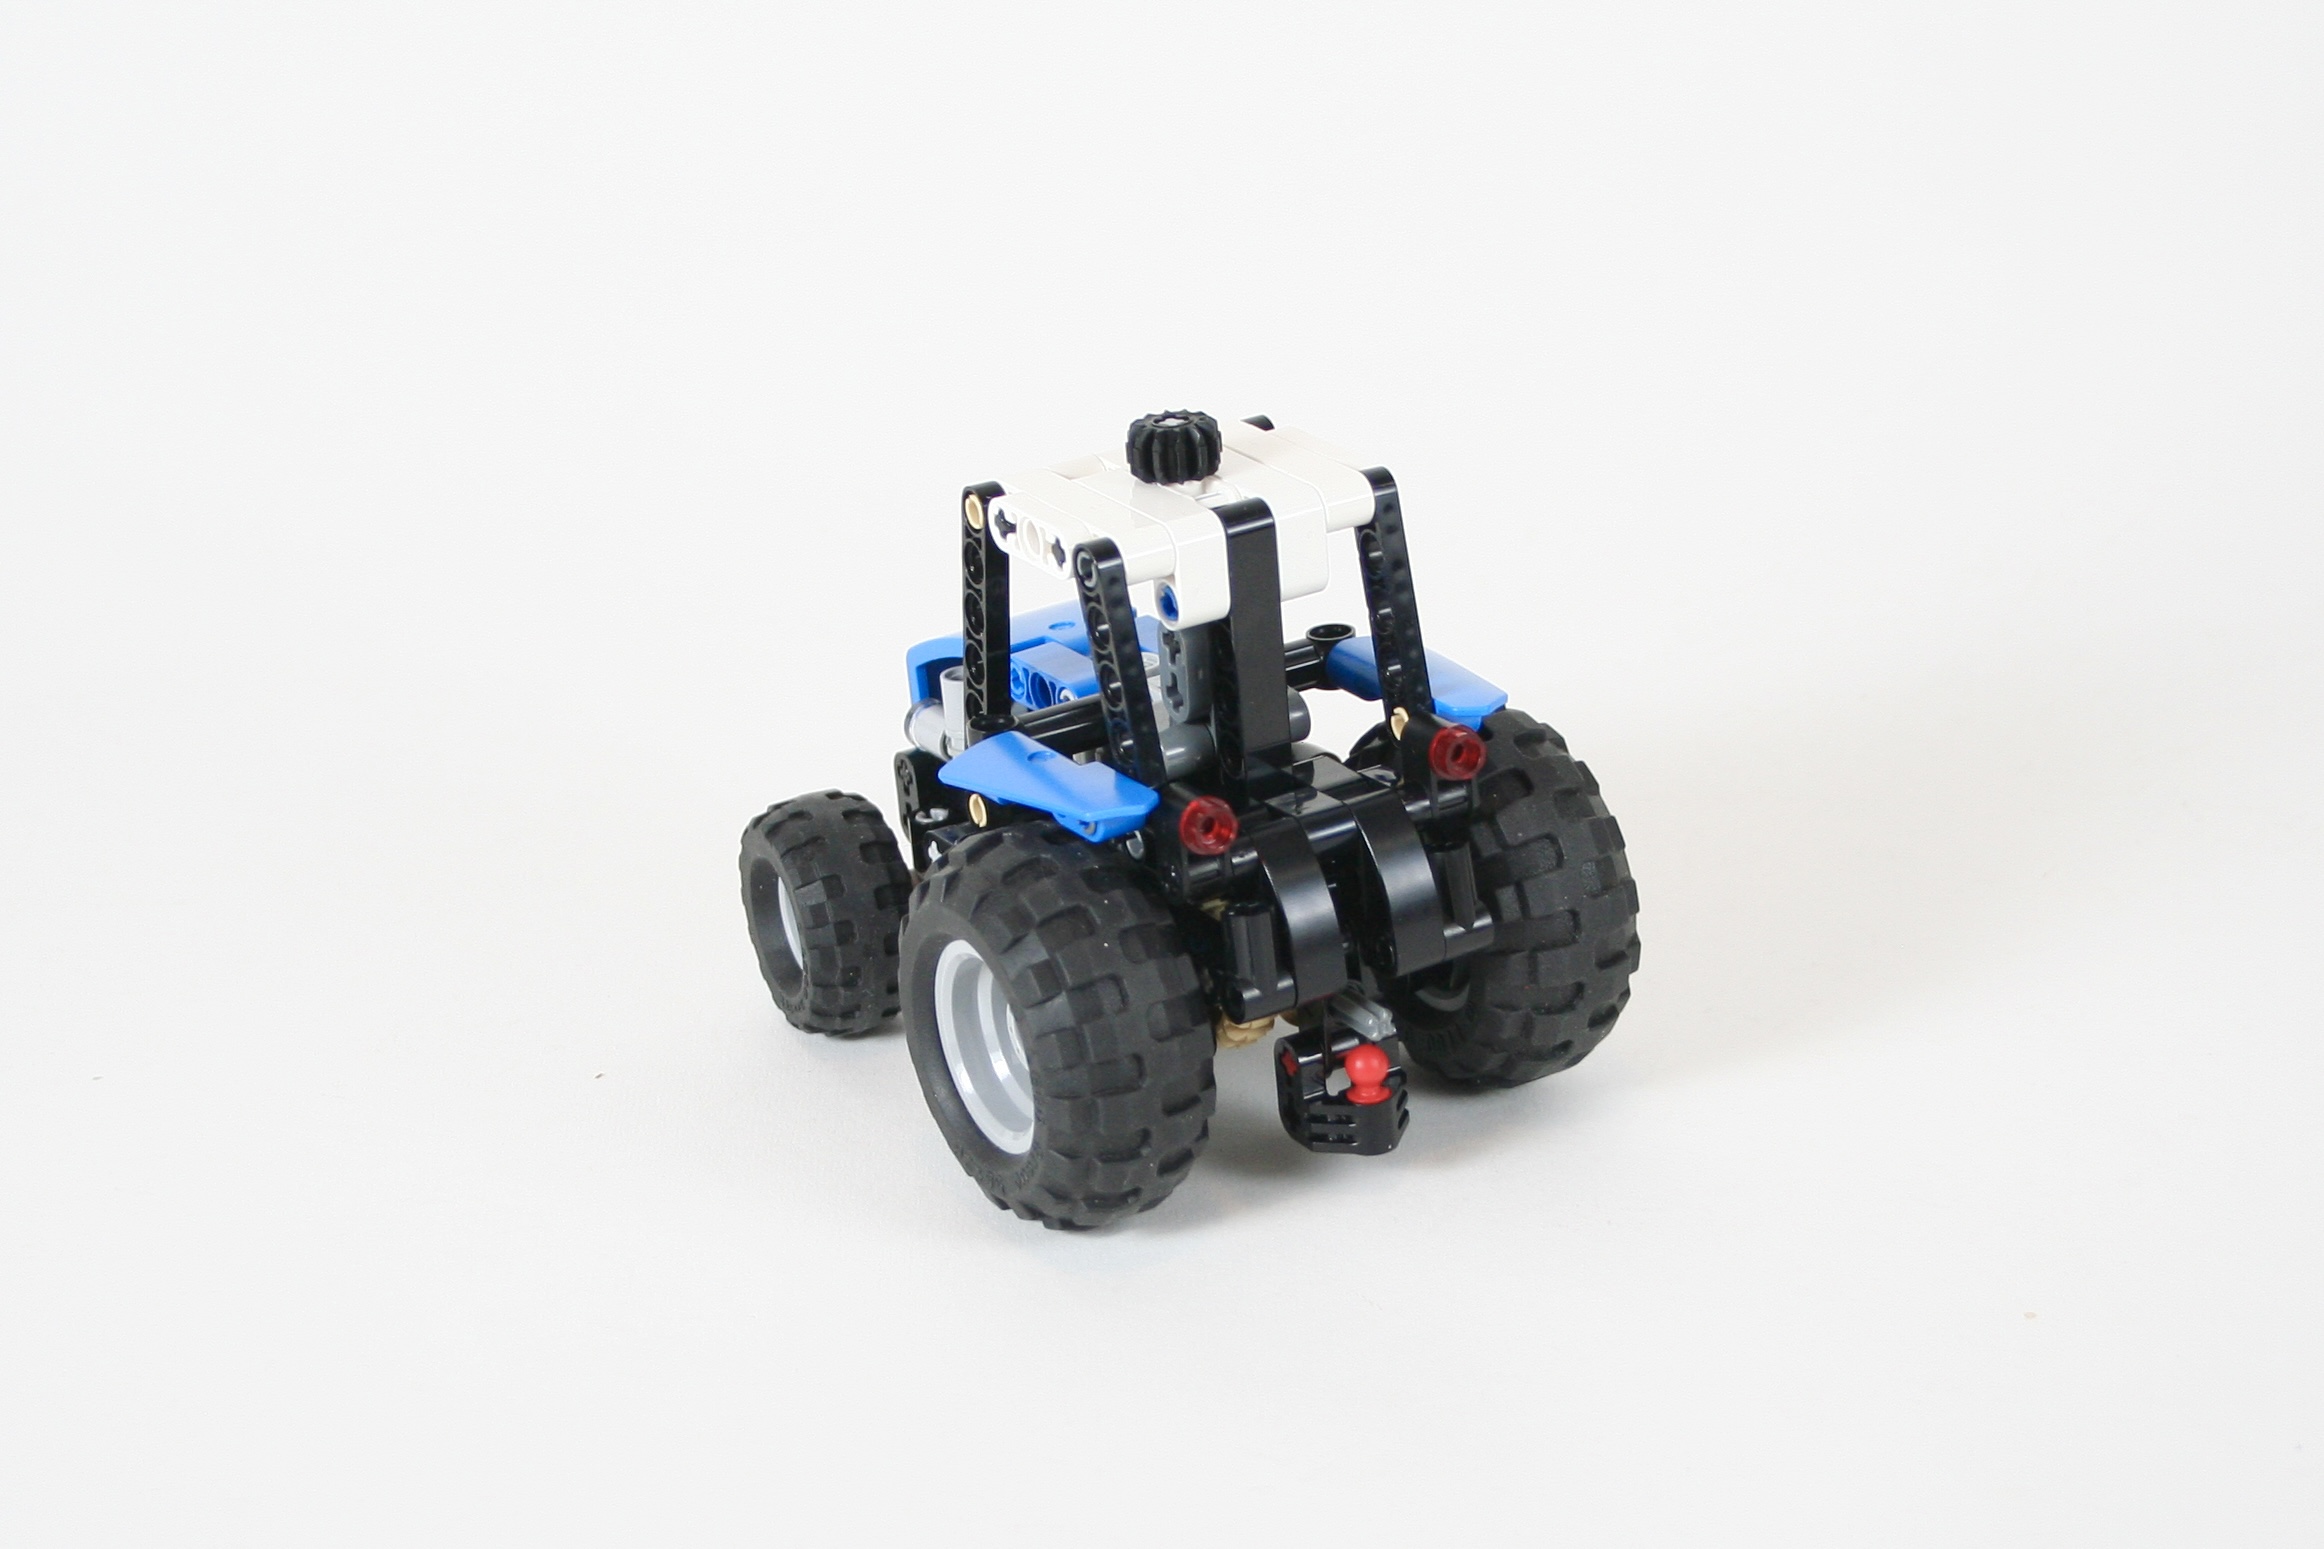
This little tractor was the result of three days of designing and building. It was modeled off the 6524 Blizzard Blazer set from 1988, which to the best of my memory, was the first set I ever acquired. This little tractor has a simple steering design, with a HOG on the top of the cabin. Additionally, a little PTO is run off one of the rear wheels and can power an attachment. Finally, a mount for a front attachment is included, as is an attachment and hitch at the rear of the tractor.
To demonstrate the versatility of this small tractor, I built a hay wagon, and two attachments. Naturally, a little snow plow was built for the front. A little hay tedder was built for the rear which is powered by the PTO. Finally, the hay wagon connects to the rear hitch and has a steerable axle. Free instructions for the wagon are also available at Rebrickable.com.
While this is not one of the best builds I have made in the last couple of years, it served a specific function of clearing my creative head. It accomplished this. It was a fun little build, and I’m sure there will be more like it in the coming years.
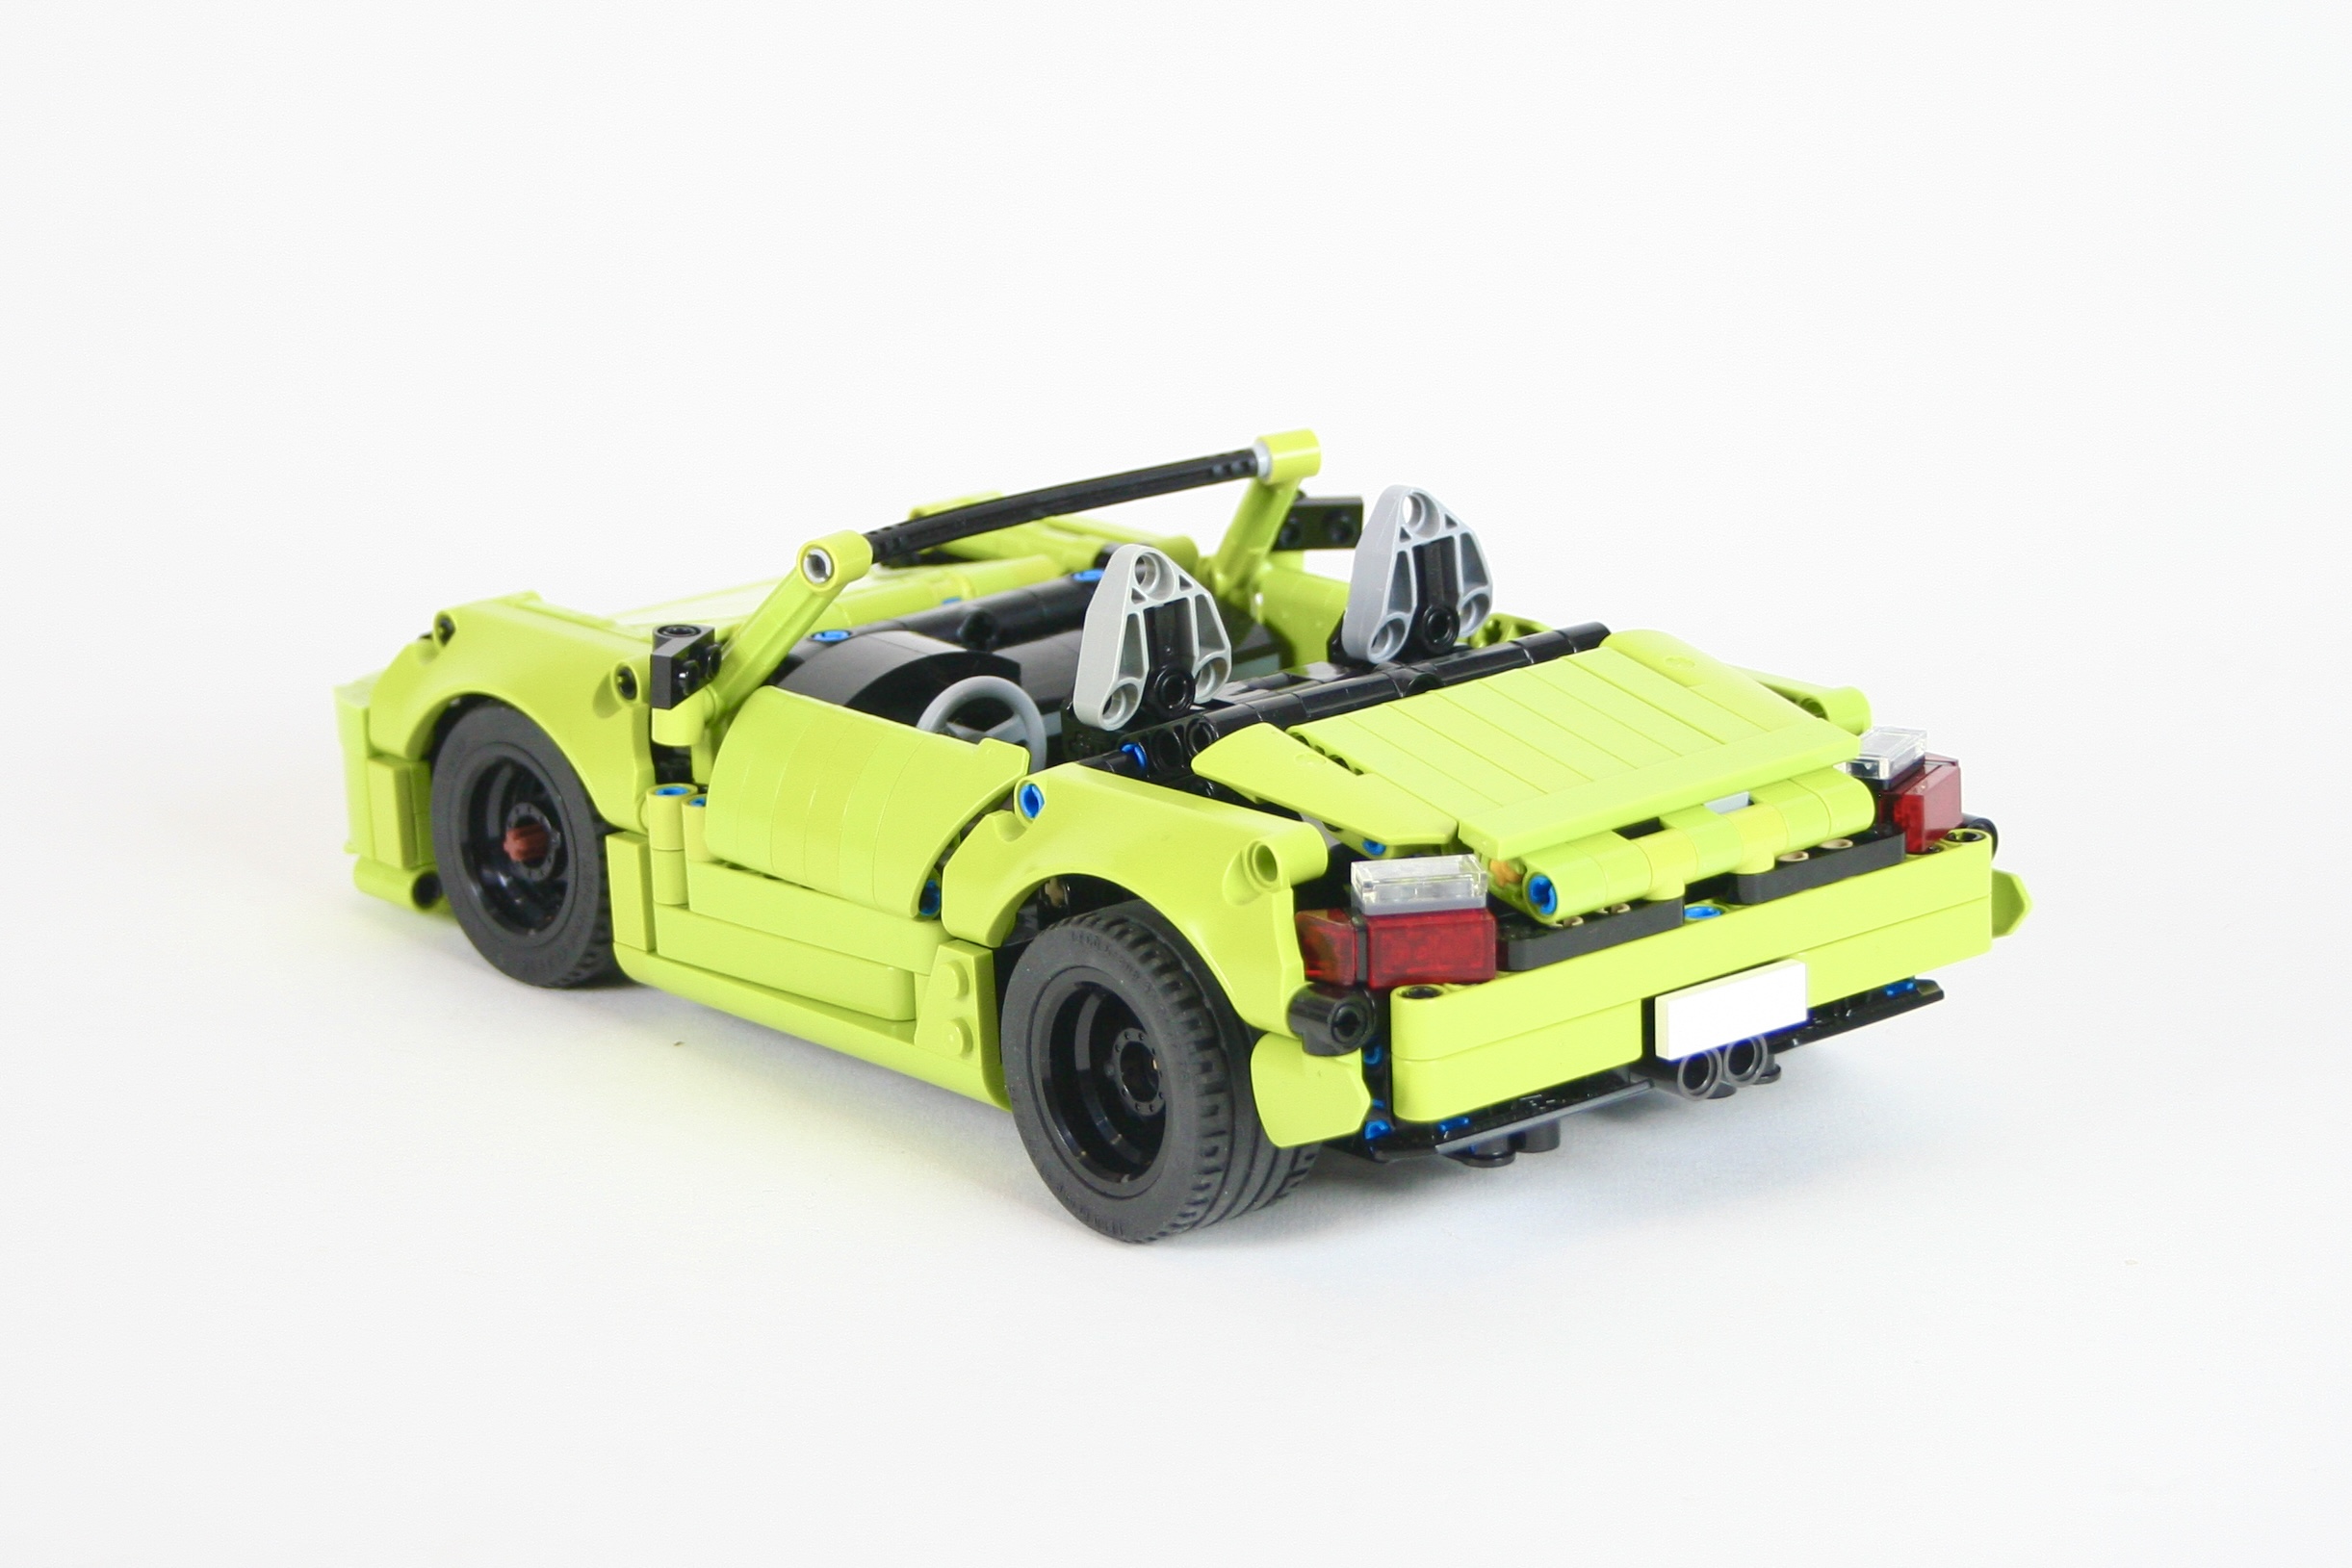
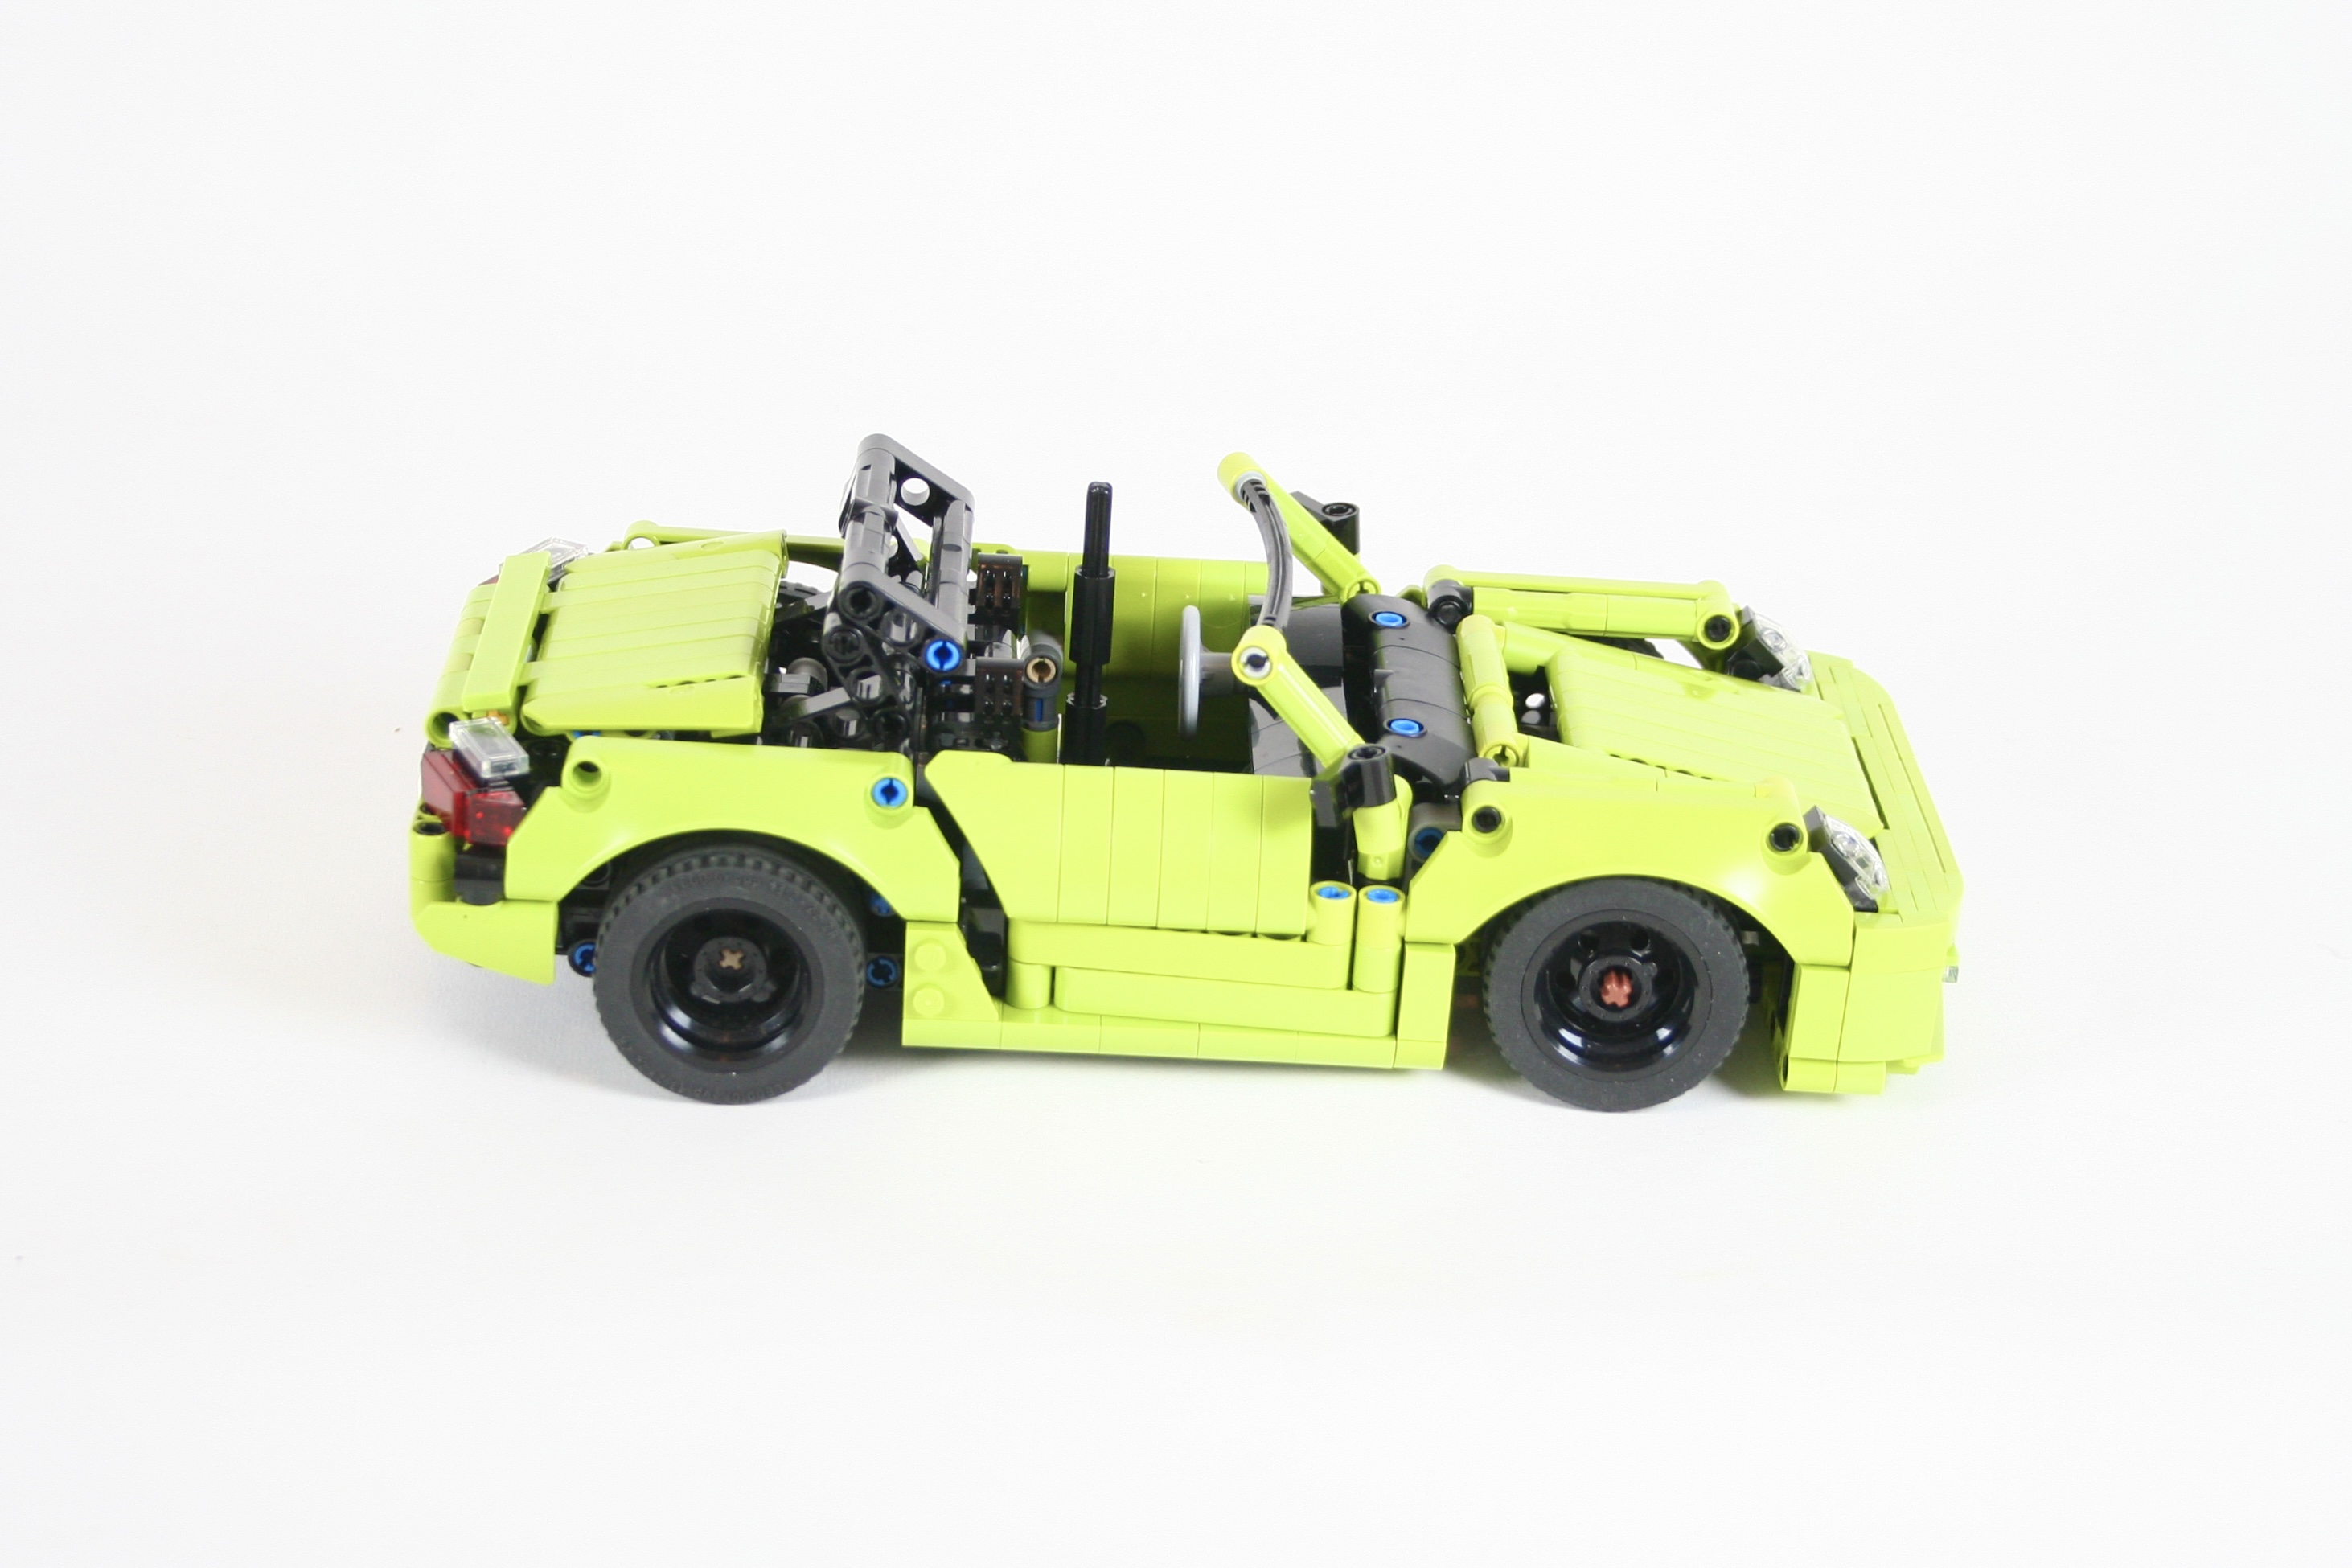
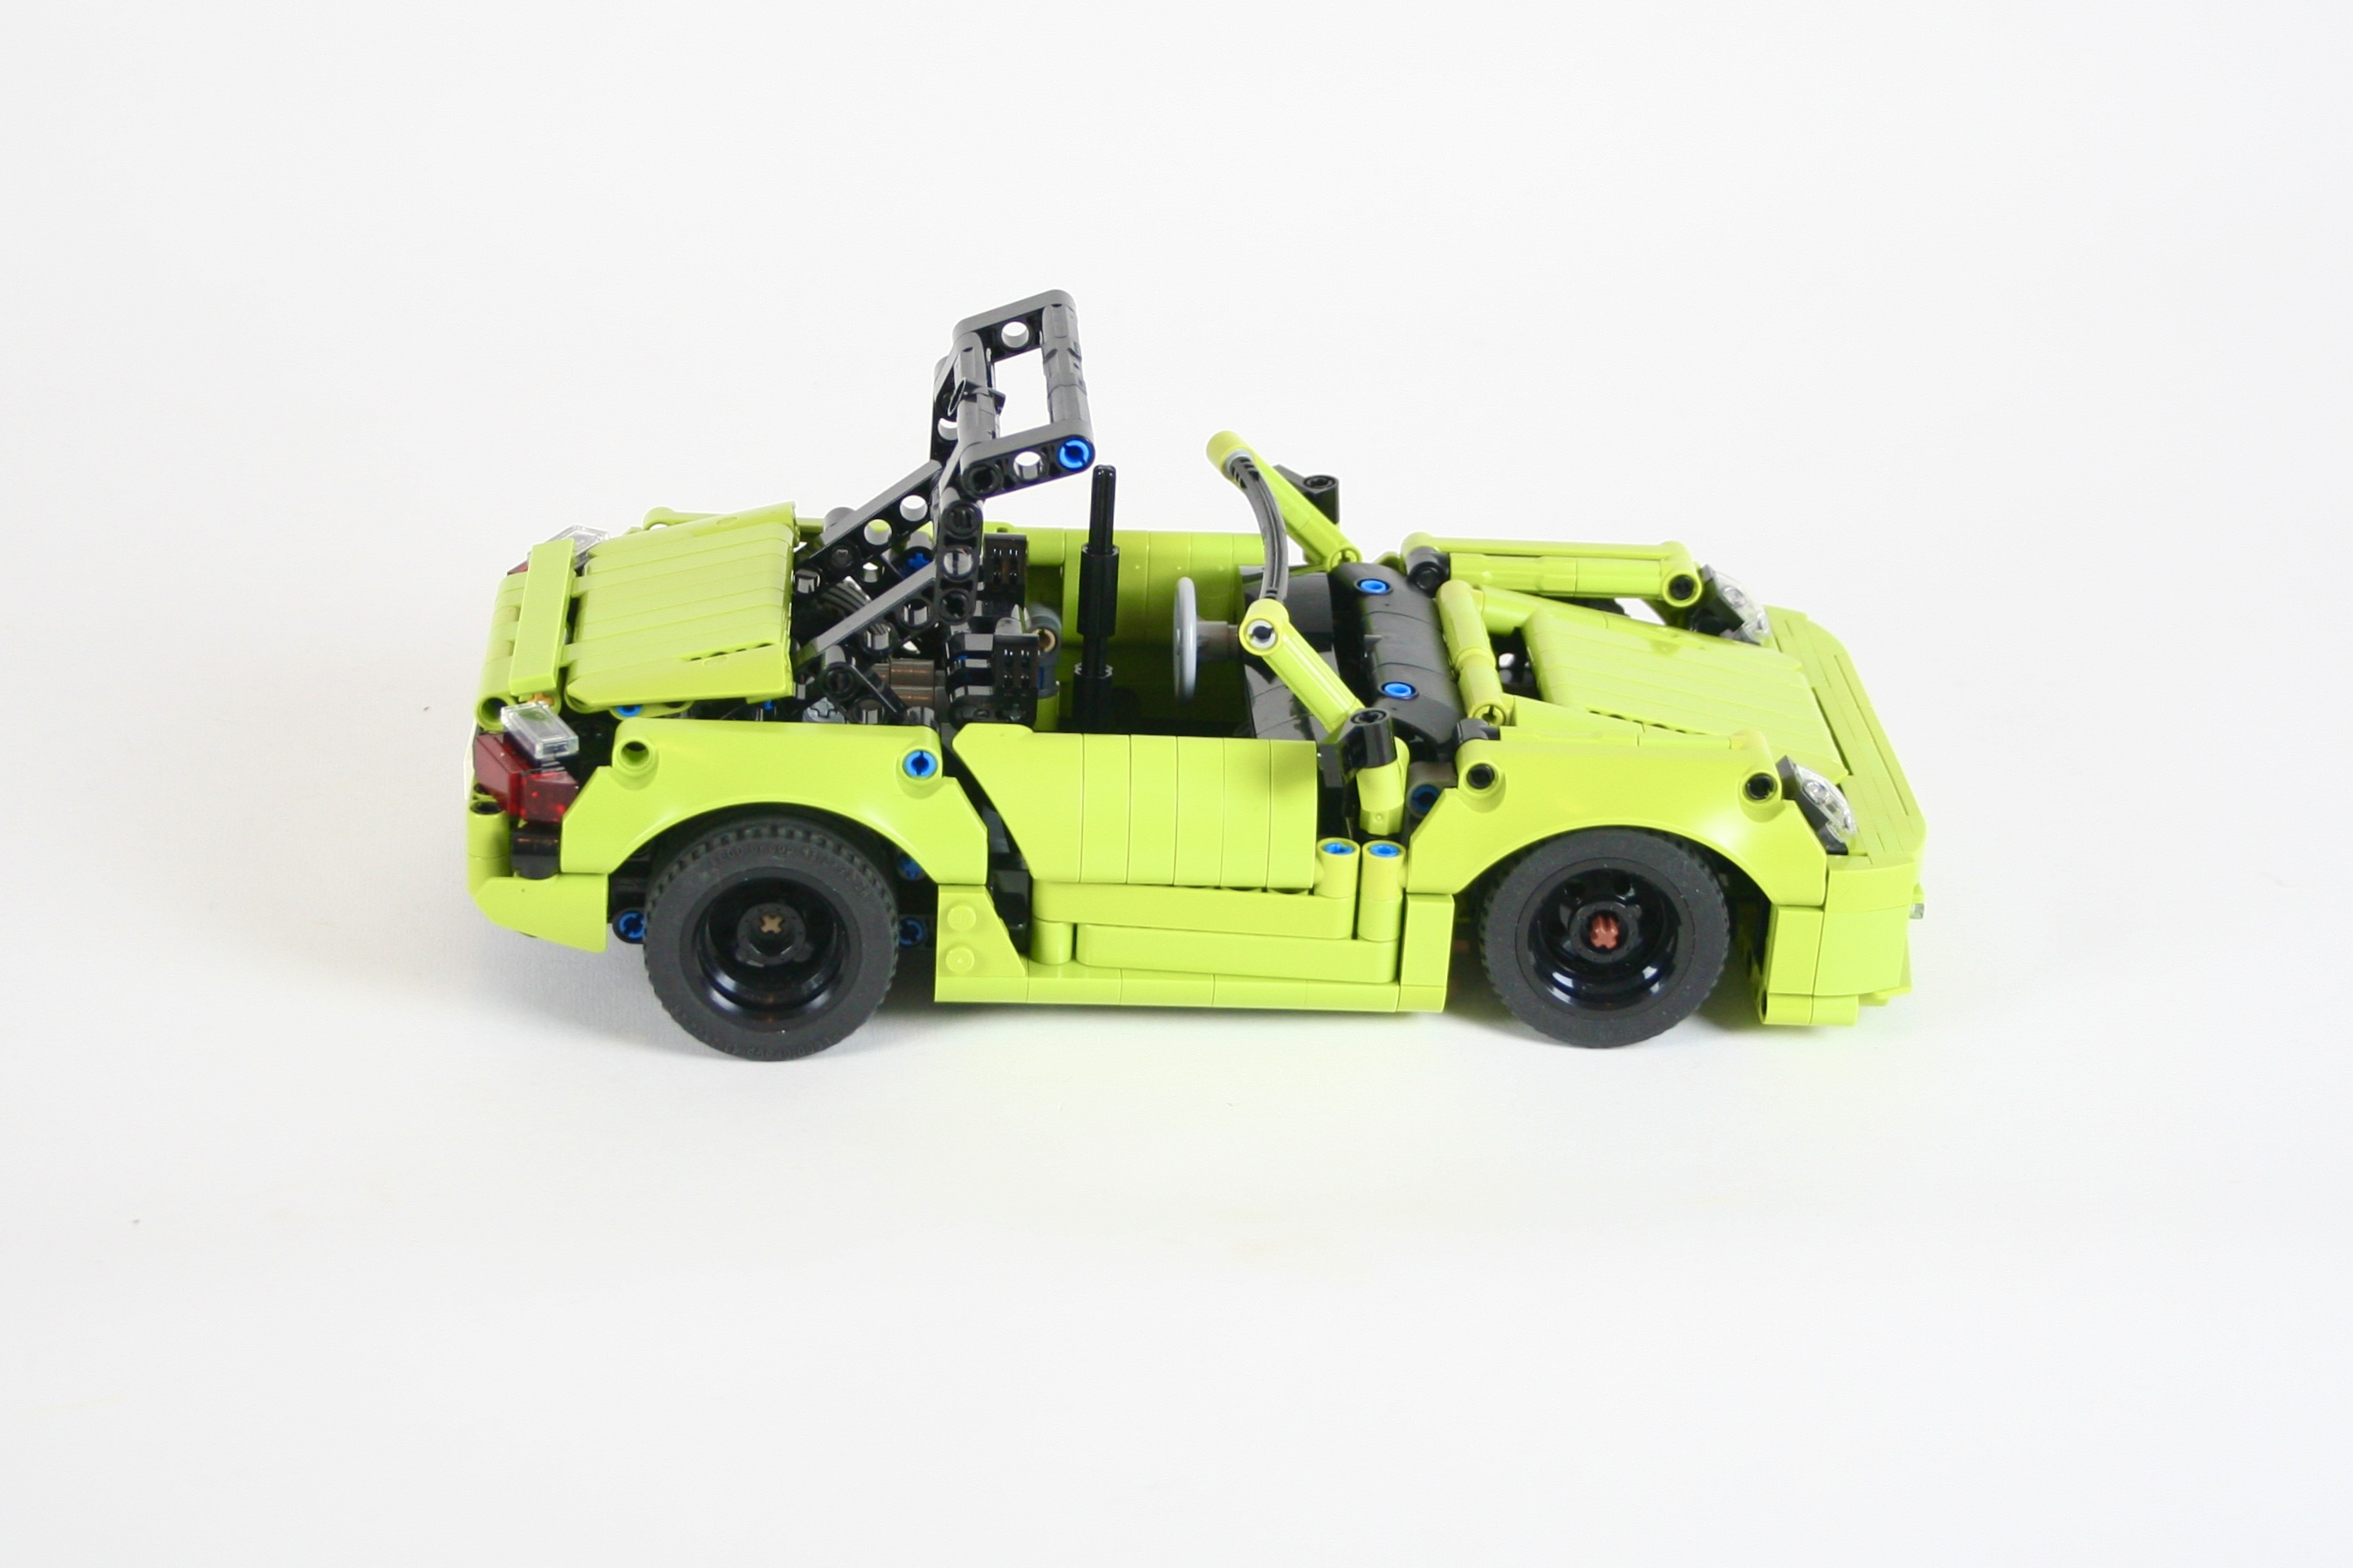
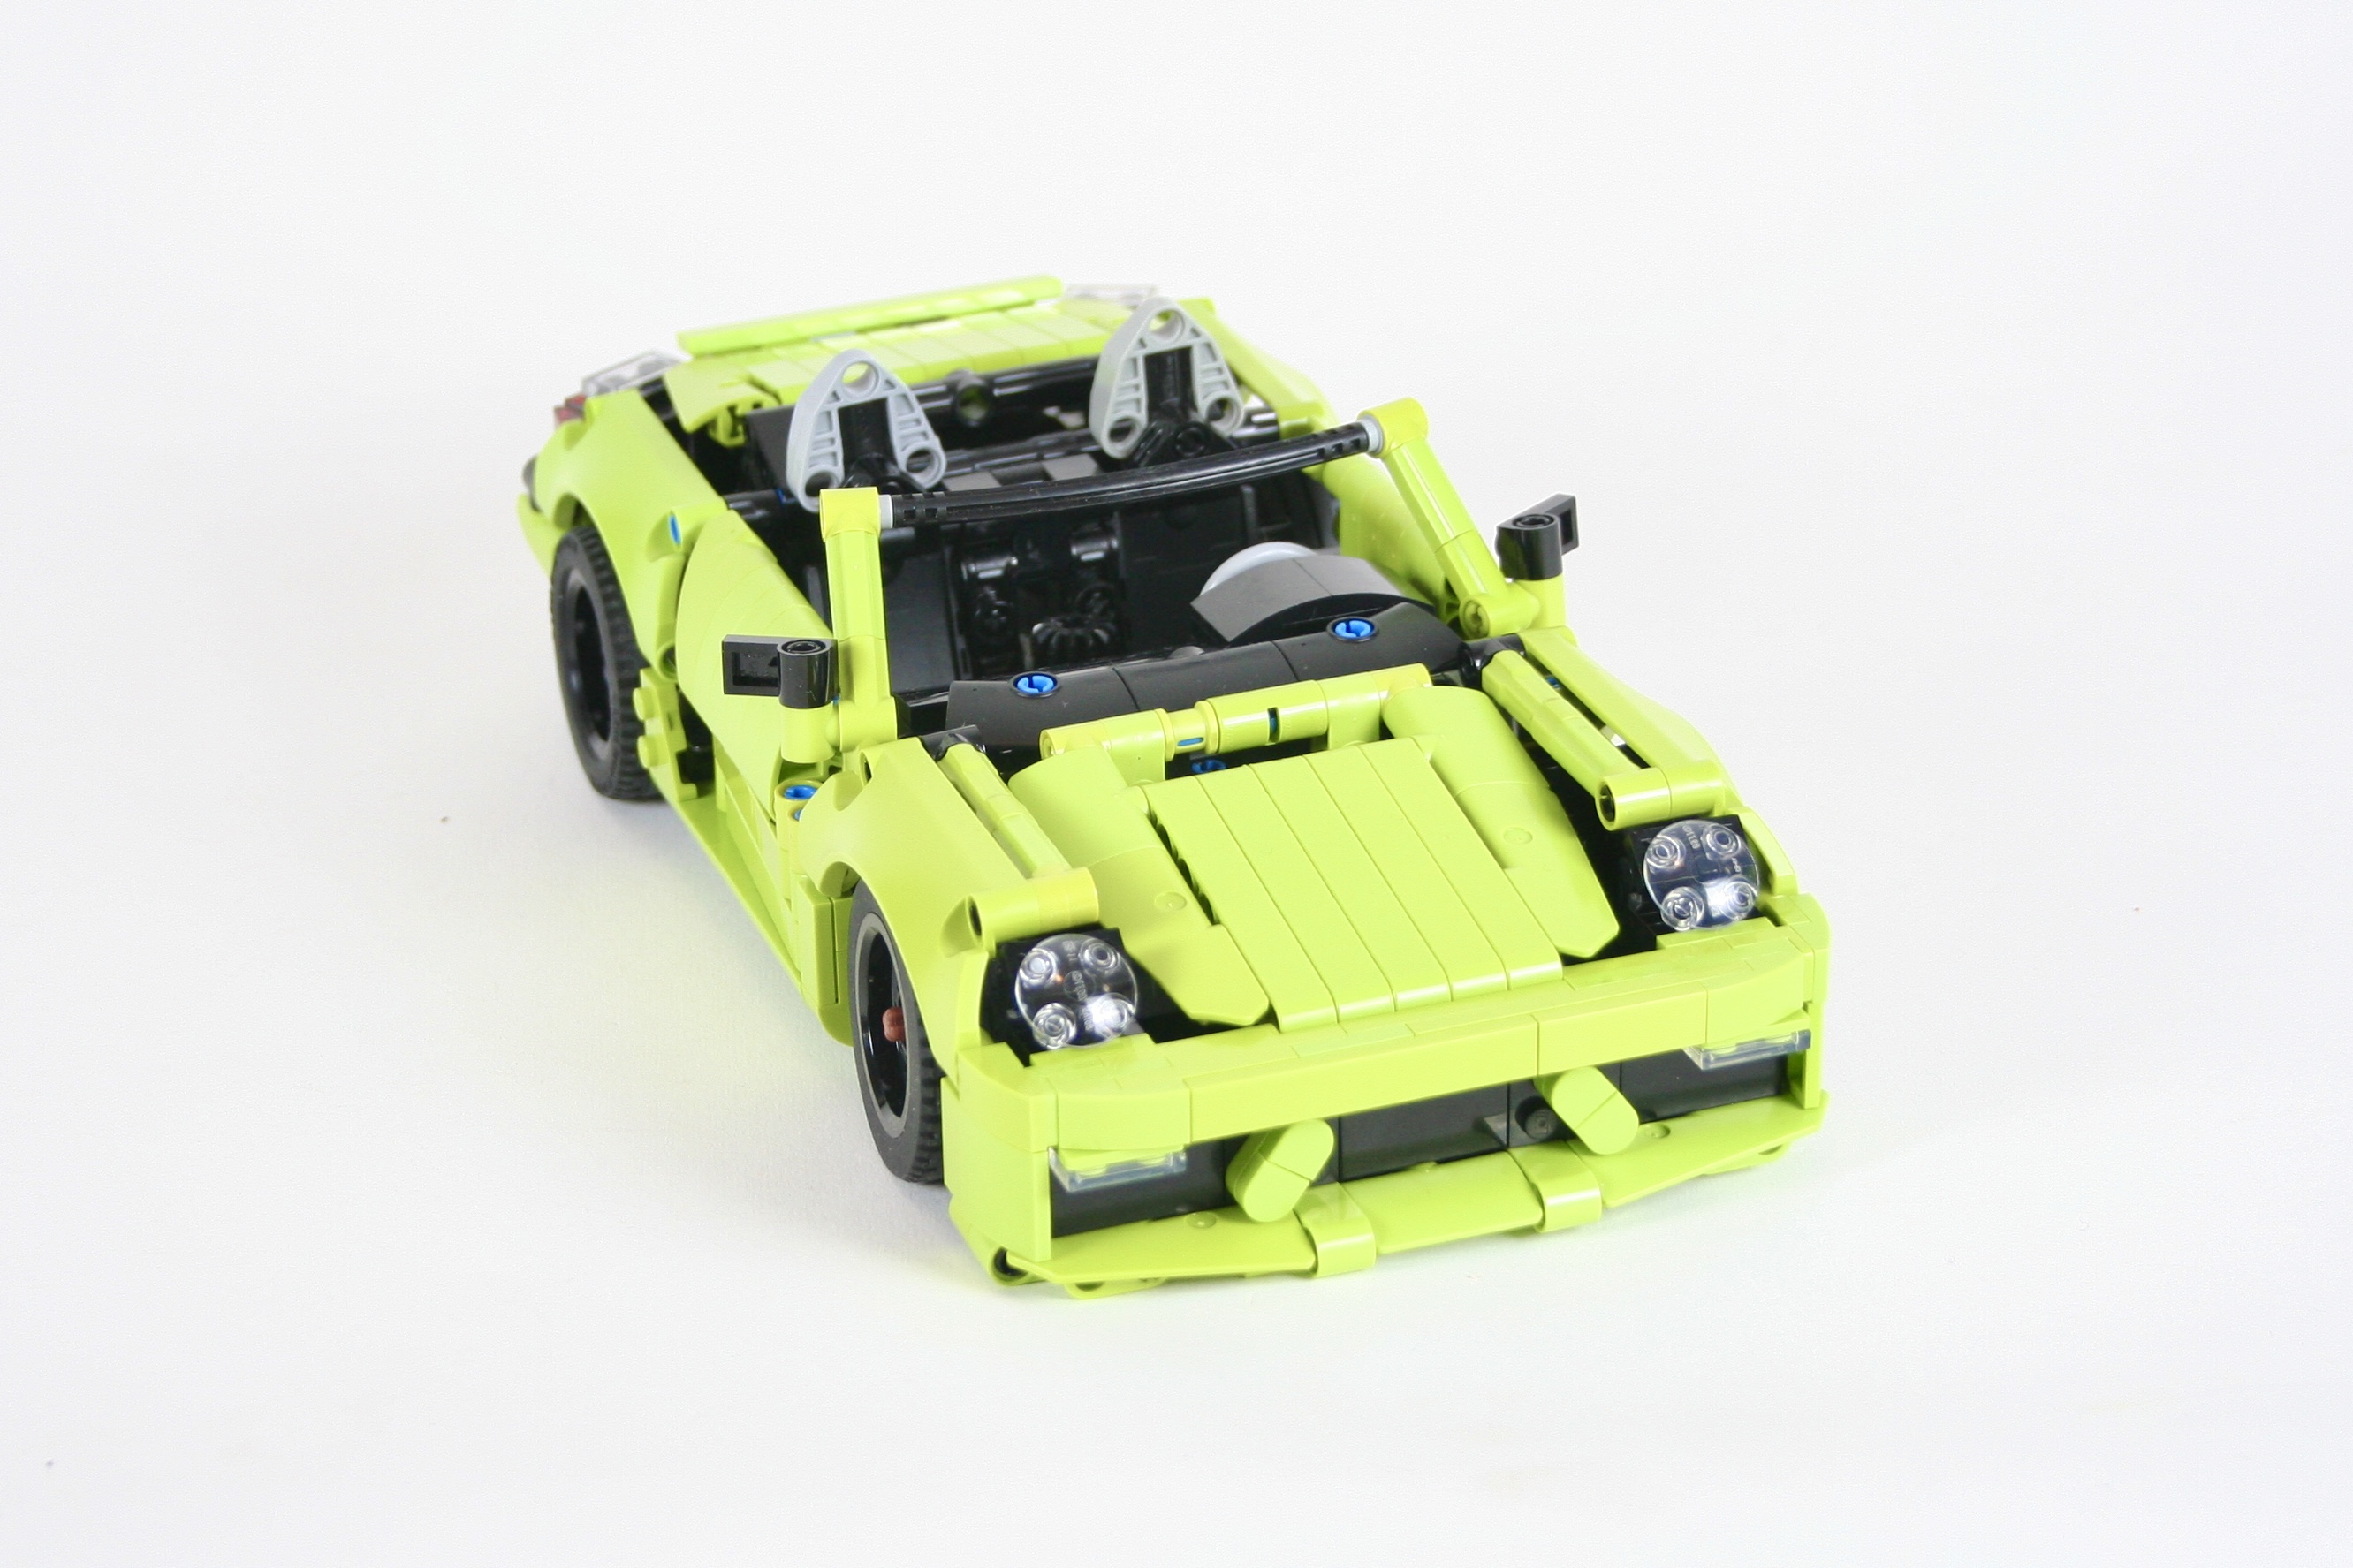
Like many car enthusiasts, I am love any Porsche. I have made my fair share of 911s, which is right of passage for LEGO car designers. But at some point, I looked around and did not find any Boxsters. So it was time to design one.
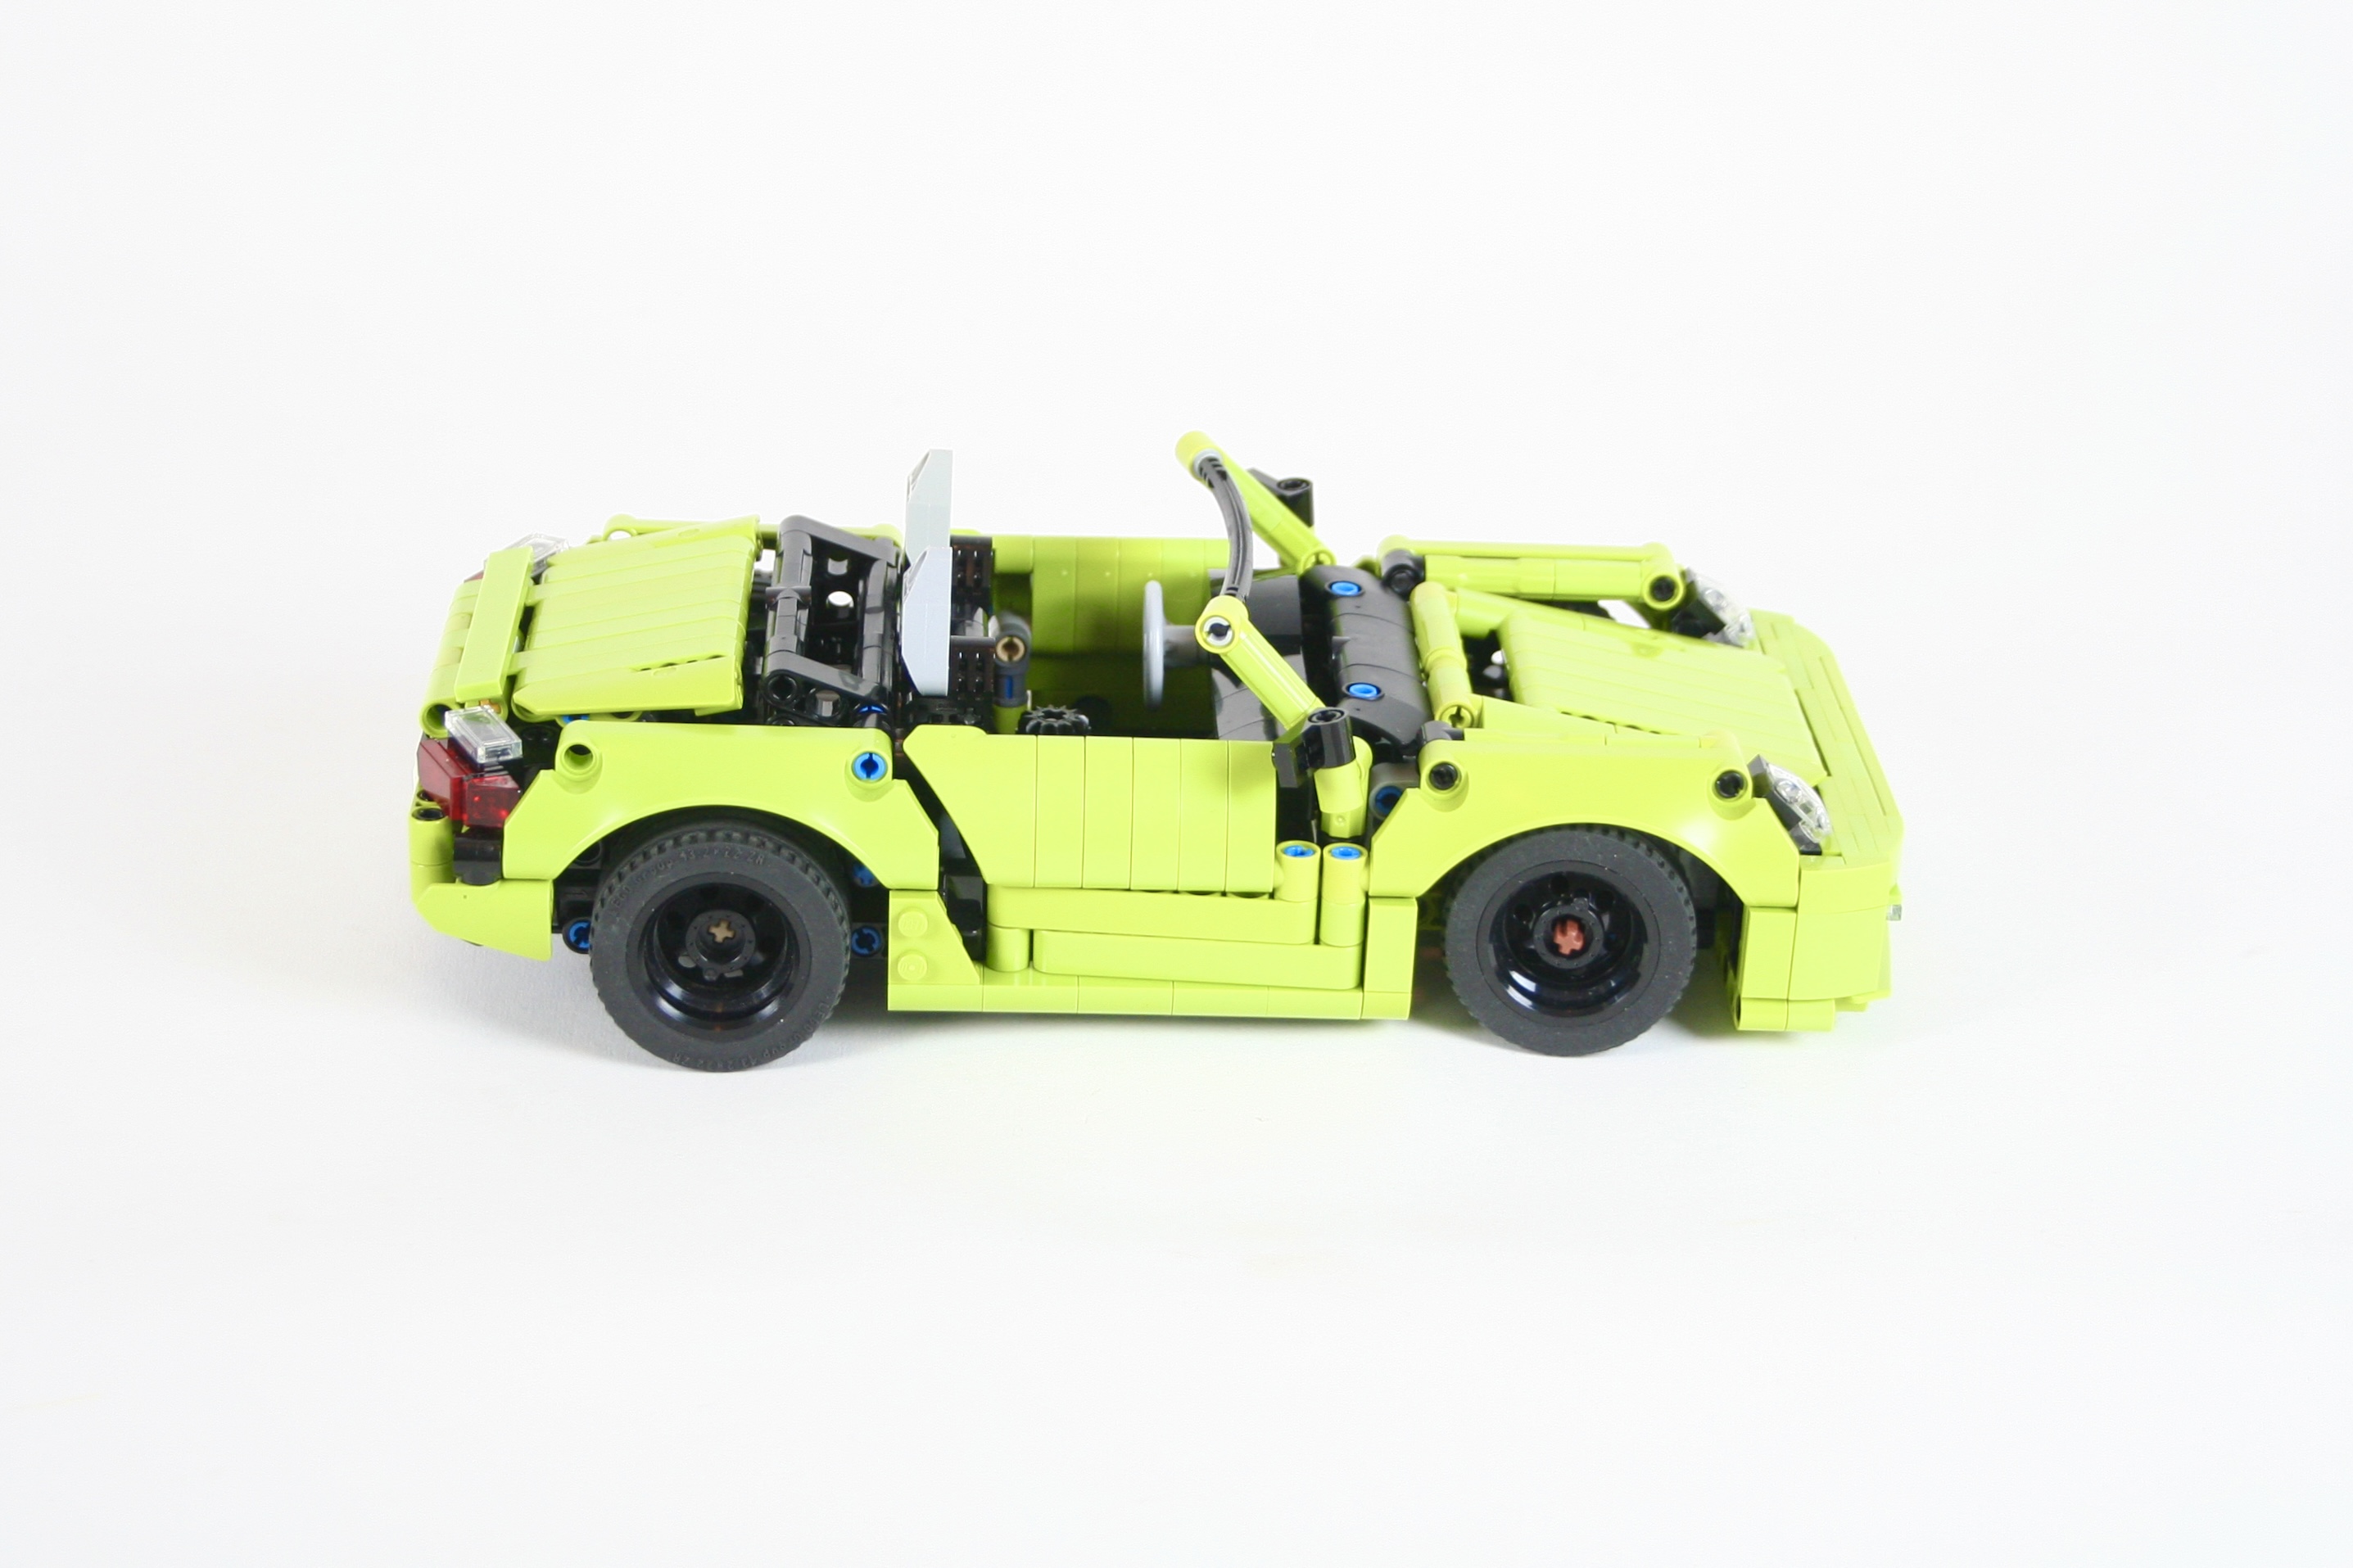
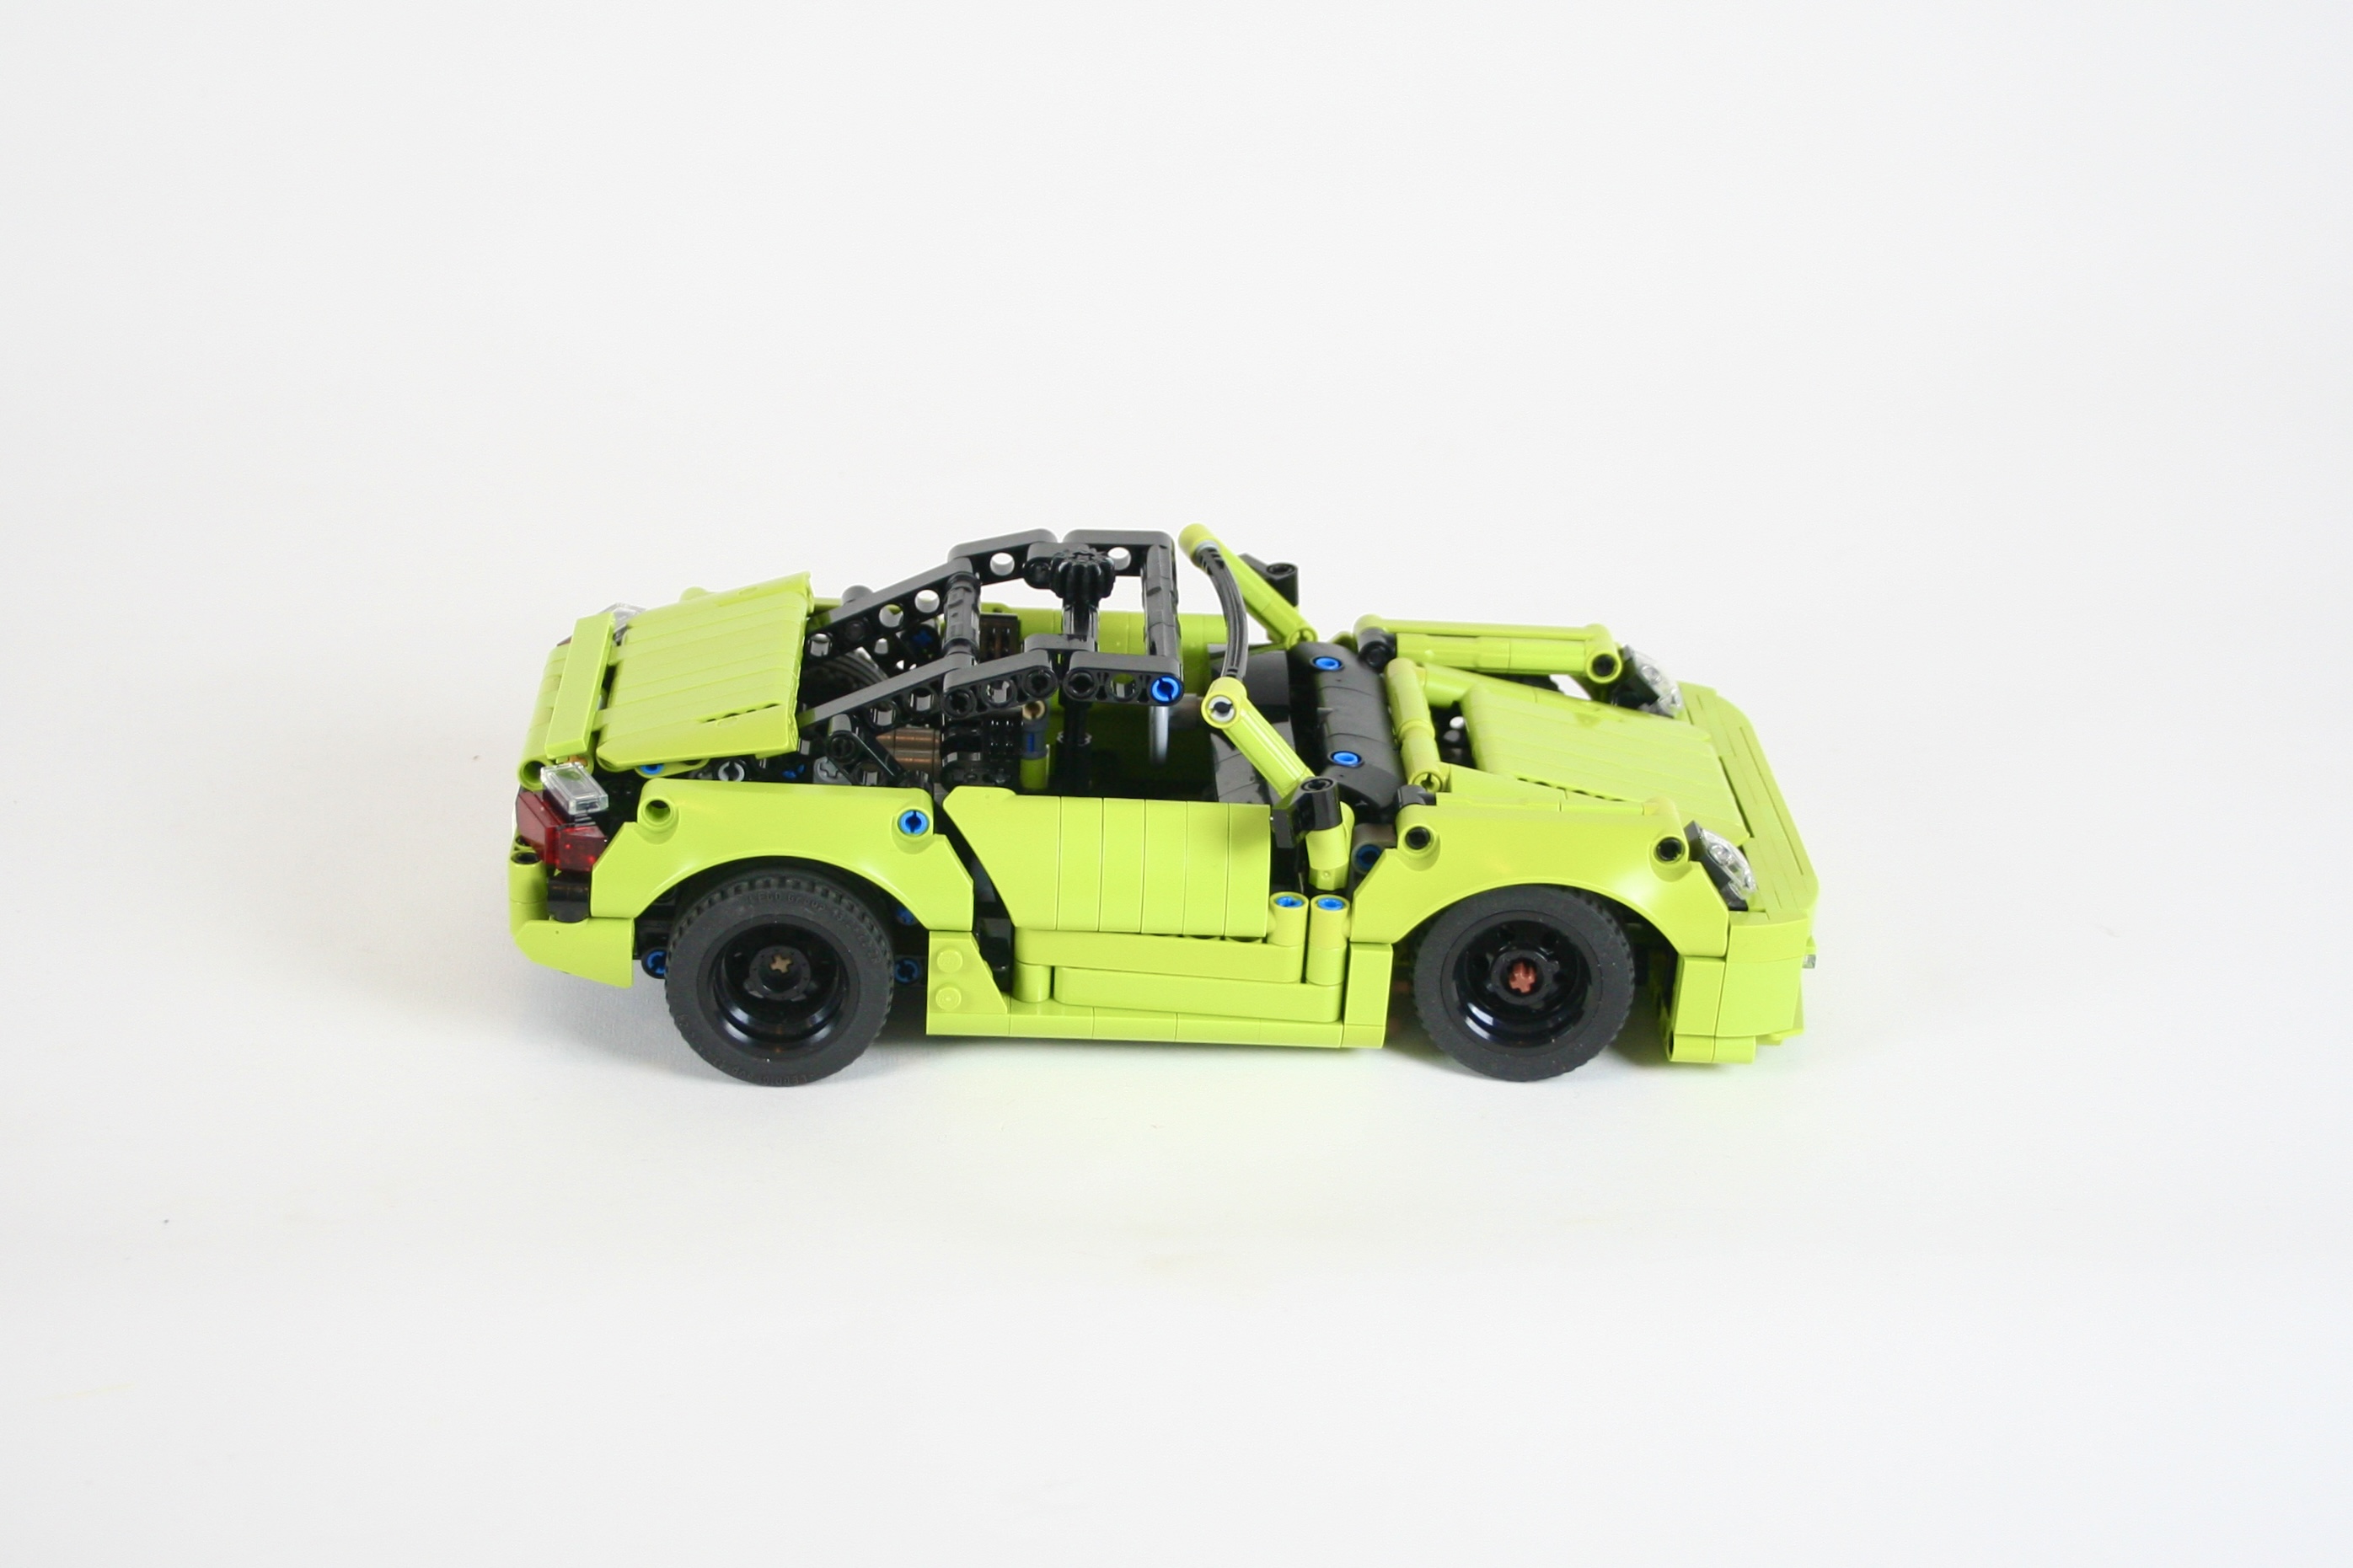
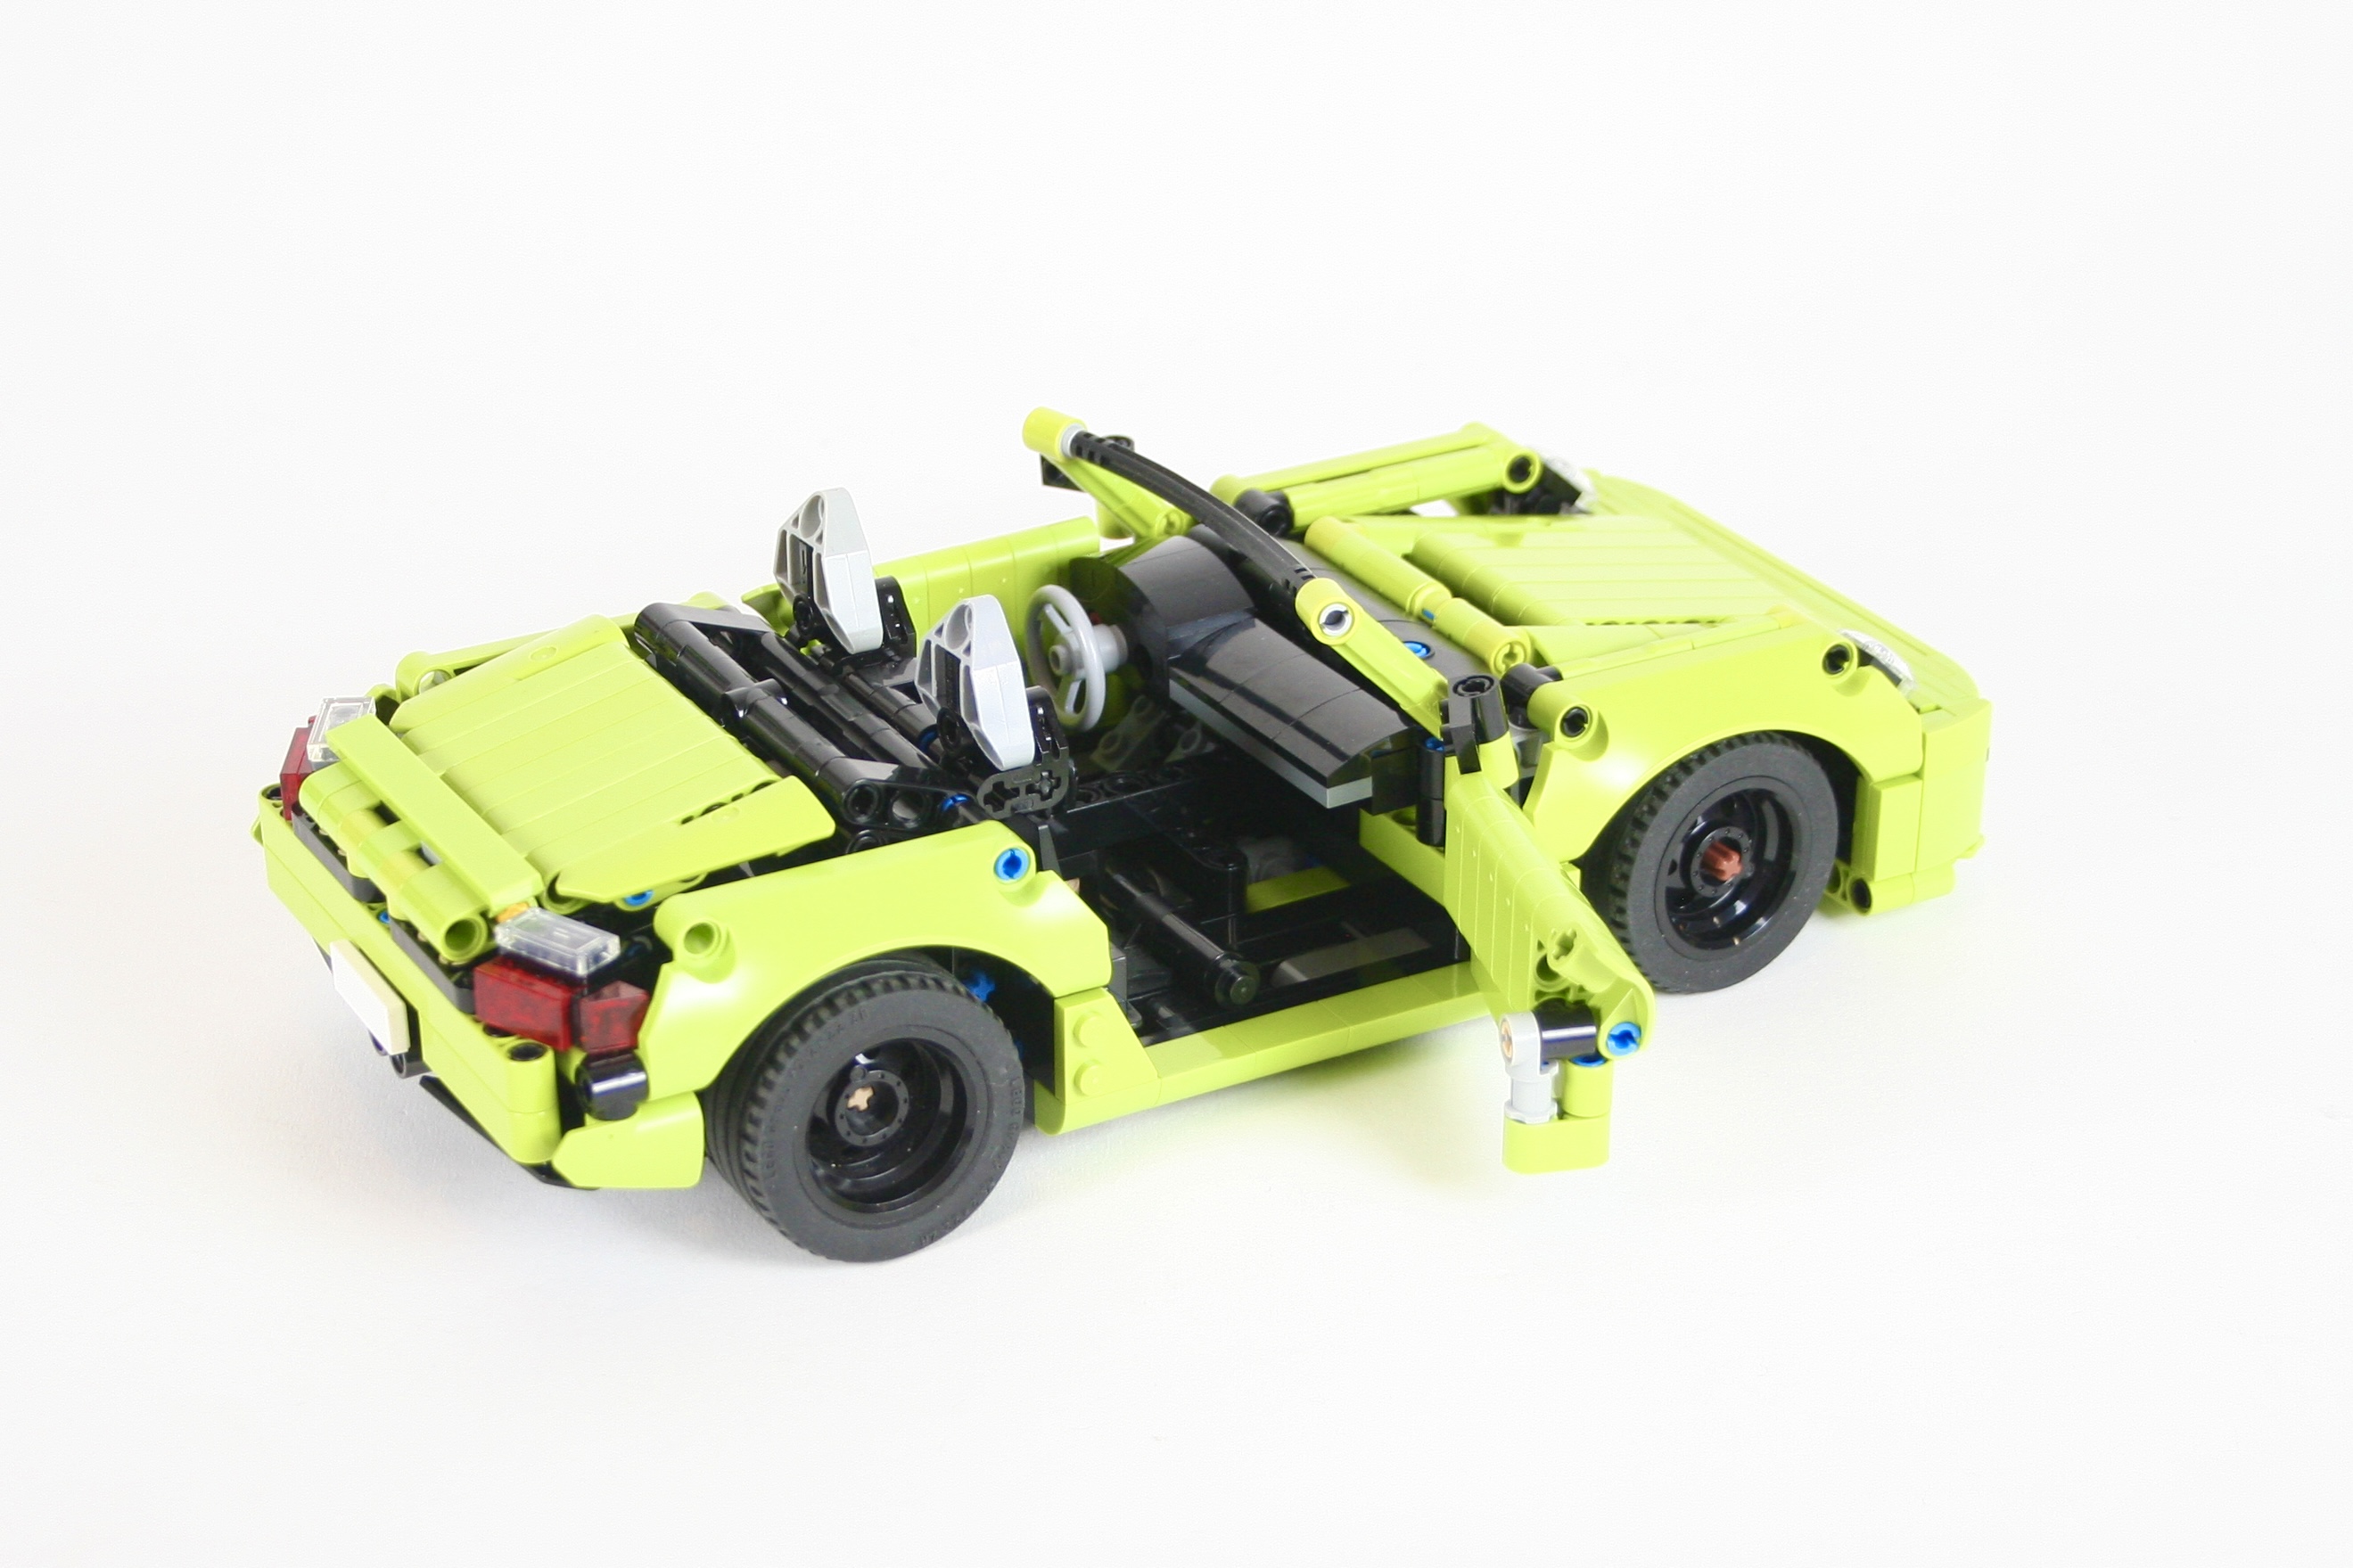
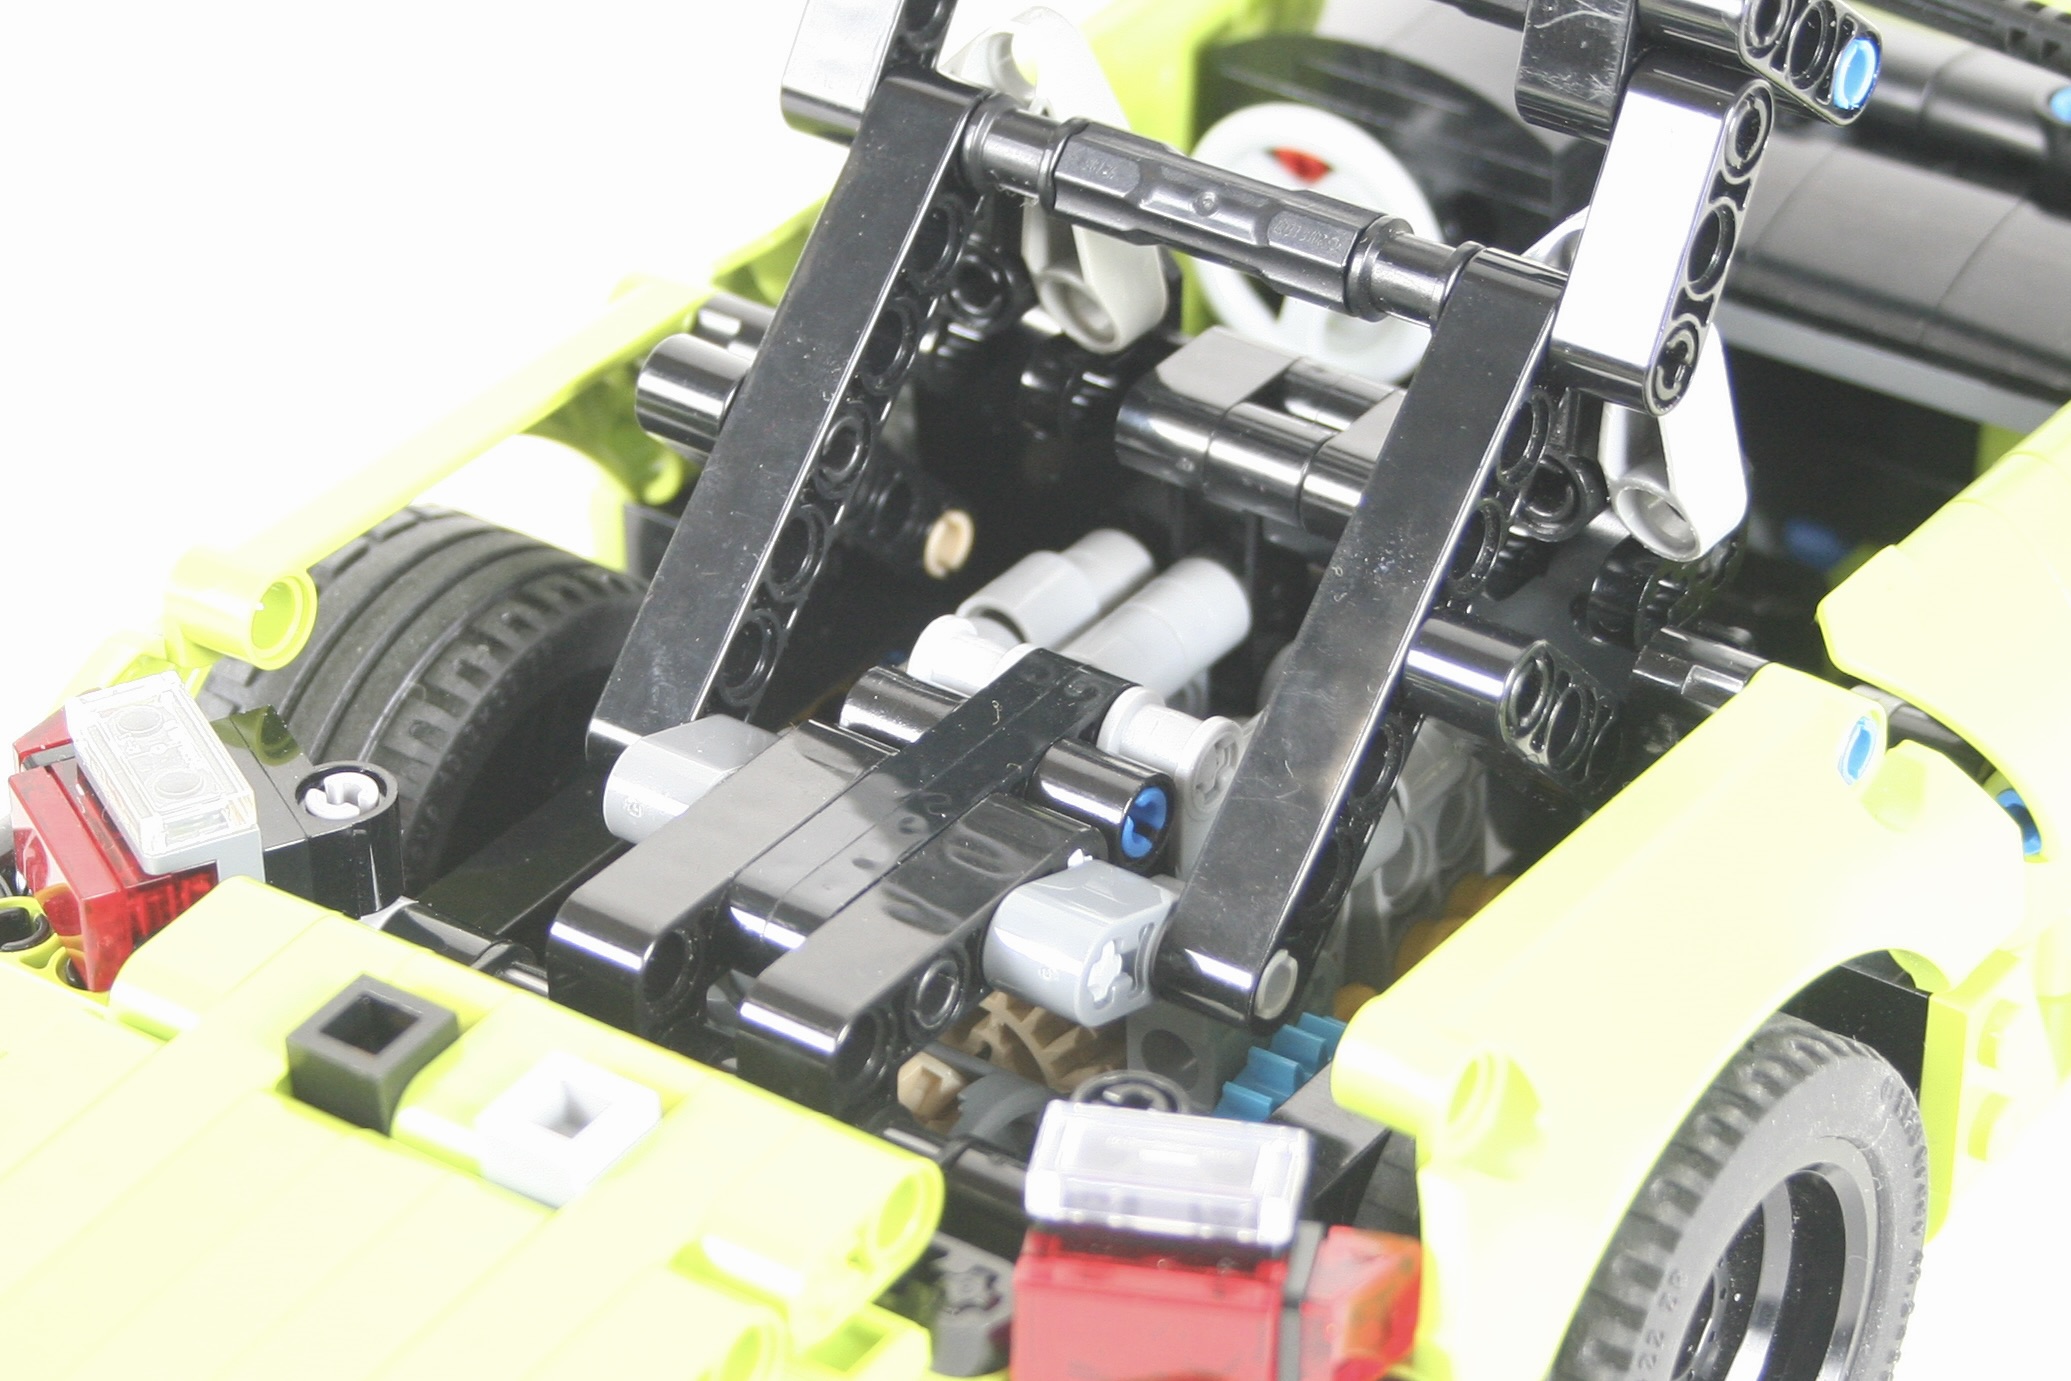
I had been playing around with some boxer engines for years, and I was finally able to come up with a design that I liked for this scale. The little axle based engine that has worked well for many smaller Technic builds is a great, and versatile design. It’s a little tall for small scale builds, but generally works well and is great to watch in these smaller cars. But it works because of gravity, so a flat engine design does not work. I tried ways to connect the axle pistons, but then the engine got so wide it would not work in this size car. Finally, after a number of drafts, and way too many months, a little design started to take shape. Built around a cam based crankshaft, pistons are mounted on a Technic connector and swing in and out to represent the engine. It is not a true flat engine, but it works smoothly, looks the part, and fits these small cars well.
Once the engine was done, building the car around it was rather fun. I worked on the doors and side of the car next, and it was at this point, I decided on the Lime color. Adding the fenders and rear deck came next, then I had to pause to build the roof. It took some time, and a number of drafts, but I finally came up with a simple roof design that would fold into the rear of the car. The roof was not too stable when up, so I use a HOG extension in the middle of the roof to give it a little support.
The car turned out to be a great little testbed for another engine design. I am pleased with how it works, and will be an idea I use in another build. The front bumper could be a little more rounded, but maybe I will update that on a future Cayman or something.
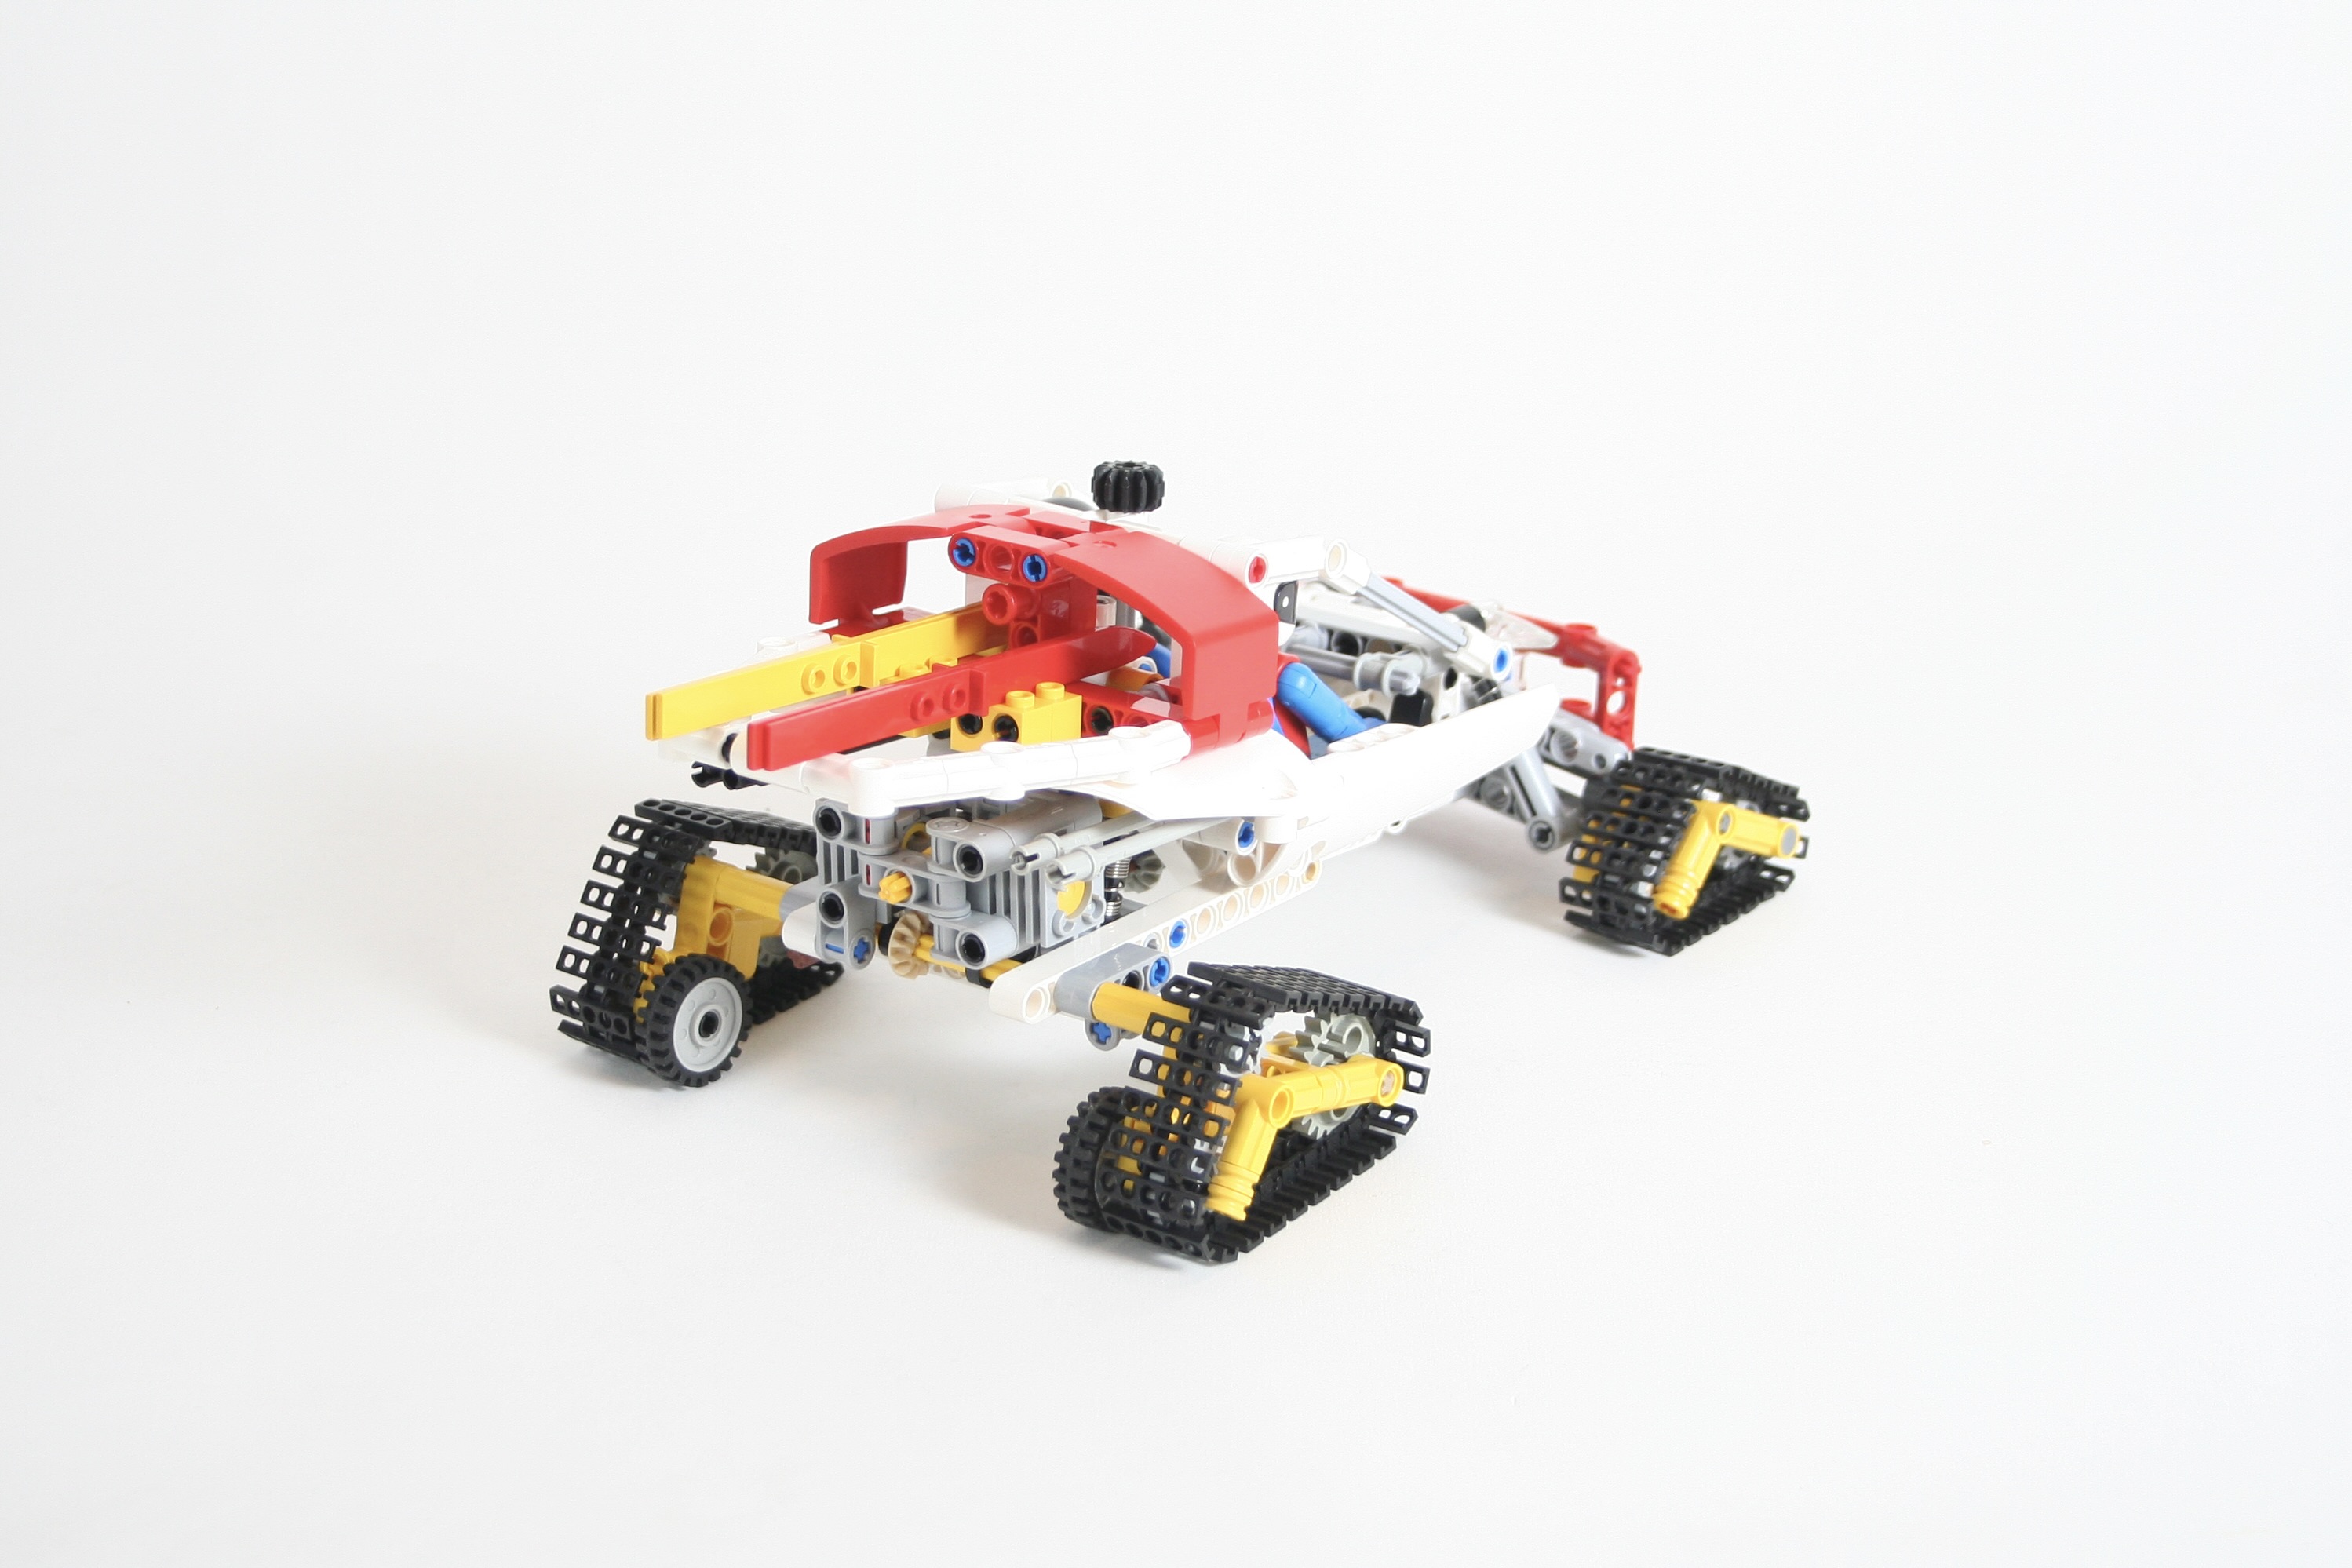
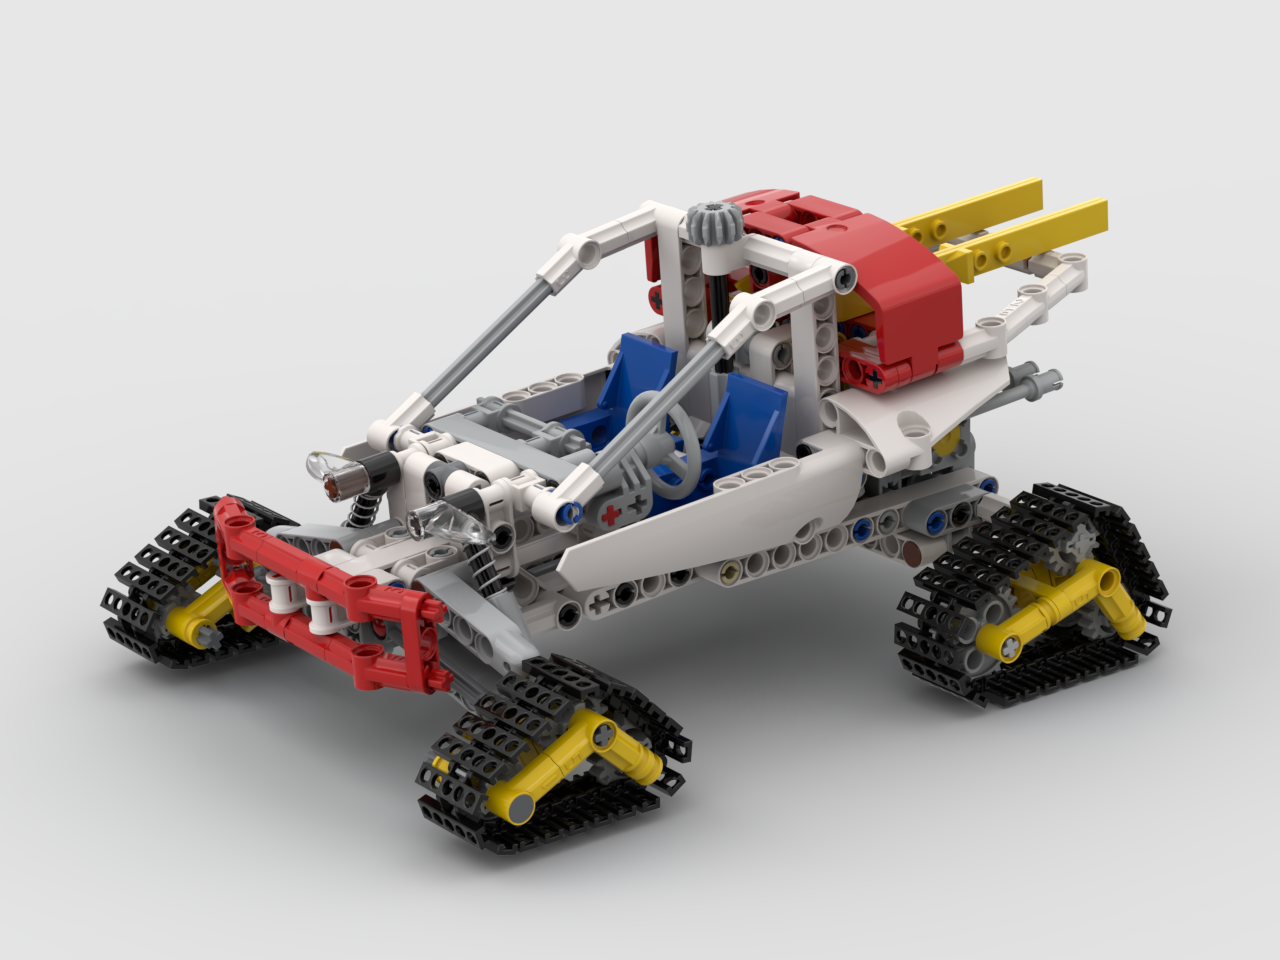
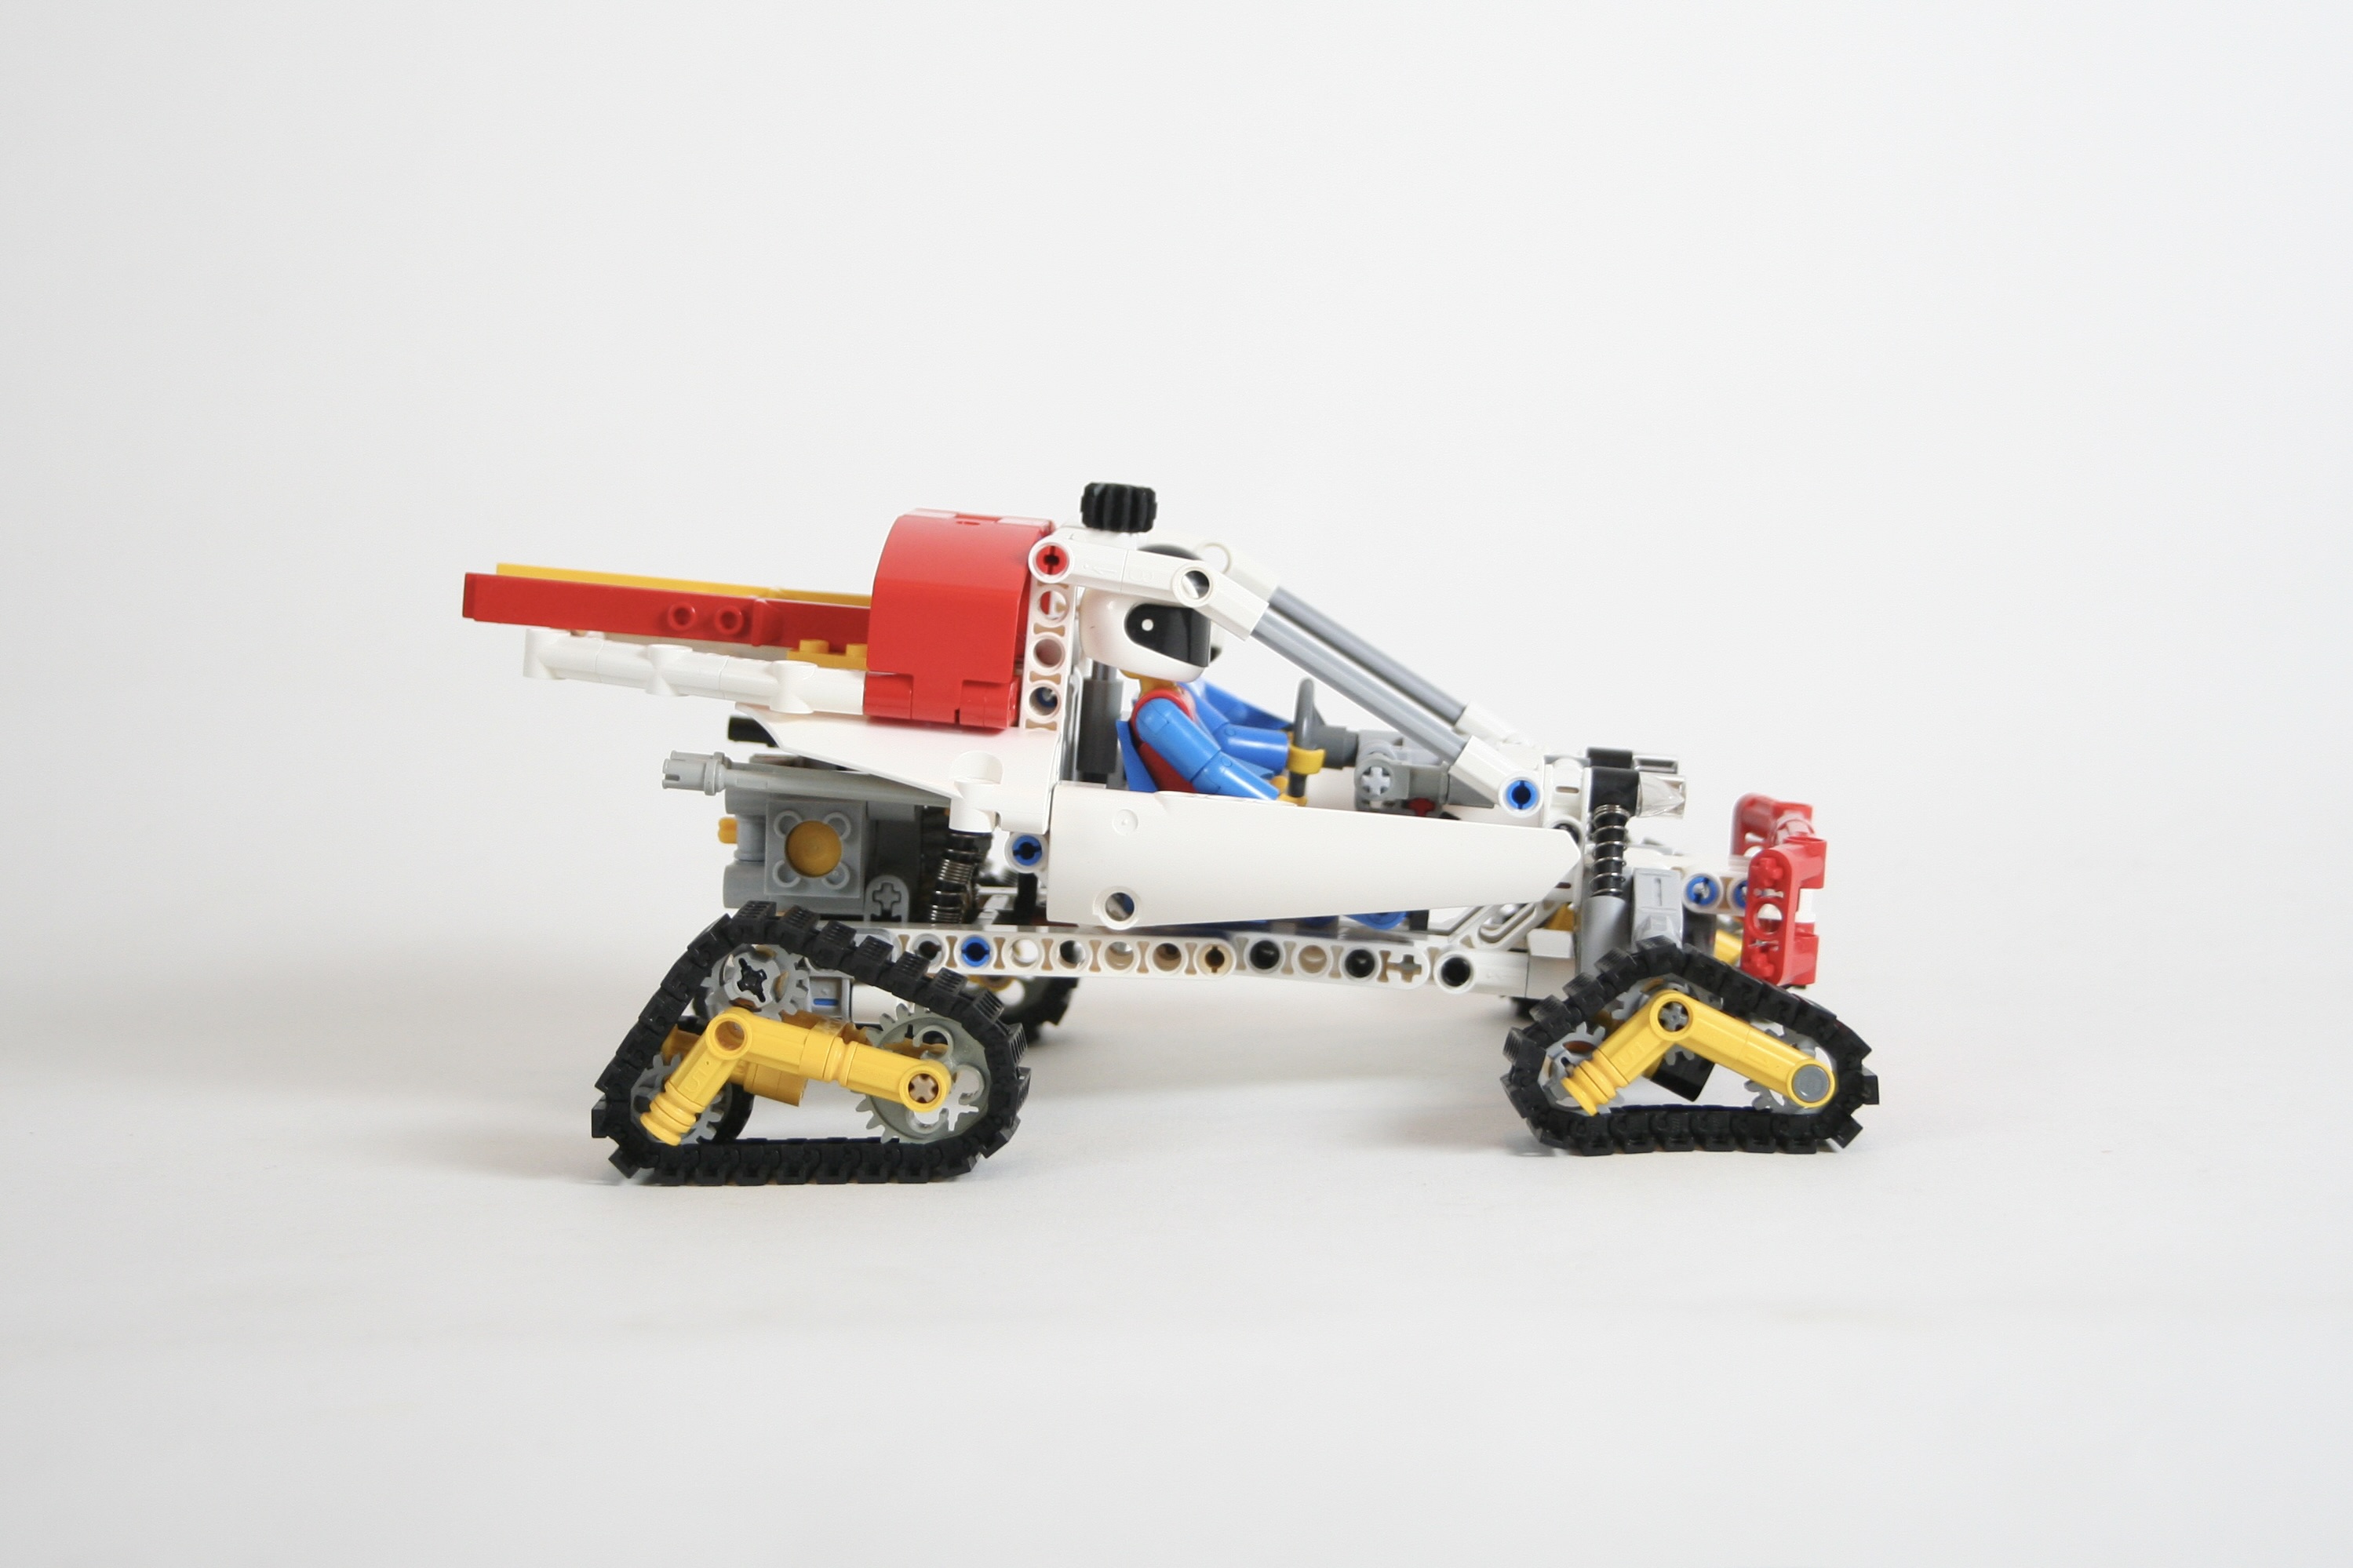
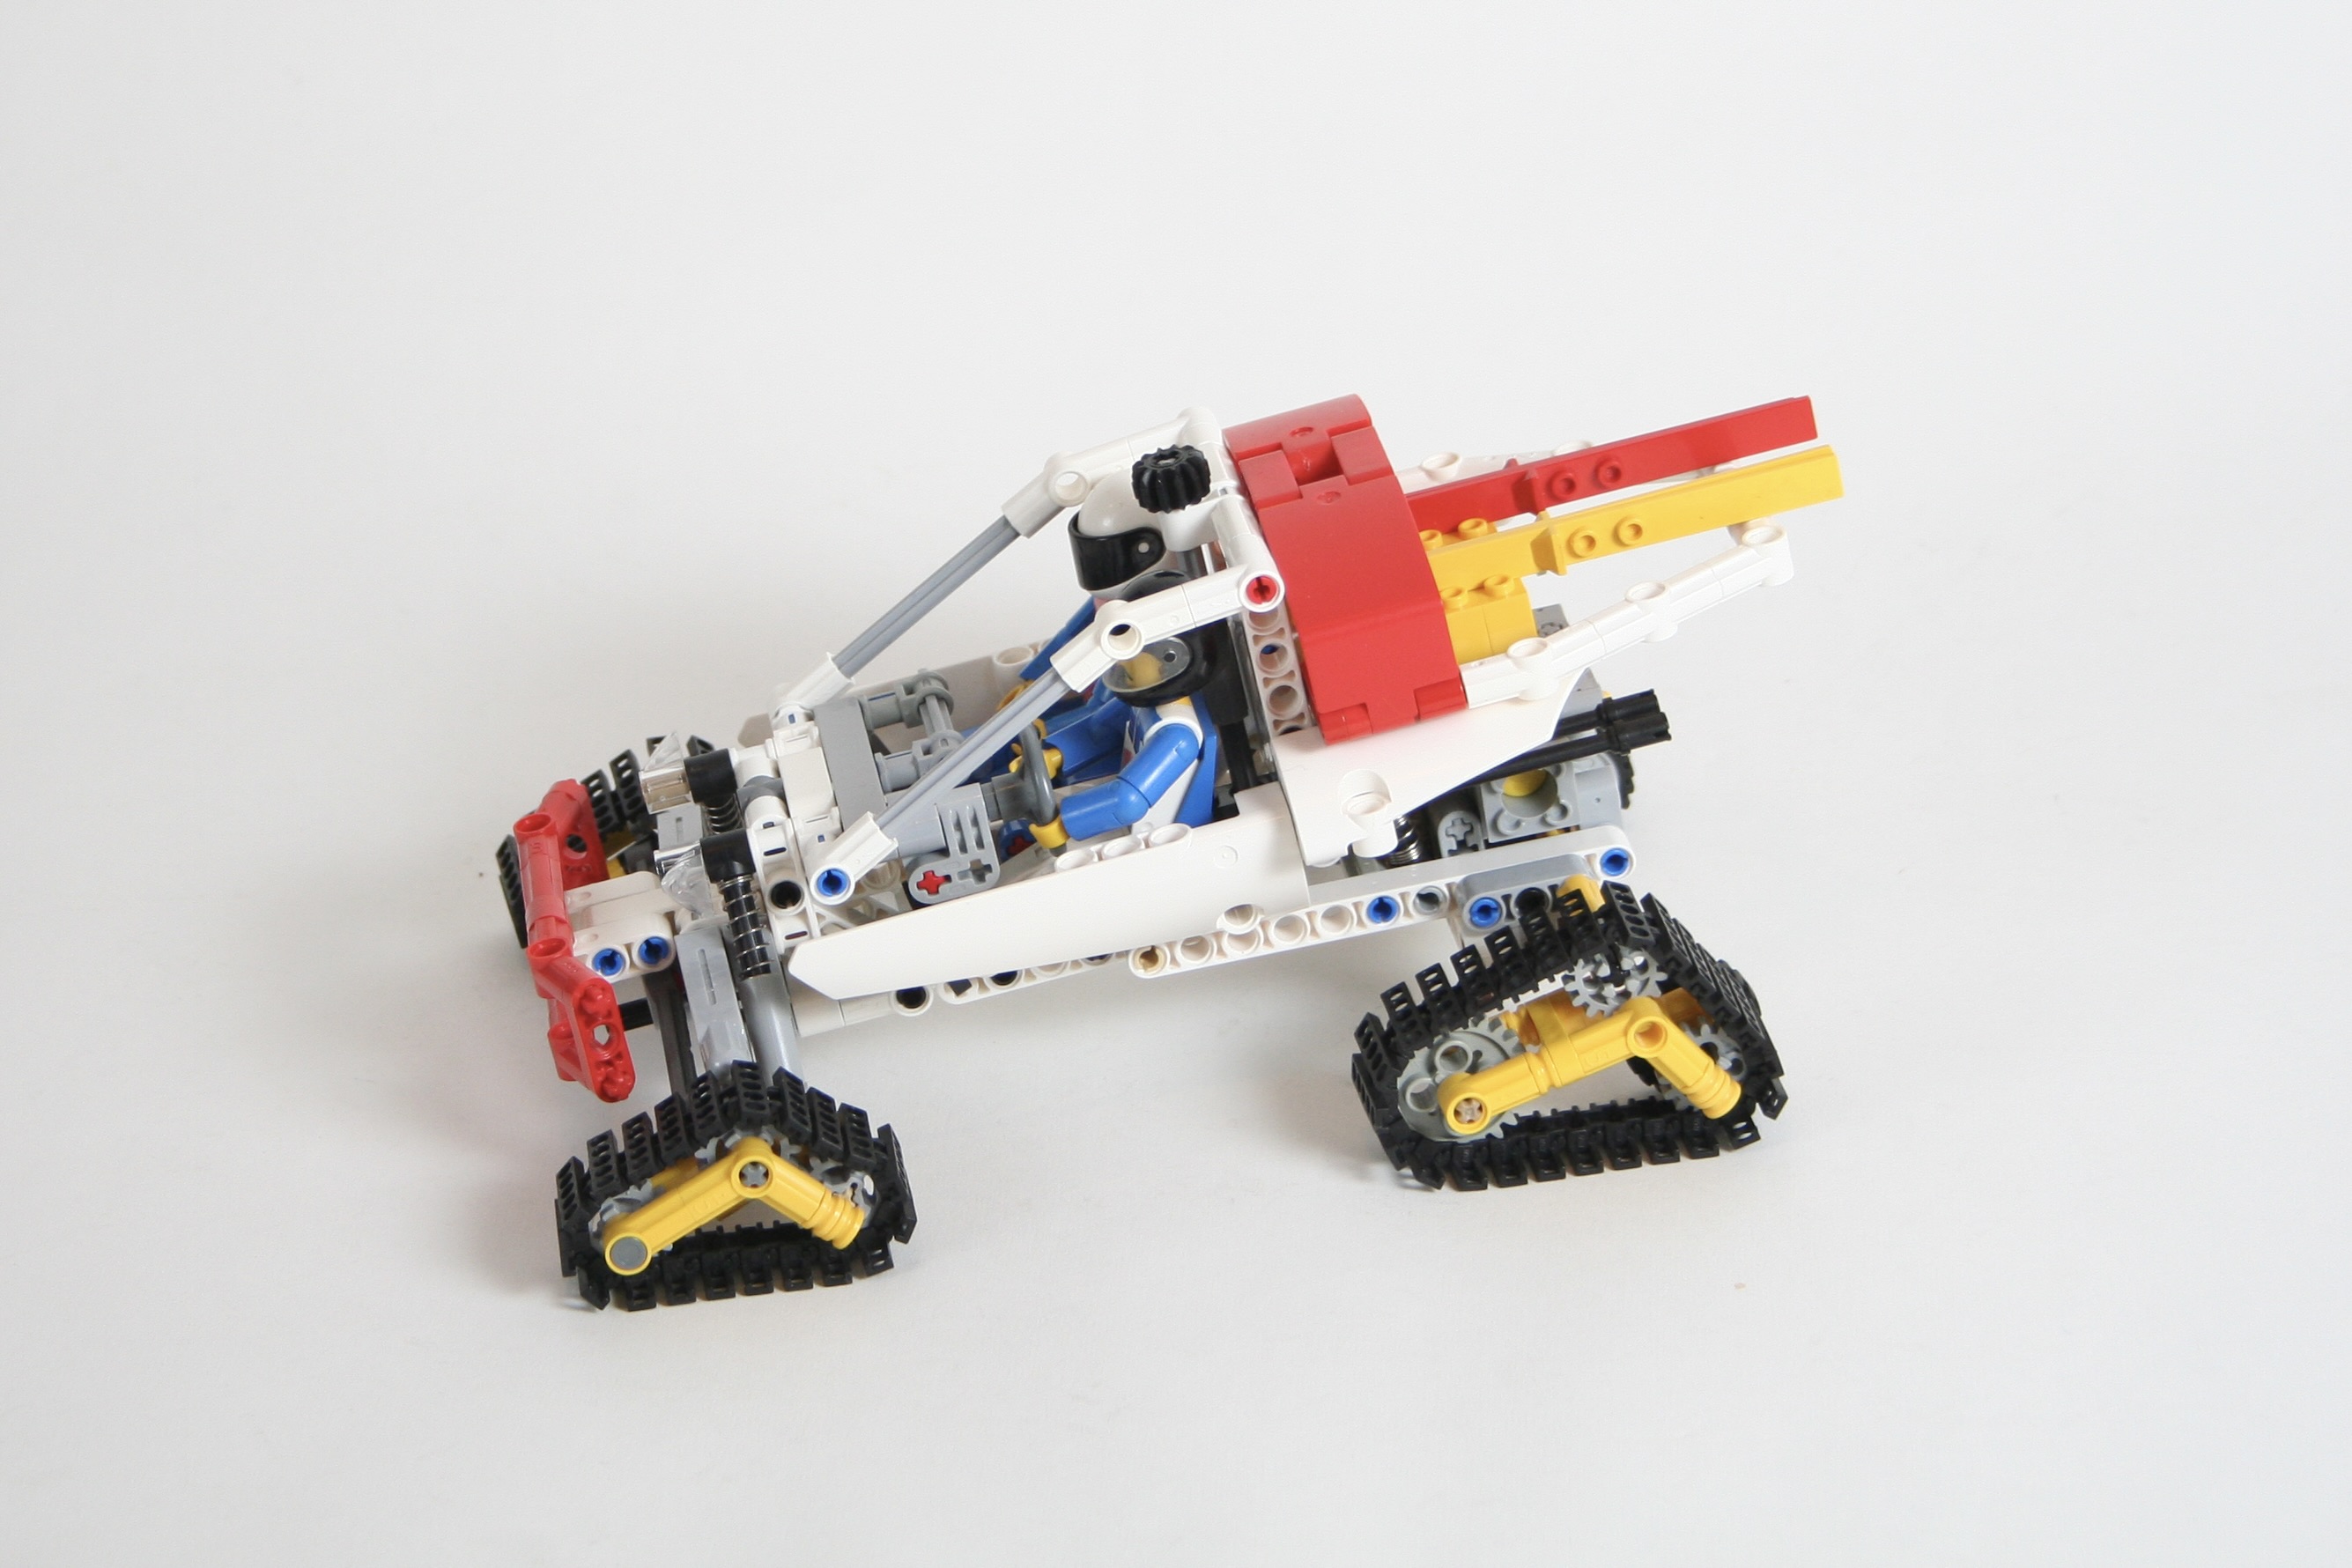
About twice a year, Eurobricks hosts a Technic build challenge, and I try to participate in as many as I am able. It keeps me building, and challenges me to build something I usually do not. And a friendly competition is always a good idea. This winter, TC26 was launched, and asked participates to build an arctic vehicle. I wanted to participate, but I did not have too much extra capacity during this season, so I decided to build something a little smaller.
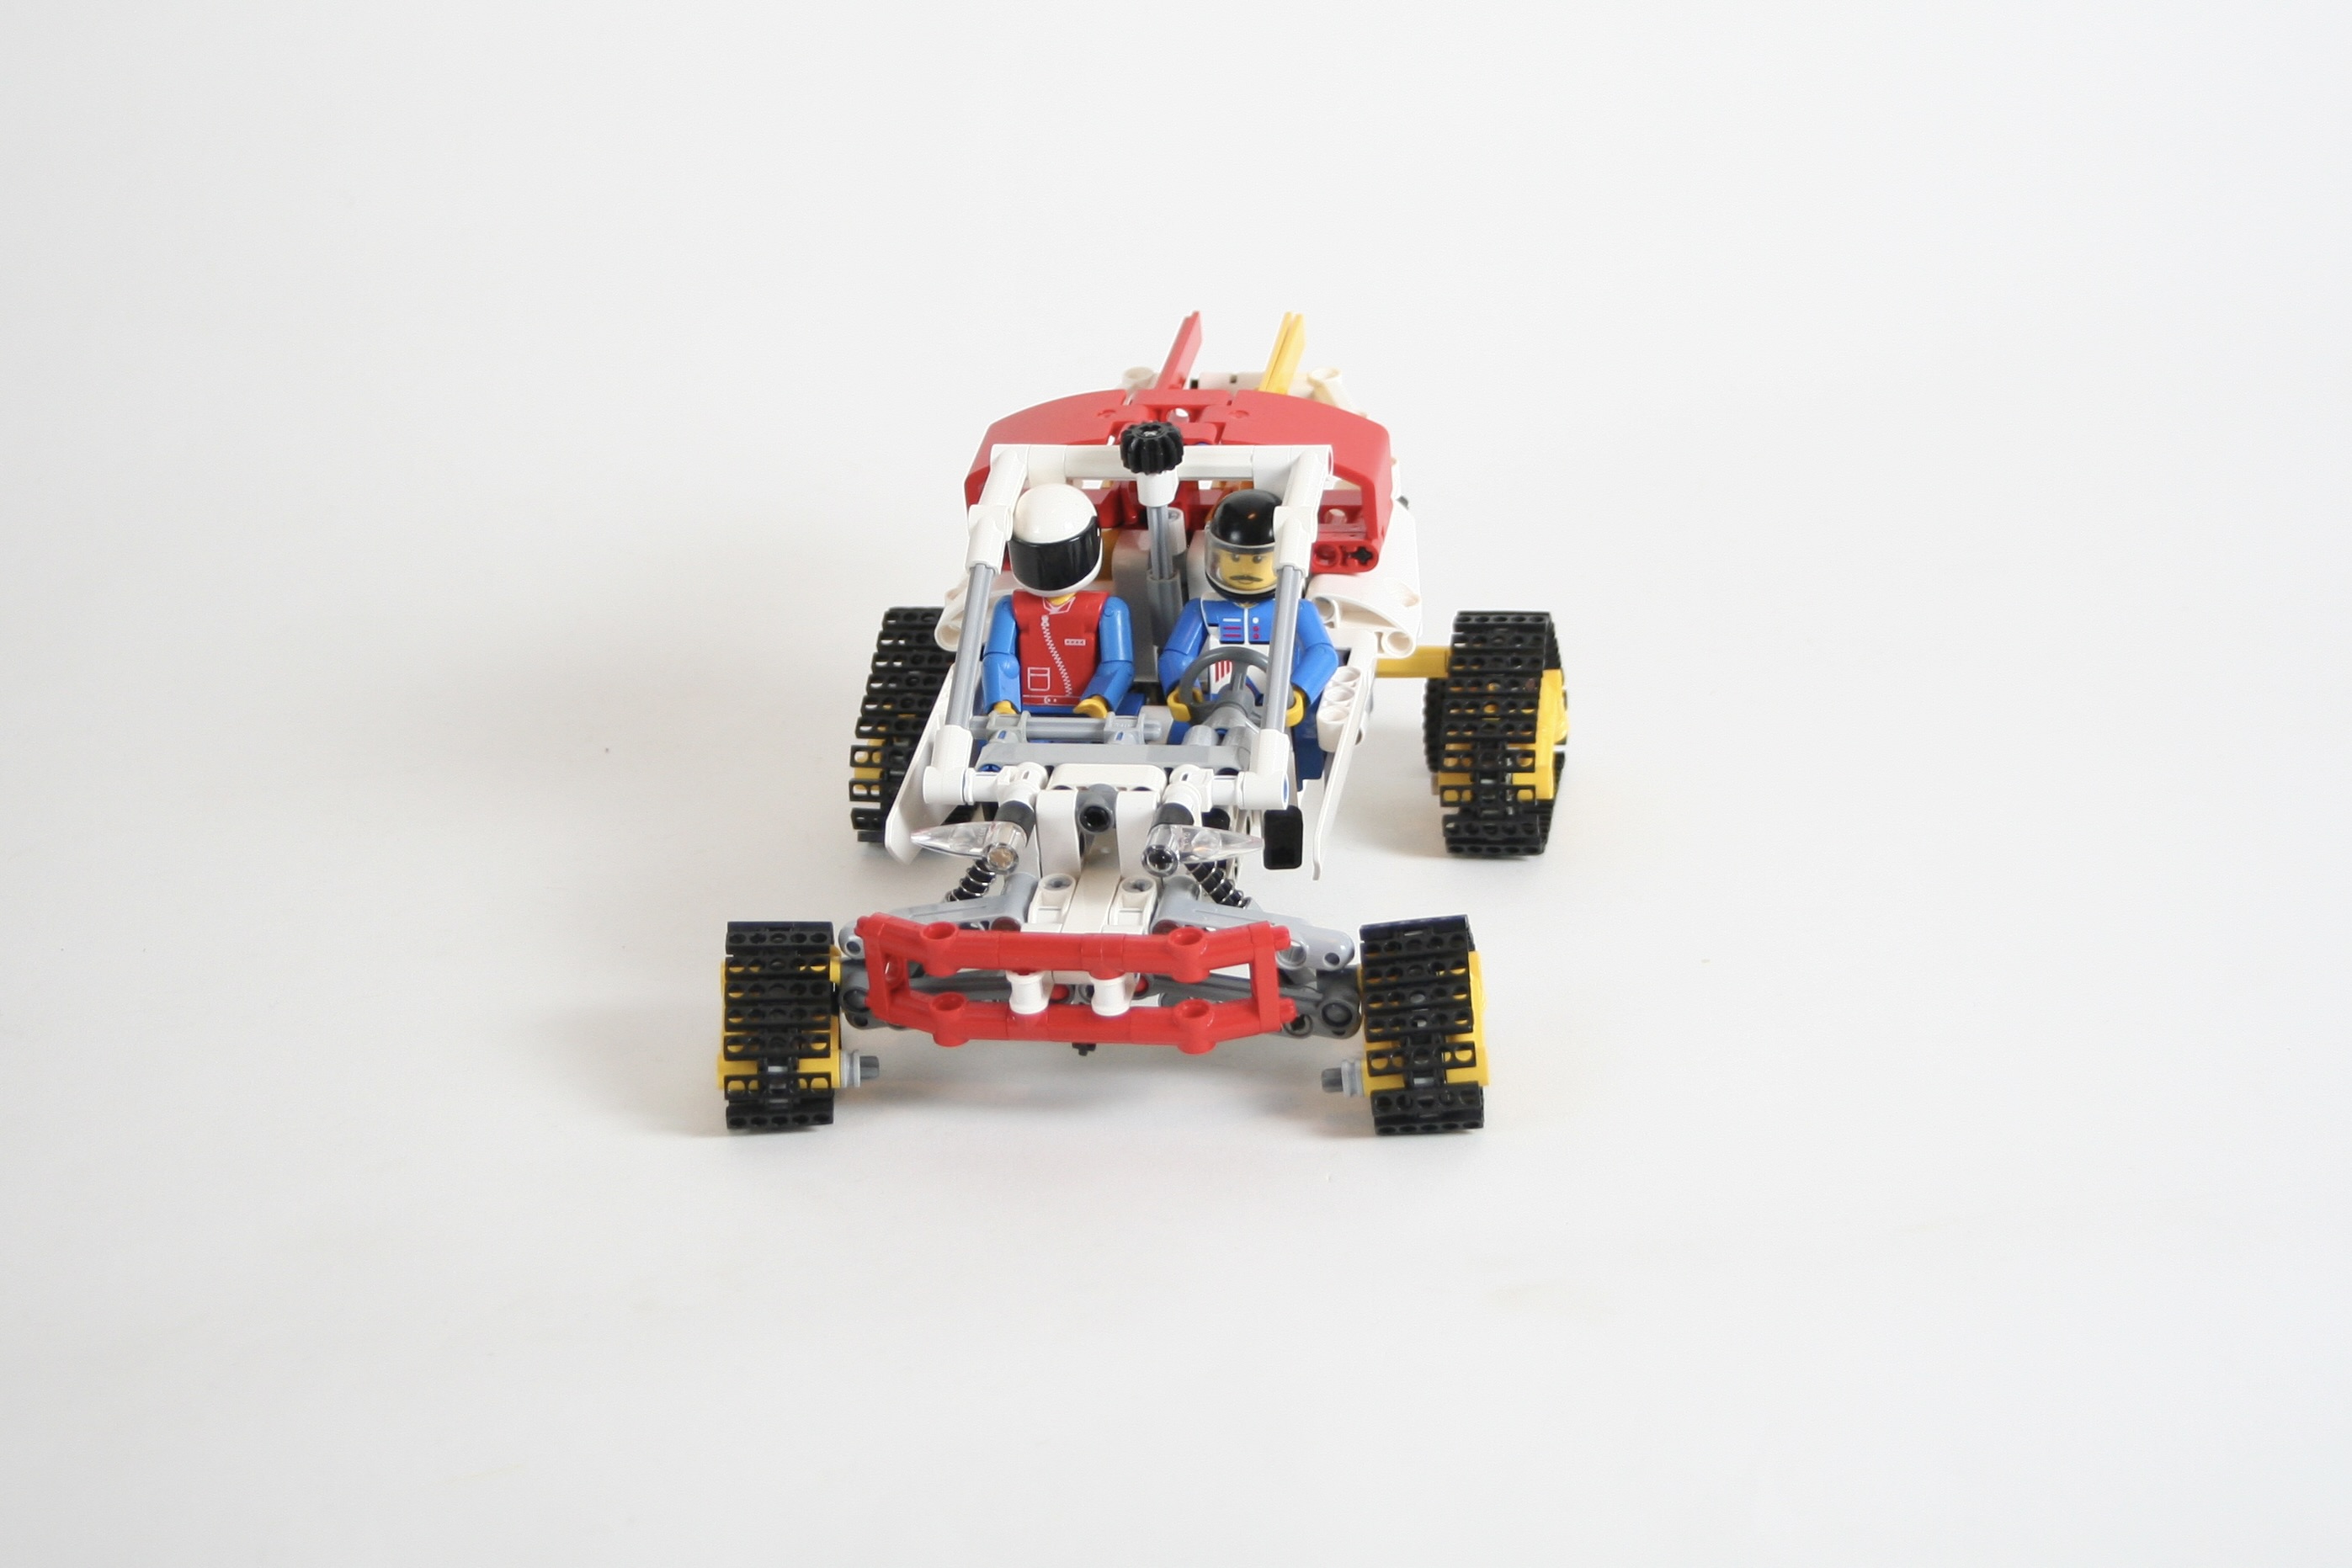
The theme called for either an orange build, or a build that matches the colors of the original arctic theme technic had during the late 80’s. I, of course, decided to use the 80’s theme because this would allow me to use my seldom used Technic figures, and their skis. Also, the build would have to use tracks, and I felt this was a requirement for a snow vehicle. I was inspired by some side-by-side vehicles recently, so that was the idea I would move forward with for the build.
I designed the front suspension first to get an idea of the front track, and then each of the four track units. This gave me a rough size of the vehicle. Then a little engine and rear suspension unit was developed.
I then added the two seats and Technic figures. I have used these seats and figures before, and every time I do, I am reminded about how different the old studs and pins technic system is from the newer liftarm based system. There is no strong, simple, and compact way to add a Technic figure seat into a liftarm body. After some work, I was able to come up with something that would work. Then I was able to finalize a body around these features.
The design was simple, and nothing too fancy. The steering could have been a little better, and the tracks were not quite as smooth as I wanted, but it looked good enough, and allowed me to participate in another contest, which is always fun. Feel free to give the build a try for yourself.
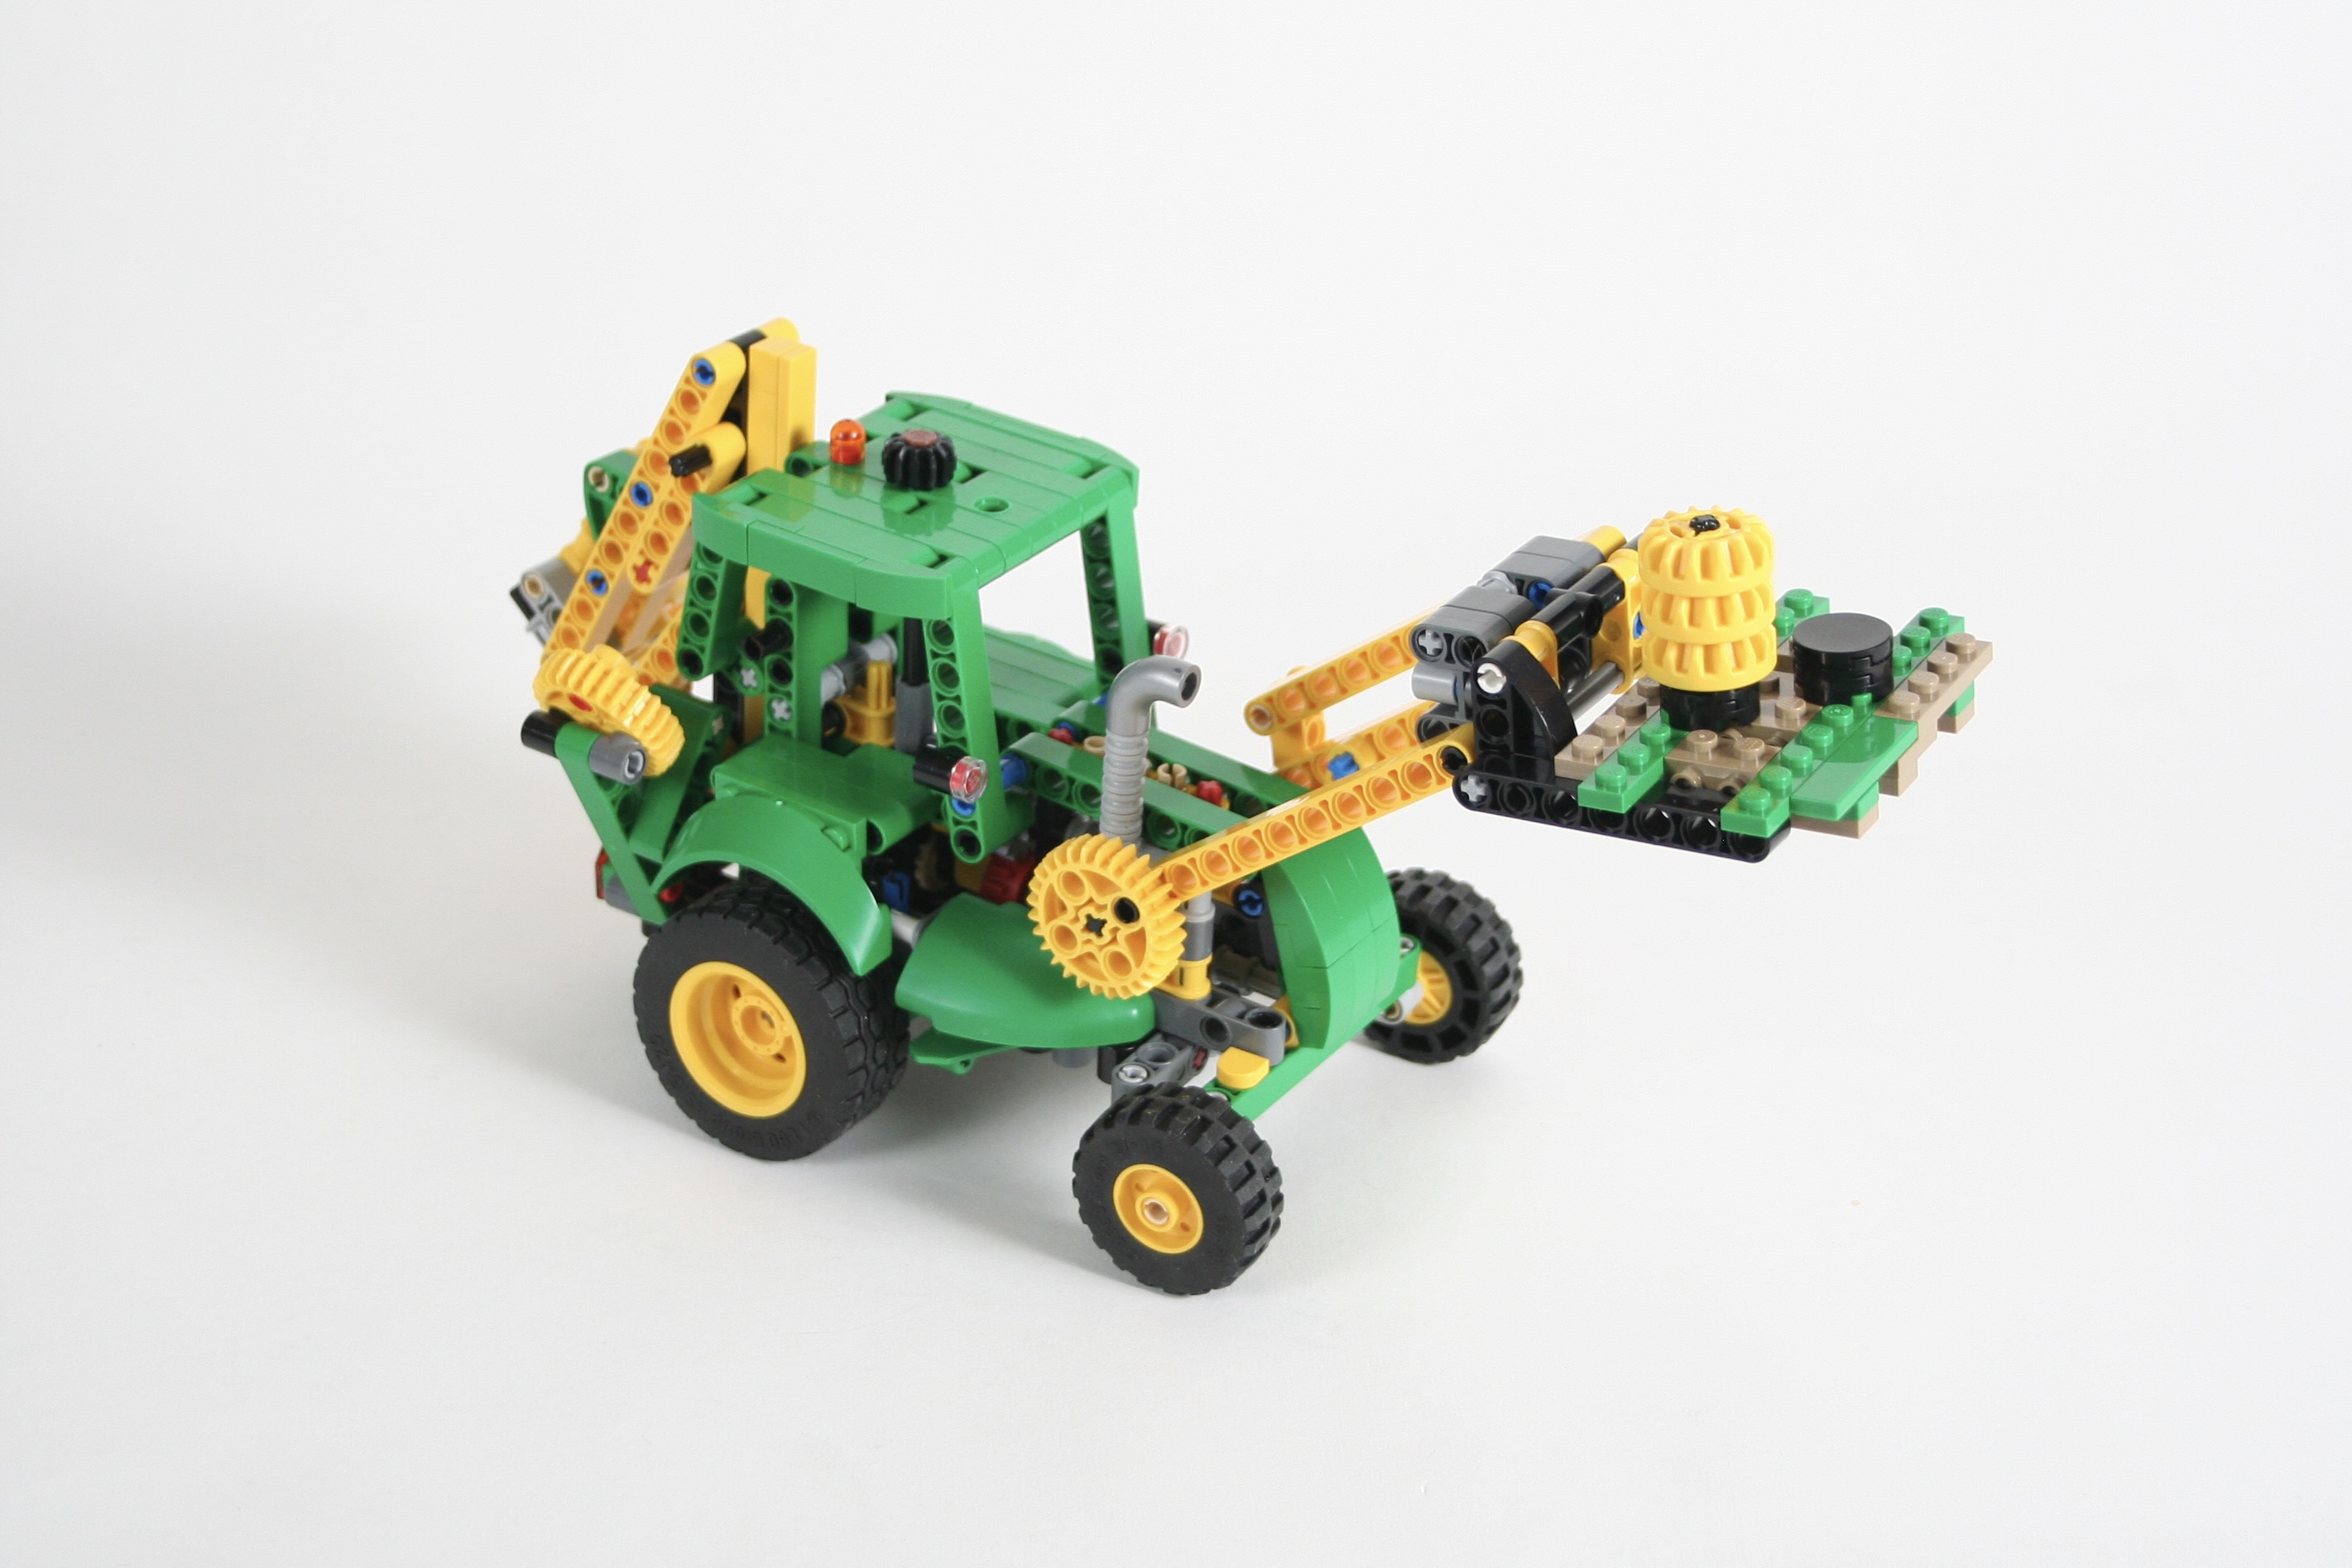
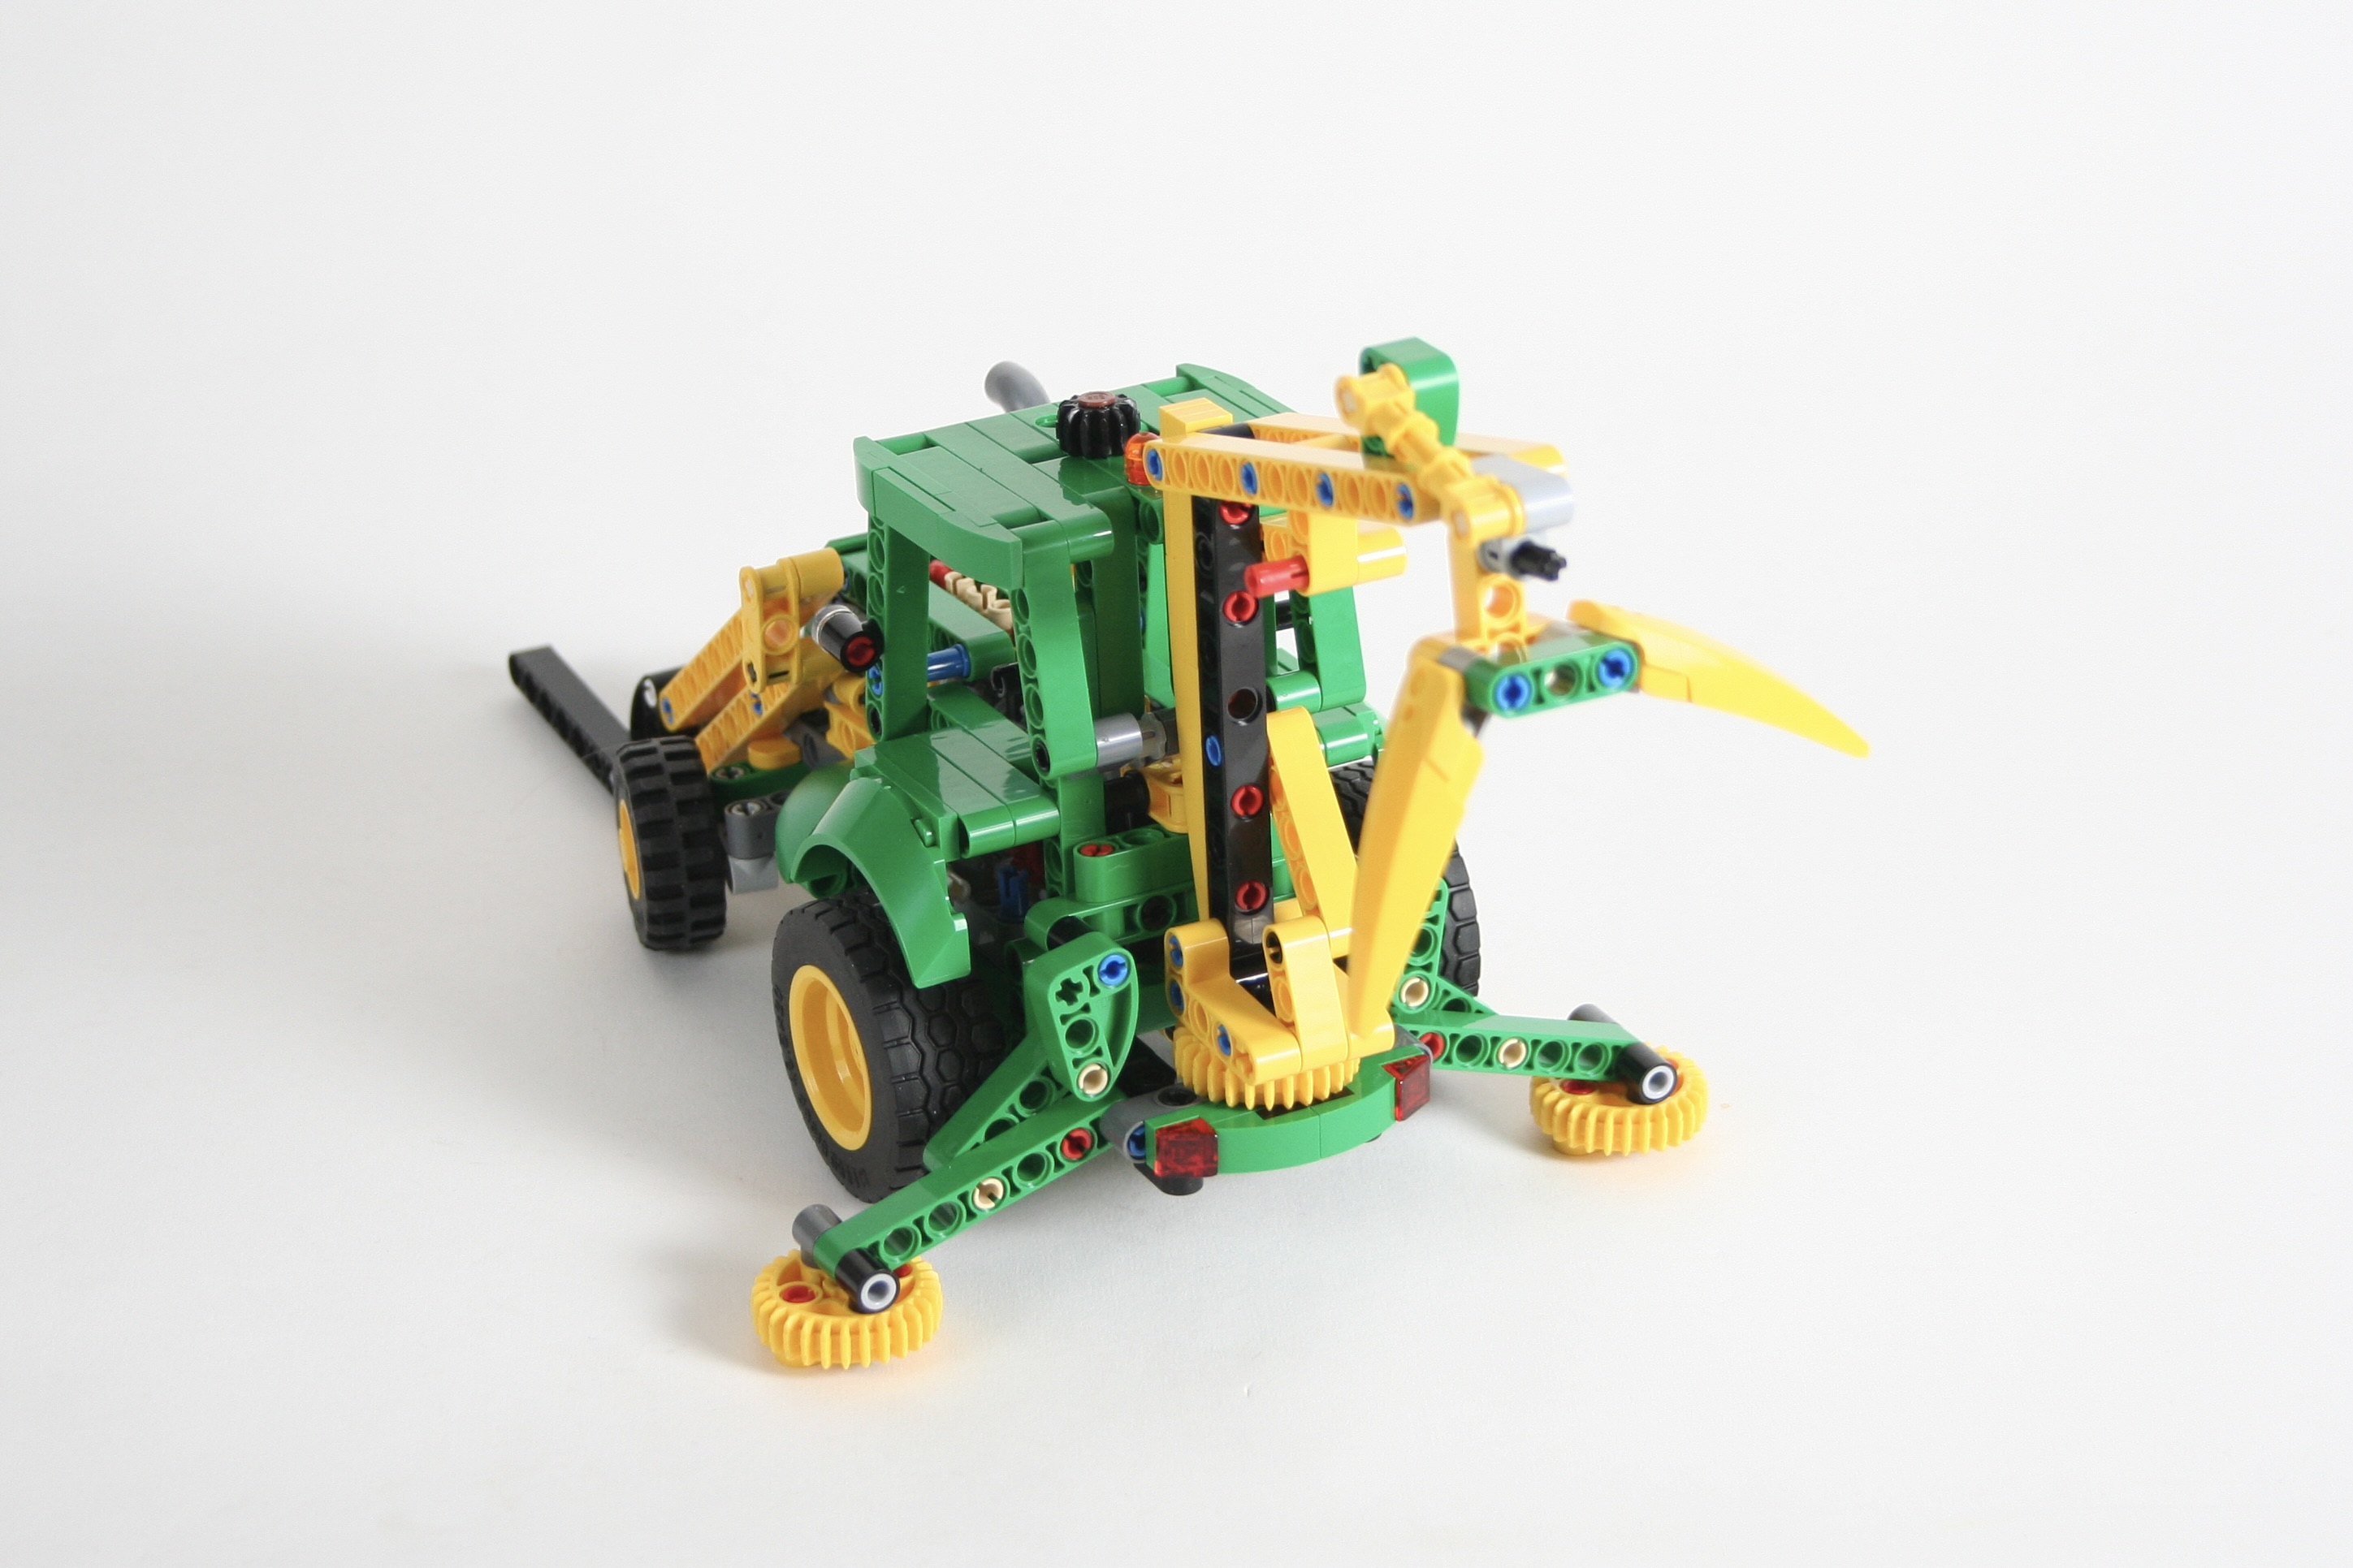
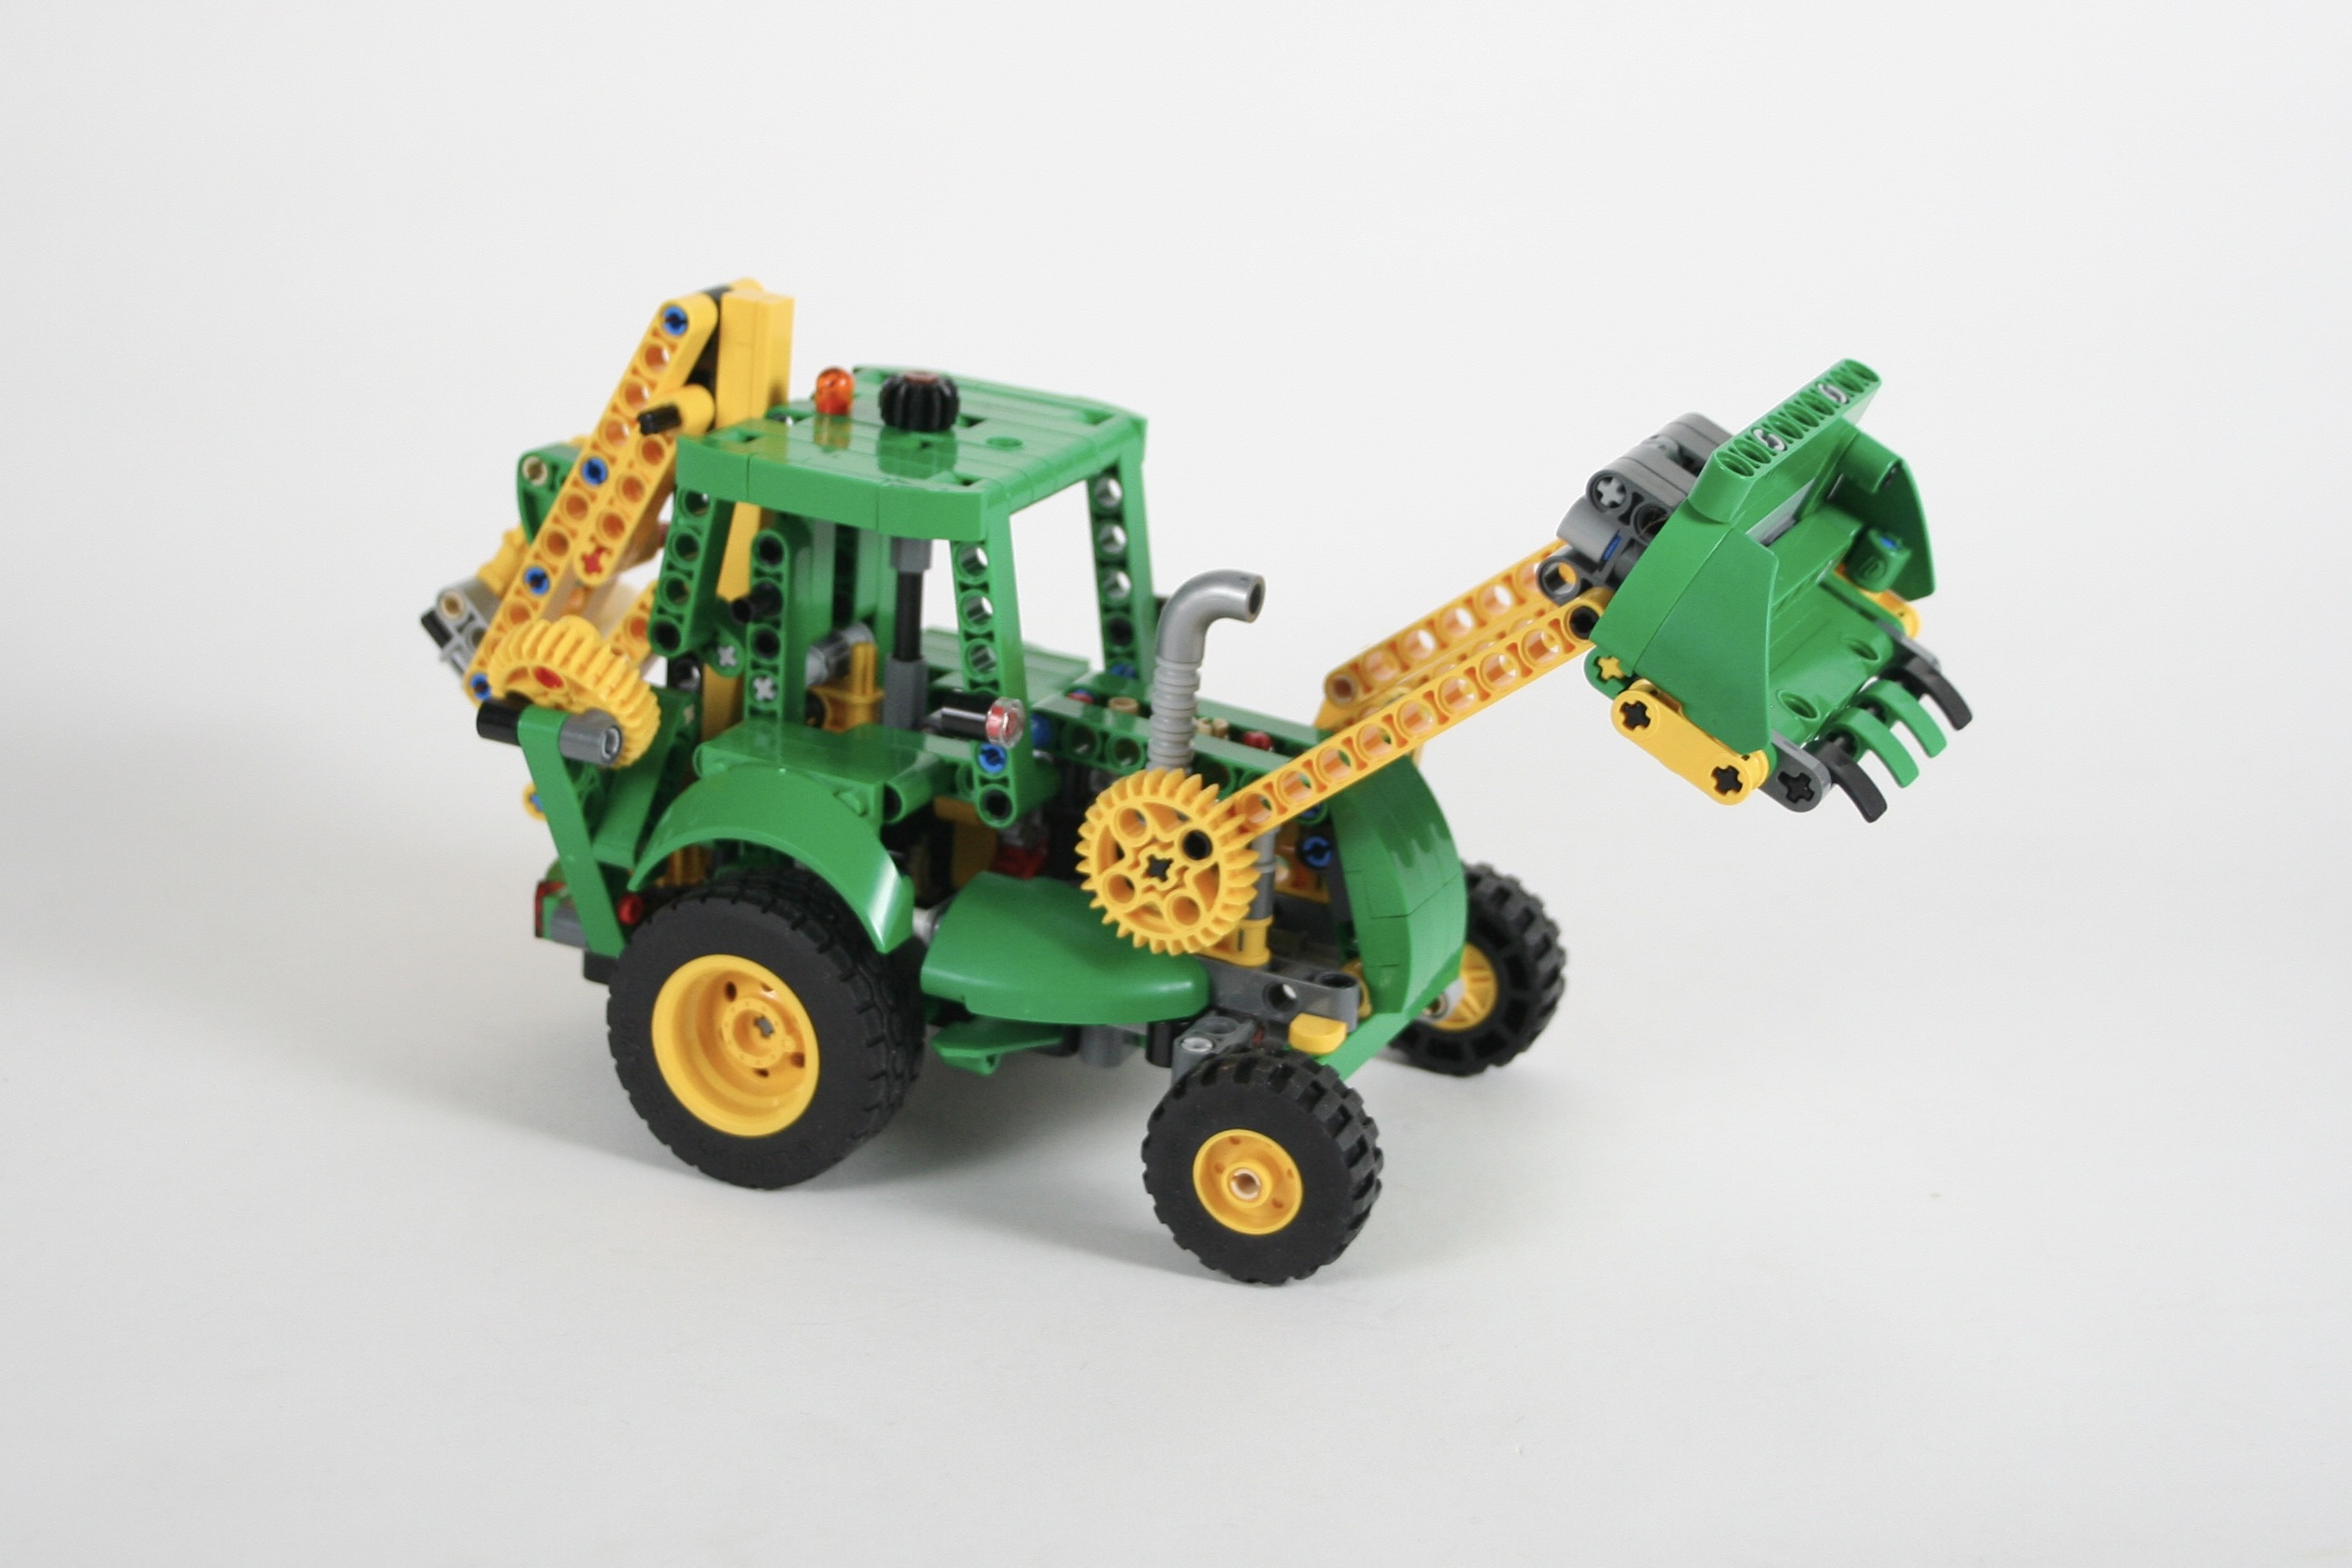
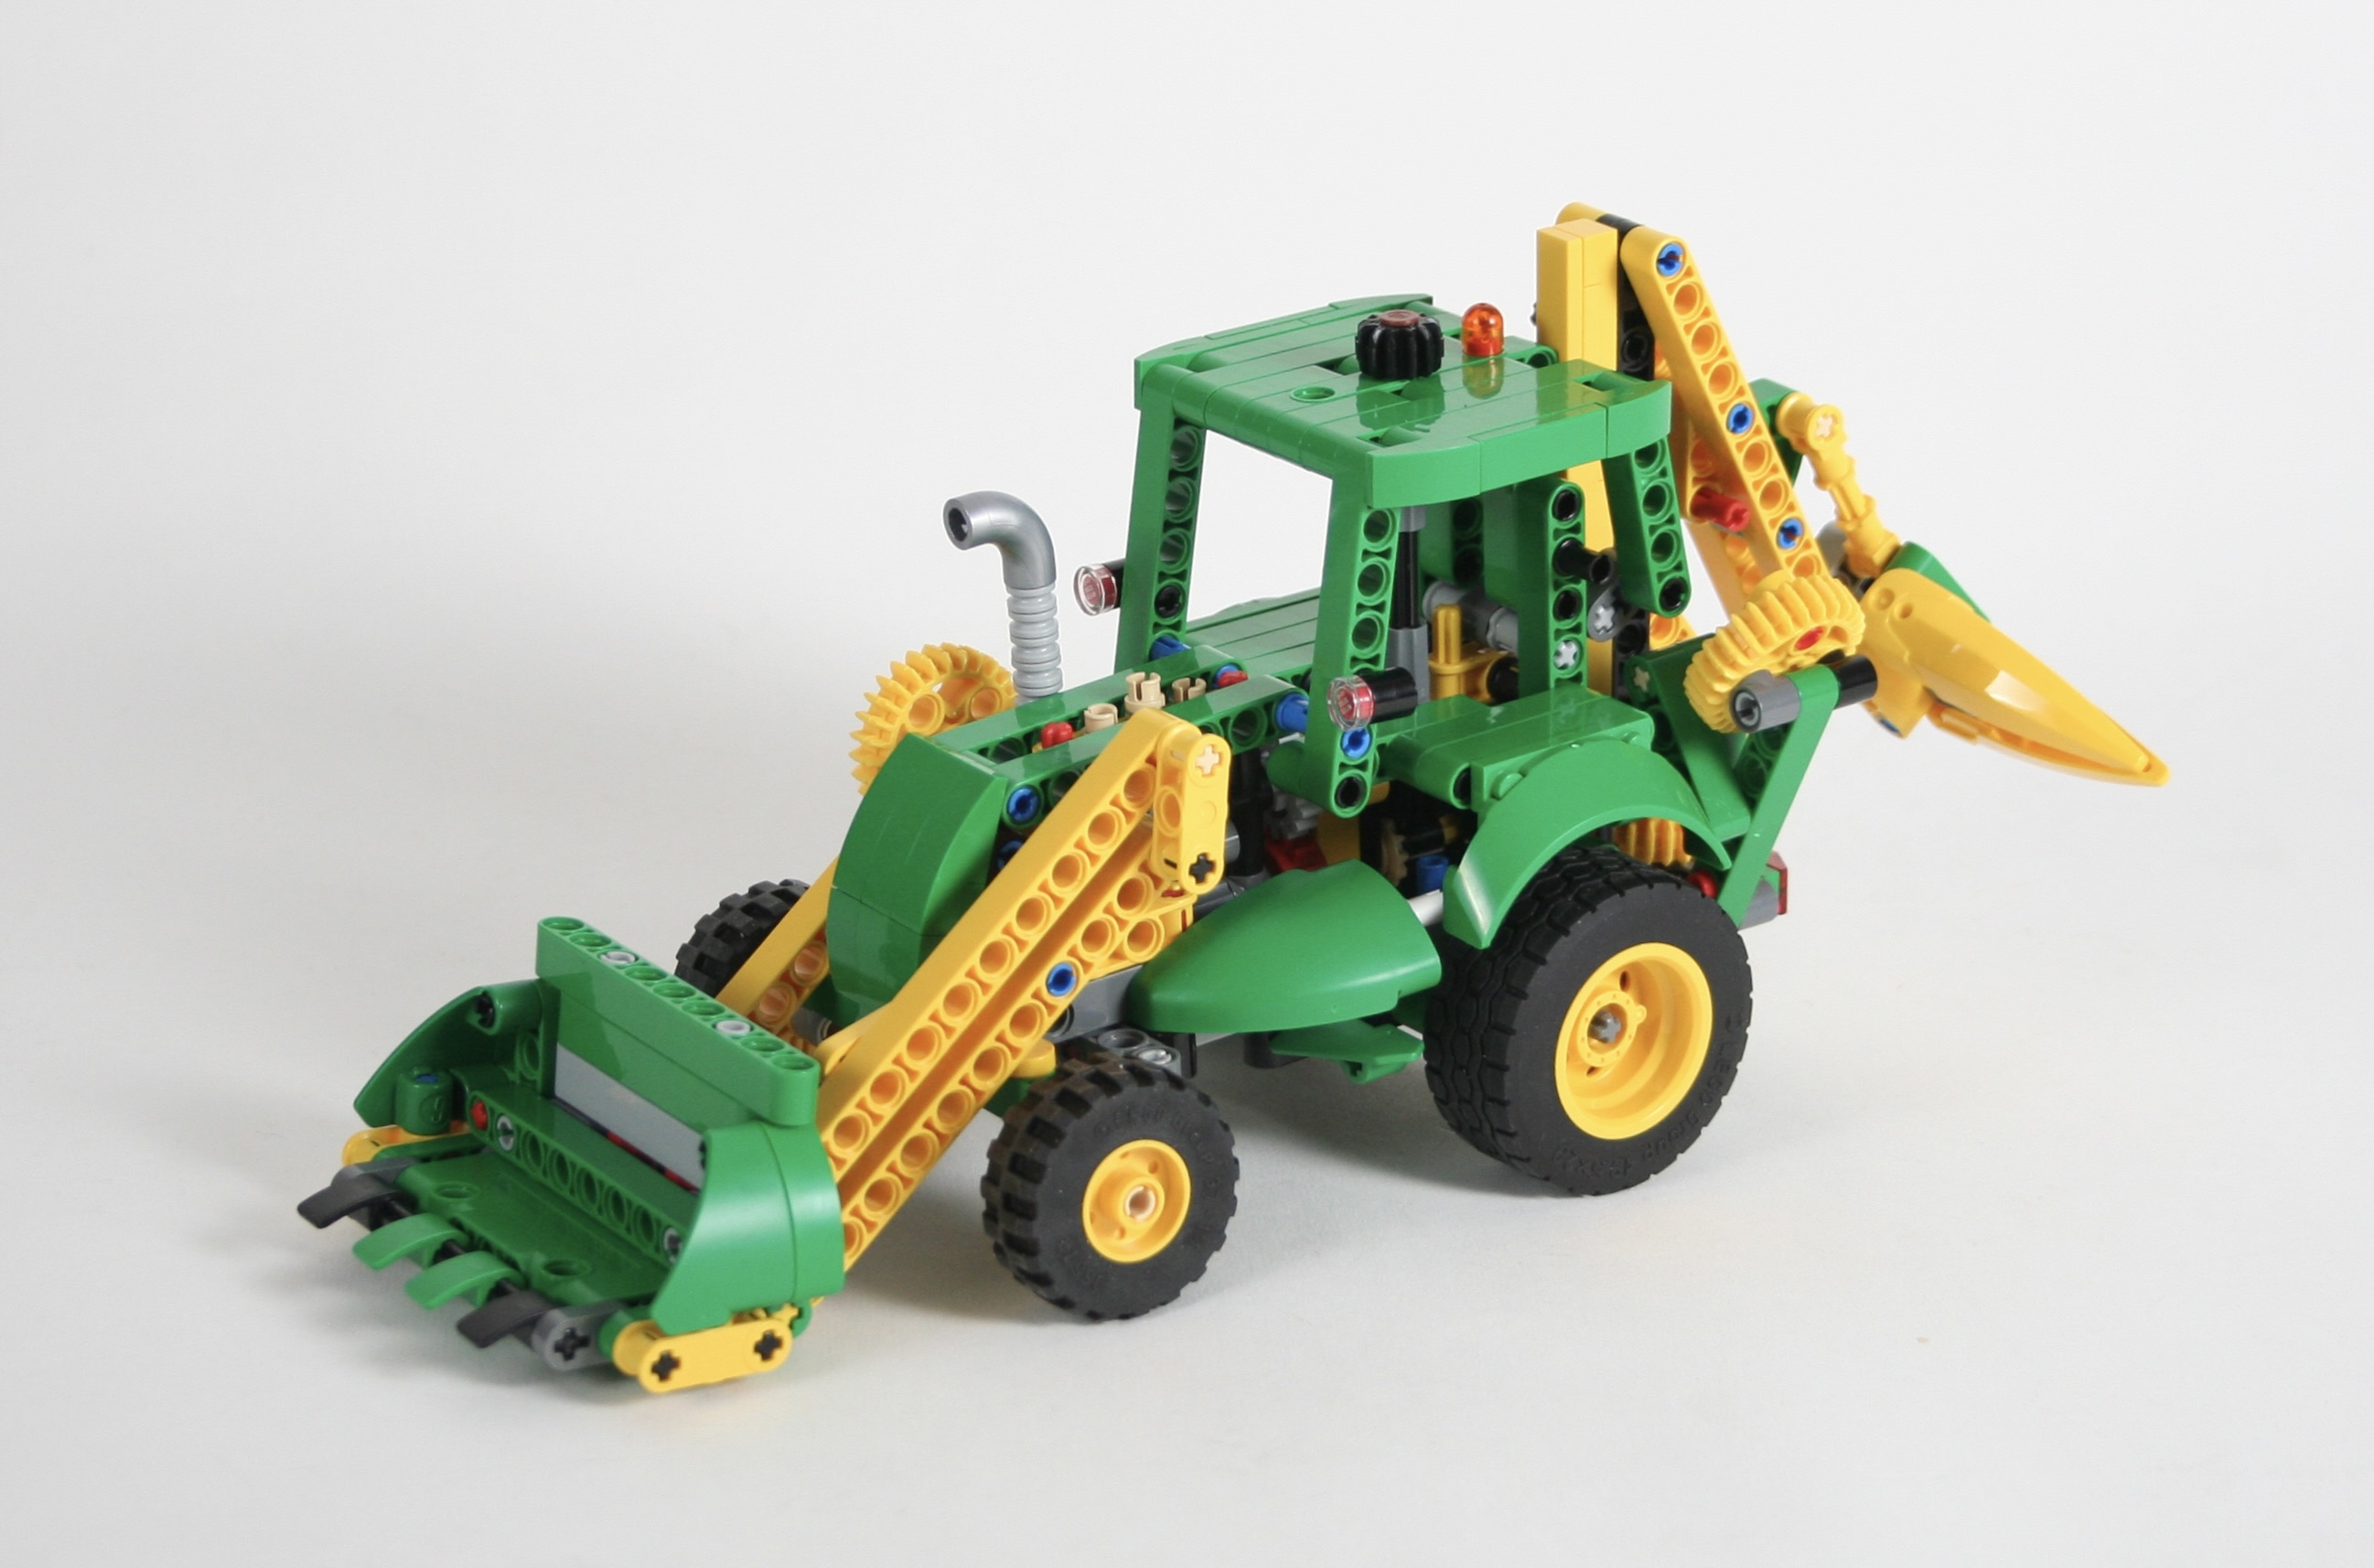
A couple of years ago I decided that it was time to learn how to make an alternative build. I recognize how more people are looking for ideas to turn a set they have purchased into another build. Well, since I enjoy building other design, I am happy to share these with other people. Plus I like the challenge an alternative build poses: a limited amount of parts to make a MOC. LEGO set 42168 is a cute little tractor with some fun features, but what I really like about it is the green. It is a small, accessible set, and has some fun parts, that can be used to build something else.
Since the set comes with two different size wheels, I decided a little backhoe would be a good idea. Plus, with the amount of yellow parts, I could use them on the rear arm and front loader. As I do with all of my builds, I started with draft including all the functions I wanted the final build to have. Quickly I had a draft with working steering and a little fake I3 engine. The I worked on how the front loader would work, and the rear arm mechanism.
As I worked on the rear arm, I was not pleased with any of the bucket designs I came up with, so I instead designed a couple of attachments that fit the tractor a little better. A little drill and a claw are included in the build. The rear arm moves in a number of ways, and the tractor also has two stabilizing arms to keep the tractor from tipping over. I used a similar approach for the front loader as well. A bucket option is included, but I find the design a little clunky looking. It includes a set of forks as well which I like a little better. A little pallet to load is included. Both the lift and tilt are manually operated, and the lift includes a lockout level so the arm may hold up a heavy load.
I like to think I am getting better at alternative builds, but I do not think this is my best one. I find the design a little rough, even though the functions work well. I hope that some other builders find some enjoyment in this design, and I’ll keep working on more ideas to make available in the future.
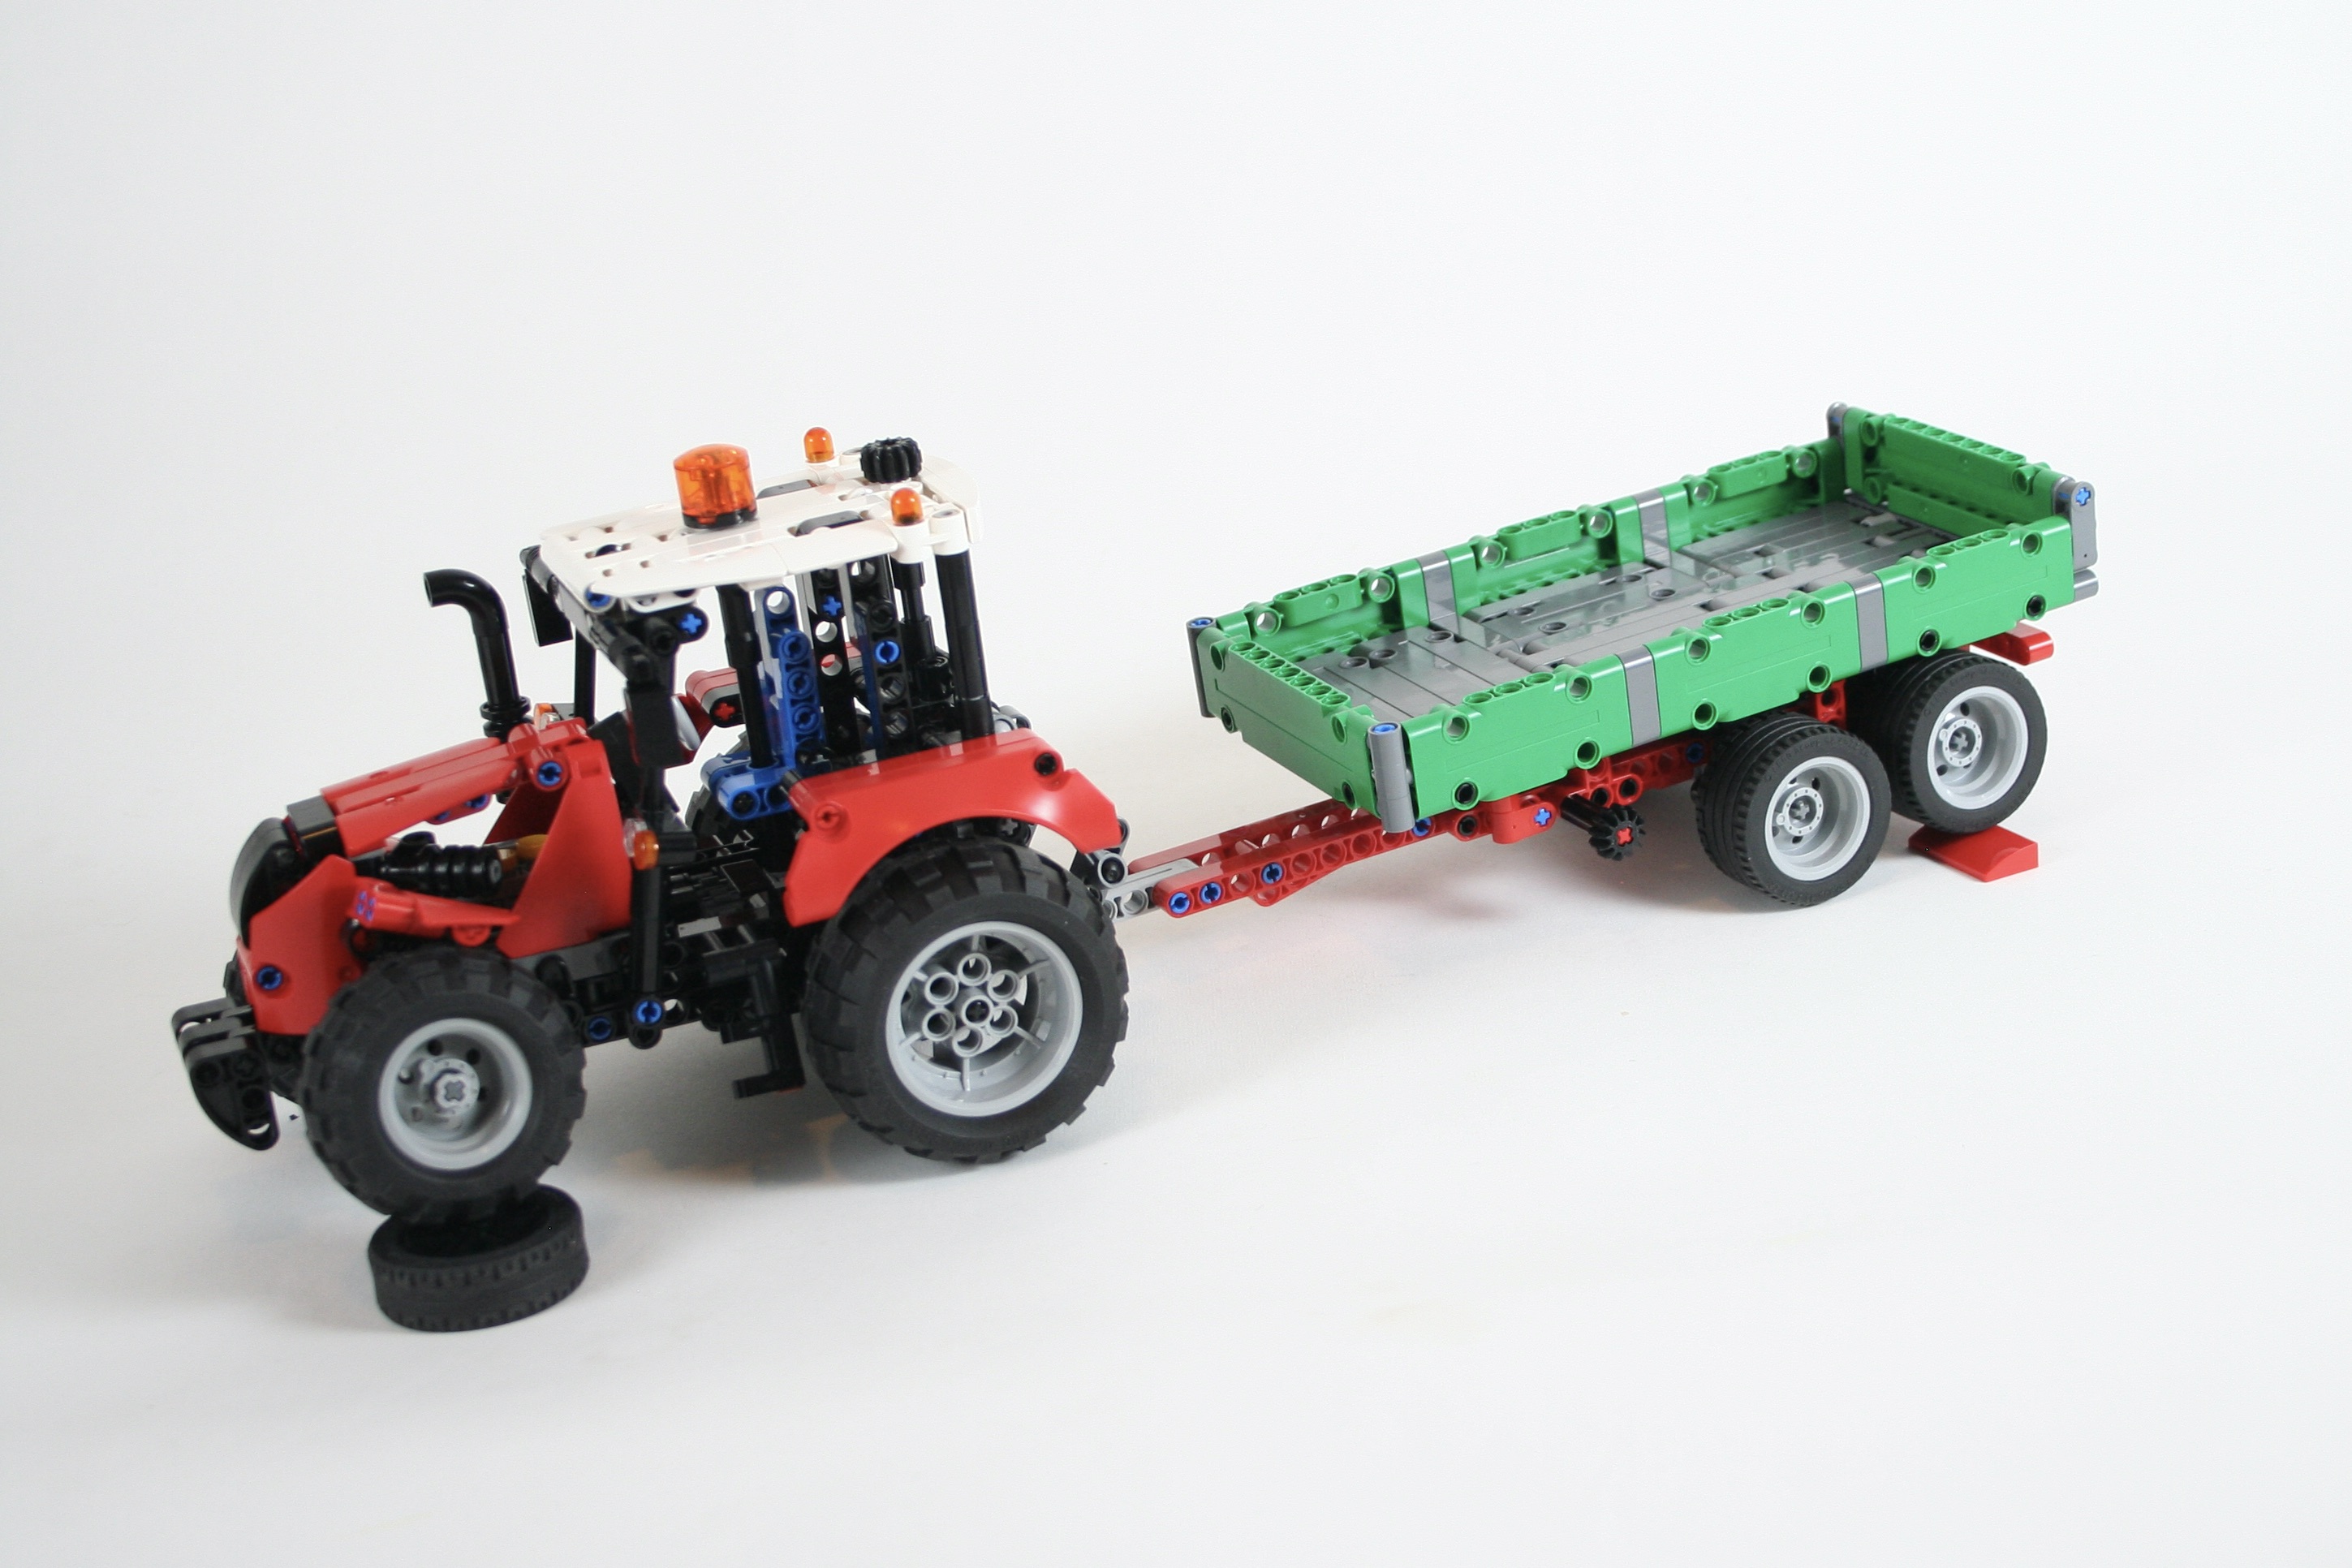
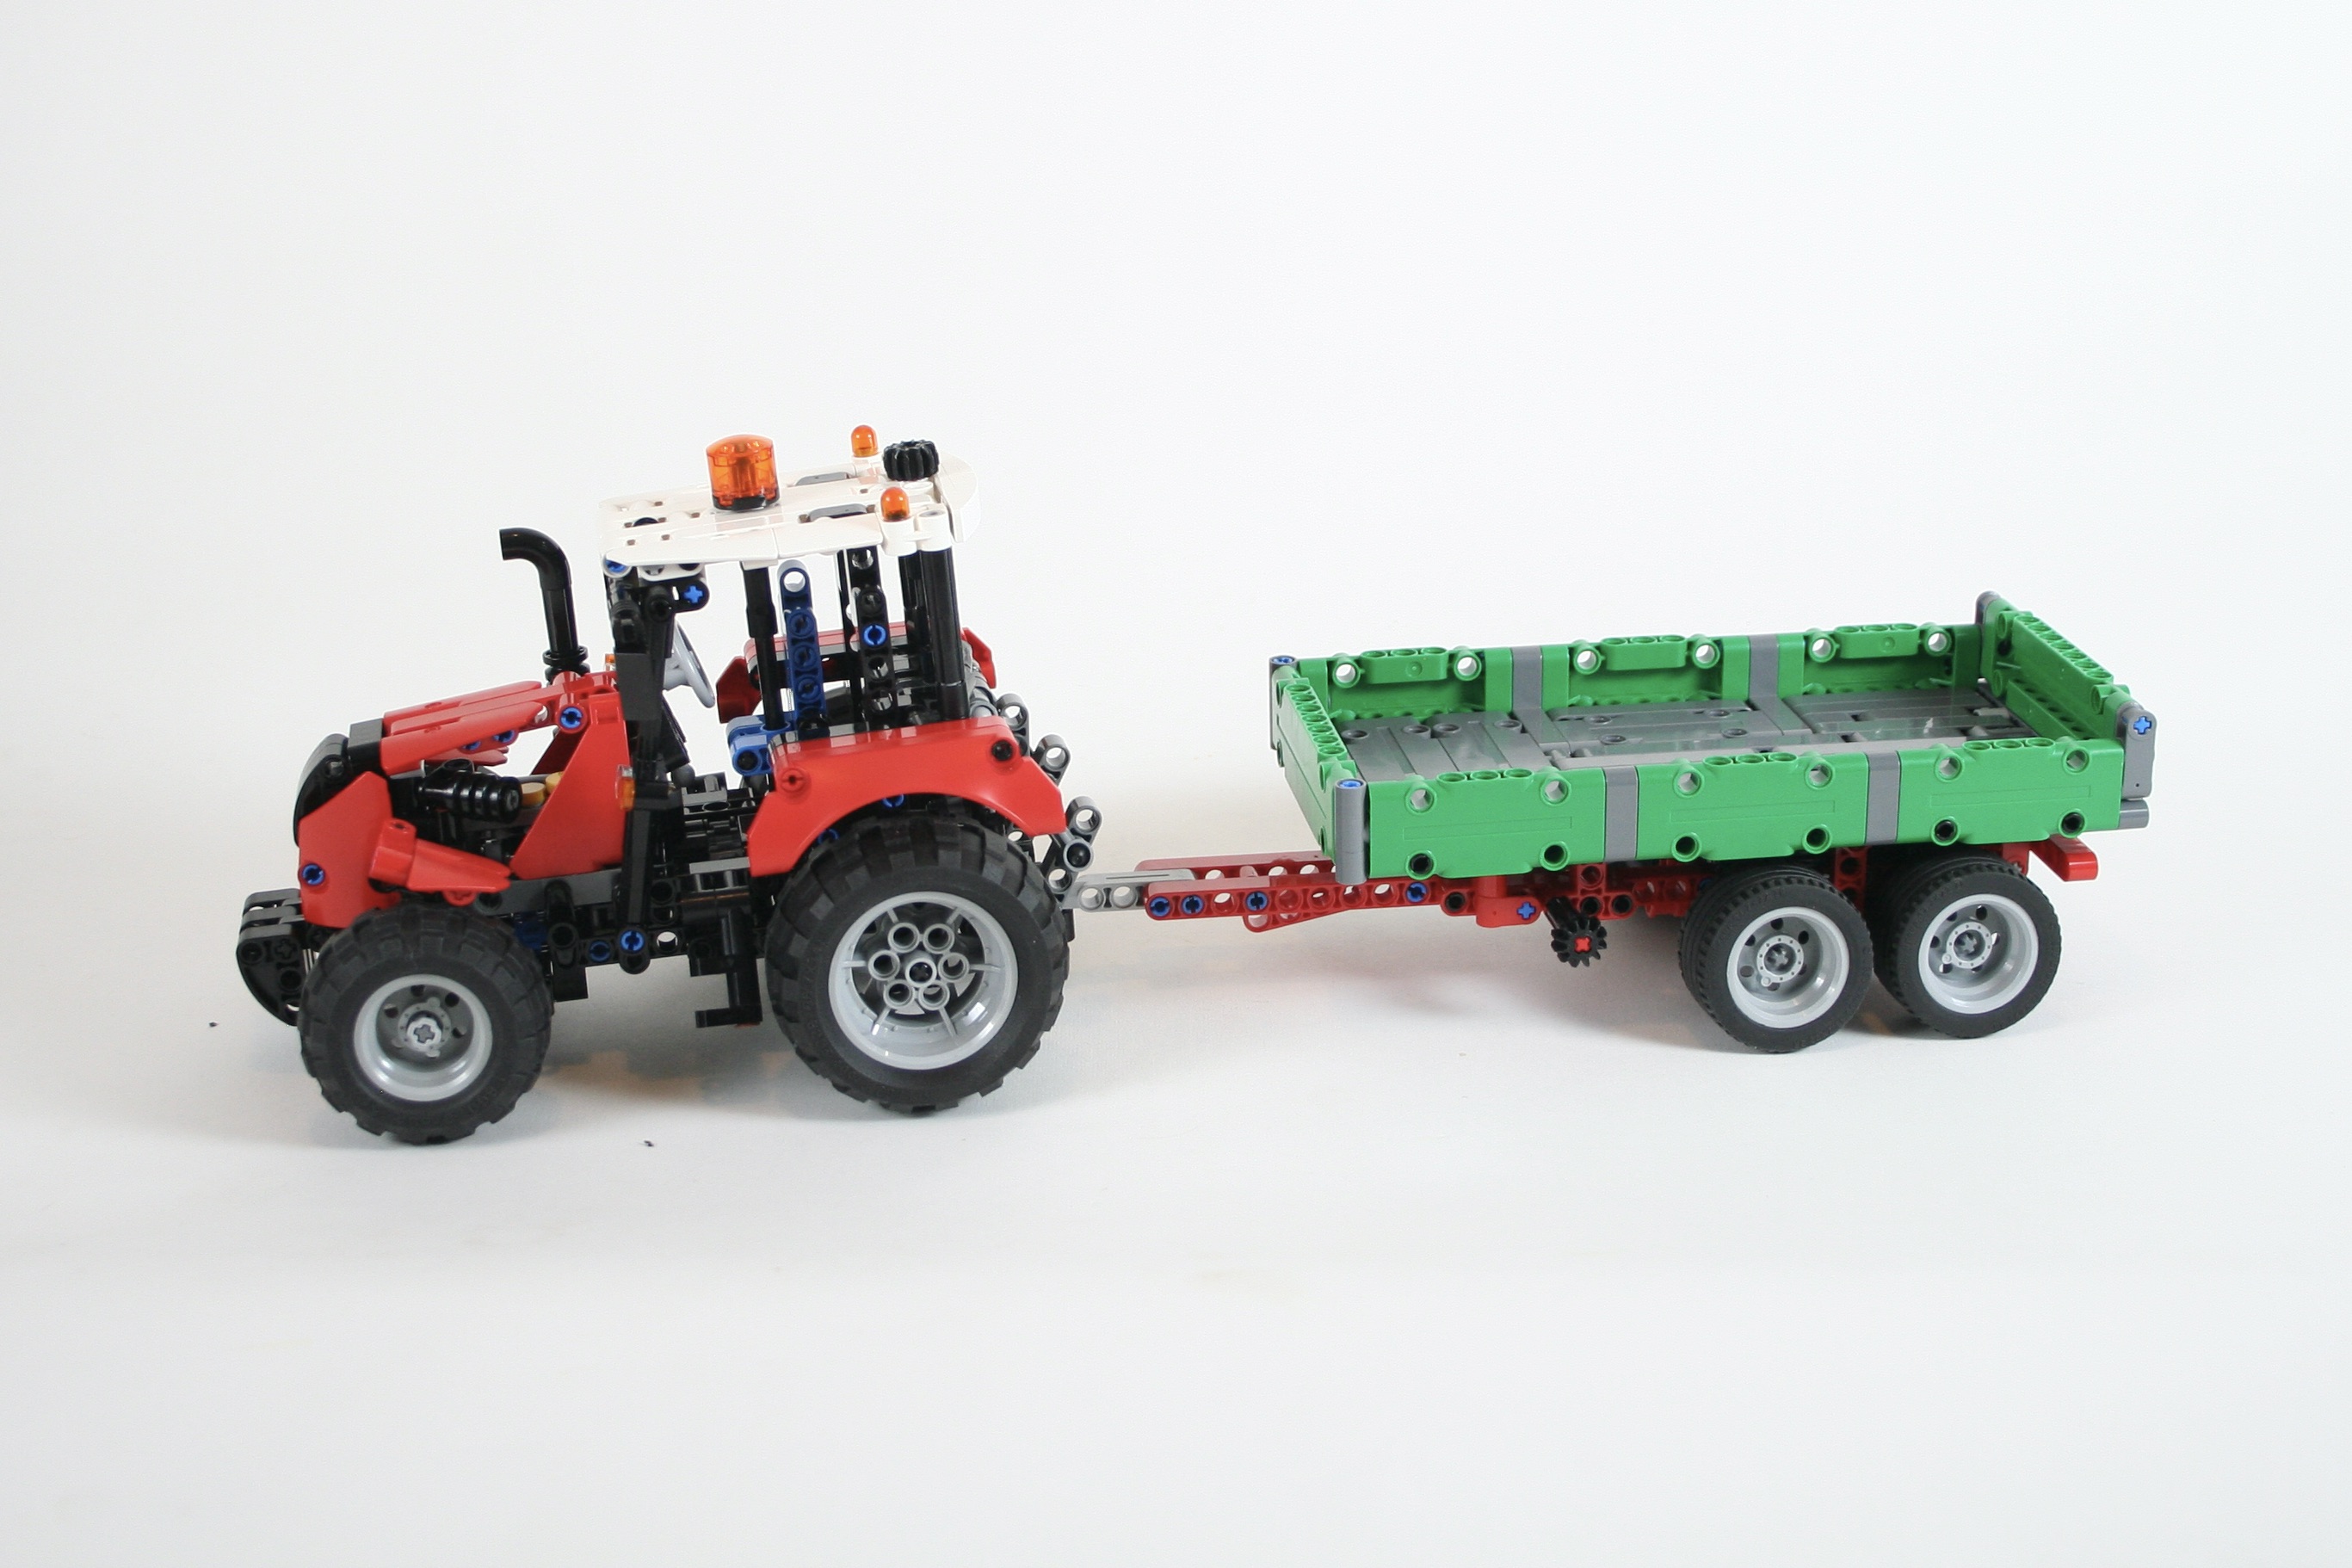
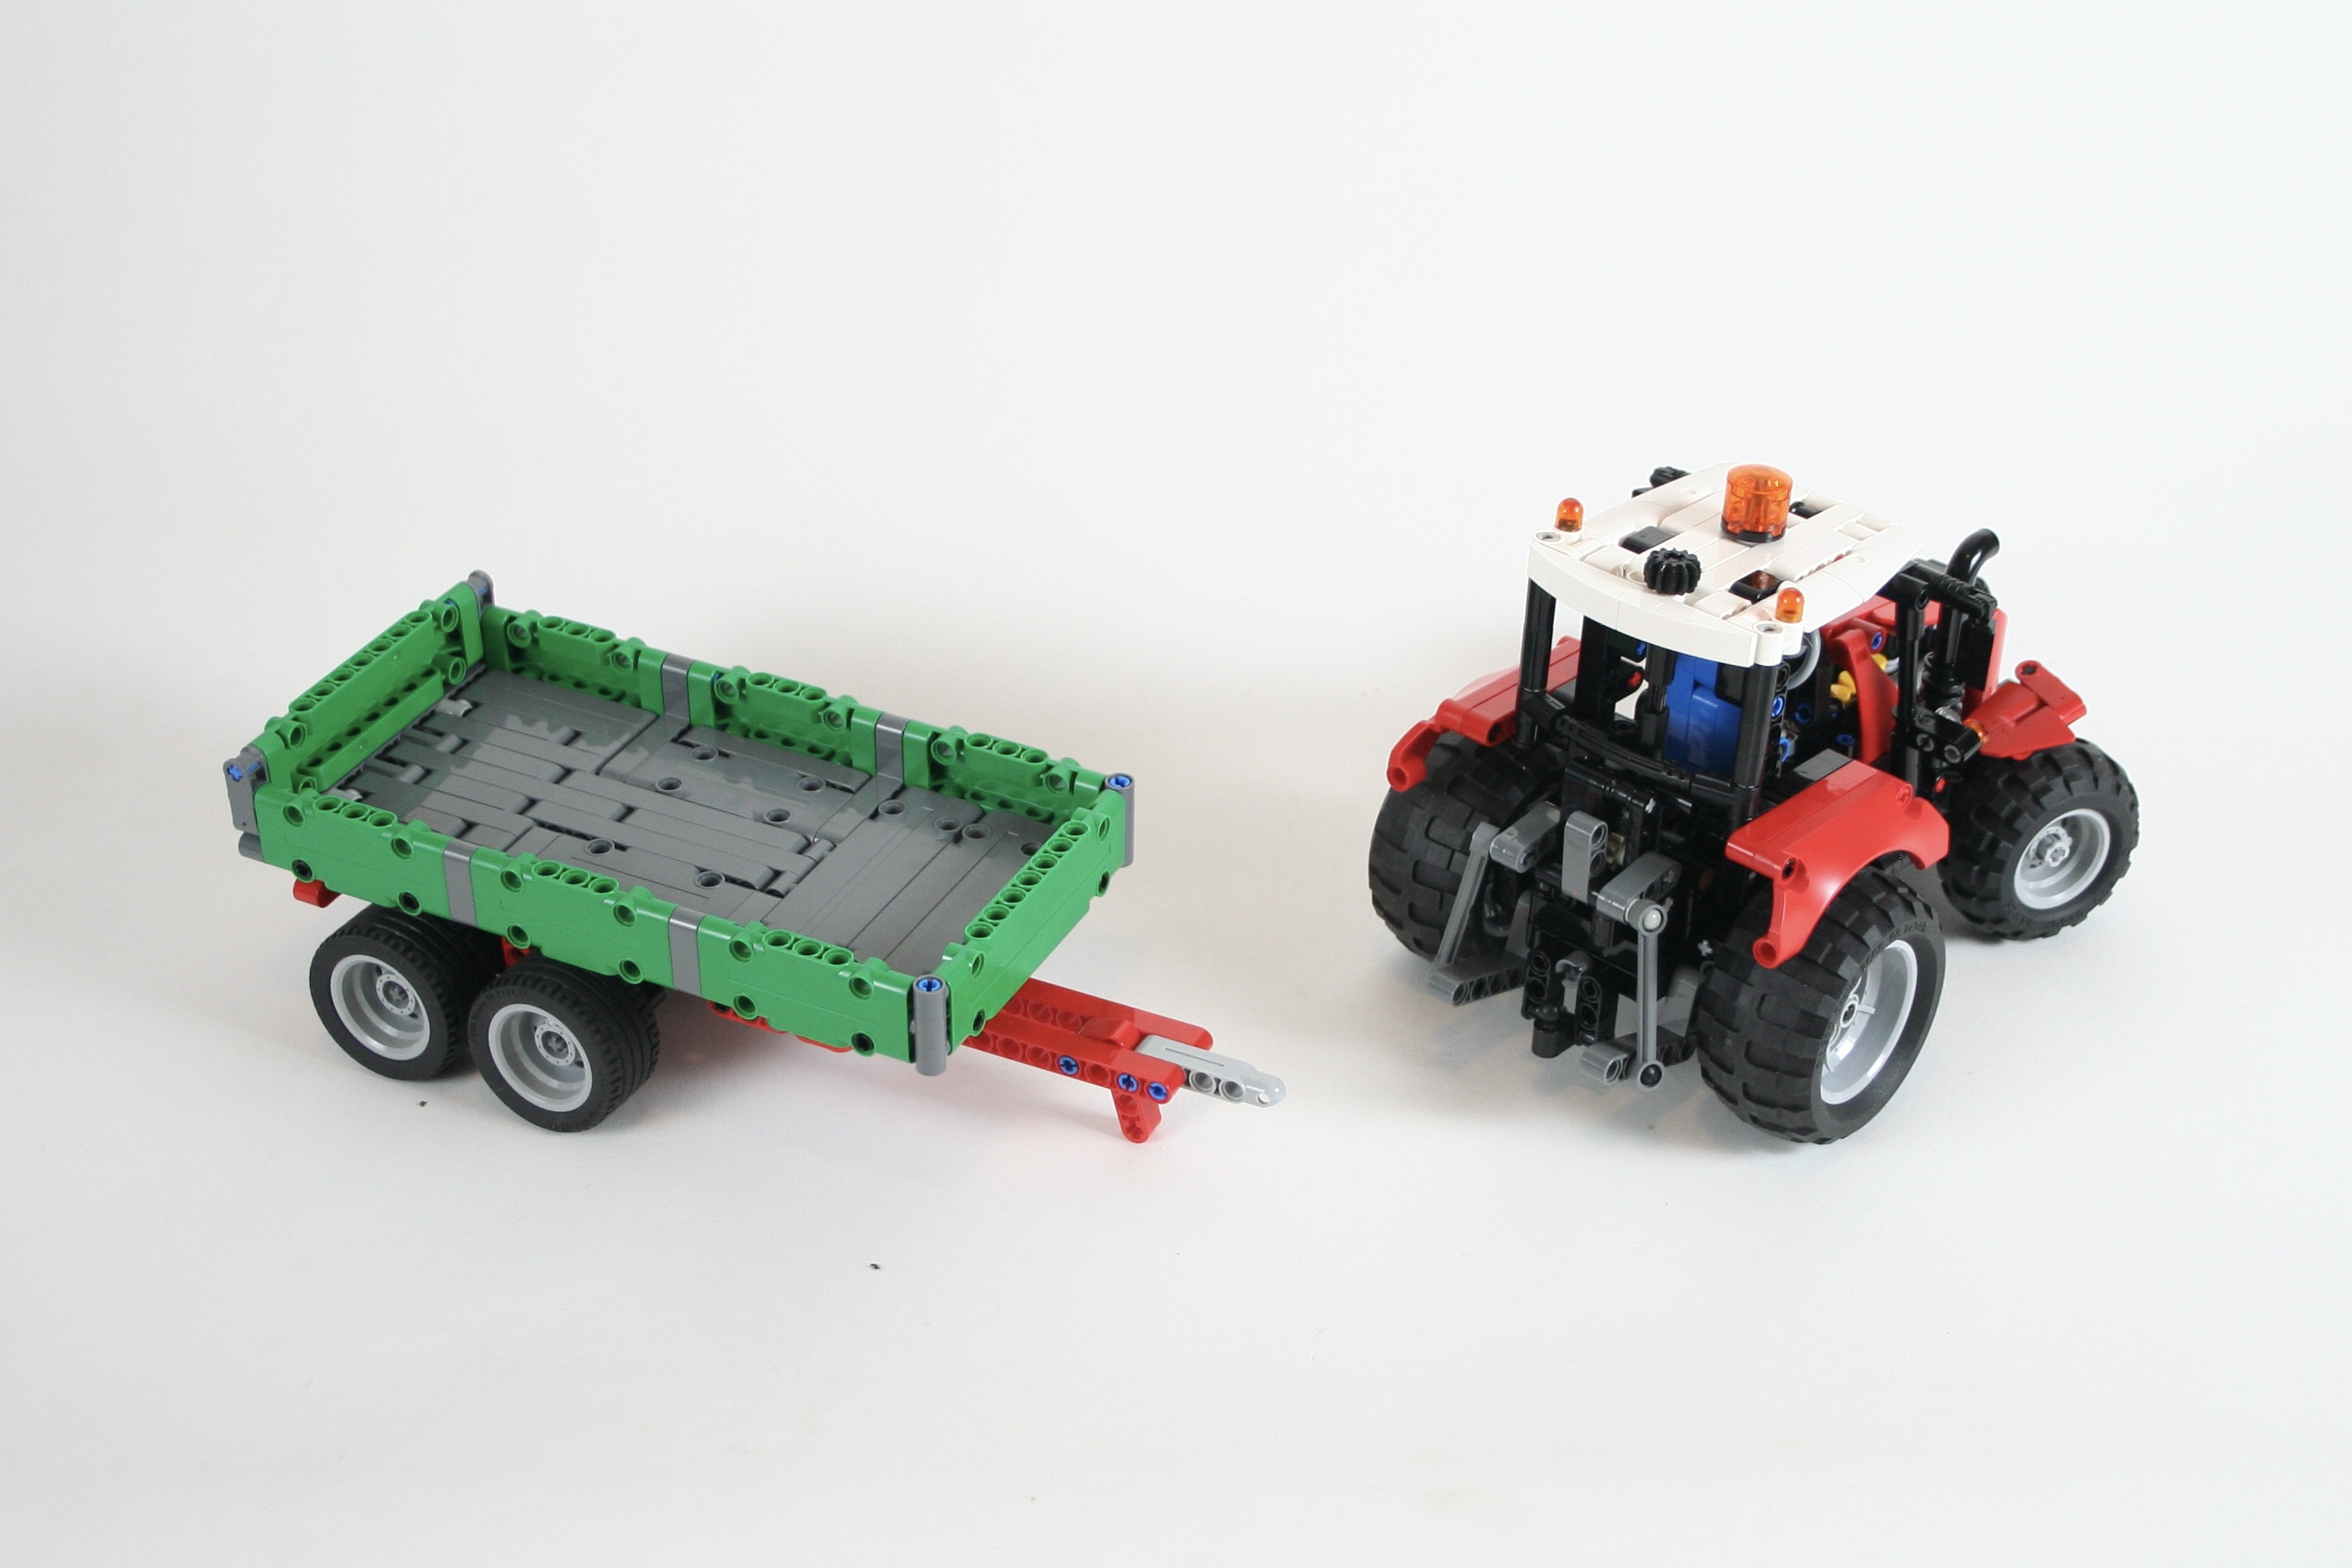
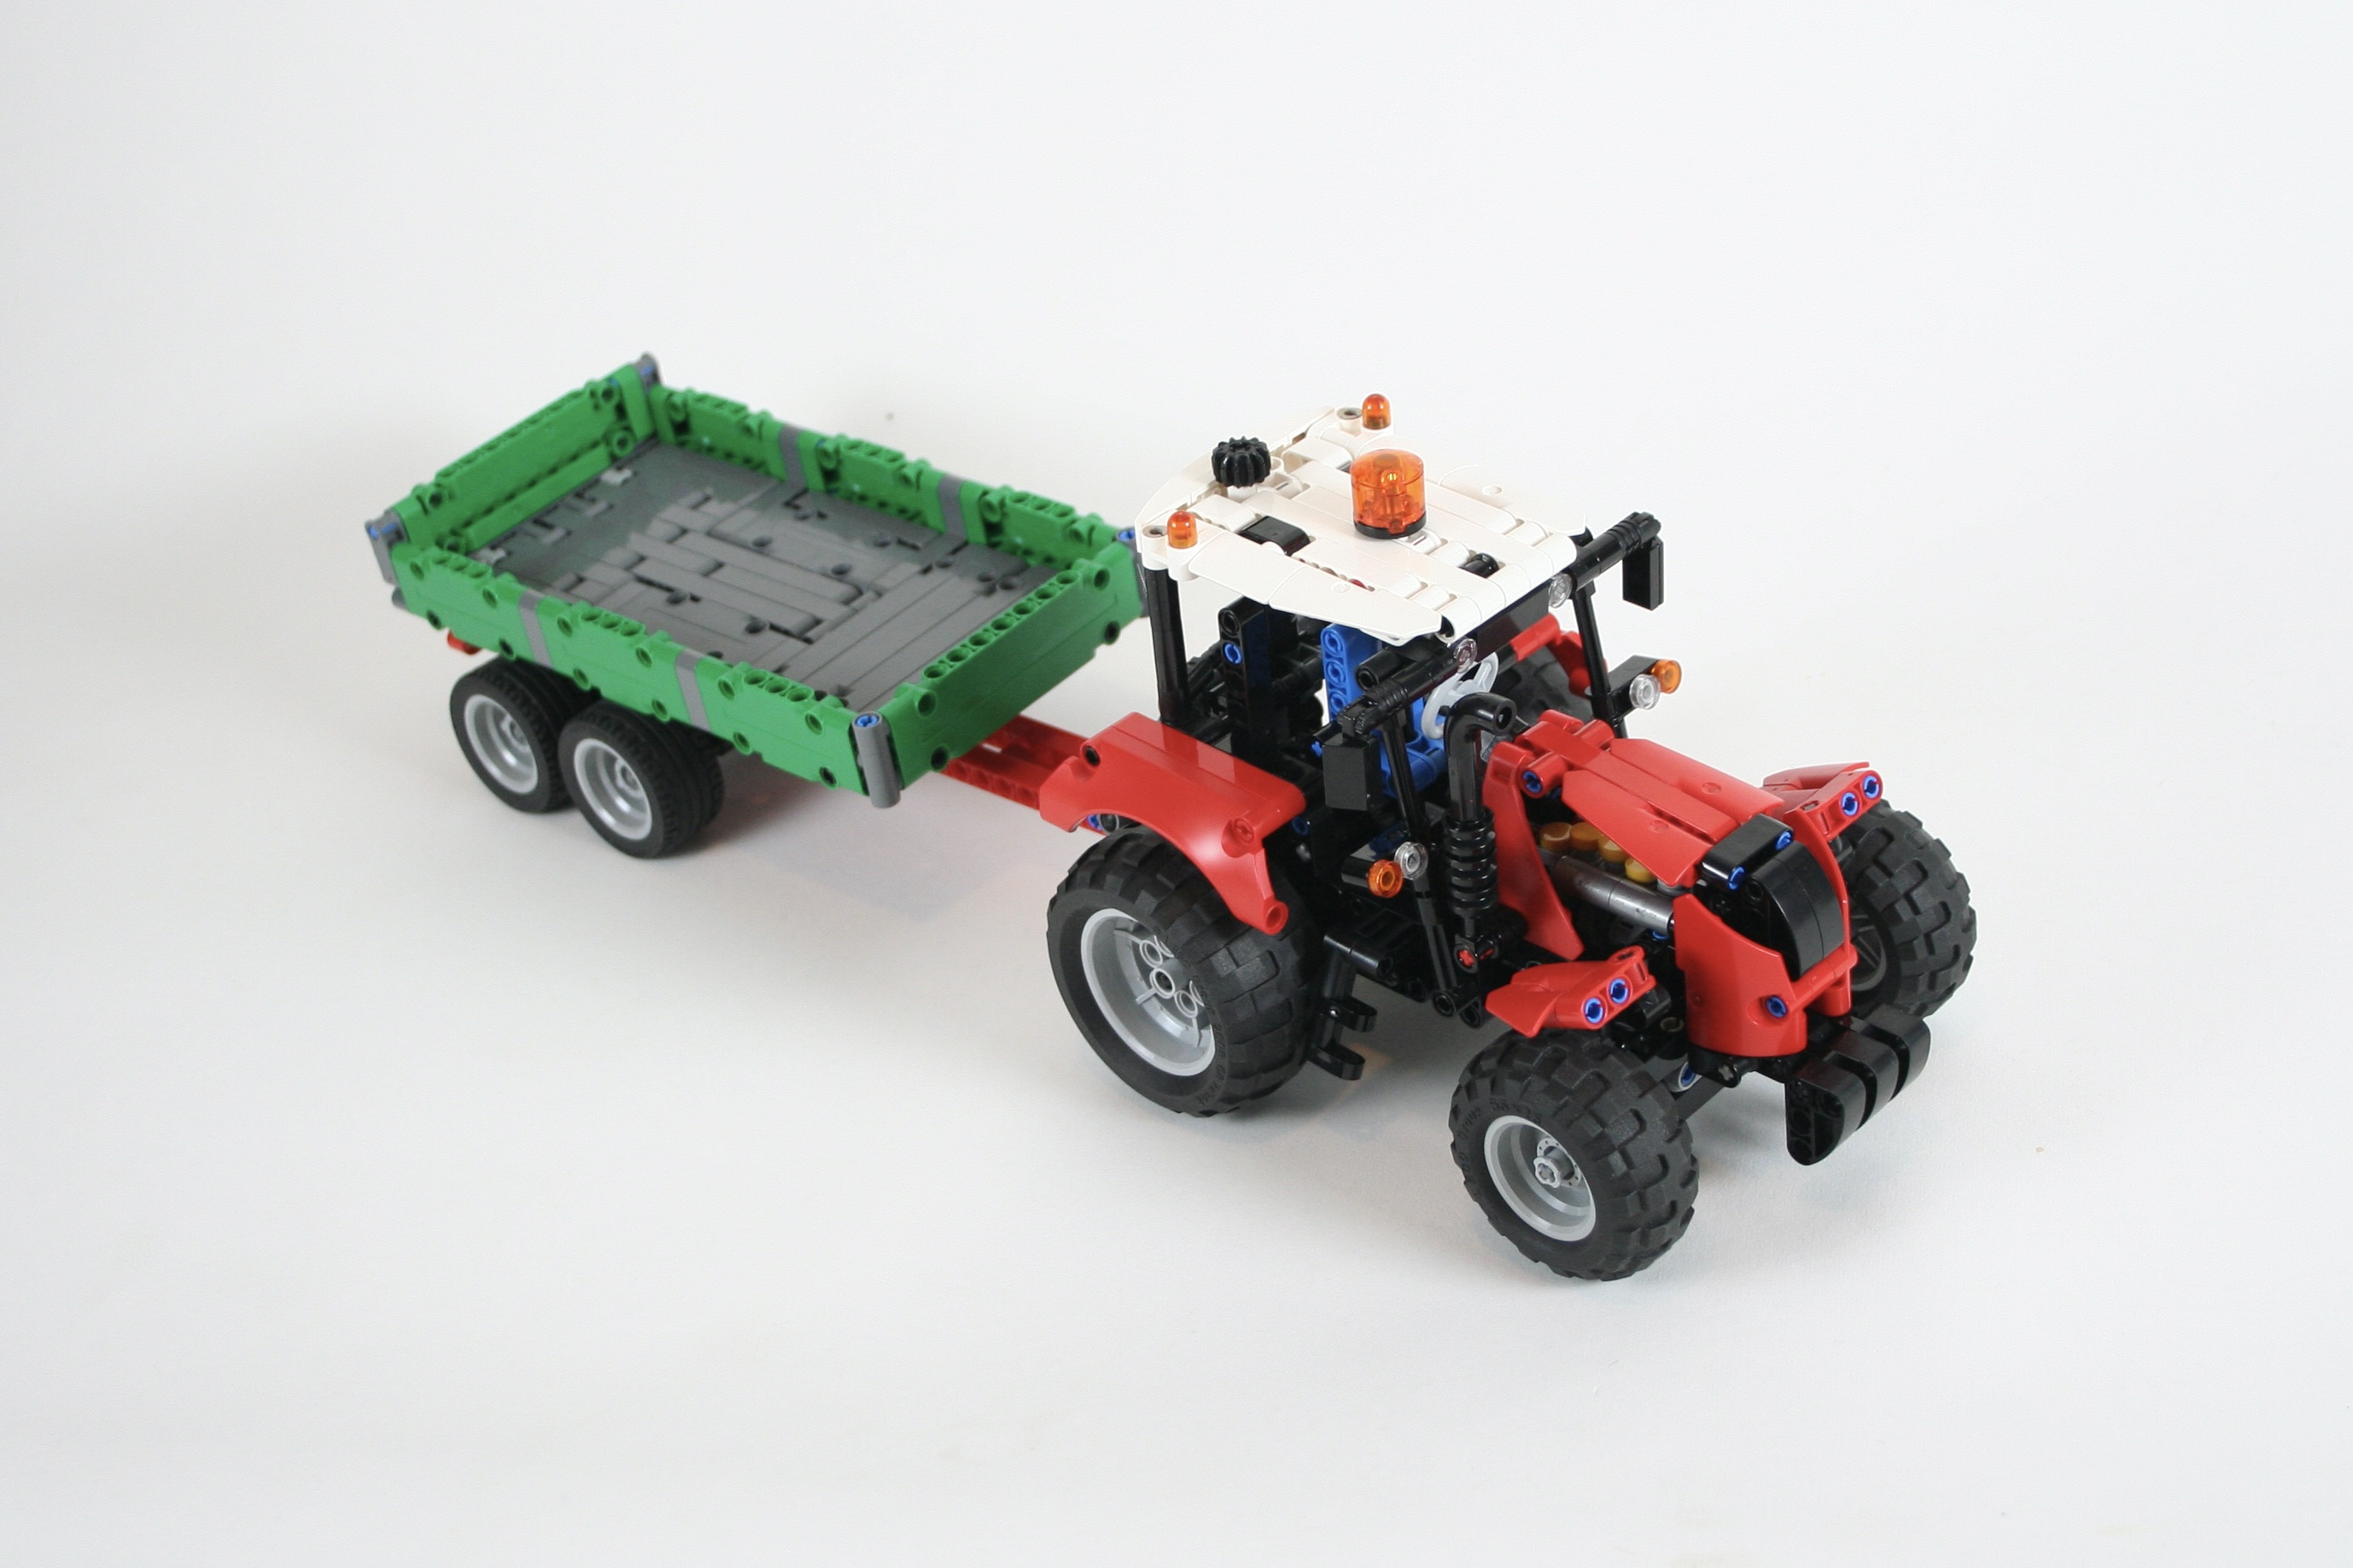
I participate in a number of Technic build contests at Eurobricks.com, the TC25 contest was another one that I was excited to join. This contest asked you to rebuild a Technic set, but smaller. After selecting a couple of sets for my shortlist to explore, I went though each to determine what I had parts for, what interesting features I could keep or add, and what I would be motivated to finish. Through this process, I decided on LEGO set 8063 from 2009. After numerous tractors for the Thirdwigg Farm, I decided I would be well suited to update this tractor.
I stared with the trailer, and added suspension for the rear axles. The tipping of the bed uses a linkage so the little mini linear actuator can use its full movement to tip the bed. The control for the tipper is on the left of the hitch. A simple rear tailgate and trailer hitch support is included as well.
The tractor is similar to my other designs in that there is steering, an engine, and a rear PTO. But this tractor also included front suspension as 8063 does. To make this work, I used small 1/2 pins with a yellow round tile on the top for pistons, and ran the steering axle below the engine. The front axle is mounted on a pivot to allow for the pendular suspension. Steering is controlled by a HOG on the cabin roof. A rear PTO was added, and a three point hitch using the Thirdwigg Farm standard.
I always love building tractors, and this scale is my favorite. I would have rather used the newer tractor tires for this MOC, but it did not match the feel of 8063, so the balloon tires were used instead. All the functions worked well, and it was nice to include all the functions of the original 8063 as well. And the red and green compliment each other so well on this build. I hope you enjoyed another little tractor until I build another one.
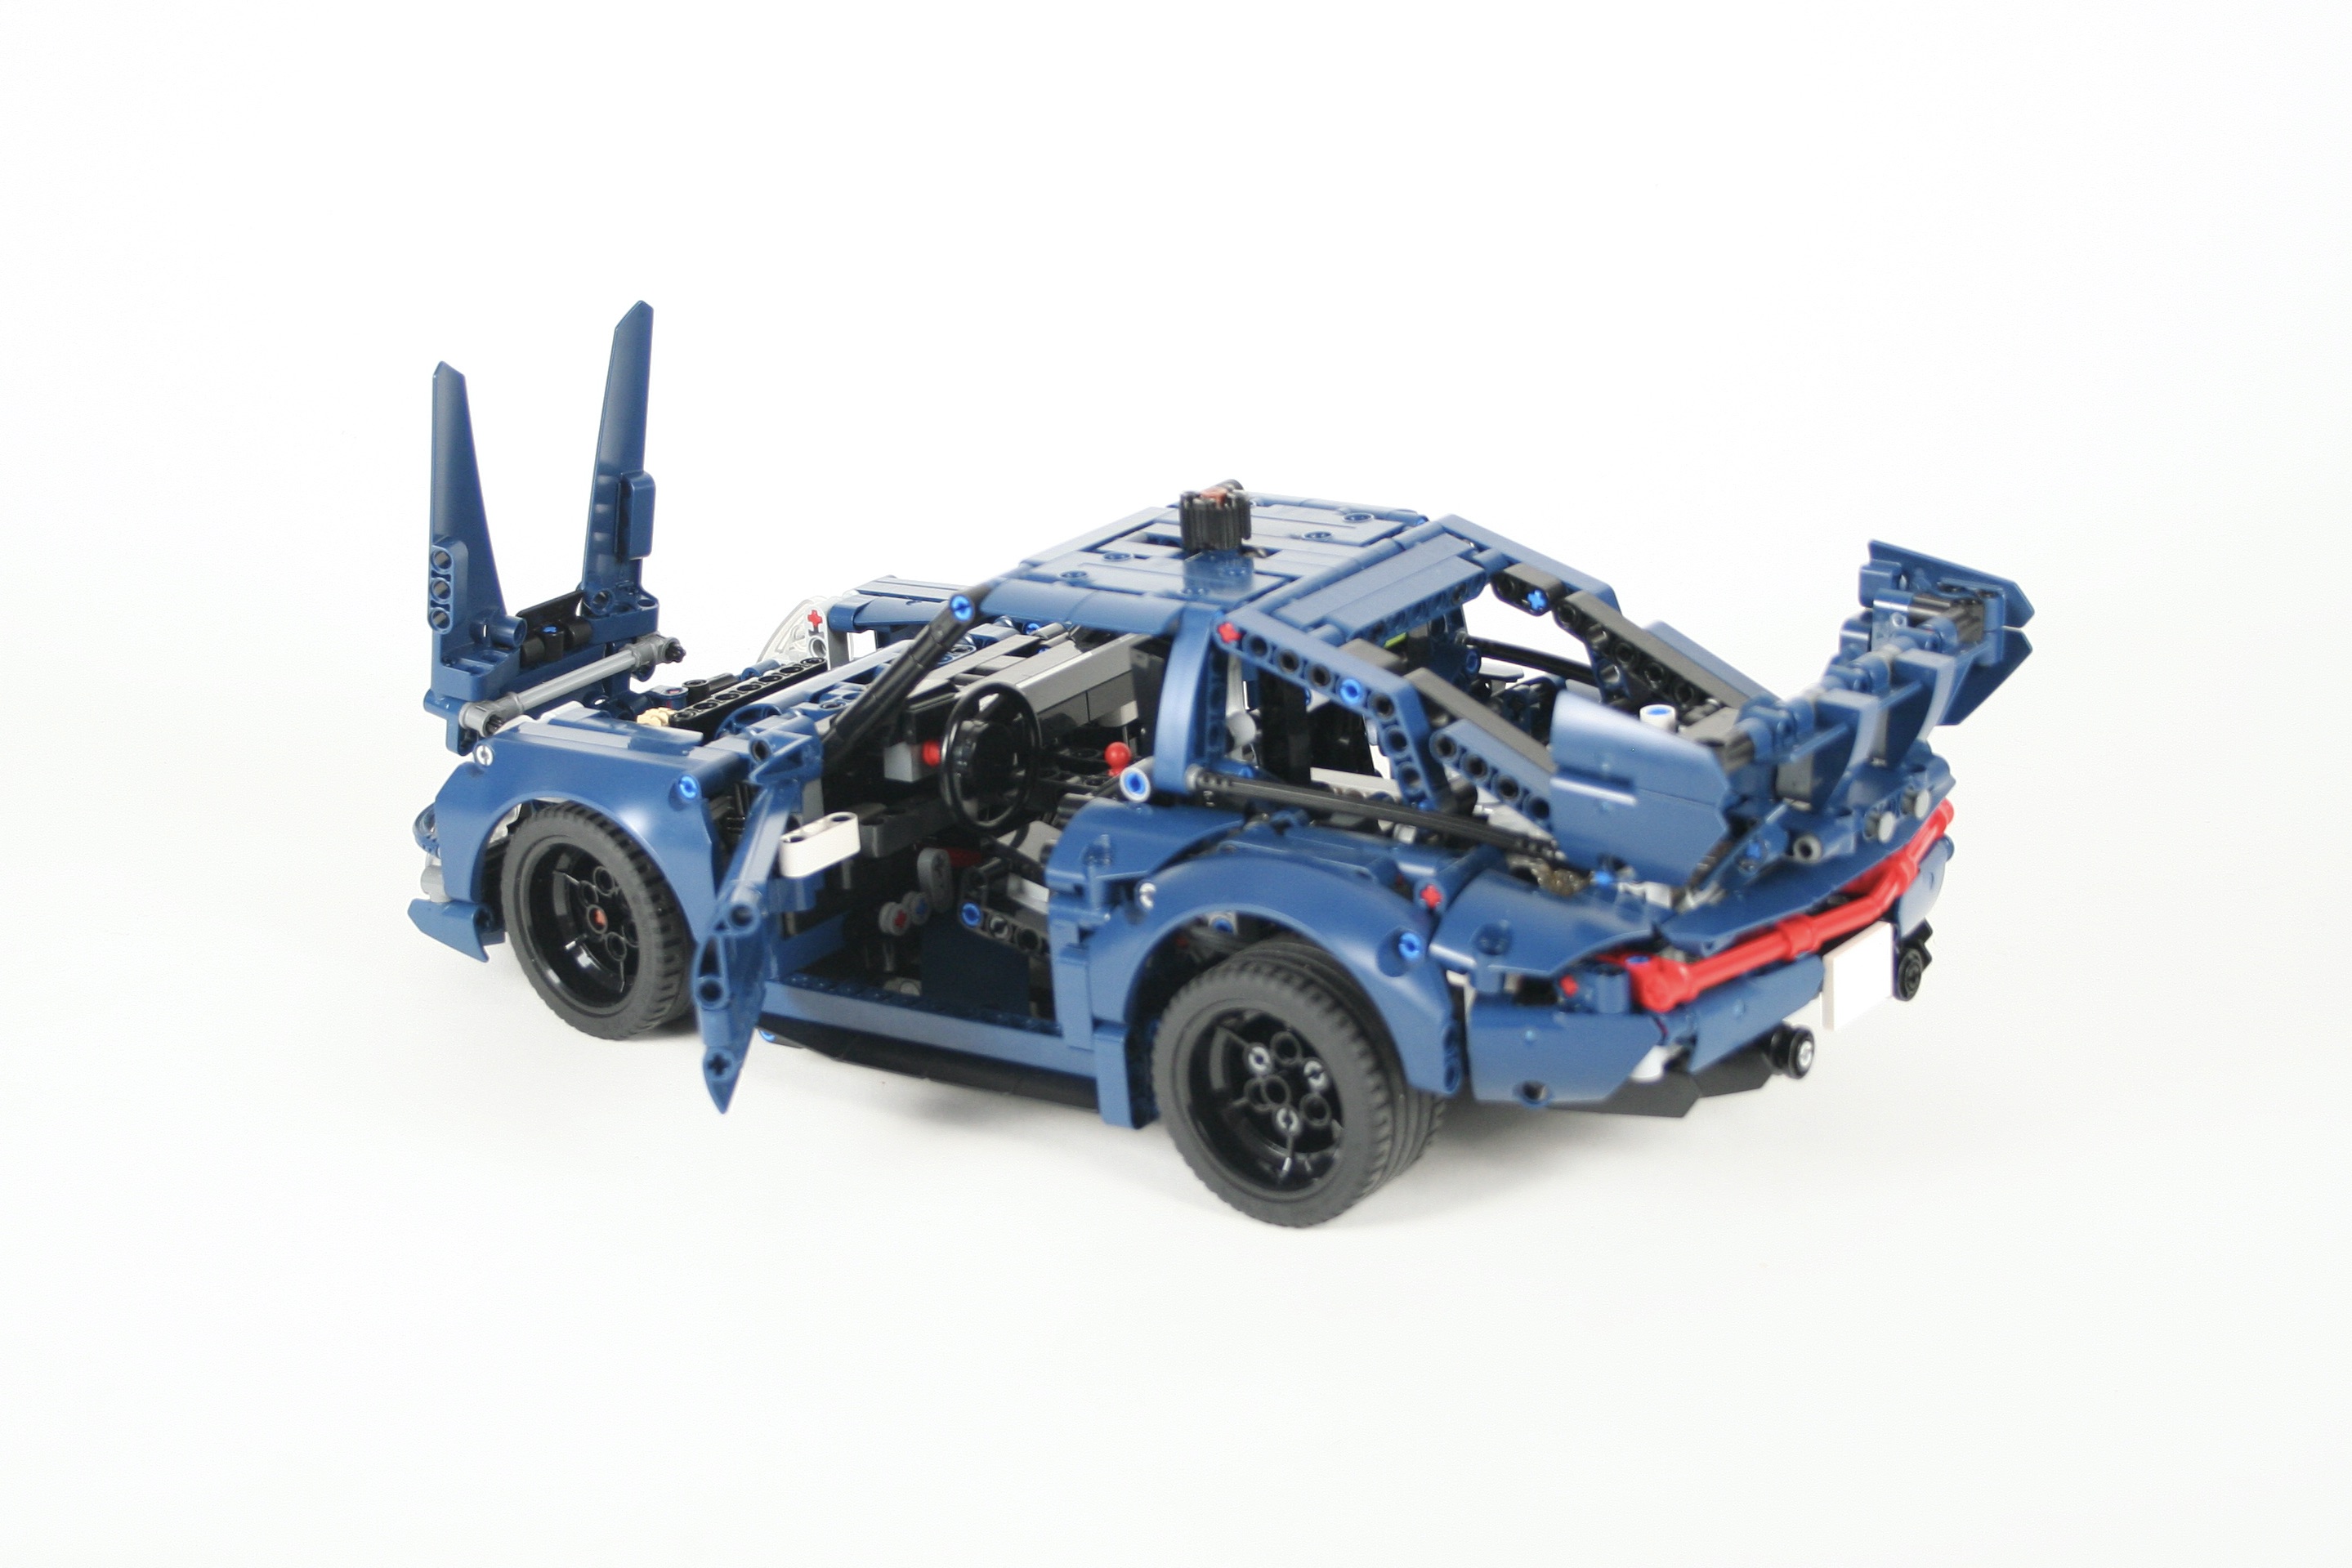
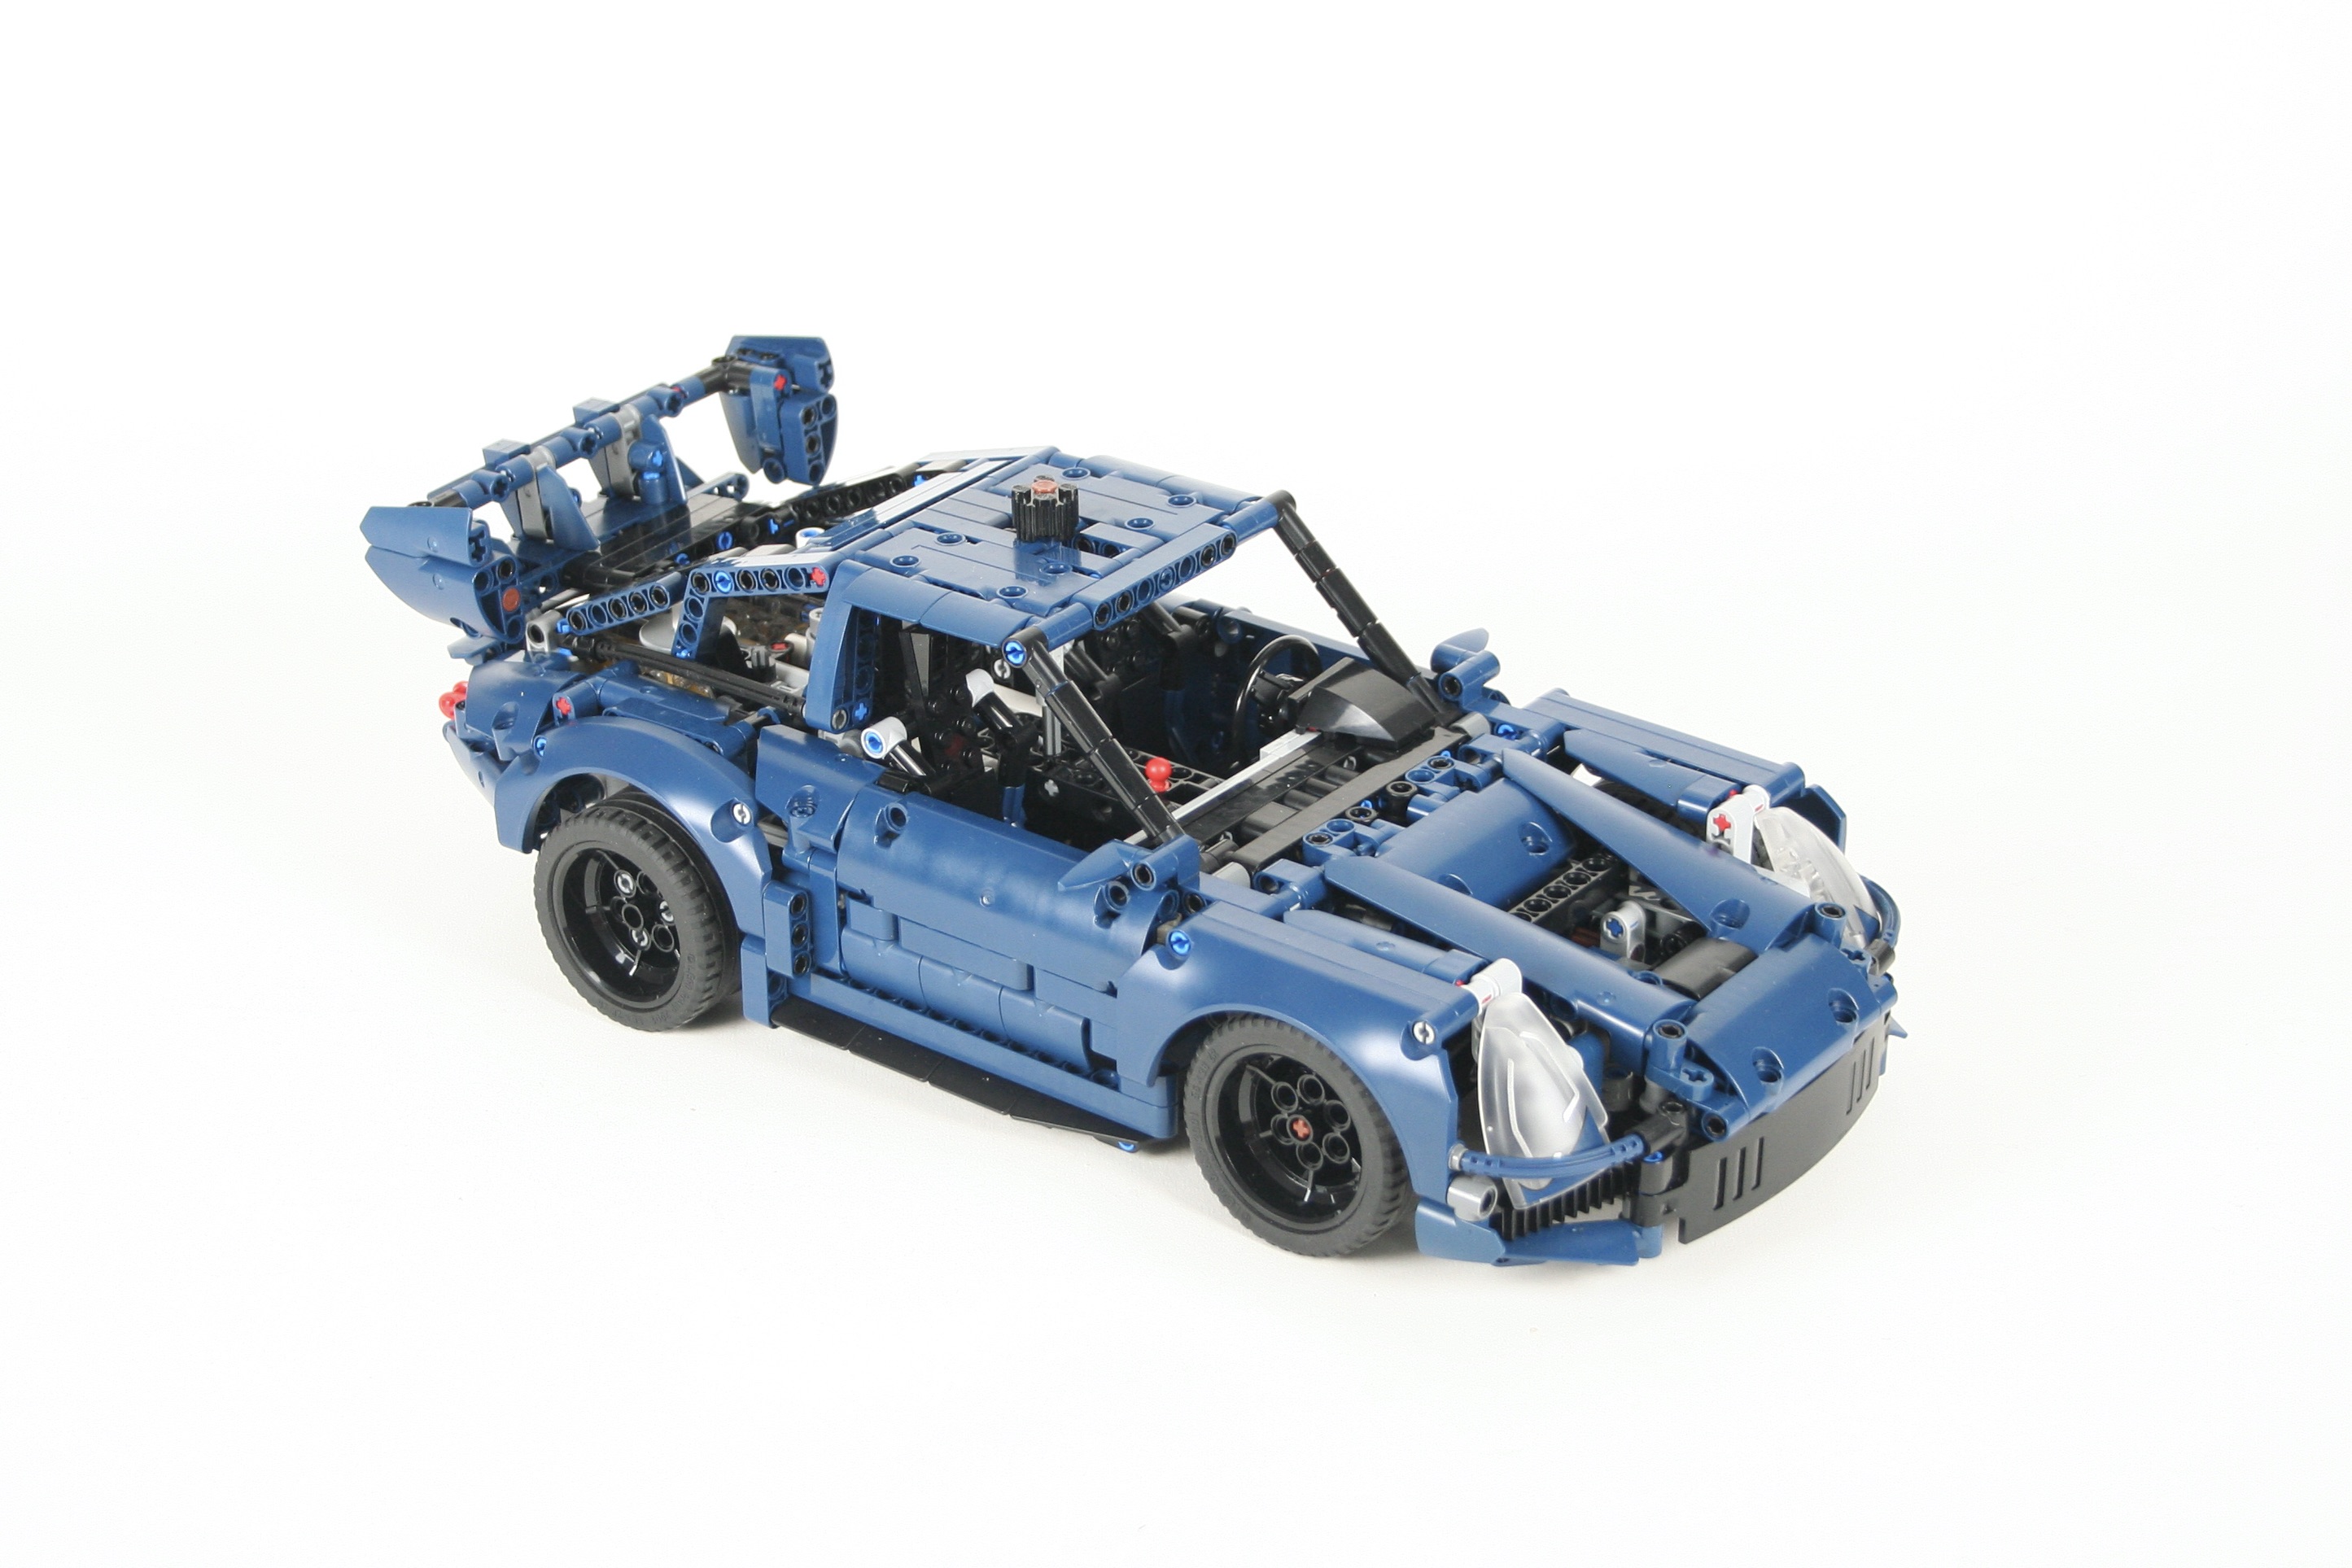
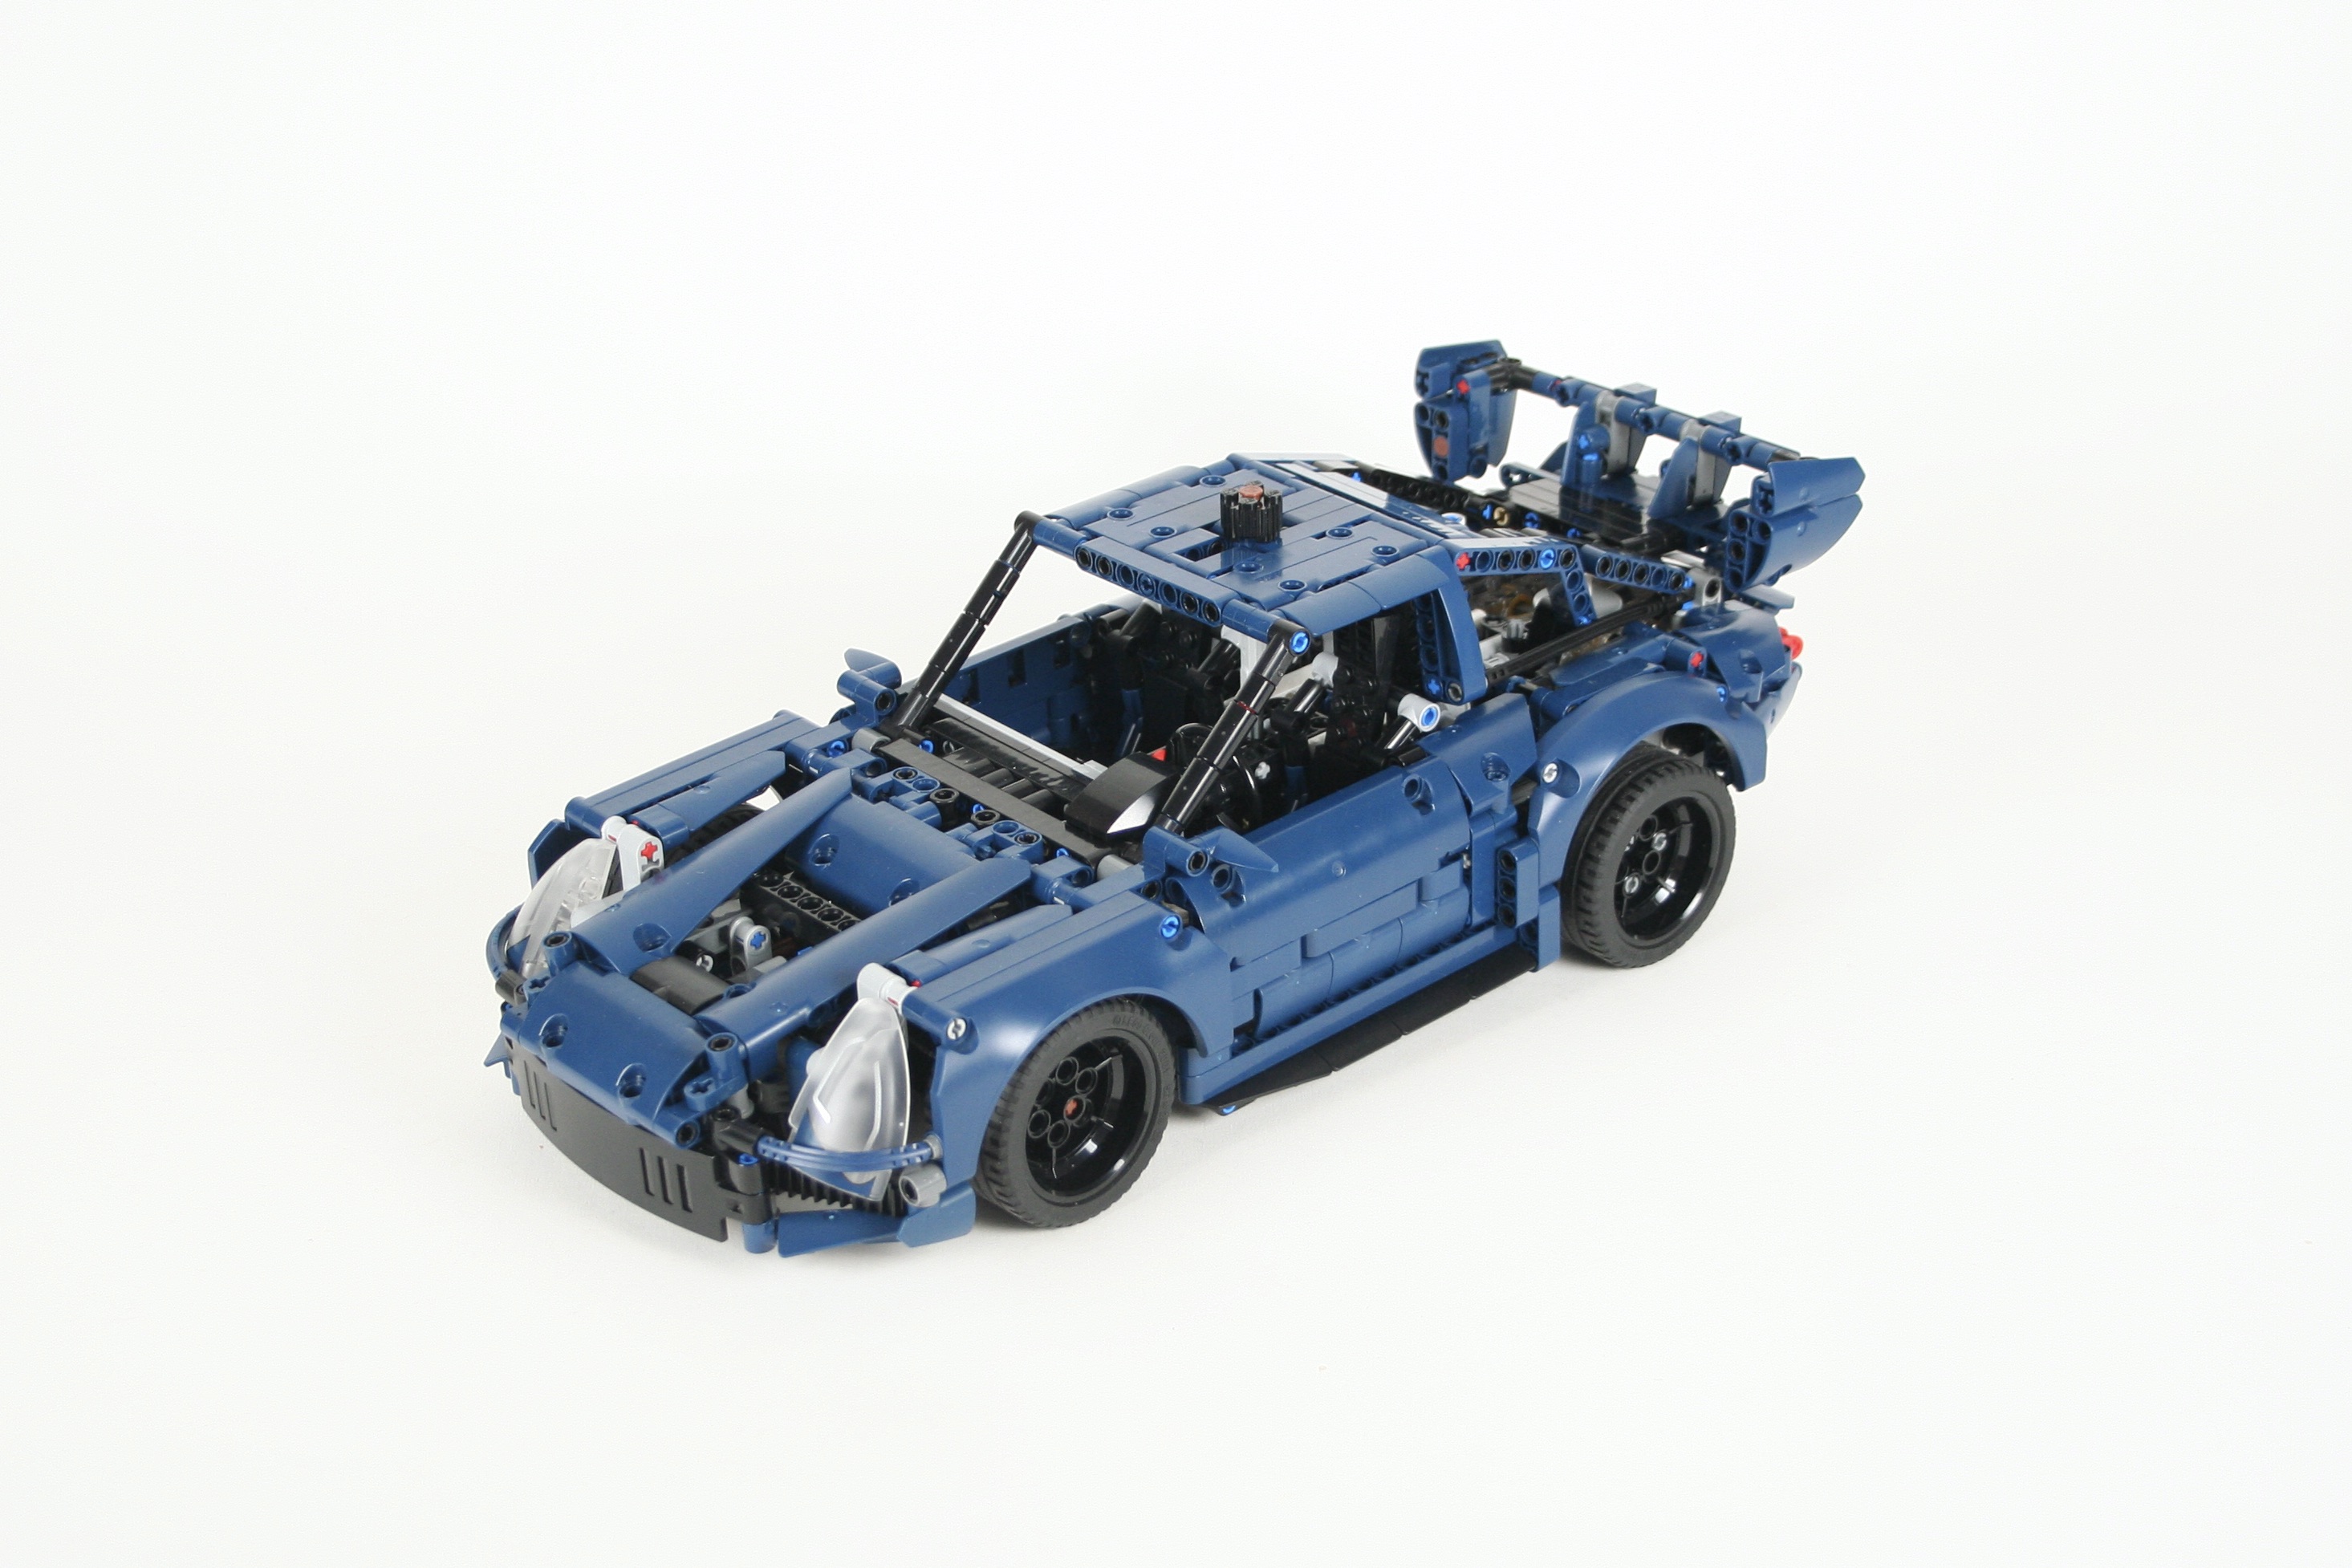
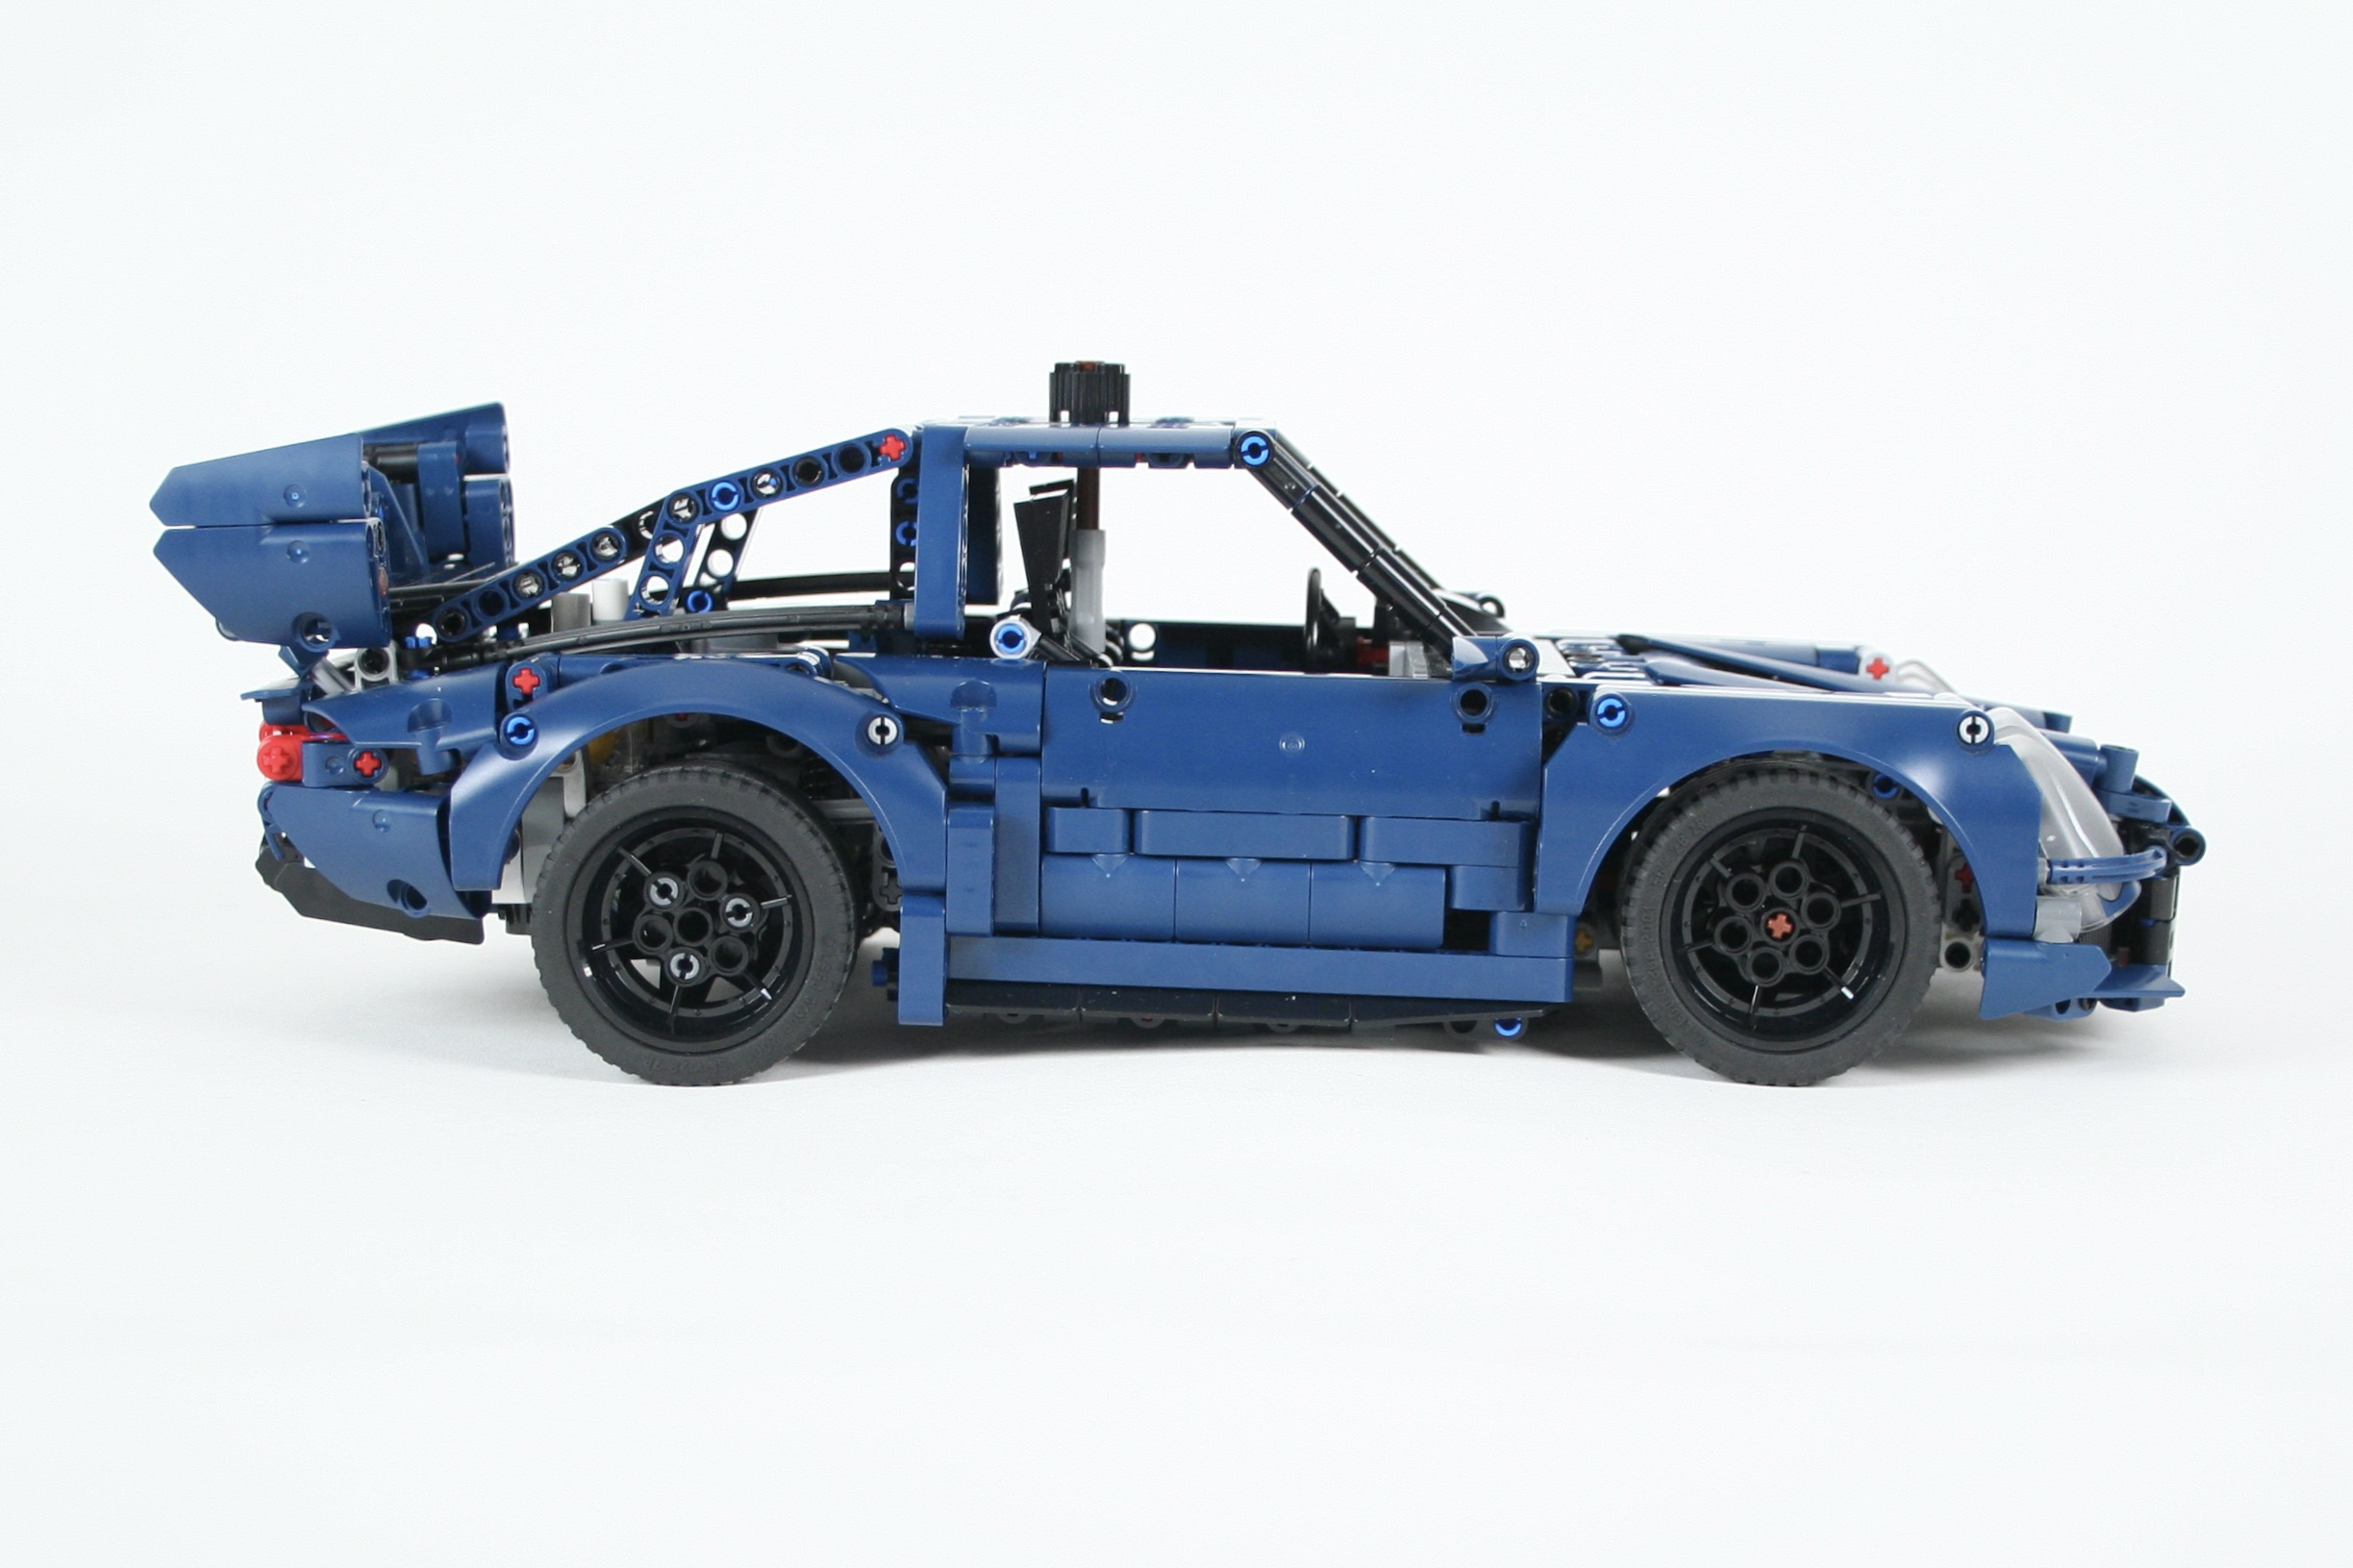
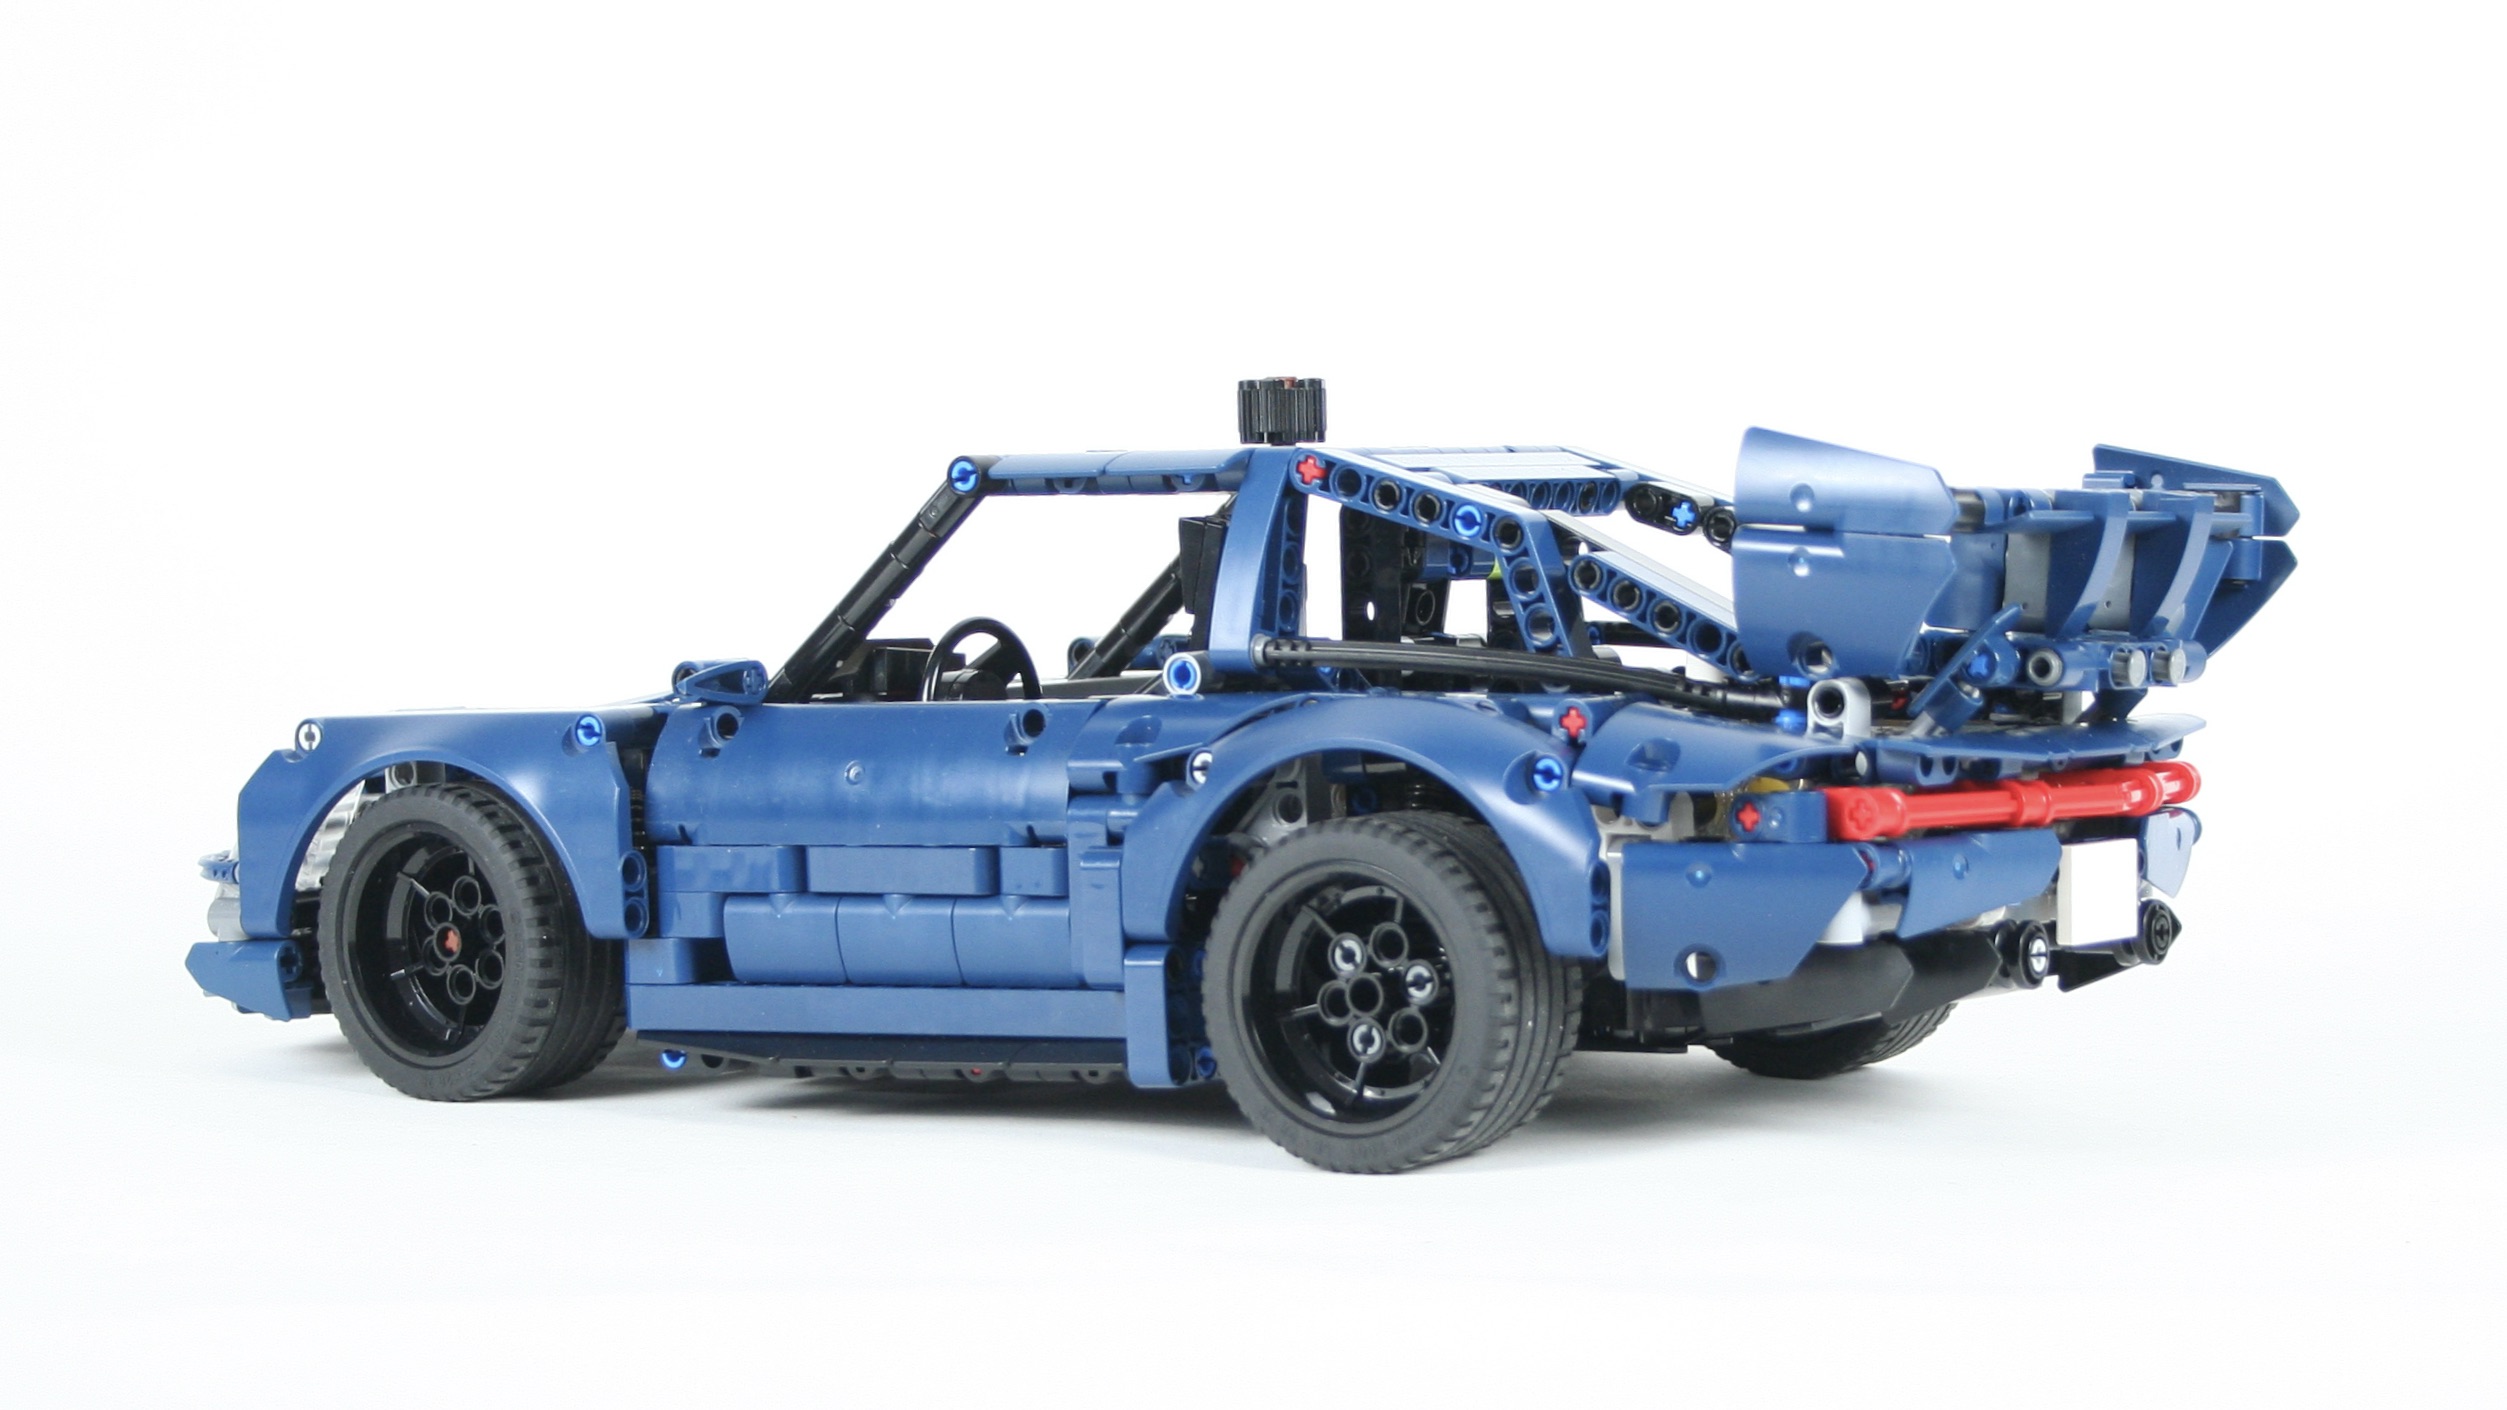
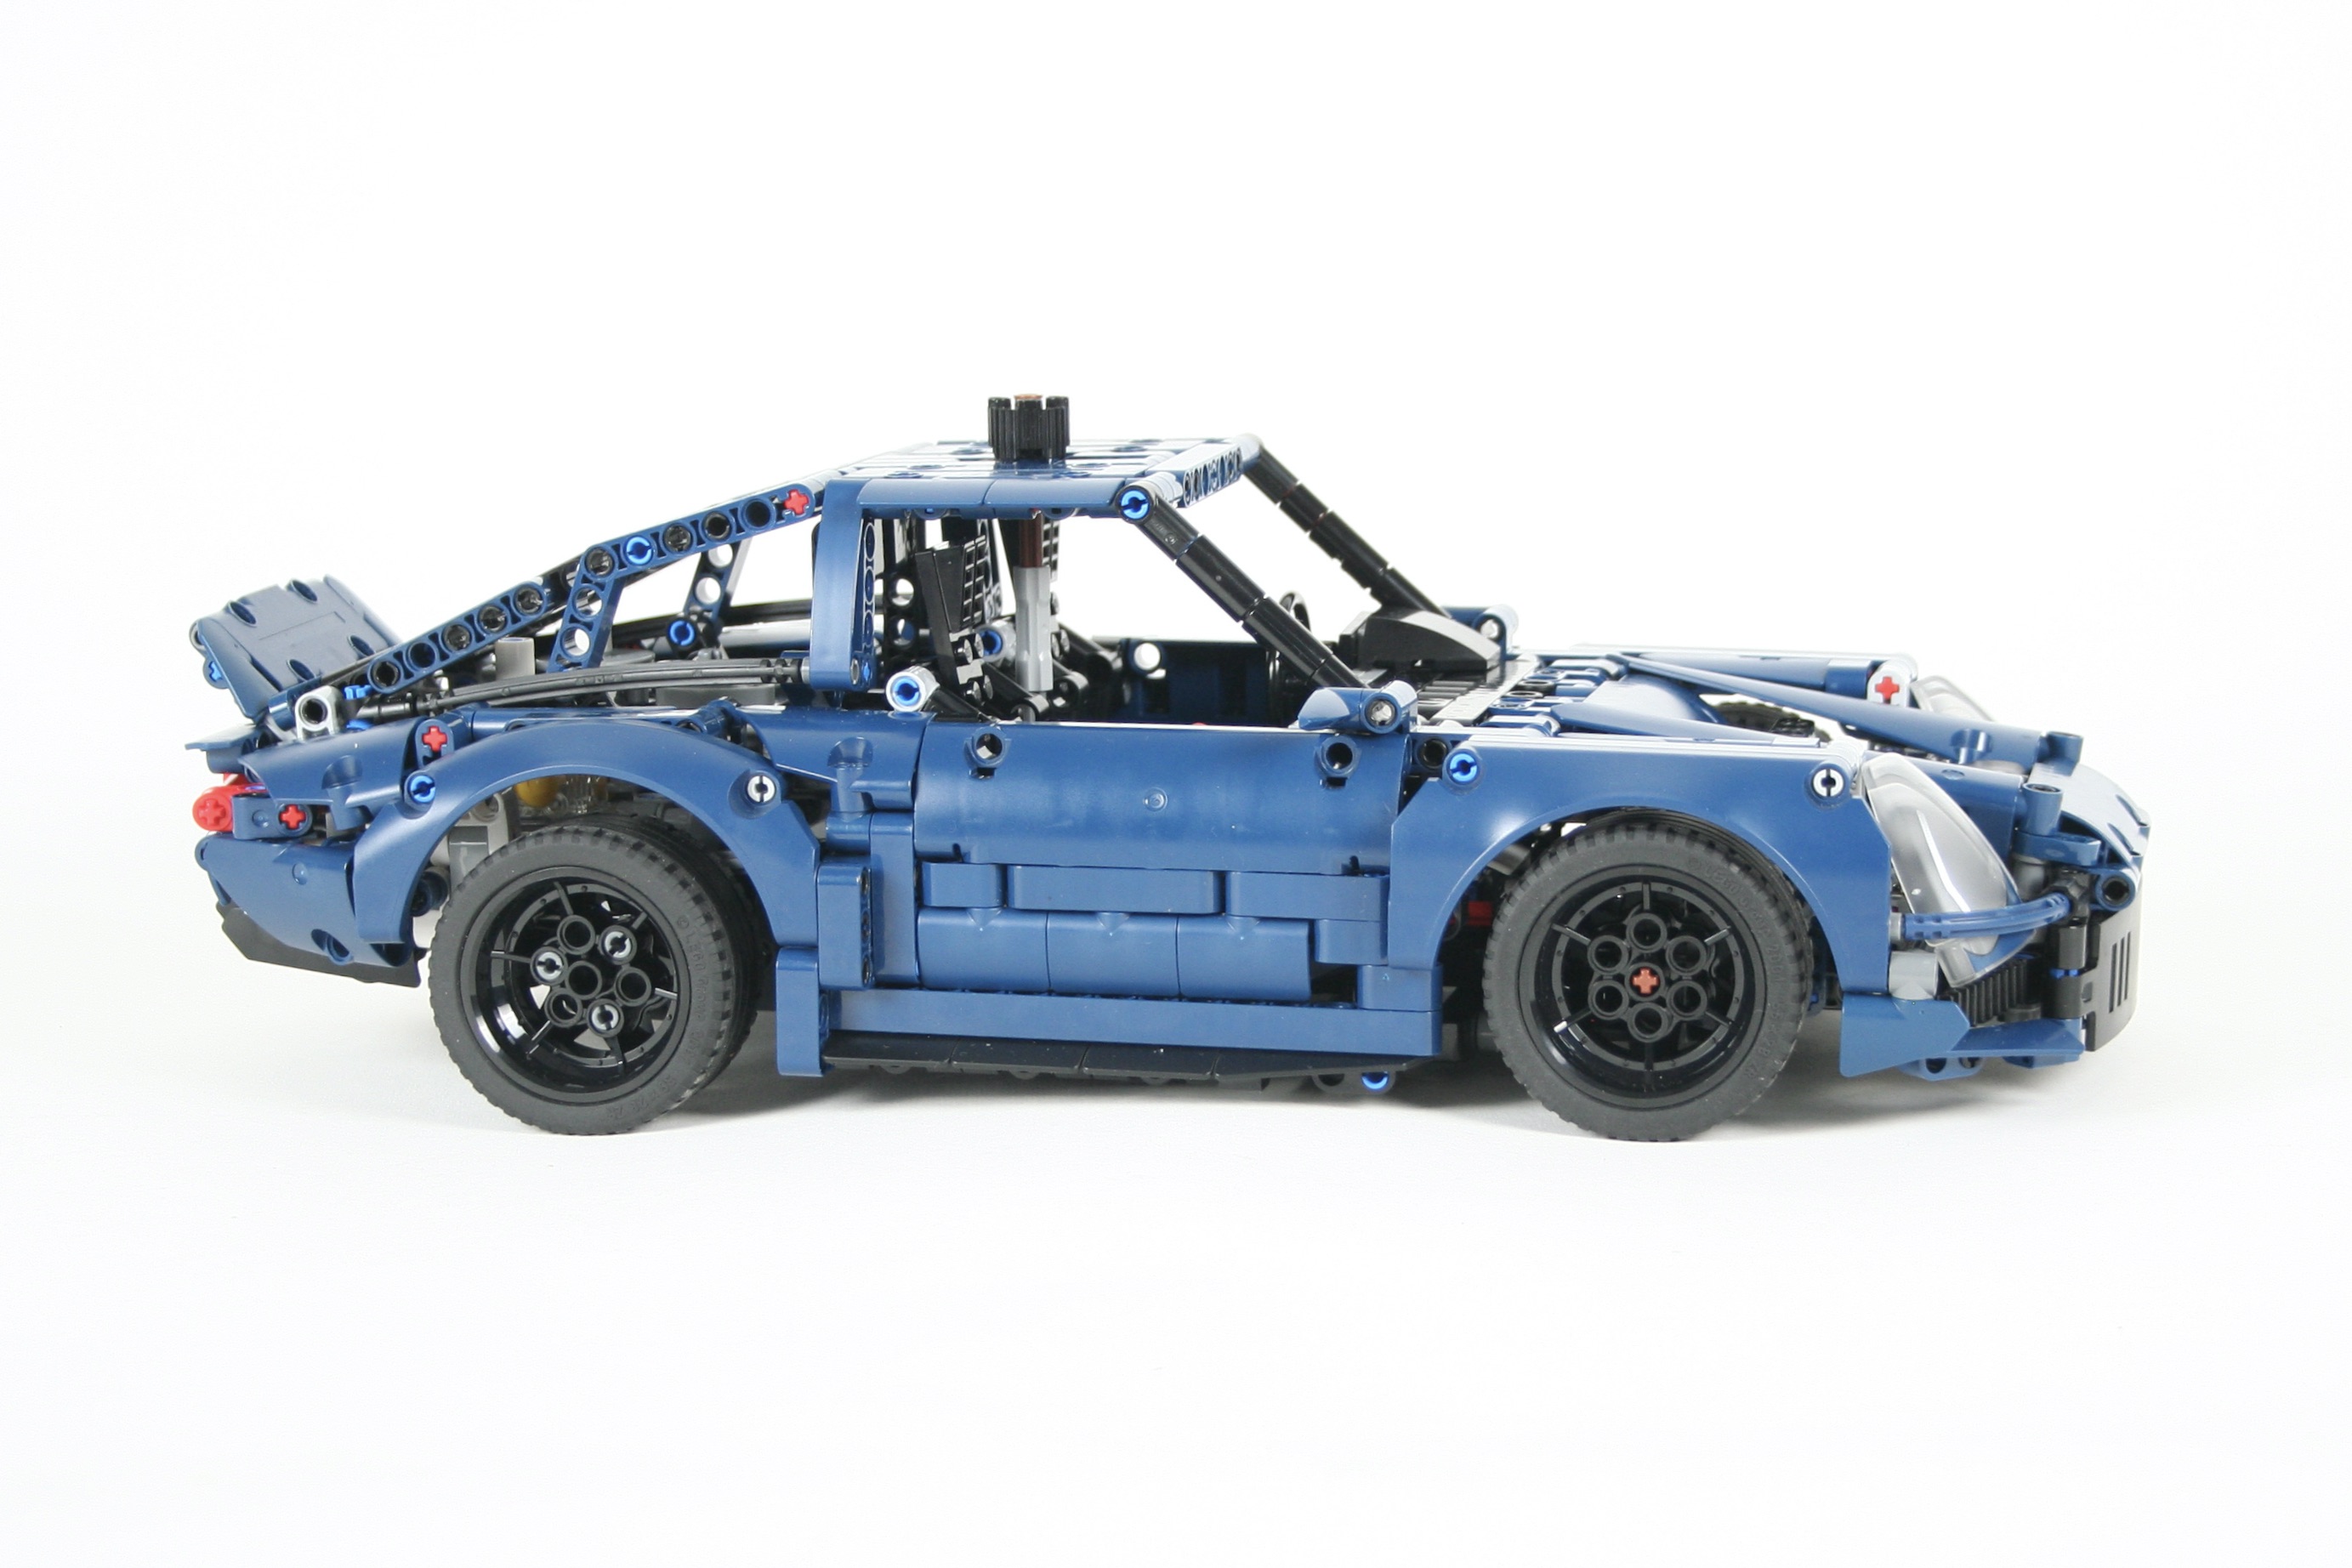
The alternative build is becoming a popular theme in the current LEGO culture, and LEGO Technic is no different. Many people buy a set or two, and look for ideas what to make with the sets they have purchased. Rebrickable has made this even easier. Certainly I would like to share some of my creativity with them, but I also like the challenge of trying to design a creation with a limited amount of parts. I have built a couple of alternative builds now, so I wanted to try something a little bigger. LEGO set 42154 is a good size, has a lot of fun parts, and has a beautiful dark blue color. I love any Porsche, so I stared with a 911.
When I do an alternative build, I start with the big parts first: namely where do the panels go. For 42154 this meant I started with the fenders, the door panels, and the transparent panels. After a quick draft, I knew I would be able to get the general shape of the 911 right.
Then I worked on the interior. The car would keep a four wheel independent suspension setup with steering at the front. A flat 6 engine was mounted at the rear with drive connected through a differential between the rear wheels. I was able to keep the HOG steering link on top of the roof. Two seats are include, but no jump seats.
It took some time working on all the remaining parts. 42154 does not have many liftarms, so I had to design and redesign what parts are used where a couple of times. At the end, I had a lot of parts leftover, so I was able to make two rear end designs: a rear wing, and a little duckbill spoiler (my favorite 911 look). Both are easily interchangeable.
I was pleased to have finished another alternative build. They are hard for me to complete, but a good exercise in working with constraints. I like the way this one turned out, as I like the stance and the proportions of the design. The size is right for my desk, and the dark blue looks great in LEGO. Plus any 911 is a good 911 in my mind.
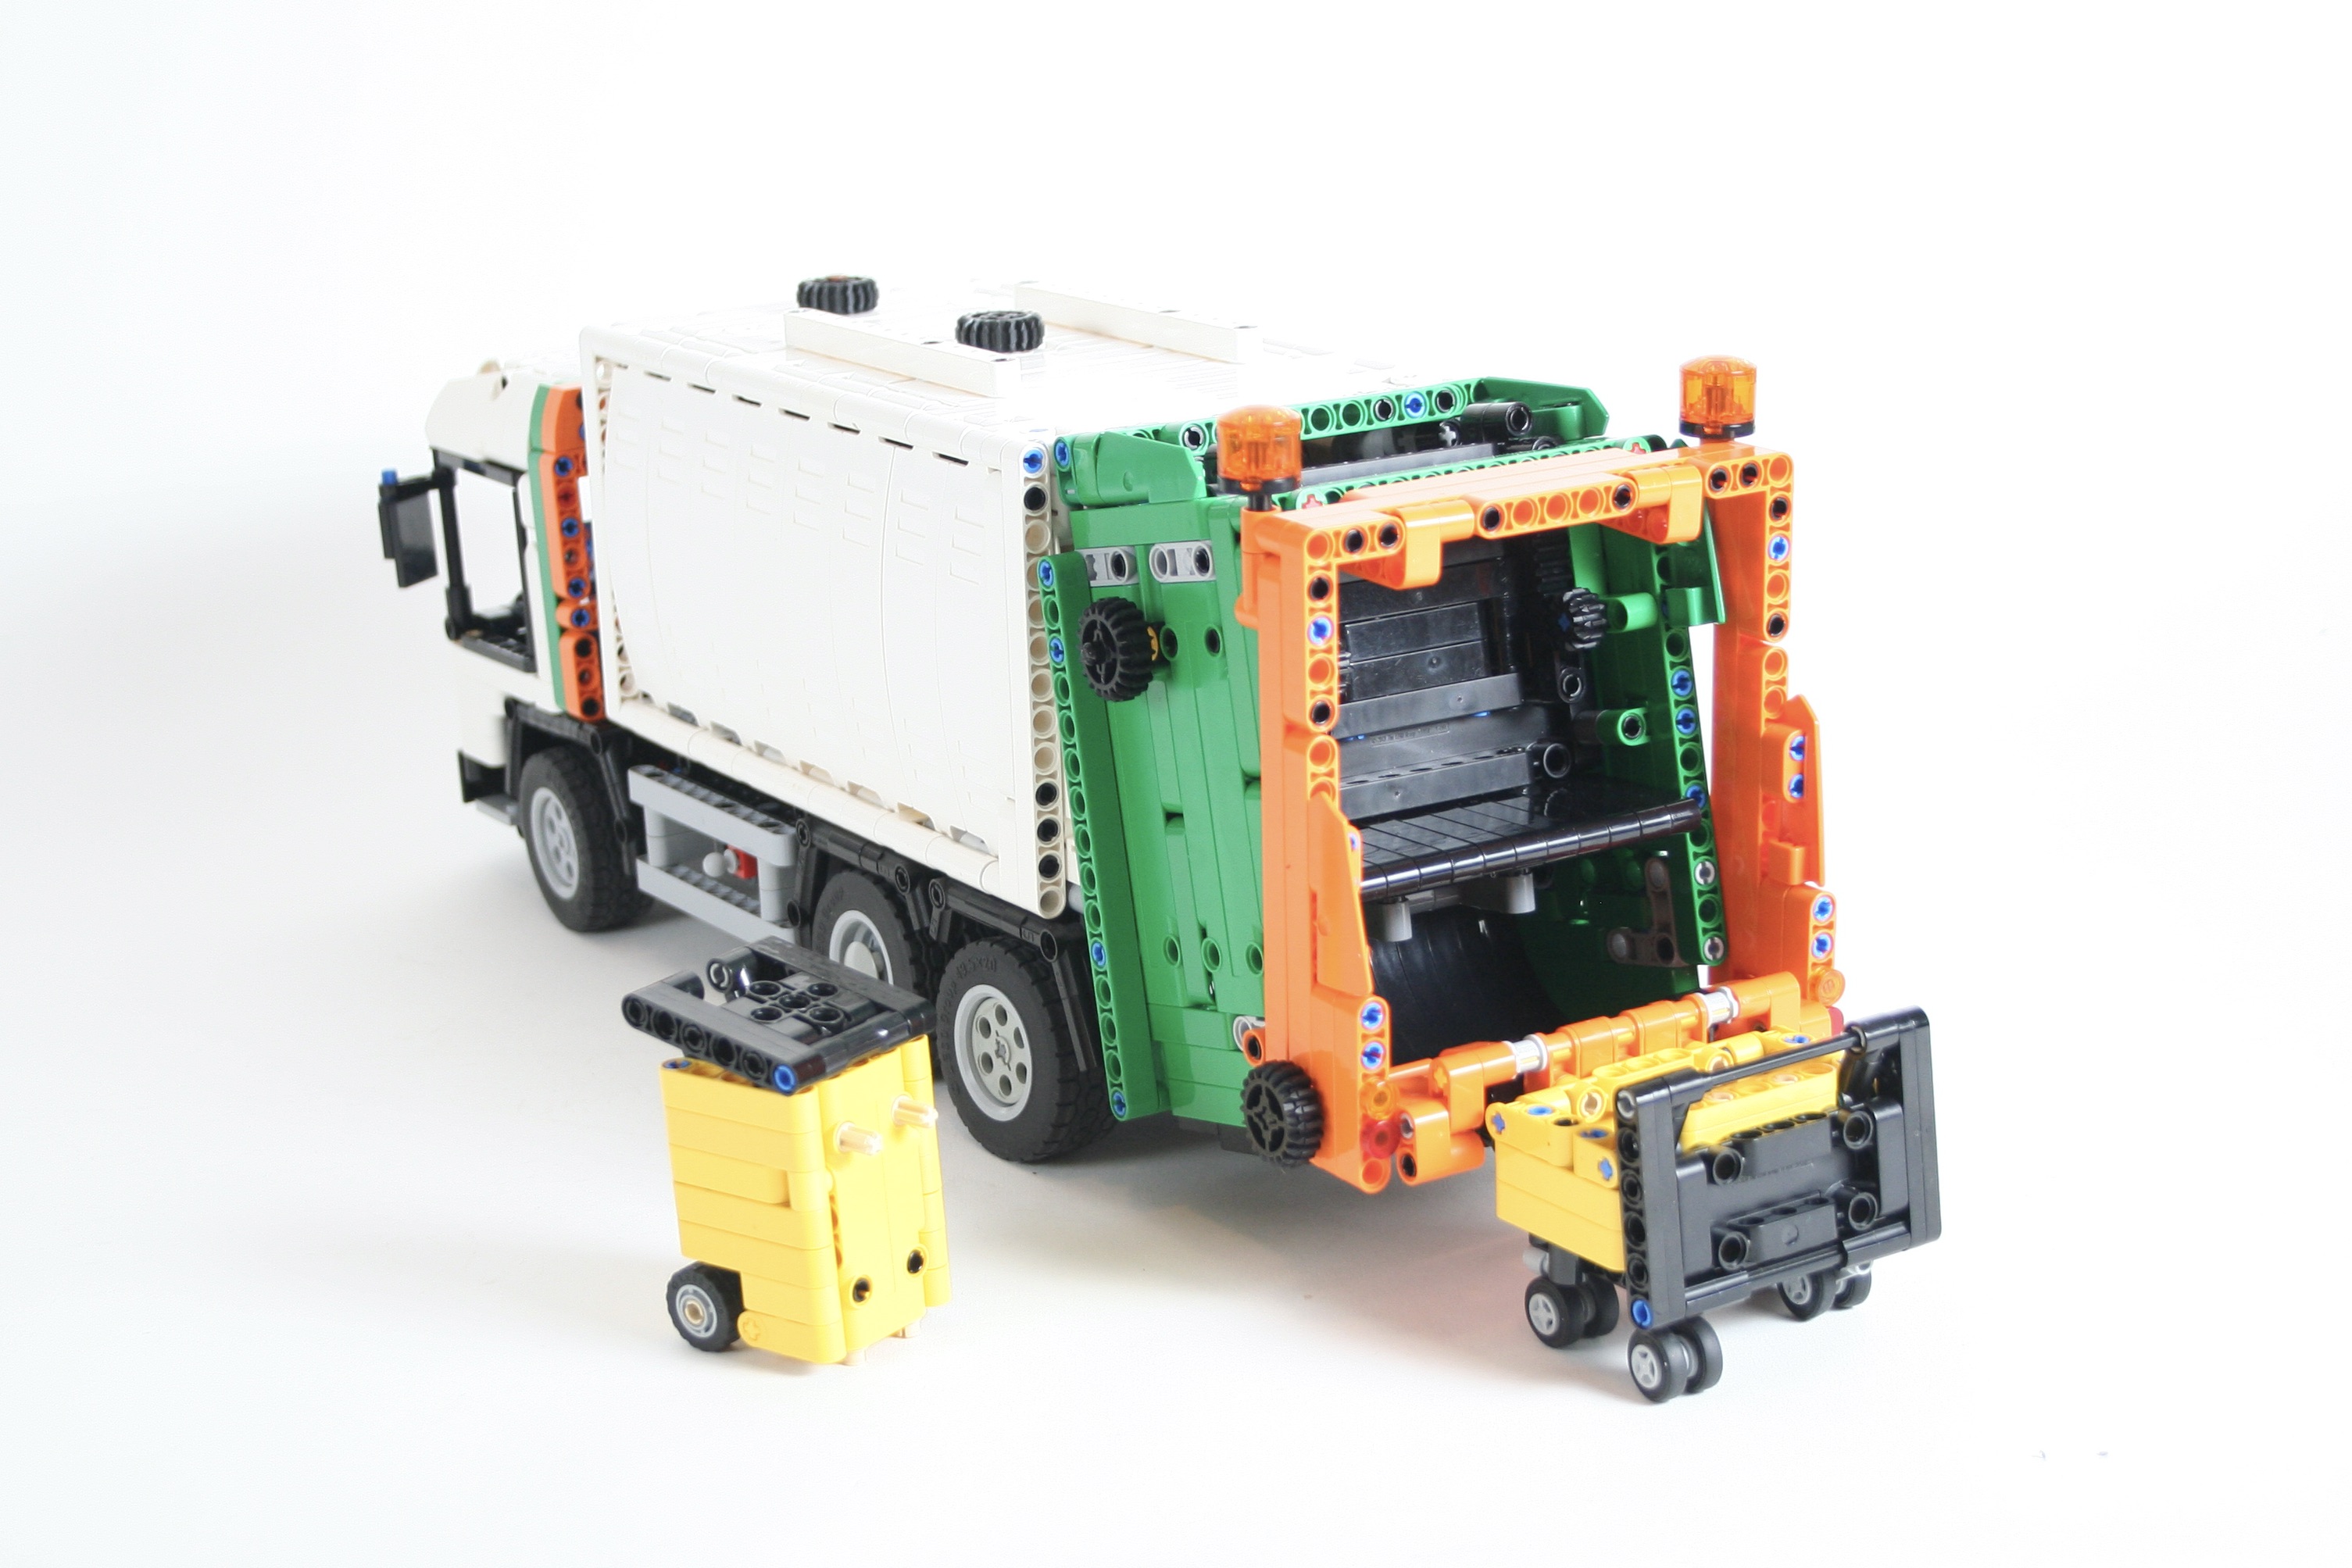
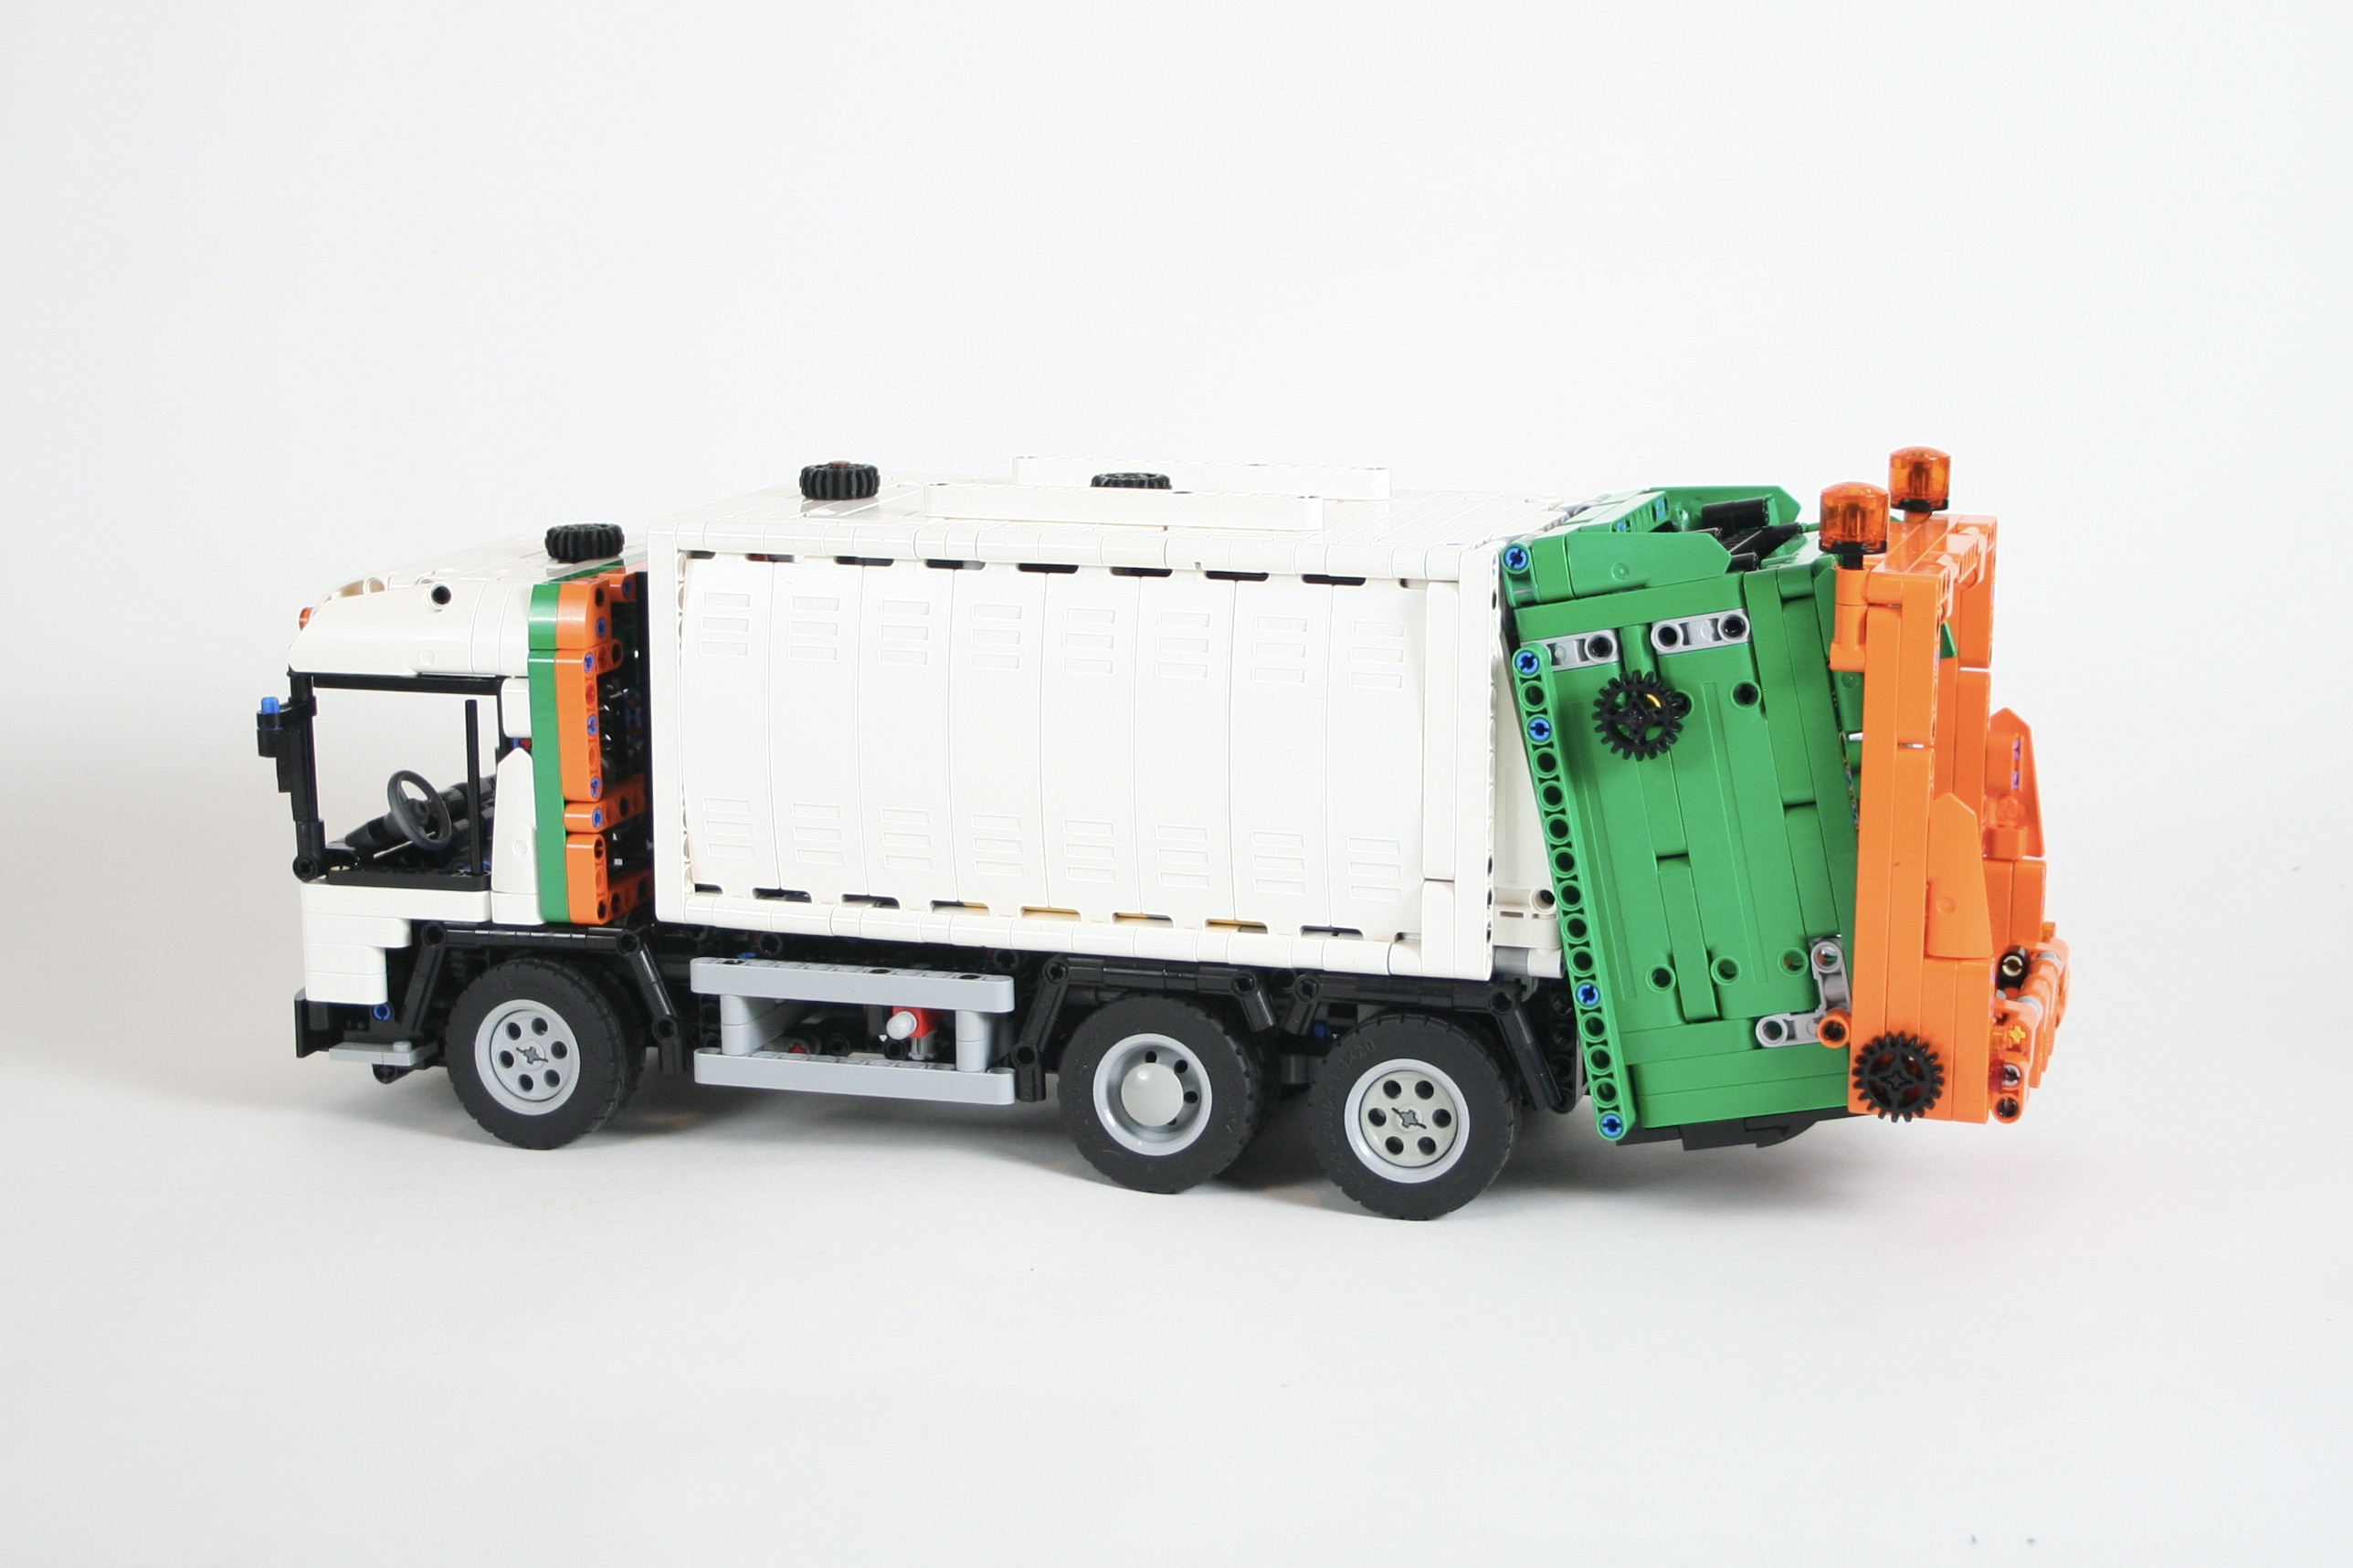
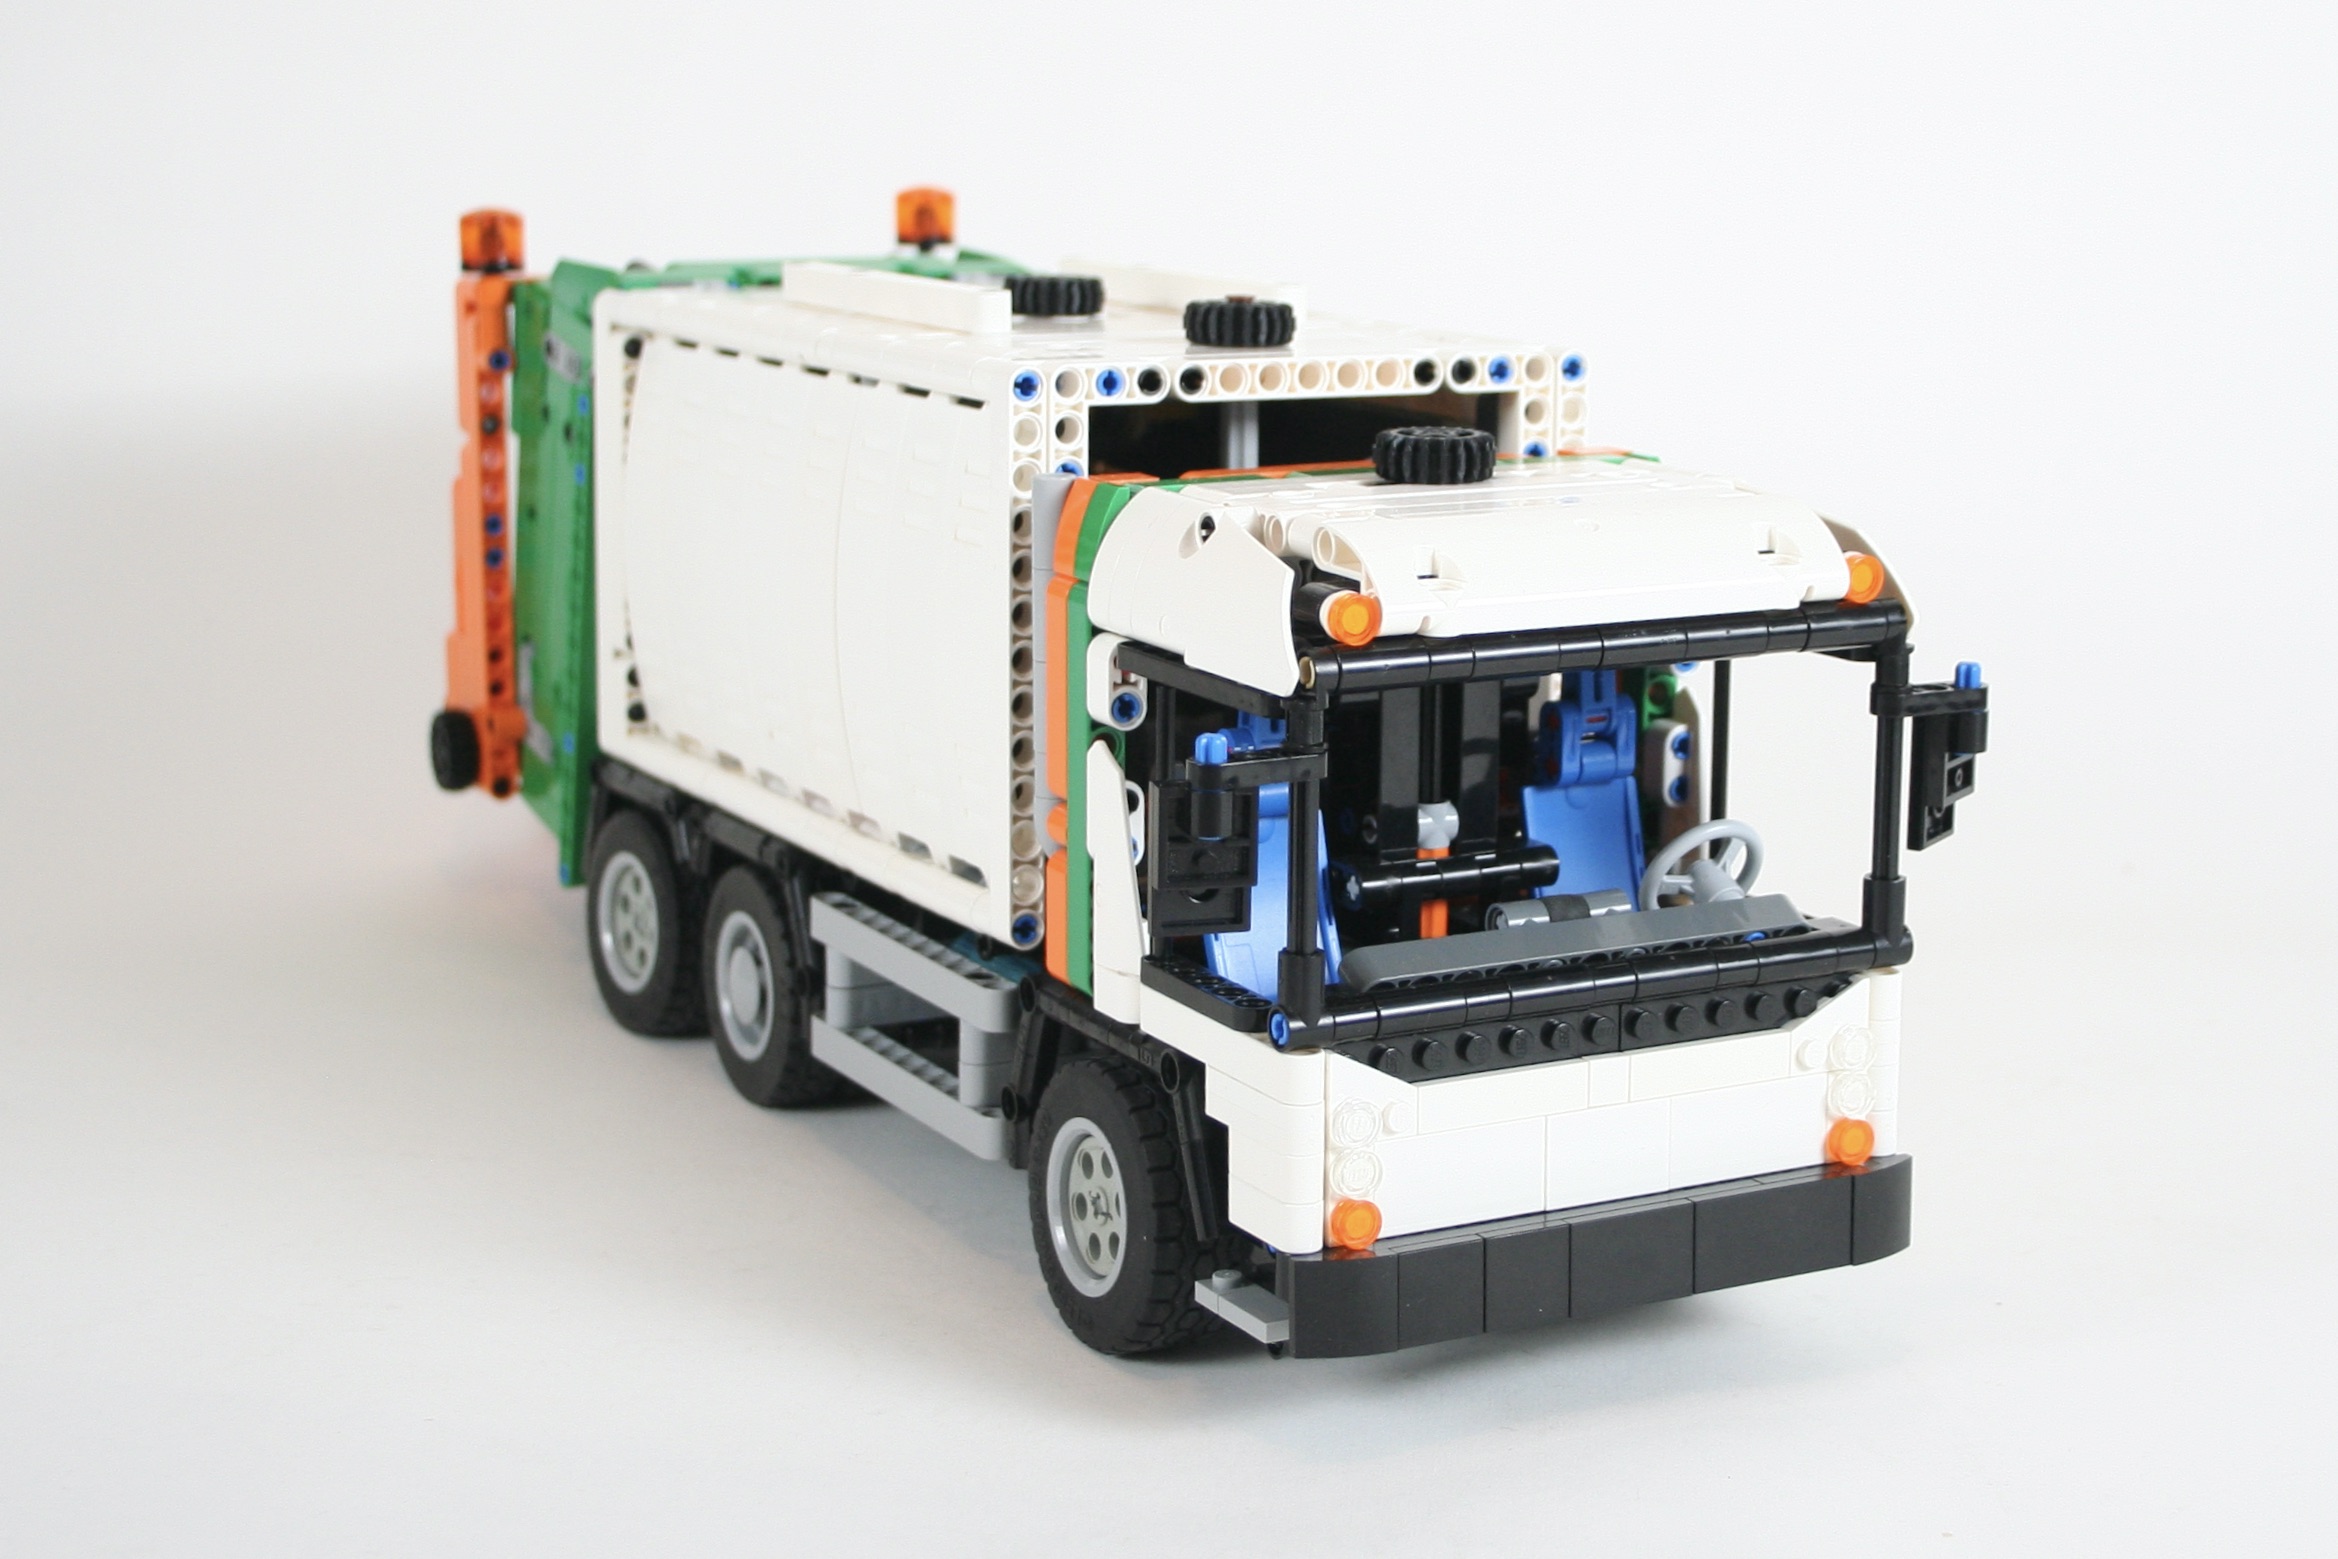
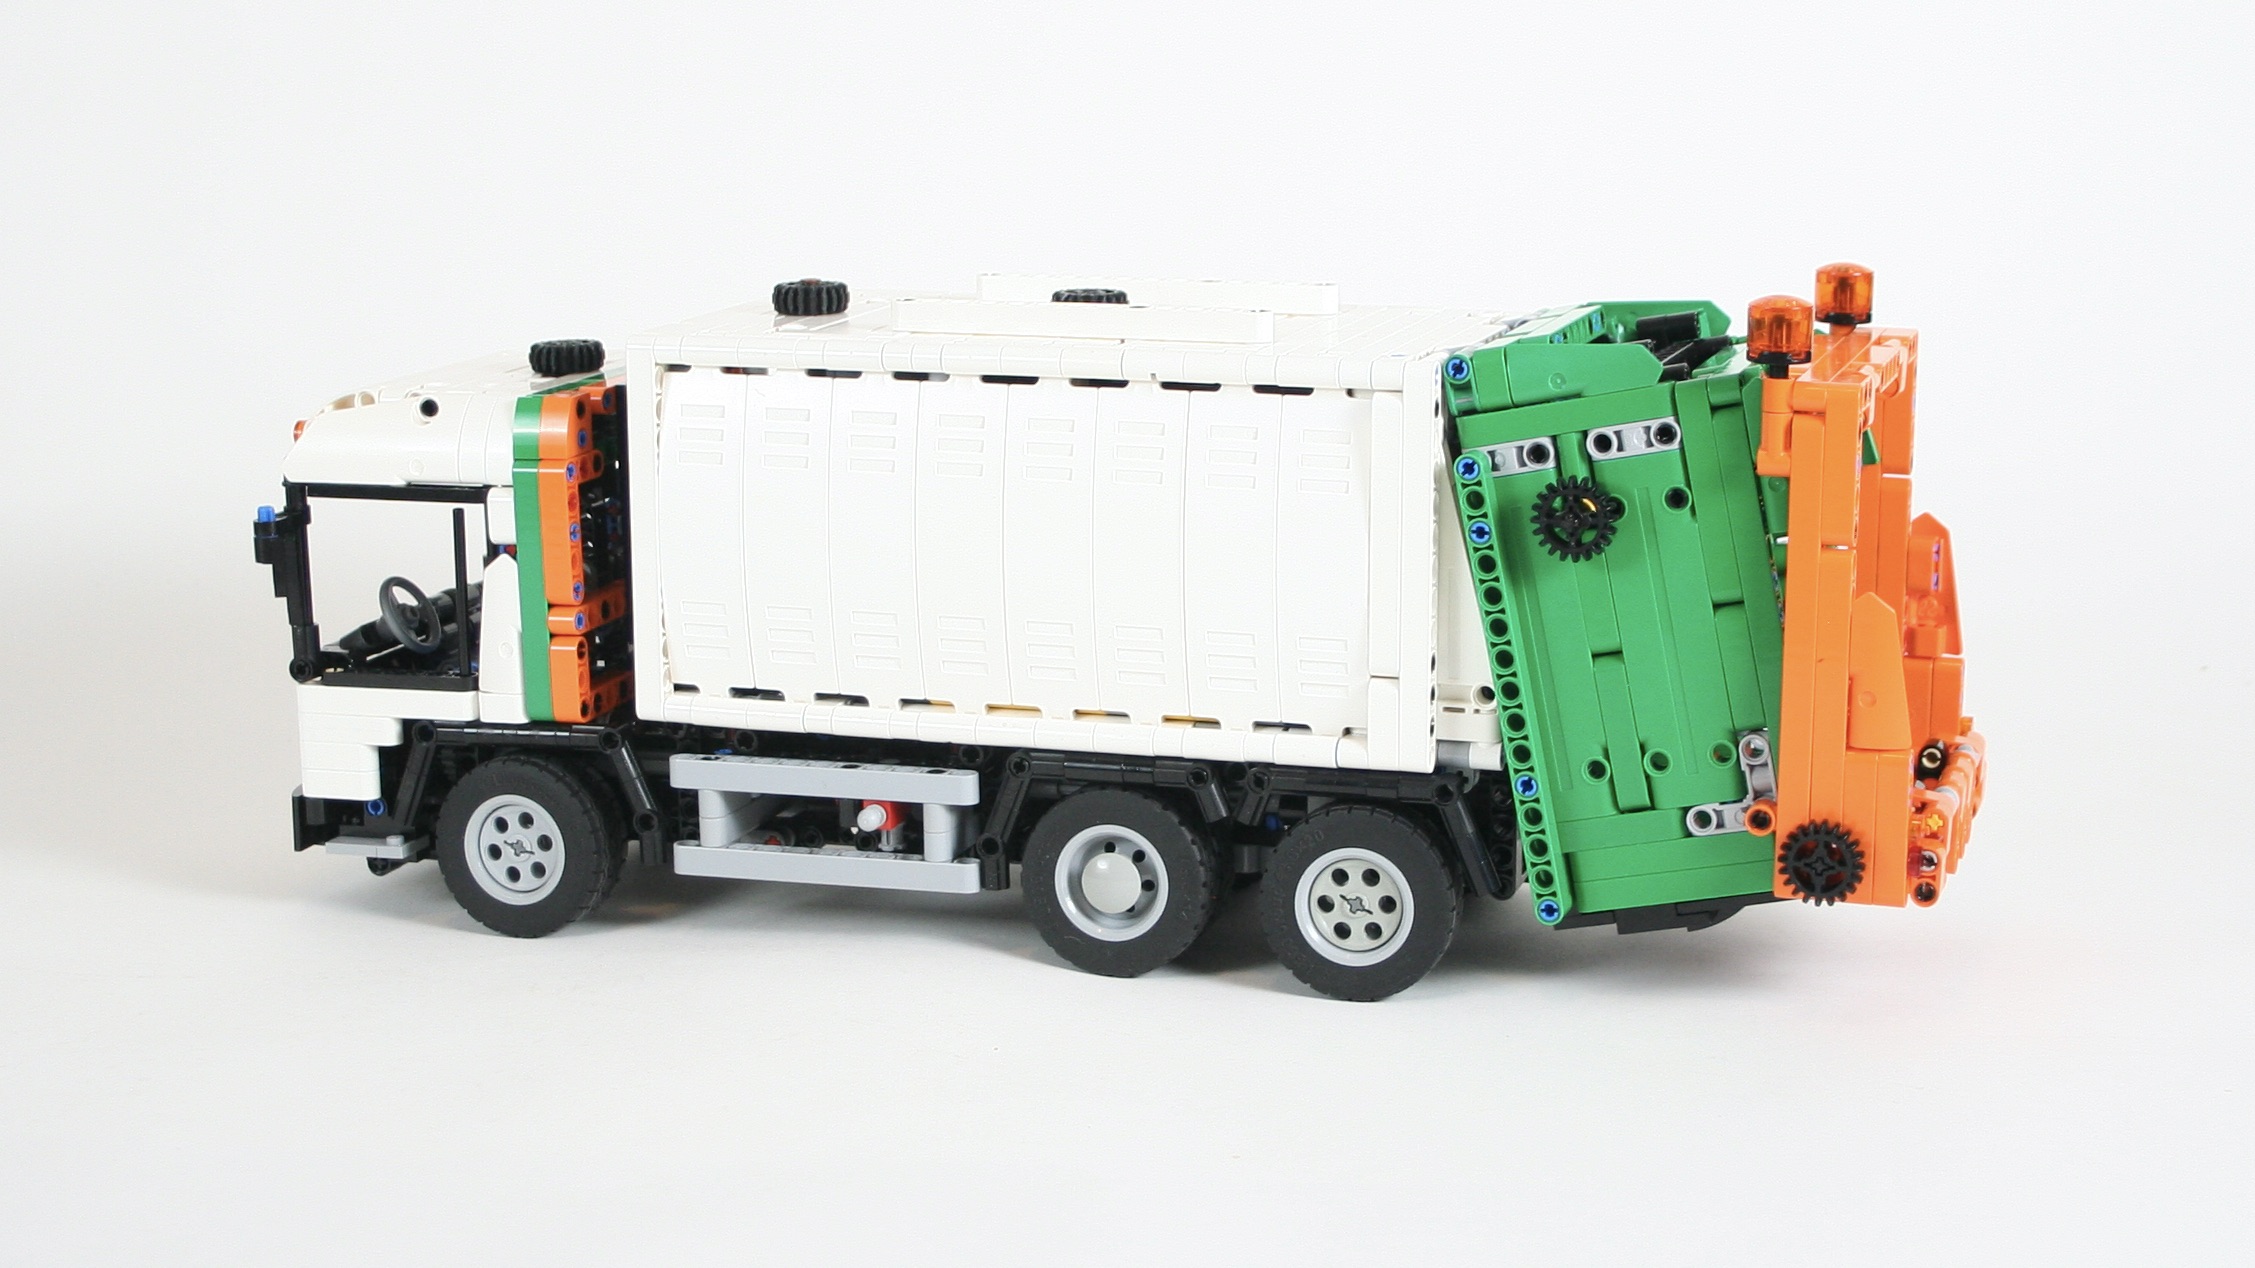
I like trucks, and I like building them. Garbage trucks are the most interested to me. Not only do they look interesting to my eyes, but mechanically they have a lot going on inside of them. Naturally, recreating this out of LEGO fits well with the type of building I enjoy. When I started on this project, I settled on a couple of standards. First, it would be 1:21 scale, second, it would be manually functioned, and finally, it would be a rear loader.
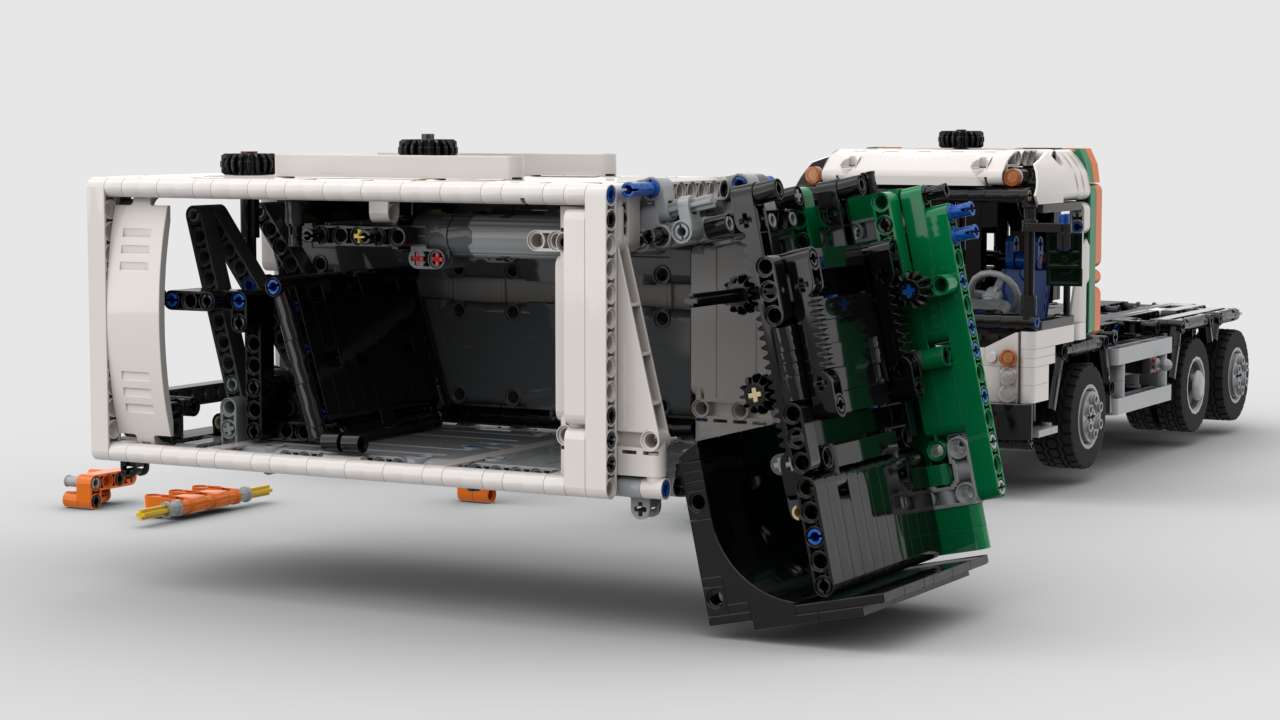
I worked on this model differently than I normally do. Generally I design a crude frame, and place all the mechanical aspects on this frame, and slowly build out the rest of model until it is done. On the garbage truck, I worked on three sections on the build in tandem: the chassis, the body, and the compactor.
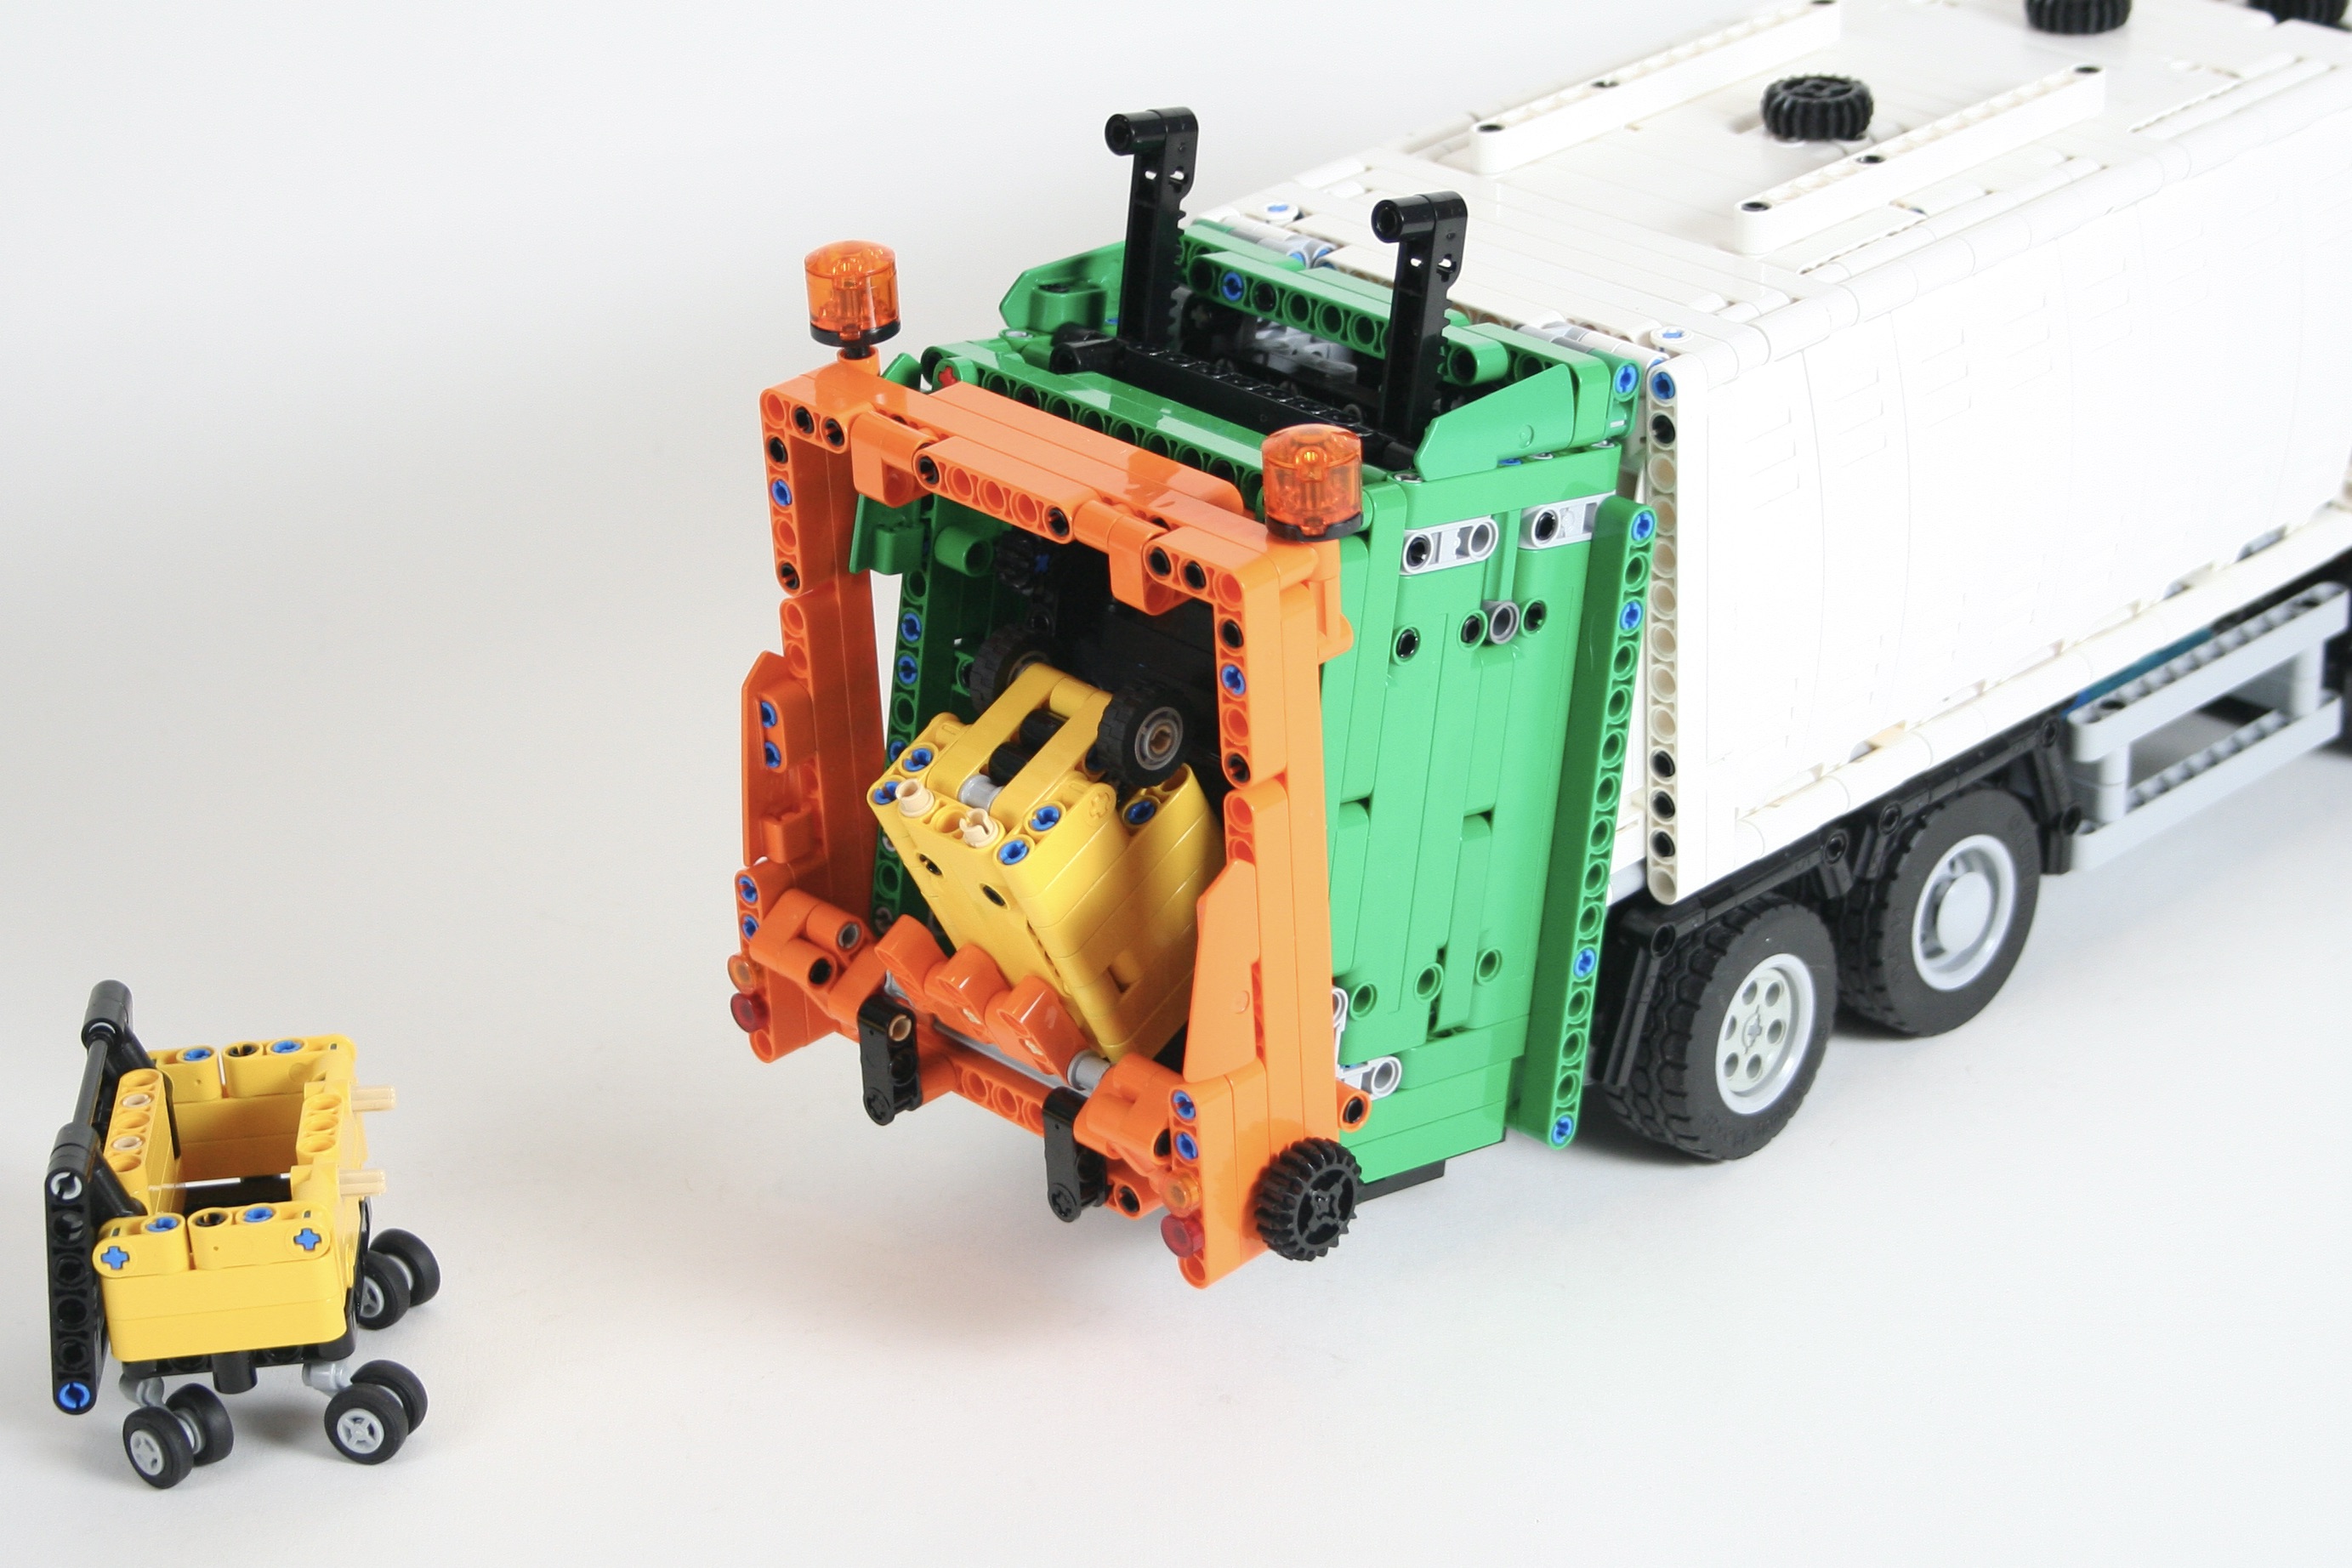
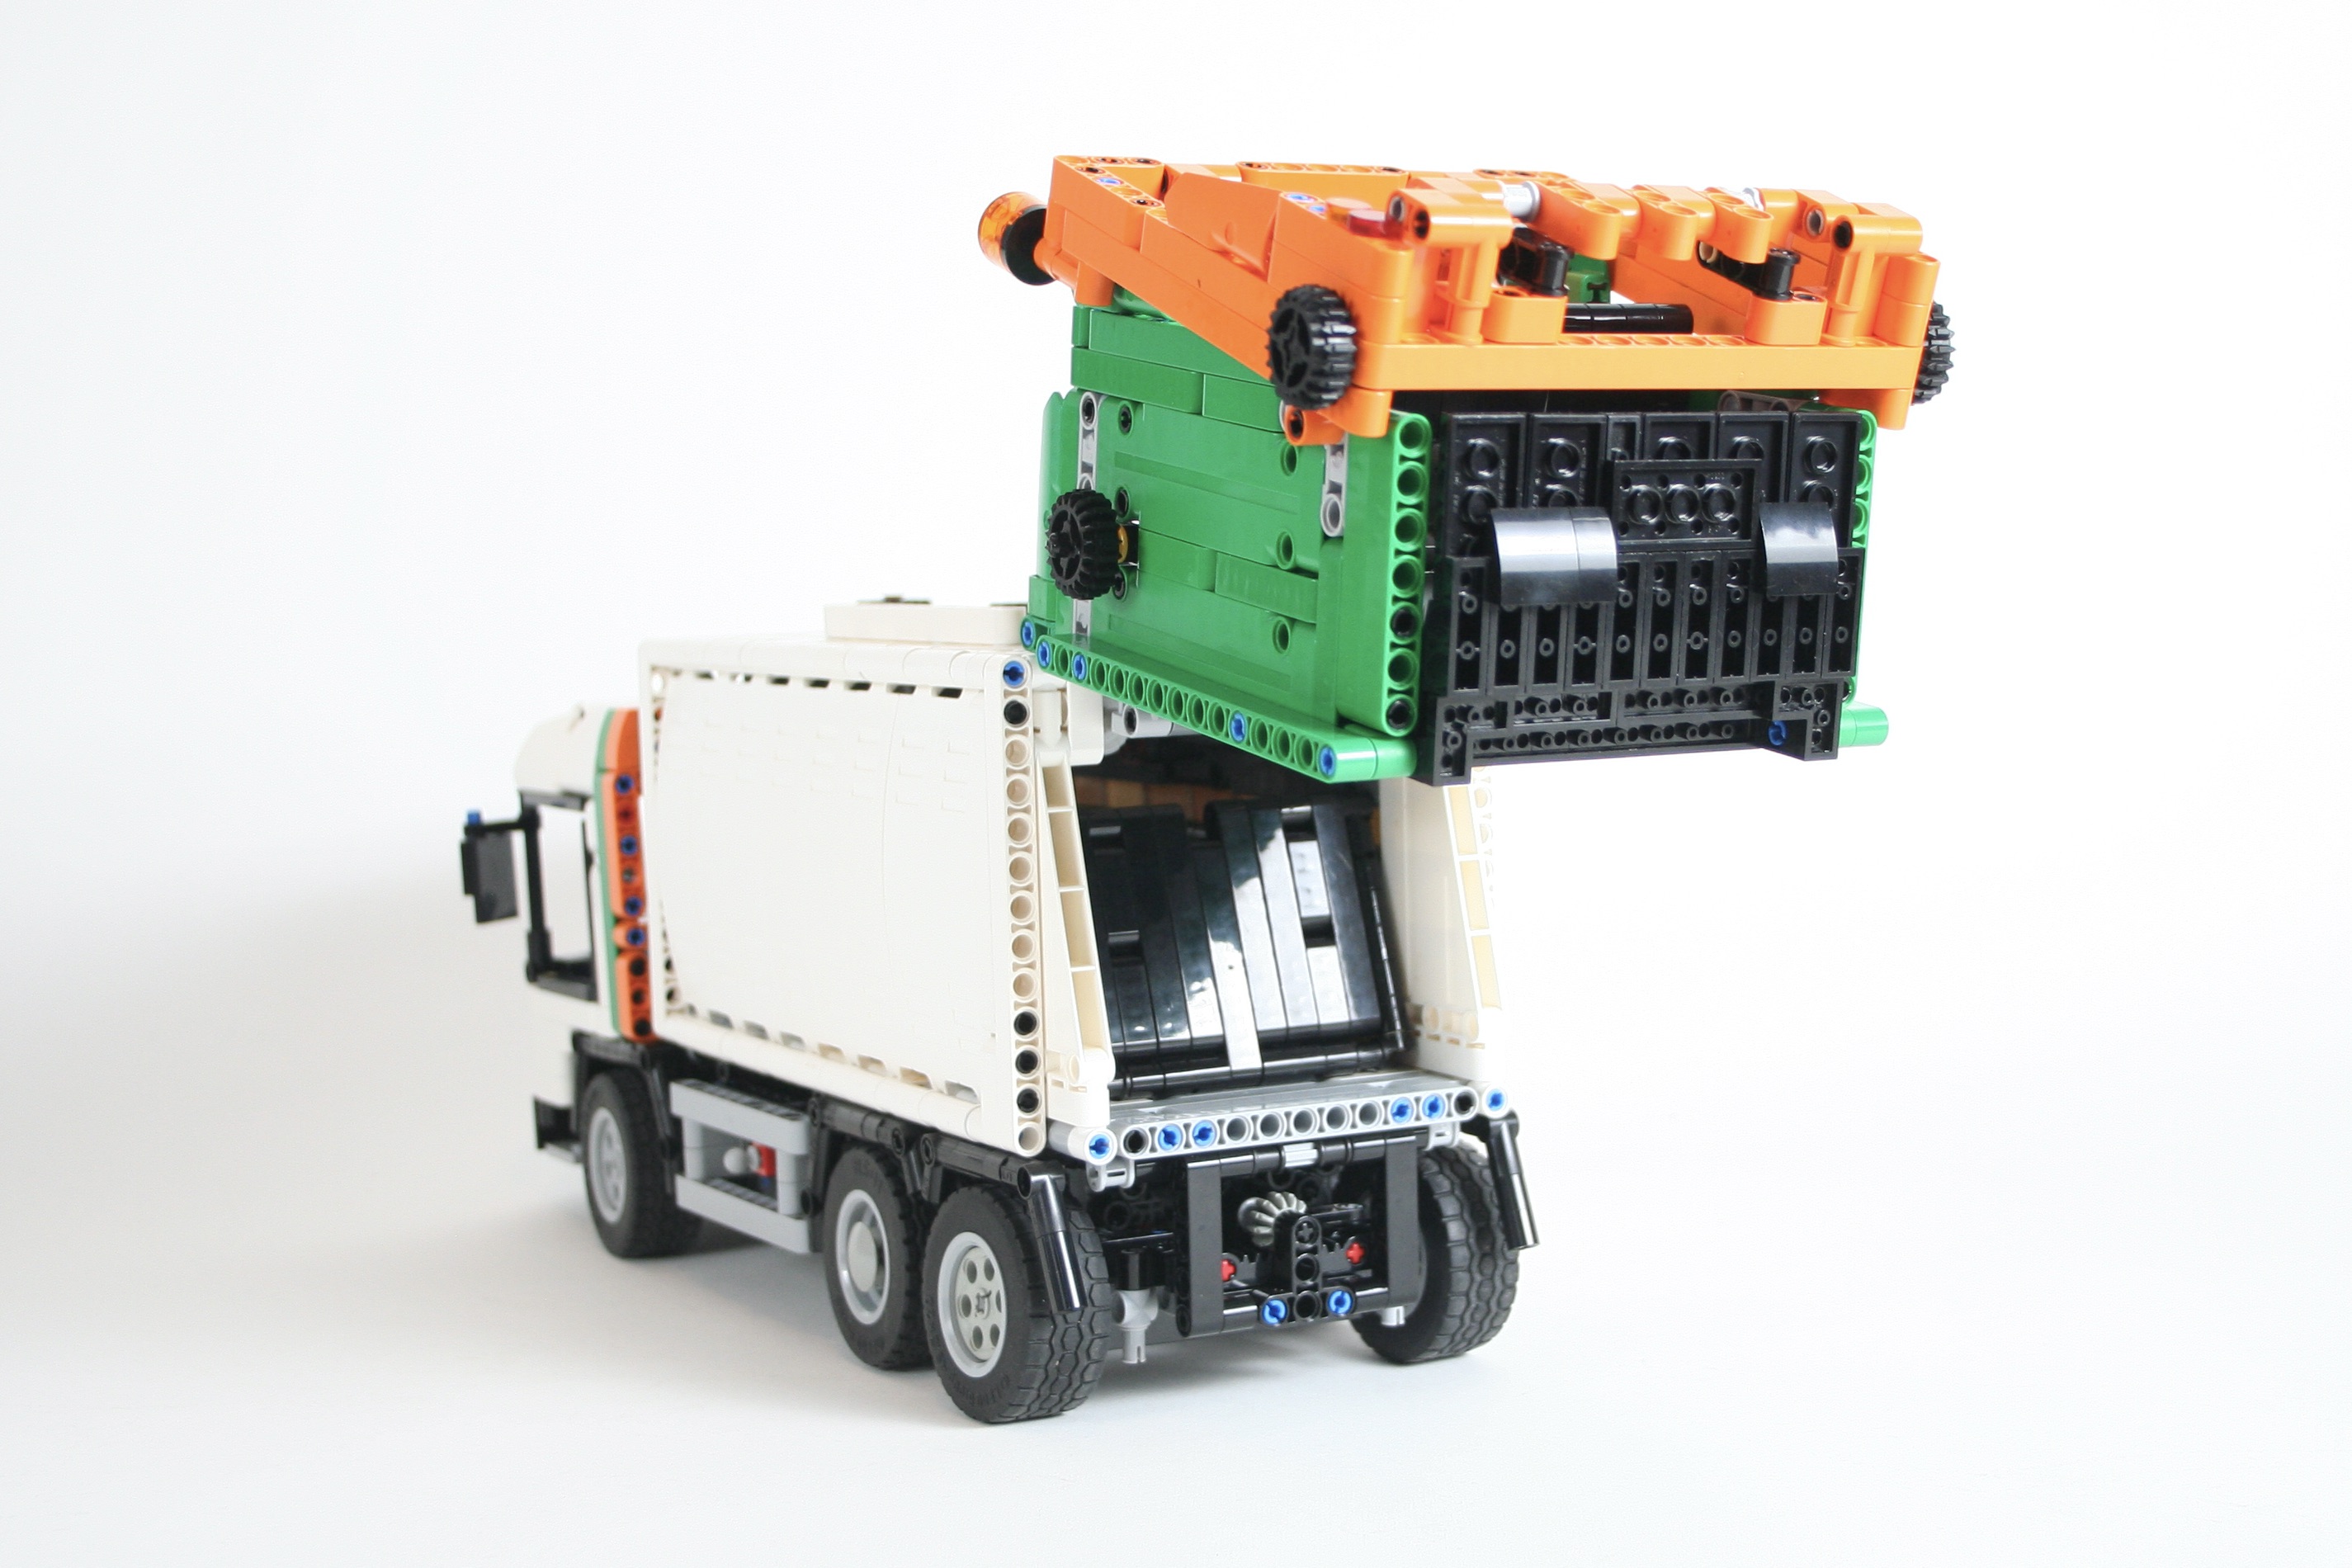
The compactor started first, and was the hardest to get right. I settled on a function that is controlled by one gear on the left of the truck. The gear moves the compactor door mount, and an interval resistance gear allows for movement of the compactor plate. The one gear controls the two movements. So when trash is added to the hopper, moving the gear extends the door down, pivots the plate, moves the door up, and then pivots the plate open again.
The body was started soon, and would need to work hand in hand with both the compactor and the chassis. The body would house both the extractor plate to push trash out of the truck, and the mechanism to pivot the compactor up to open. These two functions were simple to design, but what took the most time was making sure the body was strong to support the functions and the rear compactor, and to be smooth internally to make sure trash would not get stuck.
The chassis followed a more common building process. I started with the hardpoints like the wheelbase, length and engine placement, and slowly added in all the other parts needed. Right from the beginning I decided on a three axle chassis with axle 1 and axle 3 steering. Axle 2 would be the drive axle. As I built, it was clear there was a lot of extra space in the chassis. I added a little hybrid/EV drive to fill the space. The torque from the drive axle routes through a center differential that splits the torque between a fake electric motor and a fake piston engine. A resistance plate is added to the front of the piston engine so the torque will always start with the electric motor. When the speed increases, the torque will overwhelm the resistance plate and start using the fake piston engine too. It works just like a real hybrid engine. A selector is on the left side of the truck to select EV only where only the electric motors is used, or to select hybrid where both are used.
The truck and body are easily connected by four pins at the corner of the body. The cab tilts to make it easy to work on the engine. Finally, I created two small dumpsters for to hold trash. A small one and a larger one, and each fits with on the rear of the truck.
This ended up being one of my favorite models since the Ionos. The truck looks great, but packs lots of functional elements. The hybrid function works great and will be used again for another project. When I presented it at a show people could not get enough of watching the trash get cycled through the compactor. I always enjoy building a garbage truck, and I look forward to the next one I make.
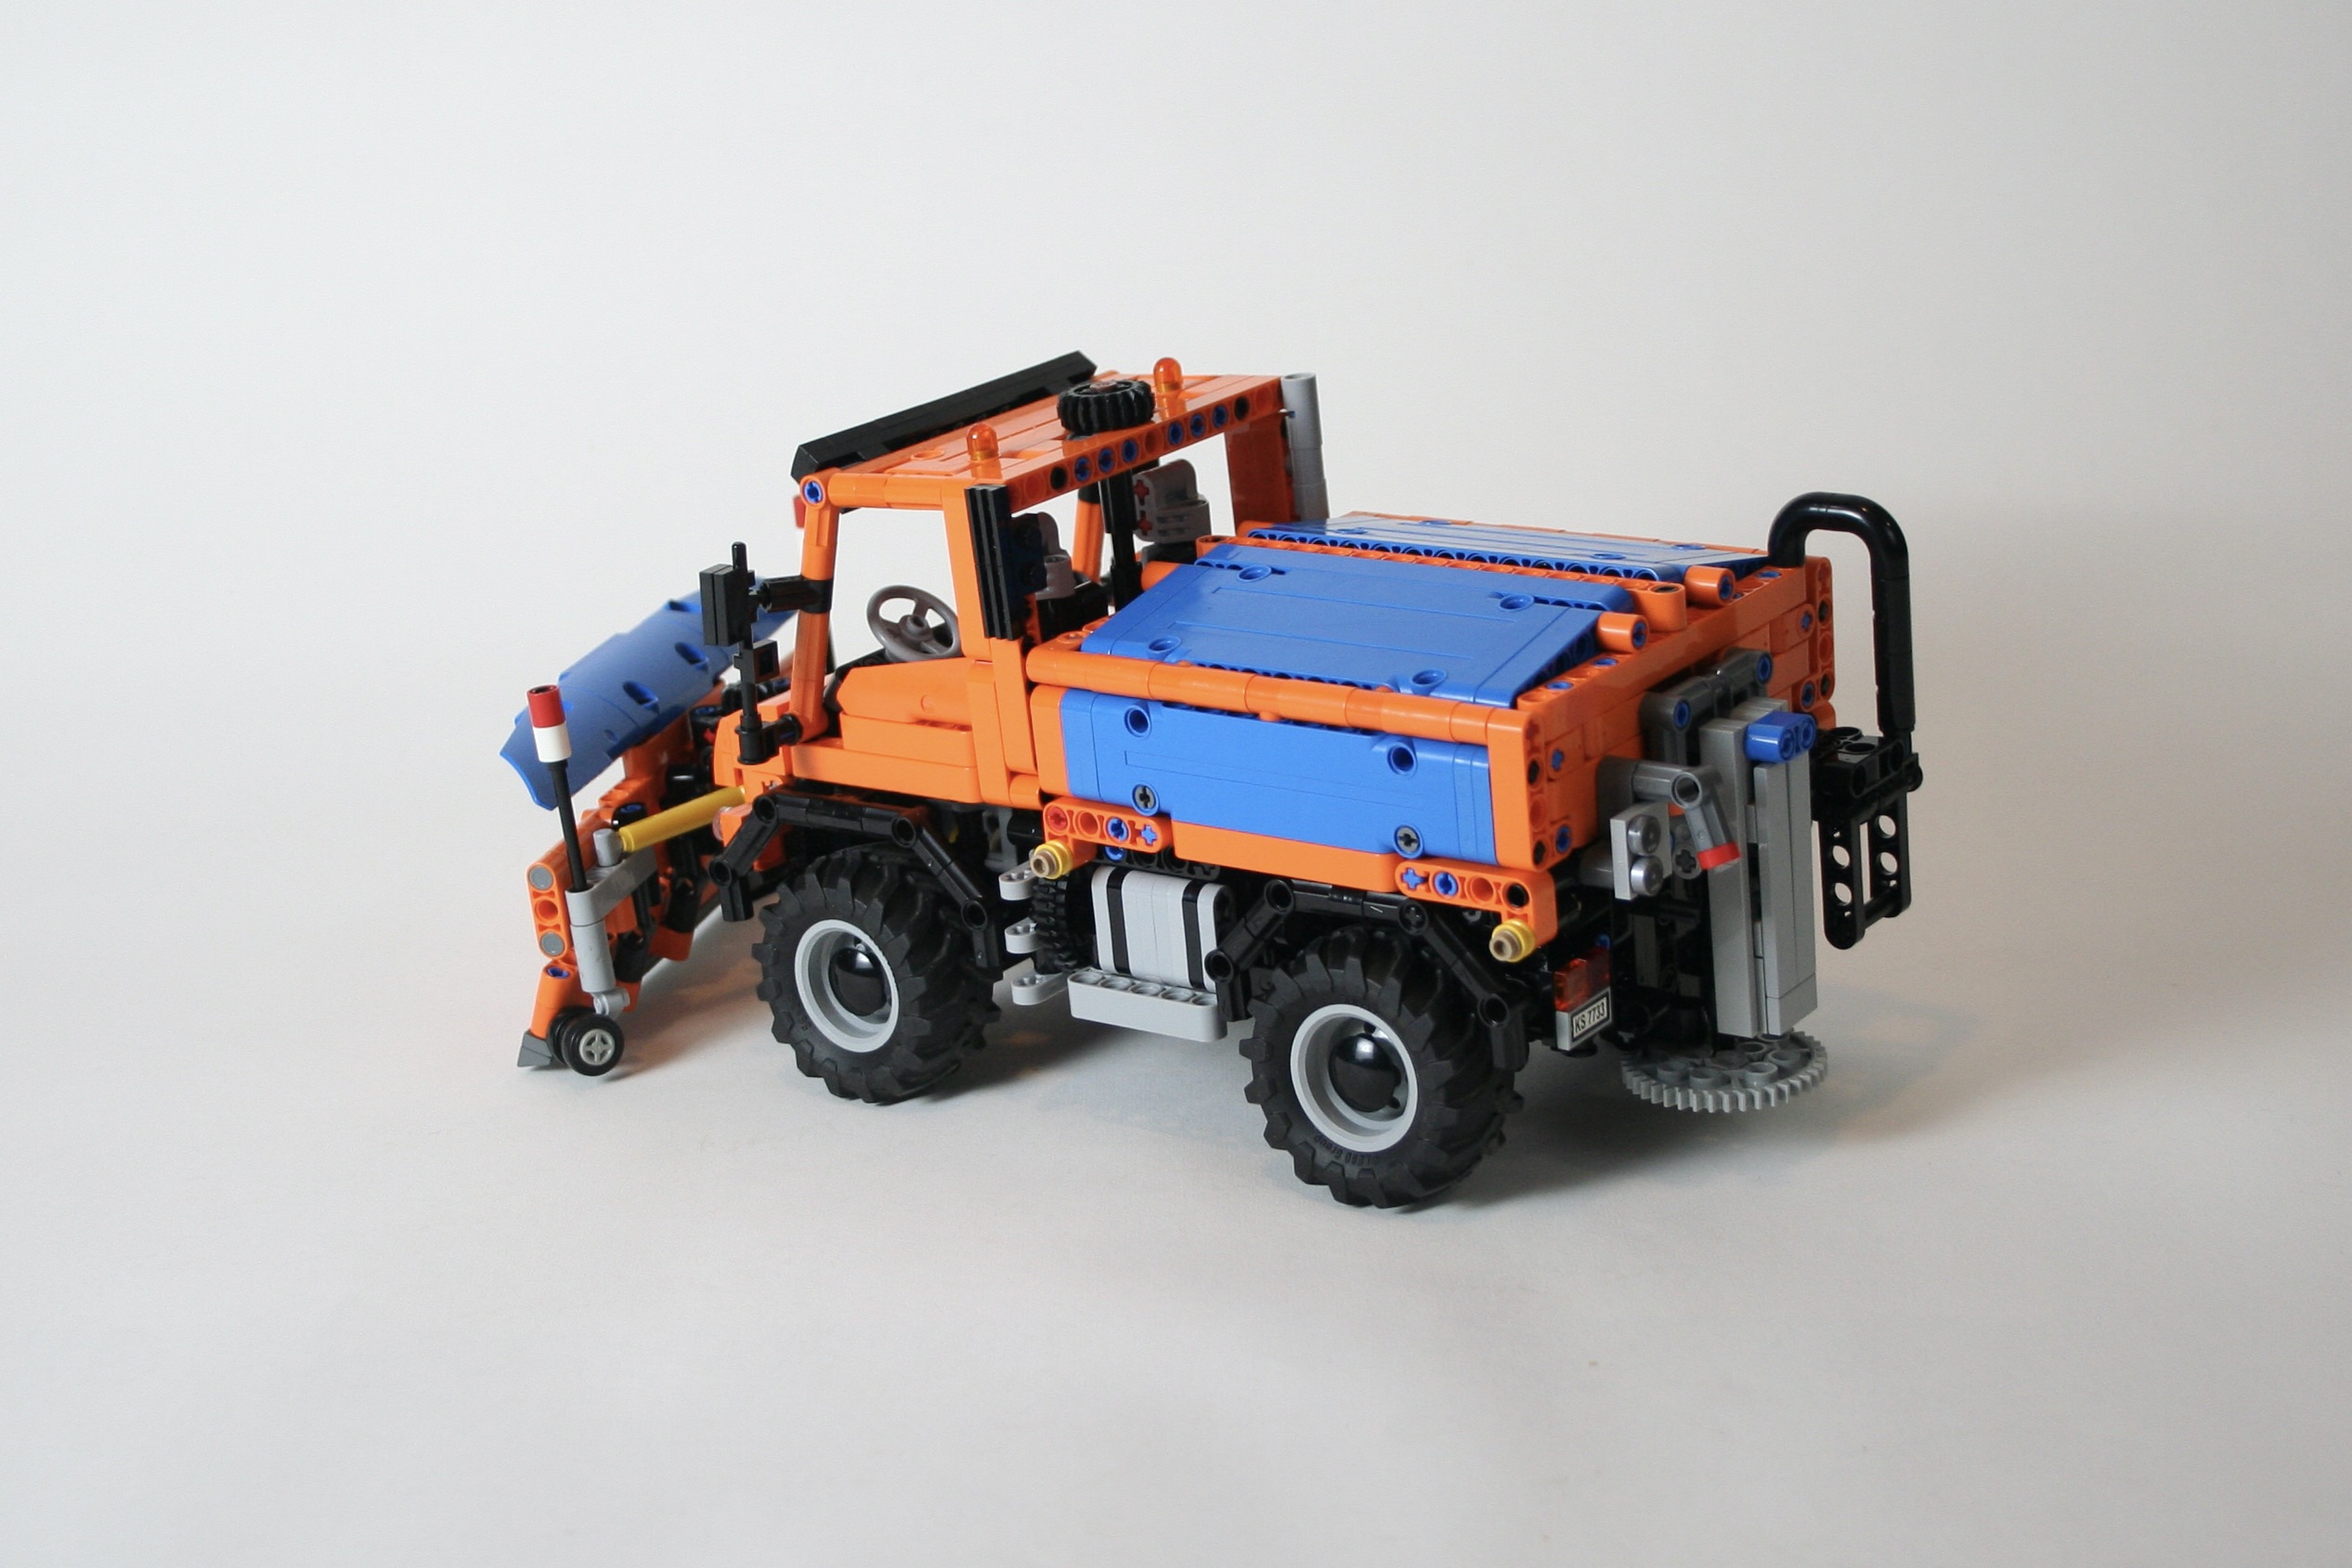
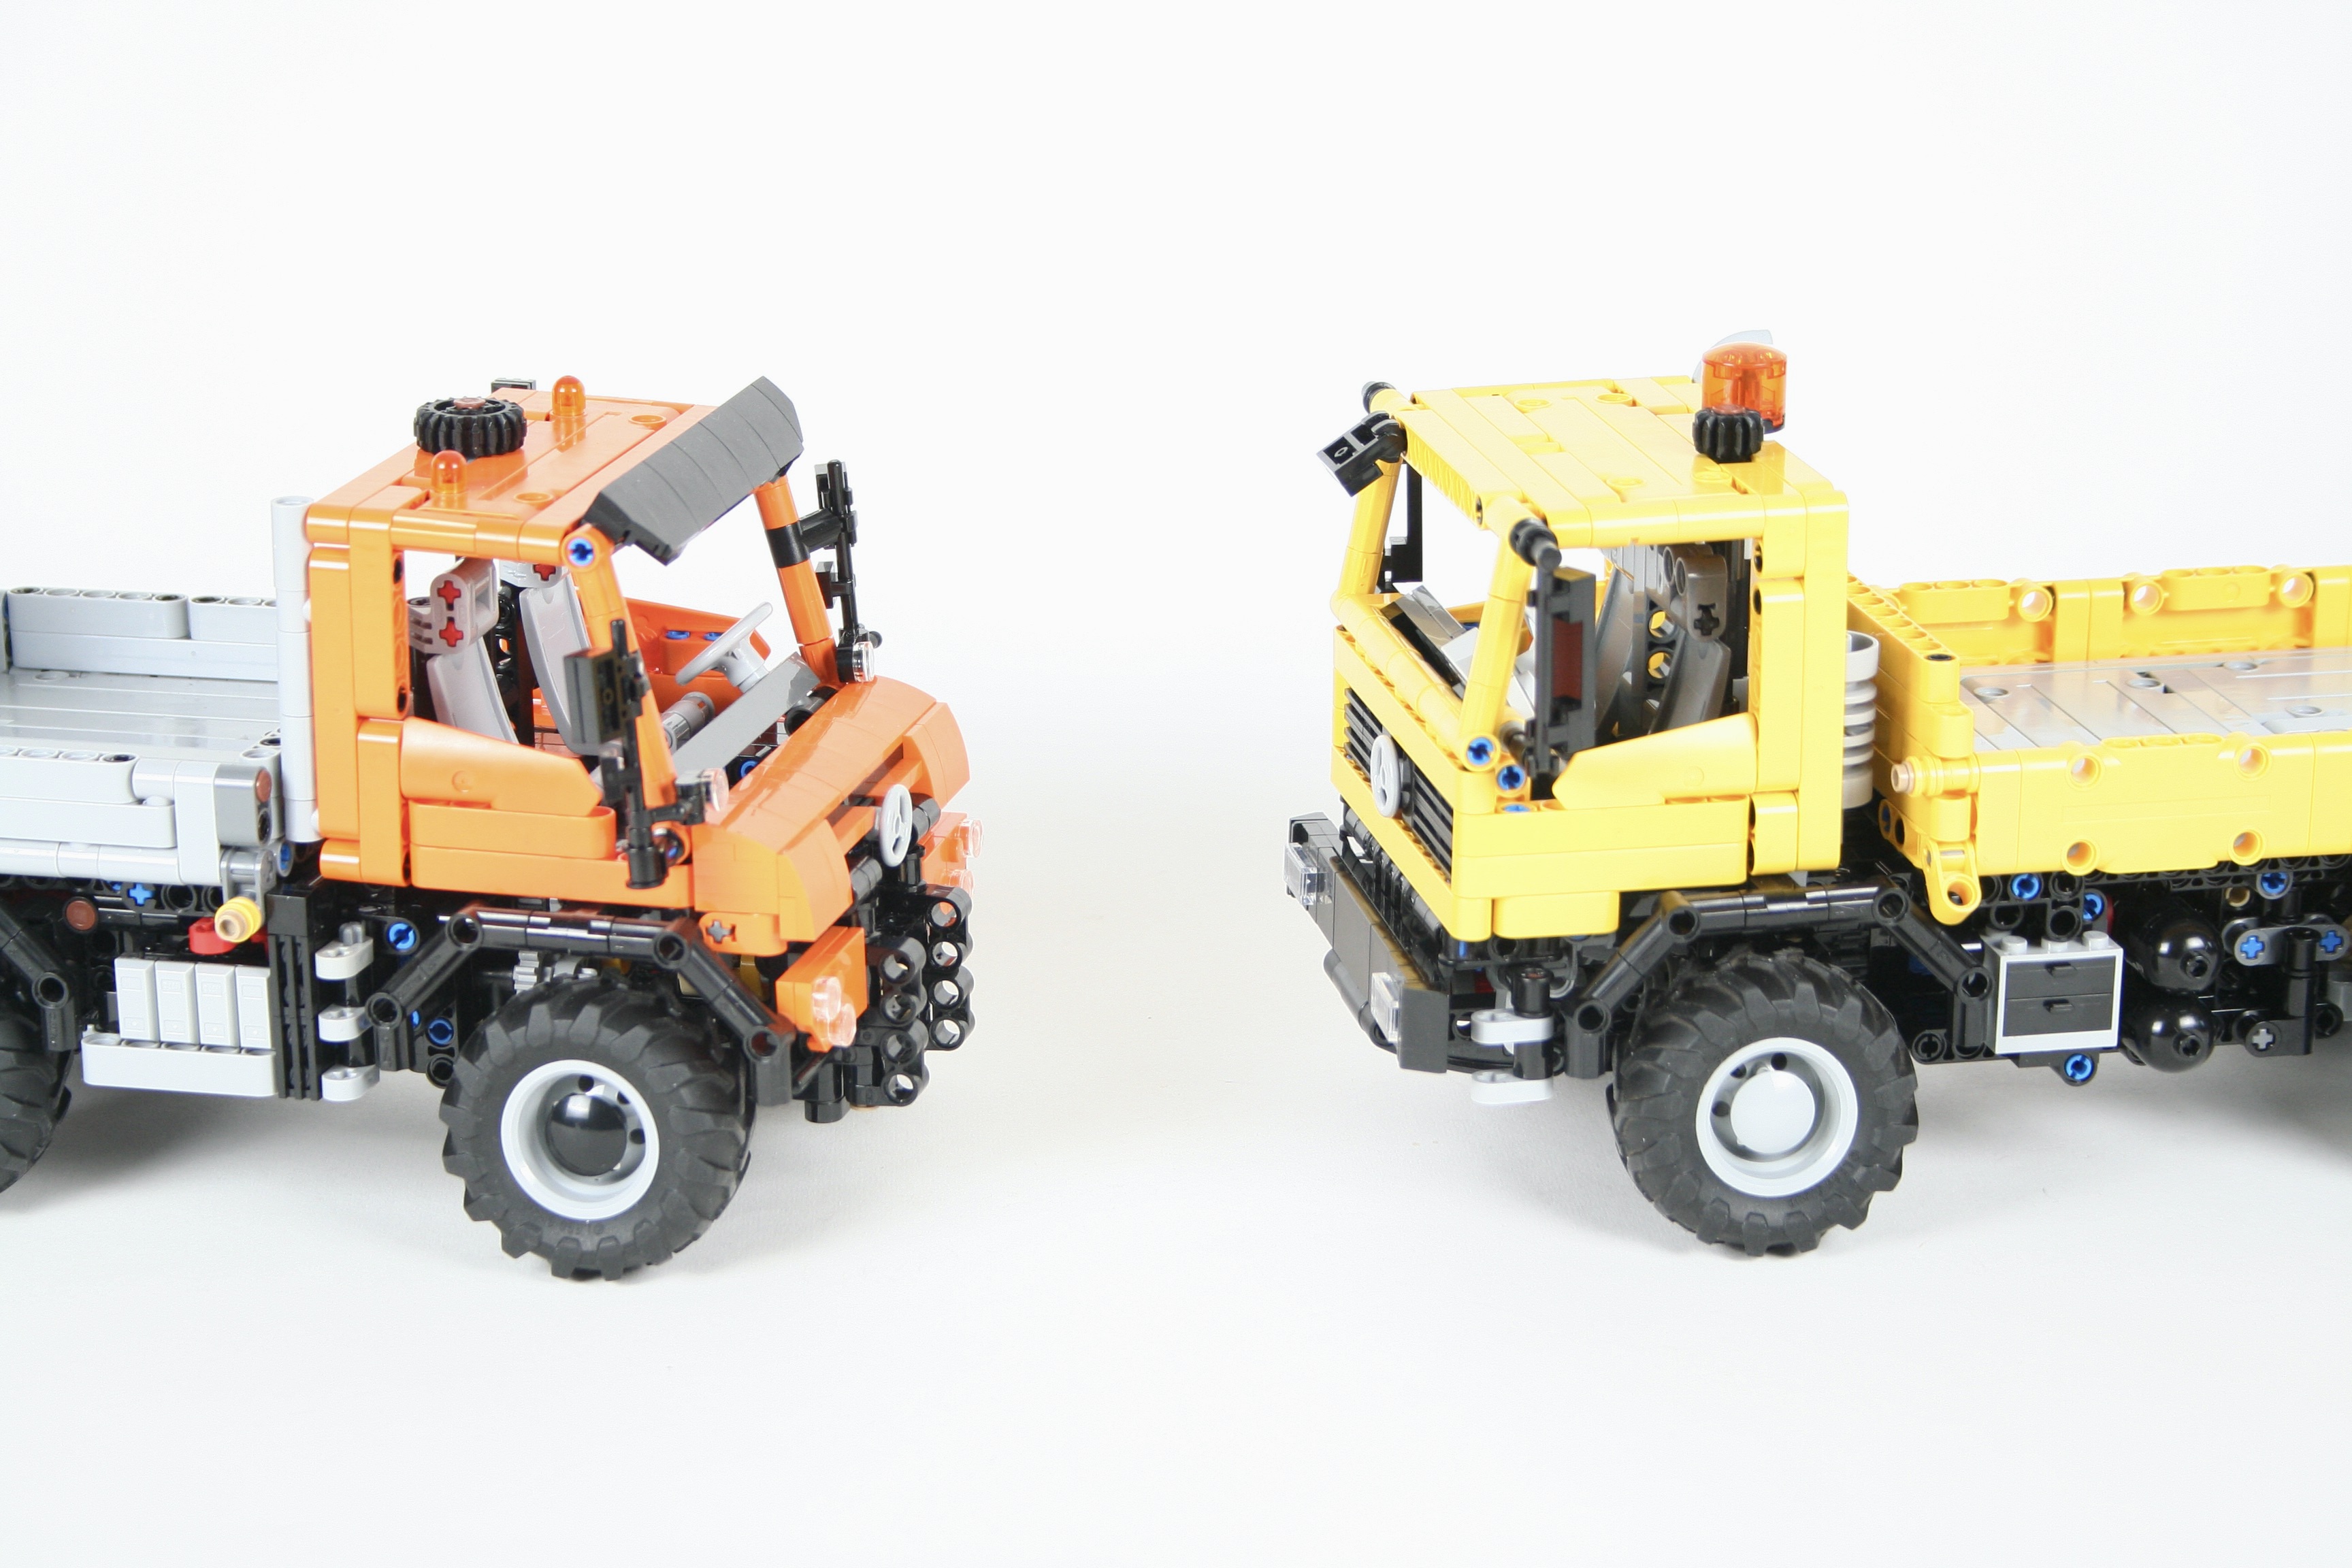
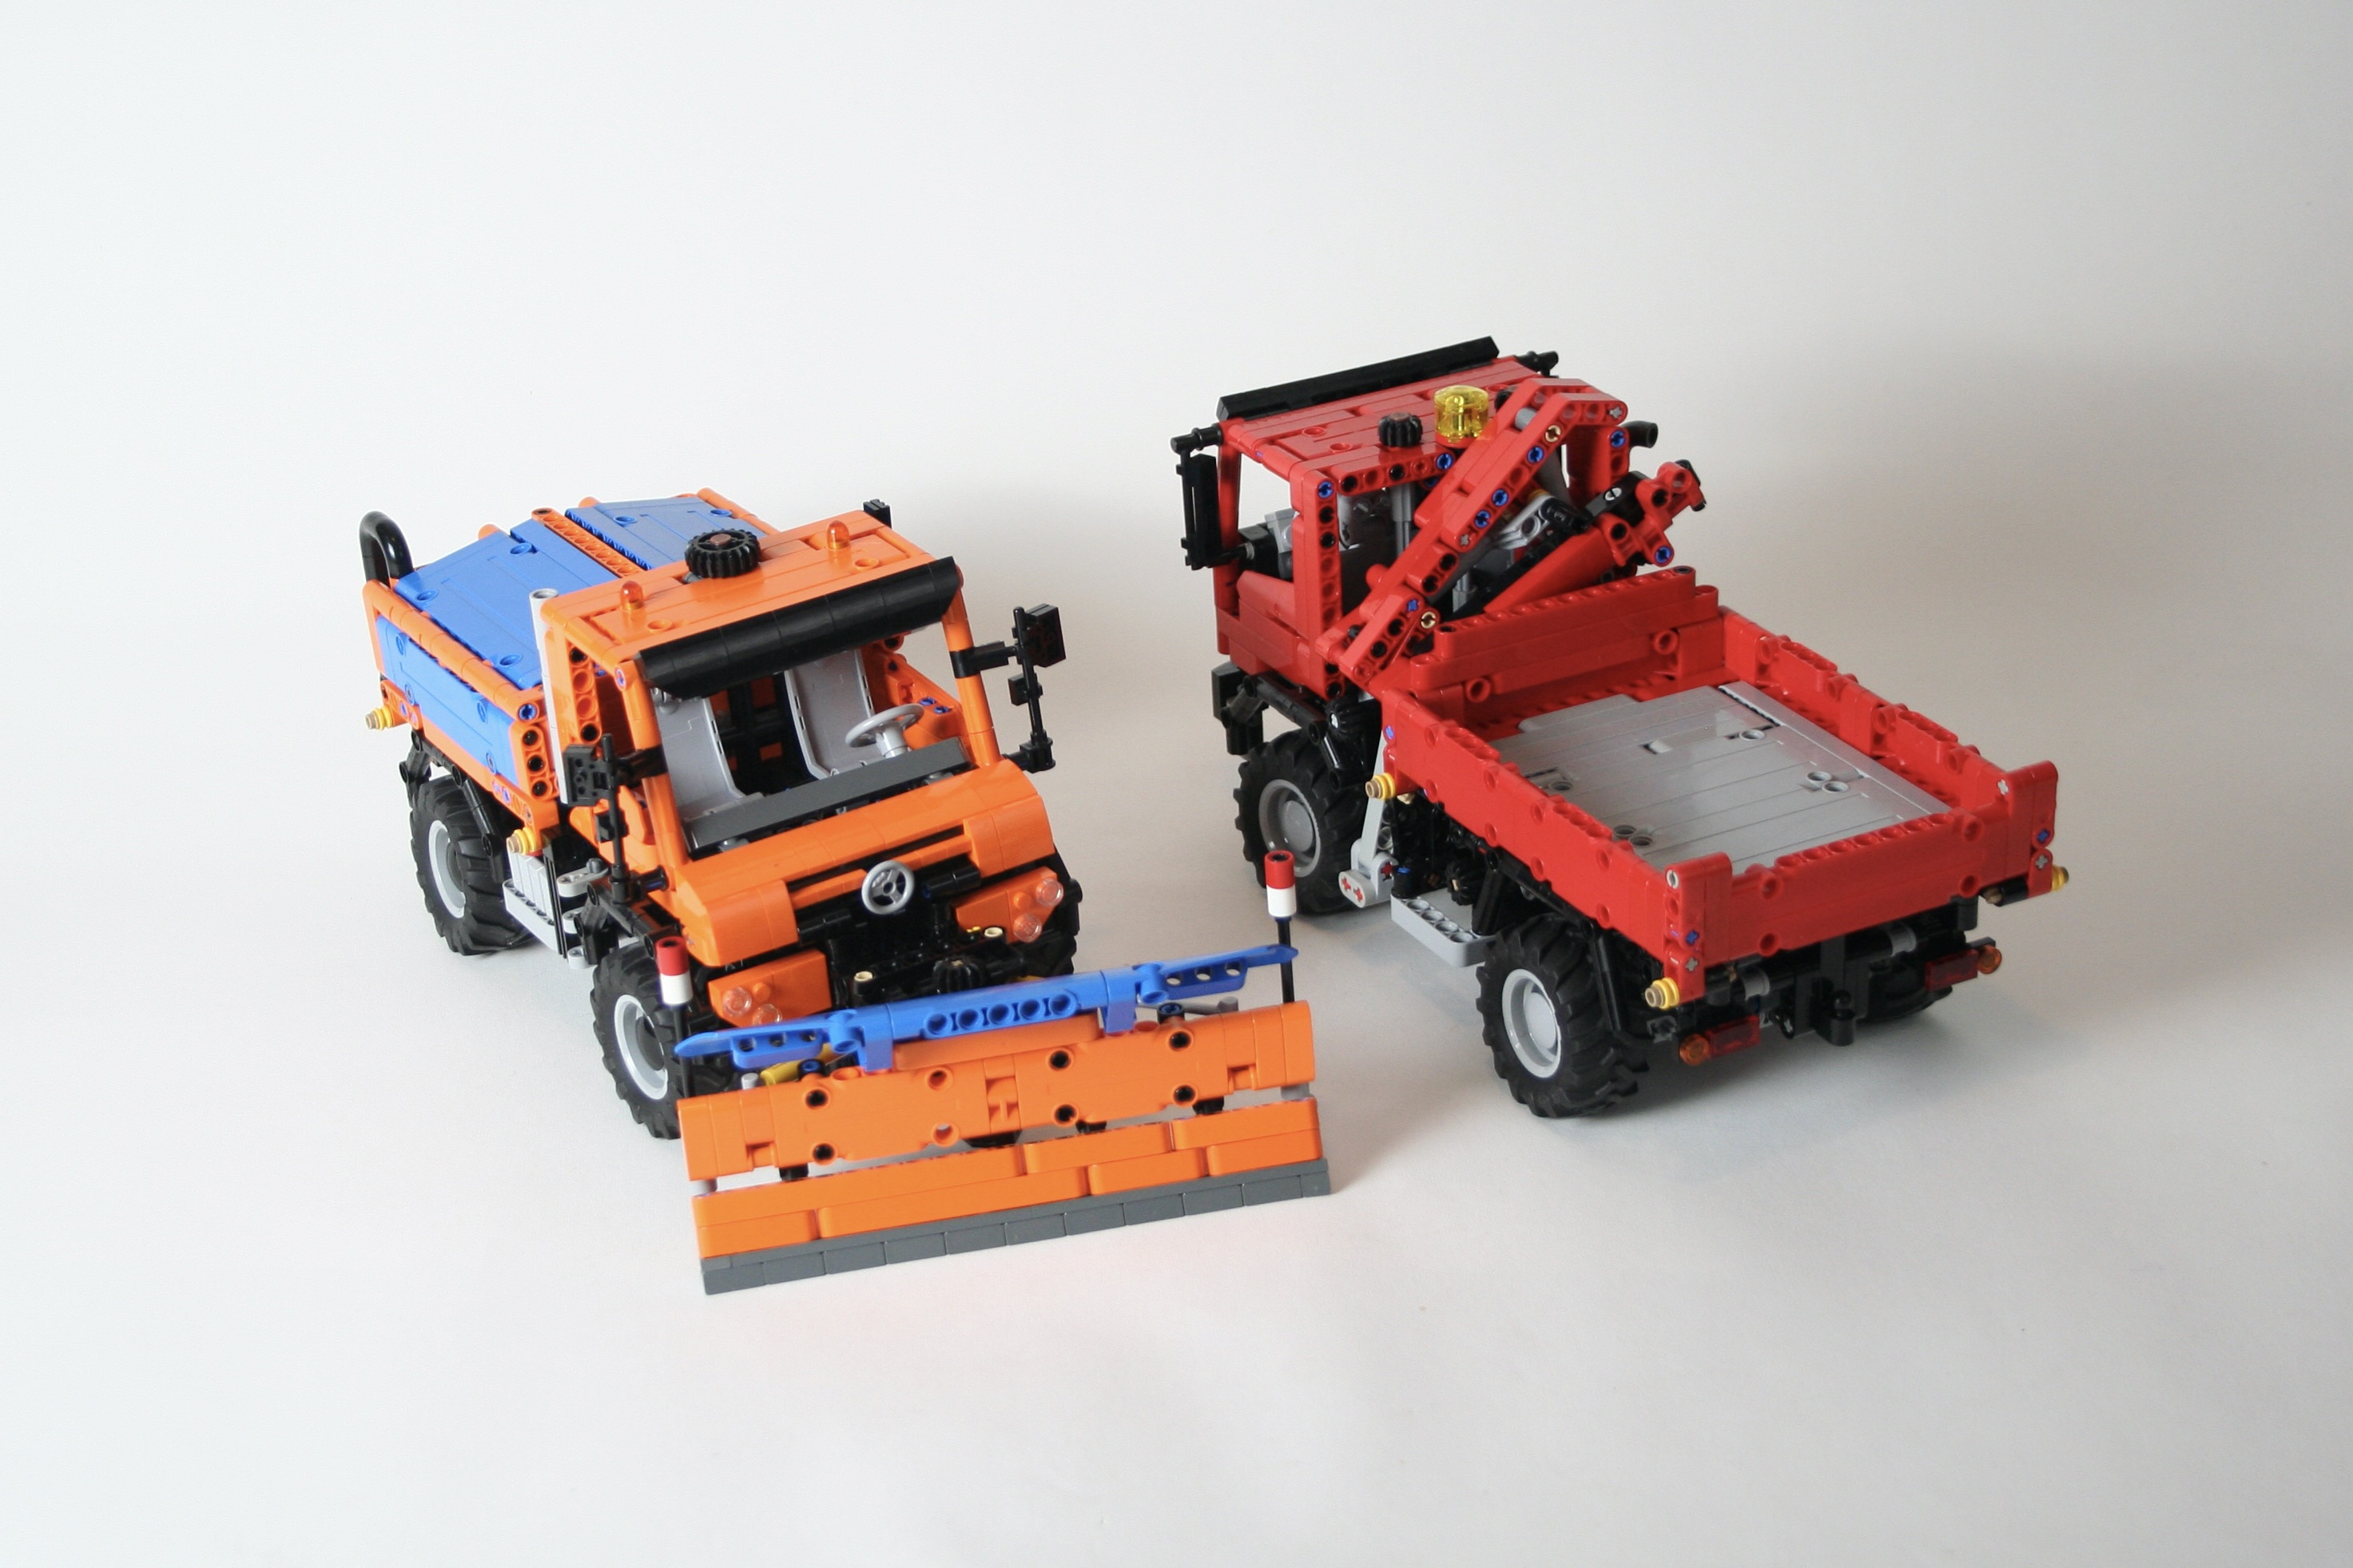
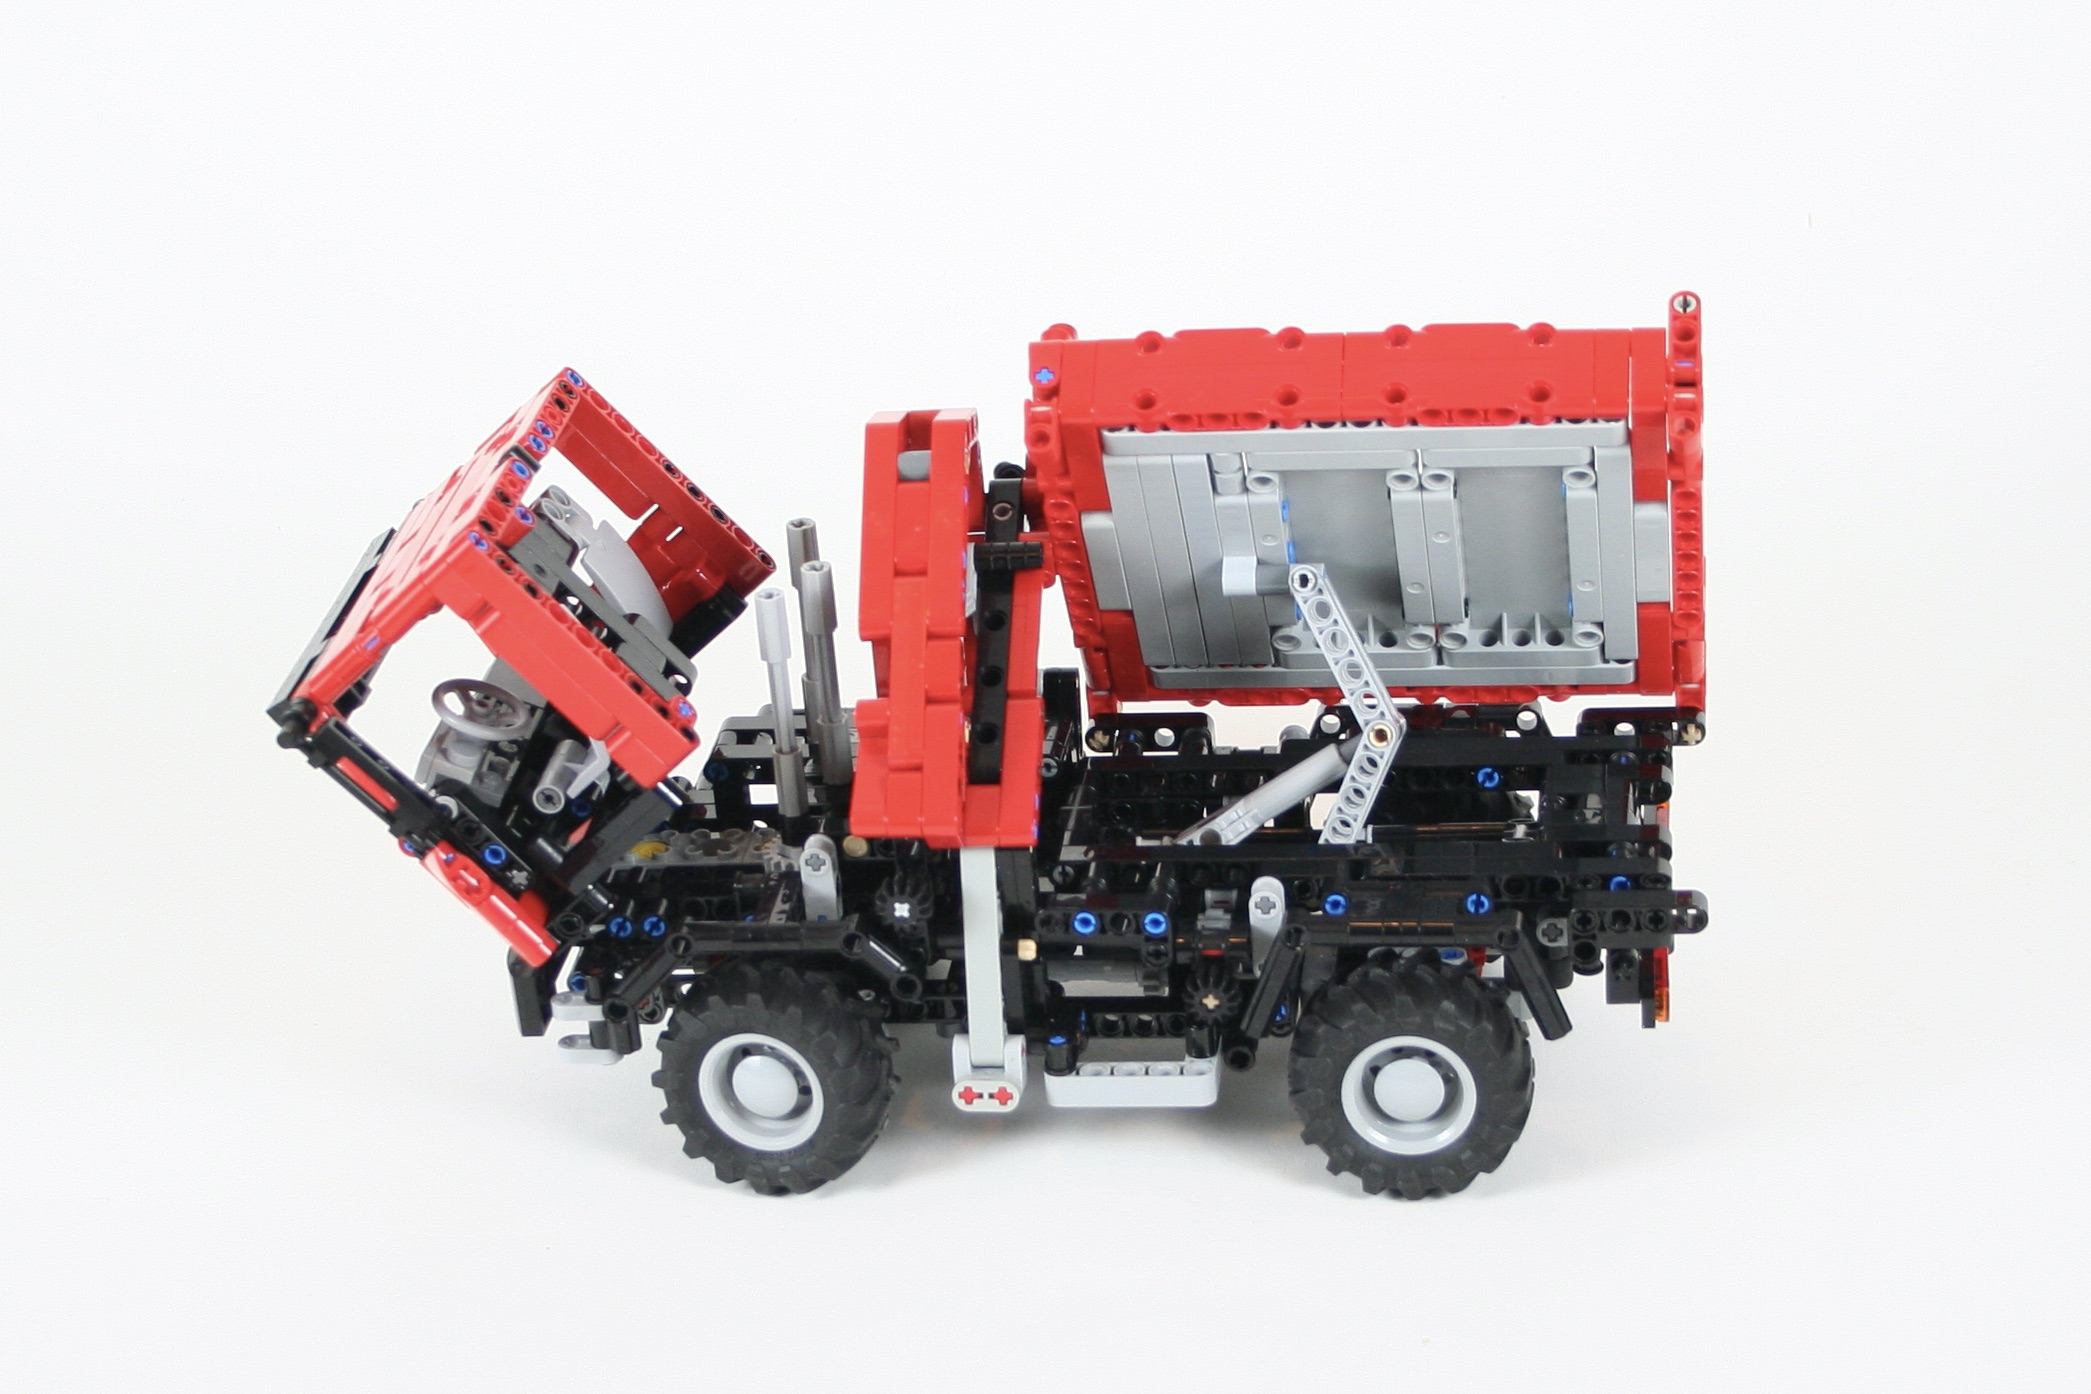
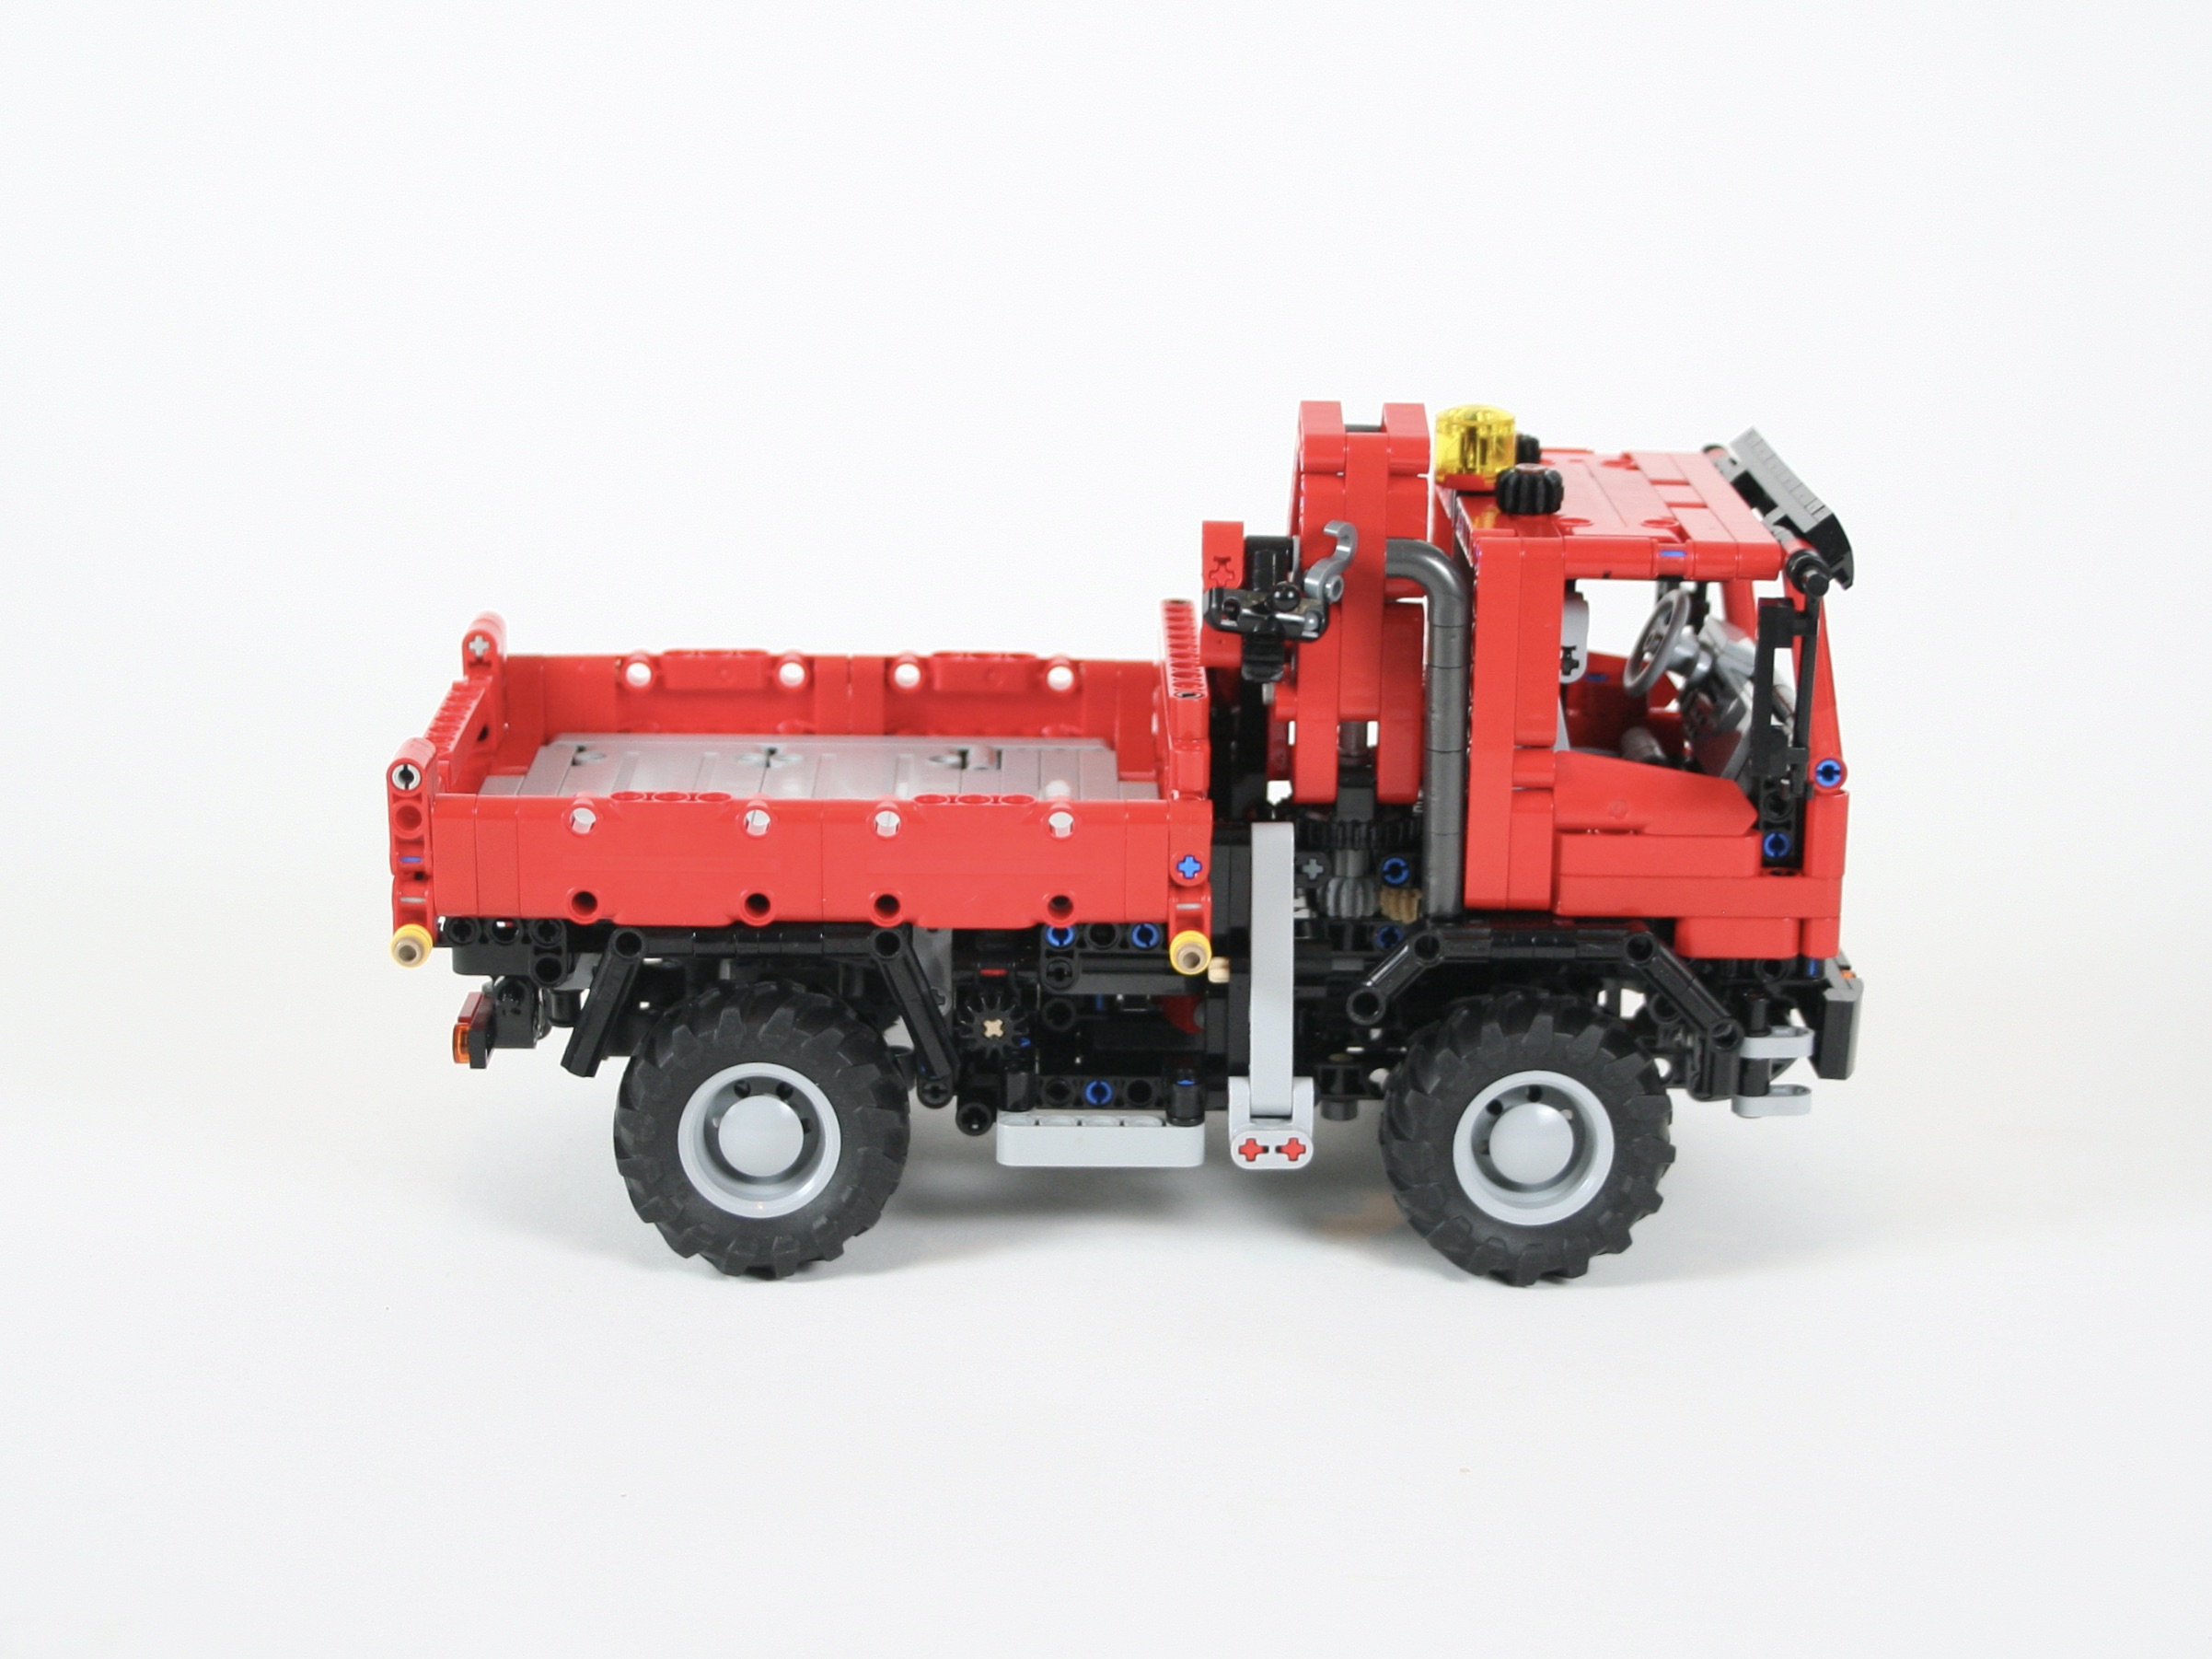
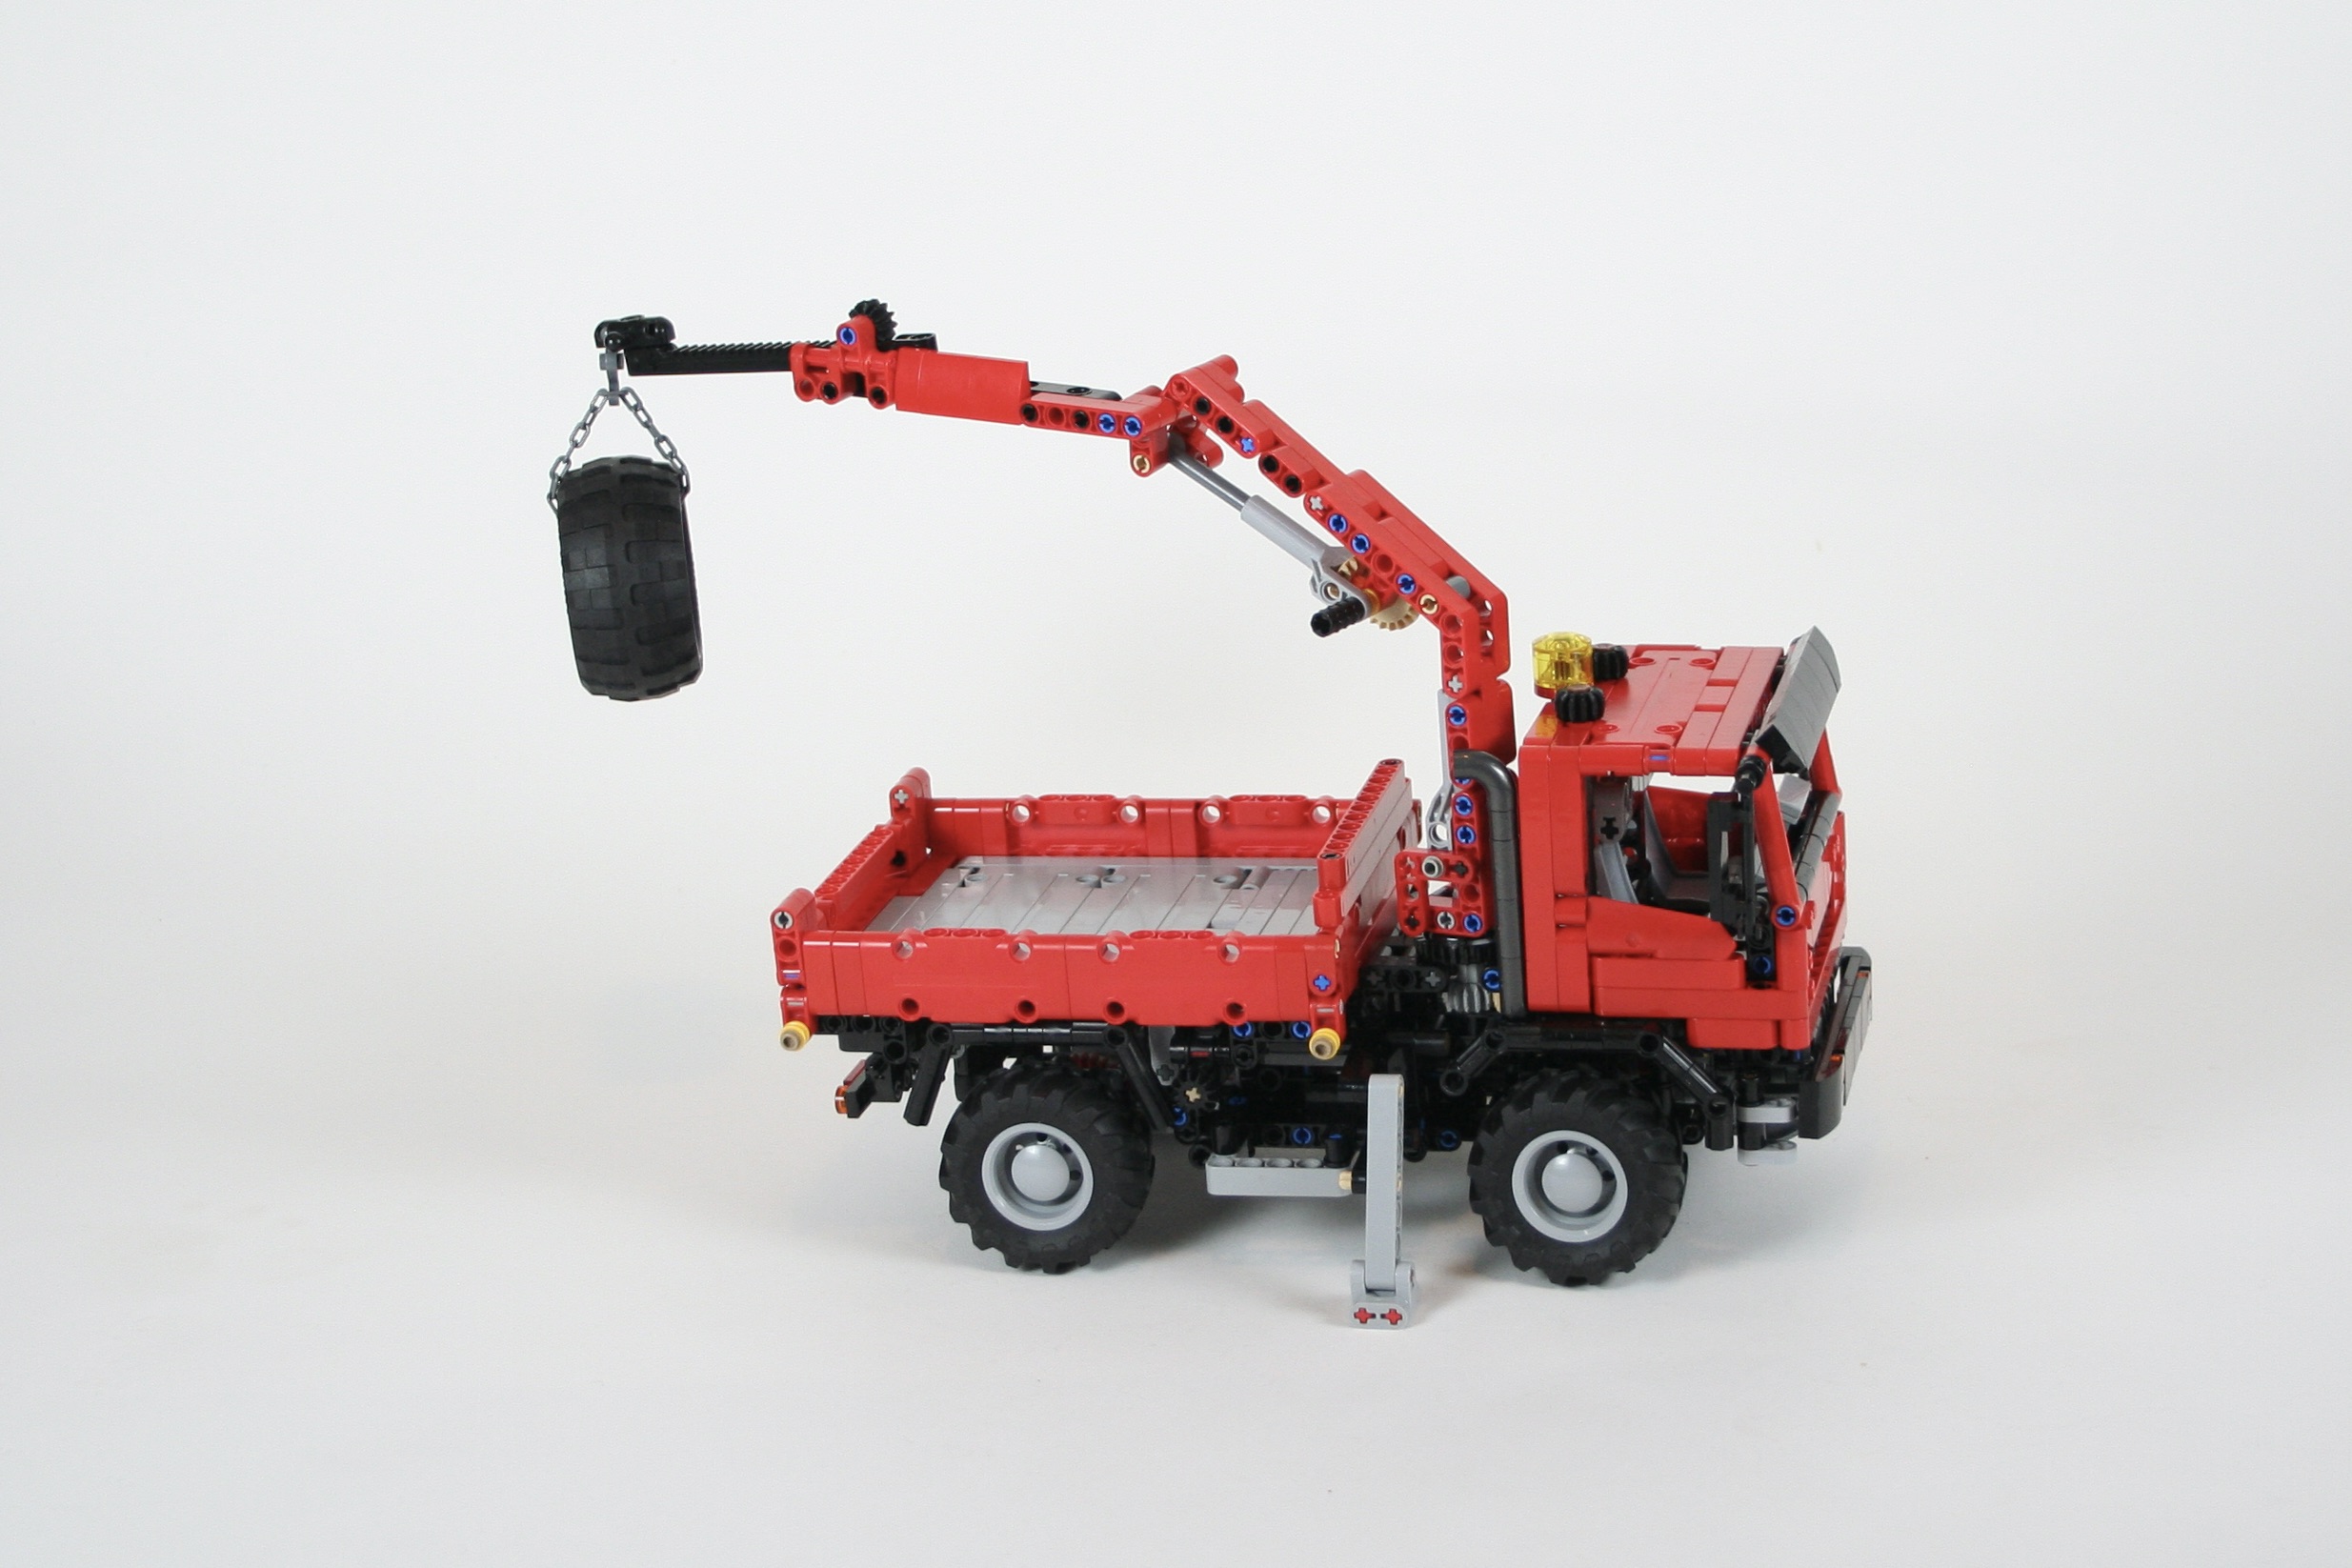
So it turns out that I have built a lot of MOCs over the years, and many of them have instructions posted on Rebrickable. Late last year, I recognized I was going to post my 100th MOC on Rebrickable, so I wanted to celebrate the occasion in some meaningful way. After a little thought, it became clear that building another Unimog was the only way to celebrate!
I have build a number of Unimogs over the years, but if one thing has happened during this time, it is the consolidation of the 1:21 scale truck that has become a standard in the LEGO MOC community. LEGO sets like 42098, 42078, and 42128 have helped to standardize the 1:21 scale truck, and many other MOCs have followed suit. Building a Unimog in this scale seemed like a good idea.
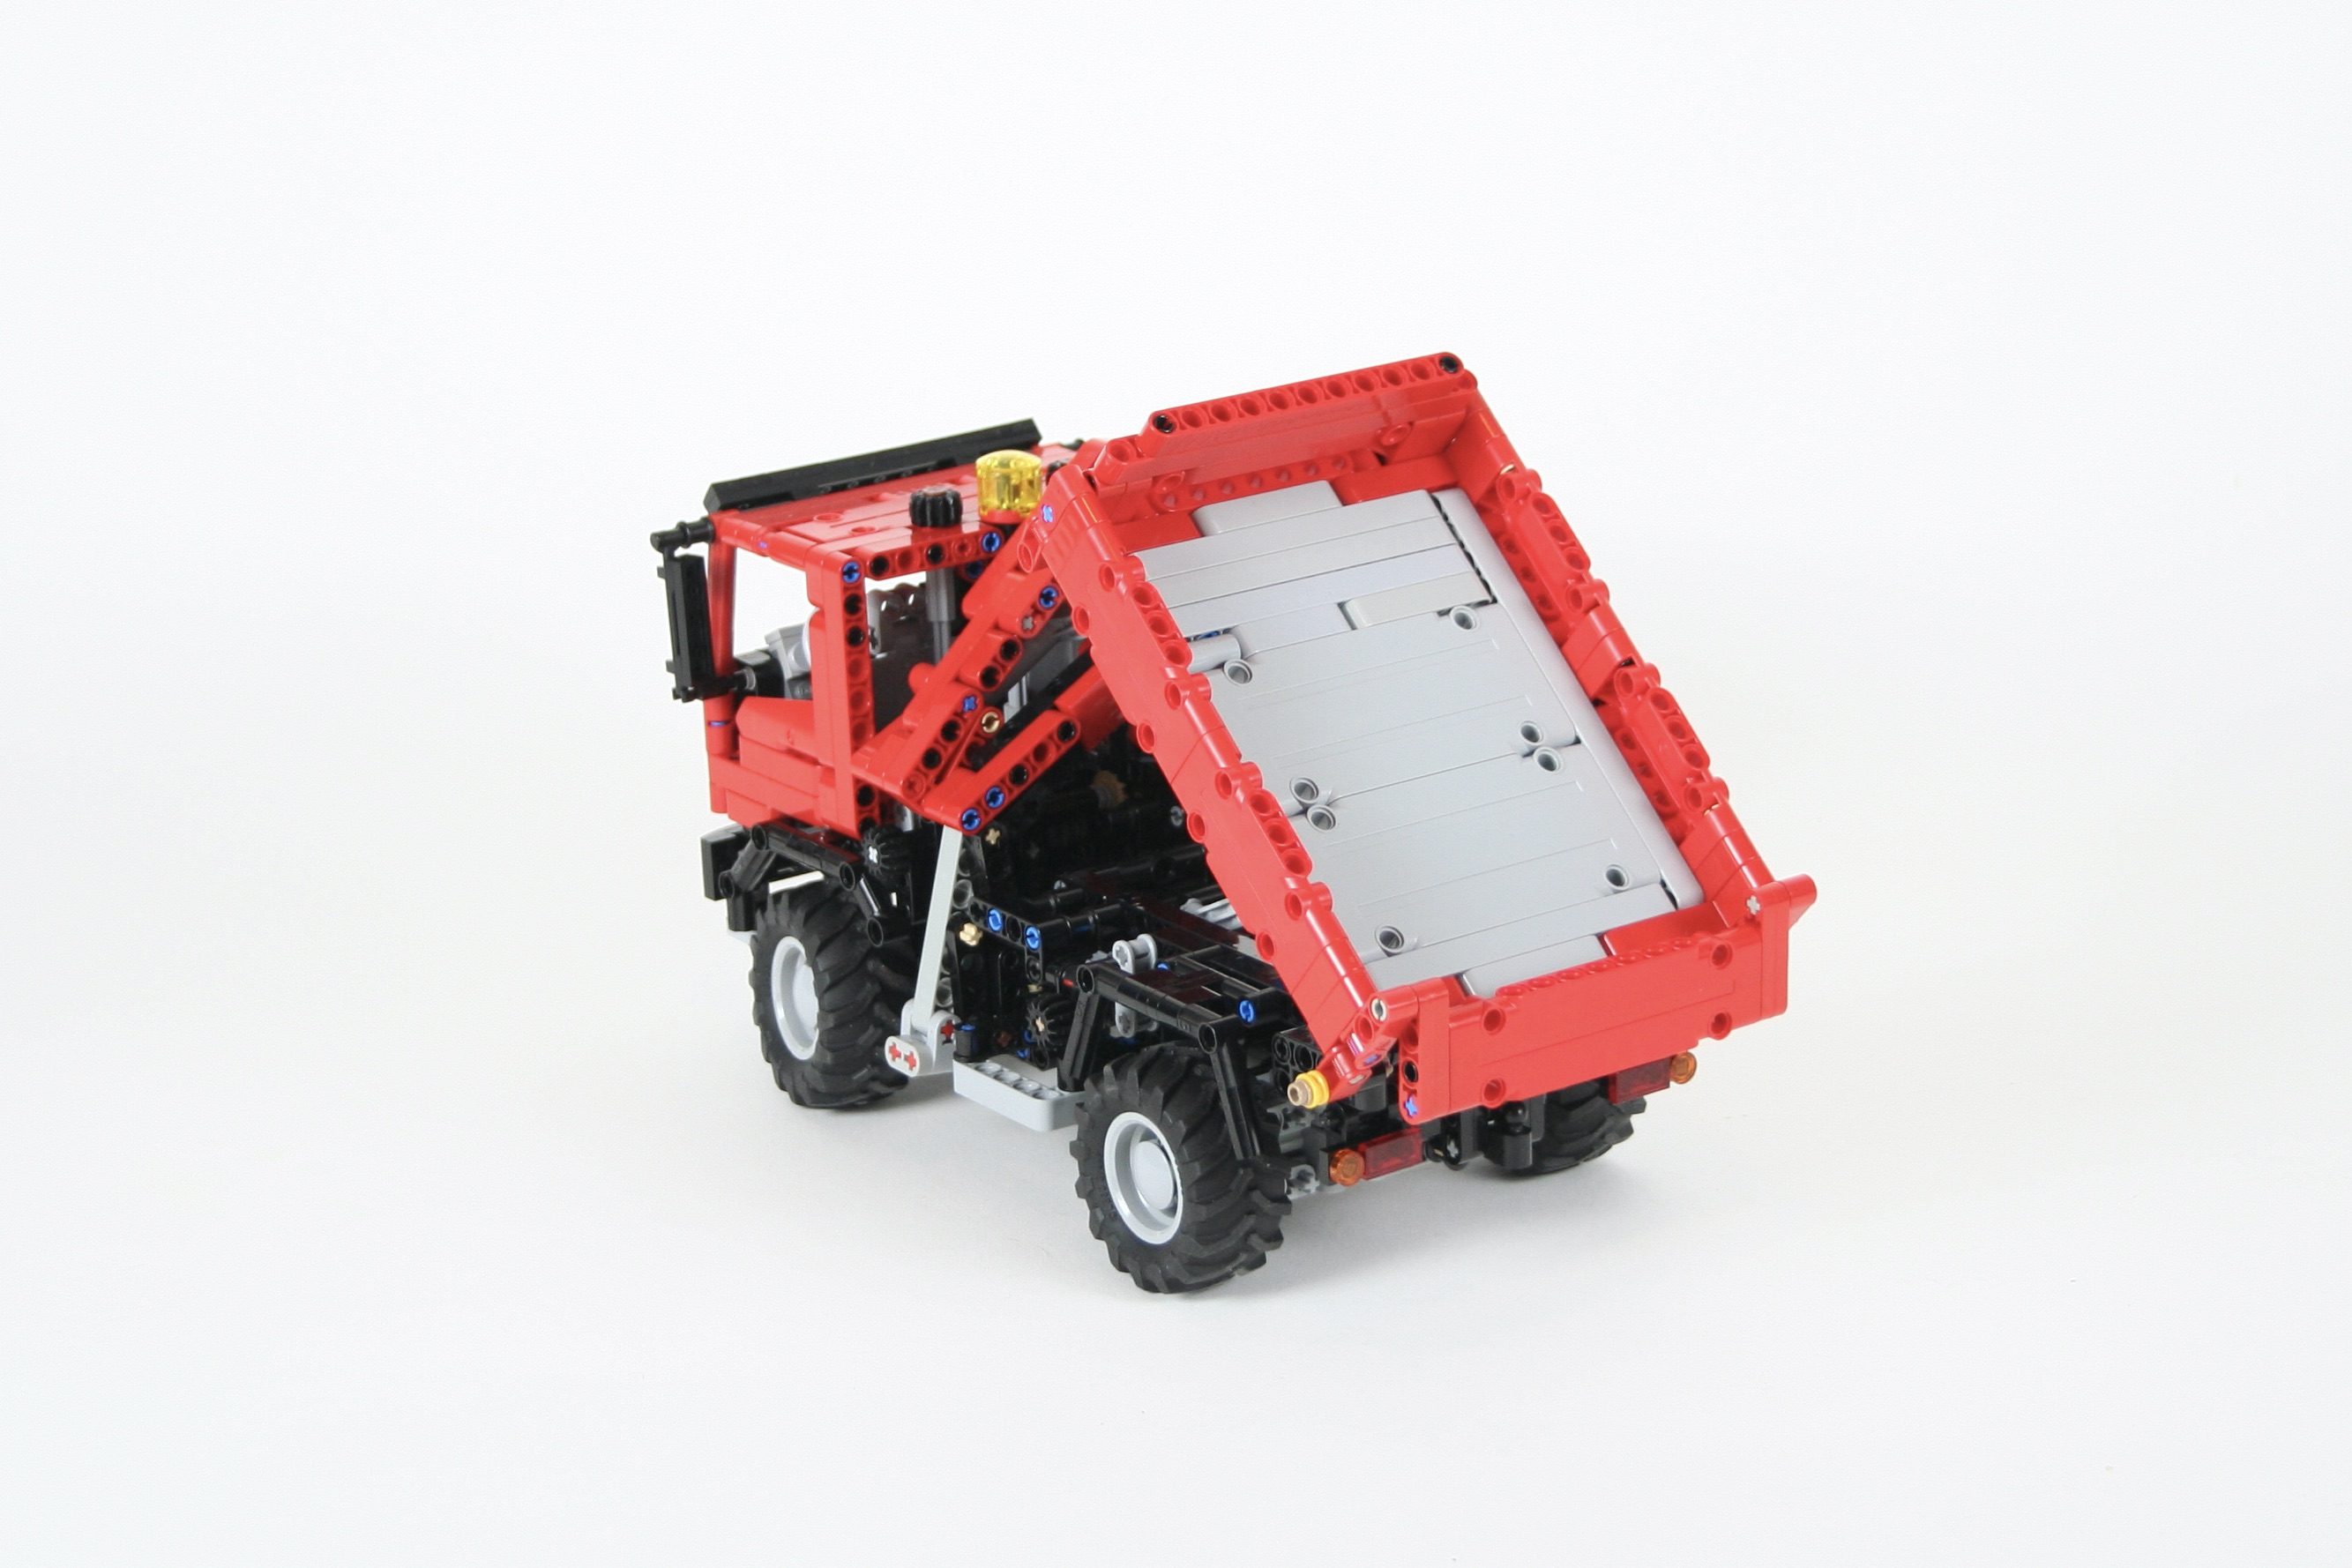
I planned right from the beginning that multiple implements would be available for the truck, so the design would need to be able to accommodate each attachment. To support this, a front, rear, and center PTO would be needed, and mounting points on the front, rear, and bed would need to be easily accessible. Once these standards were set, I measured the scale, and made a draft with all the set points fixed. As I built, the steering was finalized as well as the 2 cylinder fake engine. The truck used a rear wheel drive setup, and the rear axle has portal axles and a pendular suspension. Right above the rear axle, I placed a linear actuator to move the tipping bed. After some tinkering, I decided to use a large 36z gear on the left of the truck to move the bed up and down. It is placed just behind the steps, and looks like the left side radiator. Finally, there is a PTO on/off switch on the right of the truck that turns the rear and center PTO on and off.
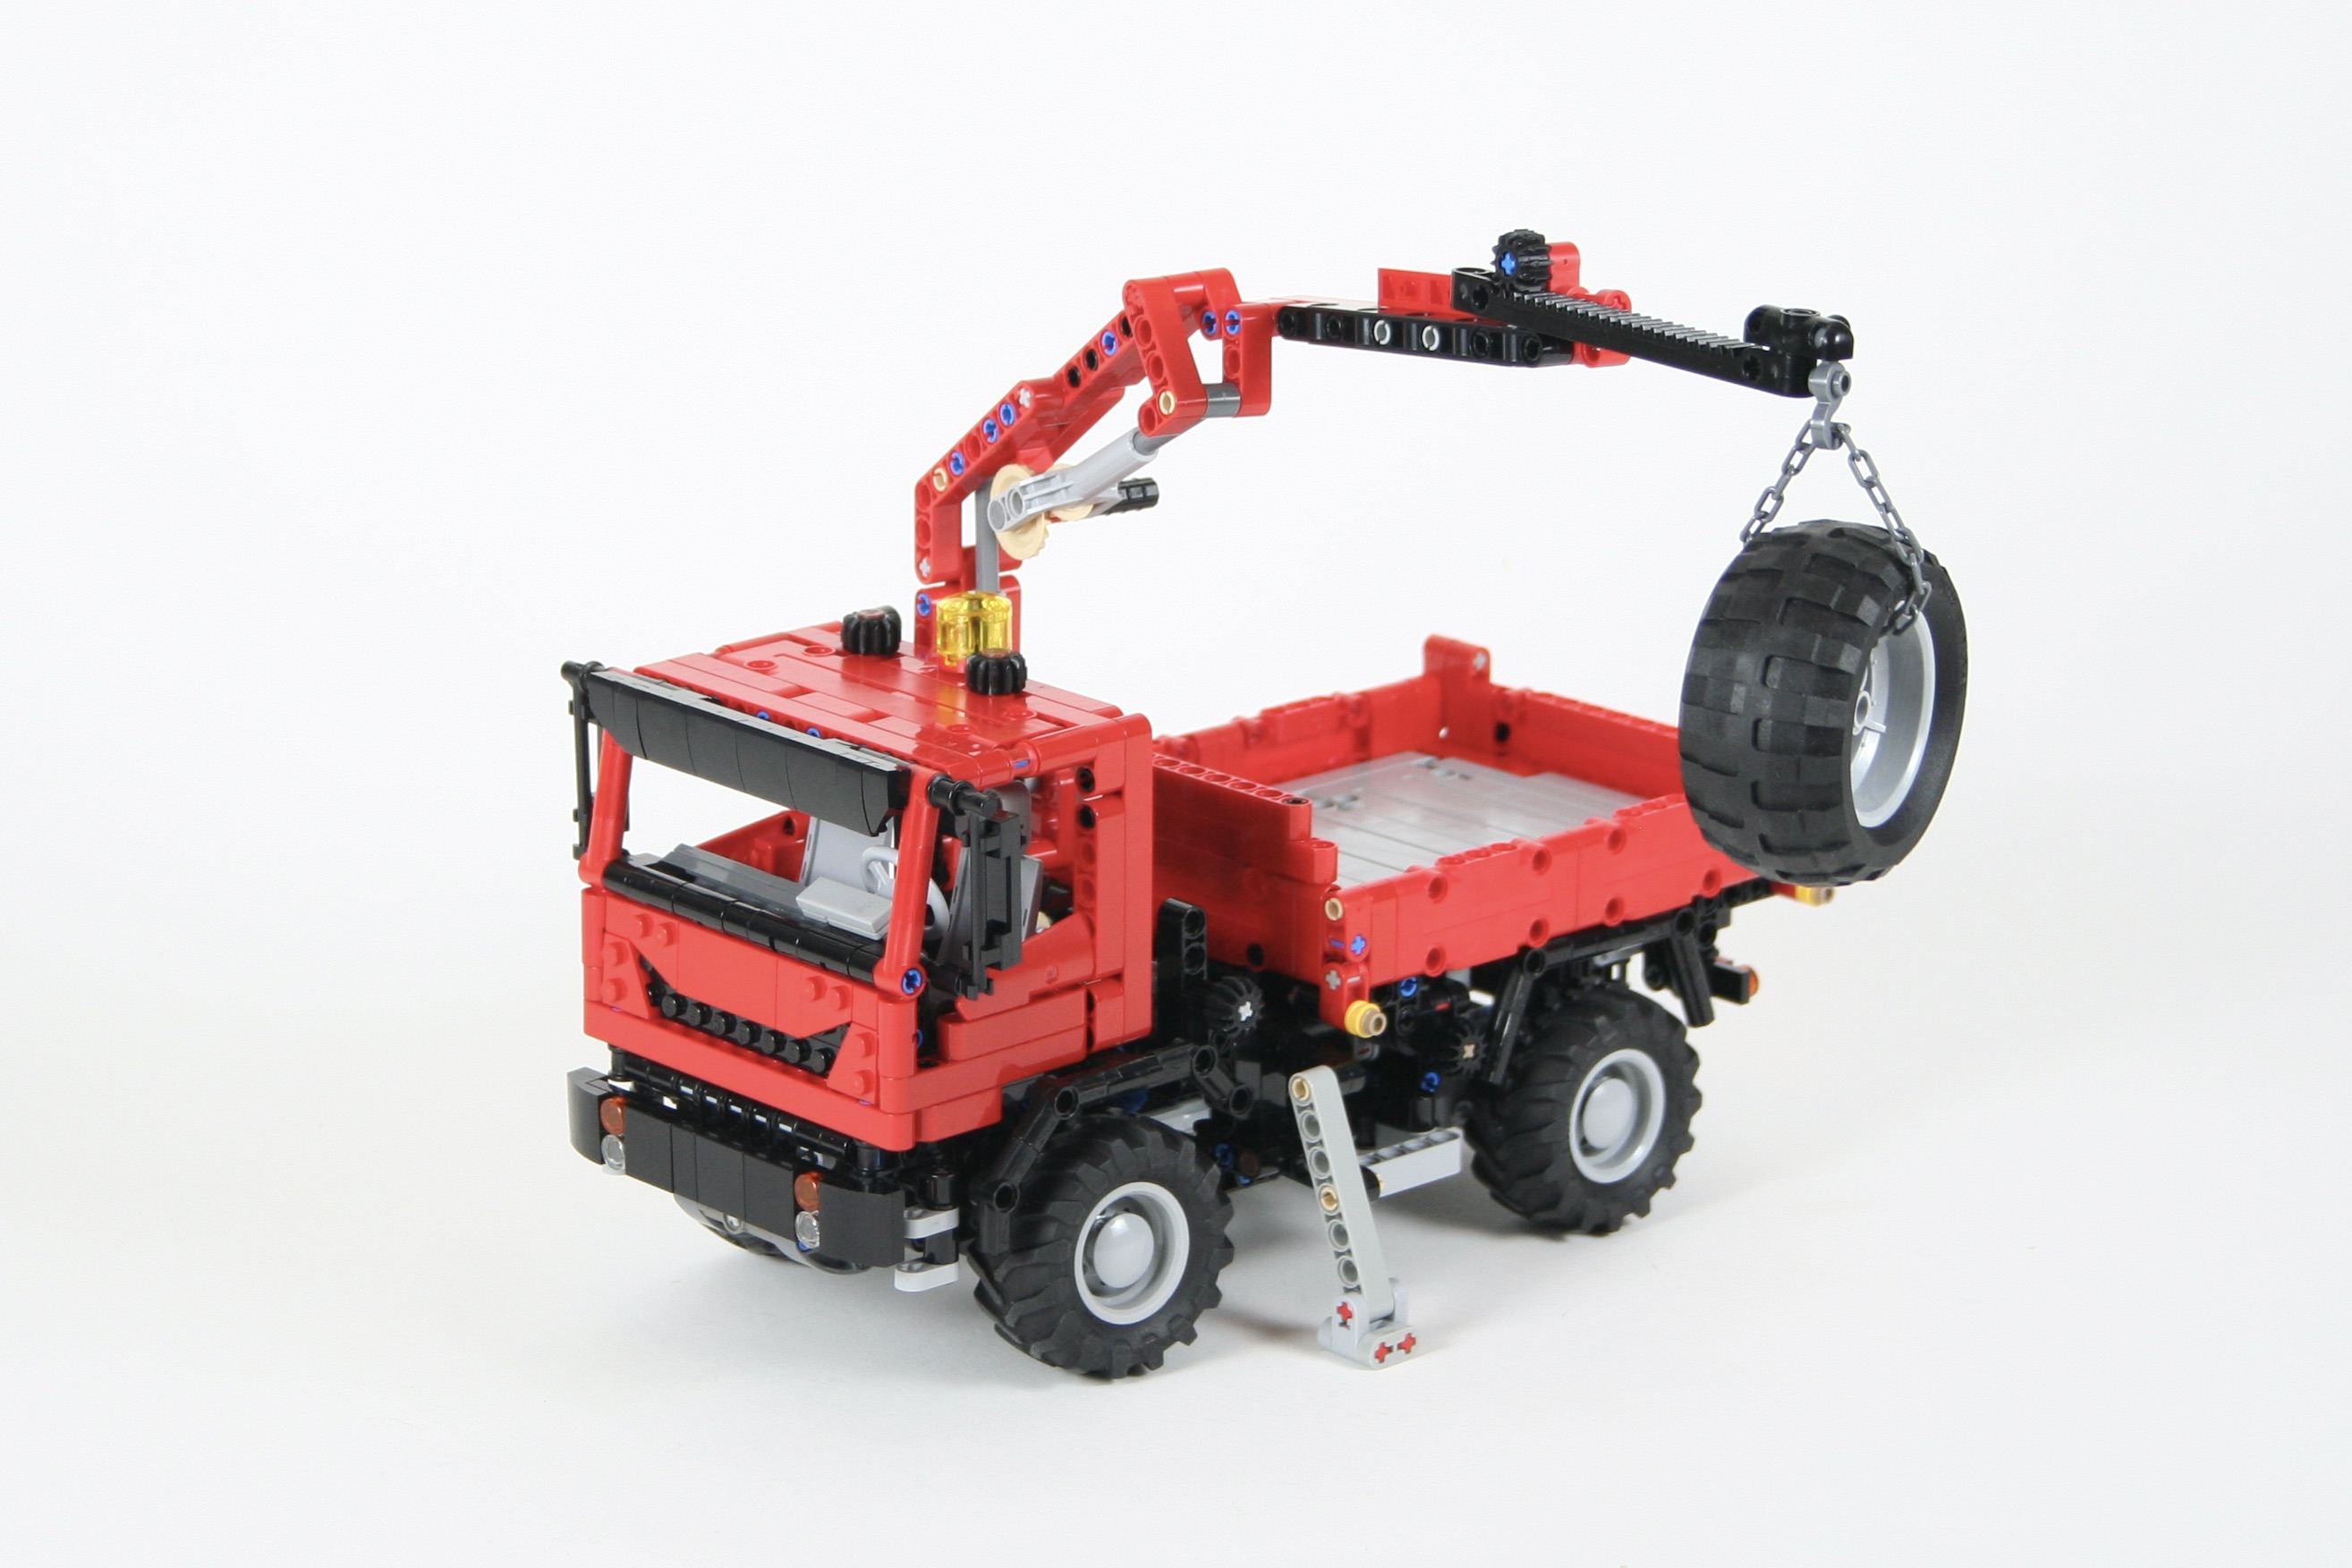
As I was building the truck, I built the attachments as well, which allowed me to make sure the attachment connection points were ridged, accessible, and standardized. From the beginning I planned on the following attachments: plow, gritter, front winch, rear crane, and bed crane. The front attachments are connected using a 5l axle with stop, and the bed mounts are connected using four 3l axles with stop.
The front plow has worm gear lift and can tilt left and right. Free instructions for the plow may be found here. The rear gritter attaches at the rear and connects to the center PTO gear. When the PTO is turned on, the center auger and the rear spreader both turn. The top of the gritter can open to drop small 1×1 round plates to use as salt. Free instructions for the gritter may be found here.
The front winch and center crane and bed can be easily attached as well. The front winch has a locking mechanism that allows the winch to be locked as needed. The rear bed has a knuckleboom crane that folds up for transportation. Instructions may be found for both here.
Finally, a rear knuckleboom crane is also available. This crane uses the same crane as above, but uses a different attachment point. A small interior cam mechanism that is worm driven is used to connect the rear crane to the truck. Two outriggers are on both sides of the crane and are locked by worm gears as well. The crane folds completely and extends as needed. Again, free instructions for the crane can be found here.
Maybe I will find additional attachments, trailers, and implements for the truck but for now I am done. This project worked just a well as I had hoped and was perfect for my 100th MOC. The truck is just the right size, and has all the features I wanted it to have. The functions work well and integrate with each other well. Each attachment was great addition as well, and gave the truck lots of distinctive styles and looks. I hope you enjoyed the build as well.
It was time for another truck! Free instructions can be found at Rebrickable.
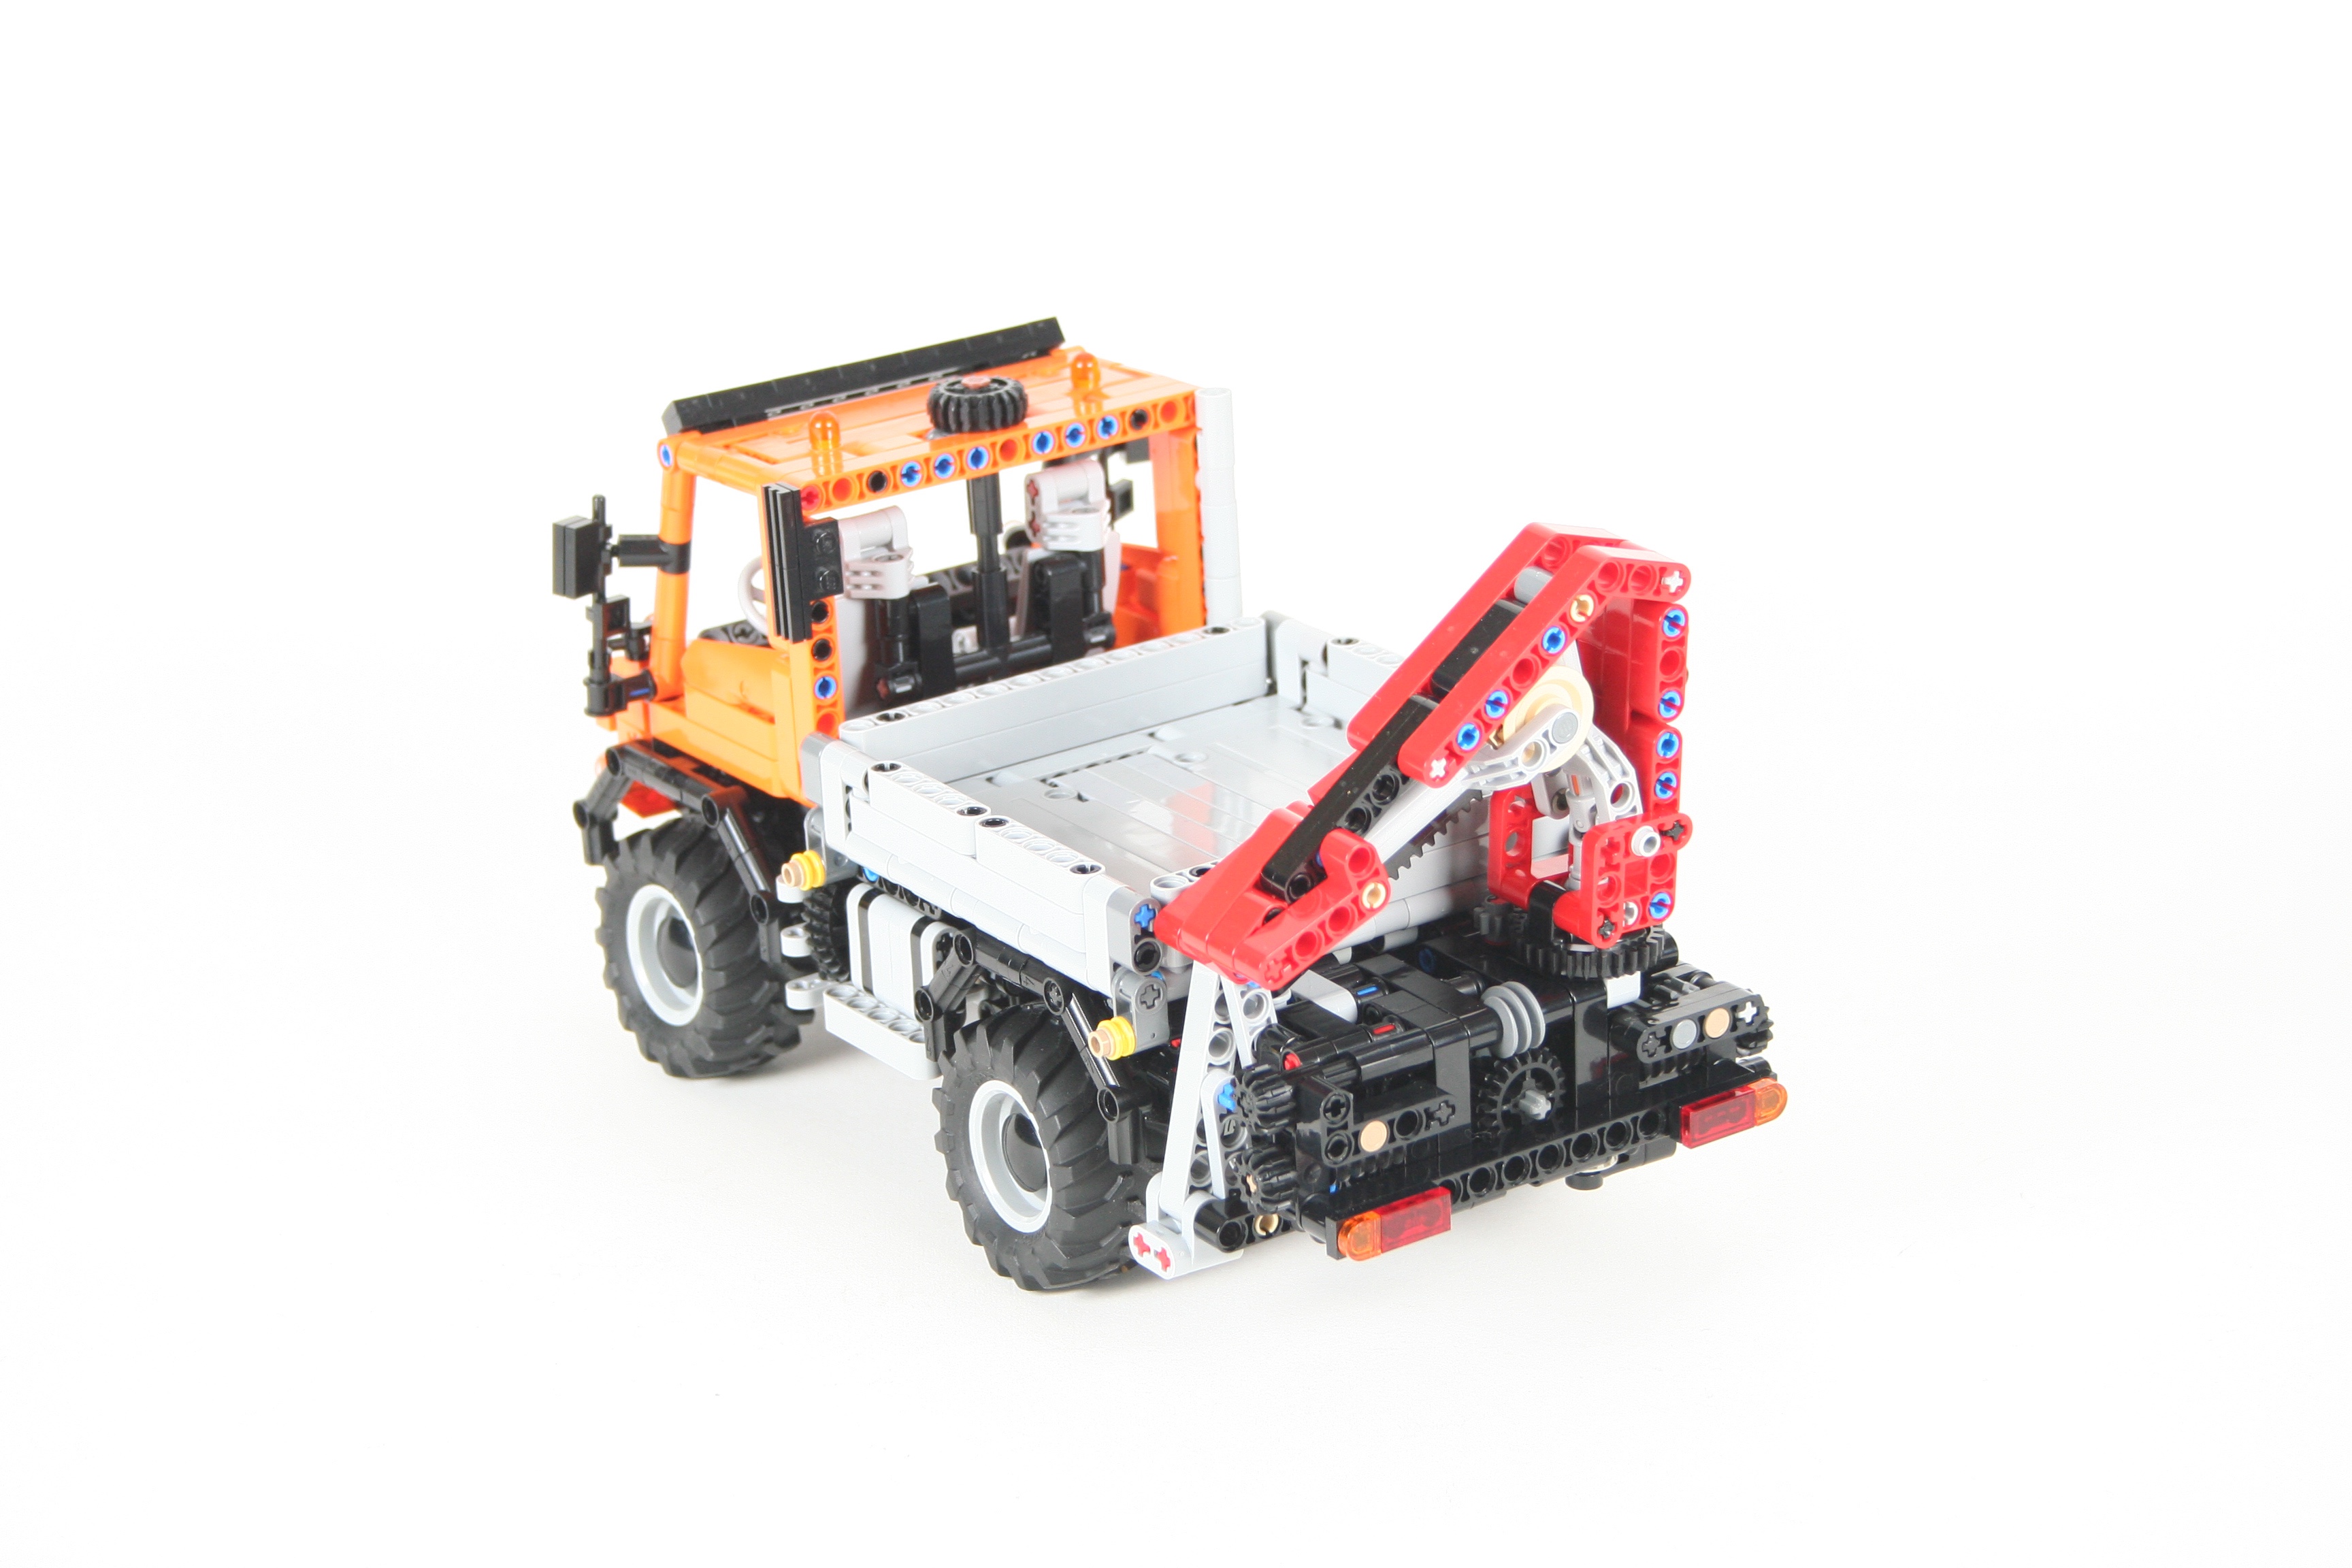
I have been building a lot of tractors and construction vehicles lately. I love building them as they offer a lot of movement and features. But it was time to build another truck. LEGO truck MOCs are beginning to coalesce around the “Mack Anthem standard” which is a 15 module wide truck in about 1:20 scale. Many MOCs are being designed in this scale as it is a good playable size, and fits the scale of some of the more recent LEGO trucks that have been released. I wanted to offer another truck in this scale, with some fun playable features.
I started with a chassis that uses a simple pendular suspension on the rear axle, which is damped by 2×1 rubber connectors. The rear axle drives a simple I3 fake engine under the cab through a two speed transmission. The transmission changeover is on the right side of the truck. Front steering is controlled though the HOG light on the top of the cab.
I have found a simple way to add a three way tipper bed in my trucks, and I have used it many times before. A mini linear actuator moves simple linkage under the bed that can pivot in three different directions. Each corner of the bed has a removable axle that allows control for which way the bed tiles. But in the past the control for this tipping function was in a tricky place to reach, so I wanted to route the control to the top of the cab. I managed to add this right next to steering light. I used a top pivot design on the bed sides and rear, locked by a 3/4 pin on the bottom.
Finally, I added a crane, and since I had a little space left over, two stabilizing outriggers. The outriggers are a simple two link design that are controlled with a worm gear mechanism. The crane is a little more complicated. It is mounted on a small turntable with a rotation control on the left side of the truck. The first lift mini linear actuator is controlled by the third HOG on the top of the cab. The second lift stage is controlled by another mini linear actuator. Finally, the third stage has an extending boom that allows the reach of the crane to extend a little more. The crane can lift some; not a lot, particularly when the boom is fully extended. By removing the three HOG knobs, the cab tips to show the engine. Also, both doors open.
I loved the way this trucks looks. The beefy tires, and the cabover design give the truck presence and look of toughness. The crane was a lot of fun to play with even if it could be a little stiffer. However, this may be the last time I use this three way tipper design. I am happy I moved the control to the top of the cab, but the linkage does not have the power it needs at the start of the tip. I will have to come up with something better for the next truck.
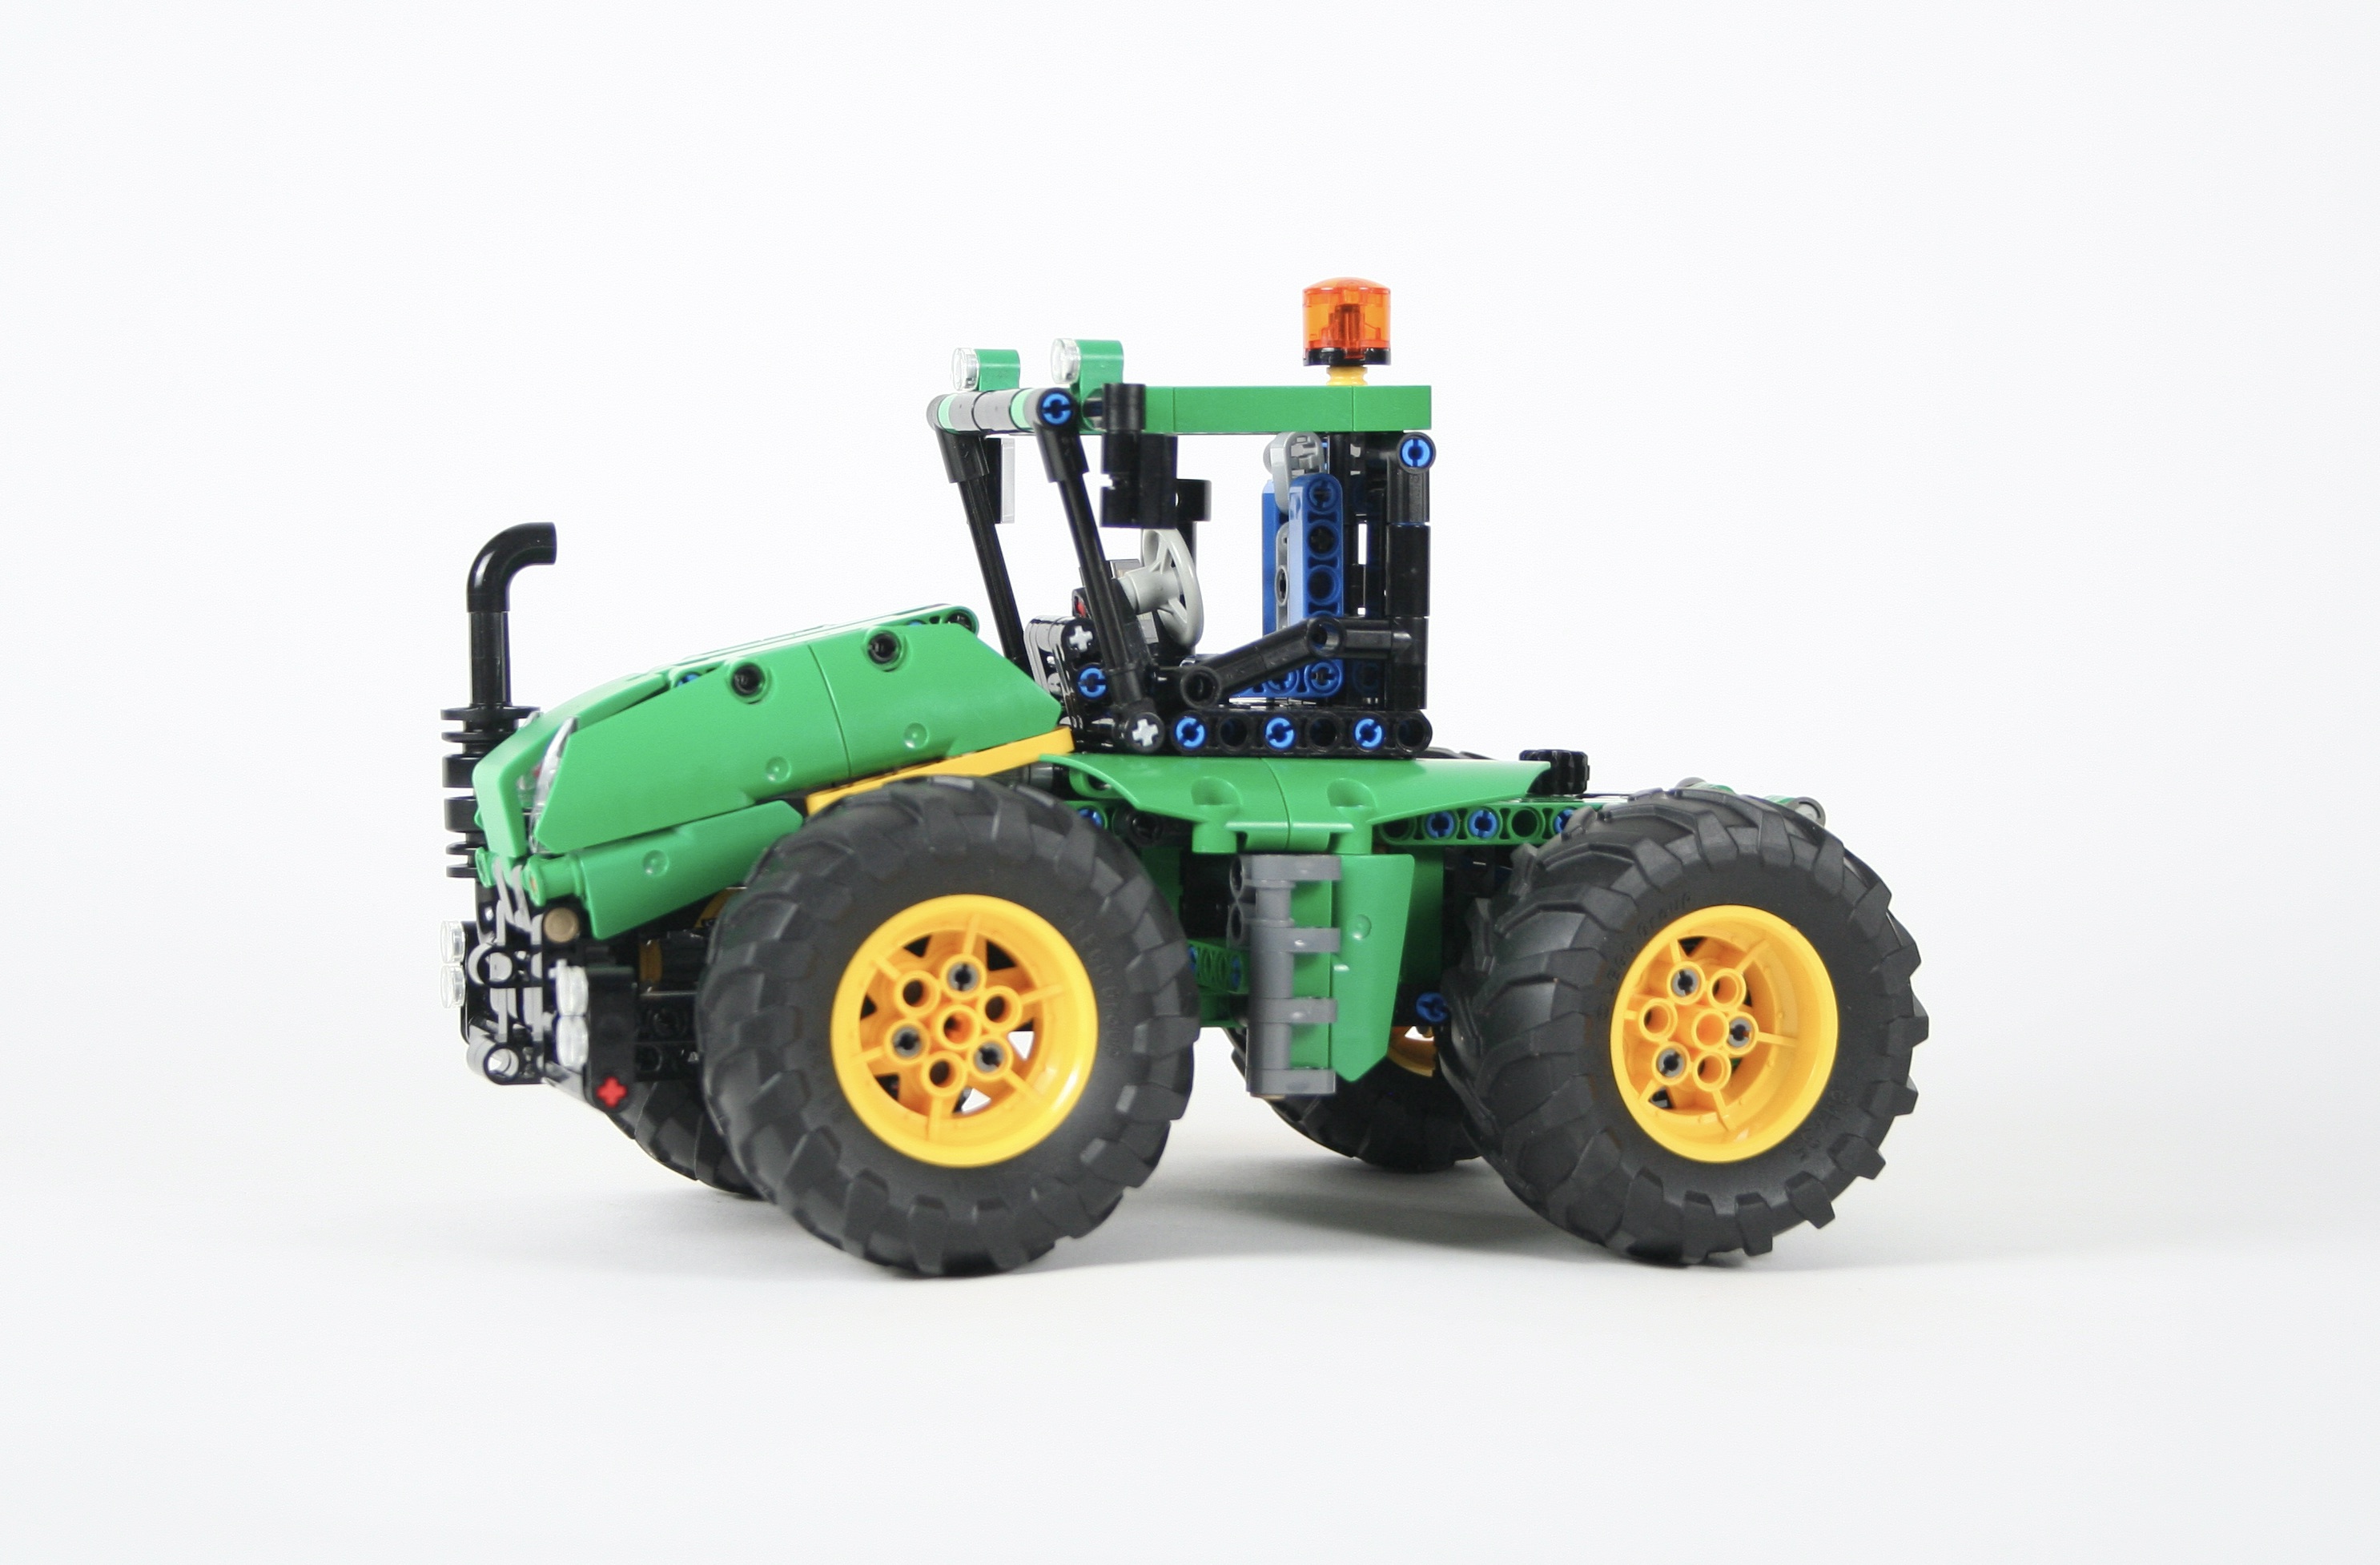
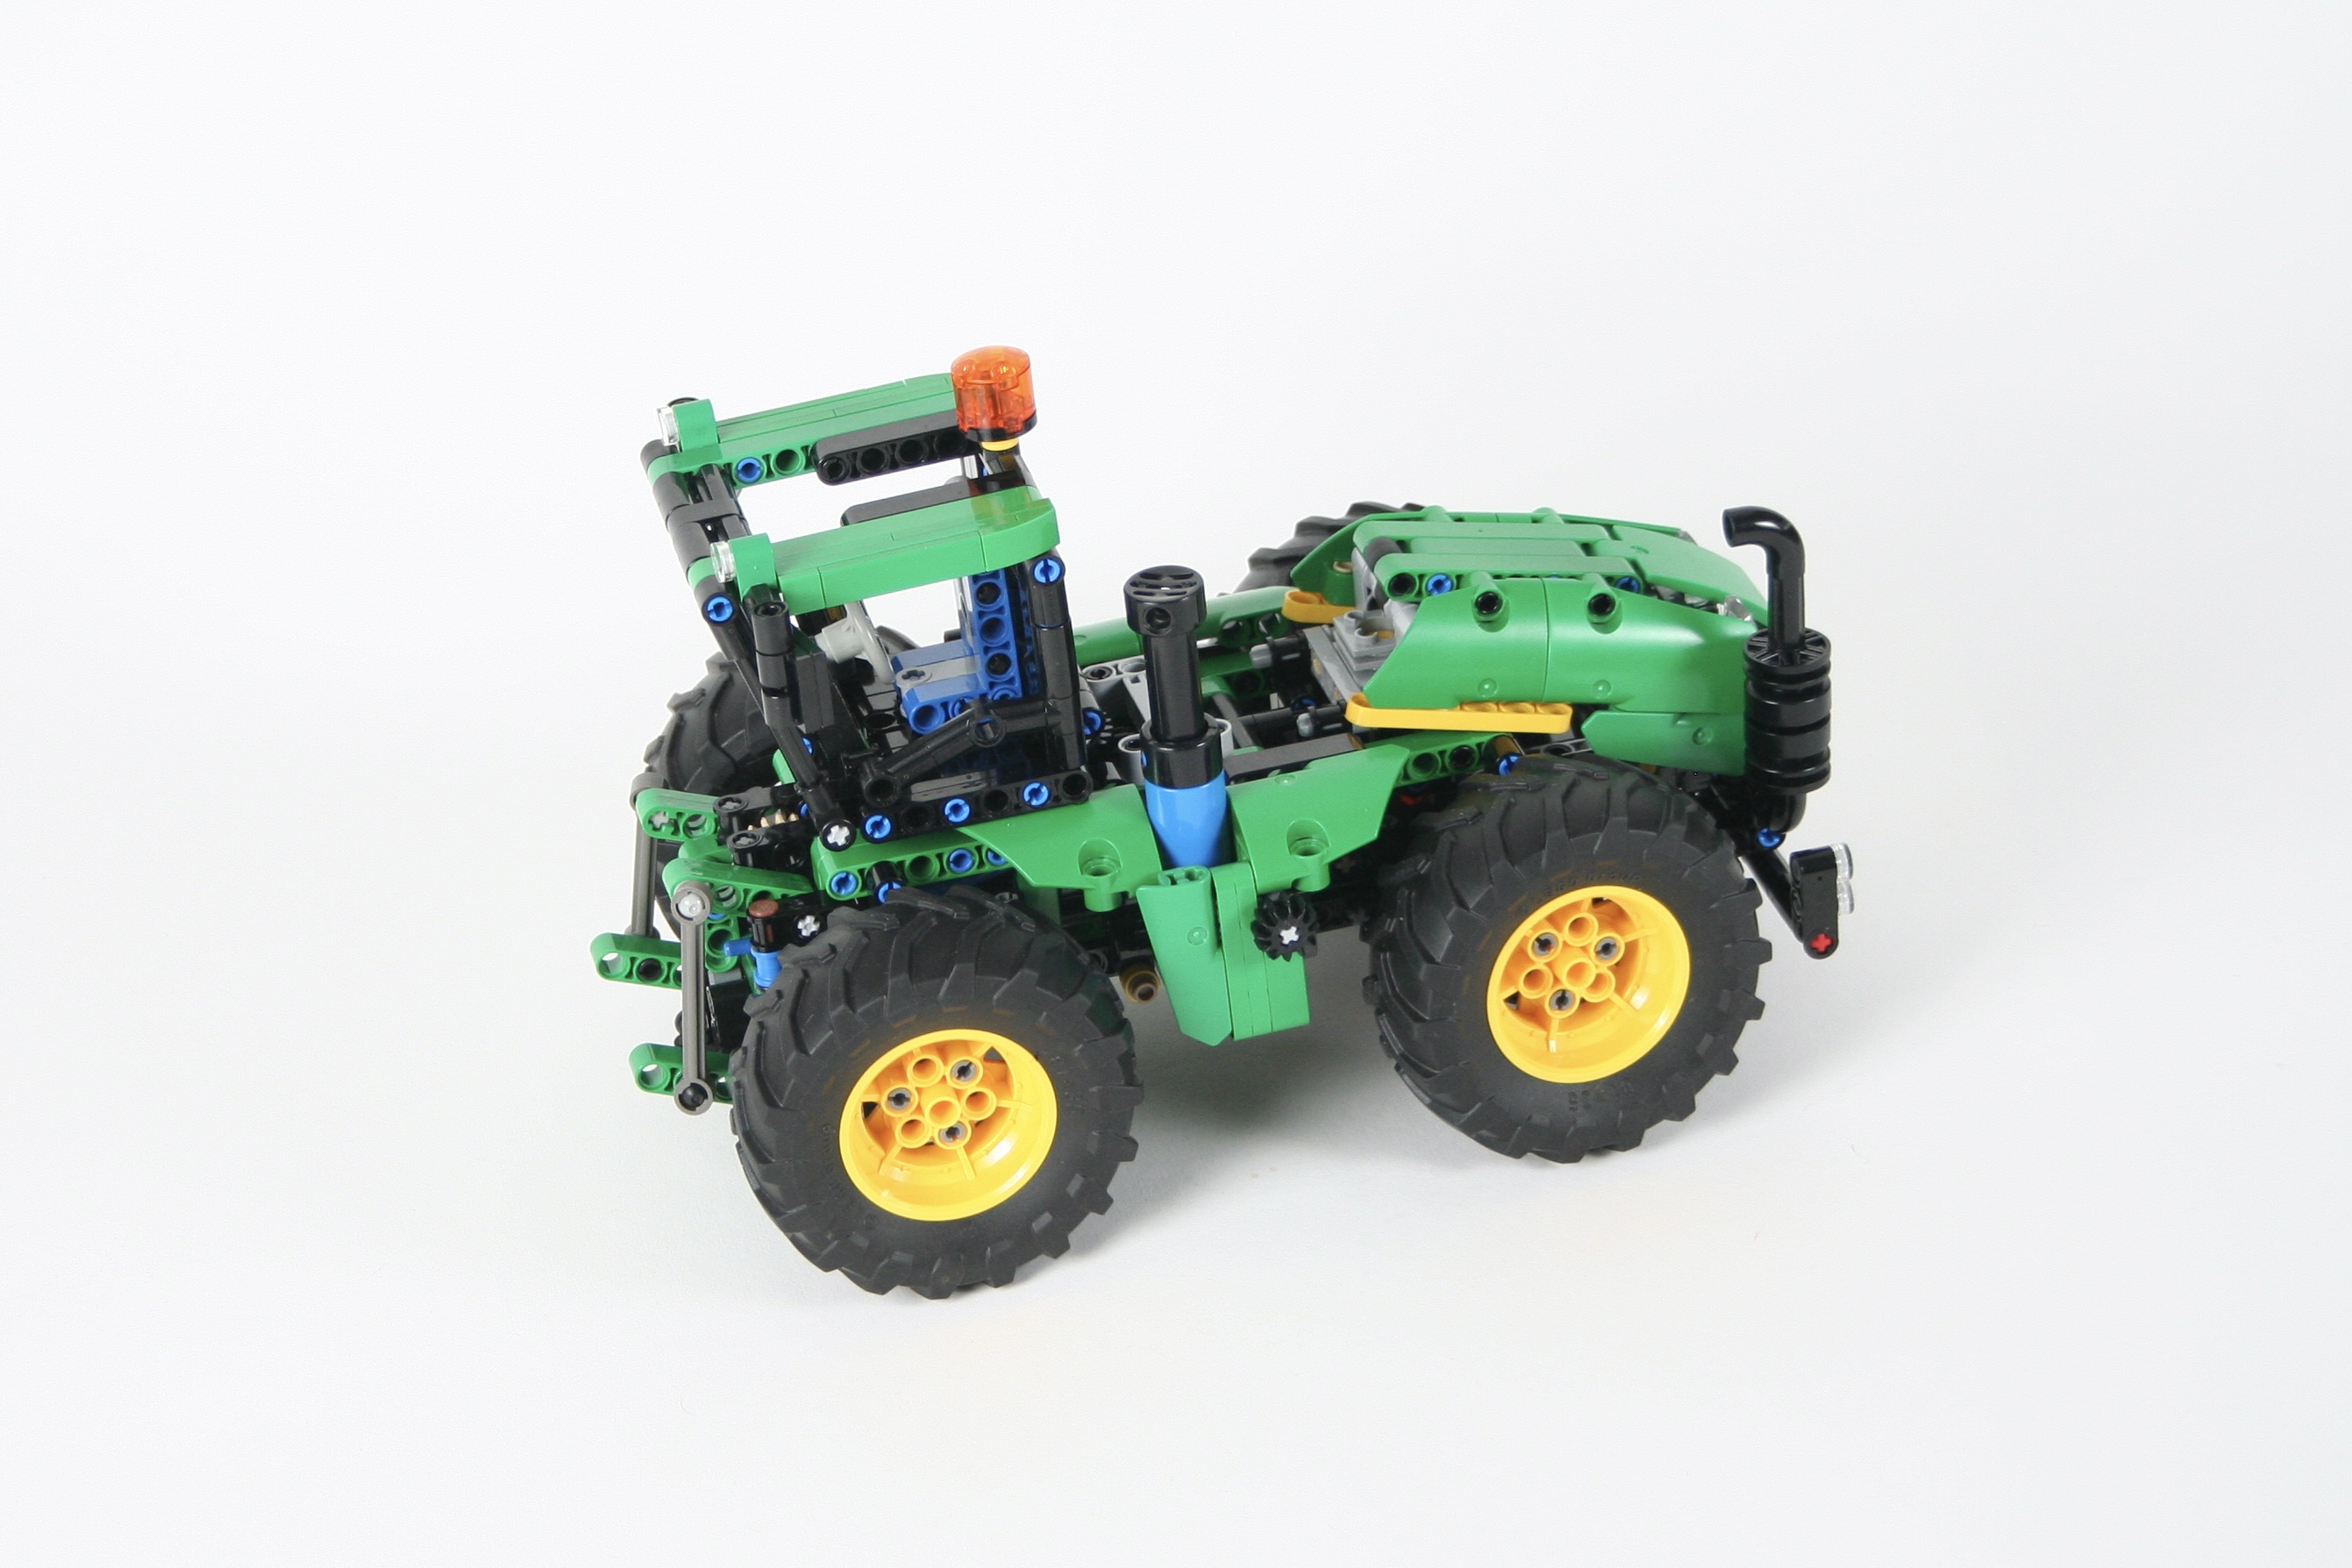
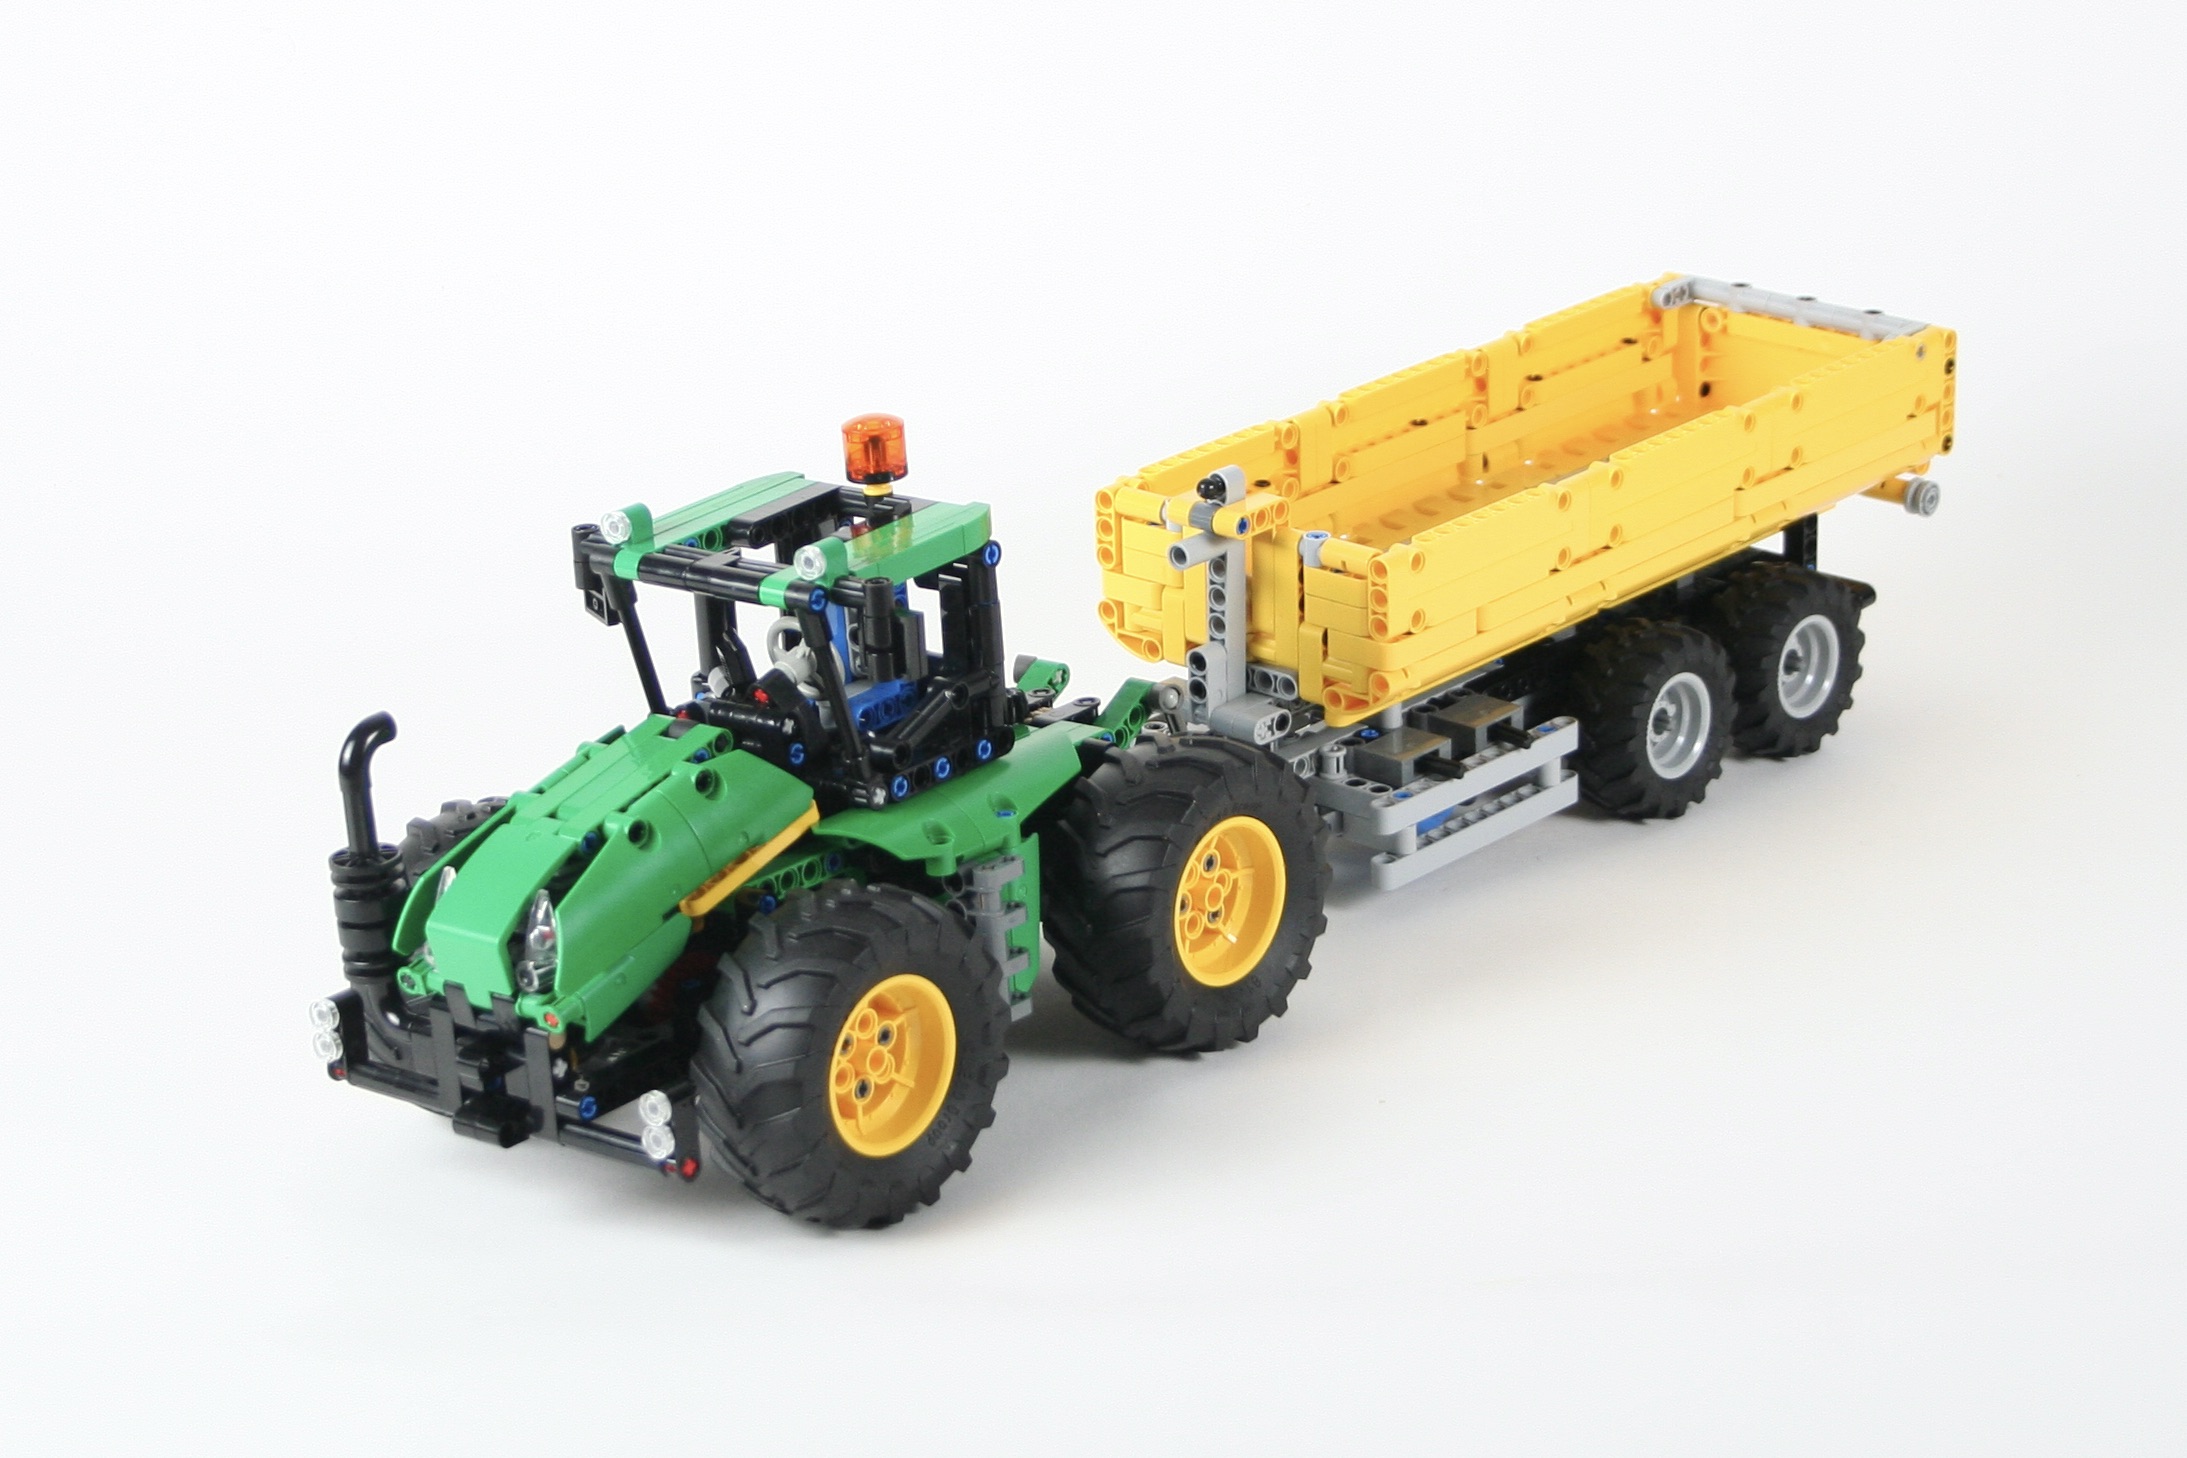
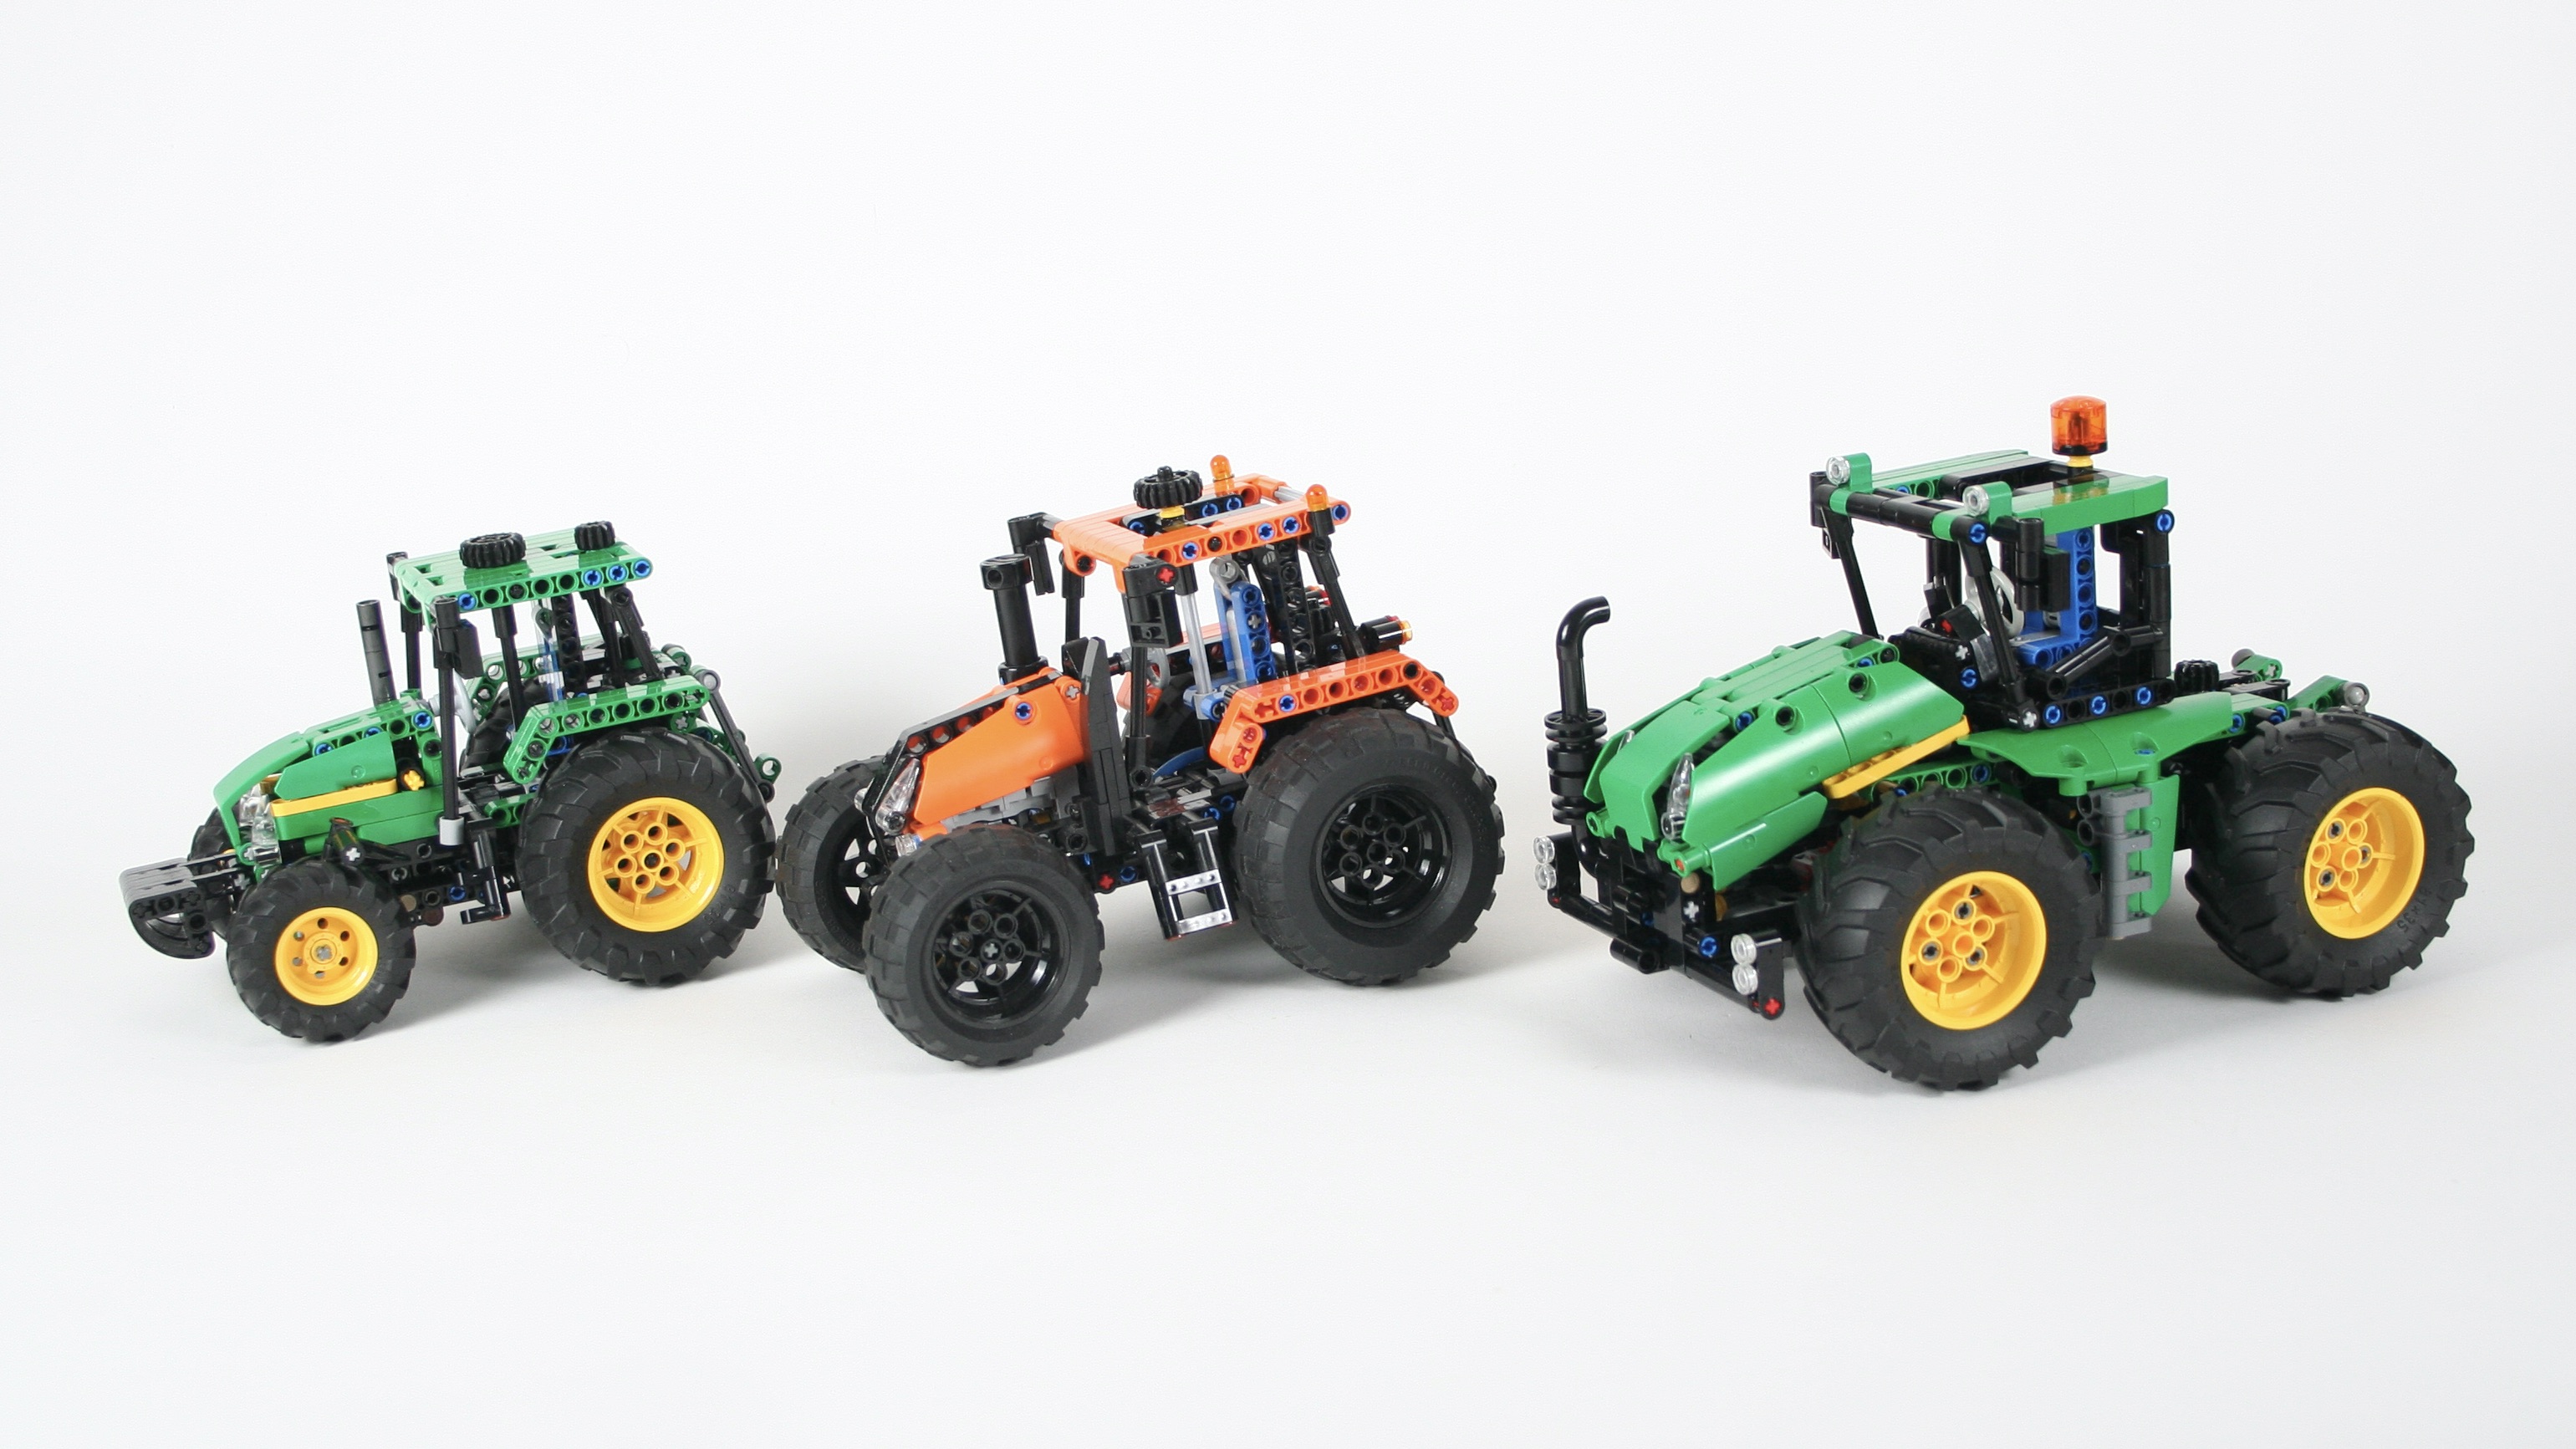
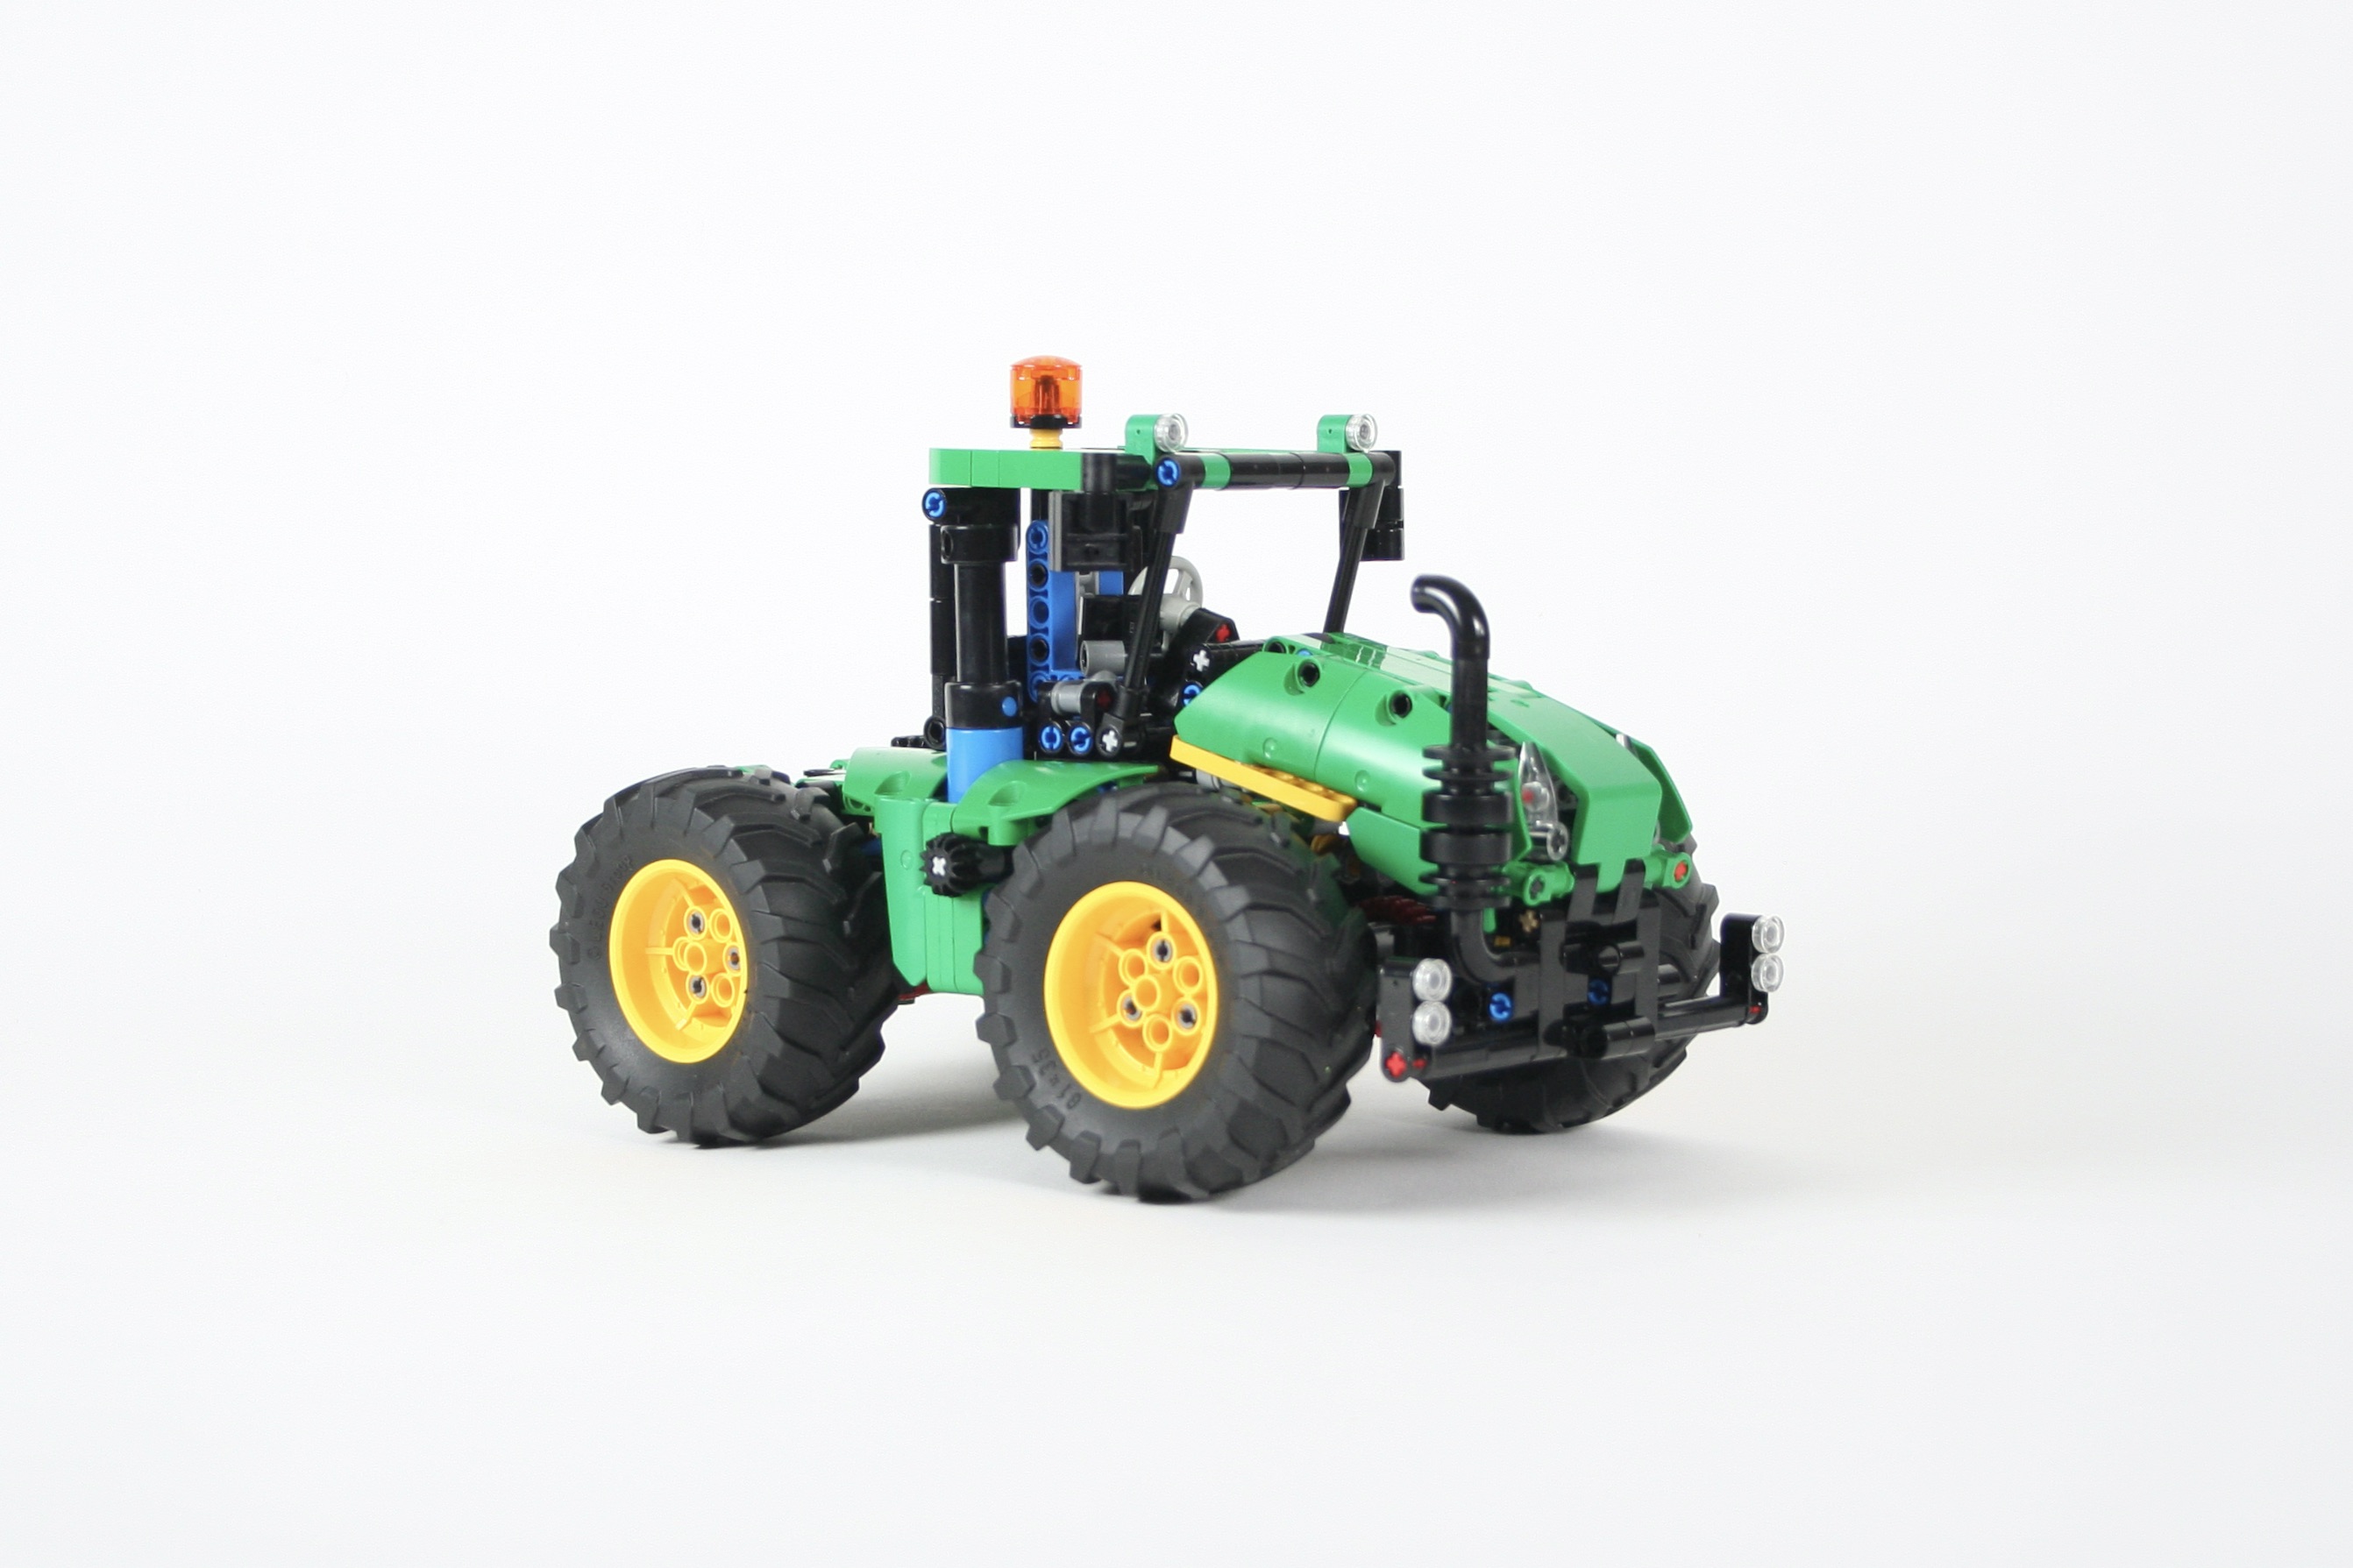
I started with a simple, small, row tractor that I called the Atmos. This tractor was mid scale and in addition to steering and a fake engine like most of my builds, it featured a front implement mount, rear three point hitch, rear PTO, and rear Pneumatic PTO. Little did I know how the tractor would grow into a lot of other tractores, trailers, impliments, and farming support vehicles. At some point, I found myself interested in making a larger tractor, and I have always loved the Claas Xerion. The Claas been done in Lego Technic before, so I went the John Deere styling route for my build.
The tractor had to integrate into the other builds, so the front and rear mount and PTO placement dictated a couple of the hard points. I built the tractor with four wheel drive, and four wheel steering. A four cylinder fake engine is placed under the frond hood above the front axle. The rear most cylinder does not move as the crankshaft would have run into the steering unit, and any change I tried to fix it made for an ugly hood. A worm gear actuated rear three point hitch allows for implements to be mounted to the tractor.
The steering is controlled by a HOG light at the top of the cab, which caused some headaches for placement as I wanted the cab to be able to rotate. There is a small gear on the right of the tractor that controls the rotation through and internally mounted worm gear. Getting the cab to rotate in the right spot, without hitting anything, and while still having the pneumatic pump, required endless test rotations.
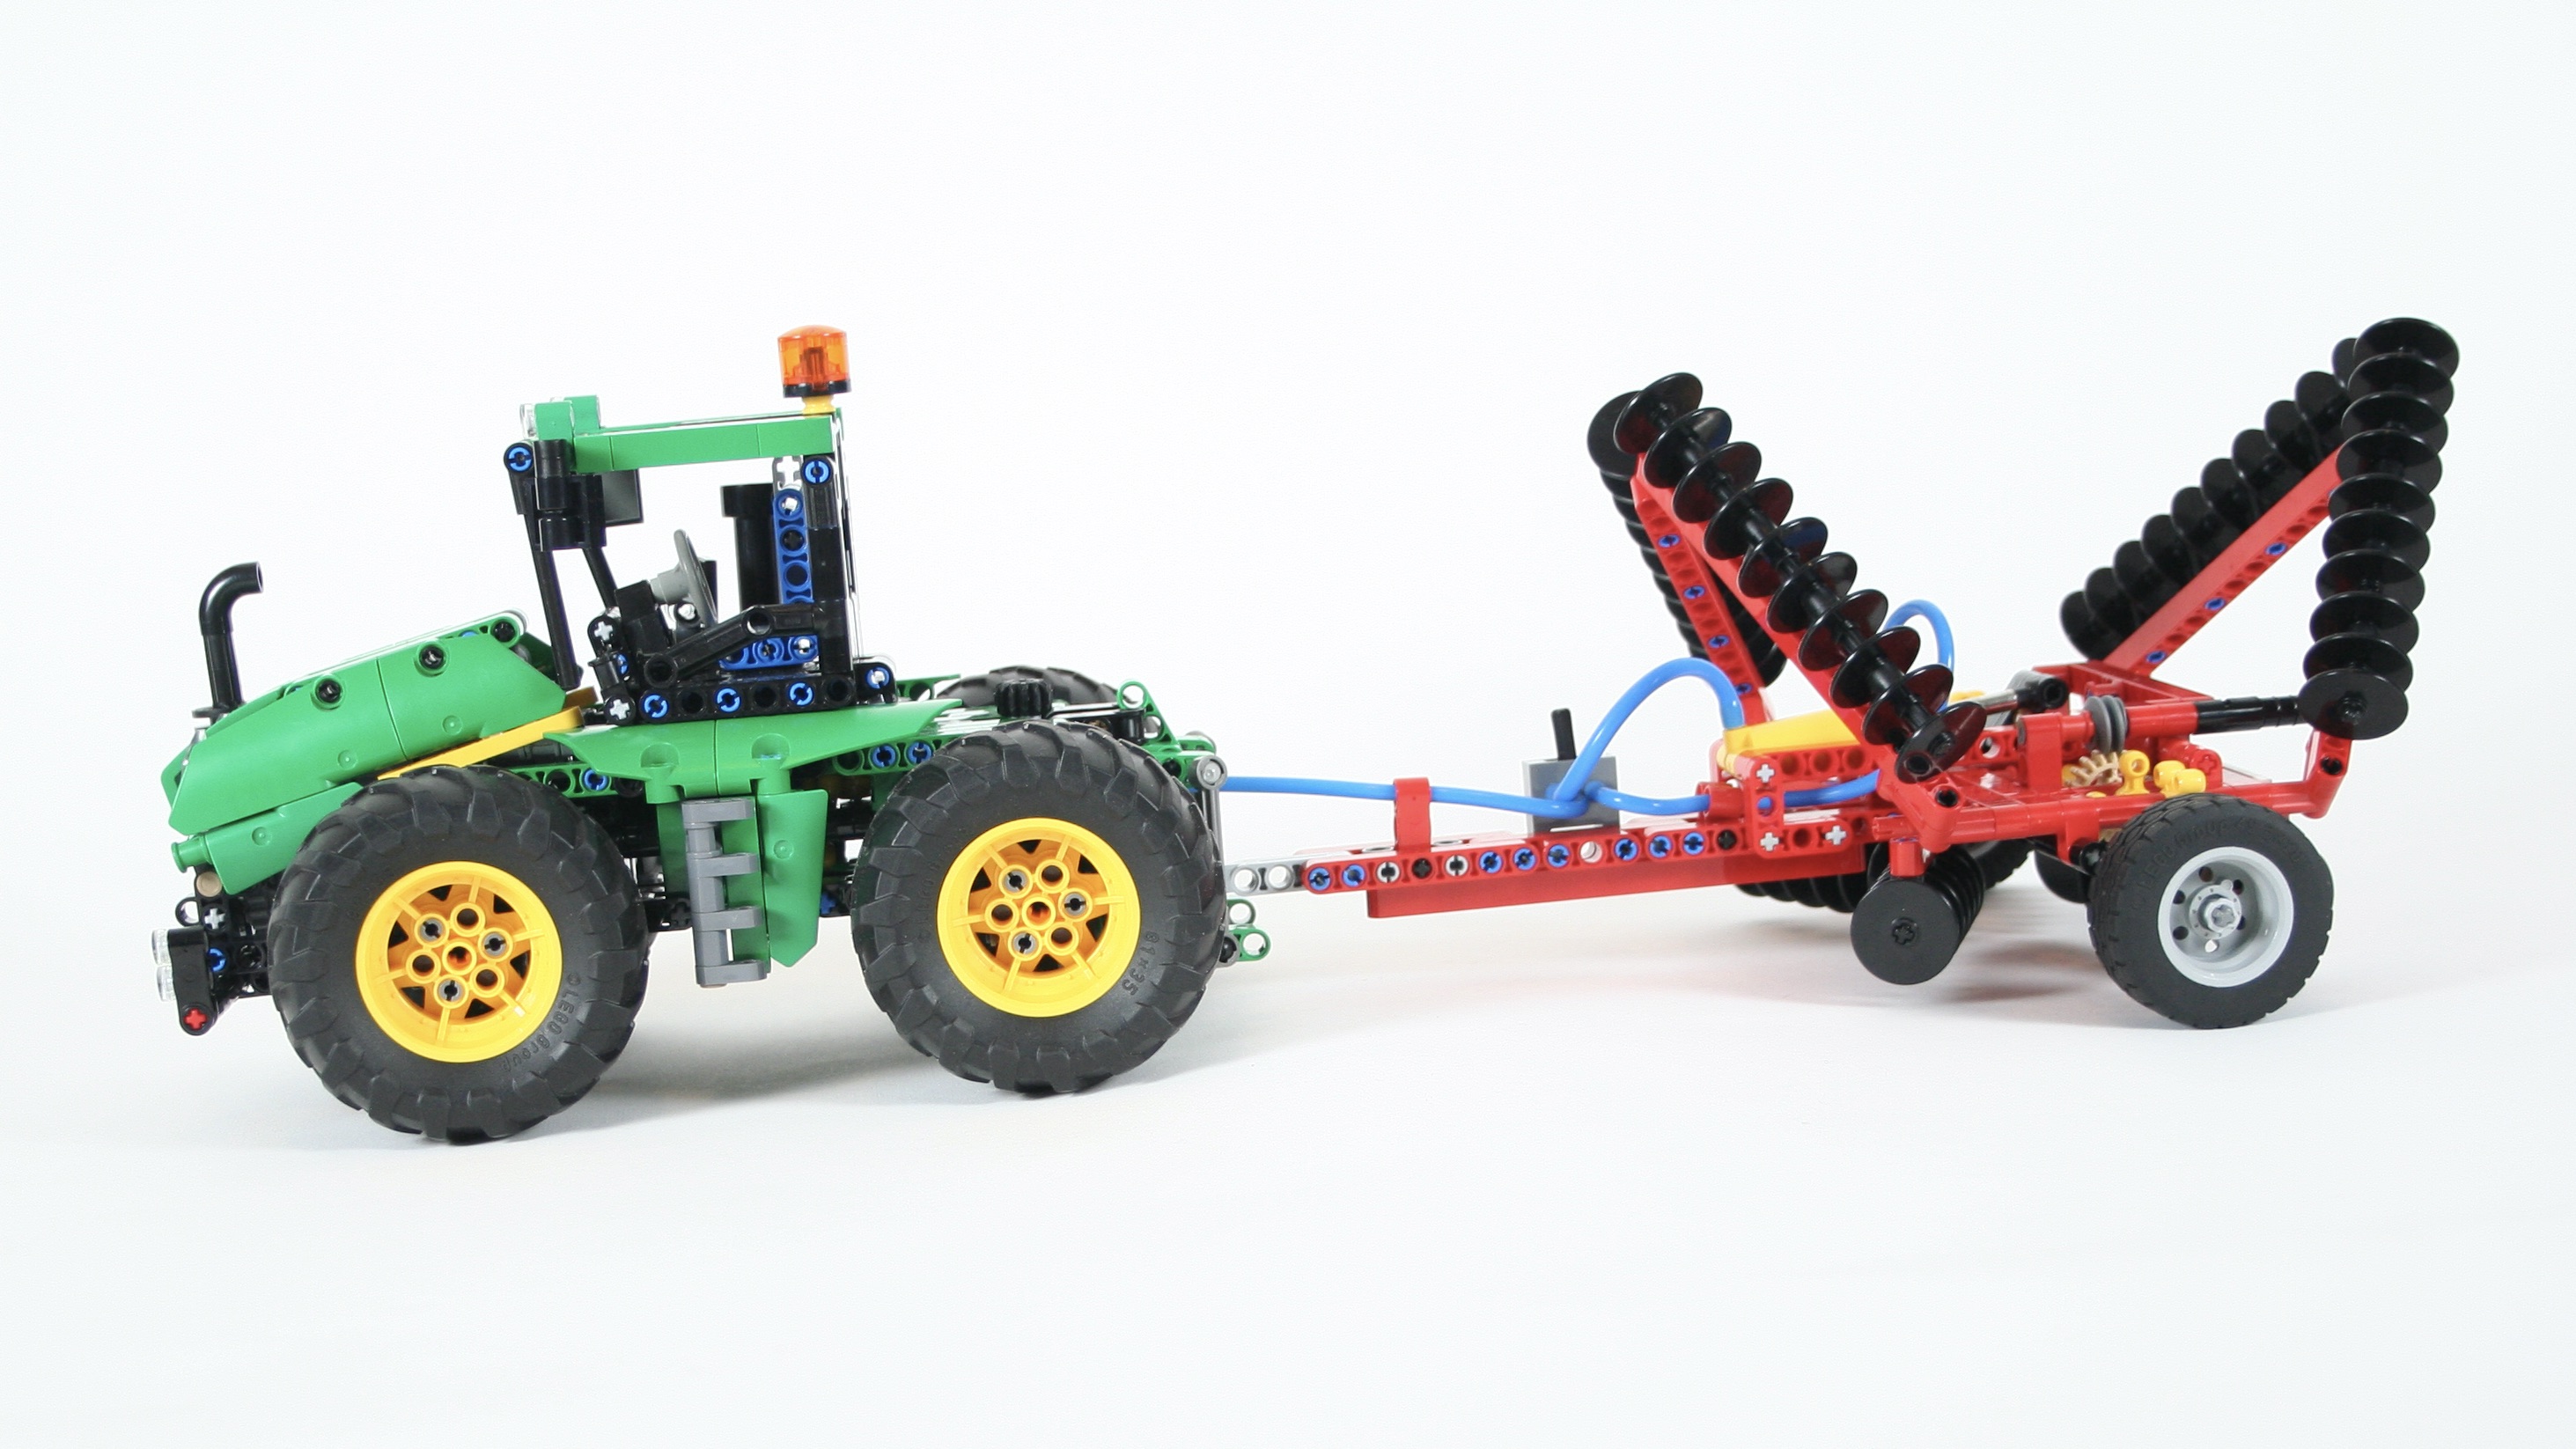
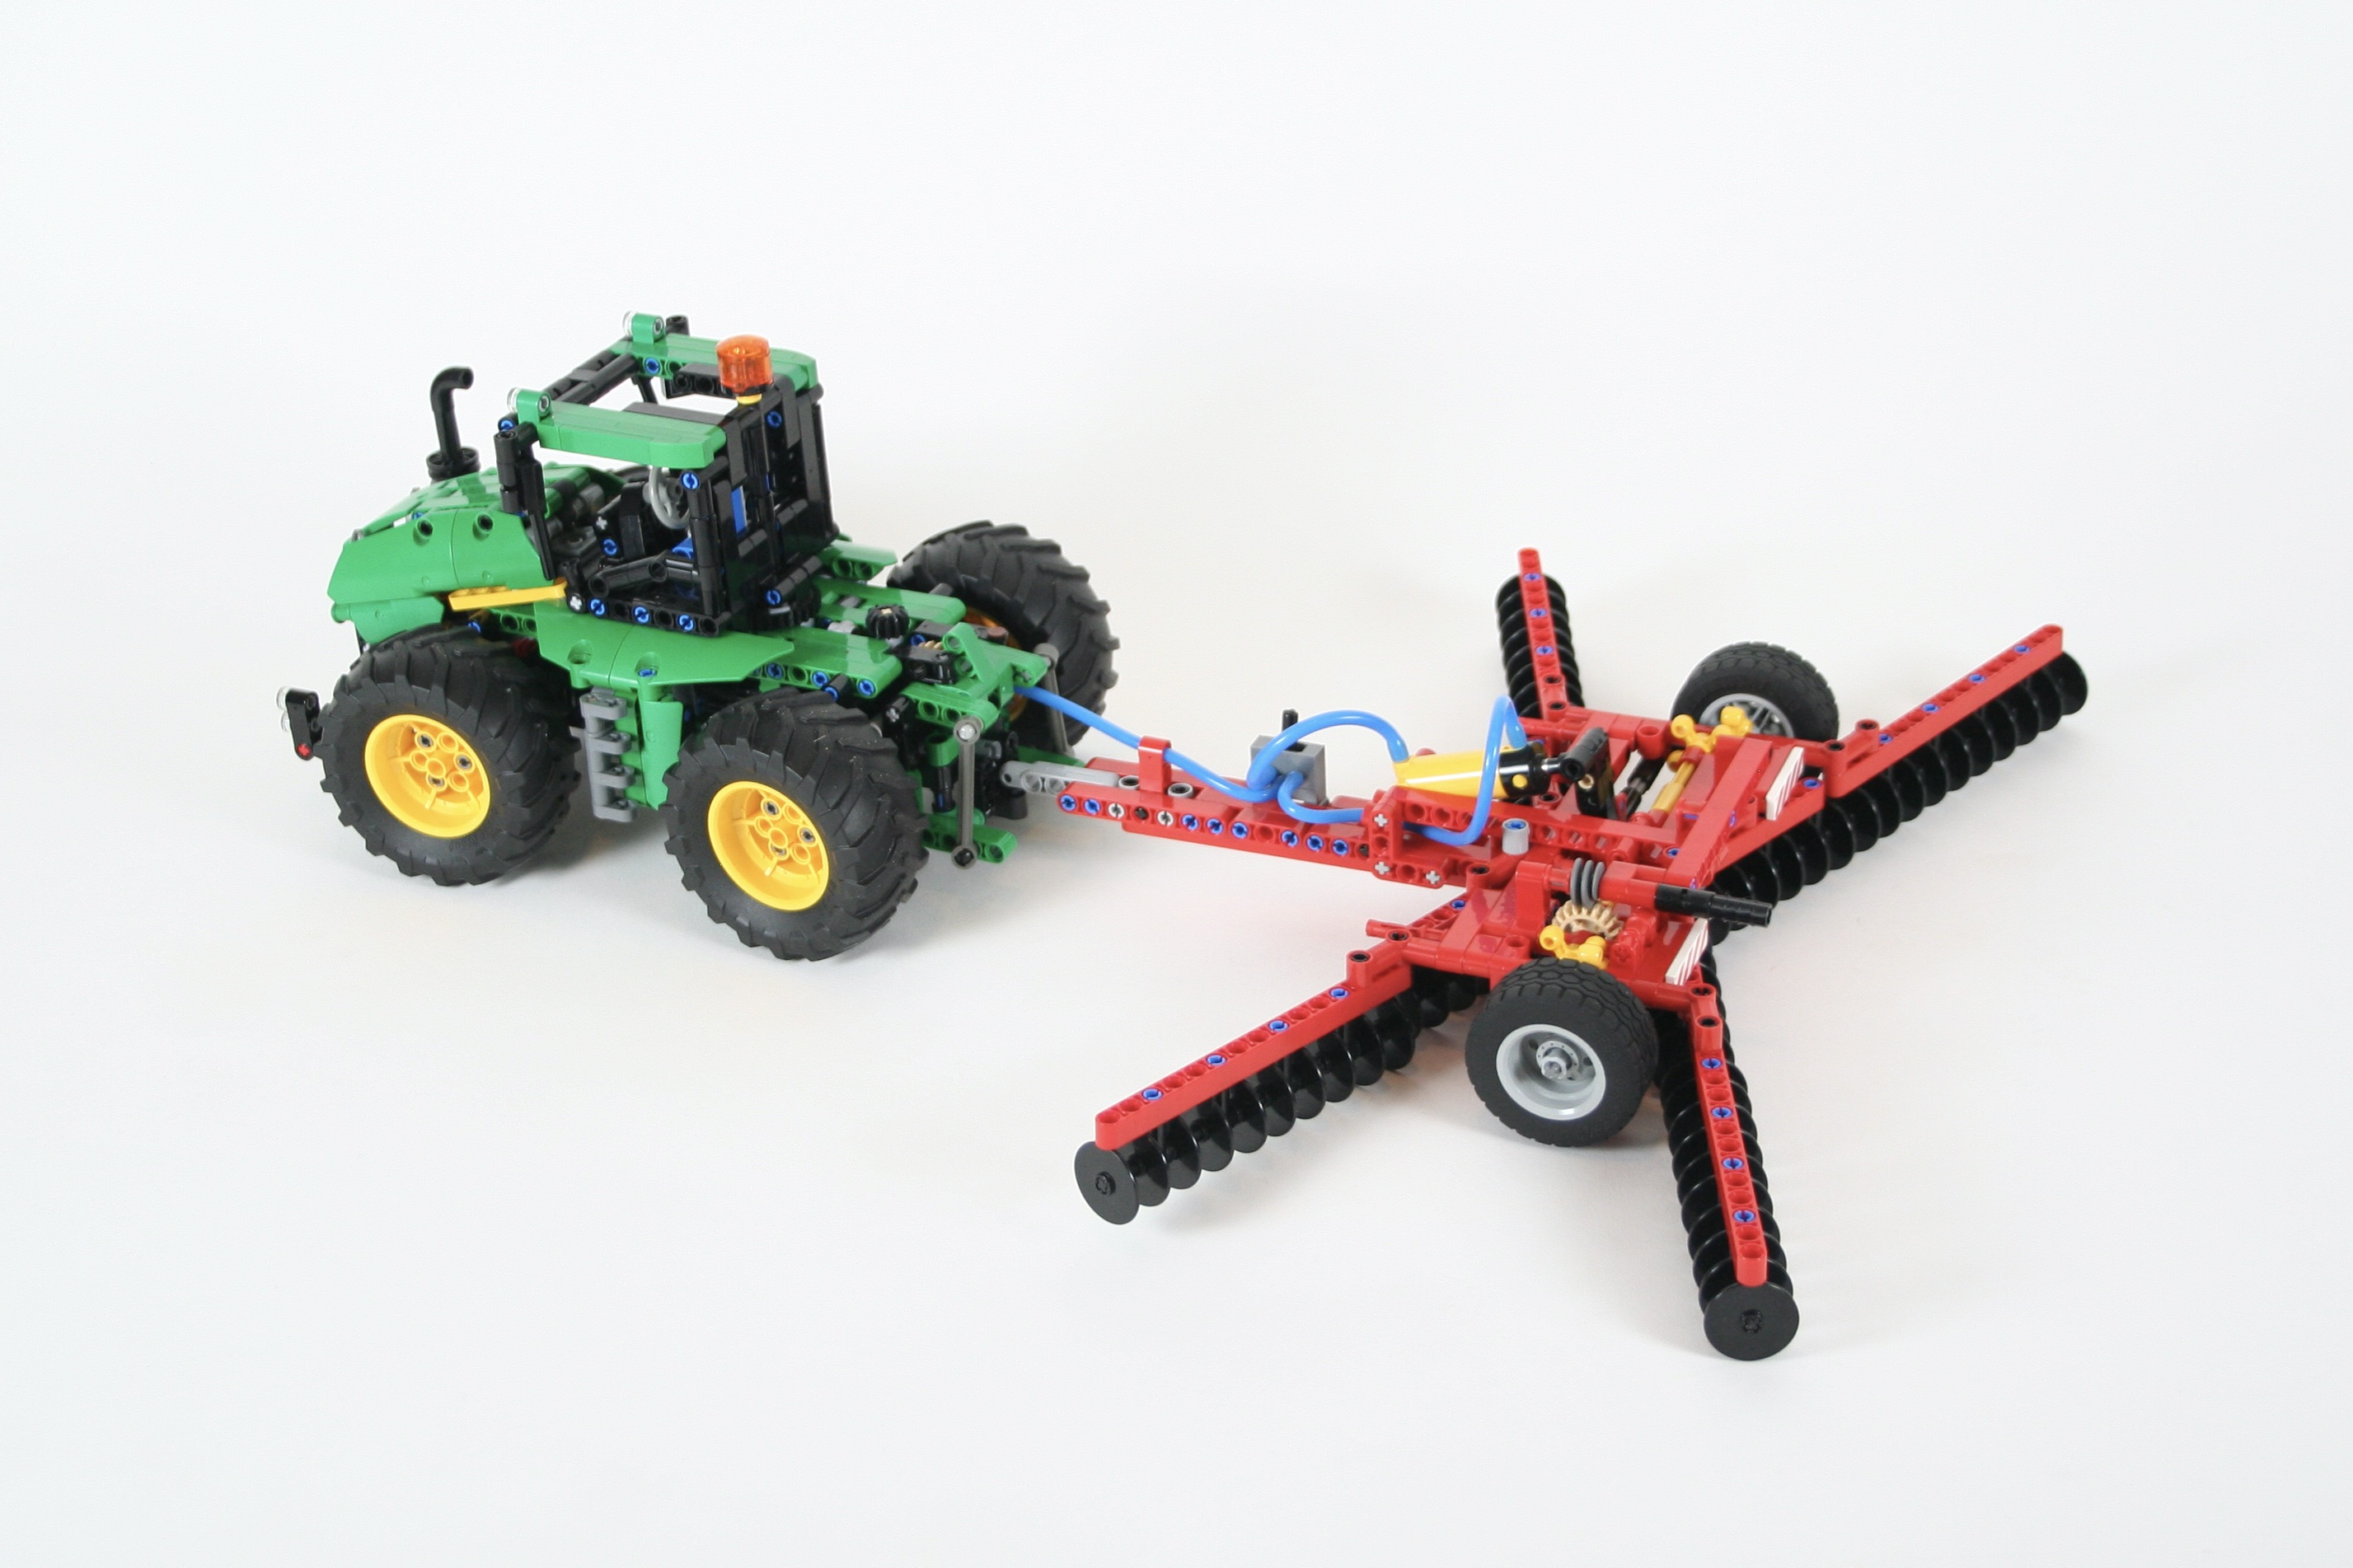
Since this is a Thirdwigg Farm tractor, there are many options to pair with this tractor, all with free instructions. My favorite is the Hookloadr trailer, but the Tandem Disc looks great too. Free instructions are available for all the options, so feel free to make your own farm.
It is always fun to make another tractor and this one was no exception. I wish the drivetrain was a little more smooth, but the rest of the tractor worked flawlessly. And it looks fantastic. Coupled with a trailer, makes it look strong and purposeful. And the rotating cab is so much fun to play with. We’ll see what gets added to the Thirdwigg Farm next!