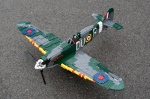
Spitfire Mk IIa
December 30, 2012 12 Comments
I am not a very ambitious person. Sure I made it through college and graduate school, and have managed to work well in job for a while now, but for me to do something challenging, takes a lot of convincing. It doesn’t happen often. This project was a little bigger than it should have been, and I got in over my head. This is not the first time this has happened (1, 2). The project was interesting enough for me to keep moving forward, even after six months. I present my 1:12 scale Spitfire Mk IIa. I hope you enjoy the work.
View the full gallery here, and the work in progress gallery here. Flickr set is here, and full instructions may be downloaded here.

First, the whole reason I did this project was because of the excellent Baby Twin Otter of Cpt. Postma completed two years ago. If you have not yet seen this creation, take a look at the above link. When I first saw this model, I went home a made his variable pitch propeller This was the first step to my Spitfire, though at the time I did not know it.
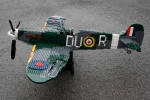
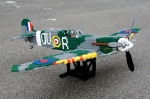
I chose to do the Mk IIa version Spitfire for a couple of reasons. First, the model had to have a three blade prop, because I wanted to use Cpt. Postma’s design. Spitfires stopped using a three blade prop somewhere in the middle of the MkV series. Second, I wanted to model a eight gun variant, rather than the cannon variant because I think it has a cleaner look, and I love the red and yellow leading edges on the eight gun variants. Finally, while it would have been great to do a early model Spitfire with the dark tan camouflage adding both the dark green and dark tan would have been too expensive, and even more ambitious. I found a number of pictures of a certain MkIIa with all the features I wanted. I chose a Spitfire flown by Lt. Tomas Vybiral, who was a Czech pilot with the French Air Force. The plane was Spitfire P8081 when he flew for the British in Squadron No. 312. It had simple markings for me to recreate, a camouflage pattern I would be able to do (read afford), and I found some good documents to help my modeling.
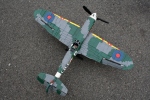
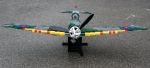
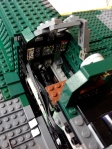
Next came the internal planning. The Spitfire would have working ailerons flaps, rudder, and elevators (with correlating pilot controls), prop, prop pitch, V-12 engine, and retracting landing gear, all within the 1:12 scale. Once I had the dimensions calculated, I started placing things in a simple “placeholder” model on my floor. I constructed the engine, the propeller spinner, pedal/joystick assembly and placed them in the placeholder. Then I made the placeholder 3D.
It took two months to get the rest of the internals all set. The required moving various parts of the 3D placeholder, and adding additional parts. The joystick is connected through various liftarms to the rear elevator, and by axles to the ailerons The pedals connected though a shaft to the rear rudder. You can see the gears on the rudder. The flaps have a simple lever in bottom left side of the cockpit.
The rest of the functions are controlled via Power Functions. The small 8878 battery box is placed behind the cockpit, as is the IR receiver. A PF M is housed under the V-12 and drives four mini linear actuators for the landing gear. It is strong and simple, and works well. It does not have the correct Spitfire landing gear geometry, but if someone can figure out a way to do it at this scale…well, I can’t figure it out. A second PF M is used to power the propeller It is placed directly behind the V-12. Finally, a third PF M is placed behind the V-12, and works through a system of gears to power two mini linear actuators to move the pitch of the prop. It’s messy inside, but it has everything I wanted.
After the internals, I had no idea how hard the rest of the Spitfire would be. LEGO, you need to make more parts in Dark Green. I know how selfish that sounds, but it would have been more helpful. Thank to some newer sets, like the 10226 Sopwith Camel, and the 21016 Sungnyemun, it made it much more possible, but still limited me in many places. I spent the next four months acquiring parts, and placing small plates over the rest of the plane. With some help on the roundels from Dieterr89, it eventually came together. The bodywork took a long time. Too long. And the lack of some parts in Dark Green forced me to make some concessions. The canopy frame should be all Dark Green, but it was not going to happen with what is available. The camouflage is not as clean as I would have liked, and there are some abrupt steps where some plate limitations made the transition for one part to another not smooth enough, such as on the rear fuselage. Also, try as I might, I could not get the leading edge of the wing to be perfect. The dihedral did not help either, nor did the yellow leading edge. Also, the gaps between the control surfaces and the fixed part of the wing and stabilizer was more than I would have liked. But this has happened before.
I am please with how it turned out, but there are some parts that I wish would be better. I never seem to remember this when I start a project in this scale, but free moving functions just do not operate well as you hope when you keep adding parts. The control surfaces work, but they could be smoother and lighter. The powered functions worked flawlessly. I was very please with the way the markings turned out. They are not as flush with the plane as painting would cause you to believe, but they make the Spitfire clearly identifiable.
My father would always tell me “never say never,” but it may be a long time before I do another large plane. But I guess I said that back in 2008.
I hope you enjoy. Thanks for reading.


This MOC is BEAUTIFUL! You should post it on the Eurobricks Technic Forum, since it has lots of internal Technic parts. I like the details!
really loved your FW-190, but this one just topped that! when i’m done with university i’ll definitly get back into building, probably trying some planes inspired by yours. congrats man!
oh, and i’m happy that i could’ve been a (very little) part of it 🙂
I worked on those Roundels for too long. Your help was invaluable. Thanks, and happy building.
Pingback: MOC of the Week: LEGO Supermarine Spitfire MK IIa - BrickExtra
Pingback: Talon Track « Thirdwigg.com
You wouldn’t happen to have a LDD (or willing to sell instructions?) It’s my brothers 50th soon and it’d make an awesome birthday present
Thanks for your comment. I do not have instructions, and this model is too complicated to make instructions. I am sorry. Thanks for following.
Pingback: 2013 | Thirdwigg.com
Pingback: Hawker Typhoon MkIb | Thirdwigg.com
Pingback: Review: Incredible LEGO Technic | Thirdwigg.com
Pingback: Top 14 of 2014 | Thirdwigg.com
Pingback: Top 15 of 2015 | Thirdwigg.com